LG StudioWorks 563N User manual

A1
Introduction
Thank you for purchasing a high resolution monitor. It will give you high
resolution performance and convenient reliable operation in a variety of
video operating modes.
Features
The Studioworks 563N/563A is a 15 inches (14.0 inches viewable ) intelligent,
microprocessor based monitor compatible with most analog RGB (Red, Green,
Blue) display standards, including IBM PC®, PS/2®, Apple®, Macintosh®, Centris®,
Quadra®, and Macintosh II family.
The monitor provides crisp text and vivid color graphics with VGA, SVGA, XGA,
and VESA Ergonomic modes (non-interlaced), and most Macintosh compatible
color video cards when used with the appropriate adaptor. The monitor's wide
compatibility makes it possible to upgrade video cards or software without
purchasing a new monitor.
Digitally controlled auto-scanning is done with the micro-processor for horizontal
scan frequencies between 30 and 61kHz, and vertical scan frequencies
between 50-120Hz.
This monitor is capable of producing a maximum horizontal resolution of 1024
dots and a maximum vertical resolution of 768 lines.
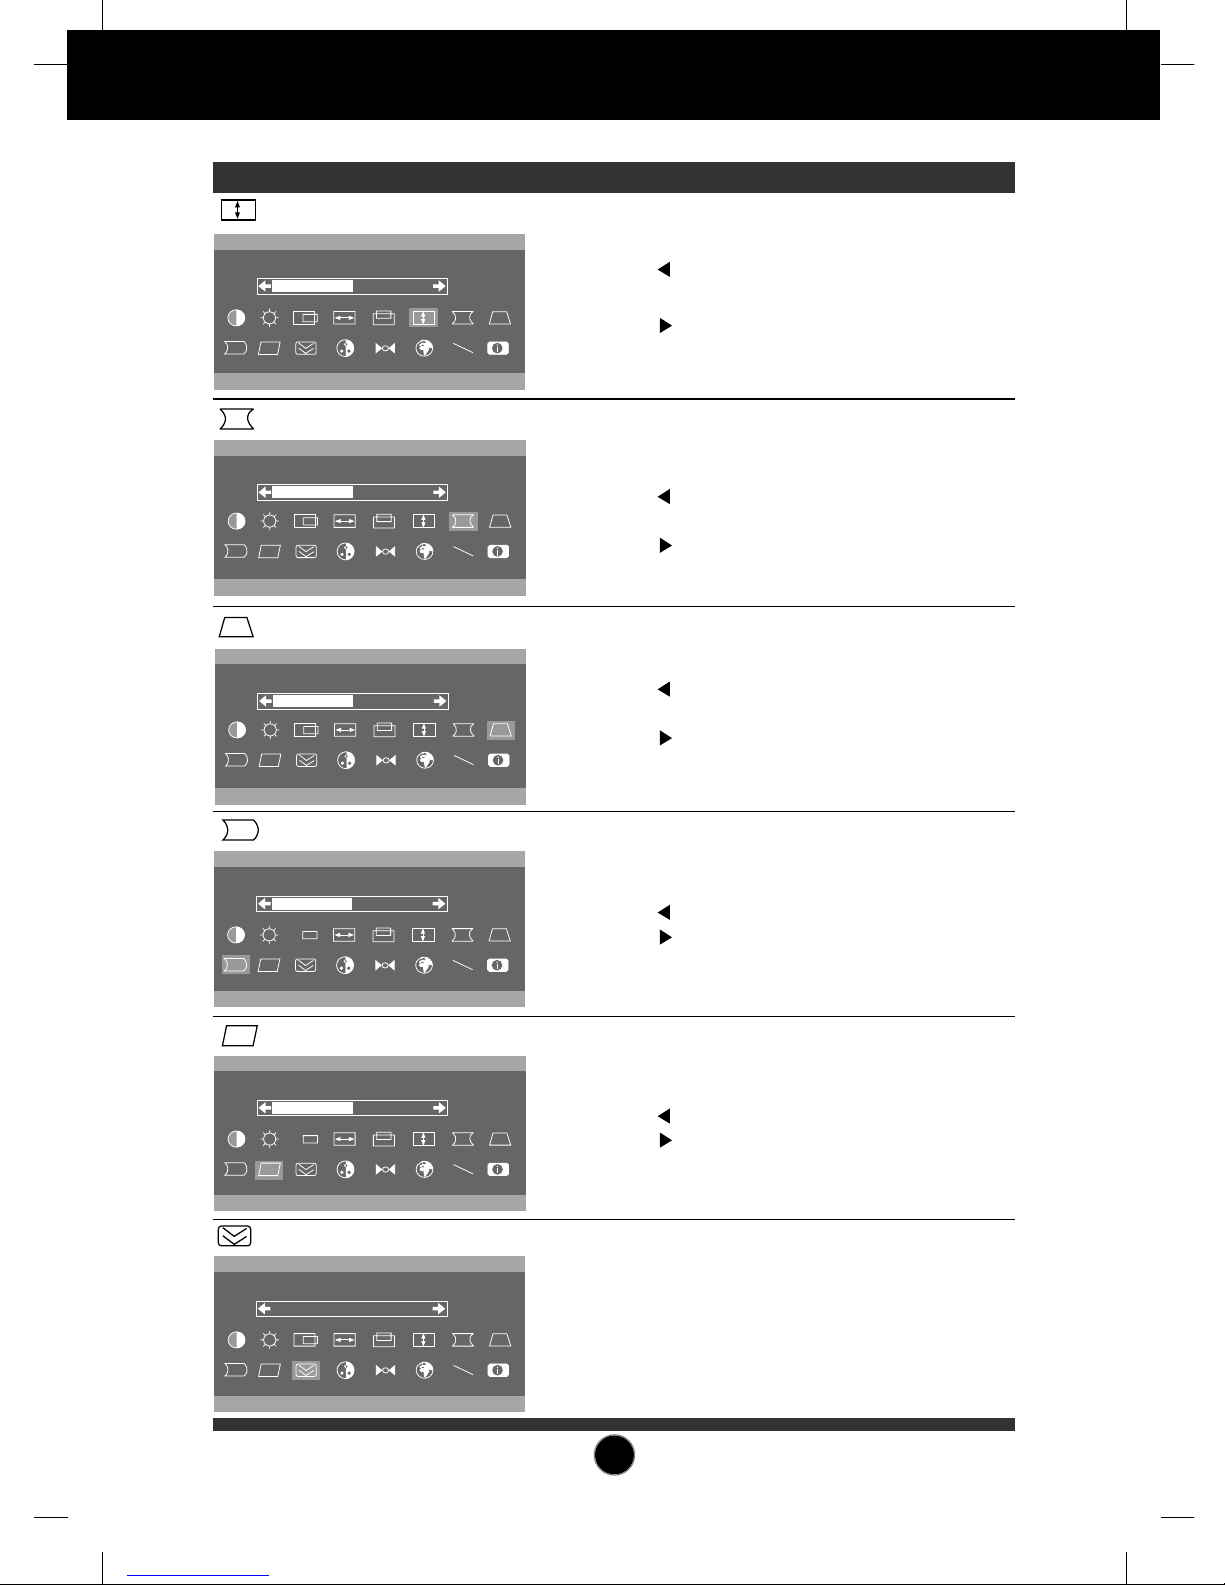
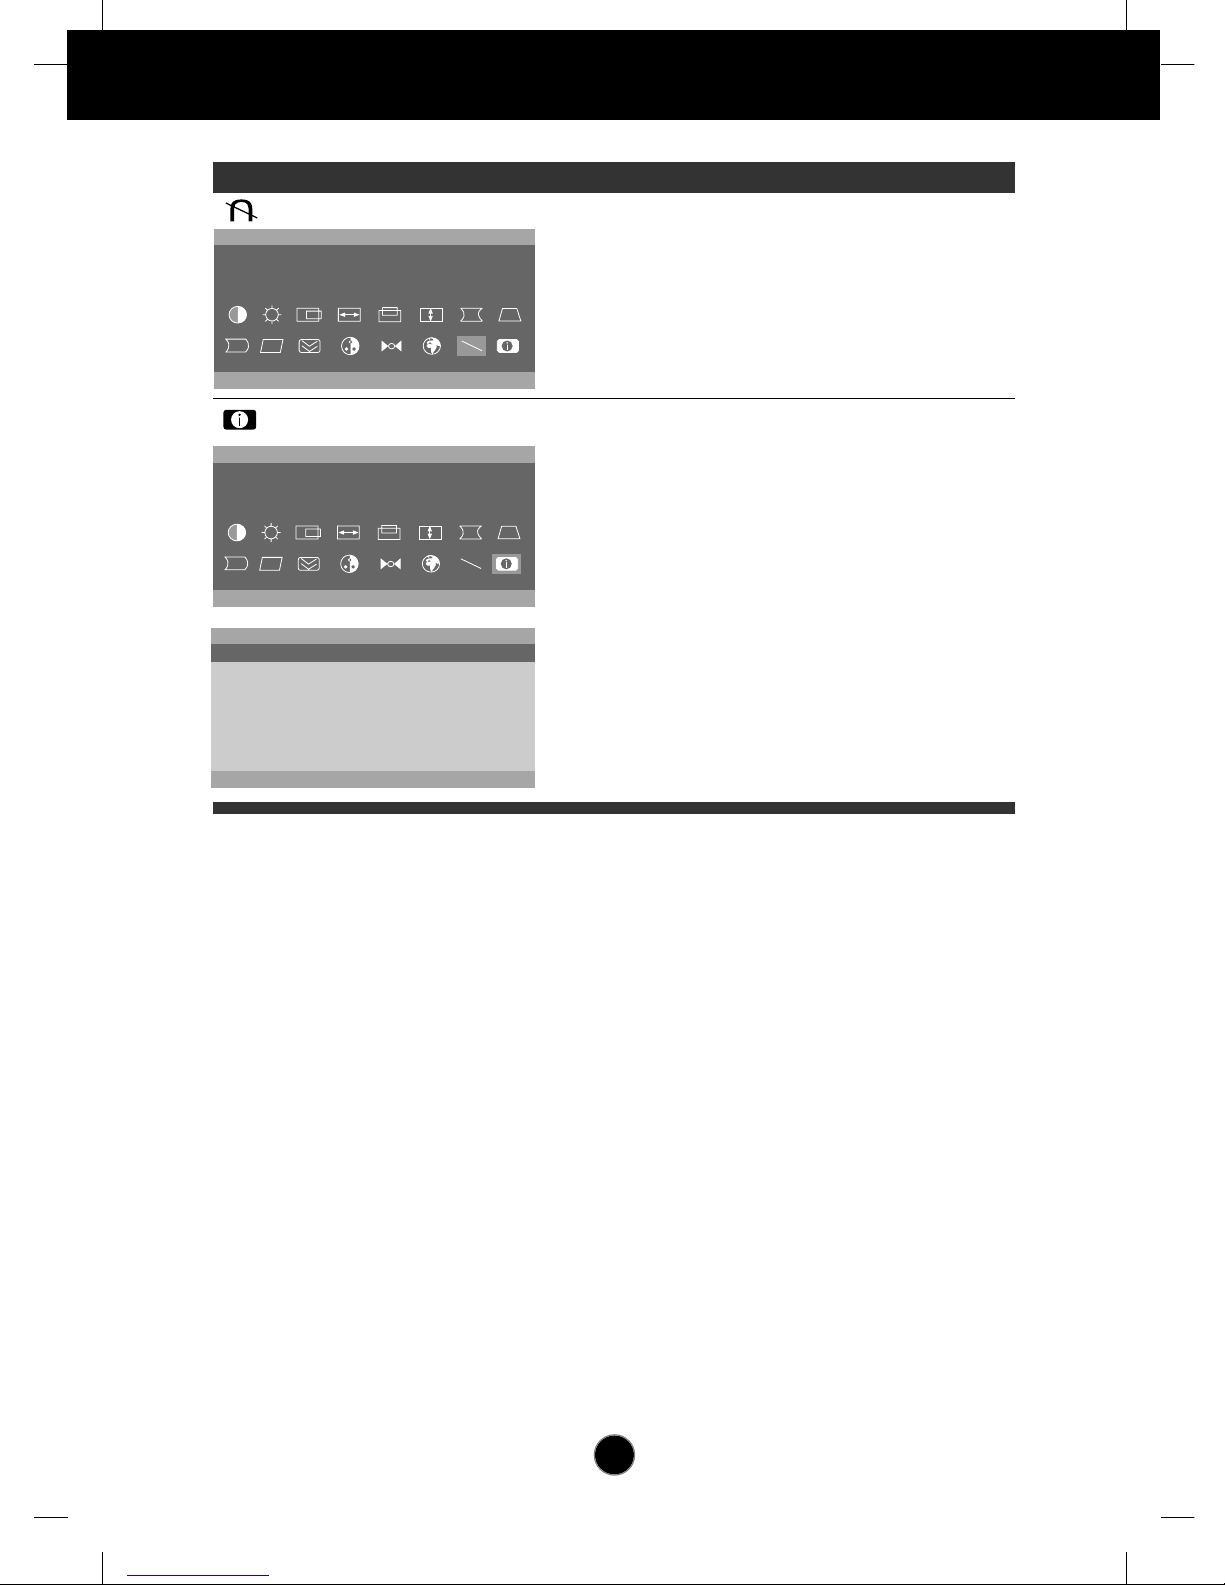
The microprocessor-based digital controls allow you to adjust conveniently a
variety of image controls by using the OSD (On Screen Display).
On Screen Display(OSD) adjustments in seven languages:
English, Deutsch, Français, Español, Italiano, Português, Korean for ease of
setup and screen optimization
Plug and play capability if supported by your system.
This monitor has DDC 2B function.*
Compliant with the following regulated specifications :*
-
EPA ENERGY STAR
-
MPR
II (Applies to 563N only)
ENGLISH
*
For detailed information, please refer to the Reference Guide provided .

Slots
Latch
Hooks
Connecting the Monitor
Turn off the equipment and all attached options.
Carefully set the monitor face-down with the underside facing you.
Installation
1. Align the hooks on the tilt/swivel stand with the matching slots in the base of
the monitor.
2. Insert the hooks into slots.
3. Slide the tilt/swivel stand toward the front of the monitor until the latches click
into the locked position.
A2
Latch
Hooks

A3
Connecting the Monitor
On the back of the monitor are two plug-in connections; one for the AC
power cord, and the other for the signal cable from the video card.
Power off both the monitor and PC.
Connect the 15 pin VGA connector of the supplied signal cable to the output
VGA video connector on the PC and the matching input connector on the rear
of the monitor. The connectors will mate only one way. If you cannot attach
the cable easily, turn the connector upside down and try again. When mated,
tighten the thumbscrews to secure the connection.
Locate the appropriate MAC to VGA adapter block at your local computer
store. This adapter changes the high density 3 row 15 pin VGA connector to
the correct 15 pin 2 row connection to mate with your MAC. Attach the other
end of the signal cable to the side of the adapter block with 3 rows.
Connect the attached adapter block/signal cable to the video output on your
MAC.
One end of the AC power cord is connected into the AC power connector on
the back of the monitor. The other end is plugged into a properly grounded
three-prong AC outlet.
Power ON the PC, then the monitor.
If you see the SELF DIAGNOSTICS message, check the signal cable and
connectors.
After using the system, power OFF the monitor, then the PC.
Power Cord
Signal Cable
D-15P
IBM PC MACINTOSH
D-15P
Mac Adapter
*NOTE : For Apple Macintosh use, a
separate plug adapter is needed to
change the 15 pin high density (3 row)
D-sub VGA connector on the supplied
cable to a 15 pin 2 row connector.
1
2
3
3
4
5
6
2'
2
2'

A4
Location and Function of Controls
Rear View
Front View
MENU SELECT
ID Label
D-Sub Signal Cable
AC Power Socket
Power Indicator
SELECT Button
Button
MENU Button
Power ON/OFF Button

A5
Control Panel Function
Front Panel Controls
MENU SELECT
Button Use these buttons to choose or adjust items in
the on screen display.
MENU Button Use this button to enter or exit the on screen
display.
MENU
SELECT
This Indicator lights up green when the
monitor operates normally. If the monitor is in
DPM (Energy Saving) mode (stand-
by/suspend/power off), this indicator color
changes to amber.
Power (DPMS)
Indicator
Use this button to turn the monitor on or off.Power ON/OFF
Button
Use this button to enter a selection in the on
screen display.
SELECT Button
Control Function
Button
Power ON/OFF Button
MENU Button SELECT Button
Power (DPMS) Indicator

A6
On Screen Display (OSD) Control Adjustment
Making adjustments to the image size, position and operating parameters of
the monitor are quick and easy with the On Screen Display Control system.
A quick example is given below to familiarize you with the use of the controls.
Following section is an outline of the available adjustments and selections you
can make using the OSD.
To make adjustments in the On Screen Display, follow these steps:
Press the MENU Button, then the main menu of the OSD appears.
To acces a control, use the or Buttons. When the icon you want
becomes highlighted, press the SELECT Button.
Use the Buttons to adjust the item to the desired level.
Accept the changes by pressing the SELECT Button.
Exit the OSD by Pressing the MENU Button.
NOTE
Allow the monitor to stabilize for at least 30 minutes before making image adjustment.
MENU
MENU
SELECT
SELECT
1
1
2
3
4
5
6
7
1
2
2
3
4
5
6
7
1
2
3
3
4
5
6
7
1
2
3
4
4
5
6
7
1
2
3
4
5
5
6
7

A7
On Screen Display(OSD) Selection and Adjustment
You were introduced to the procedure of selection and adjusting an item
using the OSD system. Listed below are the icons, icon names, and icon
descriptions of the items that are shown on the Menu.
OSD Adjust Description
31.4kHz/70Hz
CONTRAST
U
50
31.4kHz/70Hz
BRIGHTNESS
50
U
31.4kHz/70Hz
H POSITION
50
U
31.4kHz/70Hz
H SIZE
50
U
31.4kHz/70Hz
V POSITION
50
U
Used to adjust the brightness of the
screen.
Adjust the display to the contrast desired.
To move image up and down.
Moves the screen image down.
Moves the screen image up.
To move picture image left and right.
Moves the screen image left.
Moves the screen image right.
To adjust image width.
Decreases the size of the screen
image.
Increases the size of the screen
image.
CONTRAST
BRIGHTNESS
H POSITION
H SIZE
V POSITION

A8
On Screen Display(OSD) Selection and Adjustment
OSD Adjust Description
31.4kHz/70Hz
V SIZE
50
U
31.4kHz/70Hz
PINCUSHION
50
U
31.4kHz/70Hz
TRAPEZOID
50
U
31.4kHz/70Hz
PIN BALANCE
50
U
31.4kHz/70Hz
PARALELOGRAMO
50
U
To correct the bowing in and out of the
image.
Curves the image's edges
inwards.
Curves the image's edges
outwards.
To correct the balance of both sides
bowing.
Curvature of the sides to the right.
Curvature of the sides to the left.
To correct geometric distortion.
Makes the screen image narrower
at the top.
Makes the screen image wider at
the top.
This control adjusts for a skewing of the
screen image.
Tilts the screen image leftward.
Tilts the screen image rightward.
To adjust image height.
Decreases the size of the screen
image.
Increases the size of the screen
image.
V SIZE
PINCUSHION
TRAPEZOID
PIN BALANCE
PARALLELOGRAM
31.4kHz/70Hz
V MOIRE
0
U
Reduce vertical moire when
interference patterns of dark steady
wary lines appear on your screen.
The moire adjustments may affect the
focus of the screen.
V MOIRE

A9
On Screen Display(OSD) Selection and Adjustment
OSD Adjust Description
31.4kHz/70Hz
COLOR
U
31.4kHz/70Hz
COLOR
90
90
80
R
G
B
9300 6500 R G B
31.4kHz/70Hz
RECALL
U
31.4kHz/70Hz
LANGUAGE
U
31.4kHz/70Hz
LANGUAGE
ENGLISH
DEUTSCH
FRANÇAIS
ESPAÑOL
ITALIANO
Select the desired color temperature
(9300K, 6500K) or select user to set
your own color levels(R/G/B).
•9300 : Slightly bluish white.
•6500 : Slightly reddish white.
•: To set your own color levels.
Allow for specific
adjustments to Red, Green,
Blue (R/G/B).
Decreases the amount of
color in the image.
Increases the amount of
color in the image.
: To exit the COLOR OSD
You can use this function when you want
to go back to the screen display of the
time you purchased the product after
adjusting to modify it in the Preset Mode.
When you are in the User mode, you can
recall only , , , items. After
using Recall, adjust the screen display
again if necessary.
If you want more information on the
Preset Mode, refer to A11 page.
COLOR
RECALL
R G B
To choose the language in which the
control names are displayed.
OSD Menus are available in seven
languages : English, German,
French, Spanish, Italian, Portuguese
and Korean.
LANGUAGE

A10
On Screen Display(OSD) Selection and Adjustment
OSD Adjust Description
Used to demagnetize the picture to
give a move accurate image and
color.
To inform users of preset and user
mode data.
DEGAUSS
INFORMATION
31.4kHz/70Hz
DEGAUSS
U
31.4kHz/70Hz
INFORMATION
U
31.4kHz/70Hz
INFORMATION
PRESET MODE
1 60.0kHz / 76Hz
2 31.4kHz / 61Hz
3 37.4kHz / 76Hz
4 43.2kHz / 86Hz
5 31.4kHz / 71Hz
6 46.8kHz / 76Hz

A11
Video Memory Modes
The monitor has 16 memory locations for display modes, 7 of which are
factory preset to popular video modes.
Display Modes (Resolution)
User Modes
Modes 8 - 16 are empty and can accept new video data. If the monitor detects
a new video mode that has not been present before or is not one of the preset
modes, it stores the new mode automatically in one of the empty modes
starting with mode 8.
If you use up the 9 blank modes and still have more new video modes, the
monitor replaces the information in the user modes starting with mode 8.
Recalling Display Modes
When your monitor detects a mode it has seen before, it automatically recalls
the image settings you may have made the last time you used that mode.
You may, however, manually force a recall of each of the 7 preset modes by
pressing the Recall button. All preset modes are automatically recalled as the
monitor senses the incoming signal.
The ability to recall the preset modes is dependent on the signal coming from
your PC’s video card or system. If this signal does not match any of the factory
modes, the monitor automatically sets itself to display the image.
1
2
3
4
5
6
7
640 x 480
720 x 400
640 x 480
640 x 480
800 x 600
800 x 600
1024 x 768
31.47
31.47
37.50
43.27
46.88
53.67
60.02
60
70
75
85
75
85
75
Display Modes (Resolution) Horizontal Freq.(kHz) Vertical Freq.(Hz)
VESA
VESA
VESA
VESA
VESA
VESA
VESA

A12
Troubleshooting
Check the following before calling for service.
SELF DIAGNOSTICS message.
The signal cable is not connected, or is loose. Check and secure the connection.
OUT OF FREQUENCY message appears.
The frequency of the signal from the video card is outside the operating range of
the monitor.
* Horizontal Frequency : 30-61kHz
* Vertical Frequency : 50-120Hz
Use the graphics board's utility software to change the frequency setting (Refer
to the manual for graphics board).
The power LED is illuminated amber.
Display power management mode.
There is no active signal coming from the PC.
The signal cable is not fastened securely.
Check the computer power and graphics adapter configuration.
The image on the SCREEN is not centered, or too small, or not a
rectangle shape.
Image adjustment not been done yet in the current operating mode. Use the
MENU, SELECT and buttons to set the image to your liking.
The monitor doesn't enter the power saving off mode (Amber).
Computer video signal is not VESA DPMS standard. Either the PC or the video
controller card is not using the VESA DPMS power management function.
An abnormal picture is displayed on the screen. For example, the
upper part of the picture may be missing or dark.
If using certain non-VESA Standard video card, an abnormal picture may be
displayed. Try setting it to one of the factory preset modes, or selecting to a
resolution and refresh rate within the specification limits of the monitor.
NOTE
If the power indicator(LED) light is blinking amber, may result in abnomal condition of
the monitor.
Then press a power ON/OFF button on the front panel control and call your service
technician for more information.

A13
Specifications
15 inch (14.0 inches viewable)
90 degree deflection
0.28mm Dot pitch
Studioworks 563N: AGAS(Anti-Glare Anti-Static) coating
Studioworks 563A: Glare
Horizontal Freq. 30 - 61kHz (Automatic)
Vertical Freq. 50 - 120Hz (Automatic)
Input Form Separate TTL, Positive/Negative
Signal Input 15 pin D-Sub Connector
Input Form
Separate, RGB Analog, 0.7Vp-p/75 ohm, Positive
Resolution(max) 1024 x 768
@
75Hz
Normal ≤74W
Stand-by/Suspend
≤15W
Power Off ≤5W
Width 35.6 cm / 14.02 inches
Height 37.1 cm / 14.6 inches
Depth 39.5 cm / 15.5 inches
AC 100-240V 50/60Hz 1.5A
Net 11.7 kg (25.79 lbs)
Operating Condition
Temperature 10 ˚C to 40 ˚C
Humidity 10 % to 90 % non-Condensing
Storage Condition
Temperature 0 ˚C to 60 ˚C
Humidity 5 % to 90 % non-Condensing
NOTE
Information in this document is subject to change without notice and does not
represent a commitment on the part of LG Electronics Inc.
Picture Tube
Sync Input
Video Input
Power
Consumption
Dimensions (with
tilt/ swivel stand)
Power Input
Weight
Environmental
Conditions
Other manuals for StudioWorks 563N
1
This manual suits for next models
1
Table of contents
Other LG Monitor manuals