LG EC98 User manual

www.lg.com
P/NO : MFL68488306 (1409-REV01)
Printed in Korea
OWNER’S MANUAL
Please read this manual carefully before operating your set and retain it
for future reference.
*MFL68488306*
EC93**
EC97**
EC98**

TABLE OF CONTENTS
TABLE OF CONTENTS
A-3 SETTING UP THE TV
A-3 Detaching the stand
A-4 Assembling the AV cover
A-4 Tidying cables
A-6 MAKING CONNETIONS
A-6 Antenna Connection
A-6 Satellite dish Connection
A-7 HDMI Connection
A-9 - ARC (Audio Return Channel)
A-9 DVI to HDMI Connection
A-10 MHL Connection
A-11 Component Connection
A-12 Composite Connection
A-13 Headphone Connection
A-14 Audio Connection
A-14 - Digital optical audio connection
A-15 USB Connection
A-16 CI module Connection
A-17 Euro Scart Connection
LANGUAGE LIST
English
Türkçe
LANGUAGE
COMMON
B-1 SPECIFICATIONS
COMMON
A-2

SETTING UP THE TV
(Only EC97**)
1
8 EA
M4 x L20
Back cover
2Back cover
CAUTION
yWhen detaching the stand to the TV set,
place the screen(or back) facing down on a
cushioned table or flat surface to protect the
screen(or back) from scratches.
yMake sure that the screws are inserted cor-
rectly and fastened securely. (If they are not
fastened securely enough, the TV may tilt
forward after being installed.)
Do not use too much force and over tighten
the screws; otherwise screw may be dam-
aged and not tighten correctly.
NOTE
yWhen you assemble the stand again,
performing the stand detaching in reverse.
SETTING UP THE TV
Image shown may differ from your TV.
Detaching the stand
(Only EC93**, EC98**)
1
(Only EC93**)
4 EA
M4 x L20
(Only EC98**)
8EA
M4 x L20
Screen
2Screen
CAUTION
yWhen detaching the stand, make sure to hold it
firmly while removing the screws to stop it from
falling.
yWhen you assemble the stand again, have the
arrows on the bottom of the stand base looking
toward same direction to screen.
A-3

SETTING UP THE TV
Assembling the AV cover
Assemble the AV Cover as shown.
(Only EC93**)
AV Cover
(Only EC97**)
AV Cover
(Only EC98**)
AV Cover
Tidying cables
Image shown may differ from your TV.
Stand Type
(Only EC93**)
Gather and bind the cables with the cable holder.
Cable Holder
(Only EC97**)
1 Put the cable management in the hole of TV
back cover.
Cable
Management
2 EA
A-4

SETTING UP THE TV
2 Fix the cable management with cable management
Screw.
M4 x L10
2 EA
NOTE
yWhen attaching the cable management, use
a magnetic screwdriver.
yIf you don’t have a magnetic screwdriver,
insert the screws into the cable management
and then attach it to the TV.
3 Gather and bind the cables with the cable holder.
Arrange the cable in the cable mangement.
Cable Management Cable Holder
(Only EC98**)
Gather and bind the cables with the cable holder.
Cable Holder
Wall Mount Type
(Only EC93**)
Cable Holder
CAUTION
yDo not move the TV by holding the cable
holder, as the cable holder may break, and
injuries and damage to the TV may occur.
A-5

MAKING CONNECTIONS
MAKING
CONNECTIONS
This section on MAKING CONNECTIONS mainly
uses diagrams for the EC93** models.
Antenna Connection
IN
ANTENNA/
CABLE
13/18V
700
mA Ma
x
LNB IN
S
atellit
e
Wall Antenna
Socket
(*Not
Provided)
English
Connect the TV to a wall antenna socket with an
RF cable (75 Ω).
NOTE
yUse a signal splitter to use more than 2 TVs.
yIf the image quality is poor, install a signal
amplifier properly to improve the image
quality.
yIf the image quality is poor with an antenna
connected, try to realign the antenna in the
correct direction.
yAn antenna cable and converter are not
provided.
ySupported DTV Audio: MPEG, Dolby Digital,
Dolby Digital Plus, HE-AAC
Türkçe
TV’yi RF kablosu (75 Ω) ile duvar anten soketine
bağlayın.
NOT
yİkiden fazla TV’de kullanmak için bir sinyal
ayırıcısı kullanın.
yGörüntü kalitesinin kötü olması durumunda
görüntü kalitesini artırmak üzere bir sinyal
güçlendiricisi kullanın.
yAnten bağlıyken görüntü kalitesinin kötü
olması durumunda anteni doğru yönde
yeniden hizalamayı deneyin.
yAnten kablosu ve dönüştürücü ürünle birlikte
verilmemektedir.
yDesteklenen DTV Ses: MPEG, Dolby Digital,
Dolby Digital Plus, HE-AAC
Satellite dish Connection
(Only satellite models)
(*Not
Provided)
IN
A
NTENNA
/
C
ABL
E
13/18V
700mA Max
LNB IN
Satellite
Satellite
Dish
English
Connect the TV to a satellite dish to a satellite
socket with a satellite RF cable (75 Ω).
Türkçe
TV’yi uydu RF kablosu (75 Ω) kullanarak çanak
antene ve uydu soketine bağlayın.
A-6

MAKING CONNECTIONS
HDMI Connection
(Only EC93**)
HDMI
(*Not
Provided)
DVD / Blu-Ray / PC /
HD Cable Box / HD STB
(Only EC97**)
HDMI
DVD / Blu-Ray / PC /
HD Cable Box / HD STB
(Only EC98**)
HDMI
(4K@60Hz)
(4K@60Hz)
DVD / Blu-Ray / PC /
HD Cable Box / HD STB
A-7

MAKING CONNECTIONS
English
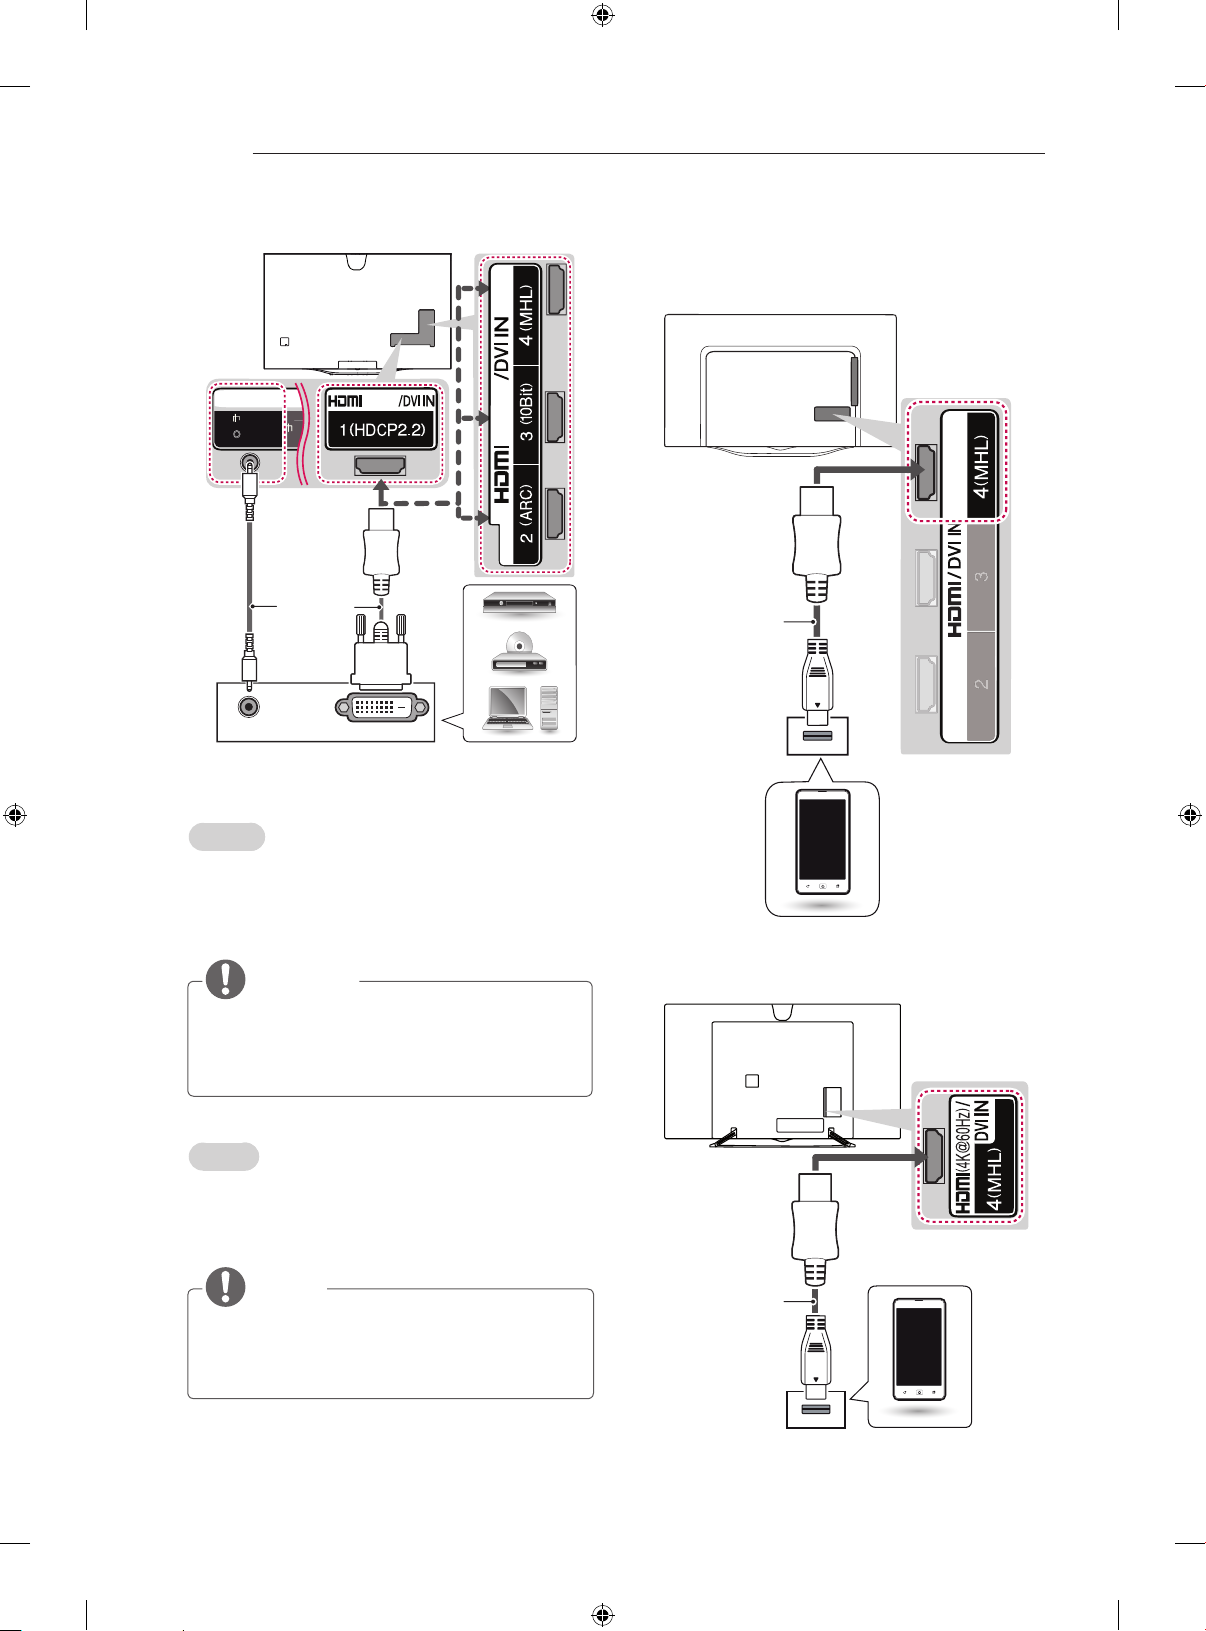
Transmits the digital video and audio signals from
an external device to the TV. Connect the external
device and the TV with the HDMI cable as shown.
NOTE
(Only EC97**, EC98**)
1) HDMI specifications may be different for each
input port, so make sure to check the device
specifications before connecting.
2) The HDMI IN 3 port is especially suitable for the
specifications to enjoy UHD Video (4:4:4, 4:2:2)
of 4K @ 50/60 Hz. However, video or audio may
not be supported depending on the specifications
of the external equipment. In that case, use any
other HDMI IN port.
3) Contact customer service for more information
on the HDMI specifications of each input port.
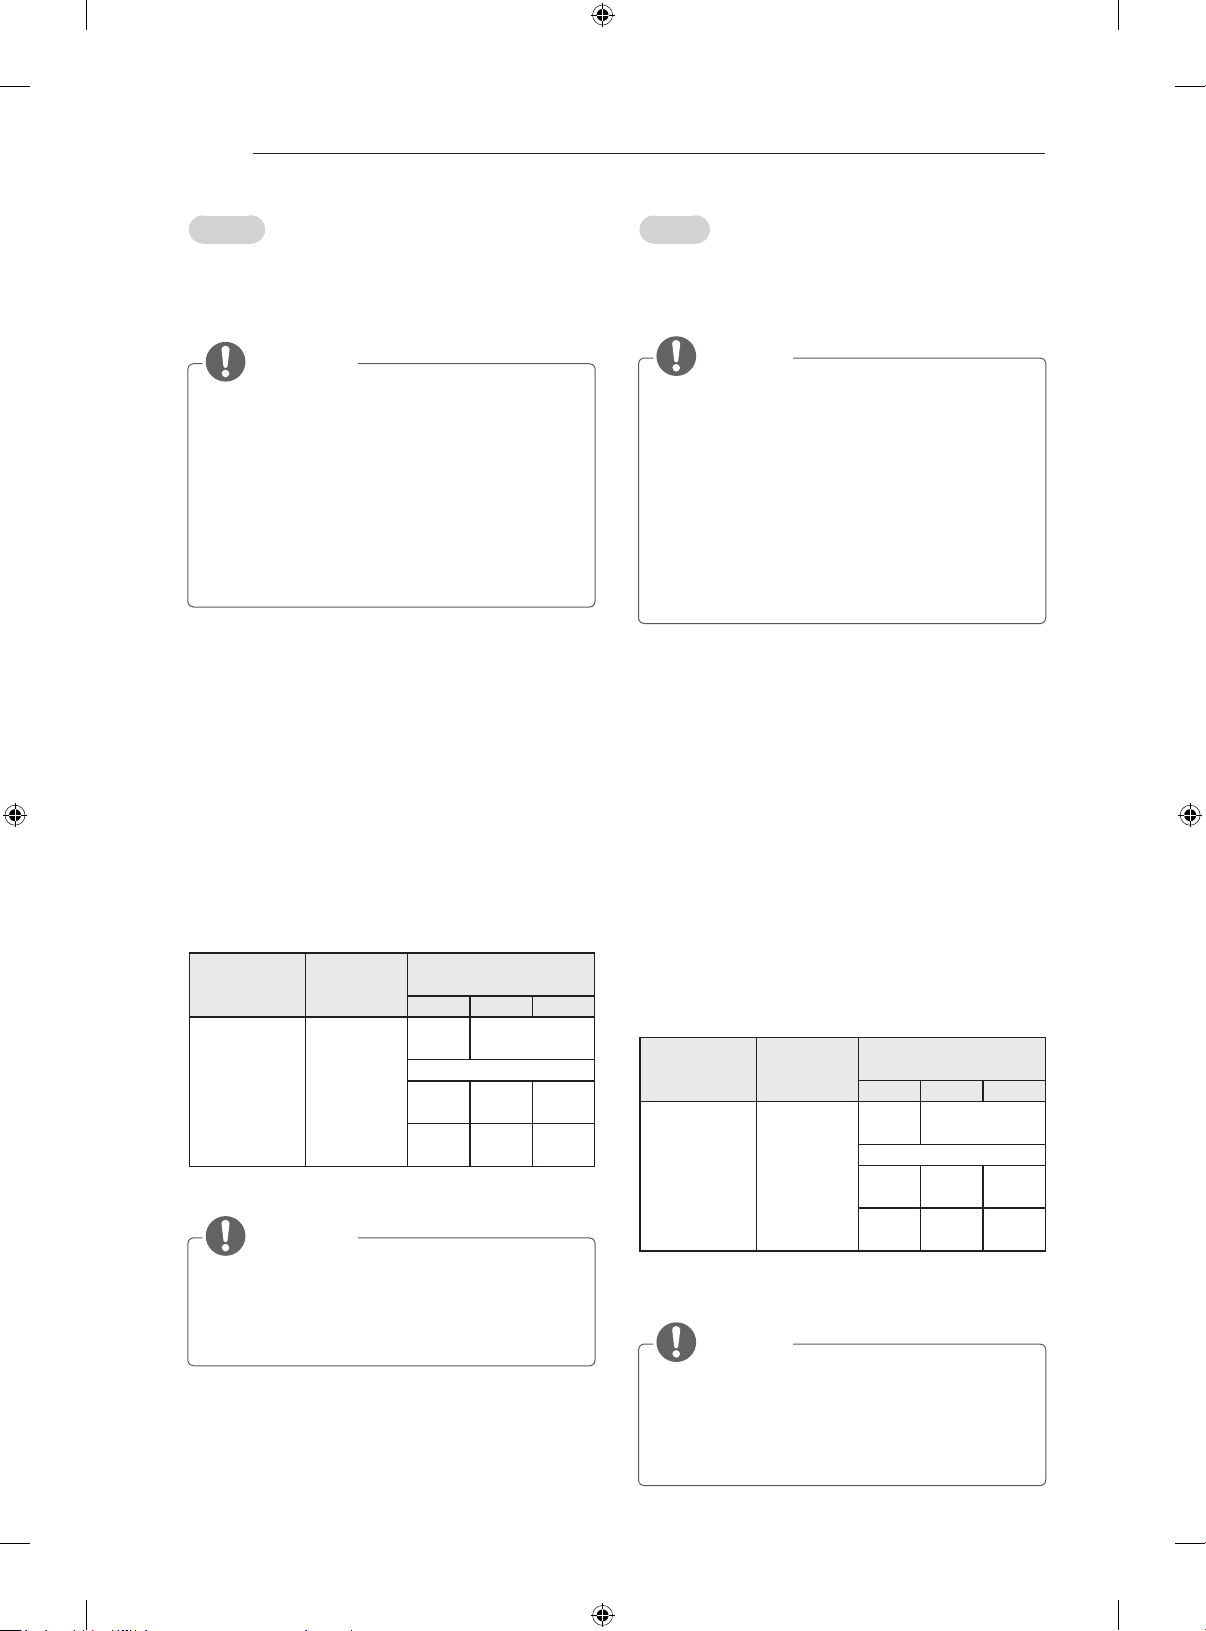
4K @ 50/60 Hz Support Format
Resolution Frame
rate (Hz)
Colour Depth /
Chroma Sampling
8 bit 10 bit 12 bit
3840 x 2160p
4096 x 2160p
50.00
59.94
60.00
YCbCr
4:2:0 YCbCr 4:2:0 1
YCbCr 4:2:2 1
YCbCr
4:4:4 1- -
RGB
4:4:4 1- -
1: Only Supported at HDMI IN 3 Port
NOTE
yIt is recommended to use the TV with the
HDMI connection for the best image quality.
yUse the latest High Speed HDMI™ Cable with
CEC (Customer Electronics Control) function.
yHigh Speed HDMI™ Cables are tested to
carry an HD signal up to 1080p and higher.
ySupported HDMI Audio format : Dolby Dig-
ital (32Khz, 44.1Khz, 48Khz), DTS(44.1Khz,
48Khz), PCM
(32Khz, 44.1Khz, 48Khz, 96Khz,
192Khz)
yWhen you use HDMI port 3, it is recommended
that you use the cable provided.
If you want to
use a regular HDMI cable, use one that is a
highspeed HDMI cable (3m or less).
Türkçe
Harici cihazdan TV’ye dijital video ve ses sinyalleri
gönderir. Harici cihaz ile TV’yi HDMI kablosuyla
aşağıdaki şekilde gösterildiği gibi bağlayın.
NOT
(Yalnızca EC97**, EC98**)
1) HDMI teknik özellikleri her bir giriş bağlantı noktası
için farklı olabilir, bu yüzden bağlantı kurmadan
önce cihaz teknik özelliklerini kontrol ettiğinizden
emin olun.
2) HDMI IN 3 bağlantı noktası özellikle 4K @
50/60 Hz kalitesinde UHD Videonun (4:4:4,
4:2:2) keyfini çıkarmanızı sağlayacak teknik
özellikler için uygundur. Ancak harici ekipmanın
teknik özelliklerine bağlı olarak video veya ses
desteklenmeyebilir. Bu durumda başka bir HDMI
IN bağlantı noktası kullanın.
3) Her bir giriş bağlantı noktasının HDMI teknik
özellikleriyle ilgili daha fazla bilgi için müşteri
hizmetleri ile iletişime geçin.
Desteklenen format: 4K @ 50/60Hz
Çözünürlük Kare hızı
(Hz)
Renk Derinliği / Renk
Örnekleme
8 bit 10 bit 12 bit
3840 x 2160p
4096 x 2160p
50.00
59.94
60.00
YCbCr
4:2:0 YCbCr 4:2:0 1
YCbCr 4:2:2 1
YCbCr
4:4:4 1- -
RGB
4:4:4 1- -
1: Yalnızca HDMI IN 3 Bağlantı Noktasında
Desteklenir
NOT
yEn iyi görüntü kalitesi için, TV’nin HDMI
bağlantısıyla kullanılması önerilir.
yCEC (Tüketici Elektronik Kontrolü) fonksiyonlu
en son Yüksek Hızlı HDMI™ Kablosunu kullanın.
yYüksek Hızlı HDMI™ Kablolarının 1080p ve
üzerine kadar HD sinyalini taşıyabildiği test
edilmiştir.
yDesteklenen HDMI Ses biçimi: Dolby
Digital(32Khz, 44.1Khz, 48Khz), DTS(44.1Khz,
48Khz), PCM(32Khz, 44.1Khz, 48Khz, 96Khz,
192Khz)
yHDMI kablosu kullanmanız gerektiğinde (HDMI
bağlantı noktası 3) birlikte verilen kabloyu
kullanmanız önerilir. Normal bir HDMI kablosu
kullanacaksanız yüksek hızlı HDMI kablosu (3 me-
tre veya daha kısa) kullanın (modele bağlı olarak).
A-8

MAKING CONNECTIONS
ARC (Audio Return Channel)
English
yAn external audio device that supports
SIMPLINK and ARC must be connected
using HDMI/DVI IN 1 (ARC) or HDMI(4K @
60 Hz)/DVI IN 2 (ARC) port.
yWhen connected with a high-speed HDMI
cable, the external audio device that
supports ARC outputs optical SPDIF without
additional optical audio cable and supports
the SIMPLINK function.
Türkçe
ySIMPLINK ve ARC’yi destekleyen harici
bir ses aygıtı HDMI/DVI IN 1 (ARC) veya
HDMI(4K @ 60 Hz)/DVI IN 2 (ARC) bağlantı
noktası kullanılarak bağlanmalıdır.
yARC’yi destekleyen harici ses cihazı, yüksek
hızlı bir HDMI kablosuyla bağlandığında ek
optik ses kablosu eklemeye gerek kalmadan
optik SPDIF çıkışı sağlar ve SIMPLINK fonk-
siyonunu destekler.
DVI to HDMI Connection
(Only EC93**)
AUDIO OUT DVI OUT
IN
AV2
( Audio in)
(*Not
Provided)
DVD / Blu-Ray / PC /
HD Cable Box / HD STB
(Only EC97**)
IN
AV2
( Audio in)
AUDIO OUT DVI OUT
(*Not Provided)
DVD / Blu-Ray / PC /
HD Cable Box / HD STB
A-9

MAKING CONNECTIONS
(Only EC98**)
(4K@60Hz)
(4K@60Hz)
AUDIO OUT DVI OUT
E
AV2
( Audio in)
CO
2
( )
(*Not
Provided)
DVD / Blu-Ray / PC /
HD Cable Box / HD STB
English
Transmits the digital video signal from an external
device to the TV. Connect the external device and
the TV with the DVI-HDMI cable as shown. To
transmit an audio signal, connect an audio cable.
NOTE
Türkçe
Harici cihazdan TV’ye dijital video sinyali gönderir.
Harici cihaz ile TV’yi DVI-HDMI kablosuyla
aşağıdaki şekilde gösterildiği gibi bağlayın. Ses
sinyali göndermek için bir ses kablosu bağlayın.
NOT
yDepending on the graphics card, DOS mode
may not work if a HDMI to DVI Cable is in use.
yWhen using the HDMI / DVI cable, Single
link is only supported.
yGrafik kartına bağlı olarak, HDMI-DVI Kab-
losu kullanılıyorsa DOS modu çalışmayabilir.
yHDMI/DVI kablosunu kullanırken yalnızca
tek bağlantıya izin verilir.
MHL Connection
(Only EC93**)
MHL passive
cable
(*Not Provided)
Mobile phone
(Only EC97**, EC98**)
MHL passive
cable
(*Not Provided)
Mobile phone
A-10

MAKING CONNECTIONS
English
Mobile High-definition Link (MHL) is an interface
for transmitting digital audiovisual signals from
mobile phones to television sets.
NOTE
Türkçe
Mobil Yüksek Tanımlı Bağlantı (MHL) dijital görsel
işitsel sinyalleri cep telefonlarından televizyon
setlerine iletmek için kullanılan bir arabirimdir.
NOT
yConnect the mobile phone to the HDMI/DVI IN
4 (MHL) or HDMI(4K @ 60 Hz)/DVI IN 4 (MHL)
port to view the phone screen on the TV.
yThe MHL passive cable is needed to
connect the TV and a mobile phone.
yThis only works for the MHL-enabled phone.
ySome applications can be operated by the
remote control.
yFor some mobile phones supporting MHL,
you can control with the magic remote control.
yRemove the MHL passive cable from the TV
when:
- The MHL function is disabled
- Your mobile device is fully charged in
standby mode
yTelefon ekranını TV’de görüntülemek için
cep telefonunu HDMI/DVI IN 4 (MHL) veya
HDMI(4K @ 60 Hz)/DVI IN 4 (MHL) bağlantı
noktasına bağlayın.
yTV ile cep telefonunu birbirine bağlamak için
MHL pasif kablo gereklidir.
yBu yalnızca MHL etkin telefonlarda çalışır.
yBazı uygulamalar uzaktan kumanda ile
çalıştırılabilir.
yMHL desteği olan bazı cep telefonlarını sihirli
uzaktan kumanda olarak kullanabilirsiniz.
yMHL pasif kablosunu TV’den çıkarın:
-MHL işlevi devre dışı bırakıldığında
-Mobil cihazınız bekleme modunda
tamamen şarj edildiğinde
Component Connection
IN
AV2
( Audio in)
IN
COMPONENT
YP
B
AUDIO
AV2
P
R
VIDEO
VIDEO
AUDIO
L R
GREEN GREEN GREEN
BLUE BLUE BLUE
RED RED RED
RED RED RED
WHITE WHITE WHITE
YELLOW
YELLOW
(Use the
composite gender
cable provided.)
GREEN
(Use the
component gender
cable provided.)
DVD / Blu-Ray / HD Cable Box
(*Not Provided)
A-11

MAKING CONNECTIONS
Composite Connection
IN
AV2
( Audio in)
IN
COMPONENT
YP
B
AUDIO
AV2
P
R
VIDEO
VIDEO
MONO
( )
AUDIO
L R
RED RED RED
WHITE WHITE WHITE
YELLOW YELLOW YELLOW
YELLOW
(Use the composite
gender cable provided.)
(*Not Provided)
DVD / Blu-Ray / HD Cable Box / VCR
English
Transmits analogue video and audio signals from
an external device to the TV. Connect the external
device and the TV with a composite gender cable
as shown.
Türkçe
Harici cihazdan TV’ye analog video ve ses
sinyalleri gönderir. Harici aygıt ile TV’yi gösterildiği
gibi kompozit kablosuyla bağlayın.
English
Transmits analogue video and audio signals from
an external device to the TV. Connect the external
device and the TV with a component gender cable
as shown.
NOTE
yIf cables are not installed correctly, it could
cause this image to display in black and
white or with distorted colours.
Türkçe
Harici cihazdan TV’ye analog video ve ses
sinyalleri gönderir. Harici aygıt ile TV’yi gösterildiği
gibi komponent kablosuyla bağlayın.
NOT
yKabloların yanlış takılması, görüntünün siyah
beyaz veya bozuk renklerle gösterilmesine
neden olabilir.
A-12

MAKING CONNECTIONS
Headphone Connection
(*Not Provided)
OUT
Ext.Speaker
/ H/P
English
Transmits the headphone signal from the TV to
an external device. Connect the external device
and the TV with the headphone as shown.
NOTE
yAUDIO menu items are disabled when con-
necting a headphone.
yOptical Digital Audio Out is not available
when connecting a headphone.
yHeadphone impedance: 16 Ω
yMax audio output of headphone: 0.627 mW
to 1.334 mW
yHeadphone jack size: 0.35 cm
Türkçe
TV’den harici bir cihaza kulaklık sinyali gönderir.
Harici cihaz ile TV’yi kulaklıkla aşağıdaki şekilde
gösterildiği gibi bağlayın.
NOT
yKulaklık bağlandığında SES menüsü öğeleri
devre dışı bırakılır.
yOptik Dijital Ses Çıkışı kulaklık takılı
olduğunda kullanılamaz.
yKulaklık empedansı: 16 Ω
yKulaklığın maks. ses çıkışı: 0,627 mW -
1,334 mW
yKulaklık jakı boyutu: 0,35 cm
A-13

MAKING CONNECTIONS
Audio Connection
OUT
OPTICAL
DIGITAL
AUDIO
OPTICAL
AUDIO IN
(*Not
Provided)
Digital Audio System
English
You may use an external audio system instead of
the built-in speaker.
Digital optical audio connection
Transmits a digital audio signal from the TV to an
external device. Connect the external device and
the TV with the optical audio cable as shown.
NOTE
yDo not look into the optical output port.
Looking at the laser beam may damage
your vision.
yAudio with ACP (Audio Copy Protection)
function may block digital audio output.
Türkçe
Dahili hoparlör yerine isteğe bağlı bir harici ses
sistemi kullanabilirsiniz.
Dijital optik ses bağlantısı
TV’den harici cihaza dijital ses sinyali gönderir.
Harici cihaz ile TV’yi optik ses kablosuyla aşağıdaki
şekilde gösterildiği gibi bağlayın.
NOT
yOptik çıkış bağlantı noktasına doğru bakmayın.
Lazer ışınına bakmak gözlerinize zarar
verebilir.
yACP (Ses Kopyalama Koruması) özelliğine
sahip sesler dijital ses çıkışını engelleyebilir.
A-14

MAKING CONNECTIONS
USB Connection
(Only EC93**)
USB
1
2 3
HDD
(*Not Provided)
USB HUB
(*Not Provided) (*Not Provided)
(Only EC97**, EC98**)
USB
1 2
3
HDD
HDD
(*Not Provided)
USB HUB
(*Not
Provided)
(*Not
Provided)
English
Connect a USB storage device such as a USB
flash memory, external hard drive or a USB
memory card reader to the TV and access the
Smart Share menu to use various multimedia files.
NOTE
ySome USB Hubs may not work. If a USB
device connected using a USB Hub is not
detected, connect it to the USB IN port on
the TV directly.
yConnect the external power source if your
USB is needed.
yConnecting via USB 3.0:
Some USB device may not work if it dose not
meet USB 3.0 standard. In case, connect it
to USB IN 2 or USB IN 3 port. (Only EC97**,
EC98**)
Türkçe
Çeşitli multimedya dosyalarını kullanmak için
TV’ye USB flaş bellek, harici sabit disk ya da USB
bellek kartı okuyucu gibi bir USB depolama aygıtı
bağlayın ve SmartShare menüsüne gidin.
NOT
yBazı USB Hubları çalışmayabilir. USB Hubı
ile bağlanan bir USB aygıtı çalışmazsa,
doğrudan TV üzerindeki USB IN bağlantı
noktasına bağlayın.
yUSB kullanmanız gerekiyorsa harici güç
kaynağını bağlayın.
yUSB 3.0 için bağlanma kılavuzu : USB 3.0
standardını karşılamayan bazı USB cihazları
çalışmayabilir. Böyle bir durumda cihazı
USB IN 2 veya USB IN 3 bağlantı noktasına
bağlayın. (
Yalnızca
EC97**, EC98**)
A-15

MAKING CONNECTIONS
Türkçe
Dijital TV modunda şifreli (ücretli) servisleri
görüntüler. Bu özellik her ülkede mevcut değildir.
NOT
yCI modülünün PCMCIA kart yuvasına doğru
yönde takıldığından emin olun. Modül doğru
takılmadığında, TV’nin ve PCMCIA kart
yuvasının zarar görmesine neden olabilir.
yCI+ CAM bağlandığında TV’de herhangi bir
görüntü ve ses yoksa, lütfen Karasal/Kablo/
Uydu Servis Operatörü ile iletişime geçin.
CI module Connection
PCMCIA CARD SLOT
(*Not Provided)
PCMCIA CARD SLOT
English
View the encrypted (pay) services in digital TV
mode. This feature is not available in all countries.
NOTE
yCheck if the CI module is inserted into the
PCMCIA CARD SLOT in the right direction.
If the module is not inserted properly, this
can cause damage to the TV and the
PCMCIA CARD SLOT.
yIf the TV does not display any video and
audio when CI+ CAM is connected, please
contact to the Antenna/Cable/Satellite Serv-
ice Operator.
A-16

MAKING CONNECTIONS
English
Transmits the video and audio signals from an
external device to the TV set. Connect the external
device and the TV set with the Scart gender cable
as shown.
Output
Type
Current
input mode
AV1
(TV Out1)
Digital TV Digital TV
Analogue TV, AV
Analogue TV
Component
HDMI
1 TV Out : Outputs Analogue TV or Digital TV
signals.
NOTE
Türkçe
Harici cihazdan TV setine video ve ses sinyalleri
gönderir. Harici aygıt ile TV setini gösterildiği
gibi euro scart kablosuyla (ya da Scart kablosu)
bağlayın.
Çıkış tipi
Geçerli
giriş modu
AV1
(TV Çıkışı1)
Dijital TV Dijital TV
Analog TV, AV
Analog TV
Komponent
HDMI
1 TV Çıkışı: Analog TV veya Dijital TV sinyal
çıkışı sağlar.
NOT
yAny Euro scart cable used must be signal
shielded.
yWhen watching digital TV in 3D imaging
mode, only 2D out signals cannot be output
through the SCART cable.
yIf you use the Time Machine function on
digital TV, monitor out signals cannot be
output through the SCART cable.
yKullanılacak Euro Scart kablosu sinyal
korumalı olmalıdır.
y3D görüntü modunda dijital TV izlerken,
yalnızca 2D çıkış sinyallerinin SCART
kablosu aracılığıyla çıkışı sağlanabilir.
yDijital TV’deki Time Machine fonksiyonu
kullanılırken TV çıkış sinyallerinin SCART
kablosu aracılığıyla çıkışı sağlanamaz.
Euro Scart Connection
AUDIO / VIDEO
IN/OUT
(RGB)
AV 1
(Use the Scart gender
cable provided.)
(*Not
Provided)
A-17

MAKING CONNECTIONS
English
Connect various external devices to the TV and
switch input modes to select an external device. For
more information on external device’s connection,
refer to the manual provided with each device.
Available external devices are: HD receivers, DVD
players, VCRs, audio systems, USB storage devic-
es, PC, gaming devices, and other external devices.
NOTE
yThe external device connection may differ
from the model.
yConnect external devices to the TV regardless
of the order of the TV port.
yIf you record a TV program on a DVD recorder
or VCR, make sure to connect the TV signal
input cable to the TV through a DVD recorder or
VCR. For more information of recording, refer to
the manual provided with the connected device.
yRefer to the external equipment’s manual for
operating instructions.
yIf you connect a gaming device to the TV, use
the cable supplied with the gaming device.
yIn PC mode, there may be noise associated
with the resolution, vertical pattern, contrast
or brightness. If noise is present, change
the PC output to another resolution, change
the refresh rate to another rate or adjust the
brightness and contrast on the PICTURE
menu until the picture is clear.
yIn PC mode, some resolution settings may
not work properly depending on the graphics
card.
yIf Ultra HD content is played via PC, the video
or audio may have disruptions intermittently
depending on your PC’s performance.
Türkçe
TV’ye çeşitli harici cihazlar bağlayın ve bir harici
cihaz seçmek için giriş modlarına geçin. Harici cihaz
bağlantısı hakkında daha fazla bilgi için cihazlarla
birlikte verilen kılavuza bakın.
Kullanılabilir harici cihazlar şunlardır: HD alıcılar,
DVD oynatıcılar, VCR cihazları, ses sistemleri, USB
depolama aygıtları, PC, oyun cihazları ve diğer
harici cihazlar.
NOT
yHarici cihaz bağlantısı modele göre değişiklik
gösterebilir.
yHarici cihazları TV’ye, TV bağlantı noktalarını
dikkate almaksızın bağlayın.
yDVD kayıt cihazına ya da VCR cihazına bir
TV programı kaydederken TV sinyal giriş
kablosunun DVD kayıt cihazı ya da VCR
üzerinden TV’ye bağlandığından emin olun.
Kayıt hakkında daha fazla bilgi için, bağlanan
cihazla birlikte verilen kılavuza bakın.
yKullanım talimatları için harici cihazın kullanım
kılavuzuna başvurun.
yTV’ye bir oyun cihazı bağlarsanız, oyun
cihazıyla birlikte verilen kabloyu kullanın.
yPC modunda, çözünürlük, dikey desen,
kontrast veya parlaklığa bağlı parazit
görülebilir. Parazit varsa PC çıkışını başka
bir çözünürlüğe ayarlayın, yenileme hızını
değiştirin veya net bir görüntü elde edene
kadar RESİM menüsünden parlaklık ve
kontrast ayarlarını değiştirin.
yPC modunda bazı çözünürlük ayarları grafik
kartına bağlı olarak çalışmayabilir.
yBilgisayarınızda Ultra HD içerik oynatılıyorsa
bilgisayarınızın performansına göre video veya
ses aralıklı olarak bozulabilir.
A-18

OWNER’S MANUAL
OLED TV
Please read this manual carefully before operating your set and retain it
for future reference.
www.lg.com

WARNING
yIf you ignore the warning message, you
may be seriously injured or there is a
possibility of accident or death.
CAUTION
yIf you ignore the caution message, you may
be slightly injured or the product may be
damaged.
NOTE
yThe note helps you understand and use
the product safely. Please read the note
carefully before using the product.
TABLE OF CONTENTS
3 LICENSES
3 OPEN SOURCE SOFTWARE
NOTICE
3 EXTERNAL CONTROL DEVICE
SETUP
4 SAFETY INSTRUCTIONS
10 - Viewing 3D Imaging
12 INSTALLATION PROCEDURE
12 ASSEMBLING AND
PREPARING
12 Unpacking
14 Separate purchase
15 Parts and buttons
17 - Using the joystick button
18 Lifting and moving the TV
19 Mounting on a table
20 Mounting on a wall
21 Wall Type Set-up Guide
21 - How to detach the stand
23 Using Built-in Camera
23 - Preparing Built-in Camera
24 - Name of Parts of Built-in camera
24 - Checking the Camera’s Shooting Range
25 REMOTE CONTROL
27 MAGIC REMOTE FUNCTIONS
28 Registering Magic Remote
28 How to use magic remote
29 Precautions to Take when Using the Magic
Remote
29 USING THE USER GUIDE
30 MAINTENANCE
30 Cleaning your TV
30 - Screen, frame, cabinet and stand
30 - Power cord
31 TROUBLESHOOTING
32 SPECIFICATIONS
2
ENG
ENGLISH
TABLE OF CONTENTS
This manual suits for next models
6
Table of contents
Languages:
Other LG OLED TV manuals

LG
LG OLED65B3PCA.AHKG User manual

LG
LG OLED65CXPVA User manual

LG
LG OLED48C3AUB User manual

LG
LG OLED55B8 Series Parts list manual

LG
LG OLED55B7T User manual

LG
LG SIGNATURE OLED77G7 Series User manual

LG
LG OLED77C3 Series User manual

LG
LG 65EU961H.AEK User manual

LG
LG OLED55C8PSA Quick start guide

LG
LG OLED65E6P Quick start guide

LG
LG OLED55B6P.AUS Quick start guide

LG
LG 65EW961H.AEU User manual

LG
LG OLED77B1PVA.AMF User manual

LG
LG OLED55BXPUA User manual

LG
LG QNED 65QNED999QB User manual

LG
LG OLED55BX Series User manual

LG
LG OLED77C8PUA User manual

LG
LG 55EA980W.AEK User manual

LG
LG OLED65B8SSB Parts list manual

LG
LG SIGNATURE OLED65W9 User manual