LG LFC21776ST User manual

REFRIGERATOR
SERVICE MANUAL
CAUTION
BEFORE SERVICING THE PRODUCT,
READ THE SAFETY PRECAUTIONS IN THIS MANUAL.
MODELS : LFC21776ST COLORS : STAINLESS(ST)

CONTENTS
- 2 -
SAFETY PRECAUTIONS
Please read the following instructions before servicing your refrigerator.
1. Unplug the power before handling any elctrical componets.
2. Check the rated current, voltage, and capacity.
3. Take caution not to get water near any electrical components.
4. Use exact replacement parts.
5. Remove any objects from the top prior to tilting the product.
SAFETY PRECAUTIONS ....................................................................................................................................................... 2
SPECIFICATIONS ................................................................................................................................................................... 3
PARTS IDENTIFICATION ....................................................................................................................................................... 4
DISASSEMBLY .................................................................................................................................................................. 5-10
DOOR ............................................................................................................................................................................... 5-6
DOOR ALIGNMENT ............................................................................................................................................................. 6
HOW TO REMOVE AND REINSTALL THE PULLOUT DRAWER ................................................................................... 7-9
ADJUSTMENT ................................................................................................................................................................. 10-11
COMPRESSOR ................................................................................................................................................................. 10
PTC-STARTER .................................................................................................................................................................. 10
OLP (OVERLOAD PROTECTOR) ..................................................................................................................................... 11
TO REMOVE THE COVER PTC ........................................................................................................................................ 11
CIRCUIT DIAGRAM .............................................................................................................................................................. 12
TROUBLESHOOTING ..................................................................................................................................................... 13-17
COMPRESSOR AND ELECTRIC COMPONENTS ........................................................................................................... 13
OTHER ELECTRICAL COMPONENTS...............................................................................................................................14
SERVICE DIAGNOSIS CHART ......................................................................................................................................... 15
REFRIGERATION CYCLE ............................................................................................................................................ 16-17
ICE MAKER AND DISPENSER WORKING PRINCILLES AND REPAIR........................................................................18-21
DESCRIPTION OF FUNCTION & CIRCUIT OF MICOM ................................................................................................. 22-35
EXPLODED VIEW & REPLACEMENT PARTS LIST ...................................................................................................... 36-40

1. SPECIFICATIONS
- 3 -
Opaque Drawer Type
PTC Starting Type
Fin Tube Type
Spiral Condenser
R-134a (125 g)
ISO10 (280 ml)
SHEATH HEATER
LED Module(27)
60 W (1 EA)
VEGETABLE TRAY
COMPRESSOR
EVAPORATOR
CONDENSER
REFRIGERANT
LUBRICATING OIL
DEFROSTING DEVICE
REFRIGERATOR
FREEZER
LAMP
ITEMS SPECIFICATIONS
Side Rounded
35 X 30 X 69 (WXDXH) 21cu.ft
254 lb. (115 kg))
Fan Cooling
Micom Control
Full Automatic
Heater Defrost
PCM, VCM, Stainless
Bar
ABS Resin
Polyurethane Foam
DOOR DESIGN
DIMENSIONS(inches)
NET WEIGHT(pounds)
COOLING SYSTEM
TEMPERATURE CONTROL
DEFROSTING SYSTEM
DOOR FINISH
HANDLE TYPE
INNER CASE
INSULATION
ITEMS
21 cu. ft
SPECIFICATIONS
DIMENSIONS
Description LFC21776ST
Depth w/ Handles
Depth w/o Handles
Depth w/o Door
Depth (Total with Door Open)
Height to Top of Case
Height to Top of Door Hinge
Width
Width (door open 90 deg. w/o handle)
Width (door open 90 deg. w/ handle)
A
B
C
D
E
F
G
H
I
30 in.
27 1/2 in.
23 5/8 in.
42 1/4 in.
68 3/8 in.
69 3/4 in.
35 3/4 in.
39 1/4 in.
44 1/4 in.

2. PARTS IDENTIFICATION
- 4 -
Digital Sensor
Control
Refrigerator Light
Shelves
Modular Door Bin
Glide'N'Serve
Ice Bin
Durabase
Divider
Dairy Bin
Modular Door Bin
Bottle Holder
Modular Door Bin
Pullout Drawer
Optibin Crisper
Keeps fruits and
vegetable fresh
and crisp
AUTOMATIC
ICEMAKER

3. DISASSEMBLY
- 5 -
3-1 DOOR
Refrigerator door
1. Remove the top hinge cover and disconnect the wire
harness.
2. Remove the ground screw.
3. Rotate the lever hinge and lift off hinge.
4. Lift off the refrigerator door.
5. Replace in the reverse order.
Door gasket replacement
1. Insert gasket bracket clips
1) Insert gasket bracket edge beneath door frame edge.
2) Turn upper gasket bracket spring so that both spring
ends are in the door channel.
3) Push in clip until you hear it snap securely into place.
4) Push in remaining two clips until you hear each snap
securely into place.
Note : Make sure that no part of gasket bracket edge
protrudes from beneath door frame edge.
2. Remove gasket bracket clips
There are two clips on each door. Start bracket removal
near one of the middle clips.
1)Pull gasket back to expose gasket bracket clip and
door frame.
2)Insert a flat tip screwdriver into seam between gasket
bracket and door frame and pry back until clips snaps
out.
3)Continue prying back along seam until all clips snap
out.
3. Remove gasket
Pull gasket free from gasket channel on the three
remaining sides of door.
Figure 2
Frame Cover Handle
Figure 5
Correct Incorrect
Figure 3
Gasket
Bracket Clip
Gasket
Bracket
Flat Tip
Screwdriver
Figure 4
Spring
Gasket
Bracket Clip
Figure 1
HINGE COVER
HINGE
Door gasket removal
1. Remove door frame cover
Starting at top of cover and working down, snap cover
out and away from door.
Door
Frame
Door
Frame

2. Insert gasket into channel
1) Snap gasket assembly into the door bracket.
Inserting the gasket assembly into the bracket door
3. Replace door frame cover
Starting at top of cover and working down, snap the
cover back into door.
2) Press gasket into channels on the three remaining
sides of door.
Figure 7
Figure 9
Figure 8
3-2 DOOR ALIGNMENT
If the space between your doors is uneven, follow the
instructions below to align the doors:
1. With one hand, lift the door you want to raise at middle
hinge.
2. With other hand, use pliers to insert snap ring as shown.
3. Insert additional snap rings until the doors are aligned.
(Three snap rings are provided with the product.)
Correct
Figure 6
Incorrect
- 6 -

- 7 -
3-3 HOW TO REMOVE AND REINSTALL THE PULLOUT DRAWER
3-3-1 FOLLOW STEPS TO REMOVE
Step 1) Open the freezer door. Step 2) Remove the lower basket.
Step 3) Remove the two screws from the guide rails (one
from each side).
Step 5) First : Remove the gear from the left side first by releasing the tab behind the gear, place a screwdriver between
the gear and the tab and pull up on the gear.
Second : Remove the center rail.
Third : Remove the gear from the right side by following the same steps for the left side.
NOTE : THIS TAB MUST BE PUSHED IN TO RELEASE THE GEAR.
Step 4) Lift the freezer door up to unhook it from the rail
support and remove.
Pull both rails to full extension.

- 8 -
3-3-2 FOLLOW STEPS TO REINSTALL
Step 1) Reinstall the right side gear into the clip.
Step 2) Insert the rail into the right side gear. Gears do not
need to be perpendicular to each other.
Step 4) The rail system will align itself by pushing the rails
all the way into the freezer section.
Pull the rails back out to full extension.
Step 5) Reinstall the freezer door by inserting the rail tabs
into the guide rail.
Step 6) Reinstall the two screws into the guide rails
(one from each side). Step 7) Reinstall the lower basket, and close the freezer
door.
Step 3) Insert the rail into the left side gear, and insert the
gear into the clip.

- 9 -
3-3-3 PULL OUT DRAWER
To separate the drawer, push the front left and right hooks in direction to pull up and remove.
Then gently lift the gear part of rear left and right side of the drawer and pull it out in direction.
To install, reposition the gear part of rear left and right side of the drawer after pulling out both rails as much as possible,
and gently push down both left and right side while checking the hook on the front part.

- 10 -
4. ADJUSTMENT
4-2 Introduction of E-Linear Compressor
E-Linear compressor is run by mechanical part design
through automatically varying the cooling power. The
main parts consist of compressor and Sub PCB which
controls the compressor. PCB authorizes constant
voltage and constant frequency to the compressor and
protects it.
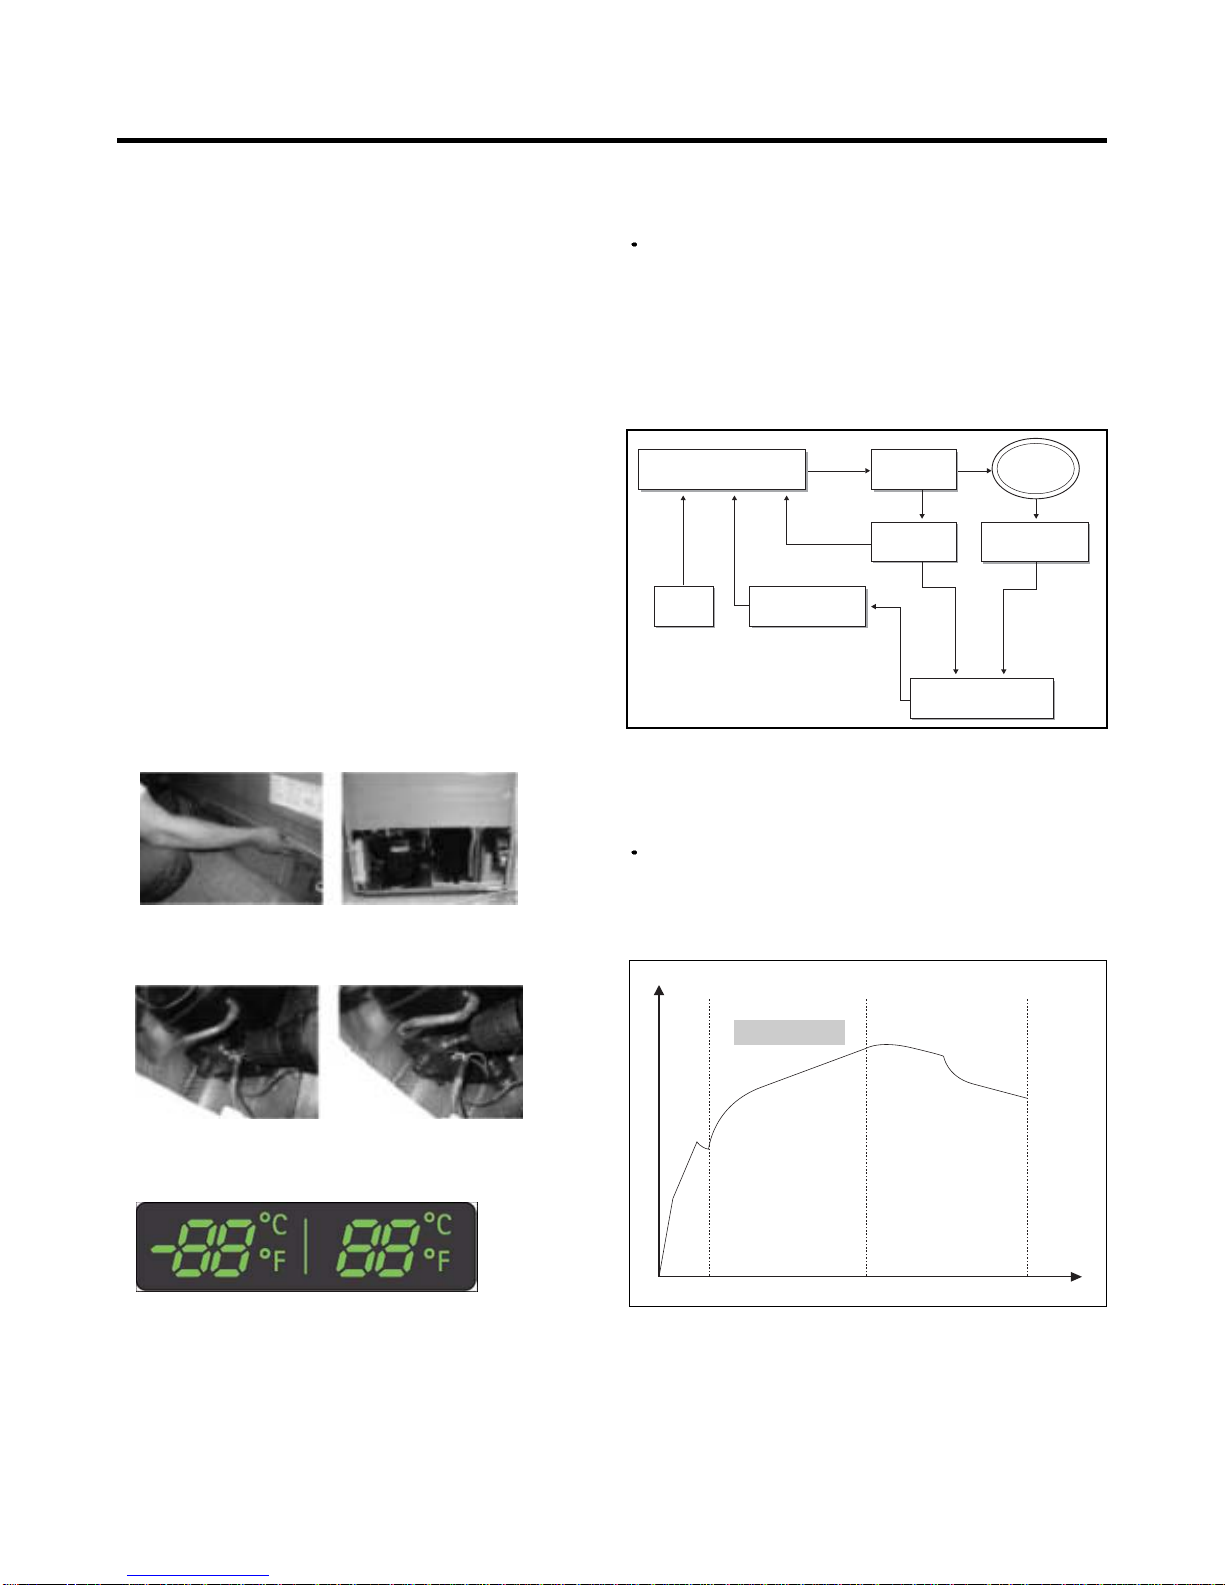
Drive half stroke after turning on initial power for 30
seconds. Then, slowly increase stroke and reach target
input. Once reaching the target input, input naturally
changes according to refrigerator load without any special
control.
Interval 1) Half stroke interval - after initial running, stay at
the initial value for 30 seconds
Interval 2) Running interval - Increase at every 0.8 till it
reaches the target input; it takes about 3’ 45”
Interval 3) CVCF interval - Run by target voltage and main
operating frequency and the input naturally
changes according to refrigerator load
❸
❶❷
4-1-1 Role
4-1 COMPRESSOR
The compressor intakes low temperature and low pressure
gas from the evaporator of the refrigerator and compresses
this gas to high-temperature and high-pressure gas. It then
delivers the gas to the condenser.
4-1-2 Note for Usage
(1) Be careful not to allow over-voltage and over-current.
(2) Do not drop or handle carelessly.
(3) Keep away from any liquid.
If liquid such as oil or water enters the Cover PTC
Compressor may fail due to breakdown of their
insulating capabilities.
(4) Always use the Parts designed for the compressor and
make sure it is properly attached to the compressor.
Parts may appear physically identical but could have
different electrical ratings. Replace parts by part number
and model number. Use only approved substitute parts.
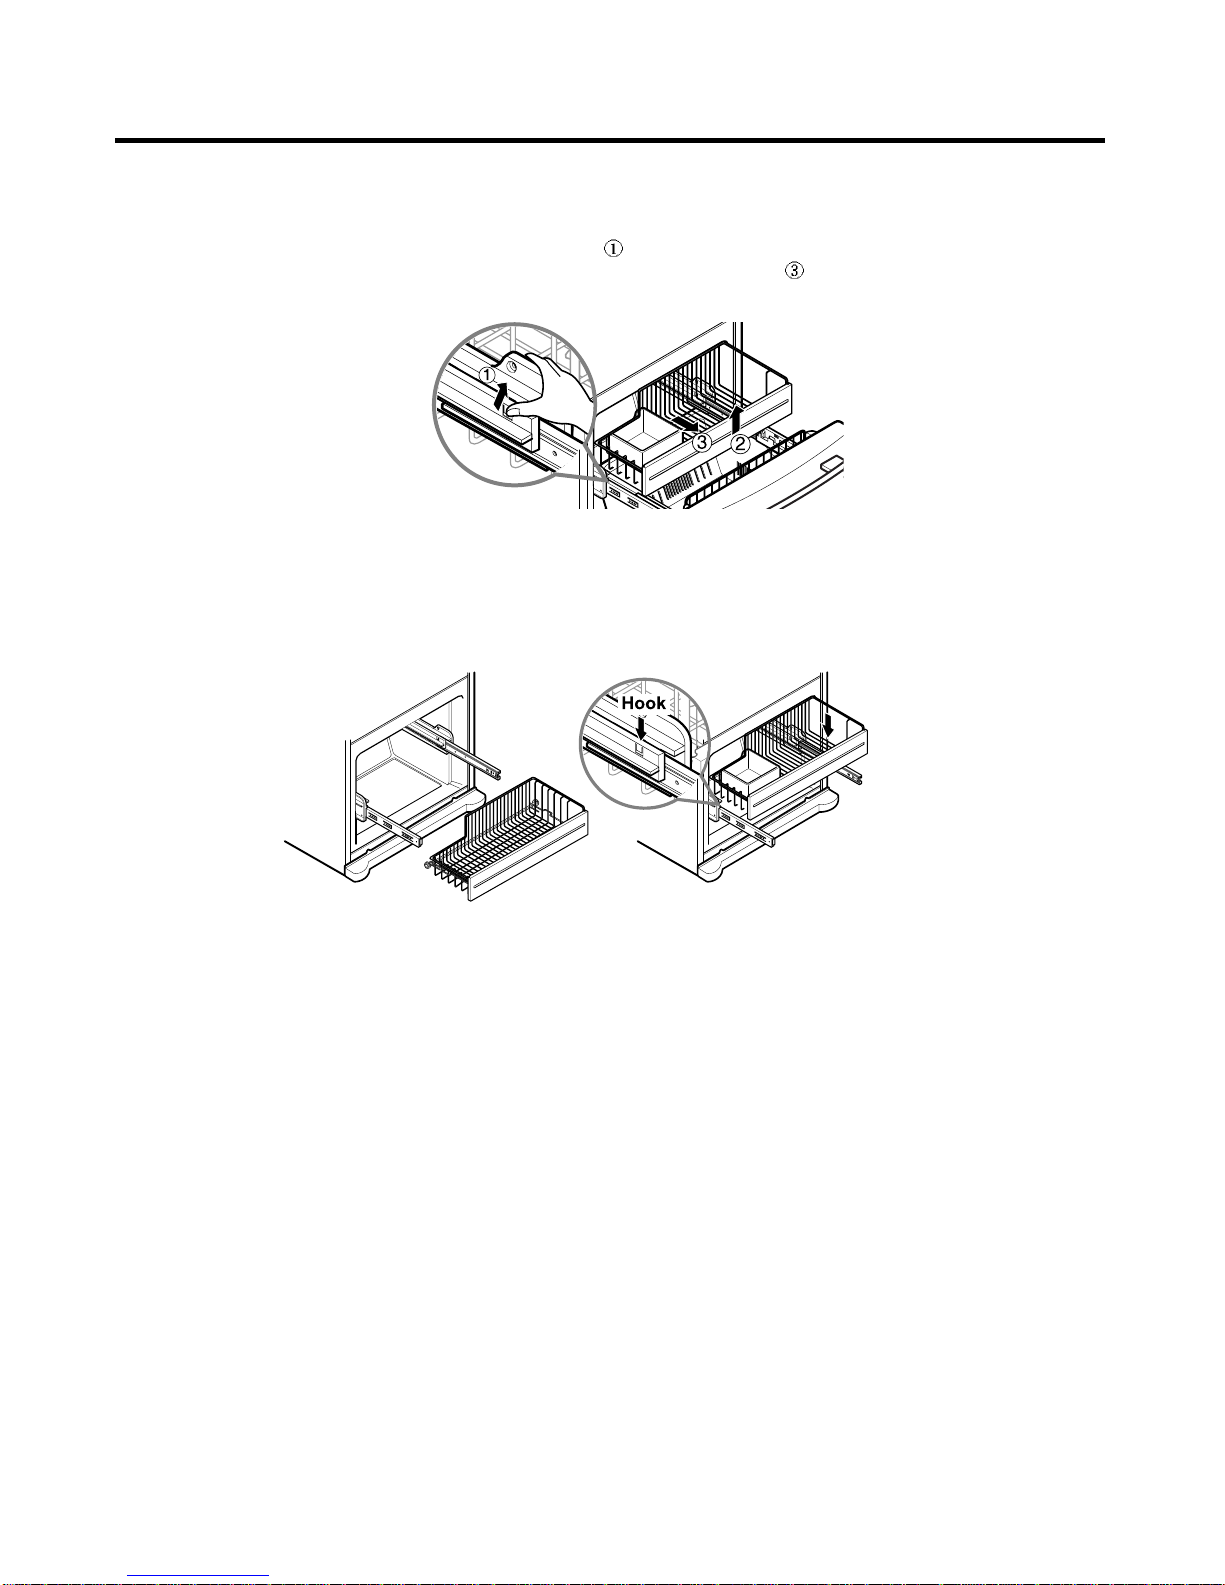
4-1-3 REMOVE THE COVER PTC
(1) Remove the Cover Back M/C
(2) Loosen two screws on comp base
(3) Use a L-shaped flap tooll to pry off the cover
(4) Assembly in reverse order of disassembly
4-2-1 Control of Compressor Block Diagram
4-2-2 Compressor operating pattern
Compressor Controller Inverter
PWM
Signal
Frequ
-ency
Linear
Comp
DC link
Voltage
Main
Micom
Calculate counter
electromotive force
Counter elec-
tromotive force
Vcap Voltage
Control Block Diagram of Compressor
Comp. input

- 11 -
4-2-4 Compressor problems diagnosis
When there is a problem or failure with the `operation,
you are kindly recommended to check it as follows ;
Measure the resistance between poles of the hermetic
terminal (as shown picture) with a multi-tester.
(measurement several minutes after power off)
Normal resistance range (measured at ambient
temperature 23 )
Case 1-1
If the measured values lie in the normal resistance range as
in the table below,
Compressor is normal.
Case 1-2
If the measured values are above several M or a infinity,
Wire is disconnected in the shell.
Case 1-3
If the measured values are excessively of small number,
There is short somewhere in the shell.
1) Check to normality by measurement of resistance
According to ambient temperature or operation situation,
the values could show a little deviation.
4-2-3 Compressor protection logic
Since linear Comp conducts linear reciprocating motion,
we have protection logic for compressor, motor and PCB
as the below.
-Stroke Trip
During the operation, if stroke is above the target value,
decrease the target volt by 3V.
-Current Trip
Current trip is set in order to protect compressor
mechanical part and drive from the overcurrent that might
arise during the operation.
Check the current for every 416.7us and if the Trip
exceeds 1.86Arms more than three times at Comp ON,
forcibly stop and restart six minutes later.
-Lock Piston Trip
If stroke is under 5mm even if the current is more than
14Arms, Take it as ‘piston lock’ and restart after 2’30” of
Comp OFF. Check the current and stroke for every
416.7us and if the condition fits more than three times at
Comp ON, the Trip occurs.
-IPM fault Trip
It occurs if FO signal received from IPM is LOW. For
every 416.7us, check whether FO signal is LOW. The trip
occurs if it is found three times during the five
periods(83ms).
P : Power Line
C : Common Line Multi-tester
Resistance
6~8
FC75LANE

- 12 -
Measure the resistance between pin of the connector (as
shown picture) with a multi-tester.
Standard for normality
-In order to decide whether compressor operating is normal
or not, check the output transfer during the refrigerator
operation.
-After input the initial power and compressor operates, wait
for 10 minutes to estimate.
-Compressor operation may be diagnosed as normal if the
voltage falls between 145V and 180V.
Warning
1. Please be cautious of electric shock and short (it is
estimated after turning on initial power).
2. If the voltage is estimated less than 80V, it is diagnosed
as bad.
2) Check to normality by measurement of Voltage
If compressor protection logic is running, LED Lamp’s
blinking frequency of sub PCB, which takes in charge of
control, can help estimate the protection logic’s symptoms
and the cause of its problems.
Trip name
Stroke Trip
Current Trip
Lock Piston Trip
IPM fault trip
Led Times
2
6
5
7
Comp Off Time
1min
6min
2min 30sec
20sec
3) Check problems by LED On & Off Count _ (Sub PCB)
-Current Trip PCB defects or Cycle clogging maybe the
causes. After estimating winding resistance, estimate
compressor operation voltage to check if there is any
problem and take actions to repair cycle at replacement of
compressor.
-Stroke Trip can occur when the surrounding
temperature is high, C-Fan, F-Fan and so on are
constrained, or when cycle problems, such as moisture
blocking or compressor defect, are related.
-Lock Piston Trip Since compressor itself can be a
potential cause of a defect, estimate the compressor
resistance value according to #1’s compressor winding
value estimation method and estimate the #2’s
compressor operation voltage to decide whether it is
defective or not
(Before replacement of compressor, replace PCB and
conduct the replacement of compressor during
compressor replacement)
-IPM fault Trip Replace sub PCB since there is high
chance that it is caused by sub PCB’s part defect.
<Fig. 1> <Fig. 1>

- 13 -
5. CIRCUIT DIAGRAM

- 14 -
6. TROUBLESHOOTING
6-1 Error Code Summary
NO Error Detection
Category
1Normality None Normal operation of Display
2Freezer Sensor
Error Er FS Short or Disconnection
of Freezer Sensor
3Refrigerator
Sensor Error Er rS Short or Disconnection
of Refrigerator Sensor Check each sensor and its
connector.
Error Generation Factors Remark
WARNING:When you check the Resistance values, be sure to turn off the power.
And wait for the voltage-discharge sufficiently.
Error Display
Freezer
Temperature Ref.
Temperature
4Defrosting
Sensor Error Er dS Short or Disconnection
of Defrosting Sensor
5Icing Sensor
Error Er IS Short or Disconnection
of Icing Sensor
6Poor Defrosting Er dH
Even though it is passed
1 hour since then Defrosting,
if Defrosting sensor is not
over 8°C, it is caused
Temperature Fuse
Disconnection, Heater
disconnection, DRAIN Jam,
Poor Relay for Heater
7Abnormality of
BLDC FAN Motor
for Freezer Er FF
It is caused when feedback
signal isn’t over 65 seconds
during BLDC FAN motor
operating
Poor BLDC Motor
connection, DRIVE IC,
and TR
8
Abnormality of
BLDC FAN Motor
for Mechanic
Room
Er CF
It is caused when feedback
signal isn’t over 65 seconds
during BLDC FAN motor
operating
Poor BLDC Motor
connection, DRIVE IC,
and TR
9Communication
Error Er CO Communication Error
between Micom of Main
PWB and Display Micom
Poor Communication
connection,Poor TR of
Transmitter and Receiver

- 15 -
7. PCB Picture
7-1 Main PCB
P/No & MFG
EBR67348002
(2010.03 ~)
Picture
CON4
CON5
CON8
CON3
CON2
CON9
CON1

- 16 -
7-2 Display PCB & Sub PCB
P/No
Display PCB
EBR42479305
(2010.03~)
Picture
CON01

- 17 -
8. Troubleshooting With Error Display
0 Short
Open
Normal
Change the sensor
Replace the refrigerator
Check the Temp and
resistance (Table-1)
Result SVC Action
8-1 Freezer Sensor Error (Er FS)
No
1
2
Checking flow
Check for a loose connection.
Check the Blue/White to
Blue/White.
Result & SVC Action
<CON4>
<Temperature table-1>
(1) To (2)
-22°F / -30°C
-13°F / -25°C
-4°F / -20°C
5°F / -15°C
14°F / -10°C
23°F / -5°C
32°F / 0°C
Result
40.5 ~ 38.5
30.5 ~ 28.5
23 ~ 21.5
17.5 ~ 16.5
13.5 ~ 12.5
10.5 ~ 9.5
8 ~7.5
The sensor is determined by
the temperature.
For example, 23 indicates -4°F.

- 18 -
0 Short
Open
Normal
Change the sensor
Replace the refrigerator
Check the Temp and
resistance (Table-2)
Result SVC Action
8-2 Refrigerator Sensor Error (Er rS)
No
1
2
Checking flow
Check for a loose connection.
Check the White to White.
Result & SVC Action
<Temperature table-2>
(1) To (2)
23°F / -5°C
32°F / 0°C
41°F / 5°C
50°F / 10°C
59°F / 15°C
Result
38.5 ~ 36.5
30.5 ~ 29.5
24.5 ~ 23.5
20 ~ 19
16 ~15.5
The sensor is determined by
the temperature.
For example, 30 indicates 32°F.
<CON4>

- 19 -
8-3 Icing Sensor Error (Er IS)
0 Short
Open
Normal
Change the sensor
Replace the refrigerator
Check the Temp and
resistance (Table-1)
Result SVC Action
No
1
2
Checking flow
Check for a loose connection.
Check the Red to Bright Orange.
Result & SVC Action
<Temperature table-1>
(1) To (2)
-22°F / -30°C
-13°F / -25°C
-4°F / -20°C
5°F / -15°C
14°F / -10°C
23°F / -5°C
32°F / 0°C
Result
40.5 ~ 38.5
30.5 ~ 28.5
23 ~ 21.5
17.5 ~ 16.5
13.5 ~ 12.5
10.5 ~ 9.5
8 ~7.5
The sensor is determined by
the temperature.
For example, 23 indicates -4°F.
<CON9>

- 20 -
0 Short
Open
Normal
Change the sensor
Replace the refrigerator
Check the Temp and
resistance (Table-3)
Result SVC Action
8-4 Defrost Sensor Error (F dS)
No
1
2
Checking flow
Check for a loose connection.
Check the Orange to Orange.
Result & SVC Action
Check the Brown to Brown.
The sensor is determined by
the temperature.
For example, 23 indicates -4°F.
<CON4>
<Temperature table-3>
(1) To (2)
23°F / -5°C
32°F / 0°C
41°F / 5°C
50°F / 10°C
59°F / 15°C
Result
38.5 ~ 36.5
30.5 ~ 29.5
24.5 ~ 23.5
20 ~ 19
16 ~15.5
Other manuals for LFC21776ST
3
Table of contents
Other LG Refrigerator manuals

LG
LG GN-B492GLCH User manual

LG
LG LRMDS3006 Series User manual

LG
LG GM-L279GT User manual

LG
LG GC-B257SLUV.APZQEBN User manual

LG
LG LT11C2000 Series User manual

LG
LG LF30H8210 Series User manual

LG
LG SXS Refrigerator User manual

LG
LG G 272 Series User manual

LG
LG GN-M562GLHW User manual

LG
LG GR-B419WLQK User manual