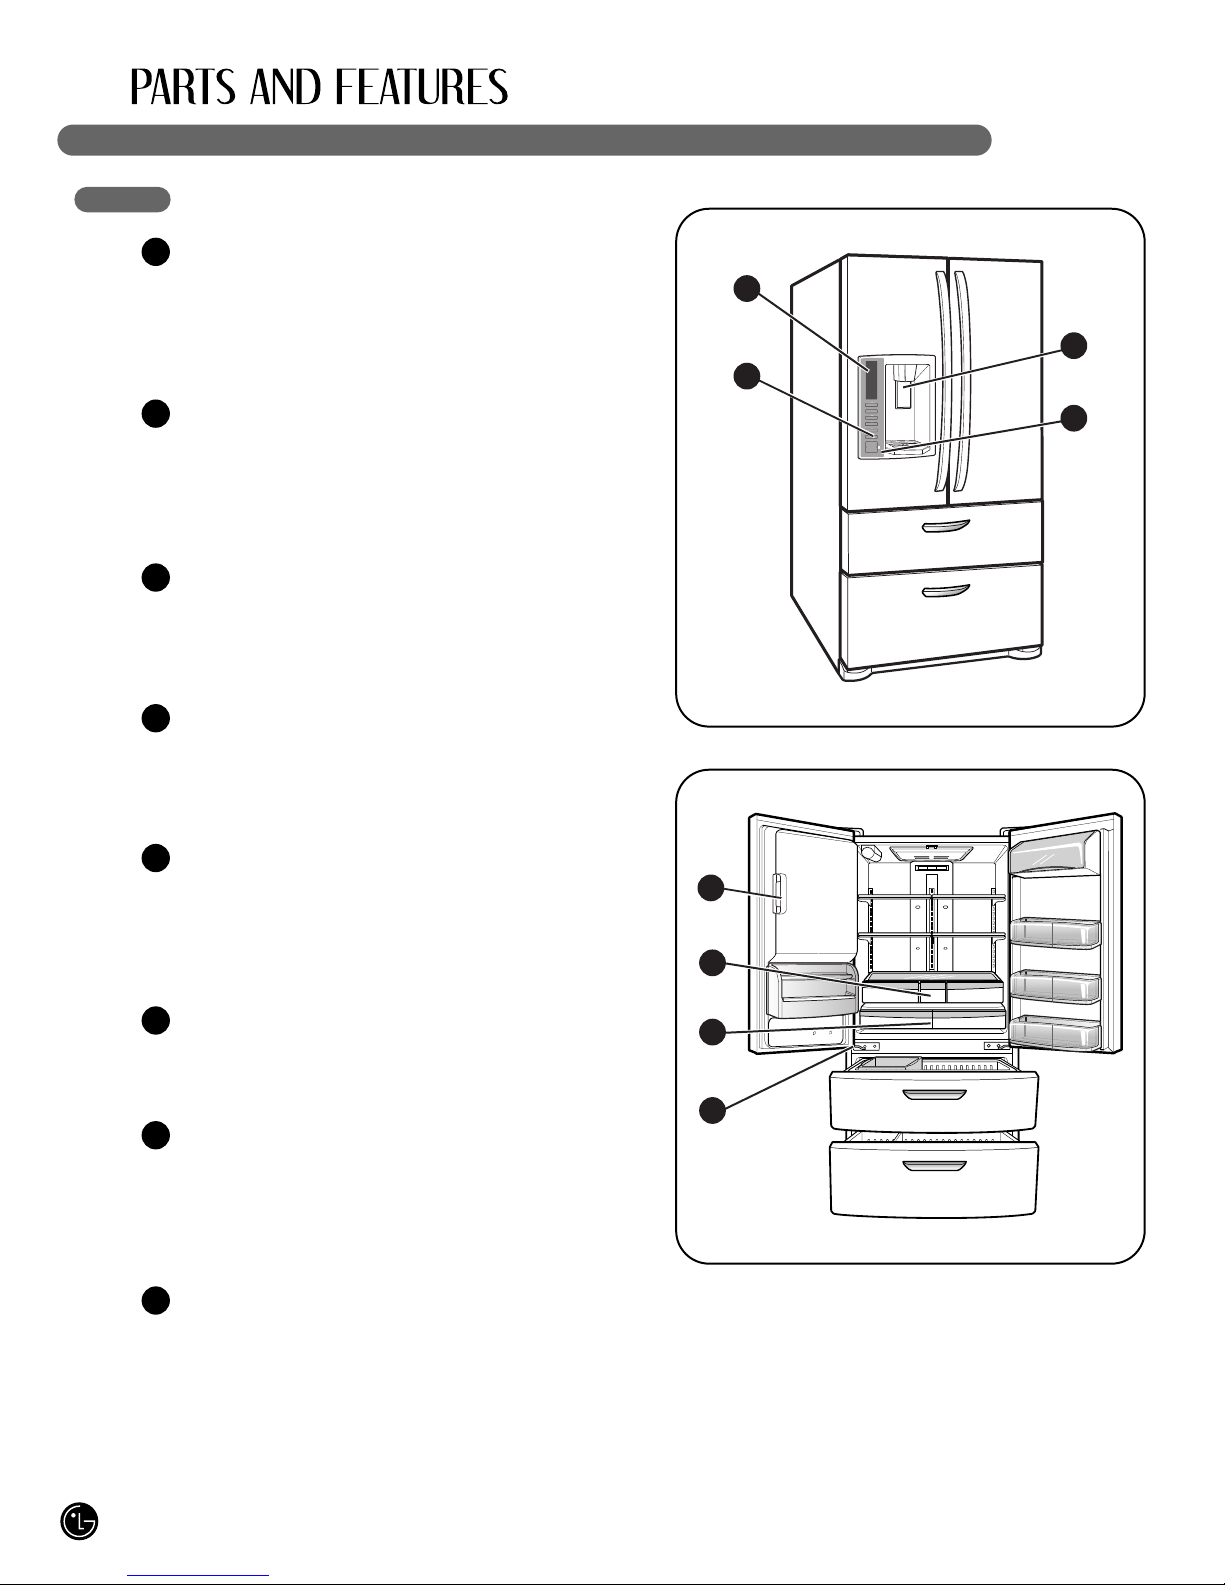
LG LMX28987 Series Instruction Manual

P/No. MFL62184505
Please read this guide
thoroughly before
operati g a d keep it ha dy
for refere ce at all times.
Veuillez lire ce guide atte tiveme t
ava t la mise e service de l’appareil
et gardez-le à portée de mai
pour le co sulter e cas de besoi .
Lea dete idame te estas
i struccio es a tes utilizar
el frigorífico y guárdelas como
refere cia para el futuro.
LMX28987**
To co tact LG Electro ics, 24 hours a day,
7 days a week:
1-800-243-0000
Or visit us o the Web at: us.lge.com
Pour co tacter LG Electro ics, 24 heures par
jour, 7 jours par semai e:
1-800-243-0000
Ou visitez otre site Web à l’adresse: us.lge.com
Para comu icarse co LG Electro ics,
24 horas al día, 7 días a la sema a:
1-800-243-0000
O visíte os e la Web e : us.lge.com

2
IMPORTANT SAFETY INFORMATION
Basic Safety Precautio s ........................................3
CFC Disposal ..........................................................4
How to Co ect Electricity ......................................5
PARTS AND FEATURES
Special Features .....................................................6
Key Parts a d Compo e ts ....................................7
INSTALLATION
Choose the Proper Locatio ...................................8
Cleara ces ..............................................................8
Floori g ...................................................................9
Ha dle Removal......................................................9
Door a d Drawer Removal....................................10
Co ecti g the Water Supply ...............................18
Co ecti g the Water Li es..................................19
Leveli g the Refrigerator Doors ............................20
Starti g..................................................................21
HOW TO USE
Co trol Pa el Features .........................................22
The LED Display ...................................................24
Adjusti g the Temperatures a d Display .............25
Operati g the Dispe ser ......................................26
Setti g the Fu ctio s ...........................................27
Spaceplus Ice System ..........................................28
Automatic Icemaker .............................................29
Stori g Foods .......................................................30
Locatio of Foods .................................................31
Shelf Height Adjustme t .......................................32
CARE AND CLEANING
Removi g a d Replaci g Compo e ts ................33
Clea i g the Refrigerator .....................................36
Ge eral I formatio .............................................36
Replaci g the Water Filter.....................................37
TROUBLESHOOTING
Before Calli g for Service …………………………38
SPECIFICATIONS
Key Dime sio s a d Specificatio s .....................42
WARRANTY
Product Registratio I formatio ..........................43
THANK YOU!
Co gratulatio s o your purchase
a d welcome to the LG family.
Your ew LG Fre ch Door
Refrigerator combi es
adva ced cooli g tech ology
with simple operatio a d high
efficie cy. Follow the operati g
a d care i structio s i this
ma ual a d your refrigerator
will provide you with ma y years
of reliable service.

3
BASIC SAFETY PRECAUTIONS
This guide contains many important safety messages. Always read and obey all
safety messages.
w This is the safety alert symbol. It alerts you to safety messages that i form you of hazards that ca kill
or hurt you or others or cause damage to the product. All safety messages will be preceded by the safety
alert symbol a d the hazard sig al word DANGER, WARNING, or CAUTION. These words mea :
wANGER You might be killed or seriously i jured if you do ’t follow i structio s.
wWARNING You can be killed or seriously i jured if you do ’t follow i structio s.
wCAUTION I dicates a immi e tly hazardous situatio which, if ot avoided, may
result i mi or or moderate i jury, or product damage.
All safety messages will ide tify the hazard, tell you how to reduce the cha ce of i jury, a d tell you
what ca happe if the i structio s are ot followed.
wWARNING
To reduce the risk of fire, electric shock, or
injury to persons when using your product,
basic safety precautions should be followed,
including the following.
Read all instructions before using this appliance.
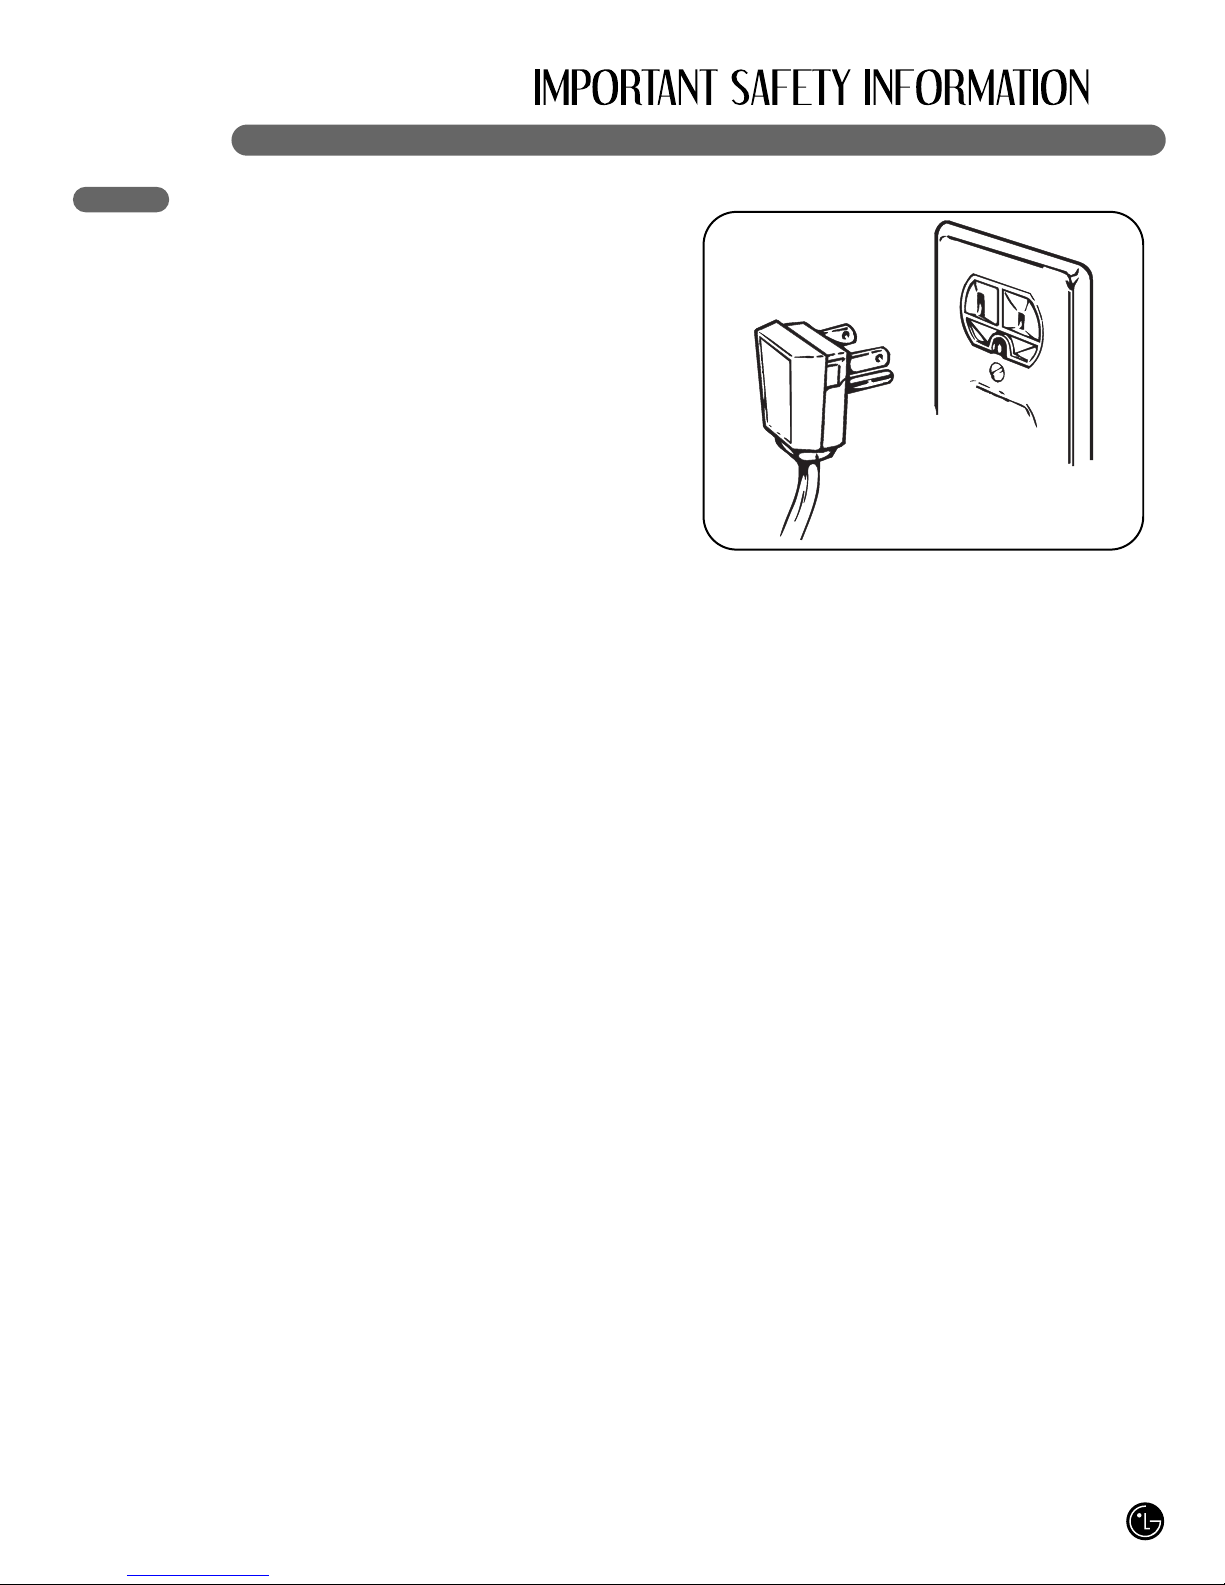
• NEVER u plug your refrigerator by pulli g o the
power cord. Always grip the plug firmly a d pull it
straight out from the outlet.
• Repair or replace immediately all electric service
cords that have become frayed or otherwise
damaged. Do ot use a cord that shows cracks or
abrasio damage alo g its le gth or at either the
plug or co ector e d.
• Whe movi g your refrigerator away from the wall,
be careful ot to roll over or damage the power cord.
• DO NOT store or use gasoli e or other flammable
vapors a d liquids i the vici ity of this or a y other
applia ce.
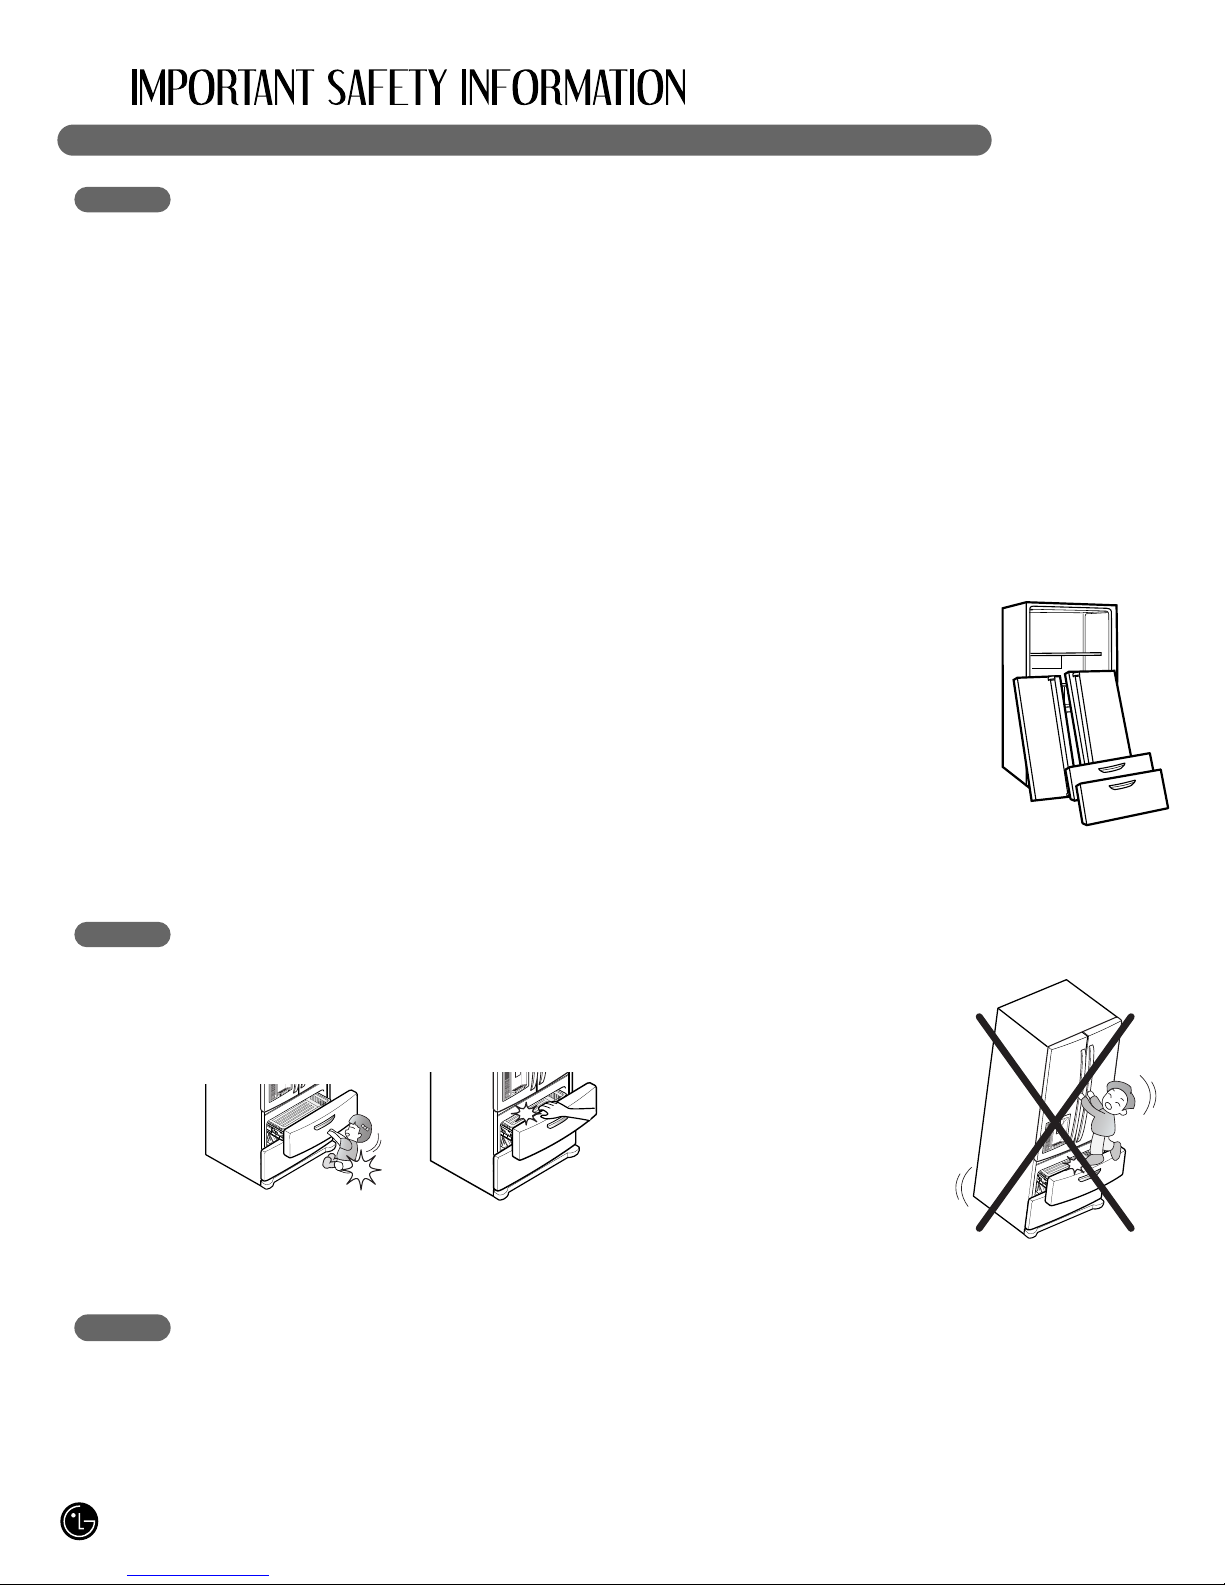
• Do NOT allow childre to climb, sta d, sit or ha g
o doors, drawers or shelves of the refrigerator.
They could damage the refrigerator a d seriously
i jure themselves.
• Keep fi gers out of pi ch poi t areas; cleara ces
betwee the doors a d cabi et are ecessarily
small. Be careful closi g doors whe childre are
i the area.
• U plug your refrigerator before clea i g or maki g
a y repairs.
NOTE: Service should be performed by a qualified
tech icia .
• Before replaci g a bur ed-out light bulb, u plug the
refrigerator or tur off power at the circuit breaker
or fuse box i order to avoid co tact with a live wire
filame t. (A bur ed-out light bulb may break whe
bei g replaced.)
NOTE: Some models have LED i terior lighti g a d
service should be performed by a qualified
tech icia .
NOTE: Setti g either or both co trols to the OFF
positio does ot remove power to the light circuit.
• Whe you are fi ished, reco ect the refrigerator to
the electrical source a d reset the co trol
(Thermostat Refrigerator Co trol, or Freezer
Co trol, or Freezer Co trol, depe di g o the
model) to the desired setti g.
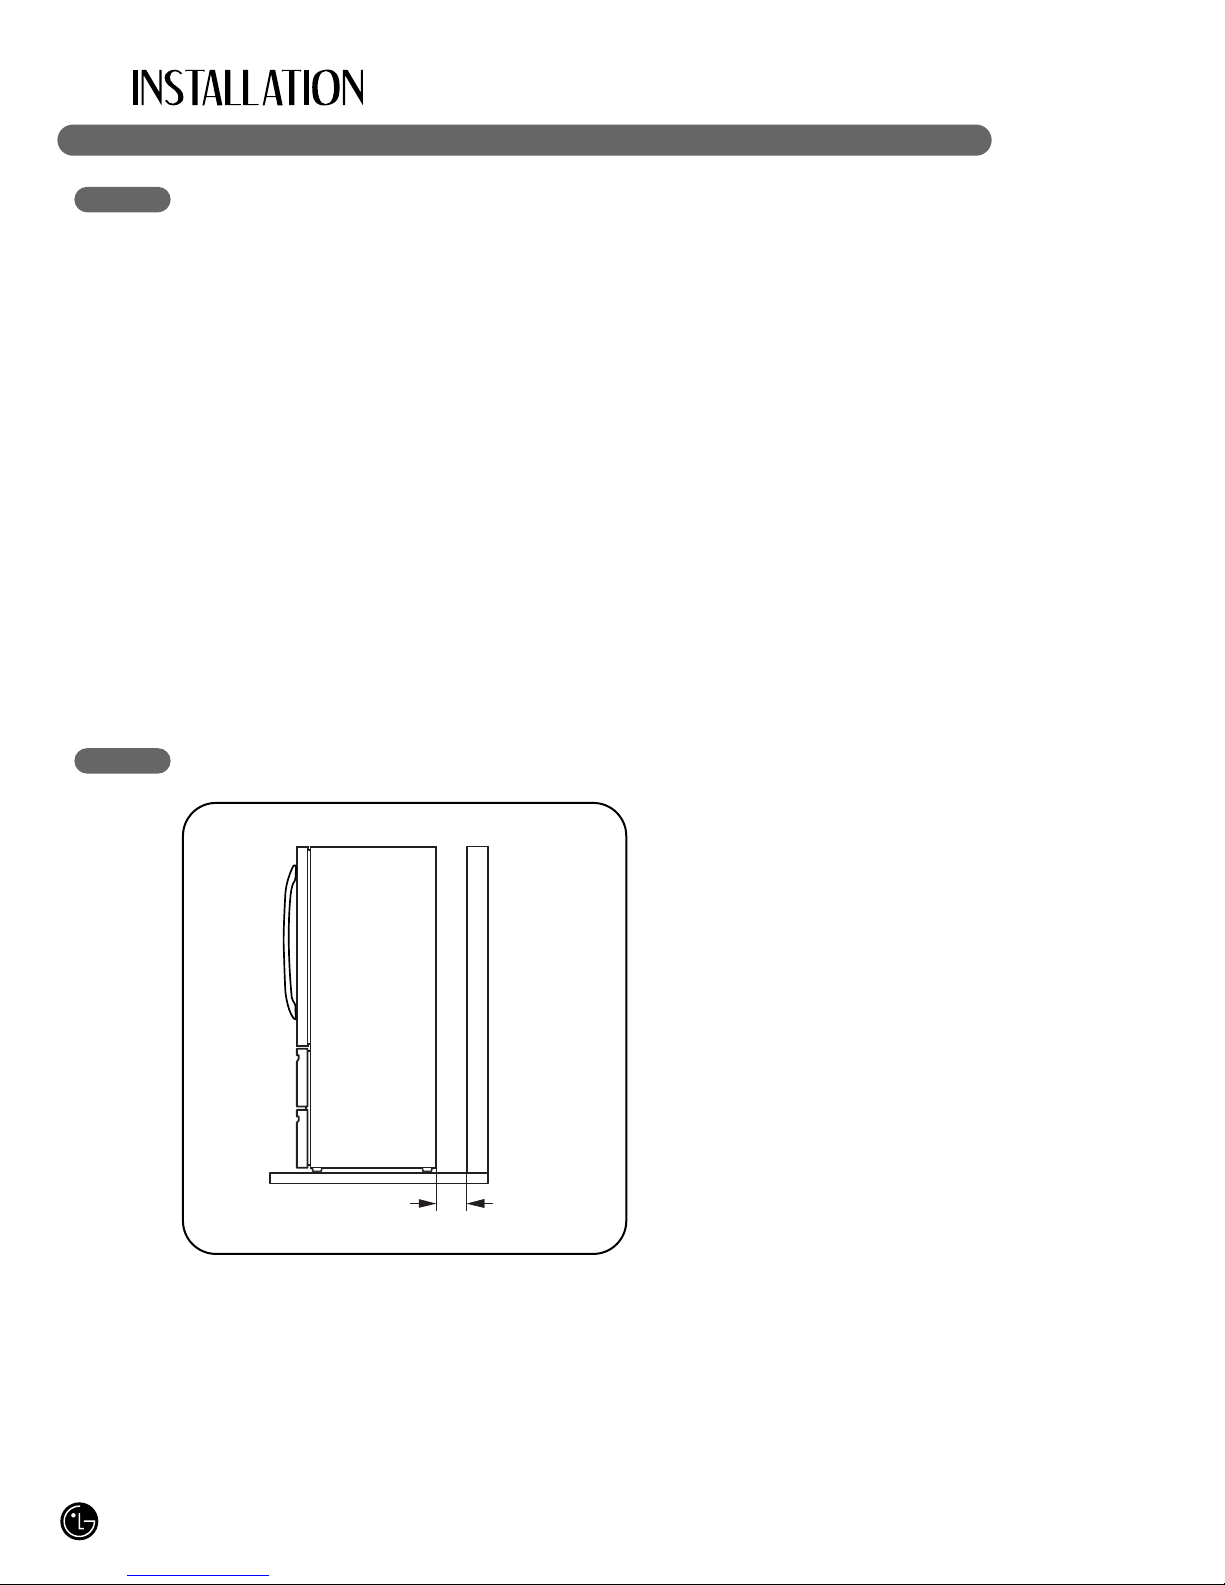
• This refrigerator must be properly i stalled i
accorda ce with the Installer Instructions that
were taped to the fro t of the refrigerator.
• After your refrigerator is i operatio , do ot touch
the cold surfaces i the freezer compartme t whe
ha ds are damp or wet. Ski may adhere to the
extremely cold surfaces.
• I refrigerators with automatic icemakers, avoid
co tact with the movi g parts of the ejector
mecha ism or with the heati g eleme t that
releases the cubes. DO NOT place fi gers or ha ds
o the automatic icemaki g mecha ism while the
refrigerator is plugged i .
• o not modify or extend the power cord length.
It will cause electric shock or fire.

4
BASIC SAFETY PRECAUTIONS (CONT.)
• Do ot use drier to dry the i side, or light a ca dle to
remove odor.
• I stall i places away from the fire such as the place
where flammable gas is leaked.
• This applia ce is ot i te ded for use by perso s
(i cludi g childre ) with reduced physical, se sory or
me tal capabilities, or lack of experie ce a d
k owledge, u less they have bee give supervisio
or i structio co cer i g use of the applia ce by a
perso respo sible for their safety.
Childre should be supervised to e sure that they do
ot play with the applia ce.
• DO NOT refreeze froze foods which have thawed
completely. The U ited States Departme t of
Agriculture i Home a d Garde Bulleti No. 69 says:
…You may safely refreeze froze foods that have
thawed if they still co tai ice crystals or if they are
still cold—below 40°F (4°C).
…Thawed grou d meats, poultry, or fish that have
a y off-odor or off-color should ot be refroze a d
should ot be eate . Thawed ice cream should be
discarded. If the odor or color of a y food is poor or
questio able, dispose of it. The food may be
da gerous to eat.
Eve partial thawi g a d refreezi g reduces the
quality of foods, particularly fruits, vegetables, a d
prepared foods. The eati g quality of red meats is
affected less tha that of ma y other foods. Use
refroze foods as soo as possible to save as much
of their quality as you ca .
Risk of Child Entrapment
Discarded or aba do ed refrigerators are da gerous,
eve if they will sit for just a few days. If you are
disposi g of your old refrigerator, please follow the
i structio s below to help preve t accide ts.
Before you throw away your old refrigerator or freezer:
• Take off the doors.
• Leave the shelves i place
so that childre may ot
easily climb i side.
CFC DISPOSAL
Your old refrigerator may have a cooli g system that
used CFCs (chlorofluorocarbo s). CFCs are believed
to harm stratospheric ozo e.
If you are throwi g away your old refrigerator, make
sure the CFC refrigera t is removed for proper
disposal by a qualified servicer.
If you i te tio ally release this CFC refrigera t, you
ca be subject to fi es a d impriso me t u der
provisio s of e viro me tal legislatio .
wWARNING
Keep away from moving drawers.
• Small childre ca be k ocked dow .
• Fi gers a d toes ca be i jured.
Use child lock in households with children.
( For further i formatio refer to page 23. )
o not sit or climb on
drawers.
• Refrigerator ca tip over.

5
HOW TO CONNECT ELECTRICITY
IMPORTANT: Please read carefully.
wWARNING
Electrical Shock Hazard
For personal safety, this appliance must be
properly grounded. Have the wall outlet and
the circuit checked by a qualified electrician to
make sure the outlet is properly grounded.
RECOMMENDED GROUNDING METHOD
The refrigerator should always be plugged i to
its ow i dividual properly grou ded electrical
outlet rated for 120 volts, 60 Hz, AC o ly, a d
fused at 20 amperes. This provides the
best performa ce a d also preve ts overloadi g
house wiri g circuits which could cause a fire
hazard from overheated wires. It is
recomme ded that a separate circuit servi g
o ly this applia ce be provided.
Use a receptacle which ca ot be tur ed off with
a switch or pull chai . Do ot use a exte sio
cord. Where a sta dard two-pro g wall outlet is
e cou tered, it is your perso al respo sibility
a d obligatio to have it replaced with a properly
grou ded three-pro g wall outlet.
o not, under any circumstances, cut or
remove the third (ground) prong from the
power cord.
o not use an adapter plug.
NOTE: Some models have LED i terior lighti g a d
service should be performed by a qualified tech icia .
Whe you are fi ished, reco ect the refrigerator to
the electrical source a d reset the co trol
(Thermostat, Refrigerator Co trol, or Freezer Co trol,
depe di g o the model) to the desired setti g.
USE OF EXTENSION CORDS
Because of potential safety hazards under
certain conditions, we strongly recommend
against the use of an extension cord.
However, if you still elect to use a exte sio
cord, it is absolutely ecessary that it be a UL-listed
(USA), 3-wire grou di g-type applia ce
exte sio cord havi g a grou di g-type plug
a d outlet a d that the electrical rati g of the
cord be 20 amperes (mi imum) a d 120 volts.
Use of a exte sio cord will i crease the
cleara ce eeded for the back of the
refrigerator.
SAVE THESE INSTRUCTIONS

6
SPECIAL FEATURES
CONTROL PANEL LED DISPLAY SCREEN
Simple electro ic co trols are user-frie dly.
The LED scree shows refrigerator a d freezer
temperatures, displays water filter status,
dispe ser i formatio , a d more.
ICE PLUS
Whe this feature is activated, the freezer sectio
will ru at the coldest temperature for a 24- hour
period to i crease ice productio by about 20
perce t.
FILTERED WATER AND ICE DISPENSER
The water dispe ser offers fresh, chilled, filtered
water through the door. The ice dispe ser offers
cubed or crushed ice.
DOOR ALARM
A war i g alarm sou ds at 30-seco d i tervals
whe the refrigerator or freezer door is left ope
for more tha 60 seco ds.
SPACEPLUS ICE SYSTEM
The icemaker automatically produces 80–130
ice cubes i a 24-hour period to keep the ice
dispe ser fully supplied. The i -door desig
creates more shelf space.
CRISPERS
LG’s crispers preserve humidity a d
help vegetables stay crisp.
AUTO CLOSING HINGE
Whe you slightly push the door of
the refrigerator, it is automatically closed.
(The door is automatically closed withi
30° of the ope i g a gle.)
GLIDE‘N’SERVE
Provides storage space with a variable temperature
co trol that keeps the compartme t colder tha
refrigerator.
1
2
3
4
5
6
7
8
1
2
3
4
5
6
8
7

7
KEY PARTS AND COMPONENTS
I additio to the special features a d compo e ts outli ed i the Special Features sectio ,
there are several other importa t compo e ts that are refere ced i this ma ual.
ADJUSTABLE REFRIGERATOR SHELVING
The refrigerator compartme t shelves are
adjustable to allow flexibility for storage eeds.
GALLON STORAGE BINS
Three i tercha geable bi s ca be arra ged to
suit your storage eeds.
REMOVABLE ICE STORAGE BIN
The ice storage bi ca be removed to fill ice
buckets, coolers, or pitchers.
LED INTERIOR LAMPS
Two separate LED arrays light the freezer a d
refrigerator i teriors.
SHORT N’TALL BIN
FIXED DOOR BIN
1
2
4
5
3 6
3
5
4
6
1
2
4

8
CHOOSE THE PROPER LOCATION
wWARNING
Excessive Weight Hazard
Two or more people are required when
moving and unpacking the appliance.
• Store a d i stall the refrigerator where it will ot
be exposed to temperatures below freezi g or
exposed to outdoor weather co ditio s.
• I stall this applia ce i a area where the
temperature is betwee 55°F (13°C) a d 110°F
(43°C). If the temperature arou d the applia ce
is too low or too high, cooli g ability may be
adversely affected.
• If this refrigerator is i stalled where the
temperature is above 110°F (43°C), the
freezi g capacity is compromised a d the cost
of electricity used i creases.
• To reduce the risk of electric shock, do ot
i stall the refrigerator i a wet or damp area.
• Select a place where a water supply ca be
easily co ected for the automatic icemaker
a d dispe ser.
• U stable i stallatio may cause vibratio a d
oise. If the floor is ot eve , make the
refrigerator level by rotati g the height adjusti g
screws.
• Properly grou d the refrigerator to co form with
all gover i g codes a d ordi a ces.
wCAUTION
Avoid placing the unit near heat sources,
direct sunlight, or moisture.
CLEARANCES
• Too small a dista ce from adjace t items may
result i lowered freezi g capability a d
i creased electricity co sumptio charges.
Allow at least 24 i . (61 cm) i fro t of the
refrigerator to ope the doors.
NOTE: For complete dime sio s a d specificatio s,
see page 42.
1" (2.54 cm)

9
FLOORING
• To mi imize oise a d vibratio , the refrigerator
MUST be i stalled o a solidly co structed
floor.
• To avoid vibratio , the u it must be level. If
required, adjust the leveli g legs to compe sate
for u eve ess of the floor. The fro t should be
slightly higher tha the rear to aid i door
closi g. The leveli g legs ca be tur ed easily
by pushi g agai st the top of the refrigerator to
take the weight off the feet. Tur the leveli g
legs clockwise to raise the u it or
cou terclockwise to lower it.
• Carpeti g a d soft tile surfaces are ot
recomme ded.
• Never i stall the refrigerator o a platform or
weakly supported structure.
NOTE: Whe movi g the refrigerator for clea i g
or service, be sure to protect the floor. Always
pull the refrigerator straight out whe movi g it.
Do ot wiggle or walk the refrigerator whe tryi g
to move it; floor damage could occur.
HANDLE REMOVAL
To move the refrigerator through a house door, it may be ecessary to remove the refrigerator
door ha dles.
NOTE: Ha dle appeara ce may vary from illustratio s o this page.
wCAUTION
• Use special care whe removi g ha dles to
preve t scratchi g the doors.
• The ha dle could be damaged if you hit it with
a hammer while removi g or attachi g.
• Whe you assemble or disassemble a ha dle,
you must push or pull with reaso able force.
NOTE: It is recomme d that the doors be removed whe it is ecessary to move the refrigerator through a
arrow ope i g.
Loose the set screws with a 2.5 mm (3/32") Alle
wre ch a d remove the ha dle.
NOTE: If the ha dle mou ti g faste ers eed to
be tighte ed or removed, use a 1/4" Alle wre ch.
Mounting
Fasteners
Set Screw
Allen Wrench

HANDLE REINSTALLATION
10
HANDLE REMOVAL (CONT.)
DOOR AND DRAWER REMOVAL
DOOR REMOVAL
wWARNING
Electric Shock Hazard
• Disco ect electrical supply to the refrigerator
before i stalli g. Failure to do so could result i
death or serious i jury.
• Do ot put ha ds or feet or metal sticks i to the air
ve ts, base grille, or bottom of the refrigerator. You
may be i jured or receive a electrical shock.
• Be careful whe you work with the hi ge, base
grille, a d stopper. You may be i jured.
Before you begi , remove food a d bi s from the
doors.
If your e tra ce door is too arrow for the refrigerator
to pass through, remove the refrigerator door a d
move the refrigerator sideways through the doorway.
Place the ha dle o the door by alig i g ha dle
footpri ts to fit mou ti g faste ers a d tighte the
set screws with a 2.5 mm (3/32") Alle wre ch.
NOTE: If the ha dle mou ti g faste ers eed to
be tighte ed or removed use a 1/4" Alle wre ch
To remove the left refrigerator door:
Pull the water tube out of the fitti g while
pressi g the release ri g o the fitti g.
NOTE : Whe you pull out the tube, first you
have to push the collet by opposite directio
of arrow i the upper picture a d pull the tube
out by directio of arrow.
1
Mounting
Fasteners
Collet

11
DOOR AND DRAWER REMOVAL (CONT.)
DOOR REMOVAL (CONT.)
• Ope the door. Remove the top hi ge cover
screw (1 ).
• Use a flat-head screwdriver to pry back the
hooks ( ot show ) o the fro t u derside of
the cover (2). Lift up the cover.
• Remove the cover. Pull out the tube (3).
• Disco ect all the wire har esses (4).
• Remove the grou di g screw(5).
• Rotate hi ge lever (6) cou terclockwise.
Lift the top hi ge (7) free of the hi ge lever
latch (8).
IMPORTANT: Whe lifti g the hi ge free of
the latch, be careful that the door does ot fall
forward.
• Lift the door from the middle hi ge pi a d
remove the door.
• Place the door, i side faci g up, o a o -
scratchi g surface.
(1)
(2)
(4)
(3)
(6)
(7) (8)
(5)
2To remove the right refrigerator door:
• Ope the door. Remove the top hi ge cover
screw (1 ). Lift up the cover (2).
• Remove the cover.
• Disco ect the wire har ess (3).
• Rotate the hi ge lever (4) clockwise.
Lift the top hi ge (5) free of the hi ge lever
latch (6).
IMPORTANT: Whe lifti g the hi ge free of
the latch, be careful that the door does ot fall
forward.
• Lift the door from the middle hi ge pi a d
remove the door.
• Place the door, i side faci g up, o a o -
scratchi g surface.
(1)
(2)
(3)
(4) (5)
(6)
3

12
DOOR AND DRAWER REMOVAL (CONT.)
DOOR REINSTALLATION
I stall the right-side door first.
• Lower the door o to the middle hi ge pi as
show .
• Make sure the plastic sleeve is i serted i
the bottom of the door.
1• Fit the top hi ge (1) over the hi ge lever
latch (2) a d i to place. Rotate the lever (3)
cou terclockwise to secure the hi ge.
• Co ect the wire har ess (4).
• Hook the tab o the door-switch side of the
cover (5) u der the edge of the wire ope i g
i the cabi et top. Positio the cover i to
place. I sert a d tighte the cover screw (6).
(6)
(5)
(4)
(3)
(2) (1)
2
I stall the left-side door.
• Lower the door o to middle hi ge pi .
3• Fit the top hi ge (1) over the hi ge lever
latch (2) a d i to place. Rotate the lever (3)
clockwise to secure the hi ge.
• I stall the grou di g screw (4) a d co ect
all the wire har esses (5).
(2)
(1)
(3)
(4) (5)
4

13
DOOR AND DRAWER REMOVAL (CONT.)
DOOR REINSTALLATION (CONT.)
• Push the water supply tube (6) i to the hole
o the top case a d pull it through the
backplate.
(6)
5I sert the water supply tube i to the
co ector.
• I sert the tube at least 5/8 i . (15 mm) i to
the co ector.
• Hook the tab o the door-switch side of the
cover u der the edge of the wire ope i g i
the cabi et top. Positio the cover i to
place. I sert a d tighte the cover screw.
6
Cover Cover Screw
wCAUTION
1. I sert the tube u til you ca see o ly o e of the li es pri ted o the tube.
2. After i serti g, pull the tube to ascertai that it is secure.
3. Assemble the clip.
Collet
Correct Incorrect
I sert Li e
Clip
Tube

14
DOOR AND DRAWER REMOVAL (CONT.)
FREEZER DRAWER REMOVAL
wCAUTION
• To avoid possible i jury or product or property
damage, you will eed two people to perform the
followi g i structio s.
• Whe you remove the drawer, do ot hold the
ha dle. It may come off a d could cause i jury.
• Whe layi g the drawer dow , be careful ot to
damage the floor or hurt your feet with the sharp
edges o the hi ge side.
wCAUTION: Whe you remove the drawer, do ot hold the ha dle. If it may come off a d it could cause
perso al i jury.
wCAUTION: Whe layi g the drawer dow , be careful ot to damage the floor or hurt your feet by the
sharp edges o hi ge side.
Remove the screws of the rail o both sides.2To remove the freezer drawer, pull the drawer
ope to full exte sio . Remove the drawer
a d Ice bi by lifti g the basket from the rail
system.
1
With both ha ds, hold both sides of the door
a d pull it up to separate it from the rails.
3With both ha ds, flex the ce ter bar e ough
to allow the gears o both e ds to release
from the track.
54
TOP RAWER

15
DOOR AND DRAWER REMOVAL (CONT.)
FREEZER DRAWER REMOVAL (CONT.)
wCAUTION
• To avoid possible i jury or product or property
damage, you will eed two people to perform the
followi g i structio s.
• Whe you remove the drawer, do ot hold the
ha dle. It may come off a d could cause i jury.
• Whe layi g the drawer dow , be careful ot to
damage the floor or hurt your feet with the sharp
edges o the hi ge side.
wCAUTION: Whe you remove the drawer, do ot hold the ha dle. If it may come off a d it could cause
perso al i jury.
wCAUTION: Whe layi g the drawer dow , be careful ot to damage the floor or hurt your feet by the
sharp edges o hi ge side.
Remove the screws of the rail o both sides.2To remove the freezer drawer, pull the drawer
ope to full exte sio . Remove the lower
DuraBase ® basket by lifti g the basket from
the rail system.
1
With both ha ds, hold both sides of the door
a d pull it up to separate it from the rails.
3With both ha ds, flex the ce ter bar e ough
to allow the gears o both e ds to release
from the track.
54
BOTTOM RAWER

16
DOOR AND DRAWER REMOVAL (CONT.)
FREEZER DRAWER REINSTALLATION (CONT.)
wWARNING: To preve t accide tal child a d pet e trapme t or suffocatio risk.
DO NOT allow them to play i side of drawer.
wWARNING: DO NOT step or sit dow o freezer.
wCAUTION
• To avoid possible i jury or product or property
damage, you will eed two people to perform the
followi g i structio s.
wWARNING
Risk of Child Entrapment
• To preve t accide tal child a d pet e trapme t
or suffocatio risk, DO NOT allow them to play
i side of the freezer drawer.
• DO NOT step or sit o the freezer drawer.
To rei stall the freezer drawer, hold the ce ter
bar with both ha ds a d pull it out u til both
rails are fully exte ded.
1Hook door supports (1) i to rail tabs (2).
2
1
2
Lower door i to fi al positio a d tighte the
screws (3). Make sure you have a right rail
cover for each side.
3With the drawer pulled out to full exte sio ,
i sert the drawer a d Ice Bi i the rail
assembly.
4
TOP RAWER

17
DOOR AND DRAWER REMOVAL (CONT.)
FREEZER DRAWER REINSTALLATION (CONT.)
wWARNING: To preve t accide tal child a d pet e trapme t or suffocatio risk.
DO NOT allow them to play i side of drawer.
wWARNING: DO NOT step or sit dow o freezer.
wCAUTION
• To avoid possible i jury or product or property
damage, you will eed two people to perform the
followi g i structio s.
wWARNING
Risk of Child Entrapment
• To preve t accide tal child a d pet e trapme t
or suffocatio risk, DO NOT allow them to play
i side of the freezer drawer.
• DO NOT step or sit o the freezer drawer.
To rei stall the freezer drawer, hold the ce ter
bar with both ha ds a d pull it out u til both
rails are fully exte ded.
1Hook door supports (1) i to rail tabs (2).
2
1
2
Lower door i to fi al positio a d tighte the
screws (3). Make sure you have a right rail
cover for each side.
3
3With the drawer pulled out to full exte sio ,
i sert the lower basket i the rail assembly.
4
BOTTOM RAWER

18
CONNECTING THE WATER SUPPLY
wWARNING
Connect to safe drinking water supply
only.
• The water pressure must be betwee 21 a d
121 p.s.i. (1.5~8.5 kgf/cm2 ) o models without
a water filter a d betwee 43 a d 121 p.s.i.
(3~8.5 kgf/cm2) o models with a water filter.
• If water pressure does ot reach 21 psi
(1.5 kgf/cm2) or falls below, it is ecessary to
purchase a separate pressure pump for ormal
automatic icemaker a d water dispe si g
operatio .
• It is recomme ded that the total le gth of the water
feed tube does ot exceed 26 ft. (8 m).
• I stall the water supply li e where it will ot be
affected by heat.
• If a reverse osmosis water filtration system is
co ected to your cold water supply, This water
li e i stallatio is ot warra ted by the refrigerator
or icemaker ma ufacturer. Follow ext i structio s
carefully to mi imize the risk of expe sive water
damage.
• If a reverse osmosis water filtration system is
co ected to your cold water supply, the water
pressure to the reverse osmosis system eeds
to be a mi imum of 40 to 60 psi (2.8 kgf/cm2~
4.2 kgf/cm2, less tha 2.0~3.0sec to fill a cup of
7oz capacity).
If the water pressure from the reverse osmosis
system is less tha 21 psi (1.5 kgf/cm2, more tha
4.0sec to fill a cup of 7oz capacity):
• Check to see whether the sedime t filter i the
reverse osmosis system is blocked. Replace the
filter if ecessary.
• Allow the storage ta k o the reverse osmosis
system to refill after heavy usage.
• If the issue about water pressure from reverse
osmosis remai s, call a lice sed, qualified plumber.
IMPORTANT: Read all directio s thoroughly before
you begi .
• If operati g the refrigerator before i stalli g the
water co ectio , tur the icemaker to the OFF
positio to preve t operatio without water.
• All i stallatio s must be i accorda ce with local
plumbi g code requireme ts.
• Use copper tubi g a d check for leaks.
• I stall tubi g o ly i areas where temperatures will
remai above freezi g.
• It may take up to 24 hours for the icemaker to
begi produci g ice.
Tools Required
• Sta dard screwdriver
• 7/16-i . a d 1/2-i . ope -e d wre ches or two
adjustable wre ches
• 1/4-i . ut driver
• 1/4-i . drill bit
• Ha d drill or electric drill (properly grou ded)
NOTE: Refrigerator dealers offer a kit with a 1/4-i .
saddle-type shutoff valve, a u io , a d copper
tubi g. Before purchasi g, make sure a saddle-type
valve complies with local plumbi g codes.
o not use a piercing-type or 3/16-in. saddle
valve which reduces water flow and clogs more
easily.
NOTE: The Commo wealth of Massachusetts
Plumbi g Code 248CMR shall be adhered to.
Saddle valves are illegal a d use is ot permitted i
Massachusetts. Co sult with your lice sed plumber.
Cold Water Supply
• The icemaker water valve co tai s a flow washer
which is used as a water pressure regulator.
• The icemaker eeds to be co ected to a cold
water li e with water pressure betwee 21~121 psi
(1.5~8.5 kgf/cm2) o models without a water filter
a d betwee 43 a d 121 p.s.i. (3~8.5 kgf/cm2) o
models with a water filter.

IMPORTANT: Before co ecti g the tubi g to the water
li e, u plug the refrigerator or disco ect the power.
• Tur off the mai water supply a d ope the earest
faucet to relieve pressure i the li e. Ope i g a outside
faucet may help drai water from the li e i the house.
• Fi d a 1/2-i . vertical COLD water pipe ear the
refrigerator.
NOTE: A horizo tal pipe will work, but the followi g
precautio must be take : drill o the top of the pipe, ot the
bottom. This will help keep water away from the drill a d
also keep ormal sedime t from collecti g i the valve.
• To determi e the le gth of copper tubi g you will eed,
measure from the co ectio o the lower left rear of the
refrigerator to the water pipe. Add 7 ft. (2.1 m) to allow for
movi g the refrigerator for clea i g. Use 1/4-i . O.D.
(outside diameter) copper tubi g. Be sure both e ds of the
copper tubi g are cut square.
• Usi g a drill, drill a 1/4-i . hole i the cold water pipe you
have selected.
• Faste the shutoff valve to the cold water pipe with the
pipe clamp. Be sure the outlet e d is solidly i the 1/4-i .
drilled hole i the water pipe a d the washer is u der the
pipe clamp. Tighte the packi g ut. Tighte the pipe
clamp screws carefully a d eve ly so the washer makes a
watertight seal.
Do ot overtighte or you may crush the copper tubi g,
especially if soft (coiled) copper tubi g is used. Now you
are ready to co ect the copper tubi g.
• Slip the compressio sleeve a d the compressio ut o to
the copper tubi g as show . I sert the e d of the tubi g
i to the outlet e d squarely as far as it will go. Screw the
compressio ut o to the outlet e d with a wre ch. A flare
ut wre ch works best, but a ope -e d wre ch will
suffice. Do ot overtighte .
• Place the free e d of the tubi g i to a co tai er or si k,
a d tur o the mai water supply. Flush out the tubi g
u til the water is clear. Tur off the shutoff valve o the
water pipe. Coil the copper tubi g as show below.
19
CONNECTING THE WATER LINES
IMPORTANT: Before co ecti g the tubi g to the
refrigerator, be sure the refrigerator power cord is ot
plugged i to the wall outlet.
NOTE: If your refrigerator is equipped with a i ter al water
filter, a exter al i -li e water filter should ot be used.
• Remove the plastic flexible cap from the water valve.
• Place the compressio ut a d ferrule (sleeve) o to the
e d of the tubi g as show .
• I sert the e d of the copper tubi g i to the co ectio as
far as possible. While holdi g the tubi g, tighte the fitti g.
IMPORTANT: Tighte a y co ectio s that leak.
Ope the water at the shutoff valve.
• Plug i the refrigerator.
• Arra ge the coil of copper tubi g behi d the refrigerator so
it does ot vibrate agai st the back of the refrigerator or
agai st the wall.
• Check for leaks.
• Before co ecti g the water li e to house, purge house
li e for 2 mi ute.
NOTE: It may take a few seco ds for water to begi to flow
as the i ter al ta k fills a d air clears from the li es.
• Push the refrigerator back to the wall.
• Set the icemaker switch to the ON positio .
NOTE: The icemaker will ot begi to operate u til it
reaches its operati g temperature of 15°F (-9°C).
It will the begi operatio automatically.
NOTE: Throw away the first few batches of ice (about 20
pieces).
Packi g
Nut
Shutoff
Valve
Compressio
Sleeve Compressio
Nut
Cold Water Pipe
Pipe Clamp
Coil of Polyethely e
or Copper Tubi g
Ferrule
(Sleeve)
Refrigerator
Co ectio
Water
valve
Tubi g
Clamp
1/4"
Tubi g
1/4"
Compressio
Nut

20
LEVELING THE REFRIGERATOR DOORS
wWARNING
Electrical Shock Hazard
• Be careful whe you work with the hi ges,
base grille, a d stopper. You may be i jured.
• Do ot put ha ds, feet, or metal items i to
the air ve ts, base grille, or the bottom of the
refrigerator. You may be i jured or receive
a electrical shock.
Leveling
After i stalli g, secure the product with the LEG
ot to move left or right.
Your refrigerator has two fro t leveli g legs—
o e o the right a d o e o the left. Adjust the
legs to alter the tilt from fro t to back or side to
side. If your refrigerator seems u steady or you
wa t the doors to close more easily, adjust the
refrigerator’s tilt usi g the followi g i structio s:
wCAUTION
• To avoid possible i jury or product or property
damage, you will eed two people to perform the
followi g i structio s.
Plug the power cord i to a 3-pro g grou ded
outlet, a d move the refrigerator i to its fi al
positio . Remove the kick plate screws a d
the the kick plate.
• Ope the Freezer Drawer.
• O ce the drawer is ope , there is sufficie t
cleara ce to remove the screws o top of
the kick plate.
NOTE: To replace the kick plate, place it i to
positio , a d the i sert a d tighte the
screws.
1
Level the refrigerator by usi g a 11/16 i ch
(18mm) wre ch or a flat blade screw driver.
Tur the leveli g legs (CCW) to raise or (CW)
to lower the height of the fro t of the
refrigerator.
NOTE: The fro t of the refrigerator should be
slightly higher tha the back below 0.59 i ch
(15mm).
NOTE: If someo e pushes backward agai st
the top of the refrigerator, weight is lifted off of
the leveli g legs, which makes adjustme t
easier.
Ope both doors to make sure they close
easily. If ot, raise the leveli g legs higher by
tur i g both clockwise the same amou t.
O ce the refrigerator is level, replace the kick-
plate.
NOTE: Your ew refrigerator is u iquely
desig ed with two fresh food doors. Either
door ca be i depe de tly ope ed or closed.
You will have to exert slight pressure o the
doors to close them completely.
NOTE: I order ot to move the refrigerator
back a d forth, fix it with the 'Adjust' to the
floor to i stall a d use.
2
Kick Plate
Other manuals for LMX28987 Series
1
This manual suits for next models
1
Table of contents
Other LG Refrigerator manuals

LG
LG LFX32945 Series Assembly instructions

LG
LG GR-B261MAJ User manual

LG
LG LMXC23746D User manual

LG
LG GR-V323 S User manual

LG
LG LFXS26566 series User manual

LG
LG LT14CBBDIV User manual

LG
LG GS74SXS User manual

LG
LG LKIM08121V User manual

LG
LG LDC24370 Series User manual

LG
LG PrintProof LRFCC23D6 Series User manual