manuals.online logo
Brands
  1. Home
  2. •
  3. Brands
  4. •
  5. LG
  6. •
  7. Refrigerator
  8. •
  9. LG LRSPC2331NI User manual

LG LRSPC2331NI User manual

This manual suits for next models

2

Other LG Refrigerator manuals

LG LFCS27596S User manual

LG

LG LFCS27596S User manual

LG GLC8839SC User manual

LG

LG GLC8839SC User manual

LG LFX21976ST User manual

LG

LG LFX21976ST User manual

LG LFX21975ST03 Instruction Manual

LG

LG LFX21975ST03 Instruction Manual

LG GR-M752GSH User manual

LG

LG GR-M752GSH User manual

LG GC-F411ELDM User manual

LG

LG GC-F411ELDM User manual

LG LFXS26973 series User manual

LG

LG LFXS26973 series User manual

LG LBNC15231V.APZCNA0 User manual

LG

LG LBNC15231V.APZCNA0 User manual

LG LFXS29626 User manual

LG

LG LFXS29626 User manual

LG LFX28979 SERIES User manual

LG

LG LFX28979 SERIES User manual

LG LT12CBB Series User manual

LG

LG LT12CBB Series User manual

LG LSFD2491ST User manual

LG

LG LSFD2491ST User manual

LG LFX31925SB User manual

LG

LG LFX31925SB User manual

LG LSXC22396 Series User manual

LG

LG LSXC22396 Series User manual

LG LRSC 26980TT User manual

LG

LG LRSC 26980TT User manual

LG GN-B492GGCH User manual

LG

LG GN-B492GGCH User manual

LG GL-478YSX4 User manual

LG

LG GL-478YSX4 User manual

LG GCB369BVQA User manual

LG

LG GCB369BVQA User manual

LG LFC20760SB User manual

LG

LG LFC20760SB User manual

LG LMX21981ST - 20.5 cu. ft User manual

LG

LG LMX21981ST - 20.5 cu. ft User manual

LG GF-B700PL User manual

LG

LG GF-B700PL User manual

LG LFX31915ST User manual

LG

LG LFX31915ST User manual

LG GM-B258R4S User manual

LG

LG GM-B258R4S User manual

LG MFL37893537 User manual

LG

LG MFL37893537 User manual

Popular Refrigerator manuals by other brands

Frigidaire FRS26TS7DW2 Use & care manual

Frigidaire

Frigidaire FRS26TS7DW2 Use & care manual

Fisher Scientific 10ECEEFSA manual

Fisher Scientific

Fisher Scientific 10ECEEFSA manual

Summit FF22BDRSS user manual

Summit

Summit FF22BDRSS user manual

Frigidaire FFRU17B2QWE use & care

Frigidaire

Frigidaire FFRU17B2QWE use & care

Hotpoint ENBGH 19xxx FW operating instructions

Hotpoint

Hotpoint ENBGH 19xxx FW operating instructions

Hitachi R-SG28KPH instruction manual

Hitachi

Hitachi R-SG28KPH instruction manual

Dometic RMH 7390 L operating instructions

Dometic

Dometic RMH 7390 L operating instructions

AEG S71700TSW0 user manual

AEG

AEG S71700TSW0 user manual

Electrolux ENB3669 Instruction book

Electrolux

Electrolux ENB3669 Instruction book

Electrolux ERN 2930 Instruction book

Electrolux

Electrolux ERN 2930 Instruction book

Beko GNE 60520 X user manual

Beko

Beko GNE 60520 X user manual

Jenn-Air JUR248LBES00 Use & care guide

Jenn-Air

Jenn-Air JUR248LBES00 Use & care guide

Dometic RGE 4000 Installation and operating manual

Dometic

Dometic RGE 4000 Installation and operating manual

Dometic L-0191B Brochure & specs

Dometic

Dometic L-0191B Brochure & specs

Daewoo RN-33 Series user manual

Daewoo

Daewoo RN-33 Series user manual

Haier RF-8888-174 Service manual

Haier

Haier RF-8888-174 Service manual

Blaupunkt 5CK2 Series user manual

Blaupunkt

Blaupunkt 5CK2 Series user manual

Beko B5RCNE366HG user manual

Beko

Beko B5RCNE366HG user manual

manuals.online logo
manuals.online logoBrands
  • About & Mission
  • Contact us
  • Privacy Policy
  • Terms and Conditions

Copyright 2025 Manuals.Online. All Rights Reserved.

PARTS IDENTIFICATION
3. Ref No. : GR-L247ER, GR-L207ER
Frame Displa
I¢
Dispenser Button
Cover Hinge Cover PWB
"\
I'-'=
Water Tube
Freezer Refrigerator
Compartment Compartment
Shelf
ice maker
Lam (optional)
I Box
Shelf.
(Steel,
T/Glass)
Drawer -
or Shelf
(optional)
Guide bottle
Shelf
Door rack
LowerCover Conversion Switch
(MeatsNegetables) Humidity Switch
drawer/Meat drawer
-14-
HOW TO INSTALL REFRIGERATOR
!. How to Adjust Door Height of Refrigerator
• Make the refrigerator level first. (If the refrigerator isnot installed onthe flatfloor, the height of freezer and refrigerator
door may not be the same.)
1. If the height of freezer dOOr is lower than that of
refrigerator compartment : 2. If the height of freezer door is higher than that of
refrigerator compartment :
Insert addver _ into the groove _ of adjusting screw
and rotate driver in arrow direction (clockwise) until the
refrigerator becomes horizontal.
Insert adriver _into the groove _ of adjusting screw
and rotate driver in arrow direction (clockwise) until the
refrigerator becomes horizontal.
-18-
HOW TO INSTALL REFRIGERATOR
2. How to Install Water Pipe
•Before Installation
1. The icemaker requires the water pressure of 1.5 -
8.5kgf/cm 2. (It is acceptable if city water fills a cup of
180cc with water for 3 seconds)
2. Install booster pump where the city water pressure is
below 1.5kgf/cm2 for normal operation of water and ice
dispenser.
3. The total length of water pipe shall be less than 12m. Do
not bend the pipe at right angle. If the length is more
than 12m, there will be troubles on water sepply due to
water pressure drop.
4. Please install water pipe where there is no heat around.
2-1. When connecting directly to the water tap.
•Please confirm the following installation parts.
Valve Feed Rubber, Packing Connector. Pipe
(_ Co_nnector, Pipe Tape, Teflon
Class.
Conve-
rtible
iWater
Valve
Water
Conn-
ector
Shape and Spec.
Connector, (MECH) Pipe
Nomenclature
Valve Feed
PINe Remarks
5221JA3001A Common Use
NoHoles
4932JA3003A
6631JA3004A
6631JA3004B
3920JA3001B
6631JA3004C No Holes
6631JA3004D
3920JA3001A
4932JA3003C
6631JA3004E No Holes
6631JA3004F
3920JA3001C
No Holes
Connector,(MECH)Pipe
ConversionConnector(3/4")
BalanceCon_%lor(3/4")
Packing(e24x3t)
4932JA3003B
ConversionConnectorON25)
BalanceConectoor(W25)
Packing(o23x3t)
Connector,(MECH)Pipe
ConversionConnector(W28)
BalanceConector(W28)
Pesking(o26x3t)
Connector,(MECH)Pipe
conversion Connector(l/2")
BalanceConector(1/Z')
Pesking(e19x3t)
4932JA3003D
6631JA3004G
6631JA3004H
3920JA3001D
-19-
HOW TO INSTALL REFRIGERATOR
1. Connection of Pipe Connector A and B.
1) Turn off main valve of water pipe.
2) Disconnect water lap from piping by loosening nuts.
3) Connect pipe connector Aand B to piping after sealing
the pipe connector with sealing tapes.
4) Connect feed valve to pipe connector A.
5) If there is only one tap water pipe, connect pipe
connector Aonly and install feed pipe.
Caution : • Feed pipe should be connected to cold water
line. If it is connected to hot water line, trouble
may occur.
•Please check rubber packing when connecting
feed pipe.
Pipe Connector B Feed
\A
How to wind
Sealing Tapes.
Single Lever Type Faucet
(general)
Two Hands Type Faucet
Feed
Valve
General Type
Single Lever Type Faucet (one
hole, tech type and hand spray)
Feed
Valve
2. Water Supply
1) After the installation of feed water, plug the refrigerator
to the earthered wall outlet, press the water dispenser
button for 2 -3 minutes, and confirm that the water
comes out.
2) Check leakage at connecting part, then arrange water
tube and locate the refhgerater at its regular place if
there is no leaking.
WaterTube
-- Water Tube
- 20 -
HOW TO INSTALL REFRIGERATOR
3, When customer uses bottled water,
*If customer wants to use bottled water, extra pump should be installed as shown below.
1. The pump system should not be on the floor (it may cause noise and vibration). Securety fasten the inlet and outlet
nuts of pump.
2. If there is any leakage alter installation, cut the water tube at right angle and reassemble.
3. When put the water tube end into the bottle, leave a clearance between bottle bottom and water tube end.
4 Check water coming out and any leakage.
Caution : • If feed tube is more than 4m, less water will come out due to pressure drops.
•Use standard feed tube to prevent leaking.
f" N
• Outternal Filter
t. Filter Fixation
1) Connect feed tube to the filter outlet and water valve connecting tube,
2) Fix the filter at proper place around the sink where it is easy to replace the filter and to receive the cleaning water,
Please consider the length of tube shall be less than 12m when locating filter.
3) When fixing the filter, use fixing plate and cable depending on the surrounding conditions.
FixingCable_
FixingPlate FixingPlate
• "J
2. Filter Cleaning
t) Connect feed tube to the inlet of feed valve end filter.
2) Clean the main valve and feed valve with water for at
least one minute until clean water comes out.
-21 -
Hot Water
Cold Water
Filter Inlet
Filter_
Water
HOW TO INSTALL REFRIGERATOR
•Install Water Filter (Applicable to some models only)
•Before Installing water filter
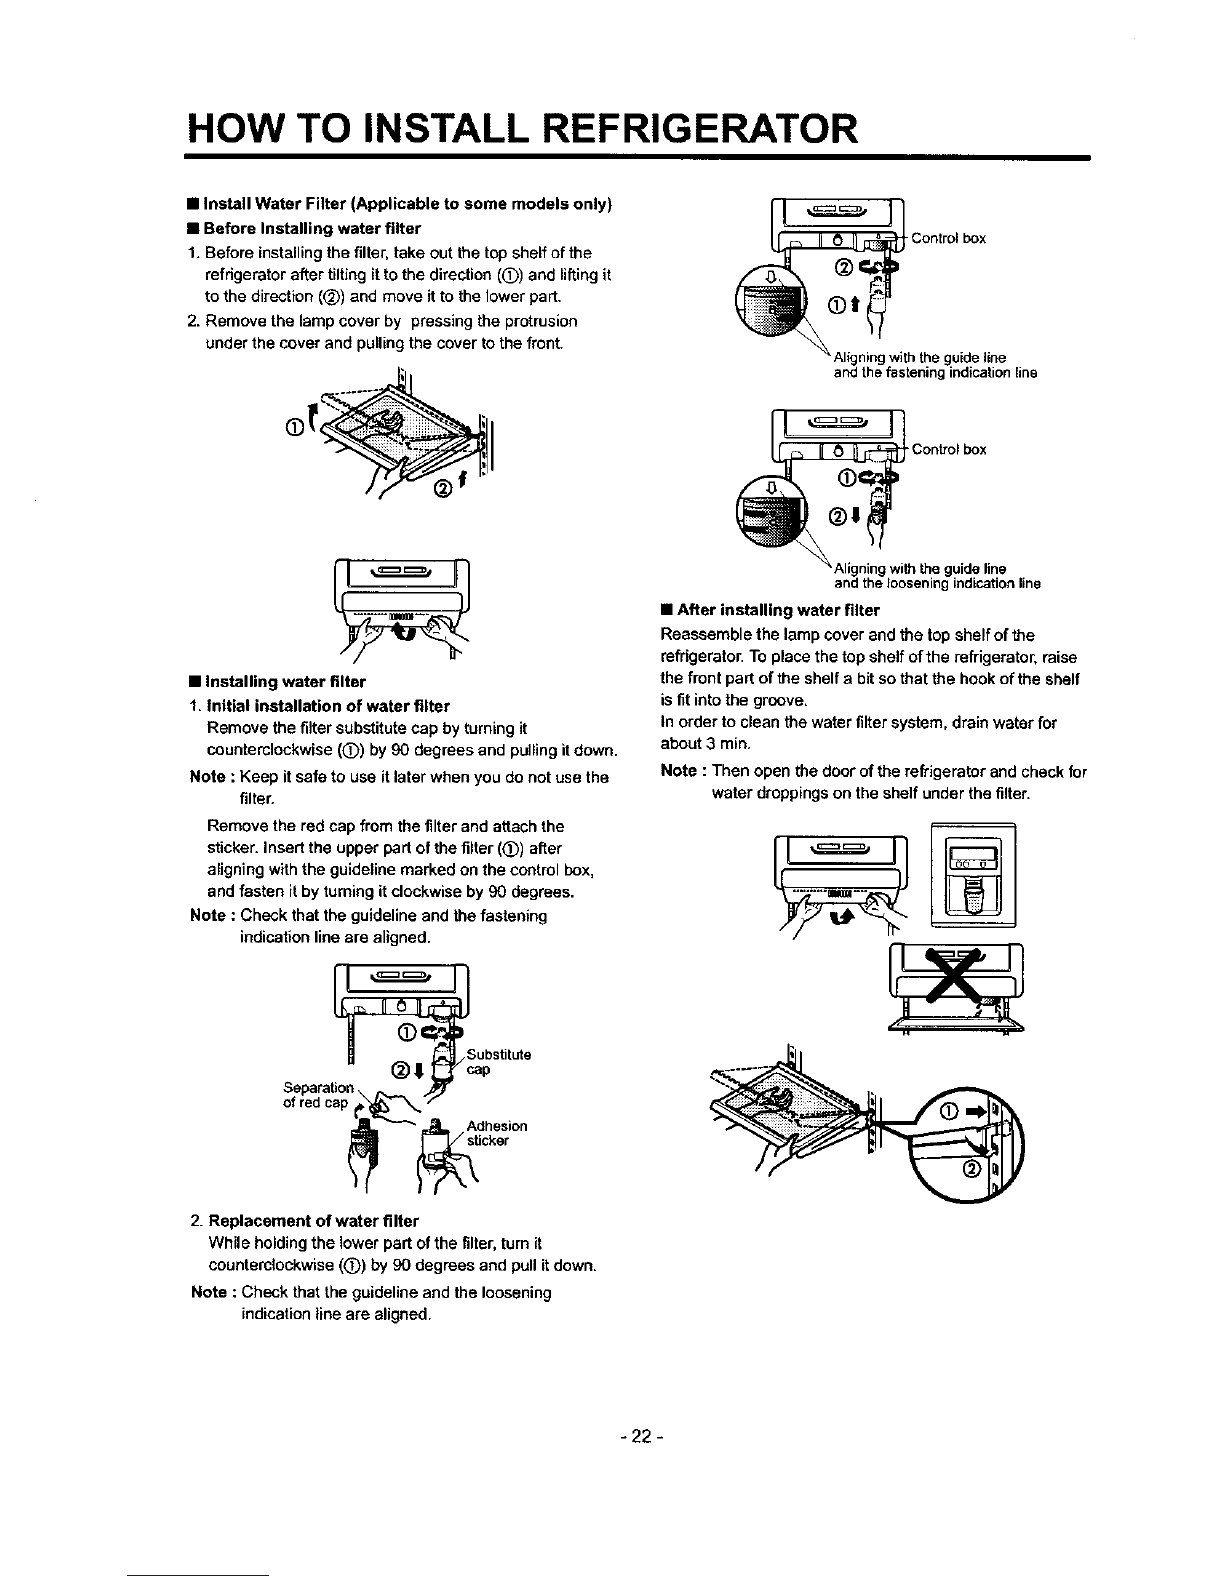
1. Before installing the filter, take out the top shelf of the
refrigerator after tilting it to the direction (O) and liRing it
to the direction ((_)) and move it to the lower part.
2. Remove the lamp cover by pressing the protrusion
under the cover and pulling the cover to the front.
Control box
guideline
and the fastening indication line
Control box
•Installing water filter
t. Initial installation of water filter
Remove the filter substitute cap by turning it
counterclockwise (O) by 90 degrees and pulling itdown.
Note : Keep it safe to use it later when you do not use the
filter.
Remove the red cap from the filter and attach the
sticker. Insert the upper part of the filter (_)) after
aligning with the guideline marked on the control box,
and fasten it by turning it clockwise by 90 degrees.
Note : Check that the guideline and the fastening
indication line are aligned.
2. Replacement of water filter
While holding the lower part of the filter, turn it
countemlockwise (O) by 90 degrees and pull itdown.
Note : Check that the guideline and the loosening
indication line are aligned.
and the loosening indication line
•After installing water filter
Reassemble the lamp cover and the top shelf of the
refrigerator. To place the top shelf of the refrigerator, raise
the front part of the shelf abit so that the hook of the shelf
is fit into the groove,
In order to clean the water filter system, drain water for
about 3 min.
Note : Then open the door of the refrigerator and check for
water droppings on the shelf under the filter.
-22 -
HOW TO INSTALL REFRIGERATOR
3. How to Control the Amount of Water Supplied to Icemaker.
3-1. Confirm the amount of water supplied to the icemaker.
1, Pull out the ice bank in the upper part of the freezer compartment,
Caution : * Do not put hands or tools into the chute to confirm
the operation of geared motor.
it may damage refrigerator or hurt hands.)
•Check the operation of motor with its operation
noise,
2. Apply electricity after connecting water pipe.
1) Press test switch under the icemaker for two seconds as shown below.
2) The bell rings(ding-dong) and ice tray rotates and water comes out from the icernaker water tube.
3) The water shall be supplied two or three times into the tray, The amount of water supplied for each time is small,
Put a water container under the ice tray and press test switch.
4) When ice tray rotates, the water in it will spill. Collect the spilt water and throw away intothe sink.
5) When ice tray has finished rotation, water comes out from the water tube. Confirm the amounts of water in the ice tray.
(refer to fig. The optimum amount of water is 110ec)
*It is acceptable if the adjusted level of water is a bit smaller than optimum level.
- 23 -
HOW TO INSTALL REFRIGERATOR
3-2o Control the amount of water supplied to the
icemaker.
Caution : • Please unplug the power cord from the wall
outlet and wait for more than three minutes
before disconnecting PWB cover as 310V is
applied in the control panel
1. Disconnect PWB cover from the upper part of the
refrigerator.
(+) Driver
I
2. Adjust the amount of water supplied by using DIP
switch.
• Water Supplying Time Control C ,tion
SWITCH NO Water Suppling
S/W1 S/W2 S/W3 Time
OFF OFF OFF 6.5 Sec.
ON OFF OFF 5.5 Sac,
OFF ON OFF 6 Sec.
ON ON OFF 7 Sec.
OFF OFF ON 7.5 Sec.
ON OFF ON 8 Sec.
OFF ON ON 9 Sac.
ON ON ON 10 Sec.
1) The water supplying time is set at five seconds when the
refrigerator is delivered.
2) The amount of water supplied depends on the setting
time and water pressure (city water pressure).
3) If ice cube is too small, increase the water supplying
time. This happens when too small water is supplied into
the ice tray.
4) If ice cube sticks together, decrease the water supplying
time. This happens when too much water is supplied
into the ice tray.
Caution : When adjusting the amount of water supplied,
adjust step by step. Otherwise the water may
spill over.
3. When adjustment of control switch for the amount of
water supplied is complete, check the level of water in
the ice tray.
Confirm the amount
of water
"-.\_'_I_ OpSmum level)
• s S
-24 -
MICOM FUNCTION
l. Monitor Panel
1-1. GR-P247, GR-P207, GR-L247, GR-L207 1-2. GR-C247, GR-C207, GR-B247, GR-B207
Function Monitor
tt'l
======
Freezer compartment Refngerator compartment Dispenser se_ec_cabuttO:l
temperature control Button temperatsre control Button
2. Description of Function
2-1. Funnction of Temperature Selection
Division
Changeof
IndicationLamp
Power Initially On 1st Press 2nd Press 3th Press 4th Press
........ .... '== , ._ . _ _ _. _ I _ == _'-- ._ __ __
--, ...... .__ __,__
i m m i i*qm. i m * mm t _ _ i_ _ i
m--. __,rap
@@ @@ @@
Temperature
Control Medium Medium Max Max Min Medium Min
Freezer -19 °C -22 °C -23 °C
Control (-18 °C) (-20.5 °C) (-22 °C) -15 °C -17 °C
<-19 °C> <-20.5 °C> <-22 °C> <-16.5 =C> <-18 °C>
Refrigeration 6 "C
Control 3 °C 1,5 °C 0=C (7 °C) 4.5 =C
<2 °C> <1 °C> <0 °C> <4,5 °C> <3 °C>
* The tenqmrature can val_yt-3°C depending on the toadcondition. *( "1: 127Vi60|lz, 110_115V,"60[lz. 115Vi60Hz RatingONLY.
*< >:TAIBEI
1. When power is initially applied or reapplied after power cut, "Medium" is automatically selected.
2. When the temperature selection switch in the freezer and refrigerator compartments is pressed, the light is on in the
following sequence:
"Medium" -* "Medium Max" -* "Max" --, "Min" --, "Medium Min" -, "Medium"
3. The temperature setting condition of freezer and refrigerator compartments shall not be indicate in the standard model
(GR-P247, GR-P207, GR-L247, GR-L207, GR-C247, GR-C207, GR-B247, GR-B207) when refrigerator or home bar
door is closed,
-25 -
MICOM FUNCTION
2-2. Automatic ice maker
-The automatic ice maker can automatically make 8 pieces of ice cube at atime, 80 pieces a day. But these quantities may
be varied according to various conditions including how many times the refdgerator door opens and closes.
•Ice making stops when the ice storage bin is full.
• if you don't want to use automatic ice-maker, change the ice-maker switch to ON-OFF.
If you want to use automatic ice-maker again, change the switch to OFF-ON.
NOTE : It is normal that a noise is produced when ice made is dropped into the ice storage bin.
2-3. When ice maker does not operate smoothly
Ice is lumped together
•When ice is lumped together, take the ice lumps out of the ice storage bin, break them into small pieces, and then place
them into the ice storage bin again.
-When the ice maker produces too small or lumped together ice, the amount of water supplied to the ice maker need to
adjusted. Contact the service center.
:,_If ice is not used frequently, it may lump together.
Power failure
•Ice may drop into the freezer compartment. Take the ice storage bin out and discard all the ice then dry it and place it
back. After the machine is powered again, crushed ice will be automatically selected.
The unit is newly installed
• It takes about 12 hours for a newly installed rethgerator to make ice in the freezer compartment.
- 26 -