LG M5201C User manual

User's Guide
0
Make sureto readtheImportant Precautions beforeusingthe product.
Keepthe User'sGuide(CD)in anaccessibleplaceforfuture reference.
See the labelattachedontheproductandgivetheinformationtoyourdealerwhenyou ask
forservice.

Name of the Remote Control Buttons
•AV Button
• Sleep Button
WhenwatchingAV/S-Video/RGB/HDMI
/Component1/Component2
Theproductwillbeautomaticallyturned
offaftera certainperiodoftime.
Pressthisbutton repetitivelyto
selectan appropriatetimeduration
•PSM Button
- Automaticallyadjuststhe image.
Pressthisbutton repetitivelyto set
the intendedscreen.
There is notafunction
whichis supported
•Menu Button
/
•UPand Down buttons/
/
Bring upand down direction._
adjustment. L
•Mute button_
CD
QQ®! I
I
®®®i
MENU
I....... J
®i o-
I_ ...... IEXIT
D-
-- •Power On/Off Button
• Input Select Button
(See next page)
-- • ARC button
To select the image size of the
screen.
•Auto Button
Automaticadjustmentfunction
(Operationalfortheanalog signalonly)
-- There isnota function
whichis supported
-- There isnota function
whichis supported
-- •Exit Button
-- •Volume < •Button
• Check Button
-- There isnota function
whichis supported
@

•AV Button
Each time you press the Input
button it will change to
AV.--_,- Component1
Component2 _ RGB'_-
HDMI/DVl
AV POWER INPUT
SLEEP PSM ARC AUTO
( )C2 )
d)®®
®®®
®®®
0®0
MENU EXIT
O
- [.,nputSe,ectOutton1
Ifyou press the button once,
the following Input Signal
Window will appear. Select
the signal type you want
using the • • button.
@Inserting batteries into remote control.
_/L_ /1" Take oat the battery cap'_/
/2. Insert the batteries with correct polarity (+/-).
/_// _
!/_3. Close the battery cap.
•Dispose of used batteries inthe recycle bin to prevent
i_ environmental pollution.
@

*The product image in the user's guide could be different from the actual image.
_Rear View
OPower Connector : Connect the power cord
Wired Remote Control Port
RS-232C Serial Ports
RGB, HDMI/DVI Ports
PC Sound Jack
:Connect the audio cable tothe *LINE OUTjack of the PC sound card.
AV Ports
Speaker Ports
@

OFirst of all,
Then, connect the signal input cable.
see if the computer, product and the peripherals are turned off.
(_) When connecting withthe D-Subsignal inputcable.
(_) When connecting with the HDMI to DVIsignal input cable (not included).
®
Rear side of the product.
®
Rear side of the product.
Connect the Audio cable,
MAC PC/MAC
.A
Macintosh Adapter (not included) I
Use the standard Macintosh adapter since an incompatible
adapter s ava abe n the market. Dfferent sgna ng system
(not included) PC
Rear side of the product.
@Connect the power cord,
PC
Rearside of theproduct.
@

_]_ (_) Turn on power by pressing the power button on the product.
(_Turn on the PC.
T
Power button
Select an input signal.
Press the INPUT button on the remote control to select the input signal.
INPUT'--_'='--_SET _
Or, press the SOURCE button on the bottom of the product.
_SOURCE---_ _'j,---,- AUTO/SET
(_ When connecting a signal input
with D-Sub cable.
• Select RGB : 15-pin D-Sub analog signal.
(_When with HDMI to DVl cable.
connecting asignal input
• Select HDMI/DVl : HDMI to DVl Digital signal.
• How to connect to two computers.
_. Note I Connect the signal cables (HDMI to DVI and D-Sub) to each computer.
Press the INPUT bu_on on the iemote ControltoSelect the €omputer tOuse.
Directly connect to a grounded power outlet on the wall or apower bar with a ground
@

Use this function when displaying ANALOG RGB inputs of a PC to the other product.
• To use different products connected to each other
Connect one end of the signal input cable(15-pin D-Sub Signal Cable) to the RGB OUT
connector of product 1 and connect the other end to the RGB IN connector of other
products.
15-pin D-Sub Signal Cable
PC
Product 1Product 2Product 3Product 4
_ao)te , When multl-c0nneclingi_out Cascadefirmat, no!oss cablesare recommended.
I We recommendthat you should usecal01edistributor.
@

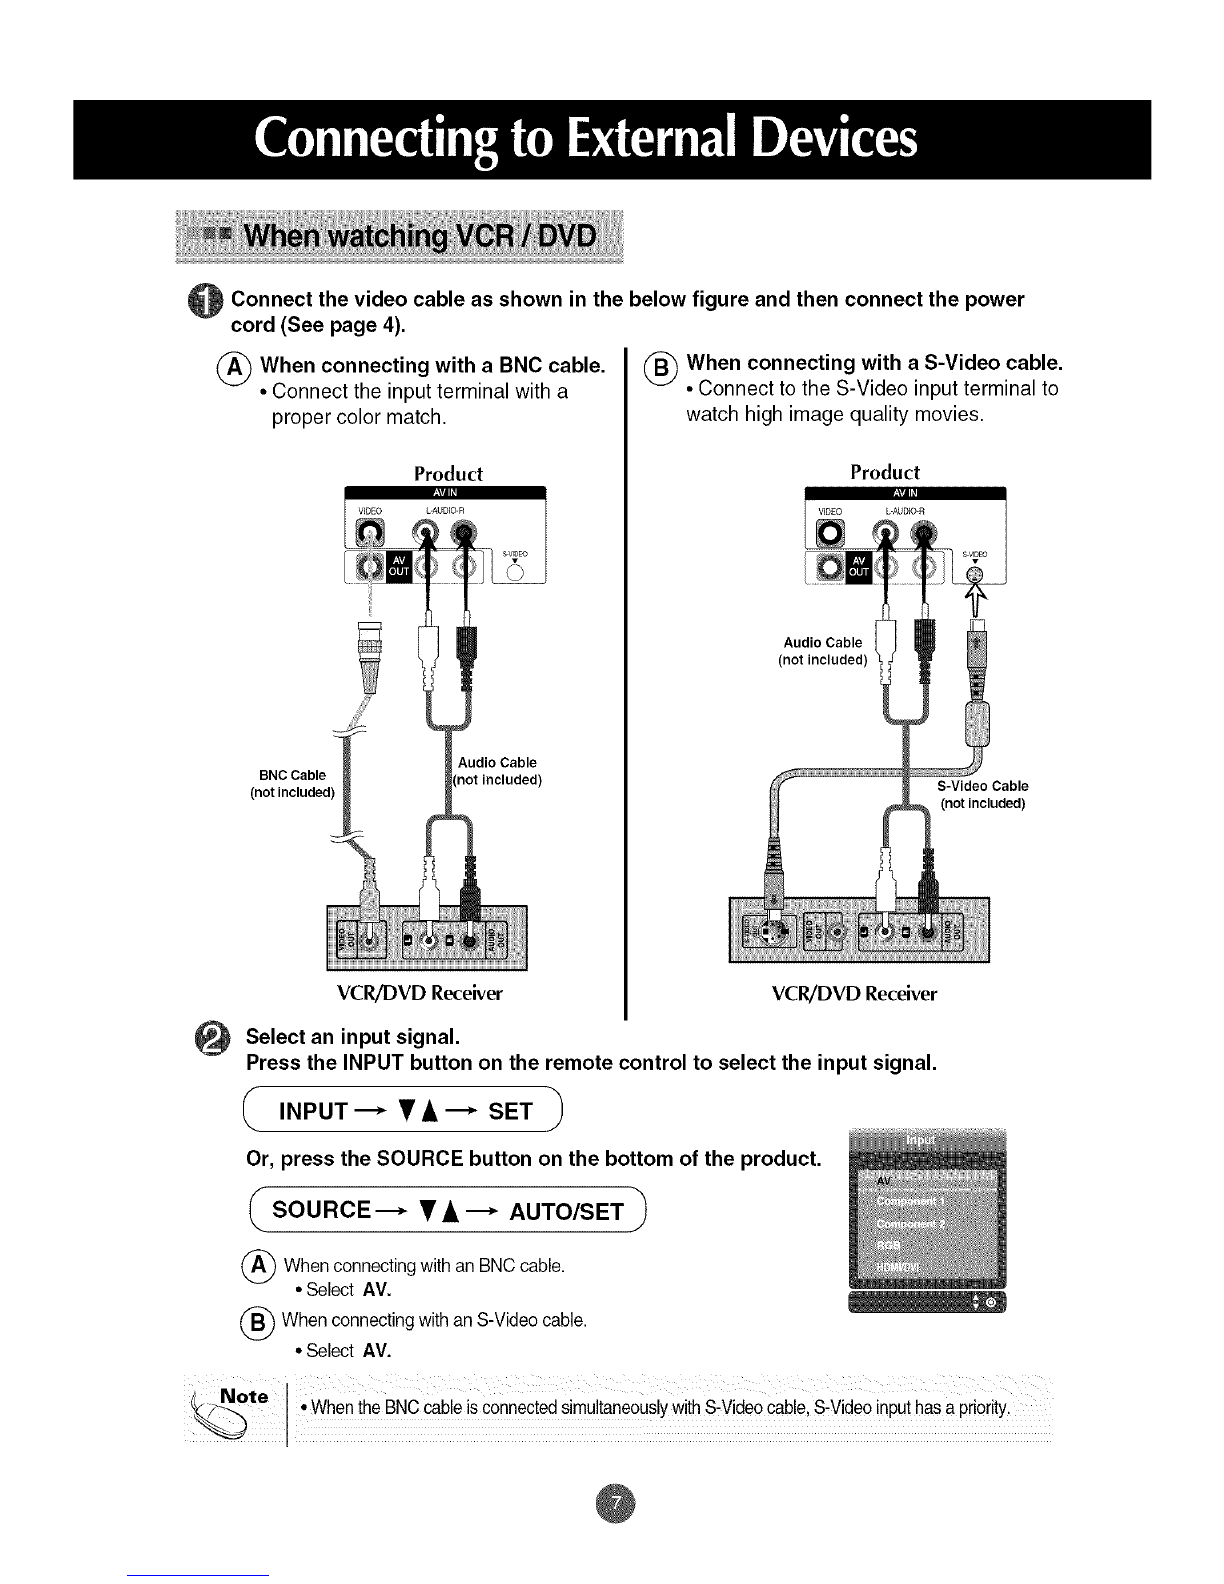
Connect the video cable as shown in the below figure and then connect the power
cord (See page 4).
(_ When connecting with a BNC cable.
•Connect the input terminal with a
proper color match.
Product
BNC Cable
(not included)
Audio Cable
(_) When connecting with a S-Video cable.
Connect to the S-Video input terminal to
watch high image quality movies.
Product
Audio Cable
(not included)
S-Video Cable
(not included)
VCRiDVD Receiver VCR/DVD Receiver
Select an input signal.
Press the INPUT button on the remote control to select the input signal.
iNpUT--•A-- SET
Or, press the SOURCE button on the bottom of the product.
SOURCE'--* • A "--" AUTO/SET
(_ WhenconnectingwithanBNCcable.
• SelectAV.
(_ WhenconnectingwithanS-Videocable.
• SelectAV.
Note i
_._ •WhentheBNCcableisconnectedsimultaneouslyw!thS-Vide0cable,S-VideoinputhasaPrioritY.
@

OConnect the video/audio cable shown in the below and then, connect the
as figure
power cord (See page 4).
•Connect the input terminalwitha proper color match.
(_ Product
BNC Cable
(not included)
HDTV Receiver
Product
BNC Cable
(not included)
HDTV Receiver
@Select an input signal.
Press the INPUT button on the remote control to select the input signal.
INPUT---*TA---*SET _
Or, press the SOURCE button on the bottom of the product.
_SOURCE'--_ •A'--* AUTO/SET
(_• Select 1
Component
(_• Select 2
Component
@

®
OConnect the video/audio cable shown in the below and then connect the
as figure
power cord (See page 4).
Product Product
HDMI to DVI
Signal Cable RCA-PC
(not included) Audio Cable
VCR/DVD/Set-top Box
HDMI Signal Cable
(not included)
VCRiDVD/Set-top Box
Product
VCR/DVD/Set-top Box
_Select an input signal.
Press the INPUT button on the remote control to select the input signal.
INPUT-- •A--SET
Or, press the SOURCE button on the bottom of the product.
• •- AUTO/SET_
SOURCE--
(_ Whenconnectingwitha HDMIto DVl signalinputcable.
Whenconnectingwitha HDMIsignalinputcable.
• SelectHDMI/DVI
(_ When connecting with a D-Subsignal input cable.
• Select RGB
@

• When you set the input signal of the main screen as 'AV (CVBS)', you can transmit the signal that
you're watching to the AV output terminal.
Video/TV
BNCCable AudioCable
(notincluded) (not included)
p.....I
Product
BNC Cable
(not included)
Audio Cable
(not included)
Video/TV
/ Note .... i ; :
_.e) • When multi:connectingin/outcascadeformat noloss calolesare :recommended.
We recommendthatYoushoulduse cabledistribut0rr
@

Name of the Buttons in the Screen Adjustment Unit
Power Button '_ •Press this button to turn on the power. Press this button again to
Jturn it off.
p -,_ *This Indicator lights up green when the display operates normally(on
ower Indicatorj mode). If the display is in sleep (Energy Saving) mode, this indicator
color changes to amber.
@ ( MENU Button ) •screen.USethis button to show/hide the OSD (On Screen Display) menu
@('f OSD Select/h
k,,,.Adjust Buttonj/
• Use this button to select an icon or adjustthe setting in the OSD screen.
T A • Adjust the up and down.
• • Adjust the volume.
@

Name of the Buttons in the Screen Adjustment Unit
AUTO/SETButton _[ForPCAnalogsignal]
[When Full HD Mode is active
and 1920 X1080 is selected]
O (,SOURCE Butto_ SOURCE---* T A -* AUTO/SET
• Selectthe inputsignal
AV Composite Video, Separate Video
Component I HDTV, DVD
Component 2 HDTV, DVD
RGB 15-pin D-Sub analog signal
HDMI/DVI Digital signal
IR Receiver _) " The unit that receives the signal from the remote control.
@

OSD Menu
Icon Function Description
Adjusts screen brightness, contrast and color that you prefer.
PICTURE
SOUND •
Adjusts the timer function.
TIMER
SPECIAL I
Adjusts the screen video.
SCREEN
_ _Note OSO(On screen Display)
The OSD function enables you to adjust the sc::een status conveniently since it provides
I graphica! presentation. @

How to adjust the OSD (On Screen Display) screen
• "_ EXIT
*Use the remote control to adjust the OSD screen.
Press the MENU Button, then the main menu of the OSD appears.
To.ccess.co.o.°sethe,, =°ttoos
When the icon you want becomes highlighted, press the SET Button.
Use the • • _1 I1_ Buttons to adjust the item to the desired level.
Accept the changes by pressing the SET Button.
Exit the OSD by pressing the EXIT Button.
How to adjust the screen automatically
You need to adjust the screen display when connecting the product to
a new computer or changing the mode. Refer to the following section to
set an optimal product screen.
Press the AUTO/SET button (AUTO button in a remote Control) in the
PC analog signal. Then, an optimal screen status will be selected that
fits into the current mode.
If adjustment is not satisfactory, you need to adjust screen position,
clock and phase in the OSD menu.
[When Full HD Mode is active
and 1920 X1080 is selected]
@

Adjusting Screen Color
PSM The PSM function automatically adjusts the screen image quality
depending on the AV usage environment.
• Dynamic : Select this option to display with a sharp image.
• Standard : The most general and natural screen display status.
•Mild :Select this option to display with a mild image.
• User1,2 : Select this option to use the user-defined settings.
CSM
Contrast :Adjust the difference between the light and dark levels inthe picture.
Brightness :To adjust the brightness of the screen.
Colour : To adjust the color to desired level.
Sharpness :To adjust the clearness of the screen.
Tint :To adjust the tint to desired level.
Selecting a factory setting color set.
• Warm • Slightly reddish white.
• Normal • Slightly bluish white.
Cool • Slightly purplish white.
User Select this option to use the user-defined settings.
Red /Green /Blue
Set your own color levels.
/i, :Note If the 'PSM: setting in the PICTURE menu is set to Dynamicl standard or Mild the
subsequent menus will be automatically set.
@

Adjusting Screen Color
XD XD is LG Electronics' unique picture improving technology that displays a real HD source
through an advanced digital signal processing algorithm.
This function is not available in RGB-PC or HDMI/DVl PC modes.
This menu is activated after selecting User1 or User2 of PSM.
•Auto : XD is automatically changed to Auto.
•Manual : When selecting the Manual, you can adjust the XD Contrast, XD Colour, XD NR,
MPEG NR.
Advanced
• Cinema • (Function works in the following mode- AV, Component 480i/576i)
When you watch the movie, this function adjusts the set to the best picture
appearance.
• Black Level • (Function works in the following mode- AV(NTSC), HDMI/DVl
adjusts the contrast and the brightness of the screen using the
black level of the screen.
Reset Return PSM, CSM, XD, Advanced to the default factory settings.
@

Adjusting the audio function
SSM Thebestsoundtonequalitywillbe
selectedautomaticallydependingonthe
videotypethatyou'recurrentlywatching.
•Surround MAX : Set the Surround MAX on. This function plays back the mono or stereo sound input
with the dynamic surround effects. It will provide rich and profound sound tone. If you set the
Surround MAX on, user audio setting can not beadjusted.
•Flat :The most commanding and natural audio.
•Music : Select this option to enjoy the original sound when listening to the music.
•Movie : Select this option to enjoy sublime sound.
•Sports: Select this option to watch sports broadcasting.
•User :Select this option to use the user-defined audio settings.
AVL
Balance
Speaker
To adjust uneven sound volumes across all channels or signals automatically to the most
appropriate level. To use this feature, select On.
Use this function to balance sound from the left and rightspeakers.
You can adjust internal speaker status.
Ifyou want to use your external hi-fi stereo system, turn off the internal speakers of the set.
//_i Note Iwhen connected to your computer and the ,SSM' setting in the audio menu is Flat Music Movie
or Sports the available menus are Balance AVL and Surround MAX.
@

Adjusting the timer function
Clock
Off/On time
Auto sleep
Power
saving
If the time is on the clock is incorrect, reset the clock manually.
1) Press the MENU button and then use • • button to select the TIME menu.
2) Press the I_ button and then use • • button to select the Clock menu.
3) Press the I_ button and then use • • button to set the hour(00-23).
4) Press the I_ button and then use • • button to set the minutes(00-59).
The off time automatically switches the set to standby at the pre-set time.
1) Press the MENU button and then use • • button to select the TIME menu.
2) Press the I_ button and then use • • button to select Off time or On time.
3) Press the I_ button and then use • • button to set the hour(01-23).
4) Press the I_ button and then use • • button to set the minutes(00-59).
5) Press the I_ button and then use • • button to select On or Off.
If Auto sleep is active and there is no input signal, the set switches to standby mode
automatically after 10 minutes.
1) Press the MENU button and then use • • button to select the Auto sleep menu.
2) Press the I_ button and then use • • button to select On or Off.
As for power saving mode, the power consumption can be made by setting the power
consumption level at desired hour.
;Once the on OrOff time is set, these function s operate daily at the preset time.
;off time function overrides o n time function if they are set to the same timel
; The set must be in standby m0de for the On time to w0rk, ...................
; When On time is operated, input screen is turned 0n as it was turned 0ft.
@

Selecting the options
Language
Child lock
ISM Method
SetID
To choose the language in which the control names are displayed.
Use the y & buttons to select On or Off. The monitor can be set up so that it can only be
used with the remote control. This feature can prevent unauthorized viewing.
In order to lock the OSD screen adjustment, set the Child lock tab to the 'On' position.
In order to unlock it, do the following :
• Push the MENU button on the remote control and set Child lock to the 'Off' position.
A frozen or still picture from a PC/Video game displayed on the screen for prolonged periods will
result in a ghost image remaining even when you change the image. Avoid allowing a fixed
image to remain on the screen for a long period of time.
Normal :If image sticking is never a problem, ISM is not necessary -set to Normal.
White wash : White wash removes permanent images from the screen.
(An excessive permanent image may be impossible to clear entirely with white wash.
Orbiter : May help prevent ghost images. However, it is best not to allow any fixed image to
remain on the screen. To avoid a permanent image onthe screen, the screen will move every 2
minutes.
Inversion : This function inverts the panel colour of the screen. The panel colour is
automatically inverted every 30 minutes.
Orb,+lnv. : This function inverts the panel colour of the screen and may help prevent ghost
images. The panel colour is automatically inverted every 30 minutes and the screen will
move every 2 minutes.
You can assign a unique Set ID NO (name assignment) to each product when several
products are connected for display. Specify the number (1-99) using the • • button
and exit. Use the assigned Set ID to individually control each product using the Product
Control Program.
@
Other manuals for M5201C
2
Table of contents
Other LG TV manuals