Owner‘s Manual
F1403FD(1~9)
Safe ty ins truc tions for use
Read all instructions and ex planations of the installat ion before use. Follow the inst ructions carefully. Keep the o perating
instructions handy fo r later use. If the appliance is sold or passed on then ensure t hat the new owner always receives these
operating instructi ons. The following warnings must be strictly o bserved for safety reasons. They mu st be read before instal-
ling the appliance and put ting it into operation.
• Inte nded use: This applian ce has been designed excl usively for use in dr y-interior households. U se the appliance onl y with cold
drinking w ater and only for washin g textiles with was hing detergents desig ned for washing machine s. Every other use is imp roper and
may lead to injur ies, whereby the liabi lity of the manufac turer will cease.
• Th is appliance may only b e used by adults. Do not allow c hildren to touch the con trols or to play with th e product.
• Nev er modify the appl iance on your own, as this i s dangerous.
• Th is appliance is heav y.Transp orting with ca re.
• Rem ove all packaging and t ransport bolts be fore using the applian ce. Otherwise ser ious damage may result.
• Al l installation work m ust be carried out by a q ualified fitter or tec hnician.
• Hav e electrical conn ections done by a quali fied electrician.
• Nev er place the applian ce on the power cord.
• If t he appliance is place d on a carpet then plac e the feet so that air can c irculate underneat h the appliance.
• Al ways unplug the machin e and turn off the wat er supply after use. Dis connect applianc e by pulling only the plug - n ever disconnect
by pulling the p ower cord. Never touch th e plug with wet fingers or ha nds.
• Do not o verload the applia nce.
• Wash o nly machine-washabl e textiles. If you have doub ts regarding this, the n observe the mark ings on the label.
• Nev er place electric al heaters, candles etc. i n the vicinity of the a ppliance. They could c ause the applianc e to ignite or parts to wa rp.
• Prote ct the appliance fro m wet and damp. Otherwi se, there is danger of elect ric shock and fire.
• Co nnect the applianc e to a suitable wall sock et for 220-240V. Never use an extensi on cord or double adapter.
• Empt y all pockets. Hard or s harp objects such as c oins, needles, nails, scre ws or stones may cause se rious damage.
Unbalanc ed mass may create heav y vibrations. If heav y vibrations remain a lso without load, cal l for an authorized cu stomer service.
• Do not w ash or dry arti cles that have been clea ned in, washed in, soaked in, or d abbed with combus tible or explosive sub stances
(such as wax, oil, pa int, gasoline, degrease rs, dry-cleaning sol vents, kerosene, etc.). This may result i n fire or explosion.
• Nev er insert product s coated with mineral o ils (e.g. nylon coati ng, plastic belts, etc. ) into t he machine. If a stain remove r has been
used then ma ke sure that the solven t has been carefully wa shed out before inser ting the clothes into t he appliance. Oil may rem ain in
the tub af ter a whole cycle result ing in fire during dry ing. So, do not load o ily clothes.
• Do not o perate the applianc e at locations where fla mmable substance s are present such as oil, ben zene or highly inflammab le gas.
Such materia ls may cause fire or explos ion. Never use combusti ble detergents.
• Onl y add the prescribed a mount of softener. Exces sive amounts may damag e the clothes.
• Af ter washing, keep the dr um door open to protect th e door seal.
• Ma ke sure that all water has r un off before opening th e door.N ever open the door if wat er still remains. Danger of s calding.
• An imals and children may get i nto the washing machin e.S o always check the ap pliance before using it.
• Dur ing washing, the glas s door becomes very h ot. Keep children away from t he appliance when in op eration.
• Nev er try to repair the m achine yourself. Incor rect repairs may result in i njuries and/or serio us defects to the machi ne.
• Th e product should be ser viced and repaired on ly by the authorise d customer servic e using original replac ement parts.
• When dispos ing of your old machine, the pow er cable must be capp ed and the door lock must b e made unusable in order t o protect children.
• Whe n placing on a carpeted fl oor,ma ke sure that the openin g in the socket is not blocked.
• If t he appliance has bee n under water then cont act the customer ser vice. There is danger of el ectric shock and fire.
• Th e cover cup of the filter as we ll as the dispenser dra wer may not be opened durin g the operation.
• Kee p all washing powder and d etergents away from chil dren. Danger of poisoning.
Disposal
Before use please read car efully the safety instructions!
Thank you for b uying an LG fully automat ic washing machine.
Please read t his owner‘s manual ca refully, it provides instr uctions on safe inst allation, use and maint enance.
Keep it handy fo r future reference of thi s machine. Make a note of the mod el and serial numbers of y our washing machine.
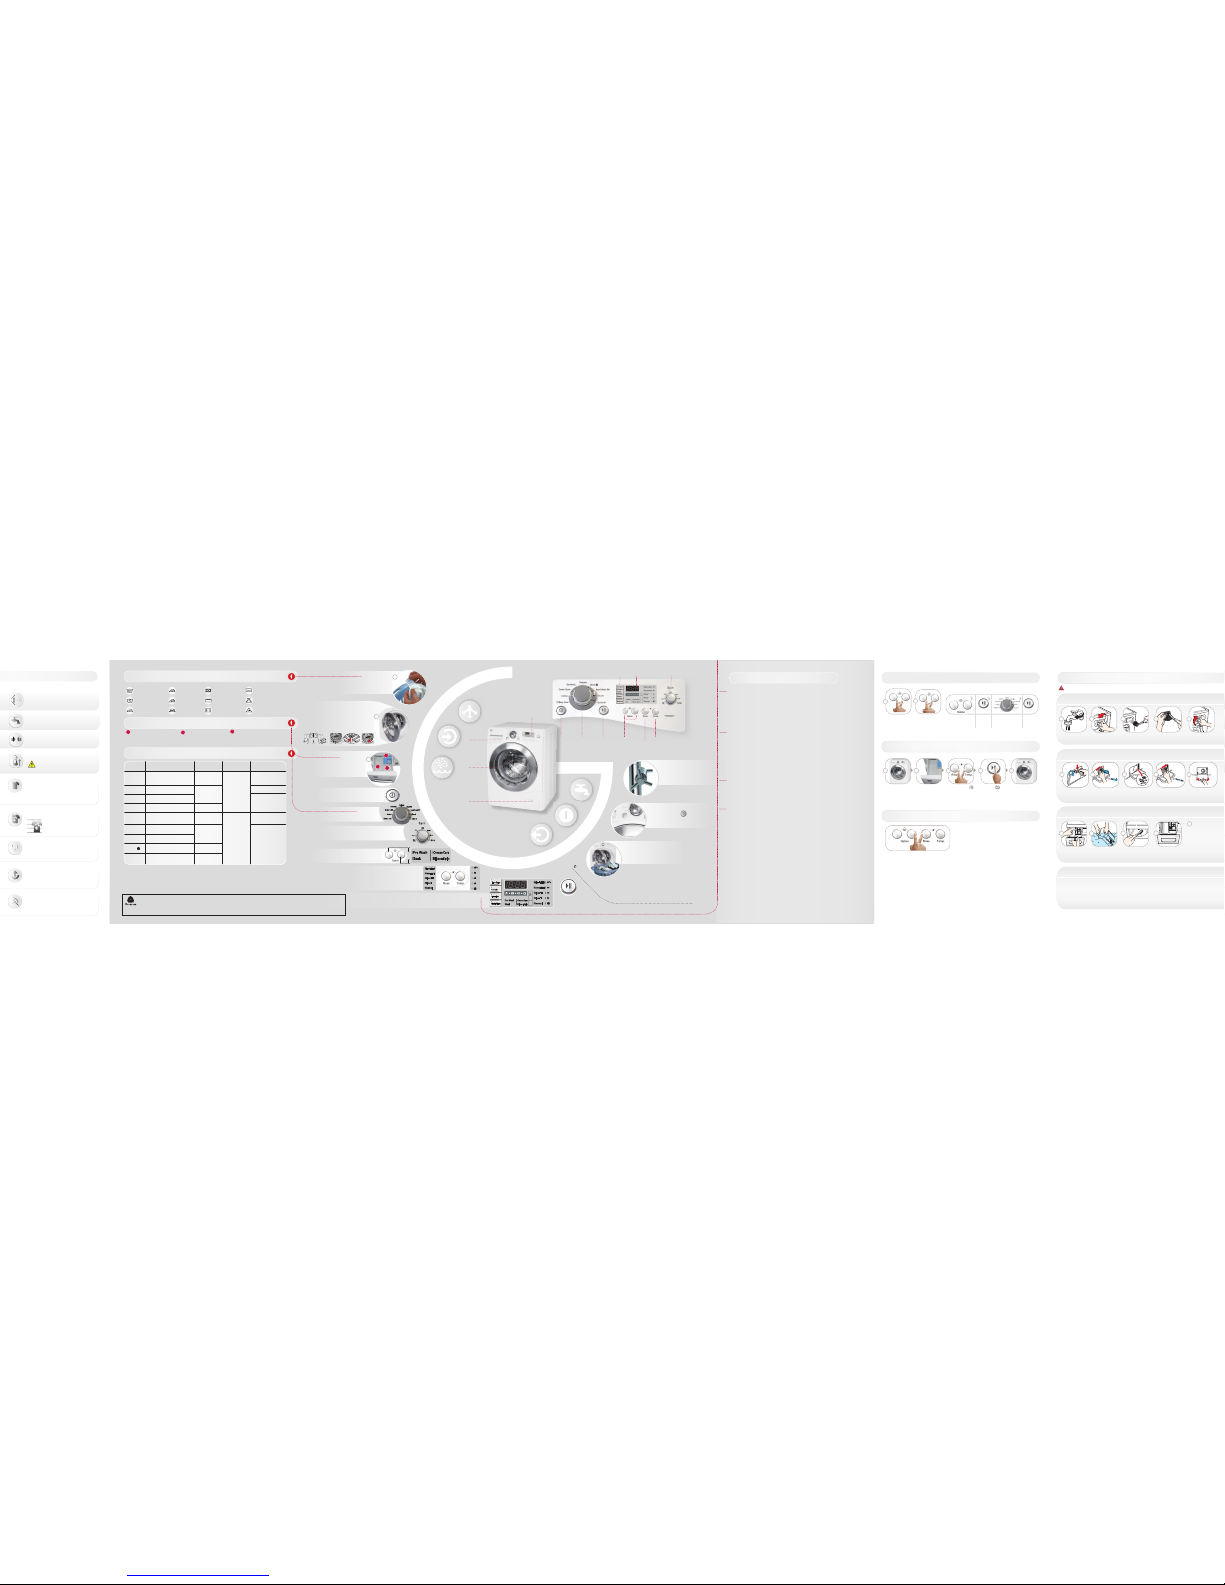
Remove Packagin g
Req uirem ents f or ins talla tion si te
Transit bo lts
Electrical conne ctio n
Conne ctin g water s upply h ose
• The appliance is fi tted with transit bolts to prevent interna l
damage during transpor t. Be careful, heavy load!
• Packing and all transi t bolts must be removed before using
the washing machine.
• When unpacking th e base, be sure to remove the additional
packing support in th e middle of the base packing.
Store original packing fo r future move.
Dispose of packing materia l according to local regulations.
Unscrew the 4 bolts
using the spanner
supplied.
Keep the 4 bolts and the spanner for the future use. Refit transit bolts before transporting the appliance.
Level floor: Permiss ible floor gradient under entire washing machine
is 1˚ .
Power socket: Must b e within 100 cm of either side of location of
washing machine. Do not overload the so cket with more than one
appliance.
Additional Cle arance: For wall, floor and door space is ne eded.
(10cm: rear / 2cm:right & left side). Do not place or st ore laundry pro-
ducts on top of the washing machine a t any times. They can damage
the finish or controls of the machi ne.
1. Do not use an extension cord or double adapter.
2. Have damaged supply cords replaced by the manufacturer or its service agents or a similarly qualified person
to prevent danger.
3. Always unplug the machine and turnoff the water supplyafter use.
4. Connect the machine to an earthed socket in accordance with current wiring regulations.
5. The appliance must be positioned so that the plug is easily accessible.
•Repairstothewashingmachinemustonlybecarriedoutbyqualifiedpersonnel.Repairscarriedoutbyinexpe-
rienced persons may cause injuryor serious malfunctioning. Contact your local service centre.
•Donotinstallyourwashingmachineinroomswheretemperaturebelowfreezingmayoccur.Frozenhosesmayburst
under pressure. The electronic control unit may become unreliable at temperatures below freezing point.
•Iftheapplianceisdeliveredinthewintermonthsandtemperaturesarebelowfreezing:Leavethewashingmachine
standing at room temperature for a few hoursbefore putting it into operation.
• Two rubber seals are supplied with the water inlet
hoses. They are used for preve nting water leaks.
• Make sure the connection to taps i s tight enough.
• Periodically check the conditi on of the hose and
replace the hose if necess ary.
• Make sure that there is no kink on the hose a nd
that it is not crushed.
When your washing ma chine has two valves:
• The inlet hose with the red connec tor is for the hot
water tap.
• If the washing machine has two valves, p ower
saving is achieved through using hot valv e.
Water supply pressure must be bet ween 1.0-10 bar (100kPa~1000kPa)
Don’t strip or crossthre ad when connecting inlet hose to the valve.
If the water supply pressure i s more than 1000kPa, a decompression
device should be installed.
• The drain hos e should not be placed higher than 100 cm above the floor.
• Proper secu ring of the drain hose will protect the floor from damage d ue to any water leakage.
• If the drain ho se is too long do not force back into the washing machine. This will c ause unusual noise.
• Proper level-adjustment of the w ashing ma-
chine prevents excessive noise and v ibration.
Install the appliance on a s olid and level floor
surface, preferably in a co rner of the room.
• If the floor is uneven, adjust feet a s required.
(Do not insert pie ces of wood etc. under the
feet). Make sure that all four feet are s table
and resting on the floor. Then check t hat
the appliance is perfe ctly level. (Use a spirit
level).
Safe ty ins tuctions f or the in stallation
Installorstoreappliancewhereitwillnotbeexposedtosub-zerotemperaturesorexposedtotheweather.Fitgroundofthe
washingmachinecorrectlytoconformwithallstatutoryregulationsandordinances.Ensurethatthebaseopeningisfreefrom
obstructionbycarpetingifthewashingmachineisinstalledonacarpetedfloor.Incountrieswherethereisariskofcockroach
infestationorothervermin,payparticularattentiontokeeptheapplianceanditssurroundingsinacleanconditionatalltimes.
Any damage which may be caused by cockroaches or other vermin is not covered by the appliance guarantee.
CAUTION abou t positioning the appliance
Installthe washing machine on a flat hard floor. Make sure that aircirculation around the washing machine is
not impeded by carpets, rug etc.
•
Never try to correct any unevenness in the floor using pieces of wood, cardboard or similar materials under the washing machine.
•
Ifitisnotpossibletopositionthewashingmachineawayfromagascookerorcoalburningstove,aninsulationpanel
(85x60cm) covered with aluminum foil on the side facing the cooker or stove, must be inserted between the two appliances.
•
The washing machine must not be installed in rooms where the temperature may drop below 0°C.
•
Please ensure that when the washing machine is installed an engineer can gaineasy access in the event of a breakdown.
•
Adjustallfourfeetusingthetransitboltspannerprovidedtoensurethattheapplianceisstable,with20mmclearnacebetween
the top of the washing machine and underside of the worktop.
CAUTION abou t the power cord
Werecommendconnectingmostappliancestoadedicatedcircuit.Thatis,asingleoutletsupplyingpoweronlytotheappliance
concerned,withoutanyadditionaloutletsorbranchcircuits.Checkthespecificationsofthisowner‘smanual.Donotoverload
wallsockets.Overloadedwallsockets,looseordamagedwallsocketsorextensioncords,frayedpowercords,damagedor
crackedwireinsulationaredangerous.Anyoftheseconditionscouldresultinelectricshockorfire.Periodicallyexaminethecord
ofyourappliance,andifitsappearanceindicatesdamageordeterioration,unplugit,discontinueuseoftheappliance,andhave
thecordreplacedwithanexactreplacementpartbyanauthorizedservicer.Protectthepowercordfromphysicalormechanical
abuse,suchasbeingtwisted,kinked,pinched,squashedinajambofadoor,orwalkedupon.Payparticularattentiontoplugs,
wall outlets, and the point where the cord exits the appliance. We recommend to use a residual current operated
device in the mains supply.
CAUTION abou t location and moving
Thisequipmentisnotdesignedformaritimeuseorforusemobileinstallationssuchascaravans,aircraftetc.Turnoffthestop-
cockifthemachineistobeleftforanylengthoftime(e.g.ifyouaregoingonholiday),especiallyifthereisnofloordrain(gully)
intheimmediatevicinity.Ifrelocatingtheapplianceusetheoriginalpackingmaterial.Disablethedoorlocktopreventyoung
childrenbecomingtrappedinside.Packagingmaterial(e.g.plasticfilm,Styrofoam)canbedangerousforchildren.Thereisarisk
of suffocation! Keep allpackaging wellaway from children.
CAUTION abou t the floor surface
•The installation surface must be clean, dry and level.
•Install washing machine on a flat hard floor.
•Proper placement and levelling of the washing machine ensure long, regular and reliable operation.
•The washing machine must be perfectly level and firmlyin position.
•It must not “see-saw” across cornersunder load.
•The installation surface must be clean, free from floor wax and other lubricant coatings.
•Do not allow the feet of the washing machine to get wet.If feet of the washing machine get wet, slipping may occur.
Name of product Front loading washing machine
Power supply 220-240 V~, 50 Hz
Size WxDxH mm: 600 x 640 x 850
Weight 65 kg
Max. Watt
2100 W (Wash)
Wash capacity 9 kg
Water consumption 63 l (7 l / kg)
Permissible water pressure 1.0-10 bar (100-1000kPa)
Rattling and cl anking noise Extraneous o bjects such as coins or safety pins maybe in drum or p ump.
Thumping sound Heavy wash lo ads may produce a thumping sound. This is usually normal.
Vibrating noi se Have all transit bolts and p acking been removed?
Water leaks. Check and tighten hose conne ctions. Unclog drain pipe.
Contact plumber if nec essary.
Excessive suds Too much dete rgent or unsuitable detergent.
Washing machine does n ot start Power cord may not be plugged in or conne ction may be loose.
Washing machine won’t s pin Check that the door is firml y shut.
Door does not ope n Once started, th e door can not be opened for safety reasons.
Wait one or two minutes before o pening the door to allow the electric
locking mechanism time to relea se.
Troubleshoot ing
Level adjust ment
To prevent internal dama-
ge during transport , the
special 4 bolts are locke d.
If they are not removed, it
may cause heavy vibrati-
on, noise and machine to
malfunction.
Installati on of drain hose
Technical Specifica tion
i
If after completing co nnection water leaks from the hose, repeat the s ame steps. Use the most conventional
type of tap for water sup ply.I n case the faucet is square or too big, remove the spacing ring be fore inserting
the tap into the adaptor.
i
BS Plug Safety Details (For U.K. User)
ThisappliancemustbeearthedAsthecoloursofthewiresinthemainslead
ofthisapparatusmaynotcorrespondwiththecolouredmarkingsidentifying
theterminalsinyourplug,proceedasfollows:Thegreenandyellowwiremust
beconnectedtotheterminalintheplugmarkedEorbytheearthsymbol or
colouredgreenorgreenandyellow.Thewirecolouredbluemustbeconnected
totheterminalmarkedwiththeletterNorcolouredblack.Thewirecolouredbrownmustbeconnectedtotheterminal
marked with the letter L or coloured red. If a 13 amp (BS 1363) plug is used, fit a 13 amp BS 1362 fuse.
For the U.K. custome r
CUSTOMER SERVI CES Tel. : +44-(0) 844 847 LGLG(5454) Fax. : +44-(0) 844 847 1413
LGEUK SERVICE WE B-SITE : http://www.lge.co.uk
i
• Whe n this crossed-out whe eled bin symbol is at tached to a product it mea ns the product is covere d
by European Di rective 2002/96/EC.
• Al l electrical and el ectronic products sh ould be disposed of sepa rately from municipa l waste stream
via designat ed collection facili ties appointed by th e government or the loc al authorities.
• Th e correct disposal of y our old appliance will h elp prevent potential ad verse consequenc es for the
environment a nd human health.
• For m ore detailed informat ion about disposa l of your old appliance, plea se contact your cit y office,
waste dispo sal service or th e shop where you purchas ed the product.
The hose supplied w ith the machine must be used. Old h oses may not be reused
Close the holes with
the caps supplied.
Remove the 4 bolts
along with the rubber
bungs by slightly
twisting the bung.
P/No. :MFL41480109