LG WD-10587BD User manual

WD-10587BD
WD-14586BDK
Lavadora
MANUAL DEL PROPIETARIO
(24P~45P)
Gracias por comprar
la lavadora totalmente automática LG.
Lea detenidamente el manual del propietario.
Antes de operar su lavadora lea atenta y detenidamente
su manual del propietario.
Proporciona instrucciones sobre la instalación el uso y
mantenimiento seguros.
Consérvelo para referencia futura.
Anote el modelo y los números de serie de su lavadora.
Wash ng Mach ne
OWNER'S MANUAL (2P~23P)
Thank you for buying a
LG Fully Automatic Washing machine.
Please read your owner's manual carefully it provides
instructions on safe installation use and maintenance.
Retain it for future reference.
Record the model and serial numbers of your washing
machine.

roduct Feature
P
ontents
C
2
Warnings...............................................................................................3
Specification..........................................................................................4
Installation.............................................................................................5
Care before washing...........................................................................10
Using the dispenser ............................................................................11
Function ..............................................................................................13
ow to use washer .............................................................................14
Maintenance .......................................................................................20
Troubleshooting guide ........................................................................23
Terms of Warranty ..............................................................................26
■Direct Drive System
The advanced Brushless DC motor directly drives the drum without belt and pulley.
■Tilted Drum and Extra Large Door Opening
Tilted drum and extra large opening make it possible to load
and unload clothing more easily.
■Water Circulation
Spray detergent solution and water onto the load over and over.
Clothes are soaked more quickly and thoroughly during wash cycle.
The detergent suds can be removed more easily by the water shower during rinse
cycle. The water circulation system uses both water and detergent more efficiently.
■RollerJets
Washing ball enhances the wash performance and reduces damage to the clothing.
The jets spray and help tumble clothes to enhance washing performance while
maintaining fabric care.
■Automatic Wash Load Detection
Automatically detects the load and optimizes the washing time.
■Child Lock
The Child lock prevents children from pressing any button to change the settings
during operation.
■The LED Display
The LED display shows the settings, estimated time remaining, options, and status
messages for your washer. When the washer is turned on, the light in the display will
illuminate.
추가선택, 예약,

arnings
W
3
For your safety, the information in this manual must be followed to minimize
the risk of fire or explosion, ele tri sho k, or to prevent property damage,
personal injury, or loss of life.
!
READ ALL INSTRUCTIONS BEFORE USE
WARNING!
• Read all ins ruc ions before using he washer.
• Do no wash ar icles ha have been previously
cleaned in, washed in, soaked in, or spo ed wi h
gasoline, dry cleaning solven s, or o her
flammable or explosive subs ances, as hey give
off vapors ha could igni e or explode.
• Do no add gasoline, dry cleaning solven s, or
o her flammable or explosive subs ances o he
wash wa er. These subs ances give off vapors
ha could igni e or explode.
• Under cer ain condi ions, hydrogen gas may be
produced in a ho wa er sys em ha has no
been used for 2 weeks or more. HYDROGEN
GAS IS EXPLOSIVE. If he ho wa er sys em
has no been used for such a period, before
using he washing machine, urn on all ho wa er
fauce s and le he wa er flow from each for
several minu es. This will release any
accumula ed hydrogen gas. As he gas is
flammable, do no smoke or use an open flame
during his ime.
• Do no allow children o play on or in he washer.
Close supervision of children is necessary when
he washer is used near children.
• Before he washer is removed from service or
discarded, remove he door o preven children
from hiding inside.
• Do no ins all or s ore he washer where i will be
exposed o he wea her.
• Do no amper wi h con rols.
• Do no repair or replace any par of he washer
or a emp any servicing unless specifically
recommended in he user-main enance
ins ruc ions or published user-repair ins ruc ions
ha you unders and and have he skills o carry
ou .
• See Ins alla ion Ins ruc ions for grounding
requiremen s.
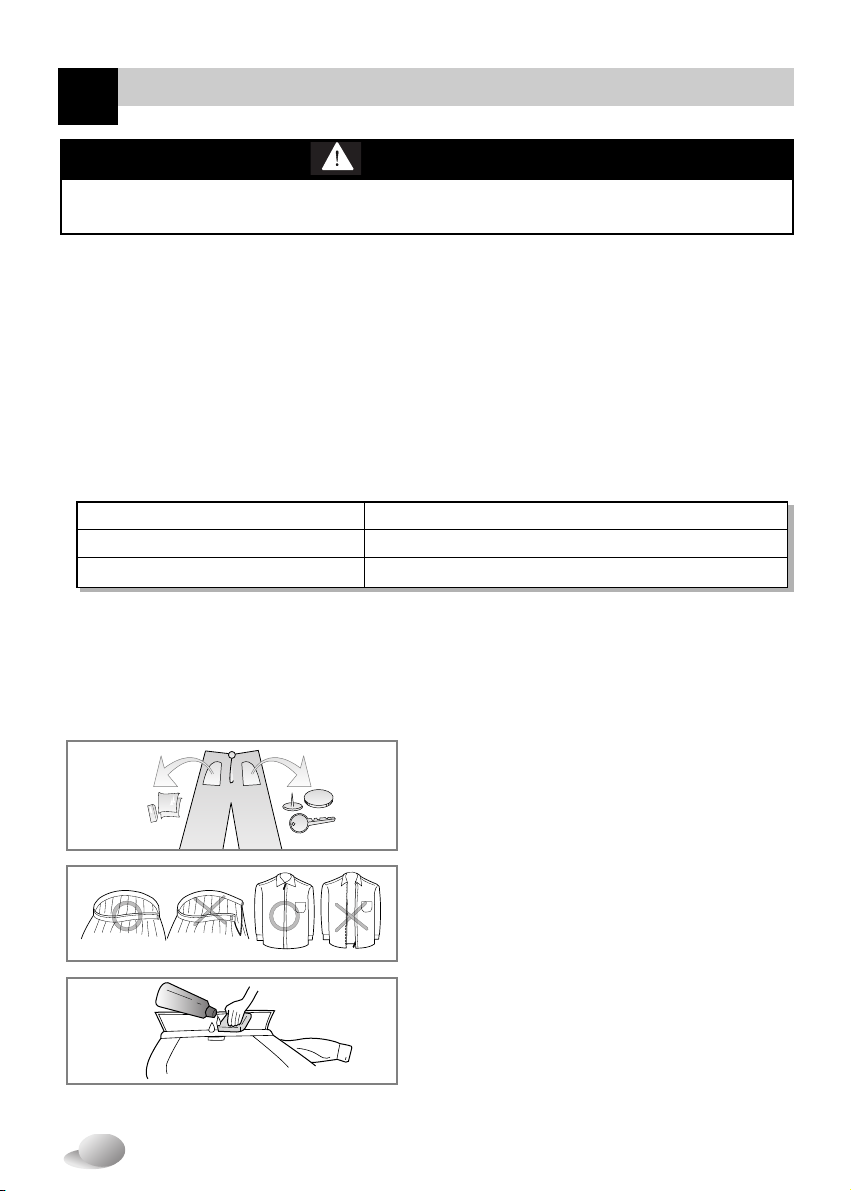
• ALWAYS follow he fabric care ins ruc ions
supplied by he garmen manufac urer.
• Do no place i ems exposed o cooking oil in
your washer. I ems con amina ed wi h cooking
oils may con ribu e o a chemical reac ion ha
could cause a load o ca ch fire.
• Do no use fabric sof eners or produc s o
elimina e s a ic unless recommended by he
manufac urer of he fabric sof ener or produc .
GROUNDING INSTRUCTIONS
This appliance mus be grounded. In he even of malfunc ion or breakdown, grounding will reduce he risk
of elec ric shock by providing a pa h of leas resis ance for elec ric curren . This appliance is equipped wi h
a cord having an equipmen -grounding conduc or and grounding plug. The plug mus be plugged in o an
appropria e ou le ha is properly ins alled and grounded in accordance wi h all local codes and ordinance.
• Do no use an adap er or ex ension cord.
• Do no remove ground prong.
• If you don’ have he proper ou le , consul an elec rician.
IMPORTANT SAFETY INSTRUCTIONS
WARNING :To reduce he risk of fire, elec ric shock, or injury o persons when using
he washer, follow basic precau ions, including he following:
SAVE THESE INSTRUCTIONS
WARNING :Improper connec ion of he equipmen -grounding conduc or can resul in risk of elec ric
shock. Check wi h a qualified elec rician or serviceman if you are in doub as o whe her he appliance
is properly grounded. Do no modify he plug provided wi h he appliance - if i does no fi he ou le ,
have a proper ou le ins alled by a qualified elec rician.
!
!

Accessories
pecification
S
4
Name : Front loading washing machine
Power supply : 120 V~, 60 H
Si e : 686 mm(W)×756 mm(D)×983 mm(H) /
1295 mm (D, door open)
Weigh : 86 kg (190 lbs)
Wash capacity : 14,0 kg (31lbs)
Spin speed : 1100 rpm max.
Permissible water pressure : 0.3-10kgf/cm2(30-1000kPa)
❋The appearance and specifications may be varied without notice to raise the units quality.
Inlet hose 1EA
❈Option Hot/Cold (2EA) Spanner Caps (4EA) Tie Strap Elbow Bracket
CajónDispenser
Drain Hose Water Circulation
Drum
Cold Water Inlet
Hot Water
Inlet
Air Vent for
Safety
Door
Drain Plug
Control Panel
Shipping Bolts
Adjusta le Feet
Lower Cover Cap
Drain Pump Filter
Power Plug
• If the supply cord is damaged,
it must be replaced by the
manufacturer or its authori ed
service technician in order to avoid a
ha ard.
Back of Washer

nstallation
I
5
1. To preven in ernal damage during
ranspor , he special 4 bol s are locked.
Before opera ing he washer, remove
he bol s along wi h he rubber bungs.
• If hey are no removed, i may cause severe
vibra ion, noise and malfunc ion.
3. Take ou he 4 bol s along wi h he rubber
bungs by sligh ly wis ing he bung. Keep
he 4 bol s and he spanner for fu ure use.
• Whenever he appliance is ranspor ed, he
ransi bol s mus be refi ed.
The appliance is fi ed wi h ransi bol s o preven in ernal damage during ranspor .
2. Unscrew he 4 bol s wi h
he spanner supplied.
4. Close he holes wi h he caps supplied.
Removing transit bolts
cap
Install or store where it will not be exposed to temperat res below freezing or exposed to the weather.
Properly gro nd washer to conform with all governing codes and ordinances.
To red ce the risk of electric shock, do not install the washer in h mid spaces.
The base opening m st not be obstr cted by carpeting when the washing machine is installed on a
carpeted floor.
In co ntries where there are areas which may be s bject to infestation by cockroaches or other
vermin, pay partic lar attention to keeping the appliance and its s rro ndings in clean condition at
all times.
Any damage which may be ca se by cockroaches or other vermin will not be covered by the
appliance g arantee.
Transit bolts

6
nstallation
I
■Installation learan es
The loca ion mus be large enough o fully open
he washer door.
■Washer dimensions
• Mos ins alla ions require a minimum
10 cm clearance behind he washer.
■Minimum installation spa ing for re essed
area installation.
The following dimensions shown are for he
minimum spacing allowed.
Addi ional spacing should be considered for
ins alla ion and servicing.
• Addi ional clearances migh be required
for wall, door and floor moldings.
• Addi ional spacing of 2.5 cm on all
sides of he washer is recommended o
reduce noise ransfer.
Companion appliance spacing should also be
considered.
[Front view]
[Side view]
■Level floor
• Allowable slope under en ire washer is 1°.
• To minimize noise and vibration, the washer
MUST be installed on a solidly onstru ted floor.
• Carpe ing and sof ile surfaces are no
recommended.
• Never ins all he washer on a pla form or weakly
suppor ed s ruc ure.
NOTE: A firm, solid floor is even more critical to a front-
loading washer than to a top-loader.
If yo r floor is wood and/or frame constr ction, yo
may need to reinforce it. Front-loaders se
s bstantially faster spin speeds than top-loaders,
ca sing greater vibration. If the floor is not solid,
yo r washer will vibrate. Yo will hear and feel the
vibration thro gho t yo r ho se.
■Power outlet
• Mus be wi hin 60 in. (1.5 m) of ei her side of he
washer. Do no overload he ou le wi h more
han one appliance.
• Time-delay fuse or circui breaker is recommended.
NOTE: It is the personal responsibility and obligation of the
c stomer to have a proper o tlet installed by a
q alified electrician.
75.6 cm
98.3 cm
68.6 cm
129.5 cm
75.6 cm
68.6 cm 2.5 cm2.5 cm
10 cm

7
nstallation
I
CAUTION on erning the Power Cord
Mos appliances recommend hey be placed upon a dedica ed circui ; ha is, a single ou le circui
which powers only ha appliance and has no addi ional ou le s or branch circui s. Check he
specifica ion page of his owner's manual o be cer ain.
Do no overload wall ou le s. Overloaded wall ou le s, loose or damaged wall ou le s, ex ension cords,
frayed power cords, or damaged or cracked wire insula ion are dangerous. Any of hese condi ions
could resul in elec ric shock or fire. Periodically examine he cord of your appliance, and if i s
appearance indica es damage or de eriora ion, unplug i , discon inue use of he appliance, and have
he cord replaced wi h an exac replacemen par by an au horized servicer.
Pro ec he power cord from physical or mechanical abuse, such as being wis ed, kinked, pinched,
closed in a door, or walked upon. Pay par icular a en ion o plugs, wall ou le s, and he poin where
he cord exi s he appliance.
CAUTION
▶
Water supply pressure must be between 30kPa and 1000kPa
(0.3~10kgf/cm2)
▶
D n’t strip r cr ssthread when c nnecting Inlet h se t the valve.
▶
If the water supply pressure is m re than 1000kPa, a dec mpressi n device
sh uld be installed.
• Two rubber seals are supplied wi h he wa er inle hoses hese are in
order o preven wa er leaks.
• Check wa er igh ness of washing machine connec ions by urning he
ap comple ely on.
• Periodically check he condi ion of he hose and replace he hose if
necessary.
• Make sure ha here is no kink on he hose and ha i is no crushed.
▶
When y ur washer has tw valves,
• The Inle hose which has red connec or is for he ho wa er ap.
• If he washer has wo valves, he energy is saved by using ho valve.
Washing Machine is to be connected to the water mains using new hose-sets and that old
hose-sets should not be used.
Connecting water supply hose
1. Do no use an ex ension cord or double adap er.
2. If he supply cord is damaged, i mus be replaced by he manufac urer or i s service agen s or
similarly qualified person in order o avoid a hazard.
3. Always unplug he machine and urn off he wa er supply af er use.
4. Connec he machine o an ear hed socke in accordance wi h curren wiring regula ions.
5. The appliance mus be posi ioned so ha he plug is easily accessible.
• Repairs o he washing machine mus only be carried ou qualified personnel. Repairs carried ou by
inexperienced persons may cause injury or serious malfunc ioning. Con ac your local service cen er
• Do no ins all your washing machine in rooms where empera ures below freezing may occur. Frozen hoses
may burs under pressure. The reliabili y of he elec ronic con rol uni may be impaired a empera ures below
freezing poin .
• If he appliance is delivered in he win er mon hs and empera ures are below freezing : S ore he washing
machine a room empera ure for a few hours before pu ing i in o opera ion.
Electrical connection
Hose connec or
Ho wa er ap
Cold wa er ap
Cold Ho
(Op ion)
Rubber seal

8
nstallation
I
Installation of drain hose
This equipmen is no designed for mari ime use or for use mobile ins alla ions such as
caravans, aircraf e c.
Turn off he s opcock if he machine is o be lef for any leng h of ime (e.g. holiday),
especially if here is no floor drain(gully) in he immedia e vicini y.
When disposing of he appliance, cu off he mains cable, and des roy he plug Disable he
door lock o preven young children being rapped inside.
Packaging ma erial (e.g. Films, S yrofoam) can be dangerous for children. There is a risk
of suffoca ion !
Keep all packaging well away from children.
• The drain hose should no be placed
higher han 100 cm above he floor.
• Proper securing of he drain hose will
pro ec he floor from damage due o
wa er leakage.
• When he drain hose is oo long, do no
force back in o he washer. This will
cause abnormal noise.
• When ins alling he drain hose sink,
secure i igh ly wi h a s ring.
• Proper securing of he drain hose will
pro ec he floor from damage due o
wa er leakage.
• Place he end of he drain hose in he
hole of he floor drain sys em.
abou 100 cm
abou 145 cm
abou 105 cm
min. 60 cm
max. 100 cm
abou 100 cm
abou 145 cm
abou 105 cm
min. 60 cm
max. 100 cm
Laundry ub
Hose
Re ainer
Tie
s rap max. 100cm
min. 60cm
max. 100cm
min. 60cm

9
nstallation
I
Level adjustment
1. Adjus ing he washing machine level
properly preven s excessive noise and
vibra ion.
Ins all he appliance on a solid and level
floor surface, preferably in a corner of he
room.
NOTE: Extend the feet no more than necessary
to level the washer. The more the feet are
extended, the more the washer will
vibrate.
2. If he floor is uneven, adjus he adjus able
fee as required. (Do no inser pieces of
wood e c. under he fee )
Make sure ha all four fee are s able and
res ing on he floor and hen check ha he
appliance is perfec ly level.
(Use a spiri level)
❊Af er he washer is level, igh en he lock
nu s up owards of he base of he washer.
All lock nu s mus be igh ened.
NOTE: If there are vibration and noise d ring
the spin cycle, re-check the leveling of
the washer, adj st the feet as req ired,
and tighten the lock n ts sec rely to
prevent changes in adj stment.
R n the washer with a test load to make
certain yo r washer is properly leveled.
P t approximately 6 po nds of la ndry
in the machine. Then, press POWER,
RINSE+SPIN, and START/PAUSE, in
that order. When the machine spins at
high speed, verify that it is stable. If not,
adj st
❊ Diagonal Check
When pushing down the edges of the washing
machine top plate diagonally, the machine
should not move up and down at all. (Please,
check both of two directions)
f machine rocks when pushing the machine top
plate diagonally, adjust the feet again.
Lock nu
Adjus able fee
Adjus able fee
Higher Lower
Adjus able fee

10
are before washing
C
1. Fabri Care Labels
Look for a care label on your clo hes. This will ell you abou he fabric con en of your
garmen and how i should be washed.
2. Sorting
To ge he bes resul s, sor clo hes in o loads ha can be washed wi h he same wash
cycle.
Differen fabrics need o be washed in differen ways.
Always sor dark colors from pale colors and whi es. Wash separa ely as dye and lin
ransfer can occur causing discolora ion of whi e clo hing. If possible, do no wash
heavily soiled i ems wi h ligh ly soiled ones.
Soil (Heavy, Normal, Light) Separate clothes according to amo nt of soil.
Color (White, Lights, Darks) Separate white fabrics from colored fabrics.
Lint (Lint Prod cers, Collectors) Wash lint prod cers and lint collectors separately.
3. Che k before loading
Combine large and small i ems in a load. Load large i ems firs .
Large i ems should no be more han half he o al wash load.
Do no wash single i ems. This may cause an ou -of-balance load. Add one or wo similar
i ems.
• Check all he pocke s o make sure ha hey
are emp y. Things such as clip, ma ches,
pens, coins, and keys can damage bo h your
washer and your clo hes.
• Close zippers, hooks, and s rings o make
sure ha hese i ems do no snag on o her
clo hes.
• Pre rea dir and s ains by brushing a li le
de ergen dissolved in wa er on o s ains like
collars and cuffs o help lif dir .
WARNING
To redu e the risk of fire, ele tri sho k, or injury to persons, read the
IMPORTANT SAFETY INSTRUCTIONS before operating this applian e.
NOTE: Do not wash or spin water-proof clothes.

11
sing the dispenser
U
The a tomatic dispenser consists of fo r compartments which hold 1) liq id chlorine bleach,
2) liq id fabric softener, 3) liq id or powdered detergent for prewash and 4) liq id or
powdered detergent
and color safe bleach for main wash.
All la ndry prod cts can be added at once in their respective dispenser compartments.
They will be dispensed at the appropriate time for most effective cleaning. After loading the
la ndry
additives into the dispenser, close the dispenser drawer.
Add detergent, blea h and fabri softener to the automati dispenser following
these steps:
1. Open he dispenser drawer.
2. Load he laundry produc s in o he appropria e compar men s.
3. Close he dispenser drawer.
■About detergent
Low sudsing de ergen is recommended for his washer. Use he manufac urer's
recommended amoun .
If low sudsing de ergen is no available, a reduced amoun of regular de ergen may be
used.
Because reducing he amoun of de ergen may reduce cleaning, i is impor an o
pre rea s ains,
sor carefully by color and soil level, and avoid overloading.
De ergen usage may need o be adjus ed for wa er empera ure, wa er hardness, size
and soil level of he load.
For bes resul s, avoid using oo much de ergen .
• Add de ergen o his compar men
when using he Prewash op ion.
Liquid or powdered de ergen may
be used in his compar men . The
de ergen will au oma ically be
dispensed during Prewash if he
Prewash op ion is selec ed.
• Add 1/2 he recommended amoun
of de ergen o he Prewash
compar men and he
recommended amoun of de ergen
o he main wash compar men .
NOTE : Liq id detergent will drain
into the washer dr m as it is
added.
Liquid Chlorine
Bleach
Compar men
Liquid Fabric
Sof ener
Compar men
Prewash
Compar men
Main Wash
Compar men
1. Prewash Detergent
Compartment

12
sing the dispenser
U
Liquid De ergen Box
Inser
• Add measured de ergen o his
compar men for Main wash. De ergen
is flushed from he dispenser a he
beginning of he cycle. Ei her powdered
or liquid de ergen can be used.
• Liquid or powdered color-safe bleach
may be added o he main wash
compar men along wi h he same ype
of liquid or powdered de ergen .
• When using liquid de ergen , make sure
he liquid de ergen box and inser are
in place. Do no exceed he maximum
fill line.
• For powered de ergen , remove bo h
he liquid de ergen box and inser .
• Powdered de ergen will no dispense
wi h he liquid de ergen box and inser
in place.
2. Main Wash Detergent
Compartment
• Add measured liquid chlorine bleach o
his compar men . The bleach will be
au oma ically dispensed a he proper
ime during he wash cycle.
• Do no exceed he maximum fill line.
Overfilling can cause early dispensing of
he bleach which could resul in
damaged clo hes.
• Do no pour undilu ed liquid chlorine
bleach direc ly on o he load or in o he
drum. Fabric damage can occur.
• Do no use powdered bleach in his
compar men .
3. Liquid Blea h Compartment
• Add recommended amoun of fabric
sof ener o his compar men .
• Dilu e concen ra ed sof eners wi h
warm wa er o he fill line.
• Do no exceed he maximum fill line.
Overfilling can cause early dispensing
of he fabric sof ener which could resul
in s ained clo hes.
• Do no pour fabric sof ener direc ly on
he wash load.
• The fabric sof ener will be au oma ically
dispensed during he las rinse cycle.
4. Fabri Softener Compartment
NOTE: Do not place, store, or spill la ndry
prod cts (soap, detergent, bleach,
softener, etc.) on the top of yo r
washer or dryer. These prod cts
can damage the finish or controls if
left there too long.

13
unction
F
■Sele t y les designed for different types of fabri and soil levels.
Cy le
HAND WASH/
WOOL
Fabri Type Spin
Speed Soil
Level Pre-
Wash Water
Plus
Qui k
Cy le Rinse
+ Spin
Extra
Rinse
Stain
Cy le
Wash/Rinse
Temp
Warm/Cold
Warm/Warm
Ho /Cold
Tap Cold/Cold
Cold/Cold
Low
Medium
No Spin
BULKY/
LARGE
Large i ems such as
blanke s and comfor ers
Normal
Heavy
Ligh
Warm/Cold
Warm/Warm
Ho /Cold
Tap Cold/Cold
Cold/Cold
High
Ex ra High
No Spin
Low
Medium
COTTON/
TOWELS
Co on, linen, owels,
shir s, shee s, jeans,
mixed loads
Normal
Heavy
Ligh
Warm/Cold
Warm/Warm
Ho /Cold
Tap Cold/Cold
Cold/Cold
High
Ex ra High
No Spin
Low
Medium
NORMAL Mixed loads,
work clo hes, jeans,
shir s
Normal
Heavy
Ligh
Cold/Cold
Warm/Cold
Warm/Warm
Tap Cold/Cold
Medium
No Spin
Low
DELICATES
Dress shir s/blouses,
nylons, sheer or lacy
garmen s
Normal
Heavy
Ligh
Warm/Cold
Warm/Warm
Tap Cold/Cold
Cold/Cold
Medium
No Spin
Low
I ems labeled
“hand washable”
Normal
Ligh
Warm/Cold
Warm/Warm
Ho /Cold
Tap Cold/Cold
Cold/Cold
Medium
High
No Spin
Low
PERM.
PRESS
Dress shir s/pan s,
wrinkle-free clo hing,
poly/co on blend
clo hing, ableclo hs
Normal
Heavy
Ligh
Ho /Cold
Tap Cold/Cold
Cold/Cold
Warm/Cold
Warm/Warm
Ex ra High
No Spin
Low
Medium
High
SPEED
WASH Ligh ly soiled clo hing
and small loads
Ligh
Normal
Heavy
• Only woolen i ems ha are designa ed as “Machine-Washable” should be washed in his washing machine.
• Wash only small loads for op imum fabric care (less han 8 lbs.)
• Only neu ral (wool safe) de ergen s should be used (Only a small quan i y of de ergen is needed due o he
small load size and low volume of wa er in he cycle.)
• The HAND WASH/WOOL cycle uses a gen le umble ac ion and low speed spin for ul ima e fabric care.
HAND WASH/WOOL
The wool wash cycle of his machine has been approved by Woolmark for he washing of machine
washable Woolmark produc s provided ha he produc s are washed according o he ins ruc ions
on he garmen label and hose issued by he manufac urer of his washing machine, M0807

14
ow to use washer
H
• Use his bu on o urn he power On/Off.
1. Power ( )
• Allows he s ar of any cycle o be delayed for
1~12 hours.
• Choose he wash cycle for your load, and hen
press he Delay Wash bu on once for one hour or
press he bu on again o increase he delay wash
ime up o 12 hours in one hour incremen s.
4. Delay Wash
• Adds ex ra wa er o he wash and rinse cycles for
superior resul s.
5. Water Plus
• SpinSenseTM can be used when here is a
vibra ion problem, especially on wood floor
ins alla ions.
• To opera e SpinSenseTM press and hold he Wa er
Plus bu on for 3 seconds when he washing
machine is running on any cycle.
• When SpinSenseTM has been selec ed, he Spin
Speed bu on ligh will blink on and off con inually
o indica e ha he SpinSenseTM func ion has been
selec ed.
• Push and hold he Wa er Plus bu on again for 3
seconds o cancel SpinSenseTM.
• Once SpinSenseTM has been selec ed, if will
con inue o func ion even if in errup ed by a power
failure.
• 'SPINSENSE' op ion canno be selec ed during
he spinning cycle.
6. SpinSenseTM
• This op ion provides an addi ional rinse.
• Use his op ion o ensure he removal of de ergen
or bleach residue from garmen s.
7. Extra Rinse
• Ro a e he Cycle selec or knob o selec cycle
designed for differen ypes of fabric and soil
levels.
• Each cycle has a prese Wash/Rinse empera ure,
Spin speed, Soil Level, and Op ion (See page 13).
• The prese se ings can be changed any ime
before S ar .
NOTE:
This front load washer req ires longer cycle time
and gets clothes m ch cleaner, yet is more gentle on
the fabrics, than top load washers. Washing time can
be red ced significantly for small loads or lightly
soiled loads by selecting Speed Wash cycle and
setting the Soil Level b tton at Light.
2. Cy les
• Use his bu on o s ar /s op he washer.
NOTE:
If yo do not press the Start/Pa se b tton within
4 min tes of selecting a cycle, the washer
a tomatically t rns off.
3. Start/Pause ( )

15
ow to use washer
H
• Selec a wa er empera ure based on he ype of
load you are washing.
• Follow he fabric care label and char below for
bes resul s.
• Warm rinses leave he loads dryer han cold
rinses. Warm rinses increase wrinkling.
• In cold clima es, a warm rinse makes he load
more comfor able o handle.
• Cold rinses save energy.
• The Cold rinse empera ures depend on he cold
wa er a your fauce .
• Warm rinses are regula ed a approxima ely 86°F
(30°C).
• For he Tap Cold/Cold se ing, bo h wash and
rinse empera ures depend on he cold wa er a
your fauce .
8. Wash/Rinse Temperature
Shows how much of he curren wash cycle has
been comple ed.
3. CYCLE COMPLETION
INDICATOR
This por ion of he display shows he selec ed
cycle, opera ing s a us, and special messages.
If a cycle has special ins ruc ions, hey will also be
displayed in his area.
4. STATUS/CYCLE DISPLAY
When he START/PAUSE bu on is pressed, he
washer au oma ically de ec s he wash load
(weigh ) and op imizes he washing ime, based on
he selec ed cycle and op ions. The display will
hen indica e he es ima ed ime remaining for he
selec ed wash cycle.
NOTE:
The cycle time displayed may appear m ch longer
than that of a top-loading washer.
The displayed time is for the complete cycle, rather
than j st the agitation portion of the cycle, as is
typically shown on a top-loading washer.
2. ESTIMATED TIME REMAINING
Indica es ha he door is locked. The washer door
will lock while he washer is opera ing. The door
can be unlocked by pressing he START/PAUSE
bu on o s op he washer.
1. DOOR LOCK INDICATOR
• To change he spin speed, press he Spin Speed
bu on repea edly o cycle hrough available
op ions.
• To start Drain/Spin y le:
1. Press Power ( ) bu on o urn on.
2. Press Spin Speed bu on only.
3. Press Start/Pause ( ) bu on.
9. Spin speed
• Press repea edly o adjus he volume of he
Beeper.
11. Beeper
• To change he soil level, press he Soil Level
bu on repea edly un il he desired se ing is on.
10. Soil Level
S ggested Wash Temp.
Ho
122°F (50°C)
Warm
104°F (40°C)
Cold
77°F (25°C)
Garment
Whi es and Heavy
soiled color-fas i ems
Mos loads
Brigh ly colored i ems,
washable woolens
LED DISPLAY
1
2
3
4

16
ow to use washer
H
OPTION EST. TIME REMAINING
• Use his op ion for loads ha need pre rea men .
Adds 16 minu es prewash and drain.
• This display shows:
a) he es ima ed ime remaining in he cycle when
opera ing,
b) he error code when an error has been
de ec ed.
STATUS INDICATOR
• These ligh s show which por ion of he cycle he
washer is opera ing. (See page 15)
DOOR LOCKED
• Ligh s whenever he door of he washer is locked.
• The door can be unlocked by pressing he
S ar /Pause ( ) bu on o s op he washer.
NOTA: If the water temperat re or the level is too
high, the door cannot be nlocked.
Do not try to force the door open when
DOOR LOCKED lights on.
CHILD LOCK
• Use his op ion o preven unwan ed use of he
washer. Press and hold op ion bu on for 3
seconds o lock/unlock con rol.
• When Child lock is se , blinks and all bu ons
are disabled excep he Power ( ) bu on.
You can lock he washer while i is opera ing.
1. Prewash
• Use his op ion o rinse and hen spin.
2. Rinse+Spin
• The Quick Cycle offers a quick cycle ime.
• Sugges ed uses include freshening newly
purchased clo hes, or clo hing ha has been
packed away.
3. Qui k Cy le
• Adds ime o he wash and rinse for be er s ain
removal.
• Au oma ically provides a rinse.
4. Stain y le
1. Remove any clo hing or i ems from he washer
and close he door.
2. Open he dispenser drawer and add liquid
chlorine bleach o he bleach compar men .
NOTE:
Do not add any detergent to the detergent
compartments. Excessive s ds may be prod ced and
leak from the washer.
3. Close he dispenser drawer slowly.
4. Power on he machine, press he “op ion” and
hen selec he “Tub Clean”.
5. Press he Start/Pause bu on o s ar .
6. Af er he cycle is comple e, leave he door open
o dry around he washer door opening, door
seal and door glass.
CAUTION: If here are small children in he
house, care mus be aken so ha
hey can no climb in o or play
inside he washer while i is open
for drying.
5. Tub Clean
!

17
The water inlet filter
- " " error message will blink on he con rol panel when wa er does no en er he
de ergen drawer.
- If your wa er is very hard or con ains races of lime deposi , he wa er inle fil er may
become clogged.
I is herefore a good idea o clean i from ime o ime.
aintenance
M
The drain pump filter
❋
The drain fil er collec s hreads and small objec s lef in he laundry.
Check regularly ha he fil er is clean o ensure smoo h running of your machine.
CAUTION Firs drain using he drain and hen open he pump fil er o remove wha ever
any hreads or objec s.
Be careful when draining if he wa er is ho .
❋ Allow he wa er o cool down before cleaning he drain pump fil er.
❋
Before leaning the washer interior, unplug the ele tri al power ord to avoid ele tri al
sho k to avoid ele tri al sho k hazards.
❋
When disposing of the applian e, ut off the mains able, and destroy the plug Disable the
door lo k to prevent young hildren being trapped inside.
2
3
2
3
1. Turn off he
wa er ap.
2. Unscrew he
wa er inle
hose.
3. Clean he
fil er using a
hard bris le
brush.
4. Tigh en up
he inle
hose.
!
2.
Unplug he drain plug (),
allowing he wa er o flow ou . A
his ime use a vessel o preven
wa er flowing on o he floor. When
wa er does no flow any more, urn
he pump fil er () open o he lef .
3. Remove any foreign ma erial
from he pump fil er (). Af er
cleaning, urn he pump fil er ()
clockwise and inser he drain
plug ( ) o he original place.
close he lower cover cap.
1.
Open he lower cover
cap () by using a
finger. Turn he drain
plug () o pull ou
he hose.

18
aintenance
M
■The washing drum
• If you live in a hard wa er area, lime scale can con inuously builds up in places where
i canno be seen
and i is no easily removed from he drum.
Over ime he build-up of scale clogs appliances, and if i is no kep in check, hese
will even ually
have o be replaced.
• Al hough he washing drum is made of S ainless s eel, specks of rus can be caused
by small me al ar icles (paper clips, safe y pins, e c.) which have been lef in he drum.
• The washing drum should be cleaned from ime o ime.
• If you use descaling agen s, dyes, or bleaches, make sure hey are sui able for
washing machine use.
• Descaler could con ain componen s ha can damage par of your washing machine.
• Remove he spo s wi h a s ainless s eel cleaning agen .
• Never use s eel wool.
■Cleaning the Dispenser
• The dispenser may need o be cleaned periodically due o laundry addi ive build-up.
• Run warm wa er and a sof brush or clo h over he drawer, liquid de ergen box and
inser s o remove any excess laundry addi ives.
• Clean he drawer opening using wa er and a small brush.
• Follow he illus ra ions in reverse order o replace he par s o heir proper loca ion.
NOTE: Do not se any cleaning s bstance on the drawer opening other than water beca se
it will drain into the t b.
If this sho ld happen, set the washer for a rinse and spin cycle to remove any
cleaning s bstance from the washer before doing a load of la ndry.
1
Pull he dispenser
drawer ou un il i
s ops.
2
Press down he lock
ab on he bleach
inser .
Remove he drawer.
3
Remove he liquid
de ergen box, sof ener
and bleach inser s from
heir compar men s.
SOFTENER
MAX
SOFTENER
MAX

19
aintenance
M
■The water ir ulation nozzle
• Clean he wa er circula ion nozzle, if clogged.
■Cleaning your washer
1. Exterior
Proper care of your washer can ex end i s life.
The ou side of he machine can be cleaned wi h warm wa er and a neu ral, non-abrasive
household de ergen .
Immedia ely wipe off any spills. Wipe wi h a damp clo h.
Try no o damage he surface wi h sharp objec s.
IMPORTANT: Do no use me hyla ed spiri , solven s or similar produc s.
2. Interior
Dry around he washer door opening, door seal and door glass. These areas should always be
clean o ensure a wa er- igh seal.
TUB CLEAN is a special cycle for cleaning he inside of he washer. This cycle uses higher wa er
level wi h higher spin speed. Perform his cycle regularly.
• To start the TUB CLEAN y le:
1. Remove any clo hing or i ems from he washer and close he door.
2. Open he dispenser drawer and add liquid chlorine bleach o he bleach compar men .
NOTE: Do not add any detergent to the detergent compartments. Excessive s ds may be
prod ced and leak from the washer.
3. Close he dispenser drawer slowly.
4. Power On and hen press he Extra Rinse bu on for 3 seconds. (Prewash op ion will be
selec ed.)
5. Press he Start/Pause bu on o s ar .
6. Af er he cycle is comple e, leave he door open o dry around he washer door opening, door
seal and door glass.
CAUTION: If here are small children in he house, care mus be aken so ha hey can no climb
in o or play inside he washer while i is open for drying.
NOTE: Remove hard water deposits sing only cleaners labeled as safe for washing machines.
■Winterizing instru tions
If he washer is s ored in an area where freezing can occur or moved in freezing empera ures, follow
hese win erizing ins ruc ions o preven damage o he washer:
1. Turn off wa er supply ap.
2. Disconnec hoses from wa er supply and drain wa er from hoses.
3. Plug elec rical cord in o a properly grounded elec rical ou le .
4. Add 1 gallon (3.8ℓ) non oxic recrea ional vehicle (RV) an ifreeze o emp y wash drum. Close door.
5. Se spin cycle and le washer spin for 1 minu e o drain ou all he wa er.
No all of he RV an ifreeze will be expelled.
6. Unplug elec rical power cord, dry drum in erior, and close door.
7. Remove he wo-compar men con ainer from he Dispenser. Drain any wa er in compar men s and
dry he compar men s.
8. S ore washer in an uprigh posi ion.
9. To remove an ifreeze from washer af er s orage, run emp y washer hrough a comple e cycle using
de ergen . Do not add laundry.
!

20
roubleshooting guide
❋This washing ma hine is equipped with automati safety fun tions whi h dete t and diagnose faults at an
early stage and rea t appropriately.
When the ma hine does not fun tion properly or does not fun tion at all, he k the following points before
you onta t your servi e provider.
T
Symptom Possible Cause Solution
Ra ling and
clanking noise
Thumping sound
Vibra ing noise
Wa er leaks.
Oversudsing
Wa er does no en er
washer or i en ers
slowly
Wa er in he washer
does no drain or
drains slowly.
• Foreign objec s such as coins or
safe y pins maybe in drum or
pump.
• Heavy wash loads may produce
a humping sound. This is usually
normal.
• Have all he ransi bol s and
packing been removed?
• Wash load may be unevenly
dis ribu ed in he drum.
• Are all he fee res ing firmly on
he ground?
• Fill hoses or drain hose are loose
a ap or washer.
• House drain pipes are clogged.
• Wa er supply is no adequa e in
area.
• Wa er supply ap is no
comple ely open.
• Wa er inle hose(s) are kinked.
• The fil er of he inle hose(s)
clogged.
• Drain hose is kinked or clogged.
• The drain fil er is clogged.
S op washer and check drum
and drain fil er.
If noise con inues af er washer
is res ar ed, call your au horised
service cen re.
If sound con inues, washer is
probably ou of balance. S op and
redis ribu e wash load.
Refer o Ins alla ion guide
for removing ransi bol s.
S op washer and rearrange wash load.
Adjus he leveling fee . Make sure all
four fee are in firm con ac wi h he
floor, while he washer is in he spin
cycle wi h load.
Check and igh en hose connec ions.
Unclog drain pipe. Con ac plumber
if necessary.
Too much de ergen or unsui able
de ergen may cause excessive
foaming which may resul in wa er
leaks.
Check ano her ap in he house.
Fully open ap.
S raigh en hose.
Check he fil er of he inle hose.
Clean and s raigh en he drain hose.
Clean he drain fil er
Other manuals for WD-10587BD
1
This manual suits for next models
1
Table of contents
Other LG Washer manuals

LG
LG T1369NEHTF User manual

LG
LG WD1475NPW User manual

LG
LG F4V310 NEH Series User manual

LG
LG F1258RDW User manual

LG
LG WM3455H Series Instruction Manual

LG
LG WTSV13BWHN User manual

LG
LG WM4370H A Series User manual

LG
LG WTP2071 series User manual

LG
LG WM3700H A /01 Series User manual

LG
LG WM2688H*MA Instruction Manual