LG WT7060C Series User manual

OWNER'S MANUALOWNER'S MANUAL
Copyright © 2019 - 2020 LG Electronics Inc. All Rights Reserved.
WT7060C*
WT7100C*
WT7250C*
WT7300C*
MFL6826706
Rev.12_080320
www.lg.com
WT7800C*
WT7880H*A
WT7900H*A
WT730 C*

3 IMPORTANT SAFETY INSTRUCTIONS
7 Parts
7 Accessories
8 Tools Needed
8 Product Specifications
9 Choosing the Proper Location
10 Unpacking and Removing Shipping Material
11 Connecting the Water Lines
12 Connecting the Drain Hose
13 Leveling the Washer
14 Connecting to the Power Supply
14 Testing the Washer
15 Using the Washer
16 Loading the Washer
17 LG SmartThinQ Application
(For the product that contains the wireless LAN
module)
20 Smart Diagnosis™ Function
21 Regular Cleaning
23 Cleaning the Water Inlet Filters
24 Care in Cold Climates
25 Before Calling for Service
33 FOR USA
36 Warranty Exceptions (U.S.)

SAFETY INSTRUCTIONS
READ ALL INSTRUCTIONS BEFORE USE
We have provided many important safety messages in this manual and on your appliance. Always read and
follow all safety messages.
This is the safety alert symbol.
This symbol alerts you to potential hazards that can kill or injure you and others.
All safety messages will follow the safety alert symbol and either the word WARNING or CAUTION.
These words mean:
If you do not follow instructions, it could result in death or serious injury.
If you do not follow instructions, it could result in minor or moderate injury or damage to the product.
All safety messages tell you what the potential hazard is, tell you how to reduce the chance of injury, and tell
you what may happen if the instructions are not followed.
Adhere to all industry recommended safety procedures including the use of long-sleeved gloves and safety
glasses.
Never attempt to operate this appliance if it is damaged, malfunctioning, partially disassembled, or has
missing or broken parts, including a damaged cord or plug.
Before use, the appliance must be properly installed as described in this manual.
To reduce the risk of severe injury or death, follow all installation instructions.
Refer to the INSTALLATION INSTRUCTIONS for detailed grounding procedures. Installation instructions
are packed with the appliance for the installer’s reference. If the appliance is moved to a new location, have
it checked and reinstalled by qualified service personnel.
Moving or installation of the appliance requires two or more people.
Do not install the appliance in humid spaces.
Store and install the appliance where it will not be exposed to temperatures below freezing or exposed to
outdoor weather conditions.
This appliance is not designed for maritime use or for mobile installations such as in RVs, trailers, or aircraft.
Strongly recommend not using a drain pan when installing this appliance, as standing water in the drain pan
may increase the risk of electric shock, injury, or death.

SAFETY INSTRUCTIONS
Keep packing materials out of the reach of children. Packaging material can be dangerous for children.
There is a risk of suffocation.
Destroy the carton, plastic bag, and other packing materials after the appliance is unpacked. Children might
use them for play. Cartons covered with rugs, bedspreads, or plastic sheets can become airtight chambers.
The appliance must be installed and electrically grounded by qualified service personnel in accordance with
local codes.
Do not, under any circumstances, cut or remove the third (ground) prong from the power cord.
When installing or moving the appliance, be careful not to pinch, crush, or damage the power cord.
Connect to a properly rated, protected, and sized power circuit to avoid electrical overload.
This appliance must be positioned near to an electrical power supply.
Disconnect the power cord, house fuse or circuit breaker before installing or servicing the appliance.
The power cord of this appliance is equipped with a 3-prong (grounding) plug which mates with a standard
3-prong (grounding) wall outlet to minimize the possibility of electric shock from this appliance.
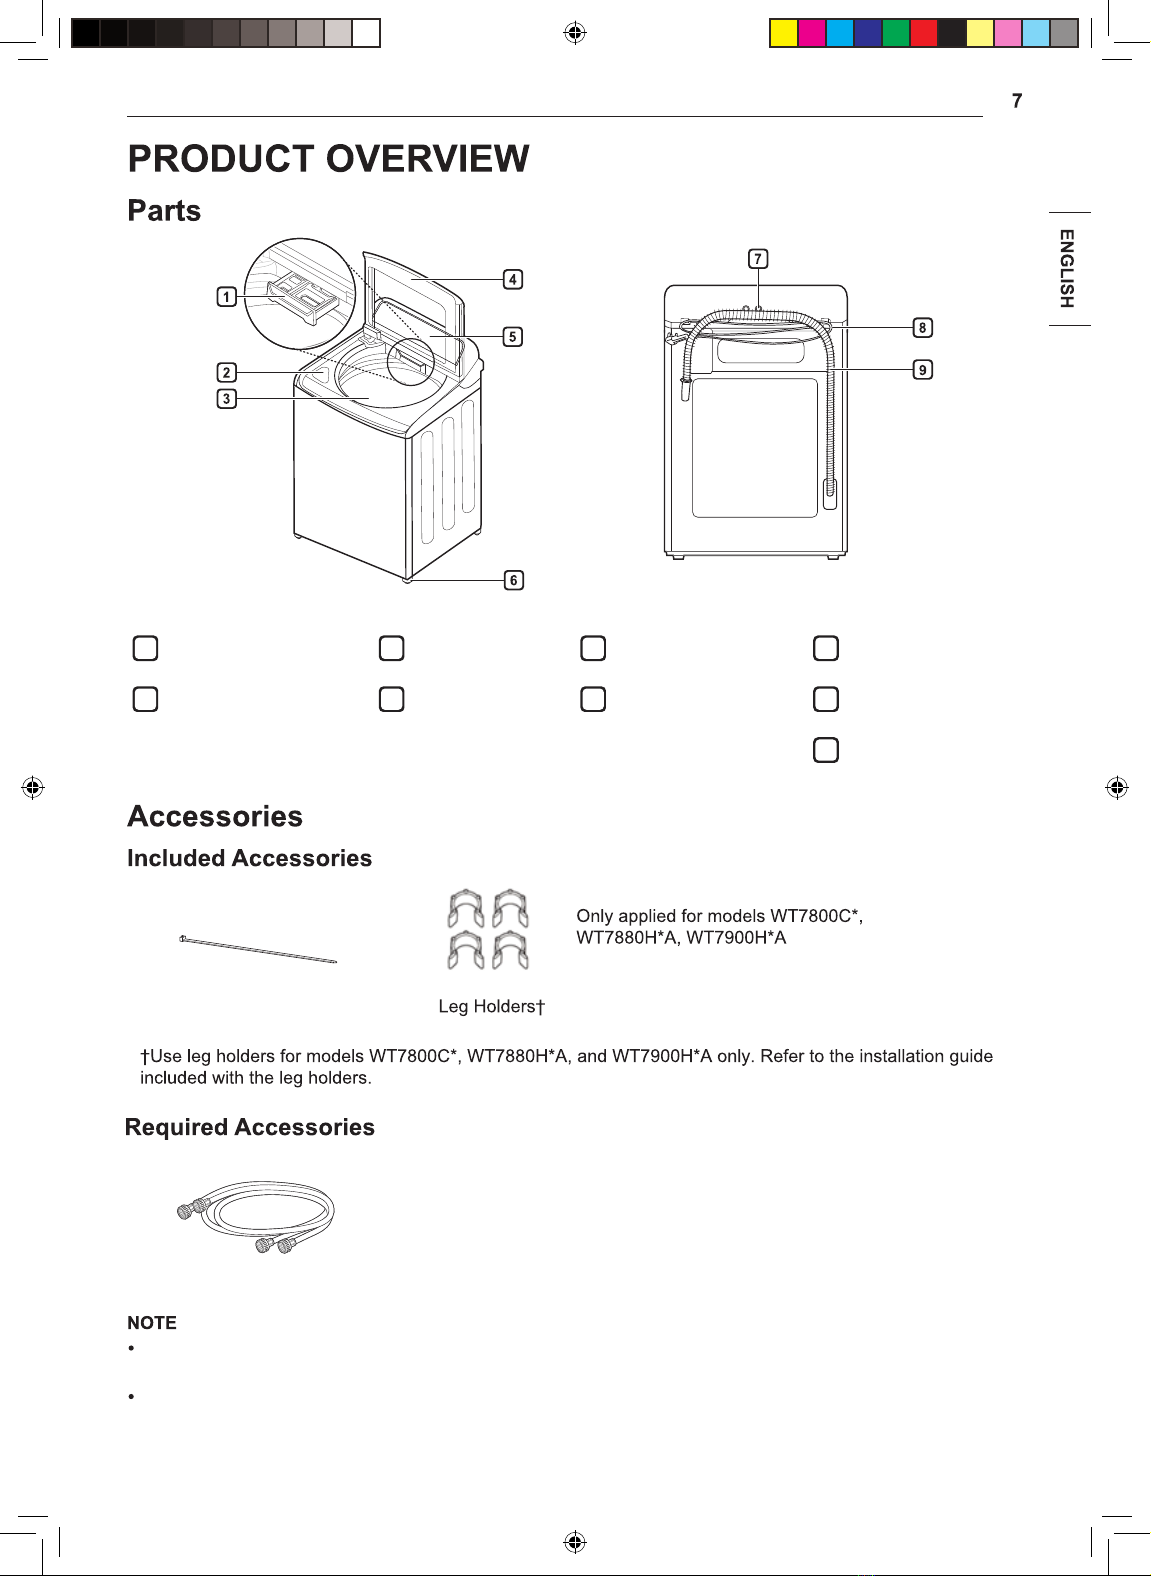
Use new hoses when connecting the appliance to the water supply. Do not reuse old hoses.
Read all instructions before using the appliance and save these instructions.
Use this appliance only for its intended purpose.
If the product has been submerged in water, sitting in standing water, or waterlogged, do not come in
contact with the product and immediately contact an LG Electronics customer information center for
instructions before resuming use.
If you detect a strange sound, a chemical or burning smell, or smoke coming from the appliance, unplug it
immediately, and contact an LG Electronics customer information center.
Under certain conditions, hydrogen gas may be produced in a hot-water system that has not been used
for two weeks or more. HYDROGEN GAS IS EXPLOSIVE. If the hot-water system has not been used for
such a period, before using the appliance turn on all hot water faucets and let the water flow from each for
several minutes. This will release any accumulated hydrogen gas. As the gas is flammable, do not smoke or
use an open flame during this time.
Do not reach into the washer if the tub or drum, agitator, or any interior parts are moving. Before loading,
unloading, or adding items, press Start/Pause and allow the tub or drum to coast to a complete stop before
reaching inside.
This appliance is not intended for use by persons (including children) with reduced physical, sensory or
mental capabilities, or lack of experience and knowledge, unless they have been given supervision or
instruction concerning the use of the appliance by a person responsible for their safety.
Do not allow children or pets to play on, in or with the appliance. Close supervision is necessary when the
appliance is used near children or pets.
Keep laundry products out of children’s reach. To prevent injury to persons, observe all warnings on product
labels.
Repair or immediately replace all power cords that have become frayed or otherwise damaged. Do not use
a cord that shows cracks or abrasion damage along its length or at either end.
Never unplug the appliance by pulling on the power cord. Always grip the plug firmly and pull straight out
from the outlet.
Do not use an extension cord or adapter with this appliance.
Do not grasp the power cord or touch the appliance controls with wet hands.
Do not modify or extend the power cord.

SAFETY INSTRUCTIONS
If the electrical supply cord is damaged, it must only be replaced by the manufacturer or its service agent or
a similar qualified person in order to avoid a hazard.
Do not put oily or greasy clothing, candles or flammable materials on top of the appliance.
Keep the area underneath and around your appliances free of combustible materials (lint, paper, rags, etc.),
gasoline, chemicals and other flammable vapors and liquids.
Do not store or use gasoline or other flammable vapors and liquids in the vicinity of this or any other
appliance.
Do not mix chlorine bleach with ammonia or acids such as vinegar. Follow package directions when using
laundry products. Incorrect usage can produce poisonous gas, resulting in serious injury or death.
Never use harsh chemicals, abrasive cleaners, or solvents to clean the washer. They will damage the finish.
Do not wash articles that have been previously cleaned in, washed in, soaked in, or spotted with gasoline,
dry-cleaning solvents, vegetable or cooking oil, or other flammable or explosive substances, as they give off
vapors that could ignite or explode.
Do not add gasoline, dry cleaning solvents, or other flammable or explosive substances to the wash water.
These substances give off vapors that could ignite or explode.
In the event of a gas leak (propane gas, LP gas, etc.) do not operate this or any other appliance. Open a
window or door to ventilate the area immediately.
Do not tamper with controls.
Fix the drain hose securely in place to avoid flooding.
Do not abuse, sit on, or stand on the lid (door) of the appliance.
Keep hands and foreign objects clear of the lid (door) and latch area when closing the lid (door).
Always check the inside of the appliance for foreign objects.
Do not repair or replace any part of the appliance. All repairs and servicing must be performed by qualified
service personnel unless specifically recommended in this owner’s manual. Use only authorized factory
parts.
Disconnect this appliance from the power supply before cleaning and attempting any user maintenance.
Turning the controls to the OFF position does not disconnect this appliance from the power supply.
Remove any dust or foreign matter from the power plug pins.
Do not disassemble or repair the appliance by yourself.
Remove the lid (door) before the appliance is removed from service or discarded to avoid the danger of
children or small animals getting trapped inside.
Make sure the dispenser drawer or lid (door) is closed at all times when not being filled with laundry
products.
Improper connection of the equipment-grounding conductor can result in a risk of electric shock. Check with
a qualified electrician or service personnel if you are in doubt whether the appliance is properly grounded.
Do not modify the plug provided with the appliance; if it will not fit the outlet, have a proper outlet installed by
a qualified electrician.
The appliance must be grounded. In the event of a malfunction or breakdown, grounding will reduce the risk
of electric shock by providing a path of least resistance for electric current. The appliance is equipped with
a cord having an equipment-grounding conductor and a grounding plug. The plug must be plugged into an
appropriate outlet that is installed and grounded in accordance with all local codes and ordinances.
Do not allow water, bleach, or other liquids to sit in the drum for extended periods. Doing so can corrode the
drum or cause mildew or odors.

SAFETY INSTRUCTIONS
Do not place objects on top of the appliance.
Turn off the water faucets and unplug the appliance if the appliance is to be left for an extended period of
time, such as during vacations.
ALWAYS follow the fabric care instructions supplied by the garment manufacturer.
Use fabric softeners or products to eliminate static only as recommended by the manufacturer.
Do not combine laundry products for use in one load unless specified on the label.
Do not touch draining water which may be hot.
If the drain hose and the water supply hose are frozen in winter, defrost before using the appliance.
Do not store or spill liquid detergents, cleaners, or bleaches (chlorine bleach, oxygen bleach) on the
appliance. Doing so may result in corrosion, discoloration or damage to the surface of the appliance.
Clothing or articles that are waterproof or water resistant must be washed in the Waterproof cycle only.
(e.g. water resistant clothing, mattress covers, outdoor clothes, plastic mats, etc.) Otherwise, it may result
in personal injury or damage to the washer, clothes, walls, floor, and surrounding objects due to abnormal
vibration.

PRODUCT OVERVIEW
1
Detergent Dispenser
3
Tub
5
Control Panel
7
Water Inlets
2
Liquid Bleach
Compartment
4
Lid (Door)
6
Leveling Feet
8
Power Cord
9
Drain Hose
Tie Strap
Hot and Cold Water Hoses
The images in this guide may be different from the actual components and accessories, which are subject to
change by the manufacturer without prior notice for product improvement purposes.
For your safety and for extended product life, use only authorized components. The manufacturer is not
responsible for product malfunction, property damage, or bodily injury caused by the use of separately
purchased unauthorized components, parts, or non-LG products.

INSTALLATION
Pliers Flat-blade
Screwdriver
Level
The appearance and specifications listed in this manual may vary due to constant product improvements.
WT7800C*
120 VAC @ 60 Hz
20 - 120 psi (138 - 827 kPa)
27" (W) X 28 3/8" (D) X 44 1/2" (H), 57 1/4" (H with lid (door) open)
68.6 cm (W) X 72.1 cm (D) X 113 cm (H), 145.3 cm (H with lid (door) open)
127.9 lbs (58.0 kg) 132.3 lbs (60.0 kg)
950 RPM (±50 rpm)
Moving or installation of the appliance requires two or more people. Failure to follow these instructions may
result in injury.
Store and install the appliance where it will not be exposed to temperatures below freezing or exposed to
outdoor weather conditions. Failure to follow this warning can cause product or part failure, serious injury,
fire, electric shock, or death.
Properly ground the washer to conform with all governing codes and ordinances. Failure to follow this
warning can cause serious injury, fire, electric shock, or death.
To reduce the risk of electric shock, do not install the appliance in humid spaces. Failure to follow this
warning can cause serious injury, fire, electric shock, or death.
To ensure proper airflow, do not block the large opening on the bottom of the washer with carpeting or other
materials.
Do not remove the ground prong. Do not use an adapter or extension cord. Plug into a grounded 3-prong
outlet. Failure to follow this warning can cause serious injury, fire, electric shock, or death.
Certain internal parts are intentionally not grounded and may present a risk of electric shock only during
servicing. Service personnel-do not contact the following parts while the appliance is energized. : pump,
motor, noise filter cover, and heater (on applicable models).
WT7900H*A
WT7880H*A
WT7305C*
WT7250C*
WT7300C* WT7100C*
WT7060C*

INSTALLATION
Install the washer on a solid floor that is strong and
rigid enough to support the weight of the washer,
even when fully loaded, without flexing or bouncing.
If the floor has too much flex, you may need to
reinforce it to make it more rigid. If the floor is not
solid, it may cause severe vibration and noise.
Before installing the washer, make sure the floor
is clean, dry and free of dust, dirt, water and oil so
the washer feet cannot slide easily. Leveling feet
that can move or slide on the floor can contribute to
excess vibration and noise due to poor contact with
the floor.
Allow for sufficient space between the walls and the
washer for installation.
The power outlet must be within 60 inches (1.5 m)
of either side of the washer.
The appliance and outlet must be positioned so that
the plug is easily accessible.
Do not overload the outlet with more than one
appliance.
The outlet must be grounded in accordance with
current electrical wiring codes and regulations.
Use a time-delay fuse or circuit breaker.
It is the personal responsibility and obligation of the
product owner to have a proper outlet installed by a
qualified electrician.
To minimize noise and vibration, the washer must
be installed on a solidly constructed floor.
Allowable slope under the entire washer is a
maximum 1 inch difference from side to side or from
front to back.
Installing on carpeting and soft tile surfaces is not
recommended.
Never install the washer on a platform or weakly
supported structure.
The washer must be installed on firm flooring to
minimize vibration during the spin cycle. Concrete
flooring is best, but a wood floor is sufficient,
provided it is built to FHA standards.
44 "
(113 cm)
27"
(68.6 cm)
1"
(2.5 cm)
1"
(2.5 cm)
To ensure sufficient clearance for water lines, the
drain line and airflow, allow minimum clearances of
at least 1 inch (2.5 cm) at the sides and 4 inches (10
cm) behind the unit. Be sure to allow for wall, door,
or floor moldings that may increase the required
clearances.
57 ¼"
(145.3 cm)
26 ¾"
(68 cm)
(72.1 cm)
32"
(81.1 cm)
3 ½"
(9 cm)
Minimum vertical space from floor to overhead
shelves, cabinets, ceilings, etc., is 58 inches (147
cm).

INSTALLATION
Unpack all shipping materials from the washer for
proper operation and inspect it for shipping damage.
Failure to remove shipping materials can cause
excessive noise and vibration.
After removing the carton and shipping material,
lift the washer off the foam base. Make sure the
plastic tub support comes off with the base and is
not stuck to the bottom of the washer.
If you must lay the washer down to remove the
base packaging materials, always protect the side
of the washer and lay it carefully on its side. Do
not lay the washer on its front or back.
Plastic tub support
Carton base
To prevent damage, do not remove the foam
block containing the owner’s manual, parts, and
laundry product samples from the washer tub until
the washer is in the final location.
Once removed, save the foam block for future use.
If the washer needs to be moved, the foam block
will help prevent damage during transportation.

INSTALLATION
To avoid the risk of costly water damage, purchase
and install new inlet hoses when installing the
washer.
Inspect the threaded fitting on each hose and
make sure there is a rubber seal in place in both
ends of each hose to prevent leaking.
Rubber seal Rubber seal
Water hose (to water
inlet on washer)
Water hose (to tap)
Connect the water supply hoses to the hot and
cold water faucets tightly by hand and then
tighten another 2/3 turn with pliers. Connect the
blue hose to a cold water faucet and the red hose
to a hot water faucet.
After connecting the inlet hoses to the water
faucets, turn on the water faucets to flush out
foreign substances (dirt, sand or sawdust) in the
water lines. Let water drain into a bucket, and
check the water temperature to make sure you've
connected the hoses to the correct faucets.
Attach the hot water line to the hot water inlet on
the back of the washer. Attach the cold water line
to the cold water inlet on the back of the washer.
Tighten the fittings securely. Turn ON both faucets
all the way and check for leaks at both ends of the
hoses.
Hot water inlet Cold water inlet
Do not overtighten the hoses or cross-thread the
hose fittings. Overtightening or cross-threading
can damage the valves or couplings, resulting in
leaking and property damage.
Do not reuse old hoses. Use only new hoses
when installing the washer. Old hoses could leak
or burst causing flooding and property damage.
Contact an LG Customer Information Center for
assistance in buying hoses.
Periodically check the hoses for cracks, leaks, and
wear, and replace the hoses every five years. Do
not stretch the water hoses intentionally, and make
sure that they are not pinched, crushed or kinked by
other objects.
Water supply pressure must be between 20 psi
and 120 psi (138 – 827 kPa). If the water supply
pressure is more than 120 psi, a pressure reducing
valve must be installed.
To provide optimum washing performance, the hot
water temperature should be set at 120 – 135 °F
(48 – 57 °C) and the cold at 60 °F (15 °C).
The washer should never be installed or stored in a
location subject to freezing temperatures. Damage
to the water lines and internal mechanisms of the
washer can result. If the washer was exposed to
freezing temperatures prior to installation, allow it to
stand at room temperature for several hours before
use and check for leaks prior to operation.
Do not use flood-preventing hoses with auto shutoff
devices. The devices can be tripped during fill and
prevent the machine from filling properly.

INSTALLATION
Connect the drain hose to either a standpipe or
laundry tub.
The drain hose should always be properly secured.
Failure to properly secure the drain hose can result
in flooding and property damage.
The drain must be installed in accordance with any
applicable local codes and regulations.
Make sure that the drain hose is not stretched,
pinched, crushed, or kinked.
Do not install the drain hose with the end lower than
29.5 inches (75 cm) or higher than 96 inches (244
cm) above the bottom of the washer or more than
60 inches (152 cm) away from the washer.
Never create an airtight seal between the hose and
the drain with tape or other means. If no air gap
is present, water can be siphoned out of the tub
resulting in poor wash/rinse performance or clothing
damage.
Insert the end of the drain hose into the
standpipe.
Use the provided tie strap to secure the drain
hose in place.
If the water valves and drain are built into the wall,
fasten the drain hose to one of the water hoses
with the tie strap provided (ribbed side on inside).
29.5 - 96 "
(75 - 244 cm)
29.5 - 96 "
(75 - 244 cm)
Tie strap
Do not insert the end of the drain hose into the
standpipe more than 8 inches (20 cm). Doing
so can cause siphoning, odors, or improper
draining.
If the drain is large enough for the flange on the
hose to fit inside, then do not insert the flange more
than 1-2 inches into the drain.
Hang the end of the drain hose over the side of
the laundry tub.
Use the provided tie strap to secure the drain
hose in place.

INSTALLATION
oT .sdeeps hgih yrev ta snips rehsaw eht fo but ehT
minimize vibration, noise, and unwanted movement,
the floor must be a level, solid surface.
Adjust the leveling feet only as far as necessary to
level the washer. Extending the leveling feet more
than necessary can cause the washer to vibrate.
Before installing the washer, make sure that the
floor is clean, dry and free of dust, dirt, water and
oil so the washer feet cannot slide easily. Feet
that move or slide on the floor can contribute to
excessive vibration and noise due to poor contact
with the floor.
Take special care not to pinch, strain, or crush the
water and drain lines. If you have a carpenter’s
level, you can use it to check that the washer
level. The slope beneath the washer should not
exceed 1 inch, and all four leveling feet must rest
firmly on the floor.
1"
Level
If the tub is NOT centered, readjust the front feet.
If you have a level, check the washer with the
level.
To check if the washer is level from side to side,
place a level on the back edge of the lid (door).
To check if the washer is level from front to back,
place a level at the side of the washer on the
edge where the cabinet side meets the top cover.
Do not place the level on the top of the lid (door).
Using these surfaces will result in the washer being
unlevel. Level from side to side
morf leveL
front to back
Turn in one direction to raise the washer or the
other direction to lower it.
Raise Lower
Push or rock the top edges of the washer gently
to make sure the washer does not rock. If the
washer rocks, repeat steps 1-3.
Using the washer without leveling it may cause
excess vibration and noise, leading to a machine
malfunction.
Extend the leveling feet only to level the washer.
If you extend the leveling feet unnecessarily, it
may cause abnormal vibration of the washer.
If the washer is not level, the lid (door) may not
stay open properly. If this happens, extend the front
leveling legs until the washer is level from front to
back.

INSTALLATION
The washer should be plugged into a 120-VAC, 60
Hz grounded 3-prong outlet. Plug in the washer.
Do not use a worn or damaged power cord or
power plug. Replace or repair it immediately.
Failure to do so may result in death, fire, electric
shock, or malfunction.
Do not modify the power cord and plug
provided with the appliance. Do not damage
it when installing or moving the washer. Doing
so may result in death, fire, electric shock, or
malfunction.
Make sure that the washer is grounded.
Connect this washer to a grounded outlet
conforming to the rating prior to use. Failure
to do so may result in fire, electric shock, or
malfunction.
Do not damage or cut off the ground prong of
the power cord. Doing so may cause death, fire,
electric shock, or product malfunction.
Improper connection of the equipment-grounding
conductor can result in risk of electric shock.
Check with a qualified electrician or service
technician if you are in doubt as to whether the
appliance is properly grounded. If it does not fit
the outlet, have a proper outlet installed by a
qualified electrician.
The appliance and outlet must be positioned so
that the plug is easily accessible.
Do not use adapters or extension cords. Doing
so may result in serious injury, fire, electric
shock, or death.
For best performance, plug the washer into
its own individual outlet. This helps prevent
overloading house wiring circuits which could
cause a fire hazard from overheated wires.
If necessary, use a new, UL-listed 3-prong
adapter or 3-wire extension cord with a 3-prong
(grounding) plug rated at no less than the branch
circuit. Do not use an extension cord longer
than 3 feet. Failure to follow these warnings may
result in serious injury, fire, electric shock, or
death.
Check if the washer is properly installed and run a
test cycle.
Make sure the tub is empty. Do not load anything
in the tub for this test.
Press the button then immediately press
and hold both the and buttons until an
code appears in the display. (See below for
a key to the codes.)
Initial test
Previous test result was good.
Previous test was ended with an
error.
is displayed first, and , or is displayed.
The indication is different for each model.
Press the button.
The washer will start the test, which will last about
3 minutes. The test automatically checks the
water inlet hoses and the drain hose.
Check the display for results.
If error code is displayed, refer to the following
guide.
Fully open the water faucets.
Straighten out any kinks in the inlet
hoses and make sure the hoses are
not pinned against the wall or under
the washer.
Straighten out any kinks in the drain
hose and make sure the hose is not
pinned against the wall or under the
washer. Remove and flush out the
drain hose to remove clogs. Adjust
or repair the drain. Maximum drain
height is 96 inches.
End of cycle.
At the end of the test cycle, or will
display. The test cycle will end and the washer will
shut off automatically after a short delay.

OPERATION
To reduce the risk of fire, electric shock, or injury
to persons, read the SAFETY INSTRUCTIONS
before operating this appliance.
Sort laundry by fabric type, soil level, color and
load size, as needed. Open the lid (door) and load
items into the washer.
Add the proper amount of HE (High-Efficiency)
detergent to the detergent dispenser. If desired,
add bleach or fabric softener to the appropriate
dispensers.
Press the button to turn on the washer.
The lights above the cycle buttons will illuminate
and a chime will sound.
Turn the cycle selector knob or press the cycle
buttons repeatedly until the desired cycle is
selected. The preset wash temperature, spin
speed, soil level and option settings for that cycle
are shown.
Pressing the button without
selecting a cycle will cause the Normal cycle to
begin immediately.
Default settings for the selected cycle can now be
changed, if desired, using the cycle modifier and
option buttons.
Not all modifiers and options are available on all
cycles. A different chime sounds and the LED does
not light up if the selection is not allowed.
Press the button to begin the cycle.
The lid (door) locks, and the washer agitates
briefly without water to measure the weight of the
load.
The light illuminates near the
beginning of the wash cycle to indicate when
it is safe to add items to the load. Press the
button to pause the cycle and add
garments to the load. Press the
button to resume the cycle.
Adding items after the Add Garment light turns off
may result in poor wash performance.
When the cycle is finished, a melody sounds.
Immediately remove the clothing from the washer
to reduce wrinkling.
If the washer includes lint filters, remember to
check them after every 2 to 3 loads.
You must press and hold the Power button
when turning off the appliance. This helps
prevent accidentally turning it off during a cycle.

OPERATION
The washer can be fully loaded, but the tub
should not be tightly packed with items. The lid
(door) of the washer should close easily.
Use the Bedding cycle for buoyant or
nonabsorbent items such as pillows or
comforters. Failure to follow this caution can
result in leakage.
Check and empty pockets. Paper clips, coins,
matches, etc. can damage clothing and the washer.
Close zippers and hooks, and tie drawstrings to
prevent snagging or tangling of clothes.
Pretreat heavily stained areas for best results.
Combine large and small items in a load. Load large
items first. Large items should not be more than half
of total load.
The washer can be fully loaded, but the tub should
not be tightly packed with items. The lid (door) of
the washer must close easily.
Do not wash single small items. Add 1-2 similar
items to the load to prevent an out-of-balance load.
Clothing or articles that are waterproof or water
resistant must be washed in the Waterproof cycle
only. (e.g. water resistant clothing, mattress covers,
outdoor clothes, plastic mats, etc.) Otherwise, it may
result in personal injury or damage to the washer,
clothes, walls, floor, and surrounding objects due to
abnormal vibration.
Wash small, light items in a mesh bag. Small items
can get caught in the impeller at the bottom of the
tub, and brassiere hooks can damage other items
or the tub.
Brush off heavy soil, dust, and hair from items
before washing. Excess dirt or sand can abrade
other fabrics and lead to poor wash performance.
The washer will not fill or operate with the lid (door)
open.
Use the Bedding cycle for large or bulky items such
as poly-filled jackets, comforters, pillows, etc. These
items may not be as absorbent as other laundry
items and should be sorted into a separate wash
load for optimal results.
Bulky items should be placed as far down in the
tub as possible for optimal results. Always place
buoyant items at the bottom of the tub. The washer
will automatically detect the load size. Because of
the high efficiency wash system, the water level
may not completely cover the load.
Do not overload the tub. Clothes should fit loosely in
the tub under the maximum fill line. Loading clothes
over the fill line may result in damage to clothing
and the washer.
- Load clothes loosely, and do not overfill the tub.
Clothes need room to circulate in order to get
clean.
- Do not press down on items while stacking them
Maximum fill line
in the tub.
•
If the appliance uses a low profile rotating hub in
the drum, follow these instructions when loading the
washer.

This manual contains an abbreviated Operation
section. For the complete Operation section, scan
the QR code below or visit: https://us.smartthinq.com/
images/pdfmanual/TL_TD_EN.pdf
Sorting Laundry
Adding Cleaning Products
Control Panel
Wash Cycles
Cycle Guide
Cycle Modifier Buttons
Option Buttons
•
•
OPERATION
•
•
3

The application allows you to
communicate with the appliance using a
smartphone.
Communicate with the appliance from a
smartphone using the convenient smart features.
Set or download any preferred cycle and operate
by remote control.
This function shows how many cycles remain
before running the function.
This function checks the energy consumption of
the recently used cycles and monthly average.
This function provides useful information for
diagnosing and solving issues with the appliance
based on the pattern of use.
Allows you to set various options on the appliance
and in the application.
When the cycle is complete or the appliance has
problems, you have the option of receiving push
notifications on a smartphone. The notifications
are triggered even if the application is
off.
• If you change your wireless router, Internet
service provider, or password, delete the
registered appliance from the
application and register it again.
• The application is subject to change for
appliance improvement purposes without
notice to users.
• Functions may vary by model.
Check the distance between the appliance
and the wireless router (Wi-Fi network).
• If the distance between the appliance and
the wireless router is too far, the signal
strength becomes weak. It may take a long
time to register or installation may fail.
Turn off the or on
your smartphone.
Connect your smartphone to the wireless
router.
• To verify the Wi-Fi connection, check that f
icon on the control panel is lit.
• The appliance supports 2.4 GHz Wi-Fi
networks only. To check your network
frequency, contact your Internet service
provider or refer to your wireless router manual.
•is not responsible for any
network connection problems or any faults,
malfunctions, or errors caused by network
connection.
SMART FUNCTIONS

• If the appliance is having trouble connecting
to the Wi-Fi network, it may be too far from
the router. Purchase a Wi-Fi repeater (range
extender) to improve the Wi-Fi signal strength.
• The Wi-Fi connection may not connect or may
be interrupted because of the home network
environment.
• The network connection may not work properly
depending on the Internet service provider.
• The surrounding wireless environment can
make the wireless network service run slowly.
• The appliance cannot be registered due to
problems with the wireless signal transmission.
Unplug the appliance and wait about a minute
before trying again.
• If the firewall on your wireless router is enabled,
disable the firewall or add an exception to it.
• The wireless network name (SSID) should be
a combination of English letters and numbers.
(Do not use special characters.)
• Smartphone user interface (UI) may vary
depending on the mobile operating system
(OS) and the manufacturer.
• If the security protocol of the router is set
to , you may fail to set up the network.
Please change it to other security protocols
( is recommended) and register the
product again.
Search for the application from the
Google Play Store or Apple App Store on a
smartphone. Follow instructions to download and
install the application.
Use a smartphone to control your appliance
remotely. You can also monitor your cycle
operation so you know how much time is left in the
cycle.
Put the laundry into the drum and add
detergent into the detergent dispenser drawer.
• If desired, add bleach or fabric softener to
the appropriate areas of the dispenser.
Press the button.
Press and hold button for 3
seconds to enable the remote control function.
Start a cycle from the application
on your smartphone.
• Once this function is enabled, you can only
start a cycle from the smartphone
application. If the cycle is not started, the
appliance will wait to start the cycle until it is
turned off remotely from the application or this
function is disabled.
• If the door has been opened, you can not start
a cycle remotely.
When this function is activated, press and hold the
button for 3 seconds.
You can download new and special cycles that are
not included in the basic cycles on the appliance.
Appliances that have been successfully registered
can download a variety of specialty cycles specific
to the appliance.
Once cycle download is completed in the
appliance, the product keeps the downloaded
cycle until a new cycle is downloaded.
SMART FUNCTIONS

• Only one downloaded cycle can be stored on
the appliance at a time.
LCW-004
2412 to 2472 MHz
IEEE 802.11b: 17.82 dBm
IEEE 802.11g: 17.72 dBm
IEEE 802.11n: 16.61 dBm
Wireless function S/W version: V 1.0
For consideration of the user, this device should be
installed and operated with a minimum distance of
20 cm between the device and the body.
Hereby, LG Electronics declares that the radio
equipment type Washing Machine is in compliance
with Directive 2014/53/EU. The full text of the
EU declaration of conformity is available at the
following internet address:
http://www.lg.com/global/support/cedoc/cedoc#
LG Electronics European Shared Service Centre
B.V. Krijgsman 1, 1186 DM Amstelveen, The
Netherlands
0.5 W
2.0 W
20 min.
To obtain the source code under GPL, LGPL, MPL,
and other open source licenses, that is contained
in this product, please visit http:// opensource.lge.
com.
In addition to the source code, all referred license
terms, warranty disclaimers and copyright notices
are available for download.
LG Electronics will also provide open source code
to you on CD-ROM for a charge covering the cost
of performing such distribution (such as the cost of
media, shipping, and handling) upon email request
to [email protected]. This offer is valid for a
period of three years after our last shipment of this
product. This offer is valid to anyone in receipt of
this information.
This feature is only available on models with the c
or d logo.
Use this feature to help you diagnose and solve
problems with your appliance.
• For reasons not attributable to LGE’s
negligence, the service may not operate due to
external factors such as, but not limited to, Wi-
Fi unavailability, Wi-Fi disconnection, local app
store policy, or app unavailability.
• The feature may be subject to change without
prior notice and may have a different form
depending on where you are located.
If you experience a problem with your Wi-Fi
equipped appliance, it can transmit troubleshooting
data to a smartphone using the
application.
• Launch the application and select
the feature in the menu.
Follow the instructions provided in the
application.
SMART FUNCTIONS
Other manuals for WT7060C Series
2
This manual suits for next models
9
Table of contents
Languages:
Other LG Washer manuals
Popular Washer manuals by other brands

Ebac
Ebac E-Care+ AWM96D2-WH user manual

Siemens
Siemens WU14UT6XES User manual and installation instructions

Zanussi
Zanussi ZWF71241SX user manual

Candy
Candy Aquamatic Aqua 600 T User instructions

Hisense
Hisense W921DJS User's operation manual

Bosch
Bosch WGG256M0GR User manual and installation instructions