LG WT7600HVA User manual

WASHING MACHINE
SERVICE MANUAL
READ THIS MANUAL CAREFULLY TO DIAGNOSE
PROBLEMS CORRECTLY BEFORE SERVICING THE UNIT.
CAUTION
MODEL : WT7600HVA / WT7600HWA / WT7600HKA

SAFETY PRECAUTION!
IMPORTANT SAFETY NOTICE!
2
This service information is intended for individuals possessing adequate backgrounds of
electrical, electronic, and mechanical experience. Any attempt to repair this appliance may result
in personal injury or property damage. The manufacturer or seller can not be responsible for the
interpretation of this information, nor can it assume any liability in connection with its use.
WARNING: To reduce the risk of fire, electric shock, or personal injury when using this
appliance, follow basic precautions, including the following:
· Wear gloves when working.
Failure to do this can result in serious injury.
· The appliance is heavy. Two or more people is
required when moving the appliance.
There is a risk of serious back injury or other injuries.
· Certain internal parts are intentionally not
grounded and may present a risk of electric
shock only during servicing. Service personnel -
Do not contact the following parts while the
appliance is energized: Pump bracket, rotor, and
heater.
To reduce the risk of fire, electric shock, or personal injury when using this appliance, follow basic precautions,
including the following.
· Disconnect this appliance from the power
supply before servicing. Turning the controls to
the off position does not disconnect this
appliance from the power supply.
Failure to do this can result in shock.
· Reconnect all grounded devices after servicing.
Failure to do this can result in shock.
CONTENTS
1. Specifications ........................................... 3
2. Installation Instructions
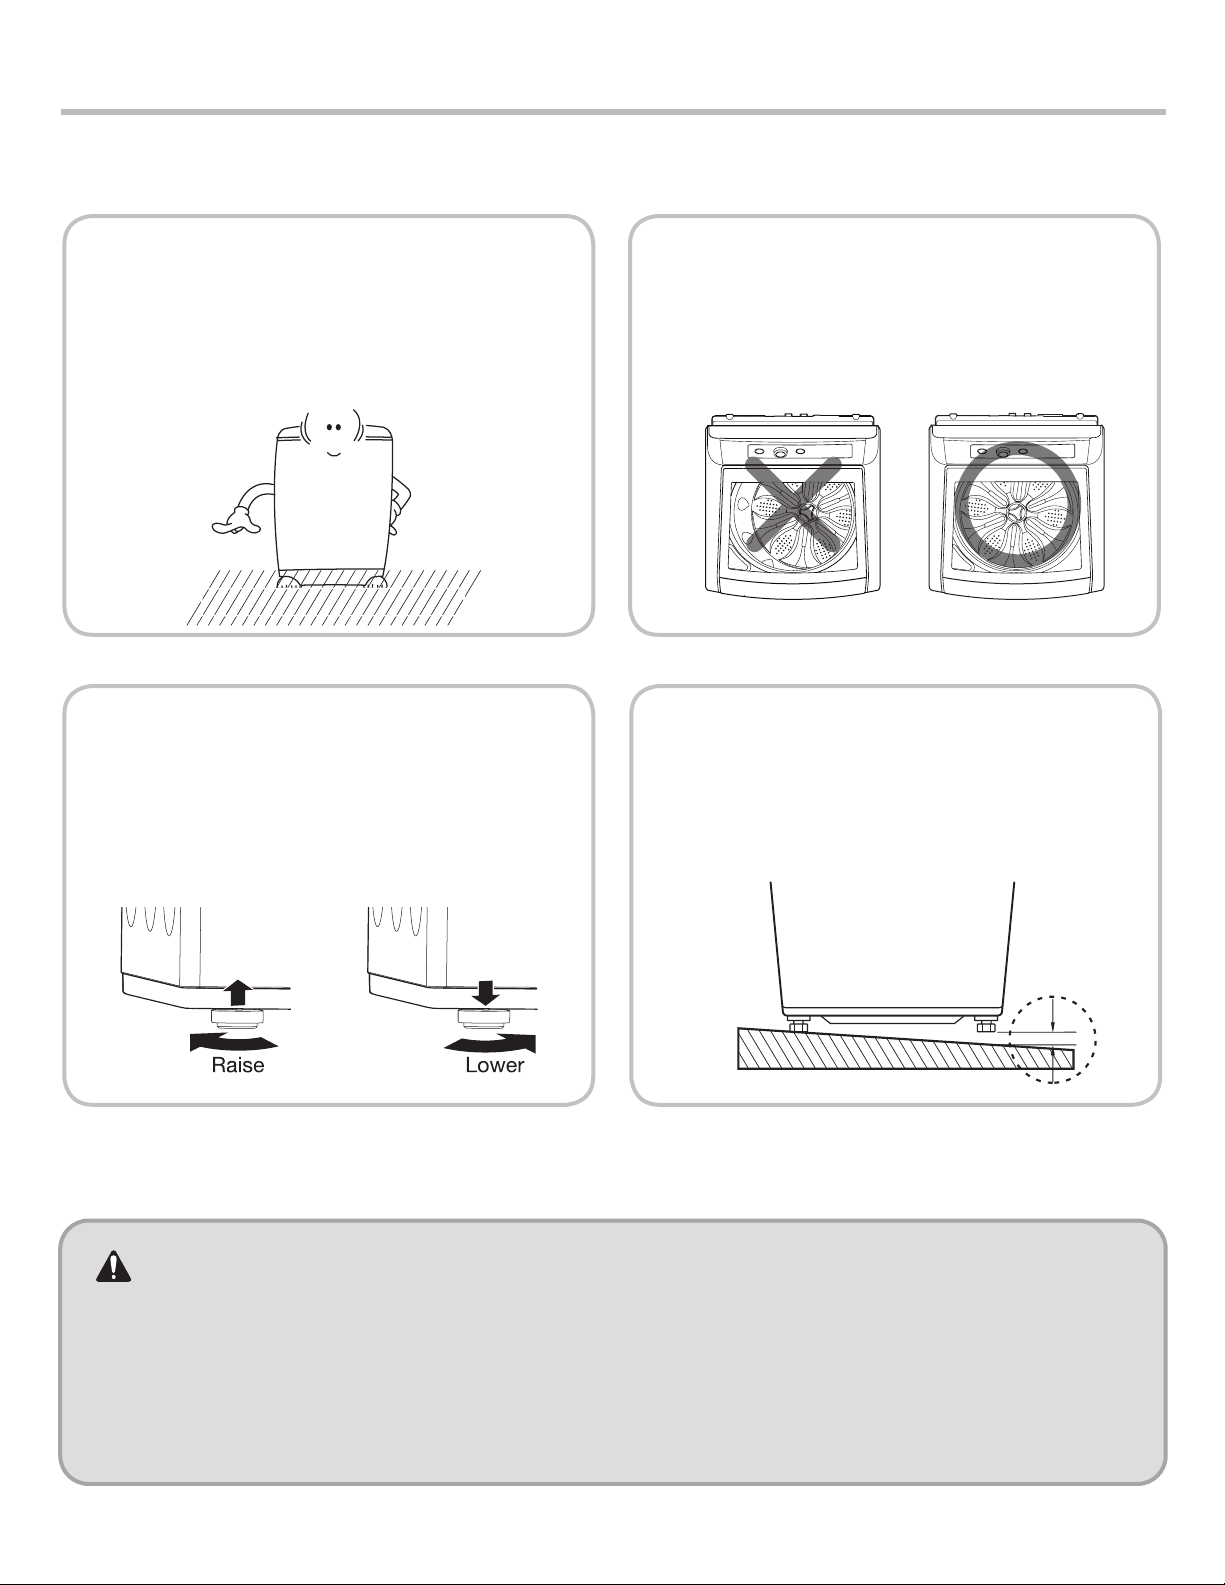
2-1. How to Adjust Level ........................... 4
2-2. Connecting Water Supply Hose ........ 6
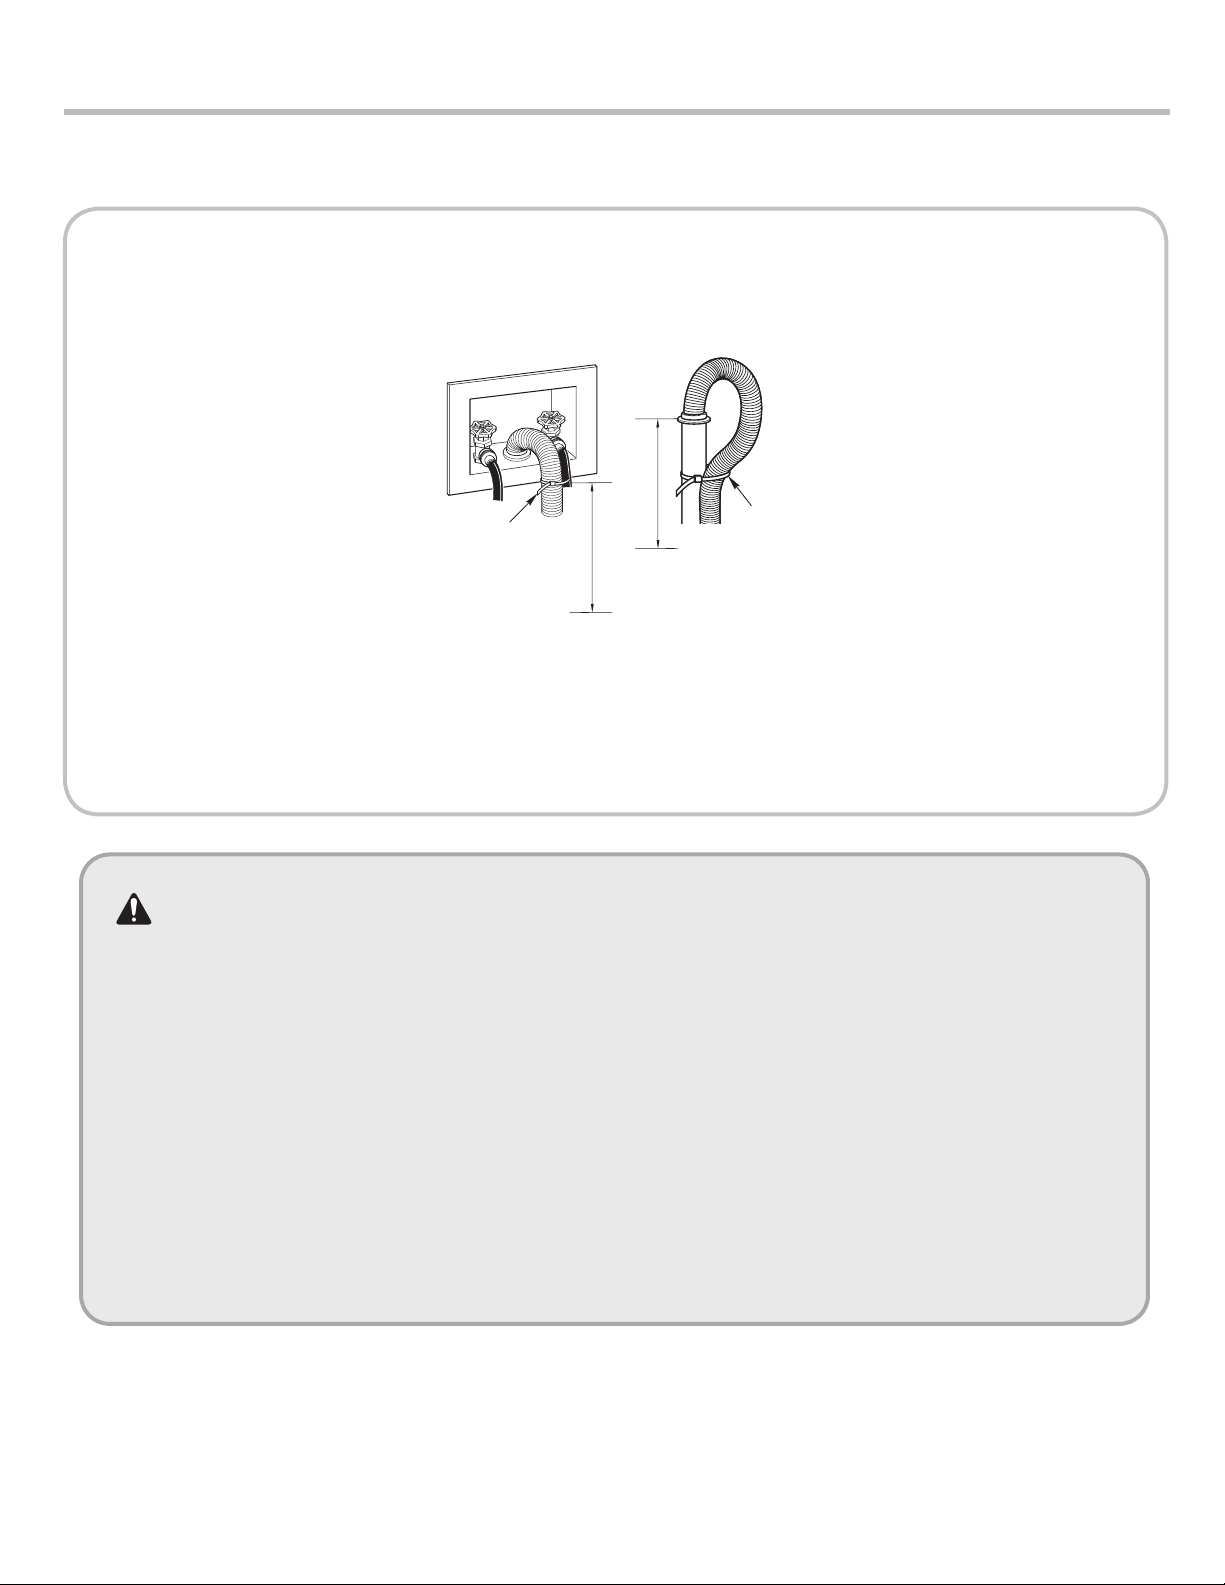
2-3. Connect the Drain Hose .................... 7
3. Operating Instructions
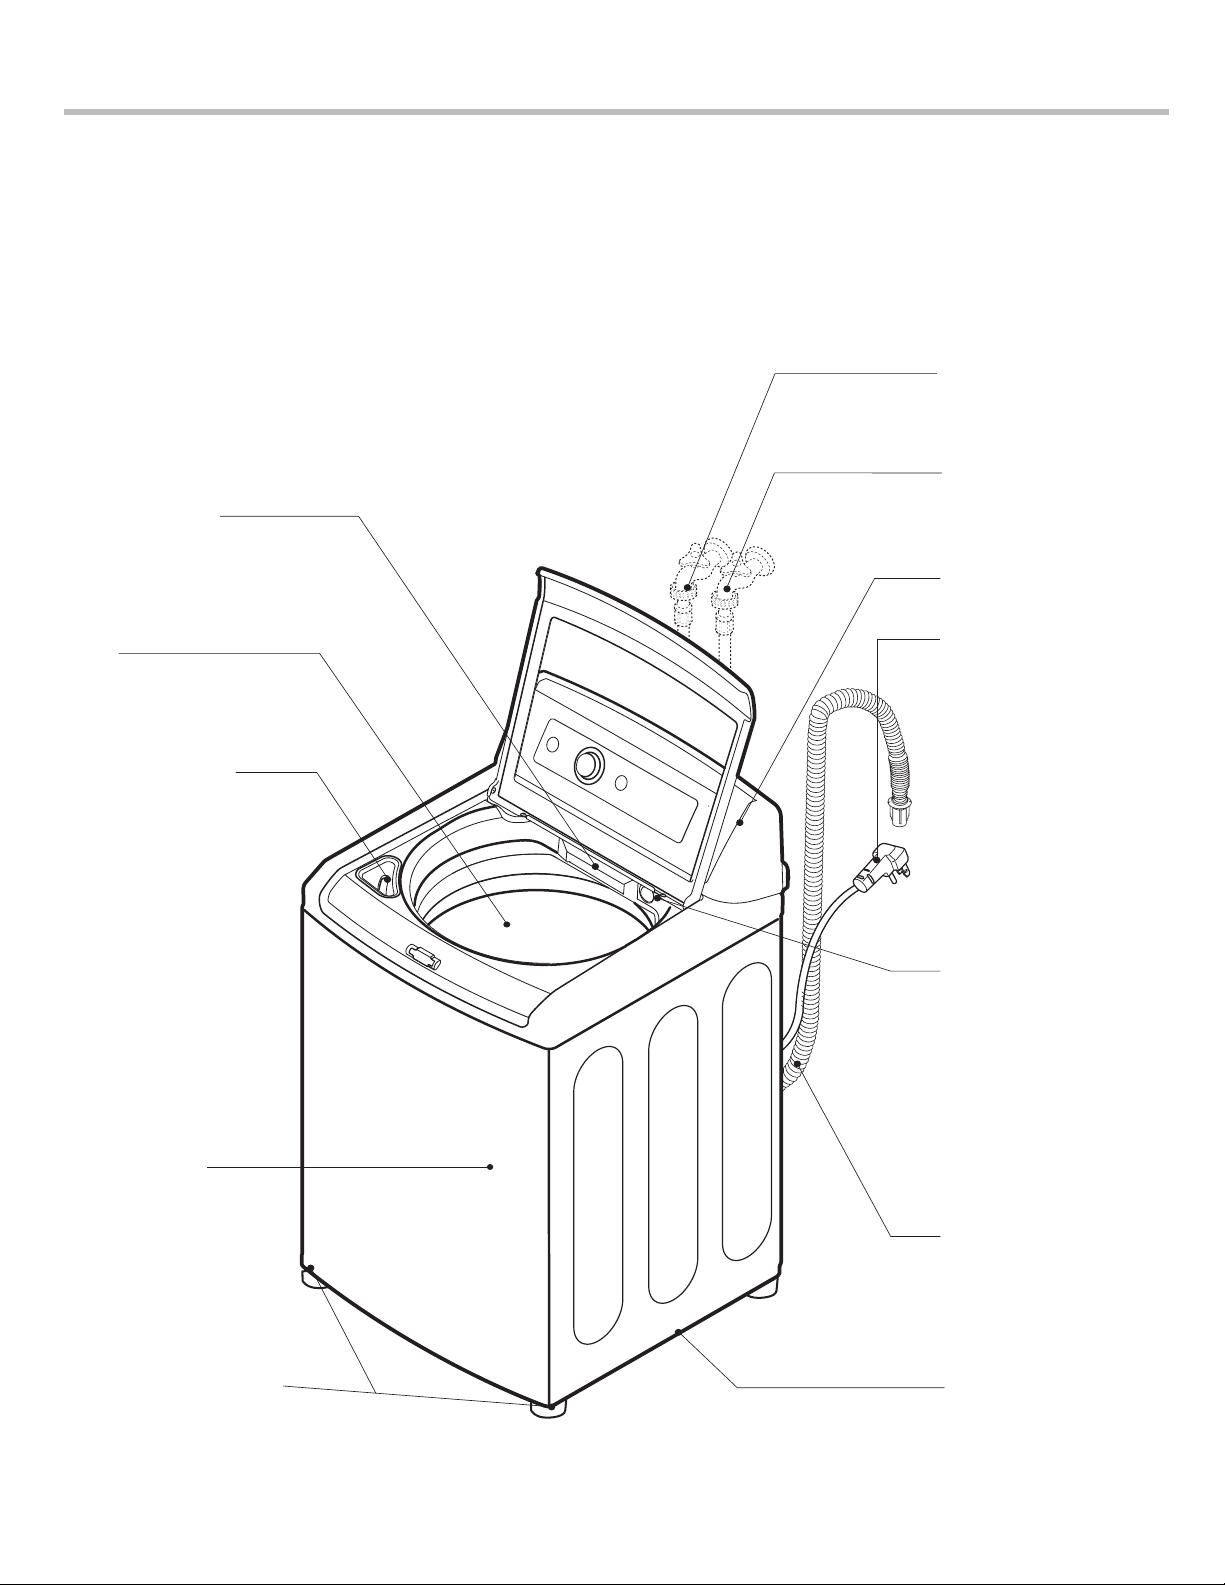
3-1. Identification of Parts ........................ 8
3-2. Before Starting to Wash .................... 9
3-3. Function of Each BUTTON ............ 16
3-4. Washing Programs ......................... 18
3-5. Care and Maintenance .................... 20
4. Service Information
4-1. Disassembly Instruction .................. 21
4-2. Wiring Diagram ............................... 28
4-3. Test Running Without Water ........... 29
4-4. Troubleshooting By Common
Washing Problems .......................... 30
4-5. Troubleshooting Summary ................ 31
4.6. PCB Picture ...................................... 32
4-7. Troubleshooting with Error Code ...... 33
4-8. Other Troubleshooting ...................... 38
5. Component Testing Information ................ 40
5-1. Filter Assembly (Line Filter) .............. 40
5-2. Door Lock Switch Assembly .............. 41
5-3. Stator Assembly ................................ 43
5-4. Pump Motor Assembly ...................... 44
5-5. Inlet Valve Assembly ......................... 45
5-6. Heater Assembly ............................... 46
5-7. Thermistor Assembly ......................... 47
6. Exploded View ........................................ 49
7. Wiring Diagram
....................................... 53

1. SPECIFICATIONS
3
Model WT7600HVA / WT7600HWA / WT7600HKA
Electrical 120VAC@60Hz.
Inner Tub Stainless
Inlet Water Pressure
14.5 ~ 116 psi(100 ~ 800 kPa)
Rating of Fuse 120V/60Hz
Spin Speed 950 ± 50
Weight 146.9 lbs (66.5kg)
Cycles
Normal, Heavy Duty, Bedding, Bright Whites™, Sanitary,
Allergiene™, Tub Clean, Perm. Press, Towels,
Speed Wash, Delicates, Waterproof, Downloaded, Normal Pre Wash+
Time Delay 1 – 19 Hr
Lid Interlock Switch
Magnet Sensor
Control Lock Yes
Softener Dispenser
Yes
Detergent Dispenser
Yes
Bleach Inlet Yes
Auto Power Off Yes
Smart Rinse™with Jet
Spray
Yes
Heater Yes

4
2. INSTALLATION INSTRUCTIONS
2-1. HOW TO ADJUST LEVEL
4
CAUTION
CAUTION
CAUTION
CAUTION
•
The ventilating openings in the base area must not be obstructed by carpeting.
•
Install the washing machine on a level and firm surface. There should be no more than 1° of variation.
•
Wooden floors may need reinforcing to prevent the normal vibration which occurs
with an unbalanced load.
•
Do not install the washer on an inclined floor.
Improper installation of the washer may cause noise and malfunctioning.
1Installation area
• Install the washer on a firm, flat
surface.
• If the washer is installed on an
unsuitable floor, it could make
considerable noise and vibrate.
2
3Checking level
• Open the lid, check if the washer is
correctly leveled by looking down
from the top. If the tub is not
centered in the opening, then the
washer is not level.
WRONG RIGHT
No shims. It would be dangerous. If the
floor is that far from being level, it is a floor
problem and not a washer problem.
Set Leveling feet
• Loosen the locknuts on 2 front leveling
feet until you can turn the feet with the
included wrench. Turn clockwise to
raise the washer or counterclockwise
to lower it.
Checking slope
• If installation surface is tilted, the
washer will vibrate. Do not install
on a sloping floor.

5
26 3/4″
57 1/5″
(68 cm)
1″
(2.5 cm) 1″
(2.5 cm)
3 1/2″
(9 cm)
44 1/2″
(113cm)
(145.3 cm)
(with lid
open)
6
7
5
Lower Raise
Confirming level
• Place the washer in original position,
confirming the level.
Horizontal setting
• Lift the front of the washer and adjust
level by turnings the adjustable legs
clockwise or using the adjusting plate.
Distance between the drain hose
and the wall
• Distance between the drain hose and
the wall should be more than 4 inches
(10 cm,) and the distance between any
other part and the wall should be more
than 1 inches (2.5 cm.)
■ Do not install the washer in the following places.
• Where the washer is exposed to direct sunlight.
• Near a heater or heating appliance.
• Where the washer is exposed to freezing temperatures.
• In damp environments such as bathrooms or harmful environments.

1Attach the water supply hose to the tap.
Push the water supply hose up so that the rubber packing
within the hose can adhere completely to the tap.
2Connect the water supply hose to the tap.
Connect the water supply hose to the tap and then tighten it by
screwing it to the right.
3Check water leakage.
After connecting the hose, open the tap to check for
any water leakage.
Connecting Water Supply Hose to the Machine
• Connect the water supply hose to inlet valve of
the washing machine, and then lock it by turning
the hose connecting part.
• Check to see if there is a rubber seal inside the
connector.
• A new washing machine should be installed with
new hoses. The old hoses should not be reused.
• Replace hoses every 5 years.
Screw Type
Water tap
Rubber Seal
Water Supply Hose
Cold water inlet
Hot water inlet
2-2. CONNECTING WATER SUPPLY HOSE
6
Before connecting the water supply hose to the water tap, check the hose type and then choose the
correct instruction here below.

7
2-3. CONNECT THE DRAIN HOSE
35"~47" (0.9~1.2m)
35"~47" (0.9~1.2m)
WARNING:
Insert the end of the drain hose into the drain.
• If the drain is large enough for the flange on the hose to fit inside, then do not insert the flange more than 1-2
inches into the drain.
NOTE : • The drain hose should always be properly secured to the drain or standpipe. Failure to secure
the drain hose properly can result in flooding and property damage.
• The end of the drain hose should be placed 39" (99 cm) above the floor.
• The drain must be installed in accordance with any applicable local codes and regulations.
• Make sure that the water lines are not stretched, pinched, crushed, or kinked.
• Do not insert the drain hose more than 12” (30 cm) into the drain pipe to avoid siphoning and
odor build-up.
Cable Tie Cable Tie
35"~47" (0.9~1.2m)
35"~47" (0.9~1.2m)
WARNING:
• The washer should never be installed or stored in a location subject to freezing temperatures. If the
washer was exposed to freezing temperatures prior to installation, allow it to stand at room
temperature for several hours before use. Damage to the water lines and internal mechanisms of
the washer can result.
• Water supply pressure must be between 20 ~ 120 psi(138 ~ 827 kPa) If the water supply pressure
is more than 120 psi, a pressure reducing valve must be installed. If you have uncontrolled water
temperature and pressure you should fit a temperature and pressure relief valve to ensure that
water temperature and water pressure remain within the safe limits. Consult a plumber or electrician
if you are unable to adjust water temperature and or pressure. Failure to do so can result in damage
to the machine.
• Plug the power cord of washer into a properly grounded outlet. Failure to do this can result in shock
or serious injury.

8
3. OPERATING INSTRUCTION
3-1. IDENTIFICATION OF PARTS
Powder detergent
Box for delayed
washing/softener additves box
INLET HOLE FOR
BLEACH
Washing Wing
(unique with lnner Tub)
LEVELLING LEGS
Use to level the washing
machine for correct balance
spin operation.
TUB
COLD WATER SUPPLY
HOSE
HOT WATER SUPPLY
HOSE
Make sure the water
does not leak.
POWER PLUG
If the supply cord is
damaged, it must be
replaced by the
manufacturer
or its service agents
or similarly qualified
person in order to
avoid a hazard.
FUNCTION SELECTOR
BASE
DRAIN HOSE
Be sure the drain hose
is properly installed on
the drain before
operating the washer.
SMART RINSE WITH
JET SPRAY
This washer is designed
to save rinse water by
using a jet spray rinse
system in the Normal/
Casual and Heavy Duty
cycles.

9
3-2. BEFORE STARTING TO WASH
Care Labels
• Look for a care label on your clothes.
This will tell you about the fabric content of your garment and how it should be washed.
Sort clothes into loads that can be washed with the same wash cycle, water temperature,
and spin speed.
Sorting
To get the best results, different fabrics need to be washed in different ways.
• SOIL (Heavy, Normal, Light) Separate clothes according to the type and amount of soil.
• COLOR (Whites, Lights, Darks) Separate white fabrics from colored fabrics.
• LINT (Lint producers, Collectors) Separate lint producers and lint collectors.
Lint Producers Terry cloth, Chenille, Towels, Diapers
Lint Collectors Synthetics, Corduroy, Permanent Press, Socks
Check before Loading
• Check all pockets to make sure that they are empty. Things such as nails, hairclips, matches,
pens, coins, and keys can damage both your washer and your clothes.
• Mend any torn garments or loose buttons. Tears or holes may become larger during washing.
• Remove belts, underwires, etc. to prevent damage to the machine or your clothes.
• Pretreat any dirt and stains.
• Make sure the clothes are washable in water.
• Check the washing instructions.
• Remove any paper or tissue in the pockets.
• underwire
Loading
Do not wash fabrics containing flammable materials (waxes, cleaning fluids, etc.).
Load Size
The WATER LEVEL should just cover the clothes. Adjust the load size
accordingly. Loosely load clothes no higher than the top row of holes in the
washer tub. To add items after washer has started, press the Start button and
submerge additional items. Close the lid and press the Start button again to restart.
※ Do not wash waterproofed fabrics (such as skiing outfits, diapers, or nappy
auto seat covers.)
Light and Large-sized clothing
Clothes like downs and woolens are lightweight, large, and float easily. Use a nylon net and
wash them in a small amount of water. If the laundry floats during the wash cycle, it may
become damaged. Use dissolved detergent to prevent the detergent from clumping.
※ Do not wash water-proof textilles (Skling outfit, baby diaper, nappy automobile seat covers.)
Long laundry items
Use nylon bag nets for long, delicate items. For laundry with long strings or long length, a bag will prevent
tangling during washing. Fasten zippers, hooks, and strings to make sure that these items don't snag on
other clothes.
※ The nylon washing bag is not supplied by Kenmore.
Pretreatment on stains or heavy soil
• Pretreat shirt collars and cuffs with a pre-wash product or liquid detergent when placing them in the washer.
Before washing treat special stains with bar soaps, liquid detergent, or a paste of water and powdered detergent.
• Use a pretreat soil and stain remover.
Treat stains AS SOON AS POSSIBLE. The longer they are left, the harder they are to remove.
(For more detail refer to page 14-15)
WIRE

10
1) Using Water
Water Temperature
• The machine sets the appropriate temperature automatically according to the wash program .
You can override the preset selection by pressing the water temperature icon. Touch the arrow buttons up or
down until your desired temperature setting is displayed.
• The temperature of the water impacts the effectiveness of all laundry additives and therefore, the cleaning results.
• We recommend temperatures of:
- HOT 120°F (120-140°F) White items, diapers, underclothing and heavily soiled, colorfast items.
- WARM 90°F (85-105°F) Most items
- COLD 66°F (65-75°F) Only very bright colors with light soil.
• When washing in COLD water additional steps may be needed:
- Adjust detergent amount and pre-dissolve detergent in WARM water
- Pretreat spots and stains
- Soak heavily soiled items
- Use appropriate bleach
* Temperature below 18°C (65°F) will not activate laundry additives and may cause lint, residue, poor cleaning, etc.
In addition, detergent manufactures and care labels define COLD water as 26~29°C (80-85°F).
If the temperature of the water in the tub is too cold for your hands, the detergent will not activate and clean
effectively.
Note
If iron is present in the water, the clothes may become an all-over yellow or they may be stained with brown or
orange spots or streaks. Iron is not always visible. Installation of water softener or an iron filter may be
necessary for severe cases.

Main Wash
Liquid Detergent
Compartment
Main Wash
Powder Detergent
Compartment
Liquid Fabric
Softener
Compartment
11
Using the Liquid Bleach Dispenser
The bleach dispenser automatically dilutes and dispenses
liquid chlorine bleach at the proper time in the wash cycle.
1. Check clothing care labels for special instructions.
2. Measure liquid bleach carefully, following instructions on the
bottle.
• Never pour undiluted liquid chlorine bleach directly onto clothes
or into the wash basket.
• Do not pour powdered bleach into bleach dispenser.
• Avoid overfilling or splashing when adding bleach to the
dispenser. The maximum capacity of the bleach dispenser is
one cup of bleach per wash cycle. Overfilling could result in
premature dispensing of bleach.
Do NOT add more bleach than is required for your particular load.
3. Before starting the washer, pour measured amount of bleach
directly into bleach dispenser. If you prefer to use powdered
bleach, add it into the wash basket directly before adding clothes.
WARNING Do NOT mix chlorine bleach with ammonia or acids, such as vinegar or rust / scale remover.
Mixing chemicals like these can produce irritating and toxic fumes. Put the manufacturer’s recommended amount of
undiluted liquid chlorine bleach into the bleach dispenser. During the final portion of the wash cycle, two sequential flushes
of the dispenser put all the bleach into the wash load and completely flush the dispenser to eliminate the carryover of
bleach to a subsequent load. Any liquid remaining in the bleach dispenser at the end of the cycle is water, not bleach. To
prevent unintentional self-siphoning of the bleach, never fill the dispenser higher than the maximum fill level marked on
the dispenser. When adding bleach to the dispenser, be careful to avoid spilling it into the laundry load or leaving droplets
of bleach around the dispenser. These things will damage your laundry items.
2) Using Detergent
Detergent
Follow the detergent package directions. Using too little detergent is a common cause of laundry problems.
Use more detergent if you have hard water, large loads, greasy or oily soils or lower water temperature.
Choosing the Right Detergent
Your washing machine is designed for use with only High-Efficiency (HE) detergents. HE detergents are
formulated specifically for top-load washers and contain suds-reducing agents. Always look for the HE symbol
when purchasing detergent. HE detergents produce fewer suds, dissolve more efficiently to improve washing and
rinsing performance, and help to keep the interior of your washer clean. Using a regular detergent will cause
unsatisfactory performance, oversudsing, machine build-up, and could damage the machine.

12
Using the Dispenser Drawer
ABOUT THE DISPENSER
The automatic dispenser consists of two
compartments which hold:
• Liquid fabric softener.
• Liquid or powdered detergent.
All laundry products can be added at once in their respective
dispenser compartments. They will be dispensed at the
appropriate time for the most effective cleaning.
After adding the laundry products to the dispenser,
close the dispenser drawer.
Close the dispenser drawer gently to avoid spilling or starting the
siphoning action.
To add detergent, bleach, and fabric softener
to the automatic dispenser:
■ Open the dispenser drawer.
■ Load the laundry products into the appropriate compartments.
■ Close the lid slowly and smoothly to avoid spilling, splashing, or
premature dispensing of the contents.
NOTE: It is normal for a small amount of water to remain in the
dispenser compartments at the end of the cycle.
NOTE: Do not use powdered or liquid bleach in the dispenser drawer.
Main Wash
Liquid Detergent
Compartment
Main Wash
Powder Detergent
Compartment
Liquid Fabric
Softener
Compartment

13
Adding Detergent
Add measured detergent to the detergent compartment of the
dispenser drawer.
• Do not exceed the maximum fill line.
Detergent is flushed through the dispenser at the beginning of
the wash cycle. Either powdered or liquid detergent can be
used, but the drawer insert must be removed to use powder.
Detergent usage may need to be adjusted for water
temperature, water hardness, size, and soil level of the load.
Avoid using too much detergent in your washer, as it can lead
to oversudsing and detergent residue being left on the clothes.
Adding Fabric Softener
Pour the recommended amount of liquid fabric
softener into the left-hand compartment. Use only liquid fabric
softener.
Dilute with water to the maximum fill line.
• Do not exceed the maximum fill line.
Overfilling can cause early dispensing of the fabric softener,
which could stain clothes.
NOTE: Do not pour fabric softener directly on the wash load.
It may stain the clothes.
Adding Wash Boost Additives
The wash boost dispenser may be used to clean heavily soiled
or stained garments more efficiently.
If desired, place the additives for the wash boost setting in the
right-hand compartment. Use only liquid additives.
• Do not exceed the maximum fill line to avoid detergent buildup
In clothing and the washer
Overfilling can cause early dispensing of presoak additives,
which could result in damaged clothes.
NOTE : Do not pour additives directly on the wash load. It may stain the clothes.

14
3) Special Guide for Stain Removal
WARNING
■
Do not use or mix liquid chlorine bleach with other household chemicals such as toilet cleaners, rust removers, acid, or products
containing ammonia. These mixtures can produce dangerous fumes which can cause serious injury or death.
■
To reduce the risk of fire or serious injury to persons or property, comply with the basic warnings listed below:
•
Read and comply with all instructions on stain removal products.
•
Keep stain removal products in their original labeled containers and out of children's reach.
•
Thoroughly wash any utensil used.
•
Do not combine stain removal products, especially ammonia and chlorine bleach. Dangerous fumes may result.
•
Never wash items which have been previously cleaned in, washed in, soaked in or spotted with gasoline, dry cleaning solvents, or
other flammable or explosive substances because they give off vapors that could ignite or explode.
•
Never use highly flammable solvents, such as gasoline, inside the home. Vapors can explode on contact with flames or sparks.
For successful stain removal:
• Remove stains promptly.
• Determine the kind of stain, then follow the recommended treatment in the stain removal
chart below.
• To pretreat stains, use a prewash product, liquid detergent, or a paste made from
powdered detergent and water.
• Use COLD water on unknown stains because HOT water can set stains.
• Check care label instructions for treatments to avoid on specific fabrics.
• Check for colorfastness by testing stain remover on an inside seam.
• Rinse and wash items after stain removal.

15
Adhesive tape, chewing
gum, rubber cement
Baby formula, dairy
products, egg
Beverages (coffee, tea, soda,
juice, alcoholic beverages)
Blood
Candle wax, crayon
Chocolate
Collar or cuff soil, cosmetics
Dye transfer on white fabric
Grass
Grease, oil, tar (butter, fats,
salad, dressing, cooking
oils, car grease, motor oils)
Ink
Mildew, scorch
Mud
Mustard, tomato
Nail polish
Paint, varnish
Rust, brown or yellow
discoloration
Shoe polish
Apply ice. Scrape off excess. Place stain face down on paper towels. Saturate with
prewash stain remover or nonflammable dry cleaning fluid.
Use product containing enzymes to pretreat or soak stains.
Pretreat stain. Wash using COLD water and bleach safe for fabric.
Soak the item in a bowl of COLD water for at least 30 minutes. Then launder as usual.
Remove all surface wax. Put the garment in the freezer for a couple of hours, then
remove and break away as much wax as possible. Try a commercial removal product
like Goo-Gone, Goop, or Go-Jo cleaner for the remaining wax stains. DO NOT
ATTEMPT TO REMOVE WITH HEAT!
Pretreat or soak in WARM water using product containing enzymes. Wash using bleach
safe for fabric.
Pretreat with prewash stain remover or rub with bar soap.
Use packaged color remover. Wash using bleach safe for fabric.
Pretreat or soak in WARM water using product containing enzymes. Wash using bleach
safe for fabric.
Scrape residue from fabric. Pretreat. Wash using hottest water safe for fabric. For
heavy stains and tar, apply nonflammable dry cleaning fluid to back of stain. Replace
towels under stain frequently. Rinse throughly. Wash using hottest water safe for fabric.
Some inks may be impossible to remove. Washing may set some inks. Use prewash
stain remover, denatured alcohol, or nonflammable dry cleaning fluid.
Wash with chlorine bleach if safe for fabric. Or, soak in oxygen bleach and HOT water
before washing. Badly mildewed fabrics may be permanently damaged.
Brush off dry mud. Pretreat or soak with product containing enzymes.
Pretreat with prewash stain remover. Wash using bleach safe for fabric.
May be impossible to remove. Place stain face down on paper towels. Apply nail polish
remover to back of stain.
Repeat, replacing paper towels frequently. Do not use on acetate fabrics.
WATER BASED Rinse fabric in cool water while stain is wet. Wash. Once paint is dry, it
cannot be removed,
OIL BASED AND VARNISH Use solvent recommended on can label. Rinse throughly
before washing.
For spots, use rust remover safe for fabric. For discoloration of an entire load, use
phosphate detergent and nonchlorine bleach. Do not use chlorine bleach because it
may intensify discoloration.
LIQUID Pretreat with a paste of powdered detergent and water. Apply paste and
scrape residue from fabric. Pretreat with prewash stain remover or nonflammable dry
cleaning fluid. Rub detergent into dampened area. Wash using bleach safe for fabric.
Stain Removal
STAIN TREATMENT

16
3-3. FUNCTION OF EACH BUTTON
•
This button
allows
you to store a
customized
wash
cycle for
future use .
•Delayed finishing time.
•
The time increases when the button
is pushed.
• The following settings are
indicated as the button is pushed 1
→2 →3 →4 →... 24→
→Reservation off 1 ...
• To cancel delay time, turn the
power switch off or push DELAY
WASH button until off.
DELAY WASH (Selection)
BUTTON
Custom Program
BUTTON
•
Select to select Water
(Wash/Rinse) Temperature.
•
Pressing the button allows
The selection of TAP COLD
→
COLD
→
ECO WARM
→
WARM
→
HOT
respectively. Default setting
is Warm/Cold.
WASH / TEMP.
Note
The time shown on the display is the estimated cycle time. If the sensors and microprocessor elect to
make changes during the cycle, the display will be adjusted accordingly.
POWER
•Power on.
•Push again, power goes off
• Power goes off automatically after the wash
is finished.
•After turning the power on, the unit will
automatically turn off if nothing is selected.
CYCLE BUTTON
•Use for selecting wash program.
• This button allows the selection of 14 different
programs for different kinds of laundry and
dirtiness.
•
Program selections light up in sequence as
follows: Normal→Heavy Duty→ →Bedding
→
Sanitary
Bright Whites™→
→ → →
→
Pre Wash+ Normal
Delicates Towels
Tub Clean
→
→
→
Select
WaterproofPerm.Press
Speed Wash Downloaded the desired
program by ressing the button.

17
EXTRA RINSE
BUTTON
·
This includes
an extra
rinse cycle
for a better
rinsing
action.
FABRIC
SOFTENER
·
Causes the
dispensing of
fabric softener
in the final
rinse cycle.
CHILD LOCK
FUNCTION
·
Use to lock or unlock the
control buttons to
prevent settings from
being changed.
·
To actuate or release the
CHILD LOCK, press and
hold the SIGNAL button
until the lock is turned
ON or OFF.
SIGNAL
BUTTON
· The beeper sounds at
the end of the cycle. The
clothing should be
removed at that time to
prevent the setting of
wrinkles.
· Touch the SIGNAL
button to cycle through
the volume settings
between OFF and high.
START/ PAUSE BUTTON
· Use to start or pause the wash
cycle.
Changes while be made to the
wash settings while the machine
is paused.
· Repeats start and pause by
pushing the button.
· Allows a selection to be make for the
strength of the wash action.
· Power option selections light up in
sequence as follows Normal →Heavy
→Light →Normal as the button is
pushed.
This can be selected for any program.
·
Adjustment can be made while
washing.
·
Default SOIL LEVEL is Normal.
SPIN SPEED
SOIL LEVEL
·
Spin speed
can be
selected from
No Spin to
Extra high.
Default is Low.

18
HOW TO USE
CYCLE GUIDE
The cycle guide below shows the default settings, available options
and recommended fabric types for each cycle. Allowable modifier
adjustments are shown below the default setting for each cycle.
Cycle Fabric or
Load Type Wash Mode Temp. Spin Soil
Soak Stain
Care Extra
RinseWater
Plus Delay
Wash PGM
Save
Normal Cotton, linen,
shirts, jeans,
mixed loads
Extra Hot
b
Extra High Heavy
★ ■
c
●●●●
Steam
Hot
High
Turbo Wash™ Warm Medium Normal
Cold Wash
b
Cold
Fabric Softener Tap Cold No Spin Light
Heavy Duty Heavily soiled
cotton fabrics
Extra High Heavy
★ ■ ● ● ● ●
Steam Hot High
Turbo Wash™ Warm Medium Normal
Cold Low
Fabric Softener Tap Cold No Spin Light
Bedding
Large items
such as blankets,
comforters, and
sheets.
No Option Heavy
★ ● ● ●
Steam Hot
Warm Medium Normal
Cold Wash Cold Low
Fabric Softener Tap Cold No Spin Light
Use the Bedding cycle for items such as pillows, comforters, pet bedding and other articles which have
difficulty absorbing water. DO NOT WASH EXCESSIVELY LARGE ITEMS. If large/bulky items do not
fit easily into the tub, there may not be enough room for them to move during washing. Keep like items
together; do not mix large bulky items with smaller clothing items. Failure to follow these instructions
may result in damage to the clothing or to the washer.
Sanitary White fabrics
No Option Extra Hot Extra High Heavy
★ ●●●●
Steam High
Turbo Wash™ Medium Normal
Low
Fabric Softener No Spin Light
Allergiene™
Heavily soiled
underwear, work
clothes, diapers,
etc. (less than
11 lbs.)
Extra Hot Extra High Heavy
●●●●
Steam High
Medium Normal
Low
Fabric Softener No Spin Light
Bright
Whites™
Underwear,
pillow covers,
bed sheets, baby
wear. (less than
12 lbs.)
No Option Extra High Heavy
★ ●●●●
Steam Hot High
Turbo Wash™ Warm Medium Normal
Low
Fabric Softener No Spin Light
Tub Clean Refer to page
27.
●
Steam Hot High
Light
b
Cold Wash and Extra Hot are not available with the Heavy soil level.
c
Stain Care cannot be used if Cold Wash is selected.
NOTE : The following options can only be used independently of each other: Steam, Turbo Wash™, Fabric
Softener, Cold Wash.
Soak and Stain Care cannot be selected together.
Fabric softener and Turbo Wash™ cannot selected together.
●
★
■
Default Setting
Available options
Cannot be used if Steam is selected
Turbo Wash™ will be deselected

19
CYCLE GUIDE
The cycle guide below shows the default settings, available options
and recommended fabric types for each cycle. Allowable modifier
adjustments are shown below the default setting for each cycle.
Cycle Fabric or
Load Type Wash Mode Temp. Spin Soil
Soak Stain
Care Extra
RinseWater
Plus Delay
Wash PGM
Save
Pre Wash+
Normal
Heavily soiled
fabrics that
require pre-
washing.
Extra Hot
Extra High
● ●●●●
Hot High
Turbo Wash™ Warm Medium Normal
Cold Low
Fabric Softener Tap Cold No Spin Light
Perm. Press
Dress shirts/
pants, wrinkle-
free clothing, poly/
cotton blend cloth-
ing, table- cloths
No Option Heavy
● ●●●●
High
Turbo Wash™ Warm Medium Normal
Cold Wash Cold Low
Fabric Softener Tap Cold No Spin Light
Waterproof
Waterproof items
- i.e. Water
resistant clothing,
mattress covers,
outdoor clothes,
plastic mats etc.
(less than 14 lbs.)
No Option
No Option
Heavy
●●●●
Warm Normal
Cold Low
Fabric Softener Tap Cold No Spin Light
Delicates
Dress shirts/
blouses, nylons,
sheer or lacy gar-
ments (less than
8 lbs.)
Heavy
● ●●●●
Warm Normal
Cold Low
Fabric Softener Tap Cold No Spin Light
Towels Big towels,
small towels
No Option Extra High Heavy
● ■
c
●●●●
Hot High
Turbo Wash™ Warm Medium Normal
Cold Wash Cold Low
Fabric Softener Tap Cold No Spin Light
Speed WashLightly soiled and
small loads
Extra High Heavy
● ●●●●
High
Turbo Wash™ Warm Medium Normal
Cold Low
Tap Cold No Spin Light
Downloaded The downloaded
cycle (See page
22.)
b
Cold Wash and Extra Hot are not available with the Heavy soil level.
c
Stain Care cannot be used if Cold Wash is selected.
NOTE : The following options can only be used independently of each other: Steam, Turbo Wash™, Fabric
Softener, Cold Wash.
Soak and Stain Care cannot be selected together.
Fabric softener and Turbo Wash™ cannot selected together.
NOTE:
To protect your garments, not every wash/rinse temperature, spin speed, soil level, or option is available
with every cycle. A chime will sound and the LED will not light if the selection is not allowed.
* When a cycle is selected, the default time for that cycle is displayed. This time will change as modifiers
or options are selected. Once the START/PAUSE button is pressed, the washer will measure the load.
The estimated time may change once the load has been measured. The washer automatically adjusts the
wash time for the amount of laundry, water pressure, water and other operating conditions.
●
★
■
Default Setting
Available options
Cannot be used if Steam is selected
Turbo Wash™ will be deselected

3-5. CARE AND MAINTENANCE
20
When There Is The Possibility Of Freezing Temperatures
•Close the water taps and remove the water supply hoses.
•Remove the water which remains in the water supply.
•Lower the drain hose and drain the water in the sump and the drain hose by running a spin cycle.
Cleaning The Inside Of Your Washer
If you use fabric softener or do regular COLD water washing, it is very important that you
clean the inside of your washer occasionally as described below.
•Fill your washer with HOT water.
•Add 1 cup of bleach.
•Let it operate for several minutes.
•Stop the washer, open the lid, and leave it to soak overnight.
•After soaking, drain the washer and run it through a normal cycle.
Products That Might Damage Your Washing Machine
•Concentrated bleaches and diaper sanitizer will cause damage to the paintwork and components of
your washer.
•Hydrocarbon solvents, i.e. gasoline, kerosene, paint thinners, and lacquer thinners, etc. can dissolve plastic
and blister paint.
(Be careful when washing garments stained with these solvents as they are flammable, DO NOT put
them in washer or dryer.)
•Some pretreatment sprays or liquids can damage your washer’s control panel.
•Use of dyes in your washer may cause staining of the plastic components. The dye will not damage
the machine but we suggest you thoroughly clean your washer afterwards. We do not recommend
the use of dye strippers in your washer.
•Do not use your washer lid as a work surface.
If Frozen
•Remove the water supply hose and immerse it in HOT water. (40° C or 104° F).
•Pour approximately 2 liters (½gallons ) of HOT water (40° C or 104° F) into the sump and allow it to stand for
at least 10 minutes.
•Connect the water supply hose to the water tap Run an Express Wash cycle to confirm that the machine fills,
drains, and operates properly.
Wash Inner-Tub Leave the lid open after washing to allow moisture to evaporate. If you
want to clean the inner-tub use a clean soft cloth dampened with liquid
detergent, then rinse. (Do not use harsh or gritty cleaners.)
Inlet Hoses Hoses connecting washer to faucet should be replaced every 5 years.
Exterior Immediately wipe off any spills. Wipe with damp cloth. Avoid hitting surface with sharp
objects.
Long Vacations Be sure water supply is shut off at faucets. Drain all water from hoses if weather will be
below freezing.
This manual suits for next models
2
Table of contents
Other LG Washer manuals