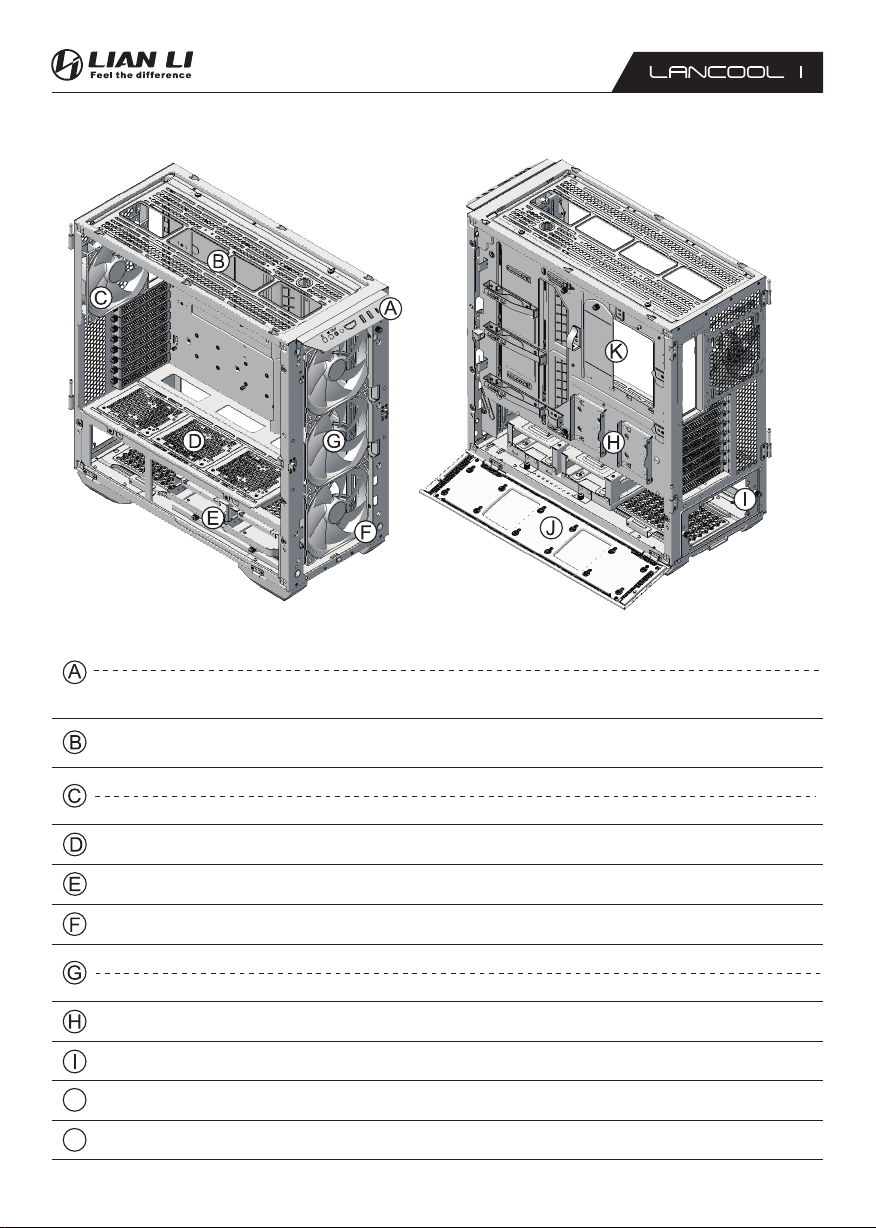
Lian-Li LANCOOL III User manual

Remove the Top Cover
卸下上蓋 /
Retirer le capot supérieur /
Entfernen Sie die obere Abdeckung /
Retire la cubierta superior/
トップカバーを外します
- 1 -
II
Remove the Side Glass Panel
卸下側玻璃 / Retirer la vitre latérale / Entfernen Sie das Seitenglas / Retire el vidrio lateral/サイドガラスを取り外します
Remove the Front Panel
卸下前⾯板 / Retirer le panneau avant / Entfernen Sie
die Frontplatte / Retire el panel frontal/
フロントパネルを取り外します
Remove the Side Mesh Panel
卸下側鐵網 / Retirer les rails latéraux/ Entfernen Sie
die Seitenschienen / Retire los rieles laterales/
サイドレールを取り外します
1
2
1
2
3
3
Remove
Remove
Attention: Peel off the protective
film on both sides.
注意:撕掉兩邊的保護膜。
這 物 件 僅 ⽤ 於 運 輸 安 全 ⽬ 的/
This piece is for transportation security purpose
only /
Cette pièce est uniquement destinée à la sécurité
du transport / Dieses Stück dient nur der
Transportsicherheit / Esta pieza es solo para fines
de seguridad del transporte / この作品は、
輸送のセキュリティのみを⽬的としています

II
Case Components
機殼部品介紹/ Composants du boîtier/ Gehäusekomponenten/ Componentes de la caja/ケース部品
J
INCL FAN 140 mm fan x 1 (200~1800 RPM / DC 12 V, 0.24A / 83.5 CFM / 2.3 mm H2O / 33dB-A)
Removable fan bracket, Supporting 120 mm fan x 3 or 140 mm fan x 3 or 360 mm radiator x 1 or 280 mm radiator x 1
Removable Toolless SSD tray, Supporting 2.5” SSD x 2
PSU tray, Supporting ATX PSU x 1 (Removable dust filter in bottom)
IO ports: 1 x AUDIO / Microphone Combo Jack, 2 x USB 3.0, 1 x USB 3.2 Type C
Power Button, Reset Button, C button for color control, M button for lighting mode control
Removable fan bracket, Supporting 120 mm fan x 3 or 140 mm fan x 3 or
360 mm radiator x 1 or 420 mm radiator x 1
Removable HDD cage, Supporting 3.5" HDD x 4 or 2.5” SSD x 4
INCL FAN 140 mm fan x 3
Removable fan bracket, Supporting 120 mm fan x 3 or 360 mm radiator x 1 or 2.5" SSD x 3
Removable SSD tray, Supporting 2.5” SSD x 3
LANCOOL III
LANCOOL III
LANCOOL III RGB INCL FAN 140 mm fan x 1 (200~1800 RPM / DC 12 V, 0.24A / 83.5 CFM / 2.3 mm H2O / 33dB-A)
LANCOOL III
LANCOOL III RGB INCL FAN 140 mm ARGB fan x 3
LANCOOL III RGB
IO ports: 1 x AUDIO / Microphone Combo Jack, 2 x USB 3.0, 1 x USB 3.2 Type C
Power Button, Reset Button
- 2 -
KRemovable controller tray
(200~1800 RPM / DC 12 V, 0.24A / 83.5 CFM / 2.3 mm H2O / 33dB-A)
(300~1650 RPM / DC 12 V, 0.23A, 0.35A / 83.5 CFM / 2.3 mm H2O / 33dB-A)

Hardware List
零件部品⼀覽表 / Liste du matériel / Hardwareliste / Lista de hardware / ハードウェアリスト
II
Anti-vibration rings
for 2.5" SSD /
3.5" HDD mount
Screws
for motherboard
mounting
Screws
for PSU mounting
Screws
for 2.5" SSD mount
Screws
for 3.5" HDD mount
Stand-off bolt
(spare parts)
for M/B mount
Tool
for stand-off bolt
Screws
for fan mounting
x 13 x 4 x 32 x 32 x 16
x 3 x 1 x 24
L-shaped
support bracket
x 2
- 3 -
abcde
fghij
x 1
Graphic card
bracket
Gasket Rubber pad
x 2 x 2
Long stand-off bolt
x 2
lm n o
p
Upper HDD Bracket
Screws
for 420 mm radiator
mounting
Screws
for fix removable
SSD tray
1. PUSH
推
2. PULL
拉
Remove the Dust Filter
灰塵濾網拆卸 /
Retirer le filtre à poussière/
Entfernen Sie den Staubfilter /
Retire el filtro de polvo /
ダストフィルターの取り外し
k
For mounting the
Upper HDD Bracket
For mounting the
top fan bracket
r
q
x 2 x 2

II
I/O Ports Function
I/O port / Installation du port I/O / I/O-Port installieren / Instalación de los puertos de I/O / I/O功能說明 ポート機能
- 4 -
LED+
LED-
Type C
RESET
COLOR MODE
USB1
USB2
MIC/SPK
POWER
POWER / RESET SW
POWER LED
LANCOOL 3R (ARGB FAN)
Connecting to MB fan socket LANCOOL 3R
Color Reset
Power
USB 3.0
USB 3.0
USB 3.2 Type C
Mode
Microphone Combo Jack
USB3.1 Gen2
MIC/SPK
RESET SW
Type C
USB3.0-2
USB3.0-1
LANCOOL 3
Reset
Power
USB 3.0
USB 3.0
Microphone Combo Jack
USB 3.2 Type C
Connecting to MB fan socket
LANCOOL 3 (GENERAL FAN)
POWER / RESET SW
POWER LED
C-Color
M-Mode
Press C to control the 7 built-in static colors.
8 Lighting effects:
1. 1st-7st: MCU built-in lighting mode.
2. 8st: Sync up the ARGB lighting with the M/B.
(a.) Connecting the header to the M/B.
(b.) To turn off the ARGB light. Press and hold
M button for 3 seconds under 8th mode.
Press and hold 3 seconds again to turn on.
UNI HUB
(Controller)
or
USB 3.2 Type C
USB 3.0
Green
Key
Orange
N.C.
GND+H.S.
TUBE
Blue
Black purple
Yellow
Gray
Red
P20
P11
P1
P10
1011
120
!This is a must to connect
to PSU SATA cable.
1x AUDIO / Microphone
Combo Jack
Green
Key
Orange
N.C.
GND+H.S.
TUBE
Blue
Black purple
Yellow
Gray
Red
USB 3.0
USB 3.2 Type C
P20
P11
P1
P10
!
Optional ! If you have any
other ARGB device, you can
connect here.
* Single 7.5 W, Max.15 W.
1x AUDIO / Microphone
Combo Jack
!Optional ! If you want to use M/B
software, you can connect to M/B
ARGB port, Push M button 7 times
to 8th mode.
警告!請不 要連接 錯誤 類型 的 LED接頭,
如果連接到1 2 V接⼝ 將造成永久損壞, 。
Warning ! Do not connect the wrong
type of LED connector. If it is connected
to the 12 V connector, permanent
damage will occur.
5 V 12 V

II
Remove the Cable Cover
卸下遮線蓋 / Retirez le couvercle du câble / Entfernen Sie die Kabelabdeckung / Retire la cubierta de cables /
ケーブルカバーを取り外します
Motherboard Installation
主板安裝/
マザーボードの取り付け
Installation de la carte mère / Mainboard-Installation / Instalación de la placa base /
- 5 -
a
f
g
Spare parts
Tool
Motherboard

- 6 -
II
PSU Installation
電源供應器安裝/ Installation du plateau du bloc d'alimentation / PSU-Einsatz installieren /
Instalación de la fuente de alimentación / 電源のインストール
b
Attention direction
注意⽅向
注意:如要安裝 1 6 0 m m以 上 ⾧ 度 的 P S U,建議卸除⼀組硬碟籠讓整線空間增⼤,⽅式如下所⽰。
Attention: For installation of PSU longer than 160 mm, suggest to remove 1 set of HDD cage to gain
pace. Instruction as below.
Remove the
second set of HDD cages
卸除第⼆組硬碟籠
HDD Cage Position Adjustment
硬碟籠位置調整/ Ajustement de la position de la cage du disque dur / Einstellung der HDD-Käfigposition /
Ajuste de posición de la caja de HDD / HDDケージの位置調整
Remove HDD Cage
硬碟籠卸除/ Retirer la cage du disque dur / Entfernen Sie den HDD-Käfig / Retire la caja de disco duro /
HDDケージを取り外します
注意:因應 P SU⾧度或是散熱 器 厚 度 ,可推動第⼆組 硬 碟 籠 移 動到需要的位置 後 再 鎖 上螺絲。
Attention: Able to adjust the position of the second set of HDD cage to fit the PSU length and front
radiator thickness, then fix the screw.
Remove the first set
of HDD cages
卸除第⼀組硬碟籠

1
II
2.5" SSD, 3.5" HDD Installation
2.5" SSD ,3.5" HDD安裝 2.5" SSD ,3.5" HDD / 2.5" SSD ,3.5" HDD-Installation /
/ Installation de
Instalación de 2.5" SSD ,3.5" HDD / 2.5" SSD ,3.5" HDD
の取り付け
2.5" SSD Installation
d
c
3.5" HDD Installation
Pay attention to the
installation direction
of the rubber pad
注意膠墊安裝⽅向
- 7 -
Upper and Lower HDD Tray Installation
上、下層硬碟托盤安裝/ Installation du plateau supérieur et inférieur du disque dur / Installation des oberen und
unteren Festplatteneinschubs/ Instalación de la bandeja HDD superior e inferior / 上下の HDDトレイの取り付け
c
q

Remove Side HDD Tray
側硬碟托盤卸除/ Retirer le plateau latéral du disque dur / Seitliches Festplattenfach entfernen /
Retire la bandeja de HDD lateral / サイドHDDトレイを取り外します
II
2.5" SSD Installation
2.5" SSD 安裝 2.5" SSD / 2.5" SSD -Installation / Instalación de 2.5" SSD / 2.5" SSD
/ Installation de の取り付け
Pay attention to the installation
direction of the rubber pad
注意膠墊安裝⽅向
d
c
1
1
1
2
1
Toolless 2.5" SSD Tray Installation
2.5" SSD快拆架安裝 / Installation sans outil du plateau SSD 2,5" / Werkzeuglose 2,5-Zoll-SSD-Einbau-Installation /
Instalación de la bandeja SSD de 2,5" sin herramientas/ ツールレス2.5"SSDトレイの取り付け
j
注 意: 如 需 運 送 ,建 議 在 快 拆 架 的 側 邊 鎖 上 ⼿ 旋 螺 絲 。 1 .
此 快 拆 架 僅 能 使 ⽤ 於 側 邊 有 鎖 孔 的 2 . 5 ” S S D。2.
Attention: 1 . Recommend to fix the thumbscrew beside the toolless SSD tray for transporting.
2. The toolless tray supports only the 2.5" SSD that has screw hole in the side way.
- 8 -
Match
對 ⿑

II
Radiator & Cooling Support
散熱器&⽔冷排⽀援/ Radiateur et ventilation compatibilité / Kühler- und Kühlungsunterstützung /
Soporte de refrigeración y radiador / ラジエーターと冷却のサポート
120 mm FAN x3
140 mm FAN x3
360 mm RADIATOR
420 mm RADIATOR
(CONDITIONAL P.11)
120 mm FAN x3
140 mm FAN x3
360 mm RADIATOR
280 mm RADIATOR
120 mm FAN x1
140 mm FAN x1
120 mm FAN x3
360 mm RADIATOR
PSU Shroud Top Fan Bracket 2.5" SSD Installation
電源包艙⾵扇架安裝2.5" SSD/PSU Carénage Support de ventilateur supérieur Installation du SSD 2,5" /
PSU Shroud Top Lüfterhalterung 2,5" SSD-Installation / Cubierta de PSU Soporte de ventilador superior Instalación
de SSD de 2,5" / PSUシュラウドトップファンブラケット2.5"SSDの取り付け
Remove the
fan bracket Remove the mounting plate
注意:安裝⾵扇或散熱器前請先移除遮⽚,以利達到最佳的散熱效果。
Attention: Remove the mounting plate before installing fans or radiator on the fan bracket to
achieve optimized cooling.
Pay attention to the
installation direction
of the rubber pad
注意膠墊安裝⽅向
c
d
2.5" SSD installation
2.5" SSD 安裝
Mounting point for
water pump
⽔泵安裝孔位預留
- 9 -
卸除⾵扇架 卸除遮⽚

- 10 -
II
Radiator Installation Direction Guide
散熱器安裝⽅向指南/ Guide de sens d'installation du radiateur / Anleitung zur Heizkörperinstallation /
Guía de dirección de instalación del radiador / ラジエーター設置⽅向ガイド
Please install the
radiator on this side
請靠此端安裝散熱器
Please install the
radiator on this side
請靠此端安裝散熱器
Outlet facing
frontward
出⽔端朝前
Outlet facing
backward
出⽔端朝後
Mount toward the back
靠後安裝
Mount toward the front
靠前安裝
Multi-purpose Mounting Slits
多元安裝孔位/ Fentes de montage polyvalentes/ Mehrzweck-Montageschlitze / Ranuras de montaje multipropósito /
多⽬的取り付けスリット
Mounting slits with 105mm gap in between,
able to install a distro plate or reservoir/pump bracket.
預留 跨距之鎖孔,可多元運⽤安裝⽔道板或是 10 5 m m
⽔泵⽀架。

II
Top Fan Bracket Guide
上蓋⾵扇架指南/ Guide du support du ventilateur supérieur / Anleitung für die obere Lüfterhalterung /
Guía del soporte del ventilador superior / トップファンブラケットガイド
Purpose of each mounting point
孔位說明
360 mm radiator
mounting point
36 0 m m 冷 排 安 裝 孔 位 120/140 mm fan
centered mounting poin
120/140 mm 置中⾵扇安裝孔位
Water pump drain port
⽔泵注⽔孔
420mm radiator mounting point
42 0 m m 散熱器安裝孔位
- 11 -
Attention: Install the radiator without removing
the fan bracket.
注意:請於不拆下⾵扇架的狀況下安裝散熱器。
Attention: Do not use screw other than size
6#32 long screw.
注意:⾧螺絲為 6 # 3 2 ⽛螺絲,如為其它規格
尺⼨請勿使⽤。
Use the original radiator screws.
使⽤散熱器原附螺絲。
i
r
When installing 420 mm radiator, must:
1. Face the inlet and outlet backward.
2. Remove the rear 140mm fan.
安 裝 4 2 0 m m 散熱器的條件:
1 . 進出⽔⼝要朝後。
2 . 須先卸下後 1 4 0 m m ⾵扇。

II
Front Fan Bracket
前⾵扇架/ Support de ventilateur avant / Lüfterhalterung vorne / Soporte del ventilador delantero /
フロントファンブラケット
注 意 : ⾵ 扇 盤 可 以 反 轉 , 有 四 種 樣 式 。
Attention: The fan bracket can be reversed, there are 4 installation style.
- 12 -
樣 式1
Style 1
樣 式2
Style 2
樣 式3( 反 轉 )
Style 3 (reversed)
樣 式4( 反 轉 )
Style 4 (reversed)
Remove the screws
卸下固定螺絲
Remove the front fan bracket
卸下⾵扇架
Attention direction
注意⽅向
This end is
facing up
此端朝上
This end
is facing
down
此端朝下

- 13 -
II
Cable Management
線材整理/ Gestion des câbles / Kabelmanagement /Mantenimiento de cable/ ケーブル管理
Controller Suggest Mounting Location
控制器建議安裝位置/
ELe contrôleur suggère un emplacement
de montage/ Controller schlagen
Montageort vor /Ebicación de montaje
sugerida del controlador/
プリセット
コントローラの貼り付けスペース
控制器安裝位置請勿
超過此範圍,會導致
遮線蓋無法確實蓋上。
Don't mount the
controller over this area,
or else the cable cover
might not close properly.
控制器與⾵扇線材管理通道
CPU 8 PIN 線材管理通道
如 何 使 ⽤ 魔 ⿁ 氈
24 PIN SATA 與硬碟 線材管理通道
控制器與⾵扇線材管理通道
FIO模組
線材管理通道
1
2
Controller and fan cable channel
CPU 8 PIN cable channel
How to use the Velcro straps
24 PIN and HDD SATA cable
channel
Controller and fan cable channel
FIO module
cable channel

Graphic Card Anti-sag Bracket Installation
顯卡⽀撐架安裝 / Installation du support anti-affaissement de la carte graphique /
Installation der Anti-Sag-Halterung für die Grafikkarte / Instalación del soporte antideslizamiento de la tarjeta
gráfica/グラフィックカードのたるみ防⽌ブラケットの取り付け
II
- 14 -
Loose the screw
for adjustment
鬆開螺絲進⾏調整
a
m
Tool / ⼯具
n
p
l
g
a

Reverse Front Panel
前⾯板倒置 / Panneau avant inversé / Vorderseite invertiert / Panel frontal invertido/フロントパネルを反転
II
卸下LOGO飾⽚
Remove the
logo plate
⾯板倒置後裝上 LO GO 飾⽚
Install the
logo plate after
flipping the front panel
7
7
翻轉 180°
Flip 180°
注 意:使 ⽤ 倒 置 型 態 時 , 前 ⾵ 扇 ⽀ 架 不 ⽀ 援 使 ⽤ 樣 式3的安裝⽅式。
Attention: Reverse front panel doesn't support front fan bracket style 3 installation.
- 15 -
3
線材由此穿到背⾯
The cable is
passed from here
to the back

LAN3-1X / LAN3-1W
II
硬體擴充⽀援 / Liquidation du matériel / Hardware-Freigabe / Liquidación de hardware/ハードウェアクリアランス
Hardware Clearance
CPU Height Clearance PSU clearence
GPU clearance
選配套件 / Kits d'options / Optionssätze / Kits de opciones/オプションキット
Option Kits
LANCOOL 3 DUST FILTER KIT
O11DE-1X / O11DE-1W
VERTICAL GPU KIT
- 16 -
This manual suits for next models
1
Table of contents
Other Lian-Li Enclosure manuals

Lian-Li
Lian-Li LANCOOL II MESH User manual

Lian-Li
Lian-Li O11 DYNAMIC XL User manual

Lian-Li
Lian-Li LANCOOL II User manual

Lian-Li
Lian-Li PC-Q39G WX User manual

Lian-Li
Lian-Li LANCOOL II MESH User manual

Lian-Li
Lian-Li PC-A51B User manual

Lian-Li
Lian-Li O11DE-4X User manual

Lian-Li
Lian-Li PC-V1000L User manual

Lian-Li
Lian-Li PC-Q39GWX User manual

Lian-Li
Lian-Li O11 DYNAMIC XL User manual