Liberty Safe Safe Power Outlet Kit User manual

INSTALLATION AND OPERATION MANUAL
www.LibertySafe.com (800) 247-5625
©2014 Liberty Safe & Security Products, Inc.
PN 11015-001
Ca t- 5USB 2.0
ANTENNA

POWER OUTLET KIT PARTS
INSTALLATION GUIDE:
HUB A
SCREW AND SPACER SETS
FOR 1 TO 4 FIREBOARD LAYERS
HUB B
HOLE SAW
CENTERING GUIDE
1 LAYER: 2 SCREWS (1 ½") & NO SPACERS
2 LAYERS: 2 SCREWS (2 1/8”) & 2 RED SPACERS (5/8”)
AND 1 SAFE ALERT SPACER (1”)
3 LAYERS: 2 SCREWS (2 ¾") & 2 SPACERS (1 ¼")
AND 1 SAFE ALERT SPACER (1 5/8")
4 LAYERS: 2 SCREWS (3 2/5") & 2 BLUE SPACERS (1 13/16")
AND 1 SAFE ALERT SPACER (2 1/3")
GUIDE ROD
(FOR HOLE SAW)
POWER CORD
COVER PLATE & COVER
PLATE SCREWS (¾")
SafElert Spacer
SafElert Spacer
SafElert Spacer
Spacer
Spacer
Spacer
Spacer
Spacer
Spacer

GETTING STARTED:
Before you begin, please note: You will need to have access to the
inside and back of your safe to complete this installation. This may require
you to remove any lag-bolts and move the safe to gain access to the back,
especially if safe is located in a closet or against a wall. Outlet kit with pow-
er cord adds 1.25" to the depth of the safe and may require repositioning
lag bolts. If you are not able to move the safe on your own, contact your
local Liberty Safe dealer, locksmith or moving company to assist you.
TOOLS REQUIRED BUT NOT INCLUDED:
• 2
3/4" or 3" Hole Saw • Utility Knife
• Vacuum • Marking Pen
• ¼" Drill Bit • Hand Phillips Screwdriver
• Electric Drill (DO NOT use electric drill to tighten screws)
1 Carefully remove and discard back cover plate by
gently prying (top corner) with a flat-head screw-
driver. Check to see if fireboard is blocking hole.
Insert hole saw centering guide into the back of the
safe. If no fireboard is blocking hole, skip to #3.
2 If fireboard is blocking hole, use ¼" drill bit to drill
through the guide hole and through all fireboard
layers. Caution: Once drill passes through all lay-
ers of fireboard, stop and reverse drill out to avoid
binding with fabric interior.
3 From the inside of the safe, locate the ¼" hole
(from step 2) or larger factory pre-cut hole by care-
fully pressing on the fabric in the bottom, back-right
corner (usually about 6.5" up from the floor).
4 Using a utility knife, carefully cut a small ‘X’ pattern
in the safe fabric where the hole is located.
5 If the diameter of the hole is already cut to 3"
(safes built after April 2014), cut fabric around hole
and skip to #14. If hole is smaller than 3", go to #6
POWER OUTLET KIT PARTS
INSTALLATION GUIDE:
GUIDE ROD
(FOR HOLE SAW)

6Remove drill bit from hole saw and replace
with included guide rod.
8Using the hole saw as a stencil, use a mark-
er to mark the fabric around the hole saw.
{Carefully pull the cut fabric off and discard.
7From inside the safe, insert the guide rod
through the hole and into the hole saw
centering guide.
9Use a utility knife to carefully cut the fabric
where it is marked around the hole.
{Reinsert hole saw to make sure the hole
saw teeth will not catch the fabric around
the hole or damage to fabric may occur.
Align the hole saw and begin cutting.
10 11

{When cutting 3 or 4 layers, it will be neces-
sary to remove 1 or 2 fireboard disks from
inside saw to finish cutting through remain-
ing layers.
{Insert two screws of the correct length
through the inside holes of Hub B, then
slide the correct color spacers on the
screws. Line the screws up with the holes
in the back of Hub A.
{Using a vacuum, clean up any debris
before continuing installation.
{Count the number of layers of fireboard and
refer to the “Power Outlet Parts” section to
determine which set of screws and color
spacers are needed to fasten the hub parts
together.
{Using a screwdriver, turn the screws
to connect Hub B to Hub A. Do not
completely tighten screws at this time.
12 13
16
14 15
HUB A HUB B
{Place the SafElert spacer (same color as
other spacers used) between the two hubs.
No spacer is required for one layer of fire-
board.
17

{Make sure Hub A is securely fastened. If it
is not, carefully tighten cover plate screws
again (but do not over-tighten).
{Plug 90° power cord into Hub B. Plug the
other end into a standard grounded 110v
outlet. For additional surge protection,
power cord may be connected to a
standard surge protector.
{From the back of the safe, place the cover
plate over Hub B and use screwdriver
to secure plate with cover plate screws.
Do not over tighten.
21
22 23
{From the inside of safe, push out the hole
saw centering guide with a screwdriver.
Insert the assembled outlet kit into hole
with Hub A facing inward.
{Using a screwdriver, finish tightening the
screws. Do not over-tighten.
{Press assembled outlet kit gently into place
until Hub B snaps into back-wall of safe.
18 19
20

POWER OUTLET SURGE PROTECTOR:
• The small blue light at the bottom of Hub A (inside of safe) will illuminate to
indicate surge protection is active.*
• Make sure electronic equipment is turned off before connecting to hub
outlets. Do not use extension cords with the power outlets inside the safe.
• Connected equipment can now be switched on.
* If blue light on Hub A turns off, surge protection may not be active but power
should still be supplied to connected equipment. In this case, the external pow-
er cord of Power Outlet Kit should be connected to a standard surge protector.
POWER OUTLET KIT WITH INTERNAL SURGE PROTECTOR
LIMITED LIFETIME MANUFACTURER’S WARRANTY
Like other surge protectors, the surge protector in this outlet kit has a finite lifespan.
After a period of time, under normal usage and in the absence of defects, the surge
protective components will expire when their capacity has been exceeded and
thereby no longer provides surge protection. In this case, the Limited Warranty is
not valid and the surge protector ought to be replaced.
The Power Outlet Kit with surge protector is warranted to be free of defects in
workmanship and/or materials for one year after date of purchase. If such a de-
fect should arise within the first year, the Power Outlet Kit will be replaced without
charge. This warranty does not include or cover installation, labor, or damage
caused by accident, lightning, misuse, or electrical surge.
This warranty only warrantees the proper use and function of this product and does
not warrant any product or equipment plugged in or attached to the Power Outlet
Kit with surge protector.
If within one year of the date of purchase you find your product is not working
as described, or you have any questions regarding the warranty of this product,
please go to www.LibertySafe.com and contact customer service.
CAT 5 CONNECTION SPECIFICATIONS:
The Liberty Safe Power Outlet RJ45 connection supports 10Mbits and 100Mbits
CAT5 CAT5e CAT6 cabling with a standard RJ45 male connector.

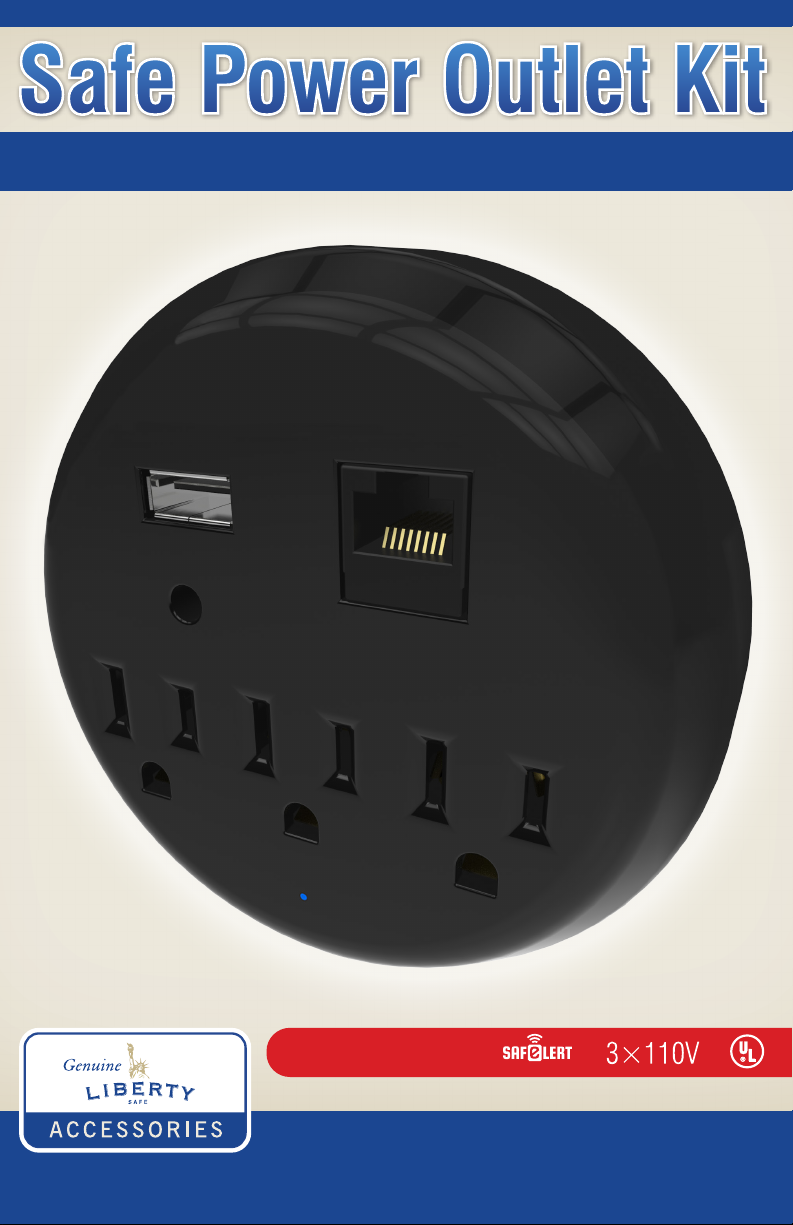
USB CONNECTION SPECIFICATIONS:
The Liberty Safe Power Outlet support USB Standards 1.1 and 2.0. The USB con-
nection IS NOT self powered, but will carry power as a pass through—For instance,
if you plug the external USB into a powered USB on a computer, the USB on the
inside of the safe will carry power to your device. If it is not plugged into an exter-
nal computer, it will not carry power. If you need power for a USB device inside the
safe, it is recommend that you use the charger that came with your USB device
and connect it to one of the three AC power outlets on the Liberty Safe HUB.
USB SUPPORTED DEVICES:
Not all USB devices are created equal and each follows the USB standards at
different levels. It is important that you consult your owner’s manual for your USB
specifications and the USB standards listed below. USB devices have a limit on
cable lengths and power consumption. It is important to note that by placing a USB
device inside the safe, it is likely you have exceeded the manufacture’s recom-
mendation for maximum distance for proper operation. It is likely that you will be
required to use an extension cable that has a repeater or an active component to
boost the signal.
THE FOLLOWING IS A GENERAL GUIDE FOR USB DEVICE USAGE.
PLEASE NOTE THAT INDIVIDUAL RESULTS MAY VARY:
USB Flash Drive - (recommended) Most will operate over a 5 meter (16 feet 4
inches) total cable length without any additional wiring requirement.
USB Hard Drive-Self powered - (recommended) These devices come with their
own power supply and do not require power from the personal computer USB port.
These usually require an extension cable that has a signal repeater built in and
provides the correct signal strength. Normal extension USB cables do not have re-
peaters built into them. You must check the extension cable to ensure that it states
Repeater or Active extension cable.
USB Portable Hard Drive - These devices are not self-powered. Power is provid-
ed only from your personal computer, not from any external source. As a result, be
sure to only use the length of cable provided with your hard drive. Using a longer
cable may affect connectivity or power and may not allow proper functionality.
Other USB Devices - It is important to follow the manufacturer’s recommended
instructions for the proper use of your USB device. It is recommended that you only
use the USB cord provided with your device.
**For greater distances, a USB to RJ45 extension adapter works well.
These devices can allow for distances greater than 15 meters (50 feet).

INSTALLATION AND OPERATION MANUAL
www.LibertySafe.com (800) 247-5625
©2014 Liberty Safe & Security Products, Inc.
PN 11015-001
Ca t- 5USB 2.0
ANTENNA
Table of contents
Popular Accessories manuals by other brands

Poweradd
Poweradd PD-MP1060BK user manual

IFM
IFM O6H7 Series operating instructions

MHS Boilers
MHS Boilers CRUZ belt Installation, operation & maintenance manual

Conrad
Conrad 2380482 operating instructions

TECTONICS UK
TECTONICS UK Fast Frame Series manual

Perlick
Perlick BC24 Series Installation and operation instructions