LIBHOF B-55 User manual

B-55/65
User manual
Návod na obsluhu
Руководство пользователя
ХОЛОДИЛЬНИК АВТОМОБИЛЬНЫЙ
КОМПРЕССОРНЫЙ
COMPRESSOR CAR
FRIDGE
CHLADNIČKA S KOMPRESOROM DO AUTA

Contents of delivery:
•Refrigerator - 1 piece
•Operating instructions - 1 piece
•Power cable for car cigarette lighter - 1 piece
•Partition of the internal volume of the refrigerator - 1-2 pieces
(depending on the model)
Please read this operating manual carefully before starting the device. Keep it in a safe
place for future reference. If the device is passed on to another person, this operating
manual must be handed over to the user along with it.
The manufacturer can not be held liable for damage resulting from improper usage or
incorrect operation.

3
English
1. SAFETY INSTRUCTION 5
1.1 General Safety 5
1.2 Operating the cooling device safety 7
2. COOLING DEVICE APPLICATION 8
3. COOLING DEVICE FUNCTION 9
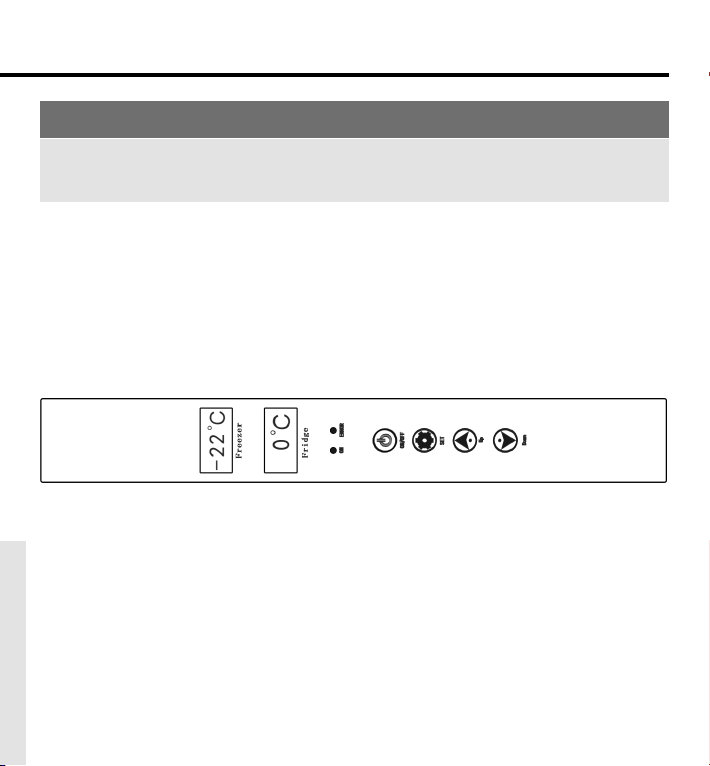
4. DISPLAY ELEMENTS AND OPERATION 10
4.1 Display & control panel 10
4.2 Cooler device switch on/off 10
4.3 Cooling temperature setting 11
4.4 Low voltage protection battery monitor setting 11
4.5 The explanation for the running code shown in the display screen 13
4.6 Energy saving tips 14
5. CONNECTING THE COOLING DEVICE 15
5.1 Using the fused DC plug for device connection 16
6. USING THE COOLING DEVICE 17
6.1 Switch on the cooling device 17
6.2 Switch off the cooling device. 18
6.3 Defrost the cooling device. 18
7. CLEANING AND MAINTENANCE 20
7.1 Replacing the DC plug fuse 20
7.2 Cleaning the cooling device 20
7.3 Storage the cooling device 21
7.4 Transporting the cooling device 21
CONTENT

5
English
1. SAFETY INSTRUCTION
1.1 General Safety
WARNING!
Do not operate the cooling device if it is visibly damaged.
If this cooling device’s power cable is damaged, it must be replaced by the customer
service in order to prevent safety danger.
This cooling device may only be repaired by qualified personnel, improper repair can
lead to considerable danger.
Cleaning and user maintenance must not be carried out by children without
supervision.
Children must be supervised to ensure that they do not play with the cooling device.
Always keep and use the cooling device out of the reach of children under age of 8
years.
Do not store any explosive substances such as spray cans with a flammable
propellant in the cooling device.

6
English
CAUTION!
Disconnect the cooling device from the power supply:
• before each cleaning and maintenance
• after every use
• food may only be stored in its original package or in suitable containers.
NOTICE!
Check that the voltage specification on the rating label corresponds to that of the
power supply.
Only connect the cooling device as follows:
• connect the DC cable to a DC power supply in the vehicle
• or connect the DC cable to an AC adaptor and then connect the AC adaptor to
the AC power supply.
Never pull the plug out of the socket by the cable.
If the cooling device is connected to the DC outlet, disconnect the cooling device
and other power consuming devices from the battery before connecting a quick
charging device.
If the cooling device is connected to the DC outlet, disconnect the cooling device or
switch it off when you turn off the engine. Otherwise you may discharge the battery.
The cooling device is not suitable for transporting caustic material or material
contains solvents.
The insulation of the cooling device contains flammable cyclopentane and requires
special disposal procedures. Deliver the cooling device at the end of its life-cycle to
an appropriate recycling.

7
English
1.2 Operating the cooling device safety
CAUTION!
Before starting the cooling device, ensure that the power supply line and the plug
are dry.
NOTICE!
• Do not use electric device inside the cooling device unless they are
recommended by the manufacturer for the purpose.
• Do not place the cooling device near naked flames or other heat sources
(heaters, direct sunlight, gas ovens etc.)
• Danger of overheating!
• Ensure at all times that there is sufficient ventilation so that the heat arises
during operation does not build up. Make sure the cooling device is sufficiently
far away from walls and other objects so that the air can circulate.
• Ensure that the ventilation openings are not covered.
• Do not fill the inner container with ice or fluid.
• Do not immerse the cooling device into the water.
• Protect the cooling device and the cable against heat and moisture.

8
English
2. COOLING DEVICE APPLICATION
The cooling device is designed to be operated from:
• DC on-board power supply from a vehicle, boat or caravan
• DC external battery
• AC power supply 220V
• AC power supply by AC adaptor.
The refrigerator has two compartments - for cooling and for freezing. Device is intended
to be used in household and similar application such as
• Staff kitchen areas in shops, offices and other working environments.
• Farm houses
• Clients in hotels, motels and other residential type environments.
• Bed and breakfast type environments.
CAUTION! Health danger!
Please check if the cooling capacity of the device is suitable for storing the food or
medicine you wish to cool.

9
English
3. COOLING DEVICE FUNCTION
The cooler device can refrigerate or freeze food products. A fast-acting and efficient
cooling system provides maintenance-free cooling performance with a compressor and
control module. The cooling device is designed for mobile use and it can be used in the
various harsh condition and situation.
Function description:
• 3-level battery monitor for protecting the vehicle battery.
• Display with temperature gauge (switch off automatically at low battery voltage).
• Temperature adjustment (in 1°C or 2°F steps).

10
English
4. DISPLAY ELEMENTS AND OPERATION
NOTICE!
After buying your new cooling device, please keep the new cooling device
horizontally for more than 12 hours before starting.
Before staring your new cooling device for the first time, your should clean it inside and
outside with a damp cloth for hygienic reasons. Please also refer to the chapter «Cleaning
and Maintenance».
4.1 Display & control panel
4.2 Cooler device switch on/off
Switch on: Touch the button «ON/OFF» once lightly by your finger.
Switch off: Keep touching the button «ON/OFF» for about five seconds.

11
English
4.3 Cooling temperature setting
• Switch on the cooling device.
• Select temperature display unit: First touch the button «down» without releasing, at
the same time use your another finger to touch the button «set» without releasing,
keep your two fingers touching the two buttons «set» and «down» for about 5 seconds,
there will be flashing «°C» or «°F» appearing in the display screen, release your two
fingers from the two buttons «down» and «set». Then touch the button «up» or «down»
to select the temperature unit Celsius or Fahrenheit. The selected temperature unit will
appear and flash in the displayscreen for a few seconds, and then the display screen
will return to display the current Temperature automatically.
• Cooling temperature setting: touch the button «SET» once, then touch the «UP +» and
«DOWN -» button to set the cooling temperature you want. A change in temperature
in the freezer leads to a corresponding change in temperature in the cooling
compartment.
• The selected temperature number will flash in the display screen for a few
seconds, and then the display screen will return to display the current temperature
automatically.
4.4 Low voltage protection battery monitor setting
The cooling device is equipped with a 3-level battery monitor which protects your vehicle
battery against excessive discharging when the device is connected to the on-board DC
supply.
If the cooler is operated when the vehicle ignition is switched off, the cooler switches off
automatically as soon as the supply voltage falls below a set level. The cooler will switch
back on once the battery has been recharged to the restart voltage level.

12
English
NOTICE! Danger of damage!
When switched off by the battery monitor, the battery will no longer be fully charged.
Avoid starting repeatedly or operating without longer charging phases. Ensure that
the battery is recharged.
In «H3» level, the battery monitor responds faster than at the level «H1» and «H2».
Monitor Level H1 H2 H3
12V Switch-off voltage, V 10.3 10.8 11.3
Restart voltage, V 11.1 11.8 12.6
24V Switch-off voltage, V 21.5 22.3 24.3
Restart voltage, V 22.7 23.7 25.7
When the cooler is supplied by the started battery, select the battery monitor level «H3»,
if the cooling device is connected to a supply battery, the battery monitor level «H1» will
suffice.
•Switch on the cooling device.
•There are 3-level low voltage protection battery monitor setting: H1, H2 and H3.
•Press and hold the «UP» and «DOWN» buttons for 3 seconds to select the battery
monitoring level H1, H2 or H3.

13
English
4.5 The explanation for the running code shown in the
display screen
Error
Code Possible Reason Suggested Solution
E0 Sensor circuit is broken or
short Connect or replace the sensor
E1 Input voltage is low Check the battery voltage or adjust the
Battery Monitor Level.
E2 Ventilating fan problem Check if the ventilating fan is blocked or
short circuit.
E3 Compressor started self-
protection
Disconnect the device from power supply
for 30 minutes, and re-start the device.
E4 Compressor protect itself
against unusual running speed.
Change the working mode by device
control panel
E5 Control panel’s overheating
warning
Move the device to a place with well-
ventilated installation environment.

14
English
4.6 Energy saving tips
•Choose a well-ventilated installation location which is protected against direct sunlight.
•Allow warm food to cool down first before placing it in the cooling device to keep cool.
•Do not open the cooling device more often than necessary.
•Do not leave the cooling device open for longer than necessary.
•Defrost the cooling device once a layer of ice forms.
•Avoid unnecessary low temperature.

15
English
5. CONNECTING THE COOLING DEVICE
WARNING! DC extension cord
Because of the potential safety danger under certain conditions, the manufacturer
does not recommend using any type of DC extension cord.
Under no circumstance should you attempt to splice extension cord wires.
Do not use power strips or two-way splitter.
Always unroll or uncoil a DC cord to avoid heat retention and possible melting.
Connecting to a battery (vehicle or boat), the cooler can be operated with DC 12V or
24V.
NOTICE! Danger of damage!
Disconnect the cooler and other consumer units from the battery before you connect
the battery to a quick charging device. Over-voltage can damage the electronic of
the cooling device.
For safety reason, the cooling device is equipped with an electronic system to
prevent polarity reversal. This protects the device against short-circuiting when
connecting to a battery.

16
English
5.1 Using the fused DC plug for device connection
NOTICE! Danger of damage!
For protection of the device, the DC cable supplied includes a fuse inside the plug.
Do not remove the fuse from the DC plug. Only use the DC cable supplied.
•Plug the DC cable into the cooling device DC power supply inlet.
•Connect the DC cable to the DC power supply outlet.

17
English
6. USING THE COOLING DEVICE
6.1 Switch on the cooling device
NOTICE! Danger of overheating!
Ensure at all time that there is sufficient ventilation so that the heat which generated
during the operation can dissipate. Ensure that the ventilation slots are not covered.
Make sure that the device is sufficiently far away from walls and other object so that
the air can circulate.
•Place the cooler on a firm foundation.
•Make sure that the ventilation slots are not covered and that the heated air can
dissipate.
•Close the cooling device.
•Switch on the cooler.
NOTICE! Danger from excessively low temperature!
Ensure that the only those objects are placed in the cooler that are intended to be
cooled at the selected temperature.

18
English
NOTE!
The temperature displayed in the screen is that of the middle in the interior.
The temperature elsewhere can deviate from this temperature.
6.2 Switch off the cooling device.
•Empty the cooler.
•Switch off the cooler.
•Pull out the DC connection cable from the socket.
•If you do not want to use the cooling device for a longer period of time.
•Leave the device cover slight open, this will prevents odour build-up.
6.3 Defrost the cooling device.
Humidity can form frost in the interior of the cooling device or on the vaporizer, and this
will reduce the cooling capacity of device. Defrost the cooling device in good time to
avoid this.
NOTICE! Danger of damage!
Never use hard or pointed tools to remove ice or to loosen objects which have
frozen in the cooler.

19
English
Process the following step to defrost the cooler
• Take out the contents of the cooler.
• If necessary, place them in another cooling device to keep them cool.
• Switch off the device.
• Leave the cover open.
• Wipe off the defrosted water.

20
English
7. CLEANING AND MAINTENANCE
7.1 Replacing the DC plug fuse
• Pull off the adapter sleeve from the DC plug.
• Unscrew the screw out of the upper half of the housing.
• Carefully raise the upper half of the housing from the lower half.
• Take out the contact pin.
• Replace the detective fuse with a new fuse with the same type and rating
• Re-assemble the plug in the reverse order.
7.2 Cleaning the cooling device
• Occasionally clean the device interior and exterior with a damp cloth.
• Make sure that the air inlet and outlet vents in the device are free of any dust and dirt,
so that heat can be released and the device is not damaged.
WARNING!
Always disconnect the device from the power supply before you clean and service it.
This manual suits for next models
1
Table of contents
Languages:
Other LIBHOF Refrigerator manuals
Popular Refrigerator manuals by other brands

Frigidaire
Frigidaire FGHT1846KE - Gallery 18' Refrigerator Product specifications

Amica
Amica VC 1622 M operating instructions

Whirlpool
Whirlpool GSC25C4EY Dimension Guide

Klarstein
Klarstein 10005399 instruction manual

KitchenAid
KitchenAid REFRIGERATOR User instructions

Beko
Beko SSA24020 Instructions for use