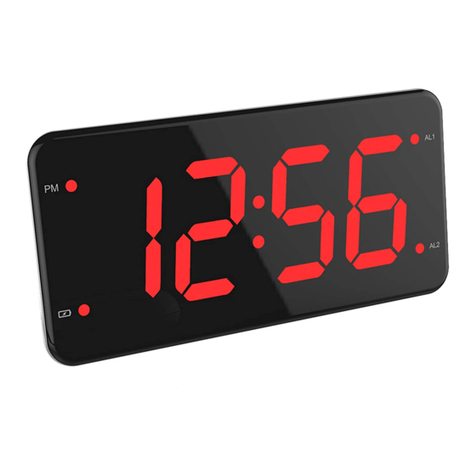
LIELONGREN LLR010B User manual

1/ 5
LIELONGREN
Dual Alarm Digital Clock
Model: LLR010B
KEY FEATURES
1. 7-inch Large Display with Full Range Brightness Dimmer
2. Dual Smart Alarm with Adjustable Alarm Duration & Snooze Duration
3. Dual Alarm Mode with Loud Buzzer and Bed Shaker
4. Dual USB Charger with Standard DC 5V/1A Output
5. Powered by USB Adapter with Battery Backup
6. Keeping Accurate Time with Under 30 Seconds per Month of Time Error.
DEFAULT SETTINGS
Time Format: 24 hour
Time: 12:00
Date: 2018/1/1
Alarm Duration: 10 mins (Adjustable)
Snooze Duration: 9 mins (Adjustable)
Alarm Mode: Buzzer
Alarm Volume: Medium (MED)
INSTALLATION
1. Plug the AC/DC adaptor to an AC household outlet, and plug the DC jack to the
back of the unit. Then your clock is ready to work for you.
2. Insert 2xAA batteries (not included) into the battery compartment to provide
backup power to the clock in the event of a temporary power interruption.
WARM TIPS
1. Long press “▲” + “Alarm2” button for 3 seconds to enter Alarm-Test-Mode,
then you can set the switcher on the right to select your favorite buzzer volume
and vibrating amplitude.
2. In setting mode, if no operation within 10 seconds, the clock will automatically

2/ 5
save the current settings and return to time mode.
3. If AC power is interrupted, press SNOOZE button, the time will display for 5
seconds for emergency situations.

3/ 5
SETTING TIME
1. In time mode, press and hold the TIME button to enter time setting mode, the
hour digits flash. Press ▲ or ▼ to set the current hour (hold to advance
rapidly).
2. Press TIME button again, the minute digits flash. Press ▲ or ▼ to set minute
(hold to advance rapidly).
3. Press TIME button again, the 12/24Hr digits flash. Press ▲ or ▼ to set
12/24Hr time format.
4. Press TIME button again, the year digits flash. Press ▲ or ▼ to set year (hold
to advance rapidly).
5. Press TIME button again, the month digits flash. Press ▲ or ▼ to set month
(hold to advance rapidly).
6. Press TIME button again, the day digits flash. Press ▲ or ▼ to set day (hold to
advance rapidly).
7. Press TIME button again, exit time setting mode.
SWITCHING ALARM ON/OFF
In time mode, press Alarm-1 (Alarm-2) button to switch on or off the alarm, the AL1
(AL2) indicator will be on or off correspondingly.
SETTING ALARMS
1. In time mode, press and hold Alarm-1 (Alarm-2) button to enter alarm setting
mode, the hour digits flash. Press ▲ or ▼ to set the current hour (hold to
advance rapidly).
2. Press Alarm-1 (Alarm-2) button again, the minute digits flash. Press ▲ or ▼ to
set the current minute (hold to advance rapidly).
3. Press Alarm-1 (Alarm-2) button again, the alarm day digits flash. Press ▲ or ▼
to set the current alarm day (hold to advance rapidly).
1-1: Single day only
1-5: Workdays only
6-7: Weekend only
1-7: Every day
4. Press Alarm-1 (Alarm-2) button again, the alarm duration digits flash. Press ▲
or ▼ to set the current alarm duration (hold to advance rapidly).
※Alarm Duration: Default 10 minutes (1-30 minutes adjustable)

4/ 5
5. Press Alarm-1 (Alarm-2) button again, exit alarm setting mode.
SETTING SNOOZE DURATION
1. In time mode, press and hold SNOOZE button to enter snooze duration setting
mode and the digits flash. Press ▲ or ▼ to set the current duration (hold to
advance rapidly).
※Snooze duration: Default 9 minutes (1-60 minutes adjustable)
2. Press SNOOZE button again, exit snooze duration setting mode.
STOPPING ALARM WHEN IT GOES OFF
When Alarm 1 (Alarm 2) is sounding, the related AL1 (AL2) indicator flash. Press any
buttons (except SNOOZE button) to stop and reset the alarm to go off the next day.
ACTIVATING SNOOZE MODE WHEN ALARM GOES OFF
When Alarm 1 (Alarm 2) is sounding, press SNOOZE button, the alarm will suspend
and go off again after the set snooze duration.
SETTING ALARM MODE
Buzzer: Wake by Buzzer
Vibration: Wake by Vibrator
Both: Wake by Buzzer and Vibrator
SETTING BRIGHTNESS
Adjust to your favorite brightness level by turning the knob at the right side.
KEY SPECIFICATION
Adapter Input: AC 100-240v, 50/60Hz
Adapter Output: DC 5V/2A
USB 1&2 Output: DC 5V/1A (Total DC 5V/2A)
Power Cord Length: 5ft
Vibrator Cord Length: 6ft
TROUBLE SHOOTING

5/ 5
If your clock displays irrelevant time or does not function properly, which may be
caused by electro- static discharge or other interference, unplug the DC jack to
disconnect the AC power (and remove the backup battery). The clock will be reset to
default settings and you need to set it again.
CARE OF YOUR PRODUCT
1. Place your clock on a stable surface, away from sources of direct sunlight or
excessive heat or moisture.
2. Protect your furniture when placing your units on a natural wood and lacquered
finish by using a cloth or protective material between it and the furniture.
3. Clean your unit with a soft cloth moistened only with mild soap and water.
Stronger agents such as Benzene, thinner or similar materials can damage the
surface of the unit. Make sure the unit is unplugged before cleaning.
4. If the unit is not to be used for a prolonged period, such as a month or longer,
remove the batteries to prevent possible corrosion. Should the battery
compartment become corroded or dirty, clean the compartment thoroughly and
replace the batteries.
PACKAGE LIST
1 x Alarm Clock
1 x Bed Shaker
1 x Power Adapter
1 x Power Cord
1 x User Manual
1 x Warranty Card
WARRANTY
100% Satisfaction Guarantee. 30 days Return & Refund policy WITHOUT hassle. Get
full refund quickly or free replacement if you aren't completely satisfied. Free lifetime
technical support and 6 months manufacturer's warranty.
LIELONGREN Customer Service Team
Email: cst4lielongren@sina.com
Table of contents
Other LIELONGREN Clock manuals
Popular Clock manuals by other brands

Bodet
Bodet Opalys 14 Installation and operating instructions

Thermo
Thermo SH-TM-247 instruction manual

Extech Instruments
Extech Instruments 40102F instruction manual

Bresser Junior
Bresser Junior 8880801 operating instructions

Conrad Electronic
Conrad Electronic 39 88 56 operating instructions

Peweta
Peweta 41 Series user manual