39.9F0132F
MANUALE UTENTE / USER MANUAL
FARETTO LED ALTA EFFICIENZA DA ESTERNO IP65
OUTDOOR LED FLOOD LIGHT HIGH EFFICIENCY IP65
Con sensore | With sensor
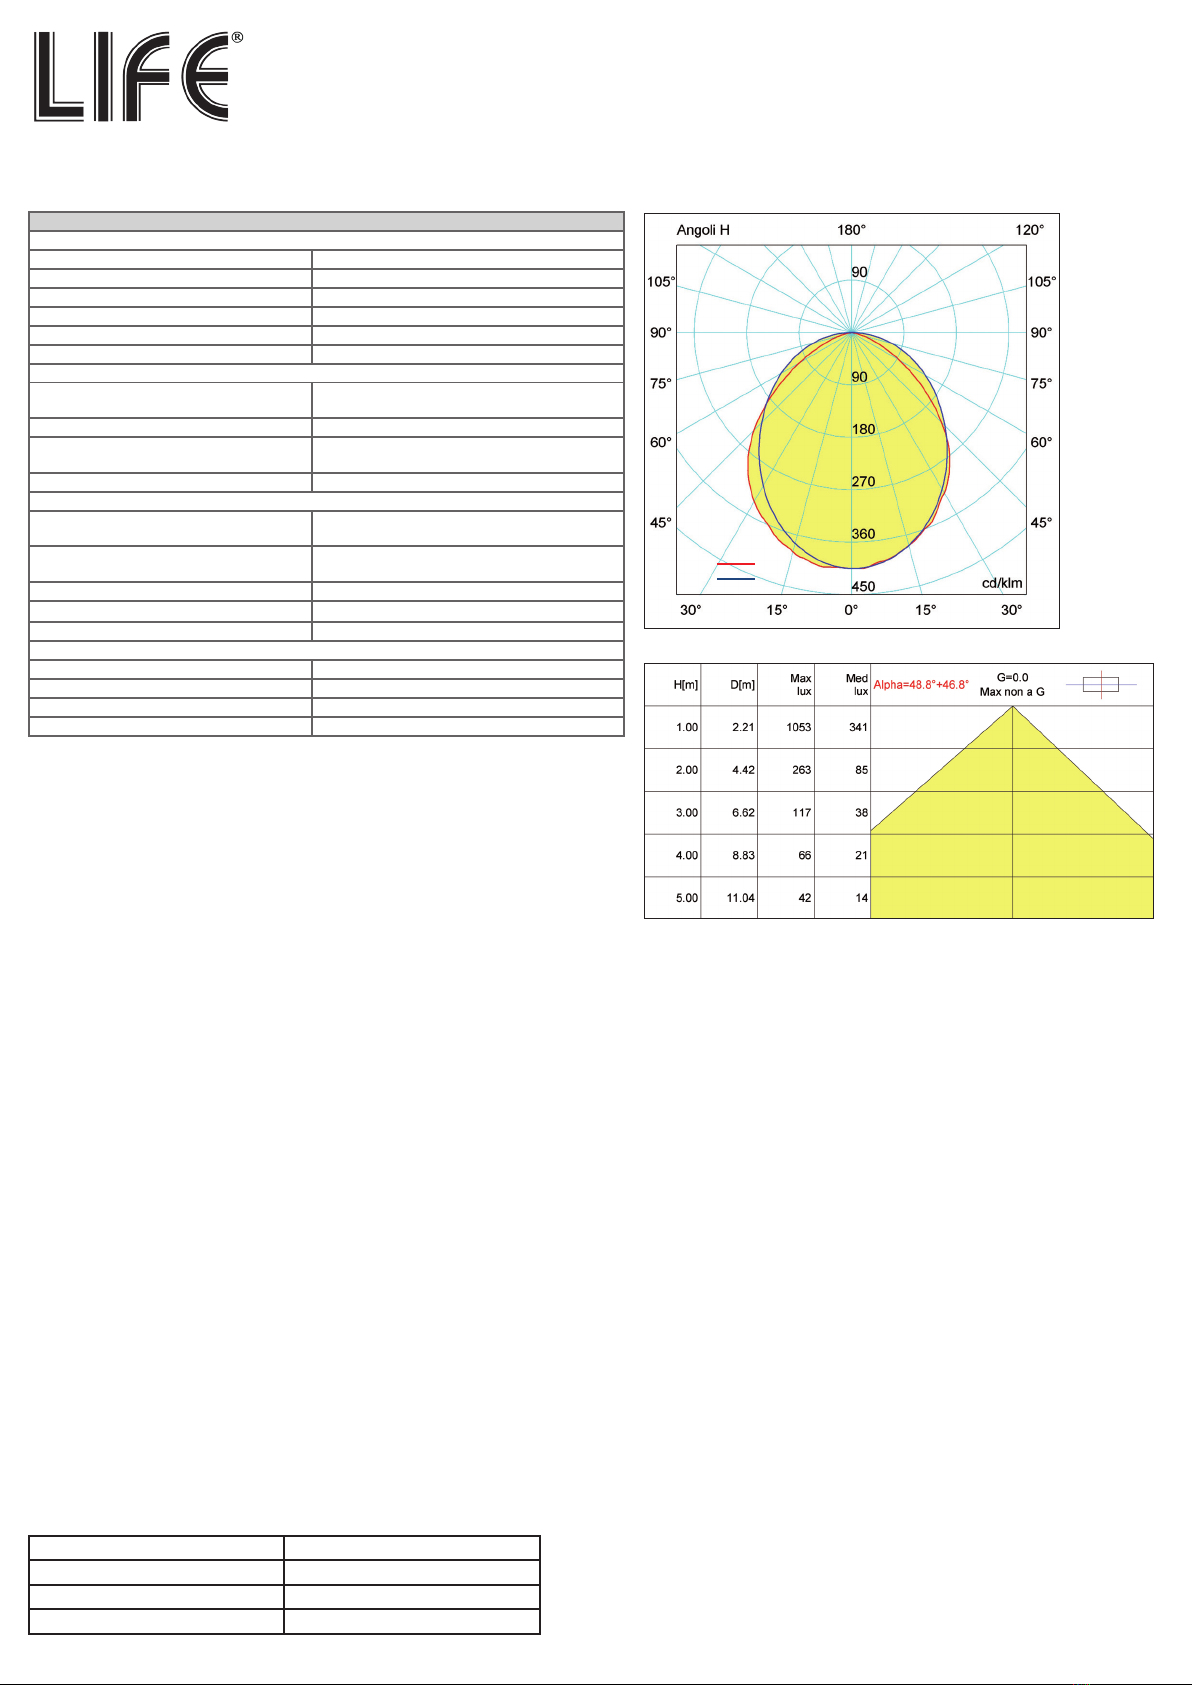
Caratteristiche e speciche tecniche/ Features and specications:
Dati Fotometrici / Photometric Data:
Luminosità / Luminous ux: 2650 lm
Angolo di diusione / Beam angle: BA110°
Temperatura di colore / Color Temperature: 6500K Bianca fredda / Cool white
Illuminazione d’accento / Accent lighting: non idoneo / Not idone
Resa cromatica / CRI: RA≥70
Warm Up Time: <1 sec
Dati Elettrici: / Electrical Data:
Assorbimento max. / watt consumption
(con driver / with driver): 30W
Tensione d’ingresso / Input Voltage: 100~265 Vac - 50~60Hz 150mA
Driver: 30-40V 750mA (Ricambio Acquistabile separa-
tamente / replacement Cod. 39.9F4030T)
Fattore di potenza / Power Factor: >0,9
Dati Meccanici/ Mechanical data:
Indice di protezione faretto /
Internal protection ood light: IP65
Indice di protezione sensore /
Internal protection sensor: IP44
Dimensioni / Sizes: 248x227x130mm
Corpo / Material: Vetro + Alluminio / Glass+Aluminium
Peso / Weight: 2,13Kg
Altri Dati: / Other data:
Vita della lampada / Life time: 30000h
Cicli ON/OFF / ON/OFF Cycle: ≥ 15000
Contenuto Mercurio (Hg) / Mercury (Hg):0,0mg
Dimmerabile / Dimmable: No
Attenzione
Al ne di installare correttamente i faretti, leggere attentamente questo manuale utente e
conservarlo.
Warning:
To install correctly led ood light, read carefully user manual and keep it.
N.B. Non toccare eventuali regolatori di tensione o corrente presenti sul driver. La modica di
queste regolazioni danneggerebbe irrimediabilmente il faretto.
Note: Do not touch any current or voltage regulators on the driver. Changing these settings will
damage irreparably the ood light.
Installazione e manutenzione / Security Warning:
Vericare i seguenti punti per un utilizzo corretto e in sicurezza.
1. Prima di aprire l’imballo, accertarsi che non si siano vericati danni durante il trasporto, in tal caso non utilizzare l’articolo, ma informare prontamente il fornitore.
2. Se l’articolo presenta difetti, non utilizzarlo ed avvertire il fornitore.
3. L’installazione deve essere eseguita da personale tecnico qualicato.
4. Prima dell’installazione assicurarsi che sia stata tolta l’alimentazione.
5. Assicurarsi che siano rispettati i parametri di tensione di alimentazione riportati sulla tabella.
6. Nel caso in cui il cavo di alimentazione risultasse difettoso o si danneggiasse, far sostituire da personale tecnico qualicato e/o rivolgersi al rivenditore, al ne di evitare danni o
incidenti.
7. Scegliere un luogo d’installazione che può sostenere il peso dell’articolo per assicurare una sicura installazione.
8. Non collegare i cavi già alimentati. Per un sicuro collegamento, accertarsi preventivamente con l’adatta strumentazione che non ci siano corto circuiti, prima di alimentare l’articolo.
9. Dopo aver ssato il faretto tramite viti adeguate, collegare all’alimentazione, rispettando lo “Schema per la connessione alla rete elettrica” ragurato di seguito.
10. Evitare di sbattere, urtare contro il faretto.
11. Pulirlo ed eseguire la giusta manutenzione periodicamente ne aumenterà la durata di vita media.
Check the following for proper use and safety.
1. Before opening the packaging, make sure that no damage has occurred during transport, in this case don’t use item, but check promptly with supplier.
2. If item is defective, don’t use it and notify the supplier.
3. The installation must be performed by a qualied electrician and in accordance with safety standards.
4. Disconnect power before starting installation.
5. Use power supply in Specications and Technical Data sheet
6. If the external exible cable or cord of this item is damaged, it shall be exclusively replaced by the manufacturer or his service agent or a similar qualied person in order to avoid
a hazard.
7. For safe installation, choose a place that can support the weight of the item.
8. Don’t connect cables already powered. Before supplying power to the item, make sure that there are no short circuits, with suitable instrumentation.
9. After xing the ood light through appropriate screws, connect to power, respecting “Outline for the mains voltage” gured below.
10. Avoid crashing and hitting the ood light.
11. Clean and perform maintenance periodically to increase the average life span.
Connessione alla rete elettrica / Connection to the mains power
Colore cavo / Cable color Schema / Scheme
Blu / Blu Neutro / Neutral
Giallo-Verde / Yellow-Green Messa a terra / Ground
Marrone / Brown Fase / Phase
ATTENZIONE: Rispettare i colori dei cavi per il collega-
mento alla rete elettrica
WARNING: Match the colors of the cables for connec-
tion to the mains power.


