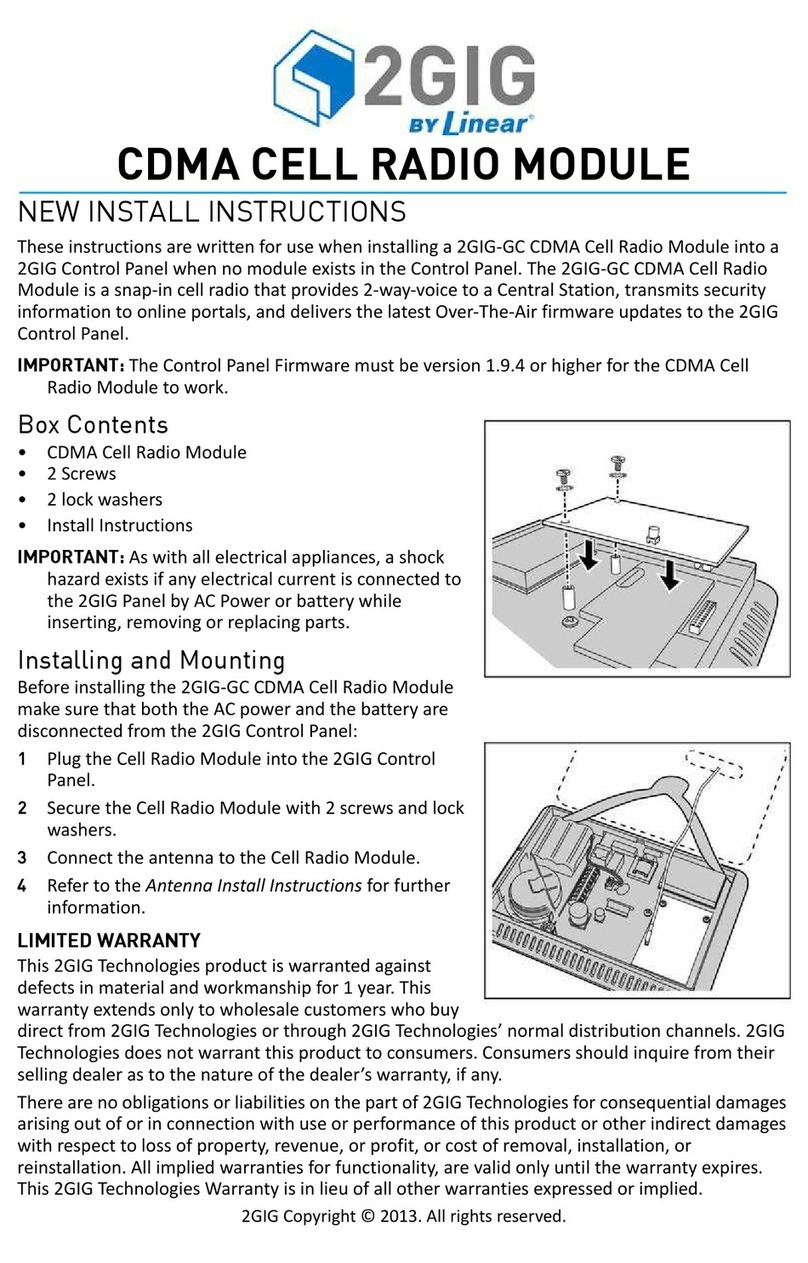
2©2013 2GIG Technologies Inc. All Rights Reserved.
IMPORTANT! Z-WAVE DOOR LOCK
CONFIGURATION
1WheninstallingaZWavedoorlock,question79mustbesetto
Option2forproperlockcodesconfiguration.
2FromSystemConfiguration,GotoQuestion79[Q79:SelectZ
Wavefeature(0to3)].
3SelectOption2asshownbelow.
4ToexitSystemConfiguration,clickendandexit.Uponexit,the
paneltakesaseveralsecondstoreboot.
FCC NOTICE
ThisdevicecomplieswithPart15oftheFCC'sRules.Operationis
subjecttothefollowingtwoconditions:
1Thisdevicemaynotcauseharmfulinterference,and
2Thisdevicemustacceptanyinterferencereceived,including
interferencethatmaycauseundesiredoperation.
Thisequipmenthasbeentestedandfoundtocomplywiththelimits
foraClassBdigitaldevice,pursuanttoPart15oftheFCCRules.These
limitsaredesignedtoprovidereasonableprotectionagainstharmful
interferenceinaresidentialinstallation.
Thisequipmentgenerates,usesandcanradiateradiofrequency
energyand,ifnotinstalledandusedinaccordancewiththe
instructions,maycauseharmfulinterferencetoradio
communications.However,thereisnoguaranteethatinterference
willnotoccurinaparticularinstallation.Ifthisequipmentdoescause
harmfulinterferencetoradioortelevisionreception,whichcanbe
determinedbyturningtheequipmentoffandon,theuseris
encouragedtotrytocorrecttheinterferencebyoneormoreofthe
followingmeasures:
•Reorientorrelocatethereceivingantenna.
•Increasetheseparationbetweentheequipmentandreceiver.
•Connecttheequipmentintoanoutletonacircuitdifferentfrom
thattowhichthereceiverisconnected.
•Consultthedealeroranexperiencedradio/TVtechnicianforhelp
ThisproductcomplieswithFCCradiationexposurelimitsforan
uncontrolledenvironment.Avoidoperatingthisproductatadistance
lessthan20cmfromtheuser.
Caution:Anychangedormodificationsnotexpresslyapprovedbythe
partyresponsibleforcompliancecouldvoidtheuser'sauthorityto
operatethisequipment.
Industry Canada Notices
NOTICE:Theringerequivalencenumber(REN)assignedtoeach
terminaldeviceprovidesanindicationofthemaximumnumberof
terminalsallowedtobeconnectedtoatelephoneinterface.The
terminationonaninterfacemayconsistofanycombinationofdevices
subjectonlytotherequirementthatthesumoftheringer
equivalencenumbersofallthedevicesdoesnotexceed5.
NOTICE:TheIndustryCanadalabelidentifiescertifiedequipment.This
certificationmeansthattheequipmentmeetscertain
telecommunicationsnetworkprotective,operationalandsafety
requirements.TheDepartmentdoesnotguaranteetheequipment
willoperatetotheuser’ssatisfaction.
Beforeinstallingthisequipment,usersshouldensurethatitis
permissibletobeconnectedtothefacilitiesofthelocal
telecommunicationscompany.Theequipmentmustalsobeinstalled
usinganacceptablemethodofconnection.Thecustomershouldbe
awarethatcompliancewiththeaboveconditionsmaynotprevent
degradationofserviceinsomesituations.
Repairstocertifiedequipmentshouldbemadebyanauthorized
Canadianmaintenancefacilitydesignatedbythesupplier.Anyrepairs
oralterationsmadebytheusertothisequipment,orequipment
malfunctions,maygivethetelecommunicationscompanycauseto
requesttheusertodisconnecttheequipment.
Usersshouldensurefortheirownprotectionthattheelectrical
groundconnectionsofthepowerutility,telephonelinesandinternal
metallicwaterpipesystem,ifpresent,areconnectedtogether.This
precautionmaybeparticularlyimportantinruralareas.
WARNING: Usersshouldnotattempttomakesuchconnections
themselves,butshouldcontacttheappropriateelectric
inspectionauthority,orelectrician,asappropriate.
LIMITED WARRANTY
This2GIGTechnologiesproductiswarrantedagainstdefectsin
materialandworkmanshipfor1year.Thiswarrantyextendsonlyto
wholesalecustomerswhobuydirectfrom2GIGTechnologi esor
through2GIGTechnologies’normaldistributionchannels.2GIG
Technologiesdoesnotwarrantthisproducttoconsumers.Consumers
shouldinquirefromtheirinstallingdealerastothenatureofthe
dealer’swarranty,ifany.
Therearenoobligationsorliabilitiesonthepartof2GIGTechnologies
forconsequentialdamagesarisingoutoforinconnectionwithuseor
performanceofthisproductorotherindirectdamageswithrespectto
lossofproperty,revenue,orprofit,orcostofremoval,installation,or
reinstallation.Allimpliedwarrantiesforfunctionality,arevalidonly
untilthewarrantyexpires.This2GIGTechnologiesWarrantyisinlieu
ofallotherwarrantiesexpressedorimplied.
FortechnicalsupportintheUSAandCanada:
8552GIGTECH(8552444832)
Internet:dealer.2gig.com
Visitwebsitefortechnicalsupporthoursof
operation
FortechnicalsupportoutsideoftheUSAandCanada:
Contactyourregionaldistributor
Visitdealer.2gig.comforalistofdistributorsinyourregion
PN:77000008001Rev.A


