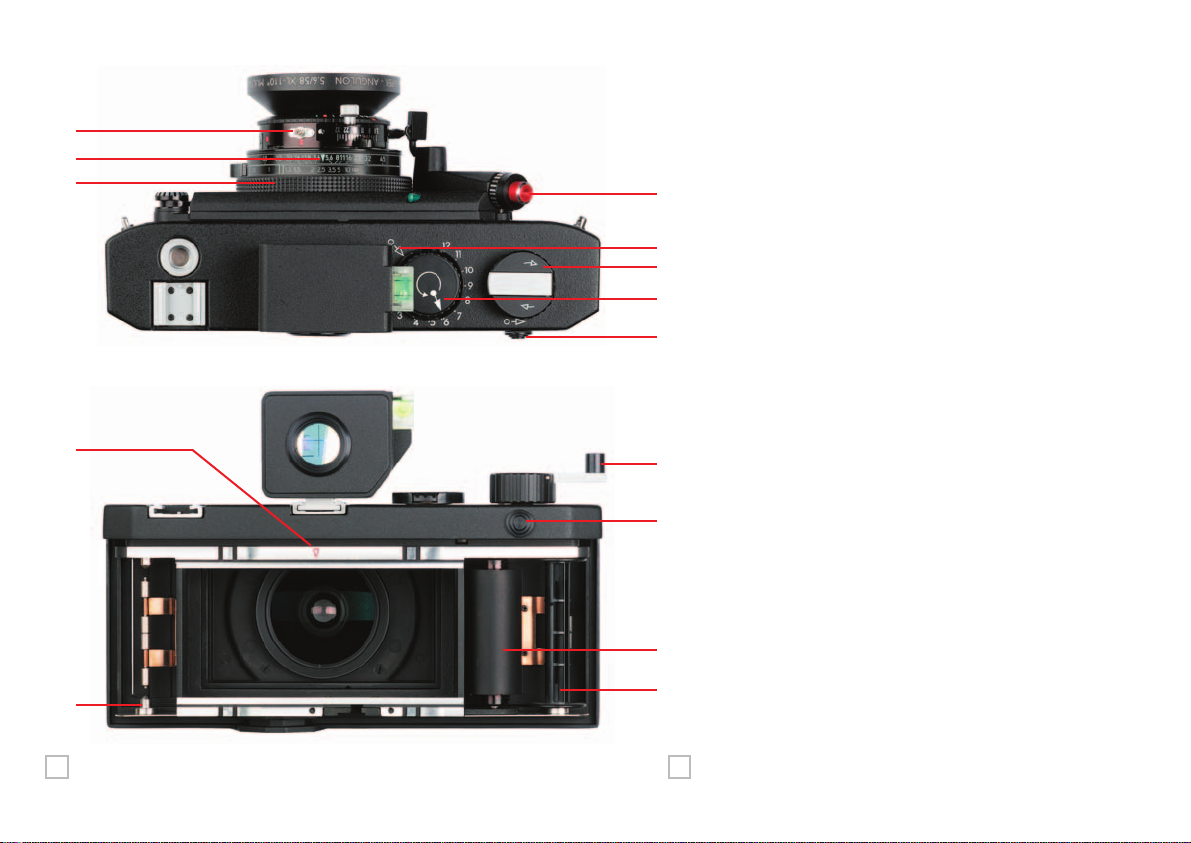
2.1 Zum Öffnen der Kamera drehen des Dreh-Schließbügels (12) an der
Kameraunterseite in Position “OFF” und Abnehmen der Rückwand.
Leerspule rechts in Aufwickelseite durch drücken der Spannhalterung nach
unten einsetzen, dabei beachten, dass die Spule am Zentrierbolzen ein-
wandfrei einrastet. Spule hilfsweise drehen.
2.2 Zum Einlegen eines unbelichteten Rollfilms: Filmspule in die Abwickelsei-
te (21) einsetzen, Klebestreifen völlig entfernen und Film mit Filmschutz-
papier über die Filmbühne ziehen, Lasche an Schutzpapier mittig in Leer-
spule einfädeln. Film durch Drehung des Kurbeltriebs (2) und vorheriger
Entriegelung (24) so weit aufspulen, bis die Anfangsmarkierung auf dem
Filmschutzpapier (Pfeil oder Dreieck) mit gravierter Markierung (26) neben-
einander liegen, dabei auf Planlage u. Faltenfreiheit des Films achten.
2.3 Einstellen der Filmandruckplatte für Rollfilm 120 oder 220 durch Andruck;
Verschieben und Einrasten dieser Platte auf rote bzw. grüne Signalmarke.
2.4 Die Kamerarückwand wieder ansetzen, parallel andrücken und durch
Drehung des Schließbügels (12)verriegeln.
2.5 Zählscheibe einstellen: Zählscheibe (3) bei gleichzeitiger Entriegelung von
(24) drehen. Bezugsmarkierungen “Dreiecke” in gegenüberliegende Po-
sition bringen. Zählscheibe rastet ein. Hilfsweise Scheibe geringfügig vor-
wärts-/rückwärts drehen.
2.6 Filmtransport, Aufnahmebereitschaft herstellen: Mit (24) entriegeln. Mit
(2) so lange drehen, bis Transportsperre wirksam wird. Das Zählwerk zeigt
Bild 1 an, die Kamera ist aufnahmebereit. Bei Verwendung von Rollfilm 120
stehen 6, bei Rollfilm 220 stehen 12 Aufnahmen zur Verfügung. Nach jeder
Aufnahme und vor dem Filmtransport mit (24) entriegeln.
2.7 Nach der letzten Aufnahme Entriegelungstaste (24) betätigen, gedrückt hal-
ten und den Film mit (2) restlos aufspulen, bis sich die Zählscheibe (3) nicht
mehr dreht. So ist gewährleistet, dass der exponierte Film vollkommen auf-
gespult ist. Danach Rückwand öffnen und den Film entnehmen.
2.1 To open the camera, turn the fold-down locking key (12) on the bottom of
the camera to the ‘off’ position and remove camera back. Insert empty film
spool in the take-up chamber on the right side by pressing the leaf spring
downwards. Make sure that the wind key engages properly. You might need
to wind the spool in order to position it correctly.
2.2 To load an unexposed film roll: place unexposed roll of film in the supply
chamber (21), remove tape seal completely and pull film including the film
covering paper until paper leader can be threaded into the middle of the
take-up spool. Pull release knob (24) in the direction of the arrow, if neces-
sary, and advance film by turning the film advance knob (2) until the marks
of the backing paper (either arrow or triangles), are opposite the red refe-
rence triangle (26) on the camera housing. Make sure the film is in correct
position without any folds or creases.
2.3 Check film pressure plate for correct adjustment. For change-over from 120
to 220 film, push down and slide pressure plate as indicated by the arrow
and the red/green reference marks.
2.4 Attach camera back again and lock it by turning the fold-down key (12).
2.5 To adjust film counter: while pulling the release knob (24) rotate film coun-
ter disk (3) on top of camera until the two reference triangles face each other
and you can definitely notice the clicking noise. You might need to adjust by
carefully turning forwards or backwards.
2.6 Film transport, preparing for the first shot: Pull release knob (24). Turn
film transport knob (2) until it stops automatically and locks in position for
the first photo. Index on film counter disk now points to frame 1, camera is
ready for use. 6 photos are available with roll film 120, 12 photos when
using a roll film 220. After each shot and before winding the film to the next
stop, pull release knob (24).
2.7 After the final shot pull film release knob (24), keep it pulled and re-wind the
film completely with the film transport knob (2), until the counter disk (3)
does not move any more. This guarantees that the exposed film is fully
rewound onto the spool. Now you can open the camera and take out
the film.
2. FILMEINLEGEN UND
FILMENTNAHME
2. FILM LOADING AND
UNLOADING
7