Linkbox Irdetino HD User manual

Digital'HDTV'satellite'receiver'Skylink'Ready'
LinkBox Irdetino HD
USER MANUAL


2
TABLE OF CONTENTS
1SAFETY ADVICE................................................................................... 3
2QUICK SETUP....................................................................................... 5
3FEATURES ............................................................................................ 8
4HOW TO CONNECT YOUR RECEIVER............................................... 9
5HARDWARE: ....................................................................................... 11
6WATCHING TV .................................................................................... 15
7MENU OPERATION ............................................................................ 23
8EDITING CHANNELS .......................................................................... 24
9INSTALLATION.................................................................................... 25
10 USER SETUP ...................................................................................... 29
11 MULTIMEDIA (only with a connected and operational external HDD). 33
12 CONDITIONAL ACCESS..................................................................... 36
13 SYSTEM .............................................................................................. 37
14 TROUBLE SHOOTING ........................................................................ 39
15 TECHNICAL SPECIFICATIONS.......................................................... 40

3
1 SAFETY ADVICE
This product has been manufactured to comply with international safety
standards. Please read the following safety precautions carefully.
MAINS SUPPLY : 90-260V AC 50/60Hz
Operate this product only from the type of power supply indicated on the marking
label. If you are not sure of the type of power supplied to your home, consult your
local power company.
- Disconnect the product from the mains before you start any maintenance or
installation procedures.
OVERLOADING: Do not overload a wall outlet, extension cord or adapter as this
may result in electric fire or shock.
LIQUID: The product should not be exposed to liquid of any kind. In addition, no
objects filled with liquid should be placed on the apparatus.
CLEANING: Disconnect the product from the wall outlet before cleaning. Use a
light damp cloth (no solvents) to dust the product.
VENTILATION: The slots on top of the product must be left uncovered to allow
proper airflow into the unit.
- Do not stand the product on soft furnishings or carpets.
- Do not stack electronic equipments on top of the product.
ATTACHMENTS: Do not use any unsupported attachments as these may be
hazardous or cause damage to the product.
CONNECTION TO THE AERIAL: Disconnect the product from the mains before
connecting or disconnecting the cable from the aerial. Failure to do so can
damage the aerial.
CONNECTION TO THE TV: Disconnect the product from the mains before
connecting or disconnecting the cable from the TV. Failure to do so can damage
the TV.
LOCATION: Place the product indoors to avoid exposing it to lightning, rain or
sun.
- Do not place it near a radiator or heat register.
- Make sure it has more than 10cm clearance from
- Do not block the openings with any object, and do not place the product on a
bed, sofa, rug, or other similar surface.
- If you place the product on a rack or a bookcase, ensure that there is adequate
ventilation and that you have followed the manufacturer’s instructions for
mounting.

4
- Do not place the product on an unstable cart, stand, tripod, bracket, or table
where it can fall. A falling product can cause serious injury to a child or adult, and
serious damage to the appliance.
LIGHTNING, STORM or NOT IN USE: Unplug the product from the wall outlet
and disconnect the antenna during a thunderstorm or when left unattended and
unused for long periods of time. This will prevent damage to the unit due to
lightning and power-surges.
EXTRANEOUS OBJECTS: Do not insert anything through the openings in the
unit, where they can touch dangerous voltage points or damage parts.
REPLACEMENT of PARTS: Replacement of parts may only be made by service
technician specified by the manufacturer.
WARNING!
To avoid damage of the power cord or plug:
- Do not modify or process the power cord or plug arbitrarily.
- Do not bend or twist the power cord.
- Make sure to disconnect the power cord holding the plug.
- Keep heating appliances as far as possible from the power cord in order to
prevent the cover vinyl from melting.
- The main plug shall remain readily operable.
To avoid electrical shock:
- Do not open the main body.
- Do not insert metal or inflammable objects inside the product.
- Do not touch the power plug with wet hands.
- Disconnect the power cord in case of lightning.
To avoid damage of product:
- Do not use the product when it is out of order. If you continue to use the product
when defective, serious damage can be caused to it. Make sure to contact your
local product distributor if the product is out of order.
- Do not insert metal or alien substance into the slots for the modules or
smartcards.
It may cause damage to the product and reduce its life span.
The socket-outlet shall be installed near the equipment and shall be easily
accessible.

5
1. Check accessories
Please check the giftbox for completeness of accessories. Included
should be: Receiver, Remote Control, external Power Supply, User
Manual, 2 Batteries
2. Connect the Receiver to the TV Set
Connect your Receiver with your TV Set. Details can be found in the
User Manual under chapter 4. How to connect your receiver.
3. Connect the Receiver with the Satellite Antenna
Connect your Receiver with your Satellite Antenna. Details can be
found in the User Manual under chapter 4. How to connect your
receiver.
4. Switch on the Receiver and TV Set
Switch on the AC-Power Switch on the rear side of the Receiver and
then press the Standby button on the Receiver Front Panel (see User
Manual for more details: Chapter 5.2 Front Panel and 5.3 Rear Panel)
5. Insert the Batteries
Insert the 2 Batteries into the battery case on the underside of the
Remote Control. Please make sure that the Battery + and - Poles are
correctly aligned.
6. Settings in the OSD Menu
After the Receiver has booted it will display the On-Screen Menu on
your TV Set. Should this not bet he case, please check the
connections as well as the settings of your TV Set.
2 QUICK SETUP
Before continuing, please insert your
smartcard into the cardreader-slot
with the chip facing downwards.

6
Use the key to select the
desired language and then press the
key on the remote control to
continue.
Set the desired time zone and press
the key to continue.
Set the method of connecting your
satellite antenna and do tune
channels. Set the DiSEqC
configuration according to your LNB
Choose:
- Search Skylink DiSEqC 19.2B - 23.5
if your DiSEqC switch or LNB
monoblock has involved satellites in
this configuration
- Astra 1 19.2E DiSEqC B(or 2)
- Astra 3A 23.5 DiSEqC A(or 1)
- Search Skylink DiSEqC 19.2 - 23.5B
if your DiSEqC switch or LNB
monoblock has involved satellites in
this configuration
- Astra 1 19.2E DiSEqC A(or 1)
- Astra 3A 23.5 DiSEqC B(or 2)
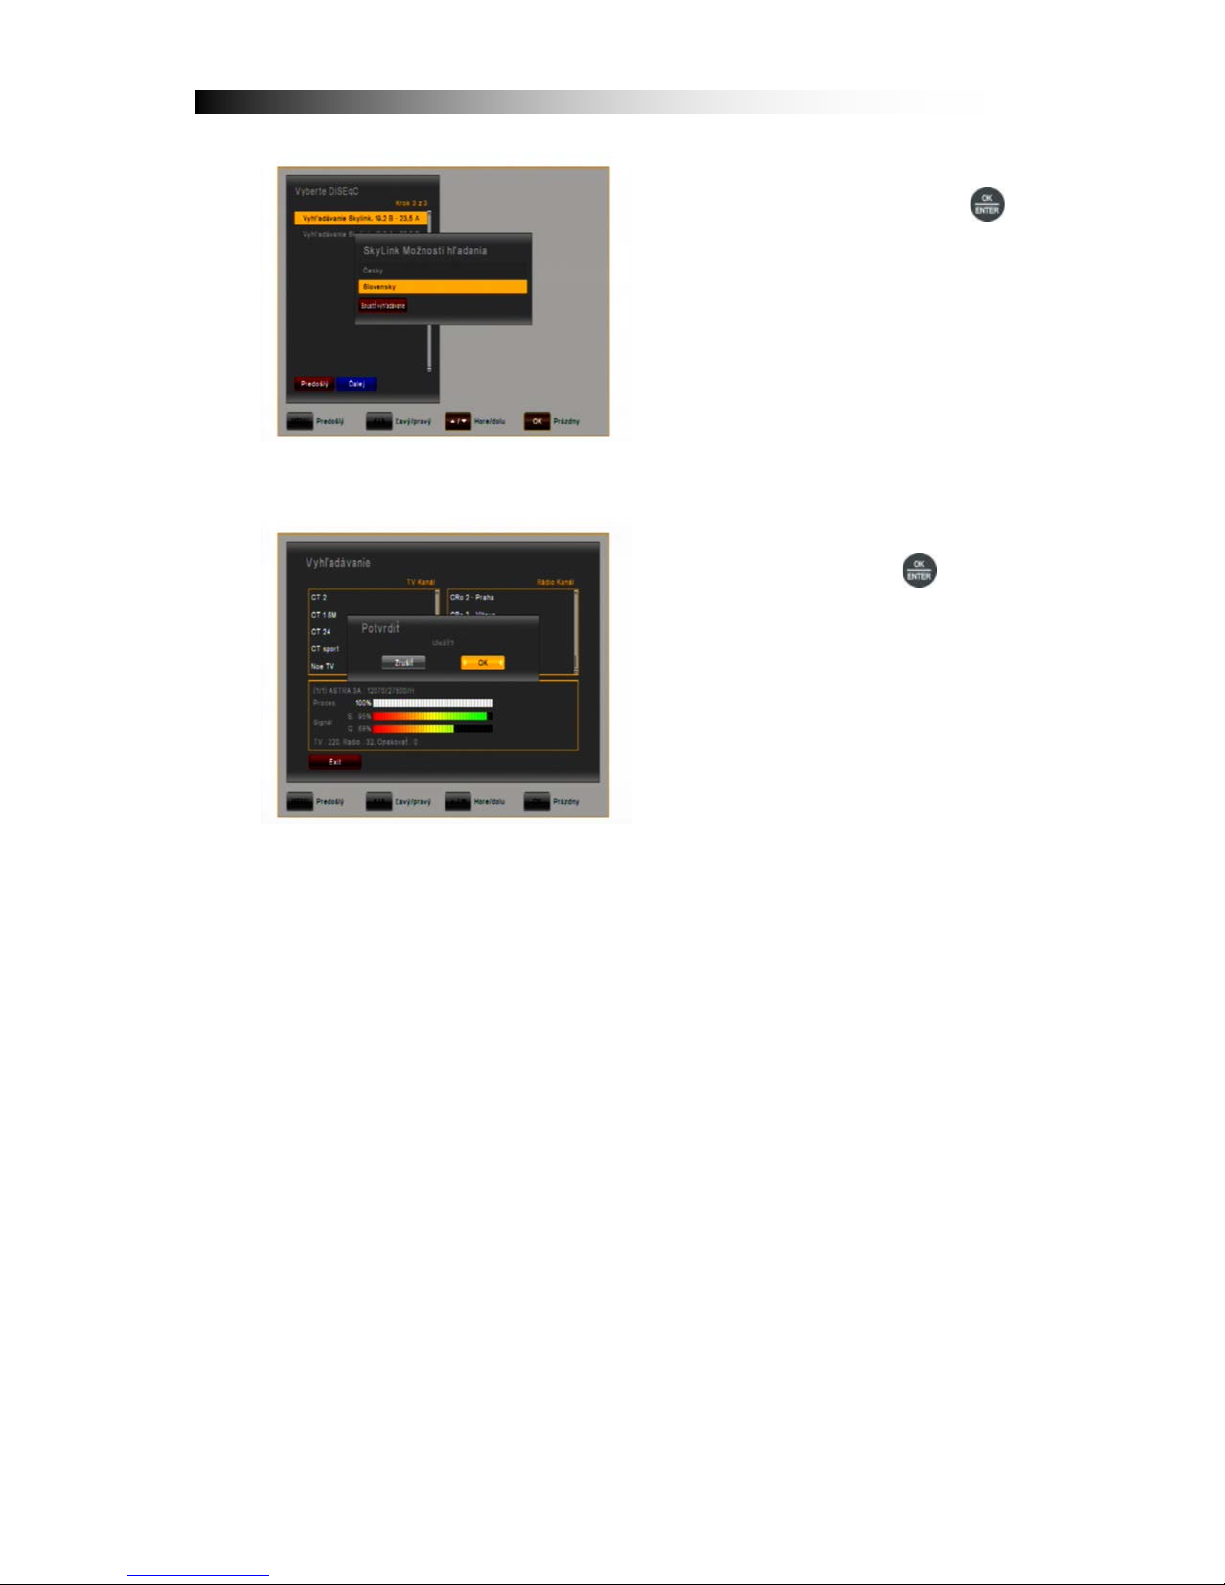
7
After selecting the setting DiSEqC
and confirming with the key
receiver asks whether you want to
run "Skylink FastScan search", in
which the receiver automatically
tunes in all channels provided by
Skylink and sorts them according to
thematic classification. The receiver
will now automatically downloads the
current table to sort channel list and
installs it into the receiver.
After the search then save the
channel, press the key. The
receiver now displays the first
channel of the newly tuned channel
list.
Information about changes to the channel list please see chapter 8. Edit
Channels in the Users Manual.
Under chapter 5.1 you can make yourself familiar with the functions of
your remote control.
Under chapter 6 the TV- as well as Recording- and Playback-Functions
of your receiver are described.

8
3 FEATURES
•Supports SD / HD (MPEG4 AVC/H.264)
•One Irdeto Smartcard Slot
•USB PVR Function (by using external HDD)
- Time Shift Mode (by using external HDD)
•High Definition Video output: HDMI
•Subtitle support : OSD & VBI insertion for TV
•4-Digit 7-Segment-Display
•Channel sorting by FTA, CAS, Satellite, Alphabet and Network
•EPG : Now and Next and 7 days EPG
•Satellitescan – Simultanious Scan of 10 Satellites
•Video output resolution: 576p, 720p, 1080i, 1080p
•User selectable output resolution
•Multi language OSD in CZ, SK, D, GB, F, I, ES, NL, PL
•Fast Channel Change
•5.000 Channels (TV und Radio) programmable
•8 Favorite List & Unlimited Programs per each
•Channel Edit Function
- Move, Delete, Favorite Edit
- Parental Lock, Channel Rename, Channel Skip
•Manual PID- and Network Search
•Optical S/PDIF-Output for Digital Audio or Dolby AC3
•Software Upgrade via OTA
•Multifeed-Function for Operator Subchannels
•Teletext with Sub-Page access
•Standby < 1 Watt

9
4 HOW TO CONNECT YOUR RECEIVER
Please note:HD Signals are not transferred via RCA-Video– For HDTV Signals
and also for the best quality on SDTV please use an HDMI cable where possible.
4.1 Connecting the Receiver to TV by using an HDMI
a. Connect the coaxial cable (Cable from your Satellite Dish) to the
connector marked „LNB IN“ at the rear of the receiver.
b. Connect an HDMI-Cable between the HDMI-ports of your TV Set and
your Receiver.
c. Connect the external 12V Power Supply

10
4.2 Connecting the Receiver to your TV by using RCA cable
a. Connect the coaxial cable (Cable from your Satellite Dish) to the
connector marked „LNB IN“ at the rear of the receiver.
b. Connect the RCA cable to port “Audio L/R”and “Video”of Receiver to the
respective RCA ports of your TV Set.
c. If the TV has a HDMI input, connect the Receiver & TV using a HDMI
cable.
d. Connect the external 12V Power Supply

11
5 HARDWARE:
5.1 Remote Control
POWER. By pressing this button, the receiver will go into
standby mode. When the receiver is in standby mode, it can
be awakened by pressing this button again.
MUTE. By pressing this button, all audio outputs of the
receiver are muted. When muted, Audio output can be
regained by pressing this button again.
HELP: Optional Function
TV FORMAT: By pressing this button you can change the
Screen-Format. Should you experience Display problems
press repeatedly until your TV Set displays the best picture.
TV/RADIO. By pressing this button the user can jump between
TV and radio lists of the receiver.
MODE: By pressing this button you can determine the Screen-
Aspect Ratio
~
0-9 NUMBER. By pressing one of the number buttons (0 - 9),
the user can change channel or enter a number to menu.
ELECTRONIC PROGRAM GUIDE. By pressing this button,
the user can see current and forthcoming programming
information for each channel. 7-day program information guide
is also available by using this button.
RECALL: return to previously viewed channel
REWIND: During Playback of recorded files this button can be
used to rewind.
STOP: By pressing this button Playback or Recording can be
stopped.
PLAY/PAUSE: By pressing this button the archive on the
connected USB HDD is displayed. During Rewind or Fast
Forward this button returns to regular playback. Press PAUSE
to halt Playback.
FAST FORWARD: During Playback of recorded files this
button can be used to fast forward
RECORD: By pressing this button you can start a recording
(only if a USB HDD is connected and operational)
CURSOR UP: By pressing this button, the user can jump to
next channel on the channel list. In menu structure, user can
move up one row.
CURSOR LEFT: By pressing this button, the user can
decrease the audio volume level of the receiver. In menu
structure, user can change between selectable options.
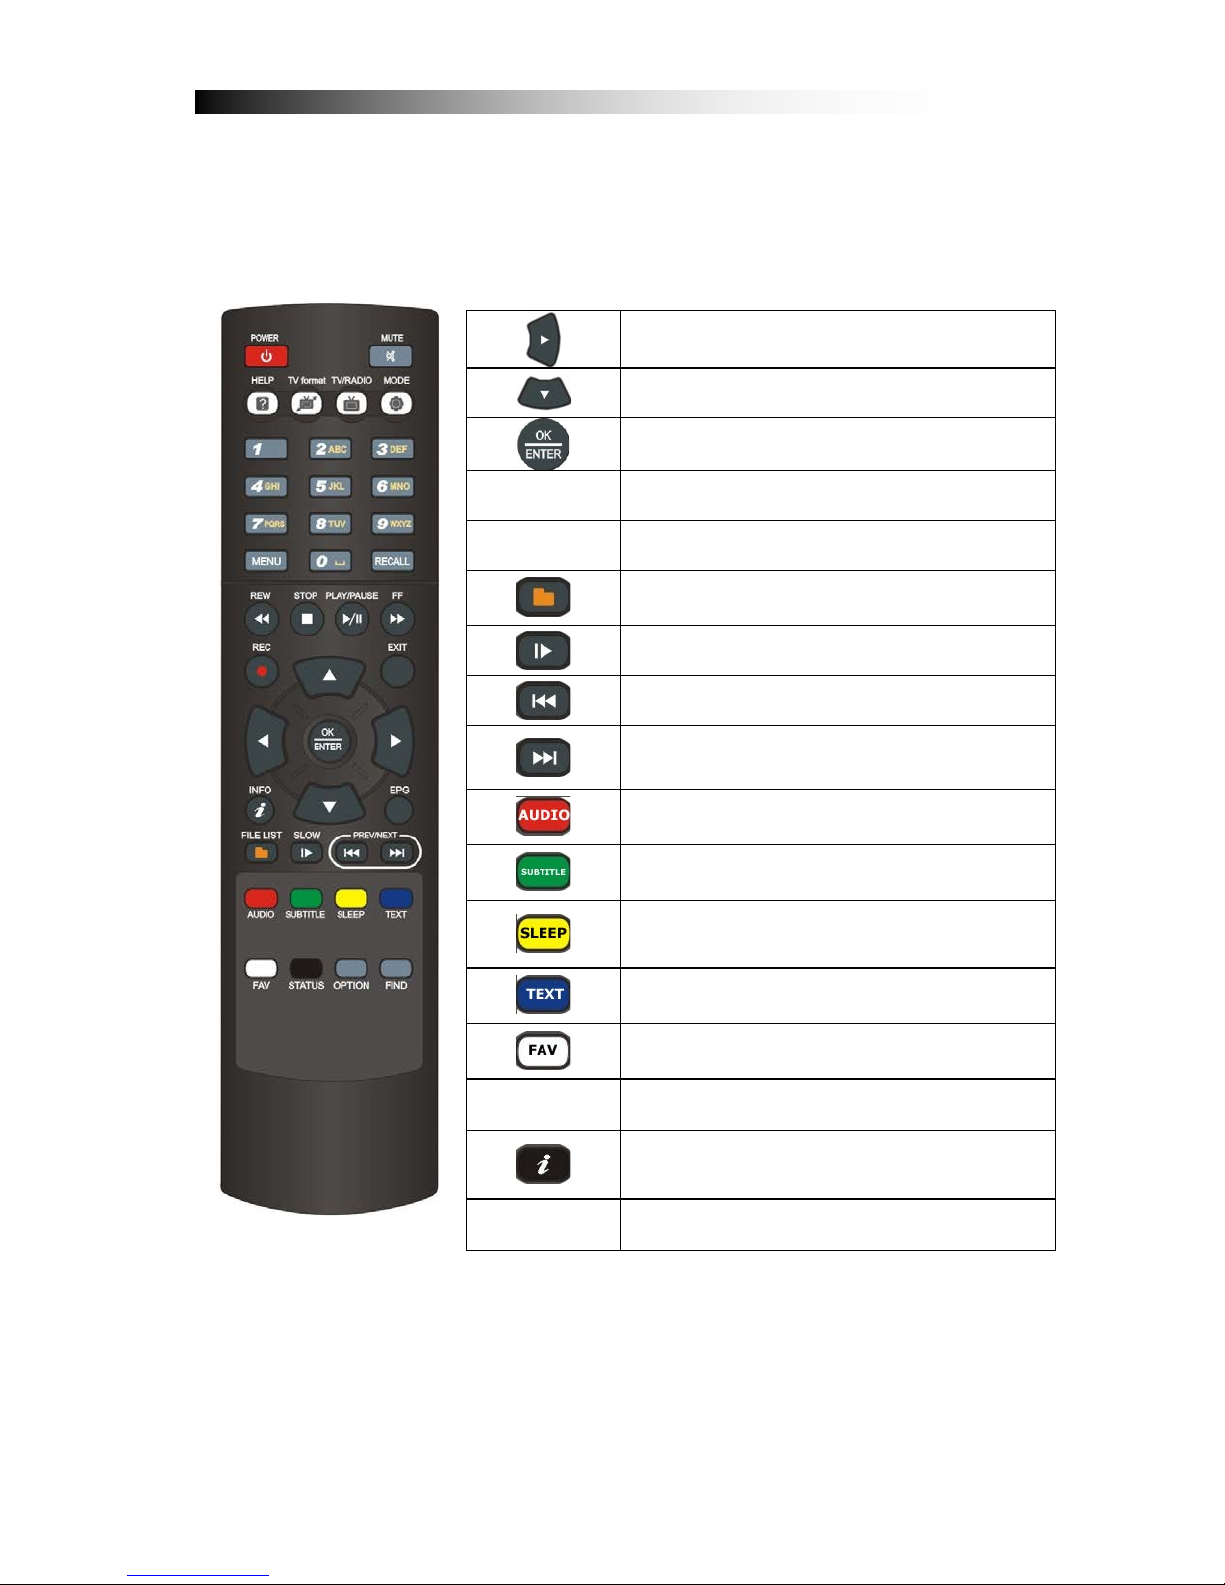
12
CURSOR RIGHT: By pressing this button, the user can
increase the audio volume level of the receiver. In menu
structure, user can change between selectable options.
CURSOR DOWN: By pressing this button, the user can jump
to previous channel on the channel list. In menu structure,
user can move down one row.
OK / ENTER: By pressing this button, the user can confirm a
selection or save settings in a menu.
MENU
MENU: By pressing this button, the user can activate the main
menu of the receiver.
EXIT
EXIT: By pressing this button, the user can exit from the menu
without saving the made changes or go one step back in the
menu structure.
FILE: By pressing this button you can access the recorded
files on a connected USB Hard-Disk-Drive
SLOW MOTION: Slow motion playback
JUMP Back: Jump forward by 10 Channels in the Channel-List
JUMP Forward: Jump back by 10 Channels in the Channel-
List
RED / AUDIO: By pressing this button you can choose
alternative Audio tracks if provided by the channel operator.
GREEN / SUBTITLE: By pressing this button you can display
subtitles if provided by the channel operator
YELLOW / SLEEP TIMER: By pressing this button one or
more times, the user can determine the time after which the
receiver will automatically go into Standby.
BLUE / TELETEXT: By pressing this button, the user can
activate the teletext application.
WHITE / FAVORITE: By pressing this button you can open the
Favorite Channel Lists, if you have previosly programmed.
STATUS
STATUS: Optional Function
INFORMATION. By pressing this button, the user can see
present and following information about the currently watched
channel.
FIND
FIND: Search for a Channel by entering the first letters of the
name.

13
FRONT PANEL
1. FRONT FLAP:
- IRDETO SMARTCARD SLOT
Behind the front flap you’ll find a Slot for an IRDETO Smartcard.
Please insert the smartcard with the chip first facing downwards.
2. CH +
Selection of TV / radio channels.
3. CH -
Selection of TV / radio channels.
4. POWER BUTTON
Switches the receiver on / off (into Standby Mode).
5. VOL -
Decreases Volume
6. VOL +
Increases Volume
7. 7-Segment Display
In operation displays the current channel number.

14
5.2 Rear Panel
No.
Name
FUNCTION
1
LNB IN
Input for Satellite Signal
2
VIDEO
Video Composite Output
3
AUDIO L
Audio Output Left
4
POWER
AC Power Switch
5
EXT. IR
Input external IR-Sensor (Original part)
6
S/PDIF opt.
Digital Audio Output optical
7
USB
USB 2.0 Port
8
AUDIO R
Audio Output Right
9
RS232
Serial Port for System Upgrade
10
HDMI
High-Definition Digital Video/Audio Output
11
DV 12V = 3A
Connection for external Power Supply

15
6 WATCHING TV
This chapter describes how to watch TV and listen to Radio using the receiver.
Thanks to the advantages of Digital TV transmissions, extra features are added
to the broadcast, such as information about the current and next program and
extra options such as the ability to choose between different languages for Audio
and Subtitling.
6.1 General watching
•Use the CHANNEL UP or CHANNEL DOWN keys to go to the next and
previous channel respectively.
•Use the NUMBER keys to input a channel number.
•Use RECALL key on the remote control to open a list of channels that the user
was watching before the currently selected channel.
•Use TV/RADIO key on the remote control to toggle between the last selected
TV- or Radio Channel.
•Press UP or DOWN keys on the front panel of the receiver to select the
next/previous channel from the current channel list.
•Use INFO key to display the information banner about the current program.
Press INFO key again to display the information of the current Event. With the
CURSOR RIGHT or CURSOR LEFT you can see the next event information.
Press again INFO key or the EXIT key to hide the banner and event
information.
In Live TV Mode, press the “i” INFO
key to display the Information Bar.
This contains Information on the
current Channel, the current time, the
Current and Next Programme on this
Channel, Information on the Signal
Quality as well as Services broadcast
on this Channel (i.e. Subtitles,
Teletext) – press the “i” key again and,
provided this is broadcast by the
operator, you will see detailed
information on the current programme
– press the < / > keys to change to the
next programme information
Please note: Programme information will only be displayed if it is included in the
current transmission. Availability and validity of program information is dependent
on the broadcaster.

16
In Live TV Mode press the OK key to
open the Channel List – move the
Cusor key UP / DOWN to move in the
List channel-by-channel -
use the < / > keys to jump 10 channels
forward / backward -
Choose your desired channel with the
OK key – Exit the List with the EXIT
key.
Find a specific channel by pressing
the FIND key on your remote control –
enter the first letters of the desired
Channel and press the YELLOW key
to jump to the search result in the
Channel List.
Display Channels in Groups –
In the Channel List, press the RED
key to display options:
- All TV
- Satellite
- Favourites
- Operator
In the Channel List you can also sort the Channels by pressing the GREEN key.
Options are sorting by numerical, Alphabetical or FTA-to-CAS order.

17
6.2 Options
Pressing OPTION key will open the "Options" menu.
The Options menu provides user selectable options that are available for the
current channel and the current program. Depending on the Programme some of
the options can be available or not. Selection from the available choices is made
with CURSOR UP or CURSOR DOWN key and confirmation by OK key.
Multifeed: On according Master-Channels you can select from available Sub-
Channels. You can exit the Options Menu by pressing the OPT- or EXIT-key.
·Subtitling language (GREEN key): The user can select from available
subtitle languages, if more than one exists. Selection from the available
choices is made with CURSOR UP or CURSOR DOWN key and
confirmation by OK key. Some broadcasters also provide Subtitles in either,
DVB- or Teletext Format.
·Audio track (RED key): Some TV channels broadcast multiple audio tracks, for
example different languages or AC3 Audio tracks. Selection from the available
choices can be made by pressing the CURSOR UP or CURSOR DOWN keys
and confirming with the OK key.
Beside alternative tracks, you can set the mode to Stereo or Mono-left or -right.
Providing the broadcaster transmits, also AC3 Sound can be chosen.
6.3 EPG (Electronic Programme Guide)
Now & Next as well as 7 days Programme Information
EPG application can be activated by pressing the EPG key when watching a TV-
programme or listening to a Radio Channel.
EPG application is divided into two levels. The first level gives an overview of 10
continuous channels with information about present and forthcoming
programmes.
By pressing the EPG key once more the second level provides information of all
available events for the selected channel for the next 7 days. Availability of
Programme information data is dependent on the individual broadcaster.
By again pressing EXIT key you can close the EPG menu.

18
Navigating on the first level of EPG (Multi-EPG)
The currently active channel and the
current programme are highlighted.
Depending on how the EPG data is
transmitted by the broadcaster it is
possible that programme information
is not available until one has actually
selected the channel. Move the cursor
up or down and confirm with the OK
key to change to another channel in
the list.
Move the cursor left or right to move to another time of the current day. Use the
blue key to advance to the next day and use the yellow key to go back by one
day.
For your orientation, please also note the timeline indicating the current time in
comparison to the programmes.
For more detailed Information on a programme, press the “i” INFO key. Please
note that not all broadcasters provide EPG or detailed EPG data.
If you wish to add a programme to your timer for recording, move the cursor to
the desired programme and press the REC key on your Remote Control. The
event is added to your Record List and, provided a USB Hard-Disk-Drive is
connected at the set time, and provided it has enough free space, the event will
be recorded to this USB device. Please press the MENU key to return back to
the EPG Menu confirming that you want to save the new event in your Record
List.
Please note: The receiver requires time to boot from Standby and to check the
current time from the satellite signal and to descrambe the programme including
check for new keys for the inserted Irdeto smartcard.
When adding an event to the record timer, please allow at least 7-8 minutes
before the recording is to begin.
Also, when programming more than one event, please allow time in between
events accoringly. – When programming events via the EPG timer function, you
can manually edit the recording list – also by default, the receiver will add 5
minutes before and 5 minutes after an EPG event – you can edit this padding
time (Start and End individually) in the menu MULTIMEDIA / PVR SETTING
Please also note, that any user input during an event (via the remote control or
the panel keys) will result in the receiver not returning into standby automatically
after the timer event is over.

19
Navigating on the second level of EPG (Single EPG)
By pressing the GREEN (Toggle) key
the second level EPG will appear. This
application provides complete EPG
information for the selected channel. It
is possible to scroll between programs
in chronological order for a particular
day with the CURSOR UP and
CURSOR DOWN keys. Choose
another day using the LEFT and
RIGHT keys.
After pressing the OK key detailed information for the Programme will be
displayed. Press the OK- or the EXIT- key to exit the detailed Information.
Please note: Programme information will only be displayed if provided by the
according channel operator.
6.4 EPG-Timer (Timer programming via EPG)
In the Single- or Multi-EPG Mode you have the option to reserve programmes in
the timer. Move the cursor to the desired programme and simply press the REC
key on your remote control.
An additional window is opened which
displays the timer reservations. If a
HDD is connected the recording will
be made accordingly to the connected
external HDD. If a HDD is not
connected the receiver will switch to
the according channel at the
programmed time.
At exiting (EXIT or MENU key) please
confirm the Event with the OK key.
Please note: Should two timer reservations overlap, and error message will be
displayed. You then need to change or delete one of the two reservations. Use
the CURSOR UP and CURSOR DOWN keys to move to the reservation you
want to change and either delete a reservation with the RED key or change the
start or duration time using the blue key.
Table of contents
Other Linkbox Receiver manuals


