Sky Master DS 66 User manual

Digital Satellite Receiver
DS 66
39708-A
OPERATING INSTRUCTIONS

DS 66
VCR
TV
HiFi
230 V
C
D
DISH
1
5
3
2
4
6
87
109
12
13
11
1414
1917
16
20
18
21
15
13
64 5
123
7
1 82
3 4 5 7 96
A
B
AC3/SURROUND


GB 2
1. Contents
You have purchased a quality receiver from the SKYMASTER®range. Our products are continuously subjected to rigorous quality inspections to
ensure your enjoyment. Welcome to the new age of digital television! The DS 66 receives unencrypted digital TV programmes. Please note that you
need a digitally-compatible satellite antenna to operate the SKYMASTER®DS 66. This must have a Digital LNB to receive ASTRA or EUTELSAT.
1. Contents . . . . . . . . . . . . . . . . . . . . . . . . . . . . . 2
2. Safety information . . . . . . . . . . . . . . . . . . . . . . 3
3. Operator’s controls . . . . . . . . . . . . . . . . . . . . . 3
4. Remote control . . . . . . . . . . . . . . . . . . . . . . . . 3
5. The OSD menu: the most important functions . . 4
Call up and exit the OSD . . . . . . . . . . . . . . . . . . . . . . . . . . . 4
Navigating the OSD . . . . . . . . . . . . . . . . . . . . . . . . . . . . . . . 4
General information on the OSD . . . . . . . . . . . . . . . . . . . . . . 4
6.1 The OSD menu:
Info screen, audio channels and volume . . . . . . 4
Channel Information . . . . . . . . . . . . . . . . . . . . . . . . . . . . . . . 4
Selecting audio channels . . . . . . . . . . . . . . . . . . . . . . . . . . . 4
Volume settings / audio mute . . . . . . . . . . . . . . . . . . . . . . . . 4
6.2 The OSD menu: Direct channel selection, etc. . . 5
Direct channel selection . . . . . . . . . . . . . . . . . . . . . . . . . . . . 5
Display channel list . . . . . . . . . . . . . . . . . . . . . . . . . . . . . . . 5
Freezing the image . . . . . . . . . . . . . . . . . . . . . . . . . . . . . . . . 5
Display subtitles . . . . . . . . . . . . . . . . . . . . . . . . . . . . . . . . . . 5
Teletext/Videotext . . . . . . . . . . . . . . . . . . . . . . . . . . . . . . . . . 5
EPG - the electronic program guide . . . . . . . . . . . . . . . . . . . 5
Navigating and calling up sub-menus . . . . . . . . . . . . . . . . . . 5
Close menus . . . . . . . . . . . . . . . . . . . . . . . . . . . . . . . . . . . . 5
6.3 Everyday use . . . . . . . . . . . . . . . . . . . . . . . . . . 6
7. The OSD menu – overview . . . . . . . . . . . . . . 6+7
The OSD menu – channels . . . . . . . . . . . . . . . . 8
1. Channels . . . . . . . . . . . . . . . . . . . . . . . . . . . . . . . . . . . 8
1.1 TV channels - (Radio channels) . . . . . . . . . . . . . . . . . . . 8
1.2 Radio channels . . . . . . . . . . . . . . . . . . . . . . . . . . . . . . 11
1.3 Delete all . . . . . . . . . . . . . . . . . . . . . . . . . . . . . . . . . . 11
The OSD menu – reception . . . . . . . . . . . . . . . 12
2. Reception . . . . . . . . . . . . . . . . . . . . . . . . . . . . . . . . . . 12
2.1 Antenna tuning . . . . . . . . . . . . . . . . . . . . . . . . . . . . . . 12
2.2 Automatic search . . . . . . . . . . . . . . . . . . . . . . . . . . . . 13
2.3 TP search . . . . . . . . . . . . . . . . . . . . . . . . . . . . . . . . . . 13
2.4 Default search . . . . . . . . . . . . . . . . . . . . . . . . . . . . . . . 15
The OSD Menu – System . . . . . . . . . . . . . . . . 16
3. System . . . . . . . . . . . . . . . . . . . . . . . . . . . . . . . . . . . . 16
3.1 Language . . . . . . . . . . . . . . . . . . . . . . . . . . . . . . . . . . 16
3.2 TV settings . . . . . . . . . . . . . . . . . . . . . . . . . . . . . . . . . 16
3.3 Time . . . . . . . . . . . . . . . . . . . . . . . . . . . . . . . . . . . . . . 17
3.4 Timer Number . . . . . . . . . . . . . . . . . . . . . . . . . . . . . . . 17
3.5 OSD Setting . . . . . . . . . . . . . . . . . . . . . . . . . . . . . . . . 18
3.6 Child Lock . . . . . . . . . . . . . . . . . . . . . . . . . . . . . . . . . 18
3.7 LNB Voltage . . . . . . . . . . . . . . . . . . . . . . . . . . . . . . . . 18
The OSD Menu – Miscellaneous . . . . . . . . . . . 19
4. Miscellaneous . . . . . . . . . . . . . . . . . . . . . . . . . . . . . . . 19
4.1 Information . . . . . . . . . . . . . . . . . . . . . . . . . . . . . . . . . 19
4.2 Antenna alignment . . . . . . . . . . . . . . . . . . . . . . . . . . . 20
4.3 Games . . . . . . . . . . . . . . . . . . . . . . . . . . . . . . . . . . . . 20
4.4 Default . . . . . . . . . . . . . . . . . . . . . . . . . . . . . . . . . . . . 21
4.5 Software update . . . . . . . . . . . . . . . . . . . . . . . . . . . . . 21
4.6 SatcoDX Auto-Programming . . . . . . . . . . . . . . . . . . . . 22
4.7 Help . . . . . . . . . . . . . . . . . . . . . . . . . . . . . . . . . . . . . . 22
8. Other functions . . . . . . . . . . . . . . . . . . . . . . . 23
Zoom Function . . . . . . . . . . . . . . . . . . . . . . . . . . . . . . . . . . 23
Multi-channel preview . . . . . . . . . . . . . . . . . . . . . . . . . . . . . 23
9. Troubleshooting . . . . . . . . . . . . . . . . . . . . . . . 23
10. Features . . . . . . . . . . . . . . . . . . . . . . . . . . . . 24
11. Technical data . . . . . . . . . . . . . . . . . . . . . . . . 24
12. Service . . . . . . . . . . . . . . . . . . . . . . . . . . . . . 24

GB 3
2. Safety information
3. Receiver Operating Elements (see packaging)
1. On/Off switch (Stand By mode)
2. Programme advance, up
3. Programme advance, down
4. Satellite signal display
5. Stand By (Stand By display)
6. On (receiver switched on)
7. 4-digit-Display
A B
Please read this safety information thoroughly before commissioning the device! Prolonged absence: In the event of prolonged
absence or thunderstorms, remove the mains plug of the device from the wall socket. Also disconnect the antenna connections to
avoid storm damage.
SM Electronic GmbH hereby declares that Article No. 39708 complies with the basic requirements and other relevant regulations of directives
89/336/EWG and 73/23/EWG.
Cleaning: Remove the mains plug before cleaning the device. Use a
dry or damp cloth and make sure that no moisture penetrates the
device!
Objects in the device: Make sure that no objects can enter the
ventilation slots. There is risk of death through electric shock!
Repair: Repairs must be performed by qualified experts. In the event
of improper intervention by a third party, the warranty will be voided
and the safety of the device can no longer be guaranteed! Never open
the housing of the device yourself: Even when disconnected from the
mains, there is an acute risk of death through electric shock. Internal
components can be damaged if touched.
Place of installation: Place the device on a straight and even
surface. To protect the surface from being discoloured as a result of
the natural heat generated by the device, place the device on a
suitable underlay.
Adequate ventilation: The ventilation slots on the device must never
be covered. Ensure that the device has a clearance of at least 10 cm at
the sides and top, and that the heat can be dissipated upwards
unimpeded.
External influences: Never expose the device to moisture
(e.g. condensation or splash water) or direct sunlight. Do not place the
device in the vicinity of heat sources, such as e.g. heaters or devices
that heat up.
Mains voltage: Use the equipment with the voltage specified on
the case only! Do not plug the equipment into the mains until all
connection and installation work has been completed.
Earthing: Antenna systems must always be earthed, paying heed to
the pertinent local and VDE regulations.
ASTRA, EUTELSAT, TÜRKSAT, DiSEqC and Skymaster are registered trademarks.
4. Remote control
1. Sound On/Off
Switches the sound off. Pressing again switches the sound
back on
2. On/Off (Stand By)
This button switches the satellite receiver on or to Stand By
mode
3. TV (optional)
No function
4. Audio – sound channel selection
Displays all available sound channels
5. TV/Radio mode
Switches between TV and radio mode at the press of a button
6. Numeral keys 0 - 9
These keys are used to switch to a particular programme or
to enter numeric values and passwords or to change station
names and favourites lists
7. Teletext/Videotext
Calls up Teletext/Videotext pages
8. Subtitles
Displays subtitles for the current broadcast
9. MENU – OSD screen menu
Calls up the screen menu via which you can define all
receiver and programme settings
10. EXIT – Exit menu
a.) Closes the current OSD screen menu and shows the
higher level menu or the TV picture
b.) To open the SLEEP TIMER menu
11. EPG – Programme information
Calls up the EPG (Electronic Program Guide)
12. ALT
Switches back and forth between the current and the last
set programme
13. CH control keys /Programme changeover
These serve for navigation within the OSD menu (up/down)
or to change programmes in ascending or descending order
14. VOL control keys /Volume control
These serve for navigation within the OSD menu (left/right)
or to regulate the volume
15. OK/Confirmation button
Press the OK button to confirm changes made or to execute
an action
16./18. PAGE – Programme list up and down
For page by page scrolling of displayed programme,
favourite or satellite lists
17. Freeze function
The TV picture is “frozen” by pressing this button
19. Browse – Programme list
Calls up the programme list (or satellite list) and closes it
when pressed again
20.i function key
Multifunction key
21. Function keys/Selection programmes
The four coloured buttons call up the favourite programmes
that you have defined or execute various actions in the OSD
Please ensure correct polarity when inserting the batteries!
The polarity is marked in the battery compartment.
Batteries: 2 pieces, Size: AAA, UM-4, Micro or R03. Used batteries are
special waste – please dispose of them correctly! Range approx. 6m.
C
1. Connection to SAT system
2. Connection to analogue SAT receiver (loop through operation)
3. Stereo sound output, for connecting to stereo system
4. Scart socket for connecting a TV unit
5. Scart socket for connecting a video recorder
6. Coaxial digital sound output for connecting a digital surround amplifier (AC3)
7. RS232 interface (for service purposes only)
8. Mains cable 230V / AC
9, Mains switch

GB 4
5. The OSD menu: the most important functions
Call up and exit the OSD: you can control all your satellite receiver's settings via the on screen
display. Access it up pressing the MENU button. To exit the OSD press the MENU or EXIT button
until all the menus are closed.
Navigating the OSD: navigation within the OSD is carried out using the blue control buttons or
directly with specific buttons. These buttons and functions are displayed on screen. In most cases
you use the number buttons on the remote control. In case you have problems with some of the
technical information in the OSD, you will find a glossary at the back of the operating instructions.
General information on the OSD: the receiver is preconfigured so there is no need to make any
changes or hardly any at all. The OSD is clearly laid out and the buttons you have to use to make
specific changes are displayed on screen. Fortunately, this means you can put the operating
instructions to one side and take them out only when you need them, e.g. after a satellite system
upgrade.
If digital satellite TV is new territory for you, you should take a little time to read through the operat-
ing instructions. You will find several options in the instructions for upgrading your antenna system
appropriately.
Channel Information:
After switching on or switching channels, an info screen appears, which provides a variety of
information about the channel:
Date/time
Channel name
Title of the program (current and next program)
Teletext available/unavailable
Subtitles
Where saved (e.g. CH 0189)
Satellite name and position
Type of channel list (e.g. All Satellites, Favourites, Sport)
The amount of information displayed depends on the station in question. If no additional information
is transmitted by the channel, you are notified (e.g. “no channel information”). You can call up the
info screen at any time by pressing the OK button. You can change how long it remains on screen
(1 - 10 seconds) (refer to configuration/OSD settings).
Note: If you are unable to select specific channels, the likely reason is that your Favourites or a
group list such as Sport, Music or Movies is active. To select the list you want press the BROWSE
button and press the 왗or 왘buttons until the overview you want appears.
Selecting audio channels:
Some broadcasts are transmitted with several channels of audio. These audio channels may include
several languages or different radio stations.
To select an audio channel or a language press the AUDIO button. Choose what you want from the
list and close it by pressing EXIT.
In addition you can specify whether the left or right hand channel is played back. The unit is
preconfigured so you always hear stereo sound.
Volume settings / audio mute:
To adjust the volume use the VOL- and VOL+ control buttons. To mute the sound press the button
with the crossed out speaker icon. You can restore the sound by pressing this button again or the
volume buttons.
6.1 The OSD menu: Info screen, audio channels and volume

GB 5
6.2 The OSD menu: Direct channel selection, etc.
With the ever-growing number of channels this means increasing complexity as well: many channels are only of regional importance (e.g. foreign
languages), many are encrypted and can only be received by paid subscription and with a special receiver or are simply of no interest. In order to
ensure you have a good overview of channel lists, various channel groups and sorting criteria are available. You can select channels in various ways:
Direct channel selection using numbered buttons 0 - 9:
If you know where the channel you want is stored in the channel list, you can enter it directly using the number buttons (e.g. 108 for “sample TV”). In
a few moments the satellite receiver will display the desired channel. TIP: By pressing the ALT button, the receiver switches to and fro between the
current and previous channels.
Display channel list:
You can obtain an overview of all the stored channels by pressing the BROWSE button. Navigate this
list by using the CH buttons. Use the two PAGE buttons to “skim through” the list faster. Once you
have found the channel you want, press the EXIT button to quit the list.
A particularly convenient way of accessing specific channels quickly is via channel groups: when you
call up a TV or radio station list, you can select various groups using the 왗and 왘buttons:
the “All Satellites” group shows all the stored channels for all available satellites. To transfer chan-
nels to your Favourites or other group lists (Sport, Music, Movies, News, etc.), choose the options
“Favourite” and “Type”. The procedure is explained in the instructions below.
Freezing the image:
By pressing the FREEZE button you can stop the moving picture, similar to the pause function in a
VCR. You can still hear the sound. Press the button again and the normal TV picture is displayed.
Display subtitles:
Occasionally programs are transmitted with subtitles, e.g. for the hard of hearing or in various
languages. To call up the subtitle selection, press the SUB button. If subtitles are not available,
“no subtitles” will be displayed.
Teletext/Videotext:
Many stations transmit additional information and services. Teletext pages are “electronic maga-
zines”, which enable you to see the latest news, sports results, weather forecasts, commercial offers
and much more besides. The amount and content of these are determined by the transmitting sta-
tion. The directory is always on page 100. Here you can get an overview of other sub-pages (e.g.
page 200, sports review). Always enter the page number as three digits or press the control buttons.
Press EXIT to leave the Teletext pages.
EPG – the electronic program guide:
Like Teletext, the Electronic Program Guide (EPG) is not transmitted by every channel. Its contents
may also vary greatly. Hence, there will be no further reference below to terms such as “if supported
by the channel”.
The EPG shows a daily or weekly overview of current or upcoming programs and their transmission
times. By pressing the [2] button you can access information about the program, which opens in a
new window.
By pressing the [1] button you switch to a weekly overview (max. 14 days) of the selected channel.
Use the control buttons to navigate the calendar bar and an overview of the selected day. When you
find a program that interests you, simply press the [2] button to add it to the timer. The satellite
receiver will switch on at the time you select and the program can be recorded on a VCR. The timer
functions are described in detail below.
When you press the MENU button, the main menu appears on the screen. You can access sub-
menus from this menu and modify your receiver's settings. You can change the look of the OSD, add
or remove channels, tune the receiver to your SAT system, load new software via satellite and much
more besides. However, you could just as easily mess everything up and the screen would remain
blank. To prevent this from happening, you should read the following pages carefully before doing
any modifications.
Navigating and calling up sub-menus:
After you call up the main menu the left menu item (CHANNEL) is highlighted. You can highlight the
other three using the LEFT/RIGHT control buttons. To access the sub-menus press OK. Using the
UP/DOWN control buttons you can highlight the sub-menu required and open it by pressing OK.
Close menus:
Menus either close automatically after you have confirmed your preferences by pressing OK or you
can close all the open menus one after another by pressing EXIT or MENU.

GB 6
6.3 Everyday use
For everyday use you only need a few functions - as you do with your TV set: switching channels, adjusting the volume and a few special ones such
as Teletext. You will hardly ever need to use your TV set's remote again because you can regulate all its present and additional functions with the
SKYMASTER remote control.
Switch channels: 0 - 9 Enter channel number directly (e.g. 0108)
CH 왖/CH 왔Channel up, forwards/backwards
Channel lists/browsing: BROWSE Browse channels
CH 왖/CH 왔Channel up while browsing
- PAGE + Navigate page by page, forwards/backwards
RED Favourites - a list of your favourite programs
YELLOW Timer functions
BLUE Multi-channel preview: Overview of nine TV channels
Volume: VOL 왗/VOL 왘Volume control and mute
Useful special functions: TEXT Teletext or Videotext
EPG “Electronic program guide”
SUB Subtitles
TV/RAD Switching between TV and radio
You can find detailed descriptions of these and other functions on the following pages.
7. The OSD menu – overview
1. Channels 1.1 TV channels –
(Radio channels)
1.1.1 Favourites Page 32
1.1.2 Shift 32
1.1.3 Search 32
1.1.4 Sort 32
1.1.5 Edit 1.1.5.1 Delete 33
1.1.5.2 Skip 33
1.1.5.3 Block 33
1.1.5.4 Edit 1.1.5.4.1 Delete
1.1.5.4.2 Skip
1.1.5.4.3 Block
1.1.5.4.4 Modify
1.1.5.4.5 Compile
1.1.5.4.6 Delete all
34
34
34
34
34
34
1.1.6 TV channel list 1.1.6.1 Type 35
1.1.6.2 Group 35
1.2 Radio channels 35
1.3 Delete all 35
2. Reception 2.1 Antenna tuning 2.1.1 Satellite 36
2.1.2 LNB Type 36
2.1.3 22 kHz 36
2.1.4 DiSEqC 36
2.1.5 Polarisation 37
2.2 Automatic search 2.2.1 Satellite 37
2.2.2 Search mode 37
2.2.3 Channel search 37
2.3 TP search 2.3.1 Satellite 38
2.3.2 TP index 38
2.3.3 TP frequency 38
2.3.4 Symbol rate 38
2.3.5 Polarisation 38
2.3.6 Search mode 38
2.3.7 Network search 38
2.4 Default search 2.4.1 Satellite 39
2.4.2 Search mode 39
2.4.3 Channel search 39

GB 7
7. The OSD menu – overview
3. System 3.1 Language 3.1.1 Menu language Page 40
3.1.2 1. Audio language 40
3.1.3 2. Audio language 40
3.2 TV settings 3.2.1 Colour standard 40
3.2.2 Screen format 40
3.2.3 Dolby Digital 40
3.2.4 Video Out 40
3.3 Time 3.3.1 GMT setting 41
3.3.2 Region 41
3.3.3 GMT offset 41
3.3.4 Date 41
3.3.5 Time 41
3.3.6 Daylight savings 41
3.3.7 Time display 41
3.4 Timer Number 3.4.1 Timer Repeat 41
3.4.2 Timer Service 41
3.4.3 Reminder message 41
3.4.4 Reminder date 41
3.4.5 Switch on time 41
3.4.6 Duration 41
3.5 OSD Setting 3.5.1 Subtitle display 42
3.5.2 Display duration 42
3.5.3 OSD Transparency 42
3.5.4 Reset defaults 42
3.6 Child Lock 3.6.1 Menu block 42
3.6.2 Channel block 42
3.6.3 New Password 42
3.6.4 Confirm password 42
3.7 LNB Voltage 3.7.1 LNB Voltage 42
4. Miscellaneous 4.1 Information Satellite 43
LNB Freq. 43
TP Freq. 43
Symbol rate 43
Polarisation 43
DiSEqC 43
Signal strength 43
Signal quality 43
Video PID 43
Audio PID 43
PCR PID 43
Text PID 43
Sub PID 43
Version 43
4.2 Antennea alignment 4.2.1 Local longitude 44
4.2.2 Local latitude 44
4.2.3 Satellite position 44
4.2.4 Calculation 44
4.2.5 Direction 44
4.2.6 Inclination 44
4.3 Games 4.3.1 Tetris 44
4.3.2 Snake 44
4.3.3 Othello 44
4.4 Default 45
4.5 Software update 4.5.1 Update via RS232 45
4.5.2 Update via Satellite 4.5.2.1 Satellite 45+46
4.6 SatcoDX Auto-Programming 46
4.7 Help 46
GB 8
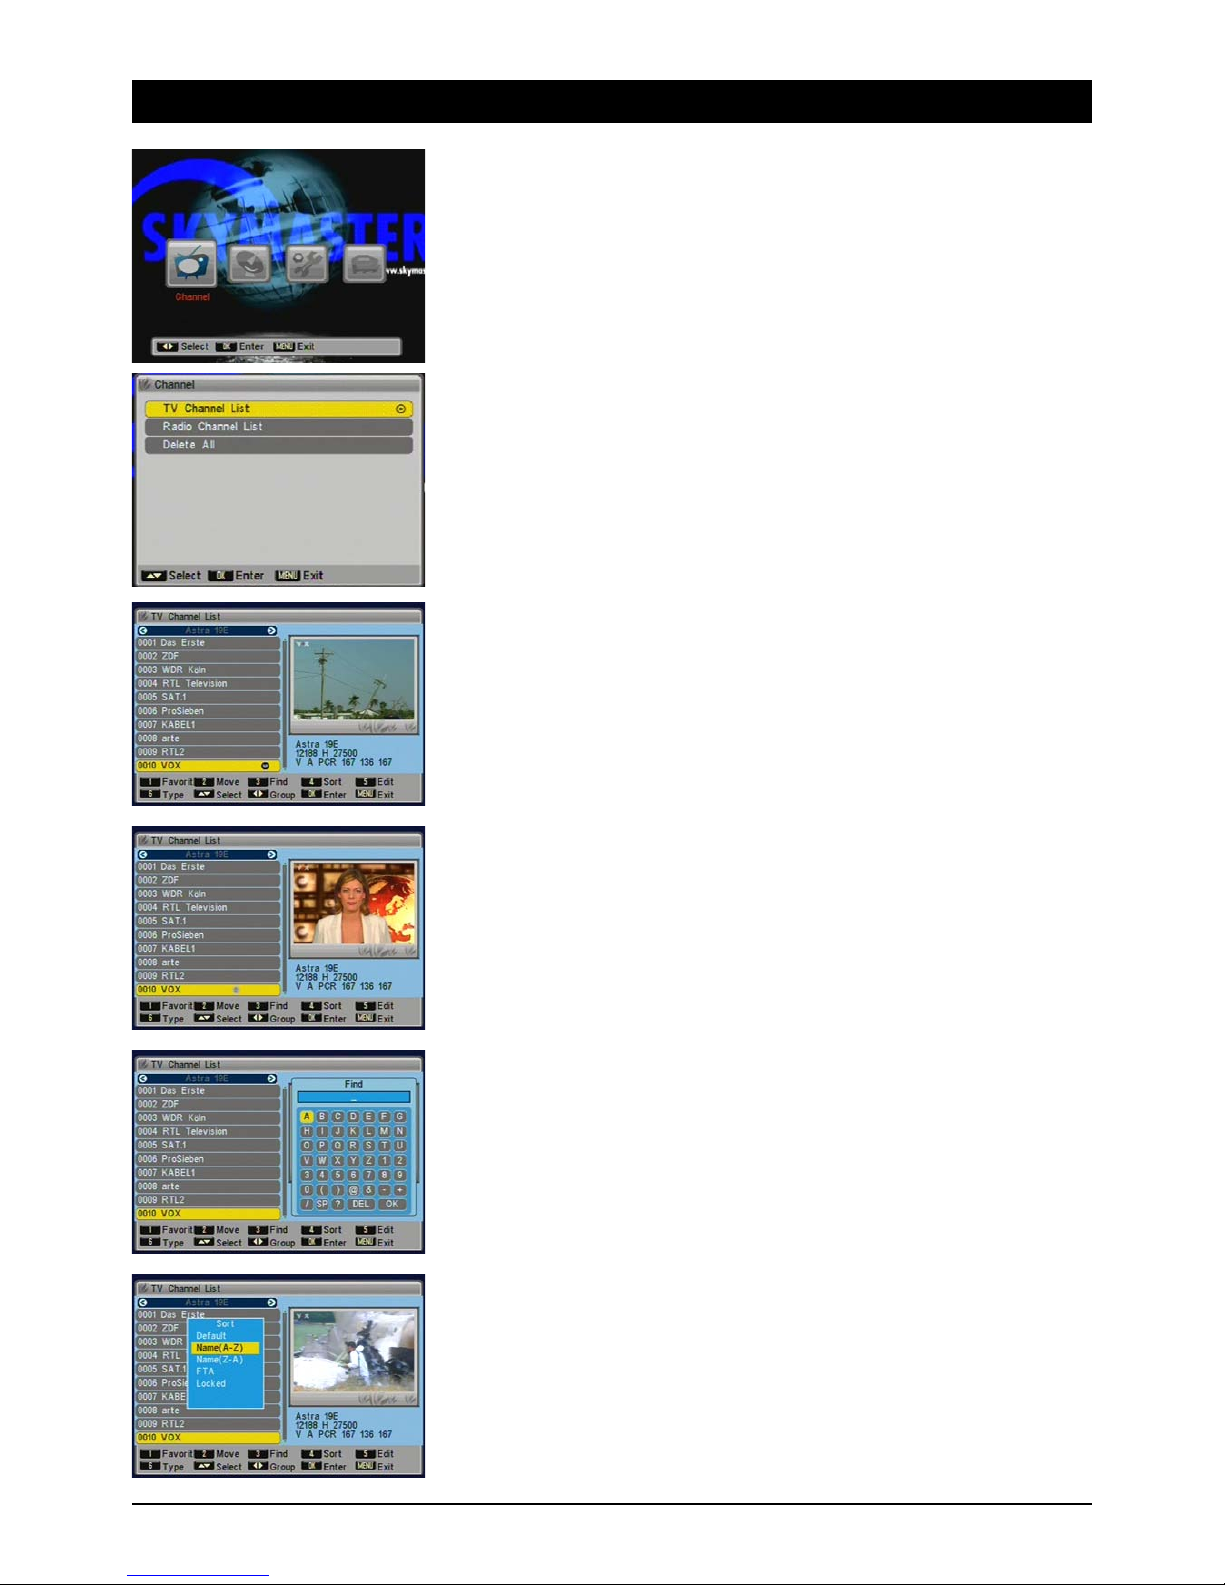
7. The OSD menu – channels
1. Channels
Editing the available TV and radio channels.
1.1 TV channels – (Radio channels)
The TV channels can be imported, moved, searched, sorted or edited in FAV lists. You can select
the satellite with the [Left/Right] buttons. You can navigate the channel list page by page using the
[Page] buttons.
After quitting by pressing [Exit] a dialog box appears and asks to confirm whether the changes
should be saved.
1.1.1 Favourites
You can transfer your favourite channels to a separate list. By pressing the red button you have
quick access to your favourite channels.
Choose the desired channel and press [1]. You can add other channels to your FAV list by pressing
[1] and remove them the same way.
1.1.2 Shift
Choose the desired channel and press [2]. Using the [Up/down] buttons you can shift the channel
to a new position and press [OK].
1.1.3 Search
Choose the desired channel and press [3]. A keyboard appears on screen, which you can operate
using the [NAV] buttons. You can add spaces with the [SP] button, to delete use the [DEL] button.
Confirm letters and figures with the [OK] button on the remote. To quit the keyboard press [OK].
1.1.4 Sort
You can sort channels based on the following: “Default” (as sorted presently), “Name (A-Z)”
and “Name (Z-A)” (alphabetical), “FTA” (free to air before encrypted channels) and “Blocked”
(blocked channels sent to the end of the list). Note: if you quit the menu and confirm channel
sorting permanently, you cannot recreate the previous sequence.

GB 9
7. The OSD menu - channels
1.1.5 Edit
To edit available TV and radio channels, i.e. delete, rename, block and more besides.
1.1.5.1 Delete
Use the [1] button to highlight the channels you would like to delete. After quitting the menu a
prompt for confirmation appears, asking if really want to delete all the channels selected.
Note: by pressing the [1] button again you can undo the selection.
1.1.5.2 Skip
You can skip channels when channel surfing by pressing the [NAV] buttons. Highlight the relevant
channels with the [2] button. Note: you can continue to select these stations by entering the
channel number directly.
1.1.5.3 Block
You can block unauthorised access to individual channels, e.g. those with content unsuitable
for children. Access is then only possible by entering a password. Highlight the channels to be
blocked with the [3] button. Note: to activate channel blocking, you must switch it on in the
“Child Lock” menu.
GB 10
7. The OSD menu – channels
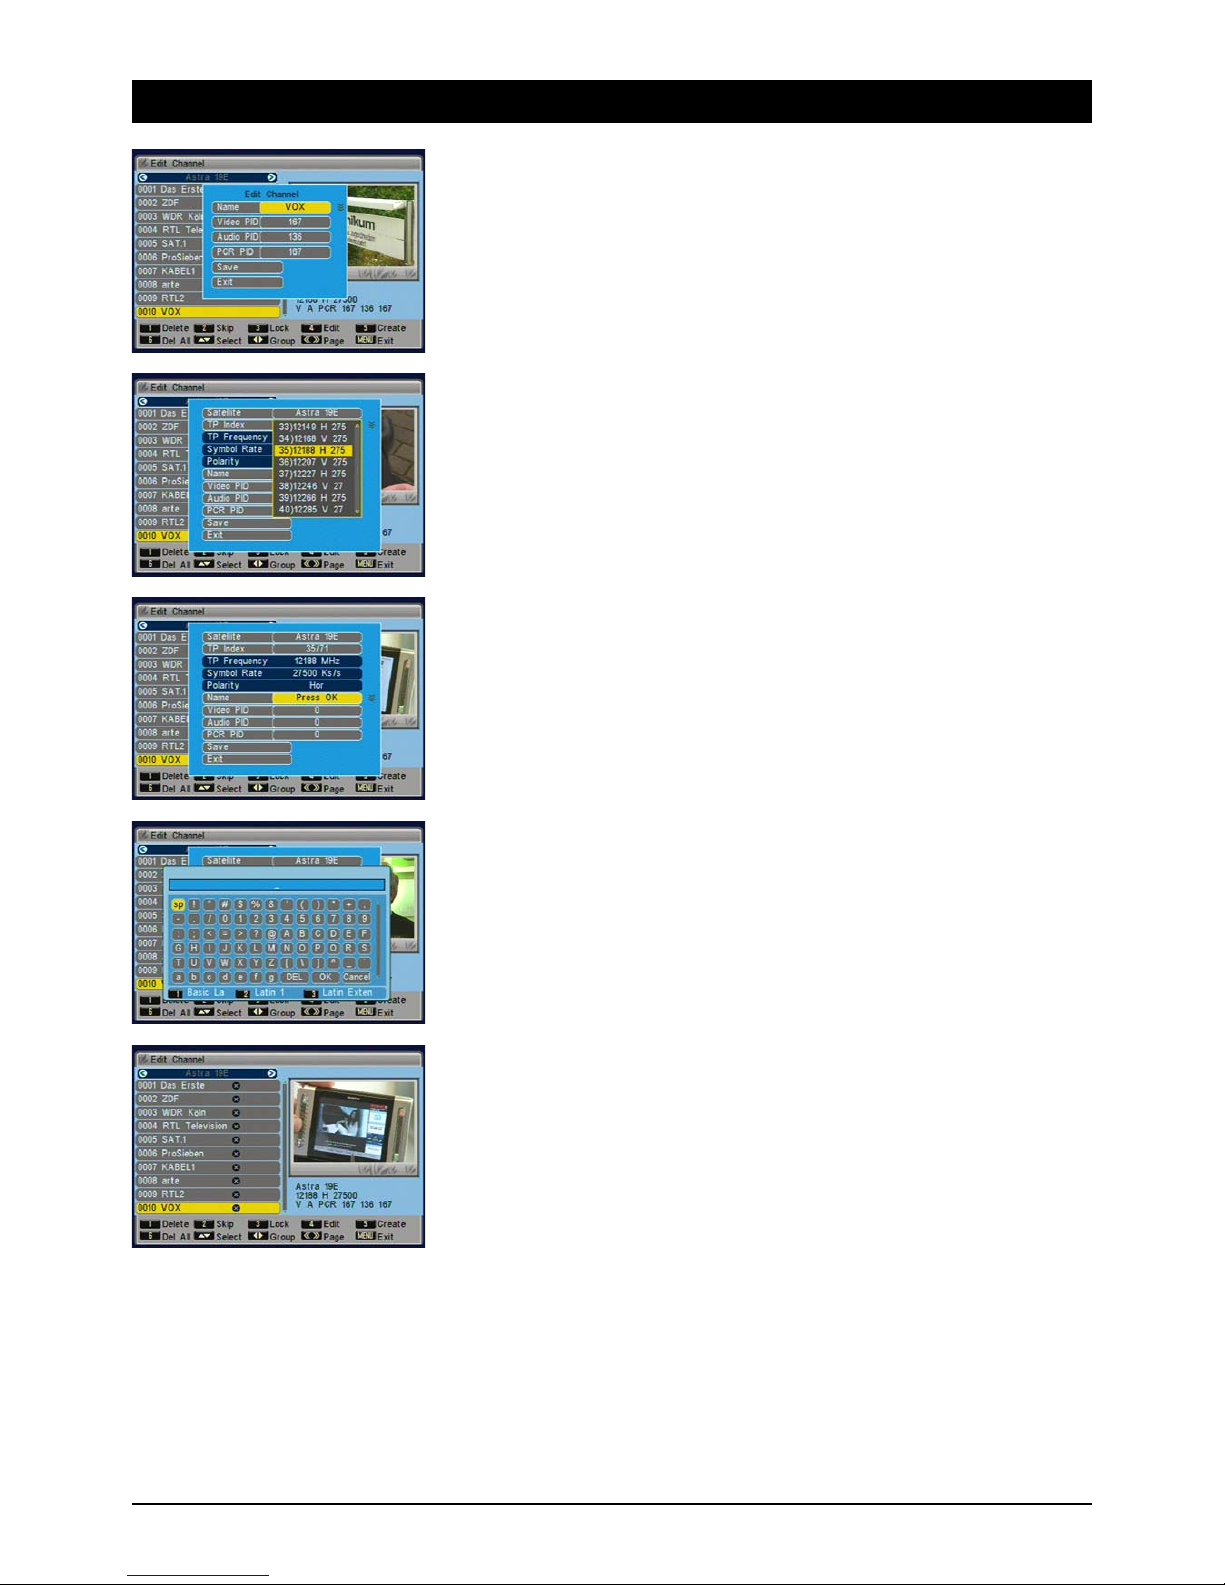
1.1.5.4 Edit
Under the “Edit” menu you will see further options for editing TV and radio channels. Press the [5]
button.
1.1.5.4.1 Delete see 1.1.5.1 [왖왔] Selection, [왗왘] Channel, [«»] Page
1.1.5.4.2 Skip sees 1.1.5.2
1.1.5.4.3 Block sees 1.1.5.3
1.1.5.4.4 Modify
Under “Modify” you can edit channel names and PIDs. Only advanced users should carry out these
modifications. To open the menu, press the [4] button.
1.1.5.4.5 Compile
To add a single channel. This feature is also intended for advanced users only. Choose the
appropriate transponder where the channel is located. Enter the future name of the channel using
the on-screen keyboard and the PIDs for video, audio and PCR and go to “Save”. Note: these
settings are not required for everyday use. You can find convenient options to search automatically
for channels under “Reception”.
To enter the station name choose “Name” and press the OK button.
A keyboard appears on the screen, which you can operate using the [NAV] buttons. Add spaces
using the [SP] button, to delete use the [DEL] button. Confirm letters and figures with the [OK]
button on the remote control. To quit the keyboard, press the [OK] button.
Press buttons [1], [2] or [3] and other options are available.
1.1.5.4.6 Delete all
Highlight ALL channels by pressing the [6] button. After you quit the menu a prompt for confirma-
tion appears, asking if really want to delete ALL the channels.
GB 11
7. The OSD menu – channels
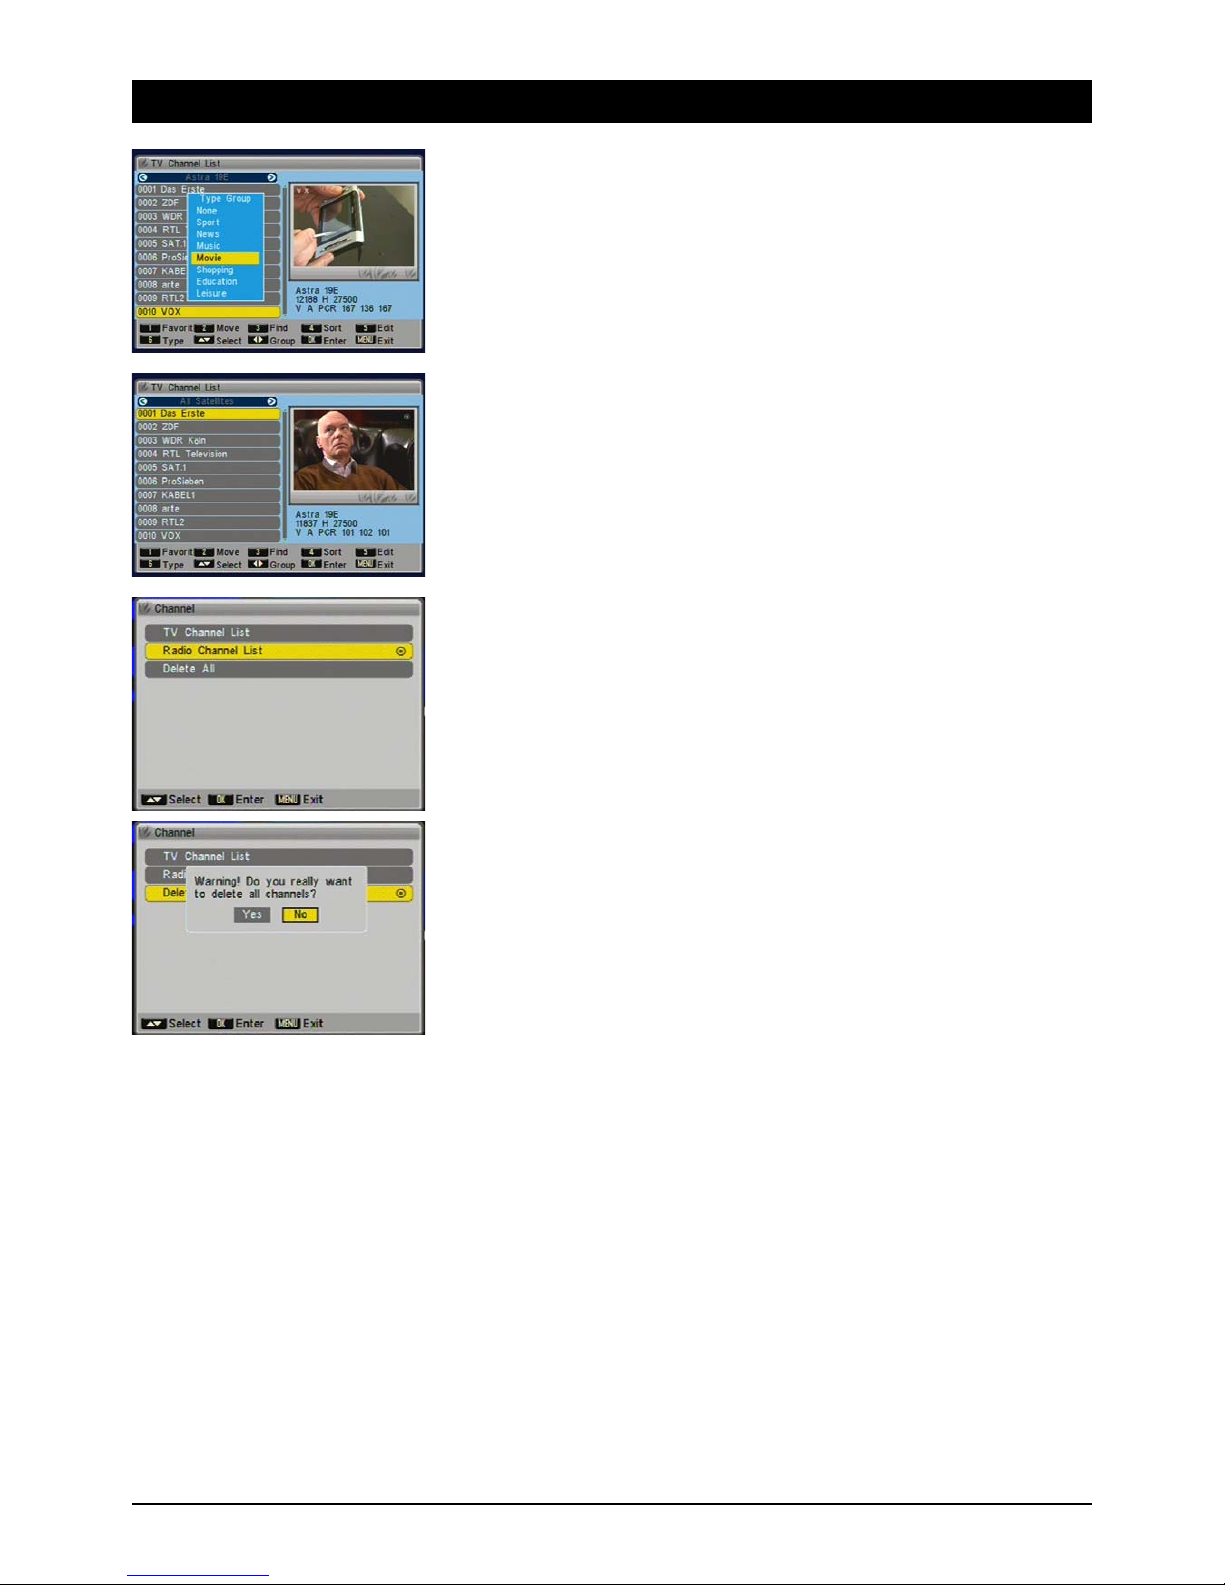
1.1.6 TV channel list
1.1.6.1 Type
You can sort channels into various categories: Sport, News, Music, Movies, Shopping, Culture and
Leisure. Beside the standard lists “All satellites” and “Favourites” this will give you further well
organised and sorted channel lists and quick access to the channels you want.
Channels that are assigned to a group are marked with an icon.
1.1.6.2 Group
When a channel list is displayed, select a “channel group” using the [왗왘] buttons. Choose a
specific satellite, “All Satellites”, “Favourites”, “Movies”, “Sport”, etc.
1.2 Radio channels
Managing radio channels. Operation is no different from the items provided for TV channels.
1.3 Delete all
The “Delete All” function is useful if you want to reinstall your receiver and then do an automatic
search.

GB 12
7. The OSD menu – reception
2. Reception
In the Reception menu you will find all the settings you require to tune to the satellite system and
store channels.
2.1 Antenna tuning
In order for the search function to work properly, you have to tune the receiver to your antenna.
2.1.1 Satellite
To select the satellite you want press [OK]. You also have the options of renaming the satellite
(button [1]), adding a new satellite (button [2]) or deleting a satellite position (button [3]).
Renaming: Select the satellite position from the list and press [1]. Choose the letters and figures
with the control buttons and confirm them one after the other with the OK button on the remote
control.
Other important buttons on the on-screen keyboard:
Space: [SP]
Delete: [DEL]
Save name and quit keyboard: [OK]
2.1.2 LNB Type
Digital is almost always the right choice for all commercially available LNBs. You should only select
further settings if the installation instructions tell you expressly to do so. Log in as “User”, if you
have to enter LNB frequencies manually.
2.1.3 22 kHz
The 22 kHz signal is used to switch the digital LNB (out = low-band, 22 kHz = high-band). If you
have selected “Digital” as the LNB type, switching occurs automatically. If you do not have a
commercially available LNB, you have to adjust the settings manually at this point.
2.1.4 DiSEqC
DiSEqC allows you to receive several satellites. If you have two LNBs, for example, that are aimed
at two different satellites (ASTRA and HOTBIRD), you should use a DiSEqC switch. Choose the
1/2 setting for ASTRA and 2/2 for HOTBIRD. You can control 2, 4, 8 or 16 port switches and
DiSEqC capable multiple switches. Note: on some DiSEqC switches the connections are marked
with letters (A, B, C, D...) instead of numbers. However, the sequence is the same.

GB 13
7. The OSD menu – reception
2.1.5 Polarisation
Satellite signals are transmitted with horizontal or vertical polarity. You should always choose the
H/V setting, which allows for reception at both levels. In very exceptional situations it may be nec-
essary to choose only horizontal OR vertical reception, e.g. in large-scale residential systems or to
receive unusual satellites.
2.2 Automatic search
To automatically search for all available transponders of a satellite position.
2.2.1 Satellite
Choose a preconfigured satellite from the list. Quit the list by pressing [MENU]. You also have the
options of renaming the satellite (button [1]), adding a new satellite (button [2]) or deleting a
satellite position (button [3]).
2.2.2 Search mode
Decide whether you want to save only the free to air or the encrypted channels as well.
2.2.3 Channel search
Decide whether you want to search for TV and/or radio stations.

GB 14
7. The OSD menu – reception
2.3 TP search
To search for a single transponder. This search method is useful if you only want to save a specific
channel or a specific channel package. You can obtain the reception parameters (frequencies,
etc.) on the net or from TV and specialist magazines.
2.3.1 Satellite
Choose a preconfigured satellite from the list. Quit the list by pressing [MENU].
2.3.2 TP index
Displays the current transponder index number. The figure after the slash displays the satellite's
total number of transponders. To add a new transponder press [1], to delete the current transpon-
der press [2]. If you would like to delete all the selected satellite's transponders, press [3].
2.3.3 TP frequency
You normally enter the frequency as five digits, e.g. 12480 (MHz) or you can modify it in separate
steps by pressing the [왗왘] buttons and confirming the new reading with [OK]. Caution: the
previous readings are overwritten when you quit the menu and respond with a “YES” to the prompt
for confirmation.
2.3.4 Symbol rate
The symbol rates of the most common satellite transponders are almost always 27500 or 22000.
You can change these values by entering them directly or in separate steps using the [왗왘]
buttons. Note: the receiver's symbol rates may differ +/- 10Ks/s.
2.3.5 Polarisation
Satellite signals are transmitted with either horizontal or vertical polarity. Select the appropriate
level H or V. Note: the way figures are often written, e.g. 12480H means: frequency 12480 MHz
and H stands for horizontal.
2.3.6 Search mode
Choose whether you want to save free to air channels or encrypted channels as well.
2.3.7 Network search
The satellites ASTRA (19.2° east) and HOTBIRD (13° east) provide what is known as network
search. These satellites transmit a table (NIT = Network Information Table) on all available
channels. This enables the satellite receiver to pick up all channels.
Signal strength
The signal strength display shows the entire gauge of the signal received.
Signal quality
The signal quality is absolutely crucial for trouble-free reception. Always align the antenna so that
the signal strength and signal quality reach the highest level possible.

GB 15
7. The OSD menu – reception
2.4 Default search
Starts the search with the factory default transponders.
2.4.1 Satellite
Choose a preset satellite from the list. Quit the list by pressing [MENU].
2.4.2 Search mode
Choose whether you want to save only free to air channels or encrypted channels as well.
2.4.3 Channel search
Choose whether you want to search for TV and/or radio channels.

GB 16
7. The OSD Menu – System
3. System
In the System menu you can tune the satellite receiver to a connected TV set, adjust the menu lan-
guage and audio playback, the time, child lock and lots more besides.
3.1 Language
In the Language sub-menu you can select the OSD language and the preferred languages for
audio playback.
3.1.1 Menu language
Choose the desired language for the on-screen display. Use the [FE] buttons in this case.
3.1.2 1. Audio language
Choose the language to be played back in multilingual programs if this is available.
3.1.3 2. Audio language
Choose the language to be played back in multilingual programs if the first audio language is
unavailable. If none of the two preferred languages is available, the transmitting channel will notify
you.
3.2 TV settings
To tune the satellite receiver to a TV set.
3.2.1 Colour standard
To tune the colour standard to a connected TV set. When operating in most of Europe use the
PAL B/G or AUTO setting. Caution: when you change the colour standard you may not be able to
see a picture. In this case press the [FE] buttons until the on-screen menu is legible again.
3.2.2 Screen format
If you own a TV set with a 16:9 format screen, choose the 16:9 setting. For 4:3 screens choose
4:3PS (Pan & Scan) or 4:3LB (Letterbox). With Pan & Scan programs transmitted in 16:9 wide-
screen format the black borders at the top and bottom is removed. This means the picture is
enlarged but the left and right hand sides of the picture are also cut off. In Letterbox format the
complete picture is visible, including the black bands with 16:9 widescreen format programs.
3.2.3 Dolby Digital
If you have a Dolby Digital/AC3 Surround amplifier, you can play back programs in surround sound
through your surround effects speakers.
3.2.4 Video Out
To determine what kind of video signals are output at the receiver's Scart connections. FBAS
(also Composite, C-Video or CVBS) is not as high quality as RGB but is compatible with virtually
all video and TV appliances. By transmitting red, green and blue separately RGB achieves the best
possible colour fidelity and image definition.

GB 17
7. The OSD Menu – System
3.3 Time
In order for the receiver to display the correct time and for the timer to start at the programmed
time, the time settings should be checked and may have to be adjusted.
3.3.1 GMT setting
GMT stands for Greenwich Mean Time and is the reference point for different time zones. If the
GMT setting is switched off you can enter the time manually.
3.3.2 Region
Choose the region you are in. If you are operating the unit in Germany, choose Berlin.
3.3.3 GMT offset
The difference in time between Central Europe and GMT is +1 or +2 hours - depending on whether
daylight savings time applies or not.
3.3.4 Date
To manually enter today's date (only if GMT is off).
3.3.5 Time
To manually enter the current time (only if GMT is off).
3.3.6 Daylight savings
Switch daylight savings on or off twice a year.
3.3.7 Time display
For receivers with a display it is also possible to display the time when in stand-by mode. To
achieve this, activate the menu item “Time display” with “On”. The function “On” or “Off” has no
significance for receivers without a display.
3.4 Timer Number
You can pre-program up to eight different timer events. For example, programs you do not want to
miss or to remind you of birthdays or anniversaries.
After quitting the menu ([MENU] or [EXIT]) the changes will be saved.
Timer Repeat
With Timer Repeat you can determine how often the timer is activated: once, daily, weekly, monthly
or annually. Choose “Off” and the timer is deactivated.
Timer Service
Choose “TV Channel” if you want to see a specific program or record it on a VCR. If you would like
to have a reminder of a particular event displayed, choose the “Message” option.
Reminder message or switch on channel
For a regular reminder choose “General”. The other options remind you of birthdays or anniver-
saries. If you have selected “TV Channel” under the “Timer Service”, at this point you can choose
the channel that will appear when it is switched on.
Reminder date
Enter the desired date (e.g. 7 November 2004) as follows: 07112004.
Switch on time
Enter the start time as four digits.
Duration
Enter the program duration as four digits. For a program lasting 90 minutes enter 01:30 (1 h 30 m).

GB 18
7. The OSD Menu – System
3.5 OSD Setting
In this menu you can edit the on-screen menu appearance.
3.5.1 Subtitle display
Choose “On” if you want subtitles shown with a program.
3.5.2 Display duration
How long information and error messages are displayed can be set between 1 second and 10 sec-
onds.
3.5.3 OSD Transparency
You can set the transparency of the on screen display between 10% (background slightly visible)
and 40% (very transparent).
3.5.4 Reset Defaults
With this option all changes to OSD settings can be reset.
3.6 Child Lock
You can block the menus and channels from unauthorised access, e.g. to content that is
unsuitable for children. Access is then only possible by providing a four-digit password.
3.6.1 Menu Block
If you want to restrict access to specific parts of the on-screen display, set the menu block to
“On”.
Channel Block
Channels you have previously blocked in the menu can only be accessed by entering a password,
if you switch on channel blocking.
New password
If you wish to change the default password 0000, enter the new password here.
Confirm password
Confirm you new password. Make sure you remember the password or store it in a safe place.
3.7 LNB Voltage
The satellite receiver's LNB voltage provides the LNB with an operating voltage and enables
switching between various reception levels. Note: leave the LNB voltage on all the time unless you
are specifically instructed to switch it off. This may be necessary in a few larger residential building
systems.
3.7.1 LNB Voltage
Switch the LNB voltage on or off. If you are not sure, leave it “On”
This manual suits for next models
1
Table of contents
Other Sky Master Receiver manuals

Sky Master
Sky Master DVR 9600 User manual

Sky Master
Sky Master DXS 23 User manual

Sky Master
Sky Master DX 7 User manual

Sky Master
Sky Master DCI 35 User manual

Sky Master
Sky Master DXR 8000 User manual

Sky Master
Sky Master DCI 9210 User manual

Sky Master
Sky Master DVR 7500 User manual

Sky Master
Sky Master DCX 10 CI User manual

Sky Master
Sky Master DVR 9200 User manual

Sky Master
Sky Master DCI 9410 User manual


