Linsar 16LED805B User manual

16LED805B16LED805B
COLOUR TELEVISION
OPERATING INSTRUCTIONSOPERATING INSTRUCTIONS

English - 1 -
Contents
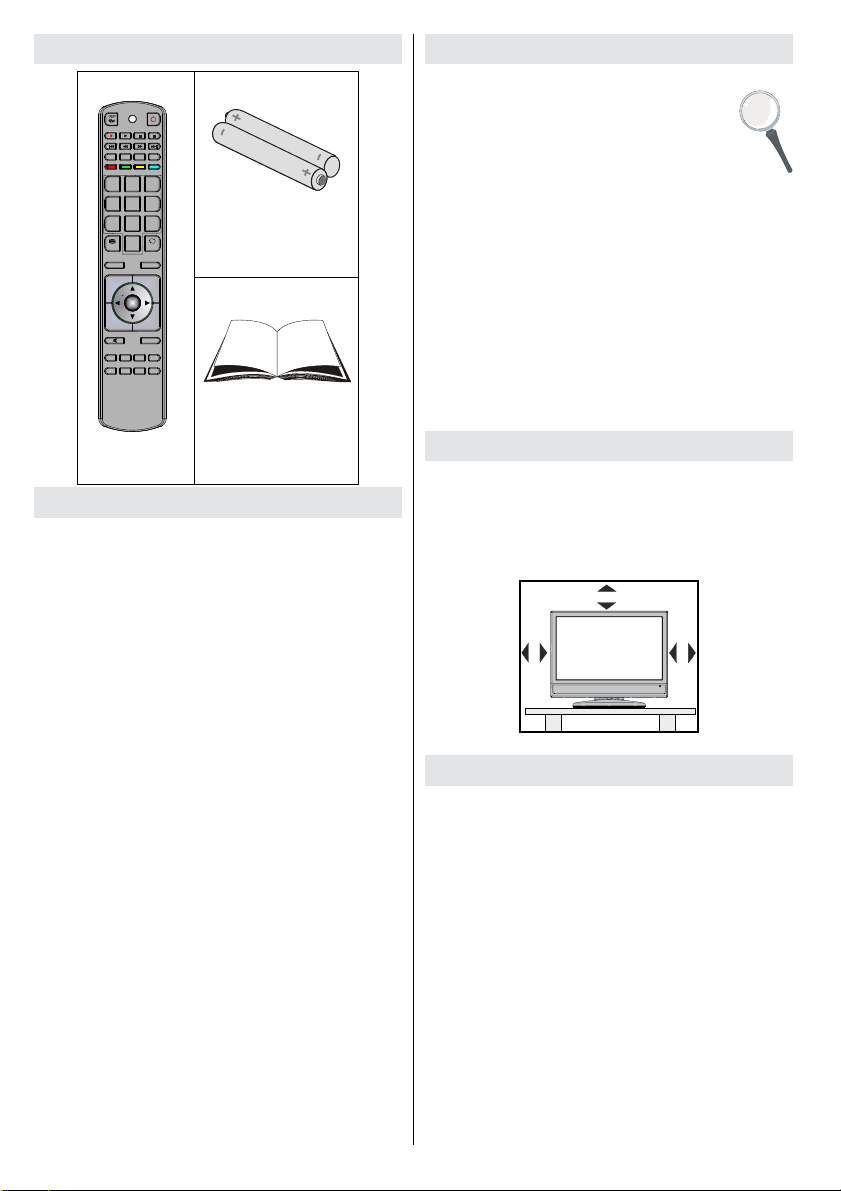
Package Contents.................................................. 2
Features ................................................................. 2
Preparation............................................................. 2
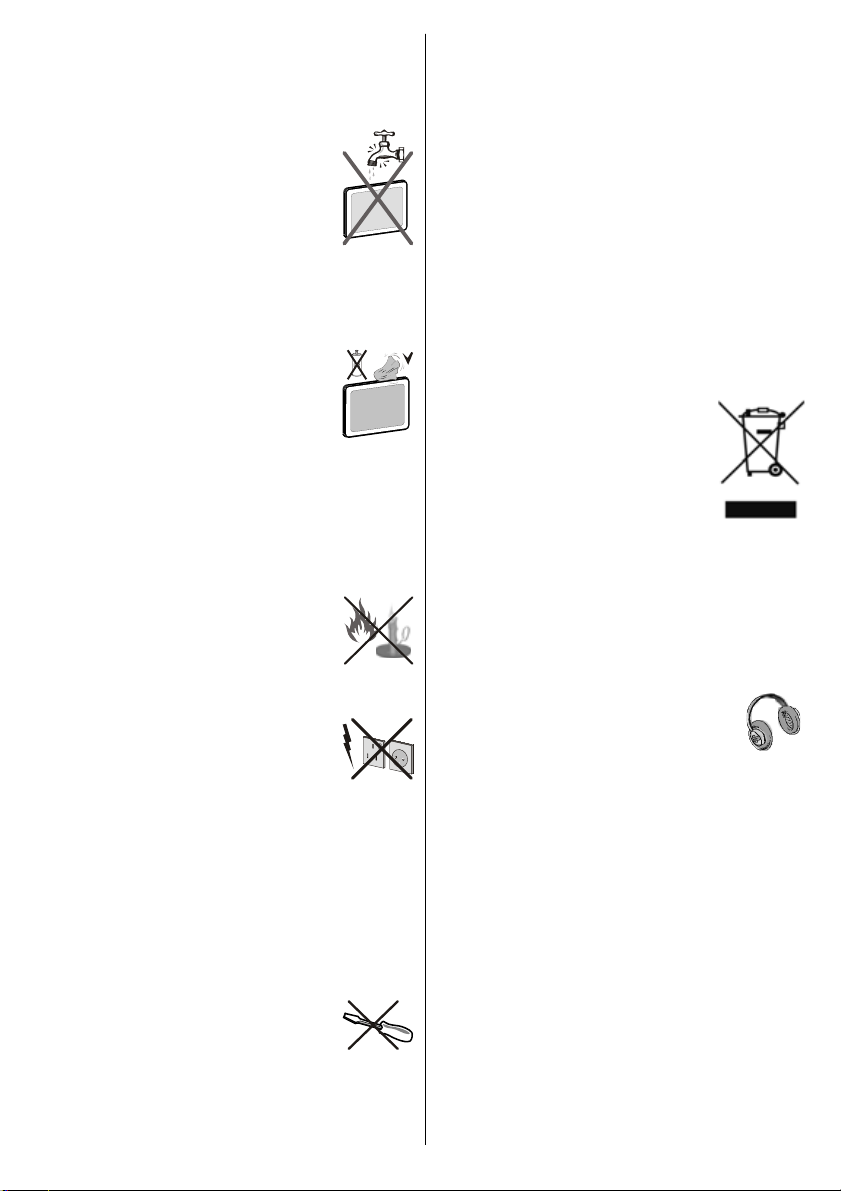
Safety Precautions ................................................. 2
Power Source..................................................... 2
Power Cord......................................................... 2
Moisture and Water ............................................3
Cleaning.............................................................. 3
Heat and Flames ................................................ 3
Lightning............................................................. 3
Replacement Parts............................................. 3
Servicing............................................................. 3
Waste Disposal................................................... 3
Information for Users in European Union
Countries ............................................................ 3
Disconnecting the Device...................................3
Headphone Volume............................................ 3
Installation........................................................... 3
LED Screen ........................................................ 3
Warning .............................................................. 4
Connection to a Television Distribution System
(Cable TV etc.) from Tuner.................................4
Electrical device not in the hands of children .....4
Environmental Information ..................................... 5
Repair Information.............................................. 5
Overview of the Remote Control ............................ 6
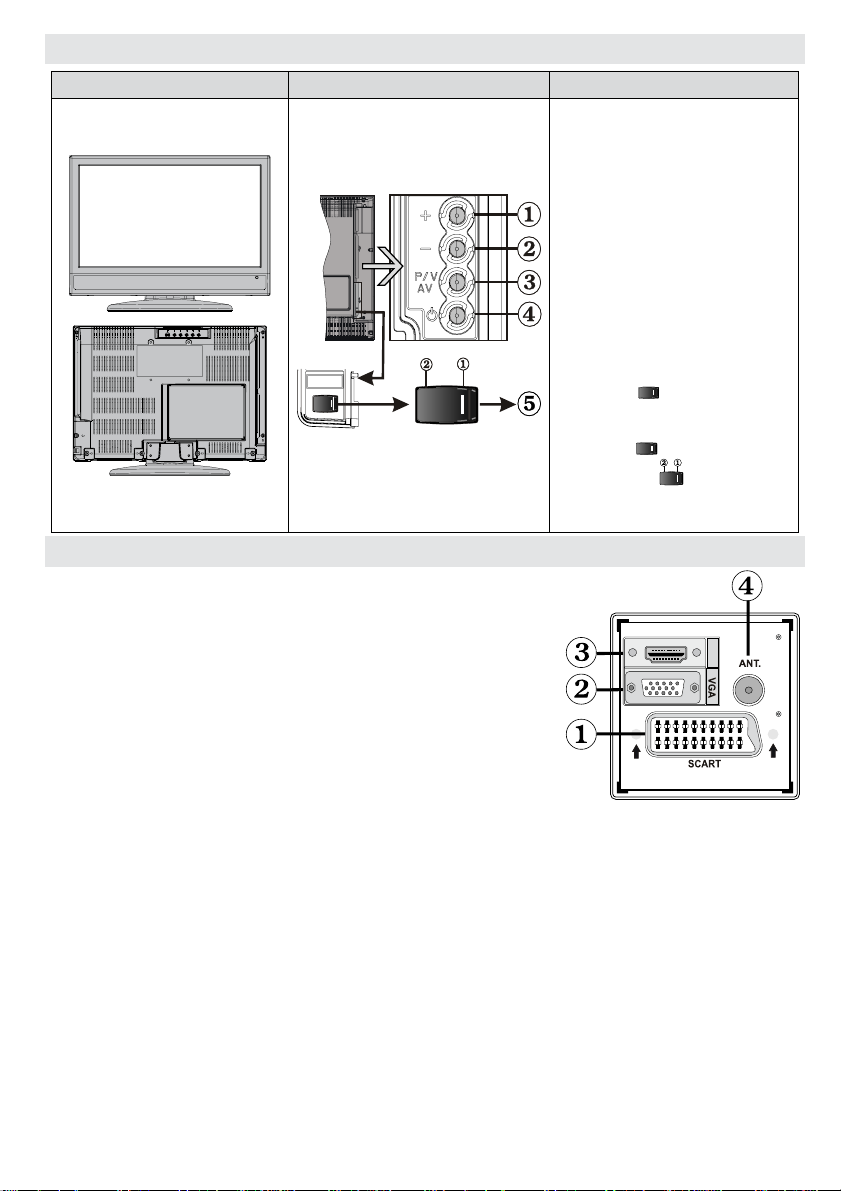
LED TV and Operating Buttons.............................. 7
Viewing the Connections- Back Connectors .......... 7
Viewing the Connections - Side Connectors.......... 8
Power Connection.................................................. 8
Aerial Connection................................................... 8
USB Connection..................................................... 9
USB Disk Connection.........................................9
Programme Recording........................................ 9
Connecting the LED TV to a PC........................... 10
Connecting to a DVD Player................................. 10
Using Side AV Connectors................................... 10
Connecting Other Equipment via Scart.................11
Inserting Batteries into the Remote Control...........11
Switching the TV On/Off........................................11
To Switch the TV On .........................................11
To Switch the TV Off..........................................11
Input Selection...................................................... 12
Basic Operations.................................................. 12
Operation of the TV Buttons of the TV.............. 12
Initial Settings....................................................... 12
General Operation................................................ 13
Timeshifting ......................................................... 13
Instant Recording ................................................. 13
Watching Recorded Programmes .......................14
Slow Forward.................................................... 14
Electronic Programme Guide (EPG) .................... 14
Programme Options.......................................... 15
Displaying Subtitles .......................................... 15
Digital Teletext (** for UK only) ......................... 15
Analogue Teletext............................................. 15
Widescreen....................................................... 15
IDTV Menu System .............................................. 16
Channel List...................................................... 16
Recording Timers.............................................. 17
Recordings Library............................................ 19
Conditional Access ........................................... 19
TV Setup........................................................... 19
Setup ................................................................ 19
Media Browser.................................................. 24
Slideshow Options............................................ 24
Video Playback................................................. 25
Recordings........................................................ 25
Media Browser Settings.................................... 25
Analogue TV Menu System.................................. 26
Picture Menu..................................................... 26
Sound Menu ..................................................... 26
Feature Menu ................................................... 27
Install Menu ...................................................... 28
Source Menu .................................................... 30
PC Mode Menu System........................................ 30
PC Position Menu.............................................30
Displaying TV Information .................................... 31
Mute Function....................................................... 31
Picture Mode Selection......................................... 31
Freezing Picture ................................................... 31
Zoom Modes......................................................... 31
Teletext................................................................. 32
Tips....................................................................... 33
Image Persistence............................................ 33
No Power.......................................................... 33
Recording Unavailable...................................... 33
USB Is too Slow................................................ 33
Poor Picture...................................................... 33
No Picture......................................................... 33
Sound ............................................................... 33
Remote Control................................................. 33
Input Sources.................................................... 33
Appendix A: PC Input Typical Display Modes....... 34
Appendix B: AV and HDMI Signal Compatibility
(Input Signal Types).............................................. 35
Appendix D: Supported File Formats for
USB Mode............................................................ 36
Specifications ....................................................... 37
Important Instruction............................................. 38
Please read the corresponding instructions of this
handbook prior to the first use of the device, even
when the usage of electronic devices is familiar
to you. Notice especially the chapter SAFETY
PRECAUTIONS. Carefully keep the handbook as
future reference. When selling the device or giving
it away, ensure these instructions are passed to the
owner.

English - 2 -
Package Contents
REPEAT
ZOOM TITLE
ROOT
TEXT SWAP
123
456
789
SCREEN
0
LANG SUBTITLE PIP
OK
MENU
SOURCE
RETURN
INFO
FAV SLEEP EPG
SEARCH
ANGLE DISPLAY
MODE
P+
PRESETS
P-
V+
V-
Remote
Control
Batteries: 2 X AAA
Instruction Book
Features
• Remote controlled colour LED TV.
• Fully integrated digital TV (DVB-T).
•HDMI connectorfordigital videoand audio.This connection
is also designed to accept high definition signals.
• USB input.
• Programme recording.
•200 programmes from VHF, UHF(analogue).
• 500 programmes for digital mode (IDTV).
• OSD* menu system.
• Scart socket for external devices (such as video,
video games, audio set, etc.).
• Stereo sound system.
• Teletext, fastext, TOP text.
• Headphone connection.
• Automatic programming system.
• Forward or backward manual tuning.
• Sleep timer.
• Child lock.
•Automatic sound mute when no transmission.
• NTSC playback.
• AVL (Automatic Volume Limiting).
•Whennovalid signal is detected, after5minutesthe
TV switches automatically to standby mode.
• PLL (Frequency Search).
• PC input.
• Plug&Play for Windows 98,ME,2000,XP, Vista,
Windows 7.
• Game Mode (optional)
* OSD-On Screen Display
Introduction
Thank you for choosing this product.This manual will
guide you through the proper operation of
your TV. Before operating the TV, please
read this manual thoroughly.
Please do keep this manual reference in a
safe place for future reference.
This device is intended to receive and display TV
programs. The different connection options make
an additional expansion of the reception and display
sourcespossible(receiver,DVDplayer,DVD recorder,
VCR, PC etc.). This device is only suitable for the
operation in dry interiors. This appliance is intended
solely for private domestic use and may not be used
for industrial and commercial purposes. We exclude
liability in principle, if the device is not used as
intended, or unauthorized modifications have been
made. To operate your LED-TV in extreme ambient
conditions may cause the damage of the device.
Preparation
For ventilation, leave a free space of at least 10 cm
all around the set. To prevent any fault and unsafe
situations, please do not place any objects on top
of the set.
Use this device in moderate climates.
10 cm
10 cm
10 cm
Safety Precautions
Read the following recommended safety
precautions carefully for your safety.
Power Source
The TV set should be operated only from a 220-240
VAC, 50 Hz outlet. Ensure that you select the correct
voltage setting for your convenience.
Power Cord
Do not place the set, a piece of furniture, etc. on the
powercord(mainslead) or pinch thecord.Handlethe
power cord by the plug. Do not unplug the appliance
by pulling from the power cord and never touch the
powercordwithwet hands asthiscouldcause a short
circuitorelectric shock. Never makeaknot in the cord
or tie it with other cords. The power cords should be
placed in such a way that they are not likely to be
stepped on.Adamaged power cord can cause fire or

English - 3 -
Waste Disposal
Instructions for waste disposal:
• Packaging and packaging aids are recyclable and
shouldprincipallybe recycled. Packaging materials,
such as foil bag, must be kept away from children.
• Batteries, including those which are heavy metal-
free, should not be disposed of with household
waste. Please dispose of used battery in an
environment friendly manner. Find out about the
legal regulations which apply in your area. Don’t try
torechargebatteries.Danger of explosion. Replace
batteries only with the same or equivalent type.
• Cold cathode fluorescent lamp in LED PANEL
contains a small amount of mercury; please follow
the local laws or regulations for disposal.
Information for Users in European
Union Countries
This symbol on the product or on its
packaging means that your electrical
and electronic device should be
disposed at the end of its service
life separately from your household
wastes. There are separate collection
systems for recycling in EU.
For more information, please contact
thelocalauthorityorthedealerwhereyou purchased
the product.
Disconnecting the Device
The mains plug is used to disconnect TV set from
the mains and therefore it must remain readily
operable.
Headphone Volume
Excessive sound pressure from earphones
and headphones can cause hearing loss.
Installation
To prevent injury, this device must be securely
attachedtothe wall in accordancewiththeinstallation
instructions when mounted to the wall (if the option
is available).
LED Screen
TheLEDpanelisaveryhightechnologyproductwith
about a million thin film transistors, giving you fine
picture details. Occasionally, a few non-active pixels
may appear on the screen as a fixed blue, green or
red point. Please note that this does not affect the
performance of your product.
give you an electric shock. When it is damaged and
needs to be replaced, it should be done by qualified
personnel.
Moisture and Water
Do not use this device in a humid and
damp place (avoid the bathroom, the
sink in the kitchen, and near the washing
machine). Do not expose this device to
rain or water, as this may be dangerous
anddonot place objectsfilledwith liquids,
such as flower vases, on top. Avoid from
dripping or splashing.
Ifanysolid object orliquidfalls into thecabinet,unplug
the TV and have it checked by qualified personnel
before operating it any further.
Cleaning
Before cleaning, unplug the TV set
from the wall outlet. Do not use liquid or
aerosol cleaners. Use soft and dry cloth.
Ventilation
Theslotsandopenings on theTVsetare intended for
ventilationandto ensurereliableoperation.Toprevent
overheating, these openings must not be blocked or
covered in anyway.
Heat and Flames
Thesetshould not beplacednearto open
flames and sources of intense heat such
asanelectricheater.Ensure that noopen
flame sources, such as lighted candles,
are placed on top of the TV. Batteries
should not be exposed to excessive heat
such as sunshine, fire or the like.
Lightning
In case of storm and lightning or when
going on holiday, disconnect the power
cord from the wall outlet.
Replacement Parts
Whenreplacementpartsare required, makesurethat
the service technician has used replacement parts,
which are specified by the manufacturer or have the
samespecificationsas the original one.Unauthorized
substitutions may result in fire, electrical shock or
other hazards.
Servicing
Please refer all servicing to qualified
personnel. Do not remove the cover
yourself as this may result in an electric
shock.

English - 4 -
Warning
Do not leave your TV in standby or operating mode
when you leave your house.
Connection to a Television
Distribution System (Cable TV etc.)
from Tuner
Device connected to the protective earthing of the
building installation through the mains connection or
throughotherapparatuswithaconnectiontoprotective
earthing-and to a television distribution system using
coaxial cable, may in some circumstances create a
fire hazard.
Connection to a cable distribution system has
therefore to be provided through a device providing
electrical isolation below a certain frequency range
(galvanic isolator, see EN 60728-11).
The Standby / On button doesn´t separate this
device completely from mains. Moreover the device
consumespowerinthestandby operation. In order to
separatethedevice completely frommains,the mains
plughastobe pulled from the mainssocket.Because
of that the device should be set up in a way, that an
unobstructed access to mains socket is guaranteed,
so that in case of emergency the mains plug can be
pulled immediately. To exclude the danger of fire, the
power cord should principally be separated from the
mains socket prior to a longer period of non-usage,
i.e. during vacations.
Electrical device not in the hands of
children
Never let children use electrical device unsupervised.
Childrencan´talwaysrecognize properly thepossible
dangers.
Batteries / accumulators can be life threatening when
swallowed.Storebatteriesoutof reachofsmallchildren.
In case of swallowing a battery medical aid has to be
sought immediately.Also keep the packaging materials
away from children. There is danger of suffocation.

English - 5 -
Environmental Information
• This television is designed to consume less energy to save environment.
Younot only helptosave the environmentbutalso you cansavemoney by reducingelectricitybills thanks tothe
energy efficiency feauture of this TV. To reduce energy consumption, you should take the following steps:
• You can use Power Save Mode setting, located in the Feature menu. If you set Power Save Mode as On,
the TV will switch to energy-saving mode and luminance level ofTV set will be decreased to optimum level.
Note that some picture settings will be unavailable to be changed when the TV is in Power Save Mode.
• When the TV is not in use, please switch off or disconnect the TV from the mains plug. This will also reduce
energy consumption.
• Disconnect power when going away for longer time.
• TV set in power safe mode has been included to reduce the power consumption when the tv is not in use,
using the TV set in Power Save Mode has more power efficiency than disconnecting theTV from the mains
plug instead of keeping stand-by mode. Therefore disconnect the TV from the mains plug to save energy
when you do not use. However it is highly recommended to activate Power Save Mode setting to reduce
your annual power consumption.
• Please helps us to save environment by following this step.
Repair Information
Please refer all servicing to qualified personnel. Only qualified personnel must repair the TV. Please contact
your local dealer, where you have purchased this TV for further information.

English - 6 -
Overview of the Remote Control
REPEAT
ZOOM TITLE
ROOT
TEXT SWAP
123
456
789
SCREEN
0
LANG SUBTITLE PIP
OK
MENU
SOURCE
RETURN
INFO
FAV SLEEP EPG
SEARCH
ANGLE DISPLAY
MODE
P+
PRESETS
P-
V+
V-
No function1. Play (in Media Browser mode)2. Record (in PVR DTV mode)3. Rapid reverse4. Skip back (optional)5. Mono-Stereo / Dual I-II / Current language (in6. DTV mode)
Image size7. Green / Picture / Subtitle on-off (in DTV mode)8. Red / Sound menu / Change channel list type9. (in DTV mode) (*)
Numeric buttons10. Teletext / Mix / PAT11. Info / Reveal (in TXT mode)12. Programme up (Page down in DTV mode) /13. Programme down (Page up in DTV mode)
Mute14. FAV (*) (Favourite Selection) (in DTV mode)15. Return / Exit (in DTV mode) / Index page (in16. TXT mode)
No function17. No function18. No function19. Picture mode selection20. Electronic programme guide (in DTV mode)21. Sleep timer22. Menu on-off23. OK / Channel list (in DTV mode) / Hold (in TXT24. mode)
Volume up / down25. Navigation buttons26. Source selection27. Previous Programme28. Blue / Install menu / Favourite mode (*) (in DTV29. mode)
Yellow / Feature / Current language (in DTV30. mode) (*)
No function31. Subtitle on-off (in DTV mode) / TXT Subtitle32. Skip forward (optional)33. Rapid advance (in Media Browser mode)34. Stop (in Media Browser mode)35. Pause (in DTV mode) / Timeshift recording (in36. PVR DTV mode)
Standby37. Operation Led Light38.
(*) Only for EU country options.

English - 7 -
LED TV and Operating Buttons
FRONT and REAR VIEW SIDE VIEW Control Buttons
Up button1. Down button2. Programme/Volume / AV3. selection button
Standby/On button4.
Note:You can use “+/-” buttons to
change volume. If you want to change
channels, press P/V/AV button once
and then use “+/-” buttons. If you hold
theP/V/AV buttonaboutafewseconds,
source OSD will be displayed. Main
menu OSD cannot be displayed via
control buttons.
Standby Switch5.
• Switch the “ ” button to position “|”
so the TV will switch to standby mode.
Then the standby LED lights up.
•Switch the“ ”button to position 2
as illustrated, ( ) so the TV will
switch off.
Viewing the Connections- Back Connectors
SCART socket inputs or outputs for external devices.1.
HDMI
Connect the SCART cable between SCART socket on TV and
SCART socket on your external device (such as a decoder, a VCR
or a DVD player).
Note: If an external device is connected via the SCART socket, the
TV will automatically switch to AV mode.
PC Input is for connecting a personal computer to the TV set.2. Connect the PC cable between the PC INPUT on the TV and the
PC output on your PC. Component Video Inputs (YpBPr) are used
for connecting component video.
You can use PC input to enable YPbPr signal connection with a
device that has component output. Connect the YPbPr to PC cable
between the PC INPUT on the TV and the component video outputs
of your device.
HDMI3. : HDMI input
HDMI Input is for connecting a device that has an HDMI socket.
Your LED Television is capable of displaying High Definition pictures from devices such as a High
Definition Satellite Receiver or DVD Player. These devices must be connected via the HDMI sockets
or Component Socket. These sockets can accept either 480i, 480p, 576p, 576i, 720p, 1080i, 1080p
signals. No sound connection is needed for an HDMI to HDMI connection.
RF Input connects to an antenna or a cable system.4. Note that if you use a decoder or a media recorder, you should connect the aerial cable through the device
to the television with an appropriate antenna cable, as shown in the illustration in the following pages.
When you use the wall mount kit (optional) with the LED TV, we would definitely recommend to plug all your cables into the
back of the LED before mounting to the wall.

English - 8 -
Viewing the Connections - Side Connectors
CI Slot is used for inserting a CI card. A CI card allows you to view all the1. channels that you subscribe to. For more information, see “Conditional
Access” section.
USB Input (Functional in DTV mode only. Note that programme recording2. feature is available via this USB input only). You can connect external
hard disk drives to this input.
Video Input is used for connecting video signals of external devices.Connect3. the video cable between the VIDEO IN socket on the TV and the VIDEO
OUT jack on your device.
Audio Inputs are used for connecting audio signals of external devices.4. Connect the audio cable between the AUDIO INPUTS on the TV and the
AUDIO OUTPUT jacks on your device.
Also to enable PC/YPbPr sound connection in such a case, use an
appropriate audio cable between the connected device’s audio outputs and
the TV’s audio inputs
Note: If you connect a device to the TV via the VIDEO or PC/YPbPr cable
you should also connect your device with an audio cable to the AUDIO
INPUTS of the TV to enable audio.
Headphone jack is used for connecting an external headphone to the5. system. Connect to the HEADPHONE jack to listen to use headphones.
Standby switch is used for turning the TV on or off6. .
Power Connection
IMPORTANT: The TV set is designed to operate on 220-240V AC, 50 Hz.
• After unpacking, allow the TV set to reach the ambient room temperature before you connect the set to the
mains.
• Plug the power cable to the mains socket outlet.
Aerial Connection
• Connect the aerial or cable TV plug to theAERIAL INPUT socket located at the rear of the TV.
HDMI

English - 9 -
USB Connection
• You can connect a USB hard disk drive or USB
memory stick to your TV by using the USB input of
the TV. This feature allows you to play files stored
in a USB drive or record programmes.
• 2.5” and 3.5” inch (hdd with external power supply)
external hard disk drives are supported.
• Note that recording feature is available only
through the USB input located on the left - hand
side (from front view) of the TV. To record a
programme, you should first connect a USB
disk to your TV while the TV is switched off. You
should then switch on the TV to enable recording
feature. Otherwise, recording feature will not be
available.
IMPORTANT !
• You may back up your files before making any
connections to the TV set in order to avoid any
possible data loss. Note that manufacturer
will not be responsible for any file damage or
dataloss.
• It is possible that certain types of USB devices
(e.g. MP3 Players) or USB hard disk drives/
memory sticks may not be compatible with
this TV.
IMPORTANT: The TV supports only FAT32 disk
formatting. NTFS format is not supported. If you
connect a USB disk with NTFS format, the TV will
ask you to format the content. See the section,
“Format Disk” in the following pages for more
information on disk formatting.
Note that ALL the data stored on the USB disk will be lost
and then the disk format will be converted to FAT32 in such
a case.
USB Disk Connection
• Plug your USB device to the USB input of the TV.
Note: Plug or unplug your USB disk while the TV
is switched off.
Note: If you are going to connect a USB hard disk
drive to the TV set, USB connection cable used
between the disk drive and the TV should have a
USB logo and should be as short as possible.
Note: While formatting aUSB harddisk thathas 1TB(Tera
Byte) or more file capacity, you can experience problems
with the formatting process. In such a case, you should
format the disk with your personal computer and the
formatted disk type should be FAT32.
SIDE VIEW USB MEMORY
CAUTION !
• Quickly plugging and unplugging USB devices,
is a very hazardous operation. Especially, do not
repeatedly quickly plug and unplug the drive.
This may cause physical damage to the USB
player and especially the USB device itself.
• Do not pull out USB module while playing or
recording a file.
Programme Recording
• Programme recording is available in digital TV
mode.
• To record a programme, you should first connect
a USB disk to your TV while the TV is switched
off. You should then switch on the TV to enable
recording feature.
IMPORTANT:When usinganew USB harddiskdrive,
it is recommended that you first format the disk using
your TV’s “Format Disk” option.
• For using recording function, you should connect
a USB disk or an external hard disk drive to the
TV and connected USB disk should have at least
1 GB capacity and should have 2.0 speed
compatibility. If the connected USB device does
not support 2.0 speed, an error message will be
displayed.
•Recordedprogrammes aresavedinto the connected
USB disk in .TS format (MPEG-2 transport stream).
If desirable, you can back up / copy these saved
recordings into a personal computer.
Note: It is possible that recorded broadcasts in .TS format
may not be supported by your media playback software. In
suchacase, youshouldinstallan appropriate mediaplayback
software to your computer.
• An hour of the recordings stored occupies
approximately 2 GB of space.
• For more information on recording programmes,
see sections “Instant Recording”, “Timeshifting”,
“ElectronicProgrammeGuide”, “RecordingsLibrary”
or “Recording Timers” in the following parts.
Recorded programmes are split into 1GB partitions.
Names of the stored recordings’ last three digits
indicates this: Such as 4801-000.ts , 4801-001.ts.
Recorded programmes are stored in the following
directoryoftheconnectedUSBdisk: \DVR\RECS.All
recordingsareindicated withanumber (suchas4801-
000.ts). A text (txt) file is created for each recording.
Thistextfile includesinformationsuch asbroadcaster,
programme, and recording time.

English - 10 -
Connecting the LED TV to a
PC
For displaying your computer’s screen image on
your LED TV, you can connect your computer to the
TV set.
• Power off both computer and display before making
any connections.
• Use 15-pin D-sub display cable to connect a PC
to the LED TV.Use an audio cable between audio
inputs of the TV (side) and audio output of your PC
to enable sound connection.
• When the connection is made, switch to PC source.
See “Input selection” section.
•Settheresolutionthatsuitsyourviewingrequirements.
Resolutioninformationcan be found intheappendix
parts.
HDMI
PC audio cable
(not supplied)
to AUDIO INPUTS
on the TV
PC RGB cable
(not supplied)
to PC input
Audio
Inputs
PC Input
Connecting to a DVD Player
If you want to connect a DVD player to your LED
TV, you can use connectors of the TV set. DVD
players may have different connectors. Please refer
to your DVD player’s instruction book for additional
information. Power off both the TV and the device
before making any connections.
Note: Cables shown in the illustration are not supplied.
• If your DVD player has an HDMI socket, you can
connectviaHDMI. When youconnectto DVD player
as illustrated below, switch to HDMI source. See,
“Input Selection” section.
• Most DVD players are connected through
COMPONENT SOCKETS. YPbPr can be use only
whenyouconnectadevicethat has aYPbProutput
through the PC input with YPbPr to PC cable. To
enable sound connection, use AUDIO IN located
side of the TV.
. When the connection is made, switch to YPbPr
source. See, “Input selection” section.
• You may also connect through the SCART socket.
Use a SCART cable as shown below.
HDMI
input
SCART socket
Component
video
inputs
Component
audio
inputs
DVD Player
Note: These methods of connection perform the same
functionbut offerdifferent levelsof quality.It isnot necessary
to connect by all three methods.
Using Side AV Connectors
You can connect a range of optional equipment
to your LED TV. Possible connections are shown
below. Note that cables shown in the illustration are
not supplied.
• For connecting a camcorder, connect to the VIDEO
IN socket and theAUDIO SOCKETS. For selecting
the related source, see the section “Input selection”
in the following parts.
•Tolistento the TVsoundfromheadphones,connect
to the HEADPHONE jack of theTV
Headphone

English - 11 -
Connecting Other Equipment
via Scart
Most devices support SCART connection. You can
connect a; DVD recorder, a VCR or a decoder to
your LED TV by using the SCART socket. Note that
cables shown in the illustration are not supplied.
Power off both theTV and the devices before making
any connections.
For more information, refer to your device’s own
instruction book.
SCART socket
Decoder
DVD Recorder Video Recorder
Inserting Batteries into the
Remote Control
•Removethebattery cover located on thebackofthe
Remote Control by gently pulling backwards from
the indicated part.
•InserttwoAAA/R3or equivalent typebatteriesinside.
Observe the correct polarity (+/-) when inserting
batteries and replace the battery cover.
Note:Remove the batteriesfromthe remotecontrolwhen it is
notto be usedfor a longperiod. Otherwise itcanbe damaged
due to any leakage of batteries.
Switching the TV On/Off
To Switch the TV On
• Connect the power cord to the 220-240VAC 50 Hz.
Then the standby LED lights up.
• Switch the “ ” button to position “|” so the TV
will switch to standby mode. Then the standby
LED lights up.
• To switch on the TV from standby mode either:
• Press the “ ” button, P+ / P- or a numeric button
on the remote control.
• Press the “ ” button, -P/CH or P/CH+ button on
the TV. The TV will then switch on.
Note: If you switch on your TV via standby button on the
remotecontrol,the programme/source thatyouwerewatching
last will be reselected.
By either method the TV will switch on.
To Switch the TV Off
• Switch the “ ” button to position 2 as illustrated,
( ) so the TV will switch off.
• To powerdowntheTVcompletely,unplugthe power
cord from the mains socket.
Note:WhentheTVisswitchedtostandbymode,standby
LED can blink to indicate that features such as Standby
Search, Over Air Download or Timer is active.

English - 12 -
Input Selection
Once you have connected external systems to your
TV, you can switch to different input sources.
• Press SOURCE button on your remote control for
directly changing sources.
or
• Select “Source” option from the main menu
by using “ ” or “ ” button. Use then “ ” or
“”buttontohighlight an input andpress“ ”button
to select.
Note: You can mark desired source options by pressing the
OK button. Therefore, when SOURCE button is pressed,
only the marked source options will be available (except for
the TV source).
Note : YPbPr mode can be use only when you connect a
device that has a YPbPr output through the PC input with
YPbPr to PC cable.
Basic Operations
Youcan operateyour TVusing boththe remote
control and onset buttons.
Operation of the TV Buttons of the TV
Main menu OSD cannot be displayed via control
buttons.“+/-”buttons will function as volumeup/down
as default. Even if you set other functions for these
buttons, “+/-” buttons will perform as default after a
short while.
Volume Setting
• Press “+/-”buttons to increase or decrease volume,
so a volume level scale (slider) will be displayed
on the screen.
Programme Selection
• Press P/V/AV button once and then use “+/-” buttons
to select the next or previous programme.
AV Mode
• Hold the “P/V/AV” button, source OSD will be
displayed.
Use “+/-” buttons to select the desired source.
Operation with the Remote Control
• The remote control of yourTV is designed to control
all the functions of the model you selected. The
functions will be described in accordance with the
menu system of your TV.
• Functions of the menu system are described in the
following sections.
Volume Setting
•Press“V+”button to increase the volume.Press“V-”
buttontodecreasethe volume.Avolumelevelscale
(slider) will be displayed on the screen.
Programme Selection (Previous or Next
Programme)
• Press “P -” button to select the previous programme.
• Press “P +” button to select the next programme.
Programme Selection (Direct Access)
•Pressnumeric buttonsontheremotecontroltoselect
programmes between 0 and 9. The TV will switch
to the selected programme. To select programmes
between10-500(for IDTV) or10-199(for analogue),
press the numeric buttons consecutively
• Press directly the programme number to reselect
single digit programmes
Initial Settings
When the TV is turned on for the first time, the menu for the
language selection appears on the screen. The message
“Welcome please select your language!” is displayed in all
language options sequentially in the OSD.
Bypressingthe“ ”or“ ”buttonshighlightthelanguage
you want to set and press OK button. After then, “First
time installation” OSD will appear on the screen. By
pressing “ ” or“ ” buttons, select thecountry youwant
to set and press OK button (* for EU countries).
Note: Country selection OSD will not be available for UK.
Press OK button on the remote control to continue and the
following message will be displayed on the screen:
• To select the “Yes” or “No” option, highlight the item by
using “ ” or “ ” buttons and press the “OK” button.
TheIDTVwill automatically tune totheUHFor VHF(*)
(* for EU countries) transmission channels, search
for digital terrestrial TV broadcasts and display the
namesofchannels found.This process willtakeabout
a few minutes.

English - 13 -
After Automatic Search is completed, the following
messageaskingfor analoguechannelsearch appears
on the screen:
To search for analogue channels, select “Yes”. TV
switches to the analogue TV mode. The menu is
displayed to search for analogue channels.
Select your Country, Language and Text language
by using “ ” or “ ” and “ ” or “ ” buttons. Press
OK or RED button to continue. To cancel, press the
BLUE button.
Formoreinformationonthisprocess,see“InstallMenu”
section.
Note:ForproperfunctioningofdigitalteletextinDTVmode,you
shouldsetcountryasUKinanalogueAUTOPROGRAMME(for
UK broadcasts only).
Do not turn off the TV while initializing first time installation.
General Operation
Press the “SOURCE” button on the remote control
and select DTV/USB to switch the TV set to digital
terrestrial television broadcasting.
Information Banner
• Whenever you change channel, using the P- / P+
button or the numeric buttons, the TV displays the
broadcast picture along with an information banner
at the bottom of the screen (available only in DTV
mode). This will remain on the screen for a few
seconds.
• The information banner can also be displayed at
any time while watching TV by pressing the “INFO”
button on the remote control:
If the selected channel is locked, you must enter the
correct four numeric code to view the channel. “Enter
PIN” will be displayed on the screen in such a case:
Timeshifting
IMPORTANT: To record a programme, you should first
connecta USBdisk to yourTVwhile the TV is switched off.
You shouldthen switch ontheTV to enablerecording feature.
Otherwise, recording feature will not be available.
•Press (PAUSE)button whilewatchingabroadcast
for switching to timeshifting mode.
• In timeshifting mode, the programme is paused and
simultaneouslyrecordedtothe connected USB disk
(*). Press “ ” (PLAY) button again to watch the
paused programme from the stopped moment.
• This playback is performed in x1 playback speed.
You will see the timeshift gap between the real and
the timeshifted programme in the info bar.
•Use (PREVIOUS/NEXT)buttonsto move
forward or backward on timeshift playback. When
the timeshift is reached, timeshifting mode will be
quitted and you will switch back to watching normal
broadcast.
• Press (STOP) button to quit timeshifting mode.
(*) Simultaneous timeshifting recording’s duration depends
on your connected USB disk’s file size and defined Max.
Timeshift in the Recordings Configuration menu. See the
section, “Recordings” for more information on setting Max.
Timeshift.
Note:Switchingto a differentbroadcastorsource;andviewing
main menu are not available during the timeshifting.
Instant Recording
IMPORTANT: To record a programme, you should first
connecta USBdisk to yourTVwhile the TV is switched off.
You shouldthen switch ontheTV to enablerecording feature.
Otherwise, recording feature will not be available.
• Press (RECORD) button to start recording an
event instantly while watching a programme. The
following OSD appears on the screen:
• Record OSD will then be displayed for a short time
and the current event will be recorded.
• You can press (RECORD) button on the remote
controlagainto record thenexteventon the EPG.In
this case, OSD will display the programmed events
for recording.

English - 14 -
• Press (STOP) button to cancel instant recording.
The following OSD will be displayed:
Select Yes by using “ ” or “ ” / OK buttons to cancel
instant recording.
Note:Switchingto a differentbroadcastorsource;andviewing
Media Browser are not available during the recording.
Watching Recorded Programmes
In the main menu, highlight Recordings Library item by
using“ ” or “ ” button and press OK button to enter.
Recordings Library will then be displayed.
IMPORTANT: To view recordings library, you should first
connecta USBdisk to yourTVwhile the TV is switched off.
You shouldthen switch ontheTV to enablerecording feature.
Otherwise, recording feature will not be available.
Select a recorded item from the list (if previously
recorded)byusing “ ”or“ ” button.PressOK button
to view Play Options. Select an option by using “ ”/“
” or OK buttons.
Available playback options:
• Play from start: Plays the recording from the
beginning.
• Resume: Recommences the recordings.
• Play from offset: Specifies a playing point.
Note:Viewingmainmenuand menu itemswillnotbeavailable
during the playback.
Press (STOP) button to stop a playback and return
to return to Recordings Library.
Slow Forward
If you press (PAUSE) button while watching
recorded programmes, slow forward feature will be
available. You can use button to slow forward.
Pressing button consecutively will change slow
forwarding speed.
Electronic Programme Guide (EPG)
• Some, but not all, channels send information about
the current and next events. Press EPG button to
view the EPG menu. EPG appears on the screen. It
is able to get Information of the channel - programs
weekly by means of 7-DAY-EPG. All programs of
channelsaredisplayed. Onthebottom ofthescreen;
info bar, showing all the available commands, will
be displayed.
RED button (Shrink): makes the info boxes smaller.
GREEN button (Expand): makes the info boxes larger.
YELLOWbutton(Prev.Day):displaystheprogrammes
of previous day.
BLUE button (Next day): displays the programmes of
the next day.
INFO (Details): displays the programmes in detail.
Numeric buttons (Jump): go to preferred channel
directly via numeric buttons.
OK : view for current broadcast/reminders for future
programs.
SWAP/ : jumps to the current broadcast.
•Press“0”button on the remote controltoviewGuide
Searchmenu.Using thisfeature,youcan searchthe
programme guide database in accordance with the
genre selected or with name match.
(Record): the TV will record the selected progamme.
IMPORTANT: To record a programme, you should first
connecta USBdisk to yourTVwhile the TV is switched off.
You shouldthen switch ontheTV to enablerecording feature.
Otherwise, recording feature will not be available.
Note: Switching to a different broadcast or source is not
available during the recording.
: Page left / Page right.

English - 15 -
Programme Options
In EPG menu, press the OK button to enter the
“Programme Options” menu.
Select Channel
In EPG menu, using this option, you can switch to the
selected channel.
Record / Delete Record Timer
IMPORTANT: To record a programme, you should first
connecta USBdisk to yourTVwhile the TV is switched off.
You shouldthen switch ontheTV to enablerecording feature.
Otherwise, recording feature will not be available.
After you have selected a programme in EPG menu,
press the OK button and and Options screen will be
displayed. Select “Record” option and press the OK
button.After this operation, a recording becomes set
to the selected programme.
To cancel an already set recording, highlight that
programme and press the OK button and select the
option “Delete Rec. Timer”. The recording will be
cancelled.
Note:Youcannot switch toany otherchannelor sourcewhile
there is an active recording on the current channel.
Set Timer / Delete Timer
After you have selected a programme in EPG menu,
press the OK button and and Options screen will be
displayed. Select “Set Timer” option and press OK
button. You can set a timer for future programmes.
To cancel an already set reminder, highlight that
programme and press the OK button. Then select
“Delete Timer” option. The timer will be cancelled.
Note: It is not possible to record or set timer for two or more
individual events at the same time interval.
Displaying Subtitles
With digital terrestrial broadcasting (DVB-T), some
programmes are being broadcasted with subtitles.
Press the “MENU” button to display the main menu,
highlight the Setup and then Language menu using “
”or“ ” button andpresstheOK button to displaythe
“Language settings” menu.
Highlight the “Subtitle” item in “Language settings”
menu and use ” or “ button to set Subtitle to the
desired language.
If“Subtitle” ison and alanguage option isset, pressing
the “ ” button causes the following warning message
display on the screen (** for UK only):
Digital Teletext (** for UK only)
• Press the “ ” button.
• The digital teletext information appears.
• Operate it with the coloured buttons, cursor buttons
and OK button.
The operation method may differ depending on the
contents of the digital teletext.
Follow the instructions displayed on digital teletext screen.
• When Press “SELECT” button or similar message
appears on the screen, press the OK button.
• When the “ ” button is pressed, the TV returns to
television broadcasting.
• With digital terrestrial broadcasting (DVB-T), in
additiontodigital teletext broadcasting togetherwith
the normal broadcasting, there are also channels
with just digital teletext broadcasting.
•Theaspectratio(pictureshape)whenwatchingachannel
with just digital teletext broadcasting is the same as the
aspect ratio of the picture viewed previously.
• When you press the “ ” button again, the digital
teletext screen will be displayed.
Analogue Teletext
Use of teletext and its functions are identical to
the analogue text system. Please do refer to the
“TELETEXT” explanations.
Widescreen
Depending on the type of the broadcast being
transmitted, programmes can be viewed in a number
of formats. Press the “SCREEN”button repeatedly to
change screen format.
WhenAuto is selected, the format being displayed is
determined by the picture being broadcasted.
PLEASE NOTE: Menu size changes depending on the
chosen image size.
Notice !
AC3 audio type is not supported. In this case, Tv
sound will be muted. If the broadcast includes AC3
stream, the following warning message will be
displayed on the screen:
If there is no audio available, the following warning
message will be displayed on the screen:.

English - 16 -
IDTV Menu System
Press the “MENU” button. Main menu will be
displayed.
Channel List
Usingthe“ ”or“ ”buttonontheremotecontrol,make
sure that the first item, Channel List, is highlighted and
pressthe“OK”buttontodisplaytheChannelList.Oryou
presstheOKbuttonwhilstwatchingDVB-Tbroadcasting
and get to the Channel List directly.
Navigating the Entire Channel List
Press “ ” or “ ” button to select the previous or next
channel. You can press “RED” or “GREEN” button to
move page up or page down.
To watchaspecificchannel,highlight it using “ ”or “
” button and then press “OK” button, while the “Select”
item on Channel List menu is highlighted by using “
” or “ ” button.
Then thename and numberof the selectedchannel will
be displayed in the top-left and top-right of the channel
display at the top-right of the screen, respectively.
Moving the channels in the channel list
• Press “ ” or “ ” buttons to select the channel that
will be moved.
• Press “ ” or “ ” buttons to select the “Move” item on
Channel List menu.
Following OSD will be displayed next to “OK” item
to indicate that enter a number by using the numeric
buttons on the remote control and press “OK” to
confirm.
Note:Ifyou enter thesameprogrammenumber of thechannel
that you want to move, “.... channel services will be replaced.
Do you want to continue?” OSD will be displayed. Press OK
to confirm or select “No” to cancel.
Deleting the Channels in the Channel List
• Press “ ” or “ ” button to select the channel that
will be deleted.
• Press “ ” or “ ” button to select the “Delete’’ item
on Channel List menu.
• Press the “OK” button to delete the highlighted
channelinthe channel list.Then the messagebelow
appears on the screen:
• Press “ ” or “ ” button to highlight the desired
option. If “OK” button is pressed while “Yes” is
highlighted, the highlighted channel is deleted.
Selecting “No” cancels the deletion.
Renaming Channels
To rename a specific channel, the channel must
be highlighted by pressing “ ” or “ ” button. Then
highlight the Edit Name item by pressing “ ” or “ ”
button as illustrated below. Press the “OK” button to
activate the rename feature.

English - 17 -
Nowpressing“ ” or“ ”button moves totheprevious/
next character. Pressing “ ” or “ ” button toggles
the current character, i.e., ‘b’ character becomes ‘a’
by “ ” and ‘c’ by “ ”. Pressing the numeric buttons
‘0...9’ replaces the highlighted character with the
characters printed above the button one by one as
the button is pressed.
Press the “MENU” button to cancel the editing or OK
button to save the new name.
Adding Locks to Channels
Channel locking provides a password-protected
access to channels selected by parents. In order to
lock a channel you should know the parental lock
password (default value is set to 0000 in the factory
and can only be changed from the Configuration
menu).
Select the channel to be locked by highlighting it and
select the Lock option by pressing “ ” or “ ” button.
Whenthe“OK”buttonis pressed,adialog OSDasking
for the password will be displayed.
Enter the password by using the numeric buttons on
the remote control. The lock icon “ ” will now be
displayed next to the selected channel. Repeat the
same operation to cancel the lock.
Setting Favourites
To setafavourite you shouldhighlightthe “Favourites”
item at the bottom of the Channel List menu. Then
press “OK” button and Edit Favourite List menu
appears on the screen.
How to Add a Channel to a Favourites List
•Bypressing “ ” or“ ”buttons, highlight thechannel
that you want to add to the favourite list.
• By pressing “OK” button, the highlighted channel is
added to the Favourite List.
•Ficonindicates that achannelisadded to Favourite
List.
Removing a Channel from Favourite List
• Highlight the channel that you want to remove from
thefavouritelist and press OKbuttonto remove.You
can press “OK” button again to re-add a channel.
•ToactivateFavourites, go totheConfigurationmenu
and select Favourite mode. Use “ ” / “ ” to set
Favourite mode as on. To cancel Favourites, set
Favourite Mode to Off.
On Screen Help
For all menus, press the INFO button to display the
help information about the menu functions.
Programme Guide
This section is same with the instructions given in
the General Operations page. Please see Electronic
Programme Guide (EPG) section in the General
Operations part.
Recording Timers
IMPORTANT:Toviewrecordingtimersorrecordprogrammes,
you should first connect a USB disk to your TV while the TV
is switched off. You should then switch on the TV to enable
recording feature. Otherwise, recording feature will not be
available.
You can set or display programmed recording timers
(for recording on a USB disk) by using Recording
Timers menu.
Press the MENU button to display the main menu
and use the “ ” or “ ” button to highlight the
“Recording Timers” line and press the OK button.
All available recording timers will be displayed. You
can add, remove or display previously set timers via
this screen:

English - 18 -
The green line at the bottom of the screen displays
available disk space. Red line indicates used disk
space.
Note: It is not possible to record or set timer for two individual
events at the same time interval.
Adding a Recording Timer
Press YELLOW button on the remote control to add
a recording timer to this list. The following screen
appears to add a timer:
Mode: Selects recording timer mode.
Channel: Selects a channel.
Record Type: Defines recording type.
Date: Starting date is entered via the Left/Right and
the numeric buttons.
Start: Starting time is entered via the Left/Right and
the numeric buttons.
End: Ending time is entered via the Left/Right and
the numeric buttons.
Duration: Displays recording duration.
Repeat: You can set a timer to be repeated as Once,
Daily or Weekly.
Playback: This setting defines playback control.
It can be set as Allowed, Disallowed or as “ Use
Parental Settings”: You might be asked to enter your
PIN code.
Change/Delete:permitsorprohibitsanymodifications
for other users. You might be asked to enter your PIN
code.
After setting options you prefer, you should press
GREEN button to save a recording timer. Press RED
button to cancel.
Editing a Recording Timer
Select a timer in the Recording Timers menu by
pressing “ ” or “ ” button. Press GREEN button
on the remote control and Modify Timer OSD will be
displayed on the screen.
You can press RED button to delete this recording
when the disk is full.
Youcan setdesiredpreferences andwhencompleted,
you can press GREEN button to save your settings.
Deleting a Recording Timer
Select a timer in the Recording Timers menu by
pressing “ ” or “ ” button. Press RED button on the
remotecontroltodelete.Aconfirmationscreenwillbe
displayed: “Delete this timer?”.
Select YES to delete the timer or select NO to
cancel.
Timers
To display timers window, activate the item from the
mainmenu.To add atimer,presstheYELLOW button
on the remote control. Then “Add Timer” window
appears.
Mode: Selects channel list mode.
Channel: “ ” or “ ” keys will navigate the user
through the TV or Radio list.
Date: Starting date is entered via the Left/Right and
the numeric buttons.
Start: Starting time is entered via the Left/Right and
the numeric buttons.
End: Ending time is entered via the Left/Right and
the numeric buttons.
Duration: Duration between Start and End time.
Repeat: You can set a timer to be repeated as Once,
Daily or Weekly.
Change/Delete:permitsor prohibitsanymodifications
for other users.
Youcan savetheadjustments bypressingthe GREEN
keyorcancel theprocessby pressing theRED button.
You can edit the list via GREEN key and delete with
the RED button.

English - 19 -
Recordings Library
IMPORTANT: To view recordings library, you should first
connecta USBdisk to yourTVwhile the TV is switched off.
You shouldthen switch ontheTV to enablerecording feature.
Otherwise, recording feature will not be available.
To view the list of recordings, press the Mbutton to
display the main menu and use the “ ” or “ ” button
tohighlightthe “Recordings Library”lineand press the
OK button. Recordings Library will then be displayed
with available recordings.
All the recordings are kept in a list in the recordings
library.
Red bar: Indicates the used space of the recordings
on the hard disk.
Green bar: Shows the free space on the USB disk.
RED button (Delete) :Erases the selected
recording.
GREEN button(Edit):Makes changes ontheselected
recording.
BLUE button (Sort): Changes the order of the
recordings. You can select from a wide range of
sorting options.
OK button: Activates play options menu:
• Play from start: Plays the recording from the
beginning.
• Resume: Recommences the recordings.
• Play from offset: Specifies a playing point.
Note:Viewingmainmenu and menuitemswillnotve available
during the playback.
INFO (Details): Displays the short extended
programmes in detail.
(Resume): Recommences the recordings.
Conditional Access
•Pressthe“MENU”buttontodisplaythe mainmenuand
use the “ ” or “ ” button to highlight the “Conditional
Access” line and press the “OK” button:
Some Digital Terrestrial channels operate on a Pay
Per View basis. These require a subscription and a
hardware decoder.
Obtain the Conditional Access Module (CAM) and the
viewing card by subscribing to a pay channel company,
then insert those to the TV using the following procedure.
• Switch off the TV and unplug from the mains.
• The CAM should be correctly inserted, it is impossible
to insert fully if reversed. The CAM or theTV terminal
may be damaged if the CAM is forcefully inserted.
•ConnecttheTVtothemainssupply,switchonandthen
wait for few moments until the card is activated.
• Some CAMs may require the following set up. Please
set the CAM by entering the IDTV menu, Conditional
Access then pressing the “OK” button. (CAM set up
menu is not displayed when it is not required.)
• To see the viewing contract information: enter IDTV;
press the “MENU” button, then highlight Conditional
Access and press the “OK” button.
• When no module is inserted, “No Conditional Access
module detected” message appears on the screen.
• Refer to the module instruction manual for details of
the settings.
Note: Insert or remove the CI module only when the TV is in
STANDBY mode or disconnected from the mains.
TV Setup
You can use this item to display the TV functions.
The digital TV Setup menu screen is accessed from
the main menu. Press the “MENU” button to display
the main menu and use “ ” or “ ” button to highlight
“TV Setup”, press the “OK” button to display TV Setup
menu screen.
You can find detailed information for all menu items in
“Analogue TV Menu System” section.
Setup
The adjustments in this menu are given as the following:
Recordings
SelectRecordingsitem intheSetup menutoconfigure
recording settings. The following menu is displayed
for recording configuration.
Table of contents
Other Linsar TV manuals