Lionstracs GROOVE X series User manual

Page:
GROOVE
LIONSTRACS
OS 5.1
GETTING STARTED GUIDE
GROOVE
Thank you for purchasing the LIONSTRACS GROOVE X-serie. What you have in your hands is a powerfull multimedia Workstation; this “ get-
ting starter” guide will help you understand the BASIC concepts needed to work with your instruments with the all new 4.0 features inclu-
ded in the new OS.
X-6 X-7

Page: 2
GROOVE
LIONSTRACS
OS 5.1
Welcome
Thank you for purchasing the GROOVE X-Serie with OS 5.1.
Welcome, Thank you for purchasing the GROOVE X-serie.Before you start plugging in all the connectors and using your GROOVE, we suggest
that you carefully read through the instructions on the following pages.
GROOVE FEATURES:
New Linux Kubuntu 9.10 distribution, 32-64Bit Realtime OS. KDE 4 windows Enviroment
11 custom designed LIONSTRACS system boards for audio, MIDI, graphics processing, keys, and LED functions
liquid TFT 8.4” touch screen display, 800 x 600 pixel resolution, 24 Bit color, powered by PCIexpress VGA card, Open GL support.
Pitch and Modulation wheels for the Keyboard (Joystick on X-76 Oriental version)..
Digital Mixer with XLR master outputs, XLR monitor/cue outputs, 8 digital inputs, 8 digital outputs, 120 dB dynamic range
Dual hardware/software transports for MIDI, audio, style players, crossfade, Realtime Time Stretch/Pitch functionality
CD, DVD, DVIX, MP3, MP4 Player, CD, DVD recording
Local area network (LAN), (6) USB Ports, Mouse port,Esata port for fast data transfer, PC keyboard port.
Internet browser, email, and utilities
Linux VST compatibility applications, including always the last new Wine windows emulator, Multiple ASIO driver and Windows VstHost.
You are assured the best in 24-bit audio quality with all models of the GROOVE.
HW DSP GM/GS CORE SYSTEM: Covers all GM/GS setups, Styles, MIDI files, WAV, MP3, MP4, DVD, DVIX, AVI, and CD audio files.
HW AMD CPU CORE SYSTEM: Covers all WAV, MP3, MP4, DVD, DVIX, AVI, and CD audio files.
LINUX SAMPLER: Allows loading of standard GIGA STUDIO LIBRARY files in .GIG format without memory sample limitations.
LINUX VstHost: Allows user to open standard Windows VST Plug-ins within the Linux OS.
MULTIPLE ASIO HOST: Allows user to open multiple ASIO Host servers in realtime.
LINUX SYNTHESISER: One of the best Linux ADD/SUB/PAD Synthesizers, allows up to 127 oscillators per voice and up to 128 voices for
the whole synthesizer.
LIONSTRACS MIDI ROUTER: Allows routing of all music applications and functions in the hardware Sliders/Silicon Buttons without use
of the Touch Screen or PC Mouse. (2) MIDI Inputs and (2) MIDI outputs hardware are standard.
With the purchase of the GROOVE X-6 all software updates are available for download free from the LIONSTRACS website so your wor-
kstation will always be ready for the future!
With the new LIONSTRACS Digital Hardware mixer under control of the ENVY24, 24 BIT Audio system, the audio outputs have more than
120 dB dynamic range with a 10 Hz to 21 kHz audio bandwidth. High quality audio like this has never been heard before in any worksta-
tion until now, with the GROOVE system. Audio can be routed via 8 digital audio inputs, 8 digital audio outputs, 2 XLR Main outputs, 2
XLR Cue outputs, 2 1/4" jack MIX outputs, and a 1/4" stereo headphone output. Two optional XLR microphone and 1/4" audio inputs are
available.
WE SUGGEST YOU TO BROWSER THE ALL GIGA SOUNDS INSTALLED MANUALLY AND INSERT THE GIGA FILE DESIDERED
UNDER THE GIGA EDIT MODE ( GIGA SOLO).
Page: 3
GROOVE
LIONSTRACS
OS 5.1
Setting Up
Unpacking and Powering up your GROOVE.
The first time you open the box, you should ensure that all the parts are enclosed. Ensure that all components are included and that none of
them were damaged during the shipping, like the LCD display, keyboards, DVD disk, sliders or button keys. Select a flat table-top to unpack
your MEDIASTATION that is near a stable power supply.
Check that the voltage of your GROOVE is switched to the correct setting for your local power supply. The paper label, which should be cove-
ring the Power plug connector, will display the factory setting.
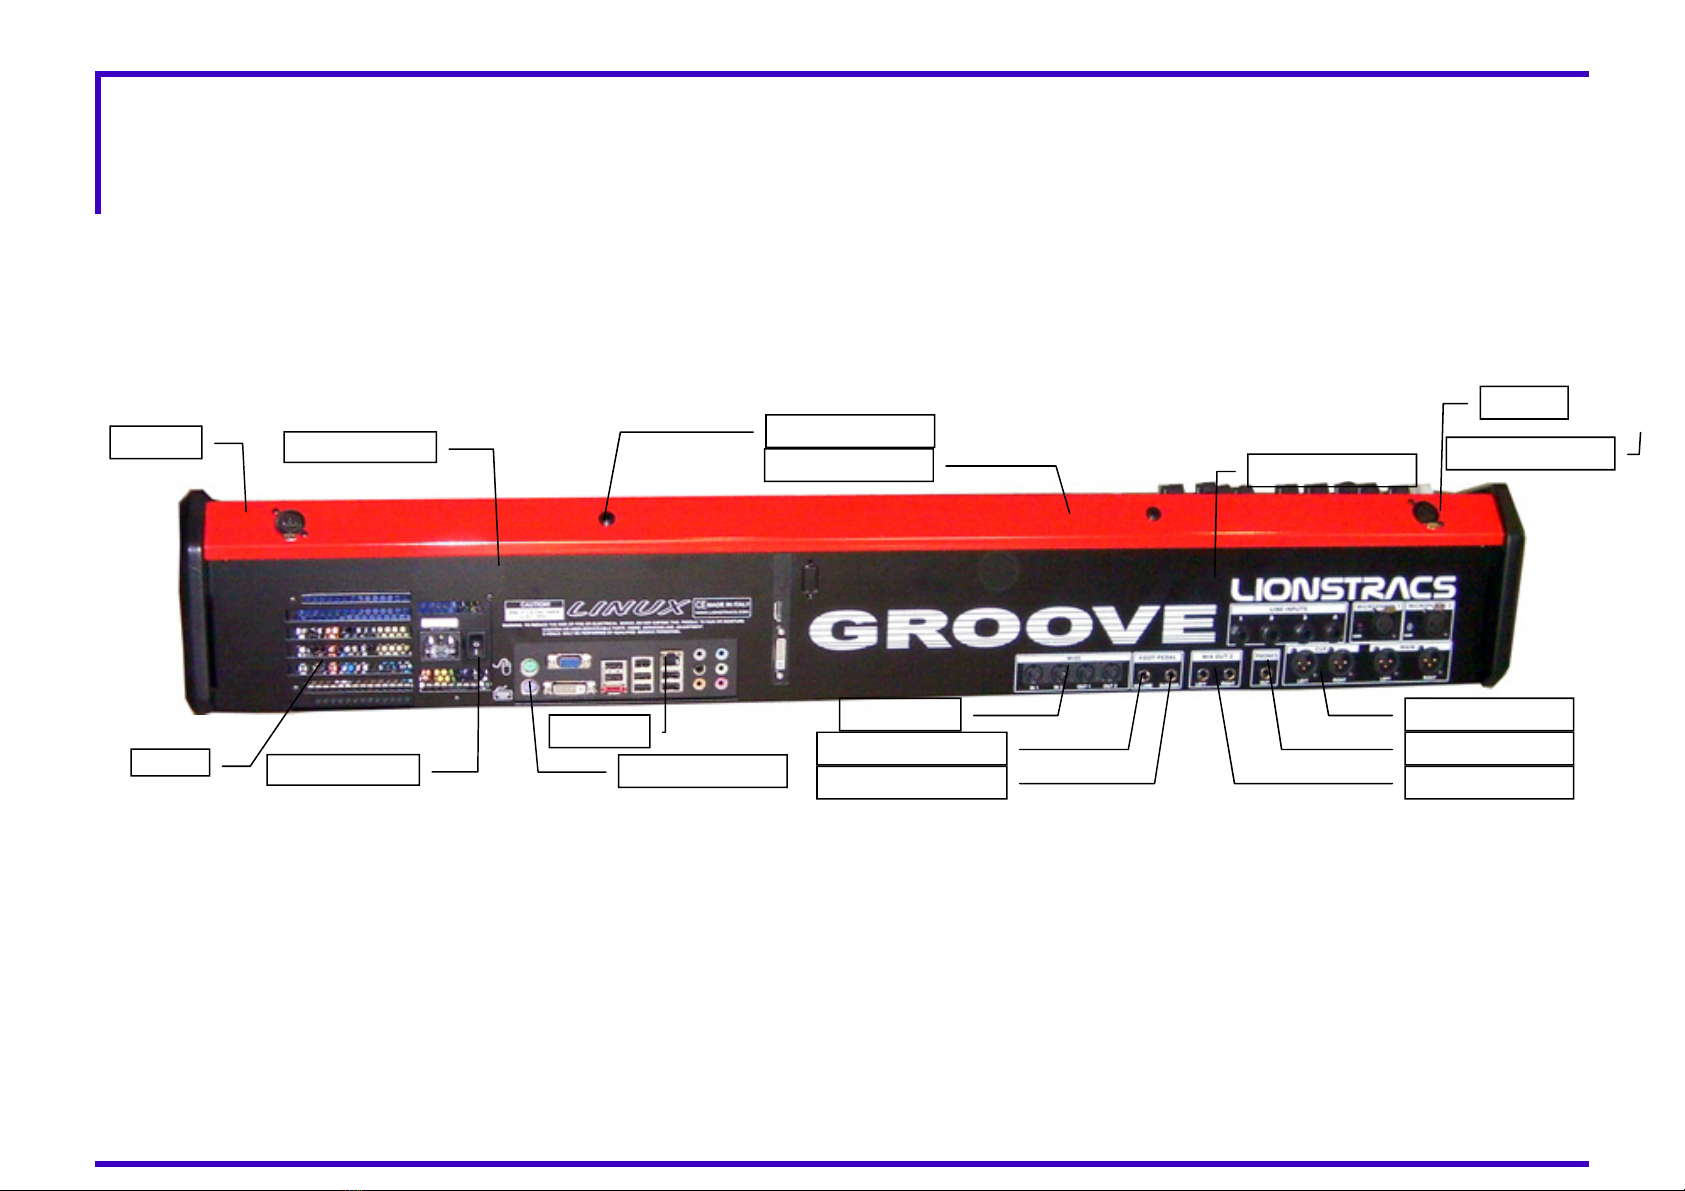
Rear Panel
Connecting the Cables
The GROOVE contains all the common interfaces you would expect to find on a computer workstation and professional Mixer.
On the back panel you will find: Main Power supply socket, power supply sockets for an external monitor, PS2 Mouse, PS2 Keyboard, 2 USB 2.0
ports, Ethernet port (10/100/1000), 2 MIDI IN ports, 2 MIDI OUT ports, Sustain Pedal (Mono Jack), Volume keyboard pedal (stereo jack), a
pair of Mono Jack MIX OUT 2 (L+R), a pair of balanced XLR Male CUE/Monitor, and a pair of balanced XLR Male MAIN OUT sockets.
With the Optional MICROPHONE interface: 2 balanced XLR Female Inputs with trimmer and 4 LINE Inputs.
Connect the supplied power cord to the AC inlets marked "Main Inputs", then plug the other end of the cord into a wall outlet. Connect the two
XLR plugs named " MAIN OUT" to your external equipment (amplifier, P.A. System or Mixer). You will need appropriate cables for your device,
having XLR female plugs on the end that connect to the GROOVE e.g. a standard XLR (male/female) cable can be used for connecting to ampli-
fied speakers with XLR Inputs. There are also Jack outputs for maximum flexibility. The software will route all the sound-outs to the MAIN OUT
XLR connectors! If you want to use the MIX OUT 2 JACK connector, you will have to route the JACK CONTROL SOFTWARE to the desired ou-
tputs.
Lamps
Lamps
Pow. AC IN
Pow. AC IN
Fan PS/2 Mouse/Keyb
USB/LAN MIDI I/O
MIC Interface
CUE/Monitor OUT
MAIN Xrl OUT
Keyb. Volume Pedal Phones Jack OUT
MIX OUT 2 OUTSustain pedal
Music Stand
Music Stand
Page: 4
GROOVE
LIONSTRACS
OS 5.1
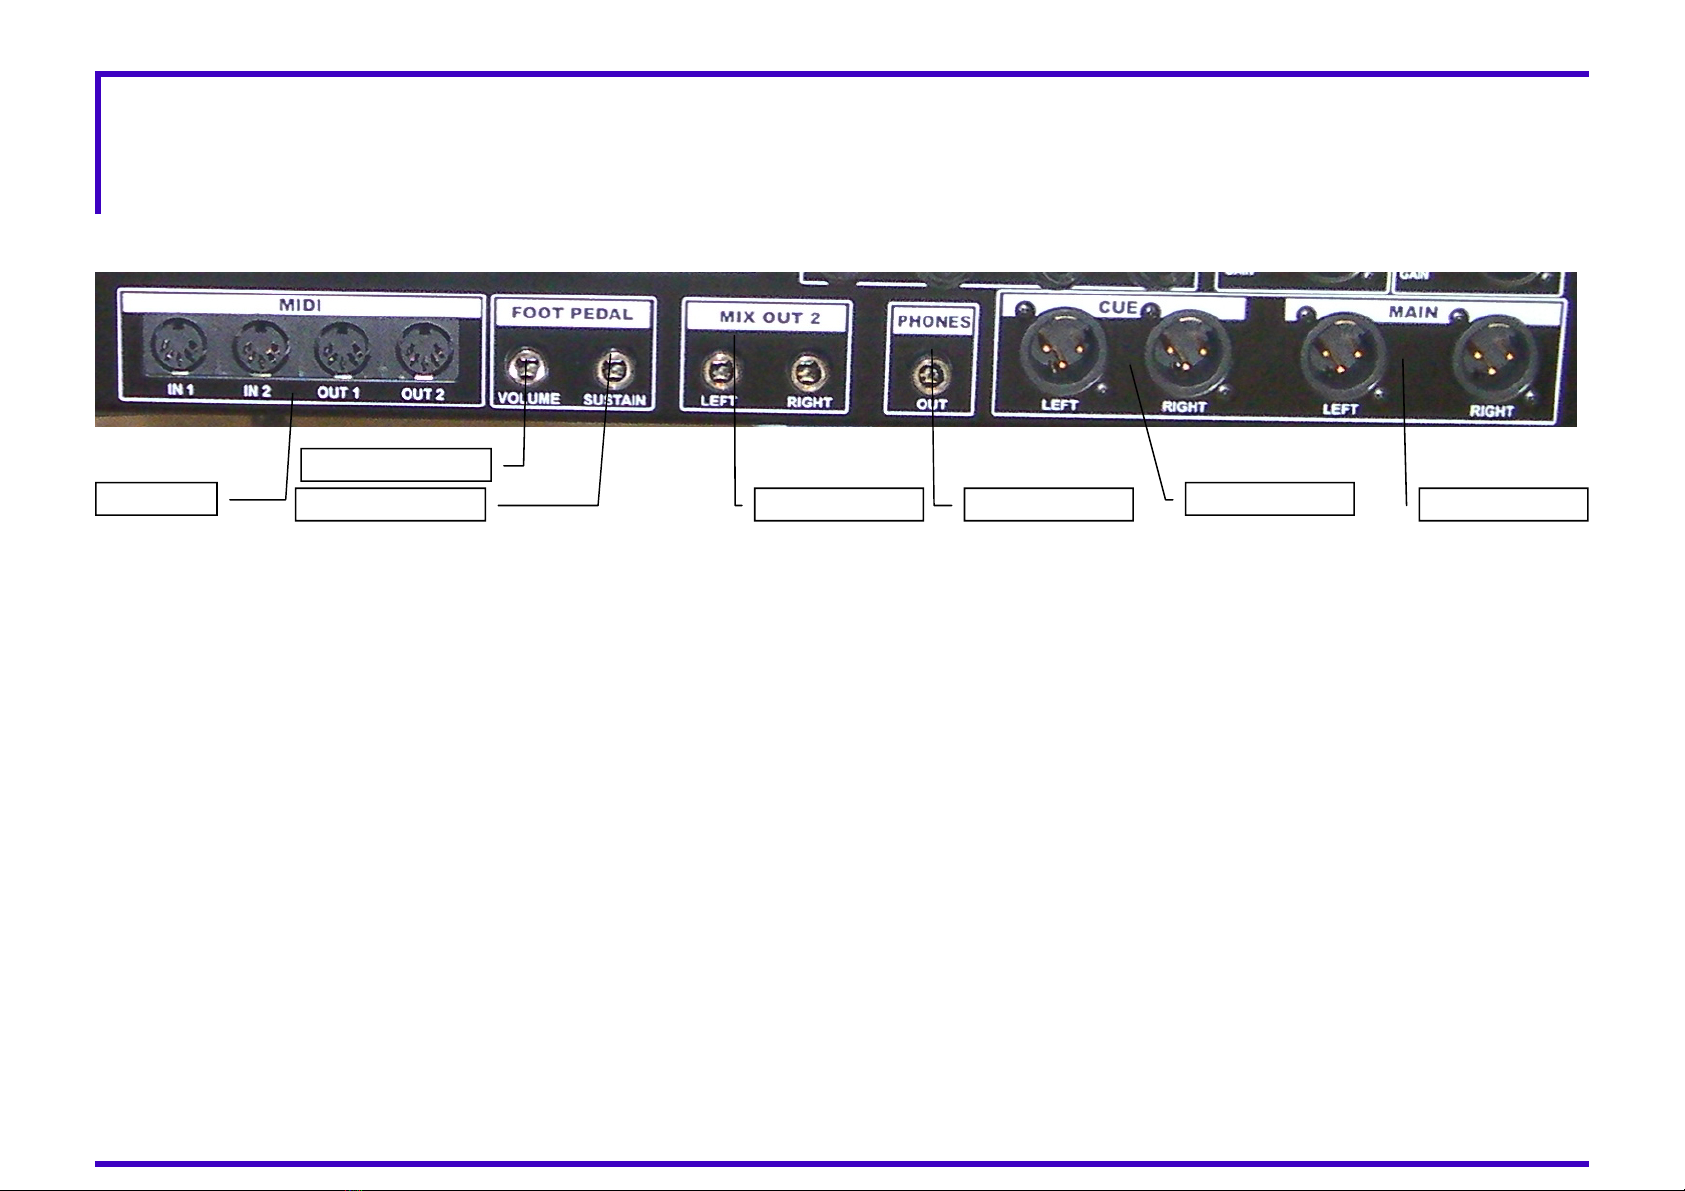
Connect the GROOVE I/O
In this section is explained how to connect the all Audio-Midi connection to the external devices, like P.A. system, mixer and Midi sound modu-
les.
Rear Panel
Connecting the Cables
MAIN XRL OUTS:Connect the two XLR plugs named " MAIN OUT" to your external equipment (amplifier, P.A. System or Mixer). You will need
appropriate cables for your device, having XLR female plugs on the end that connect to the GROOVE e.g. a standard XLR (male/female) cable can
be used for connecting to amplified speakers with XLR Inputs.
CUE XRL OUTS:Connect the two XLR plugs named " CUE OUT" to your external equipment (amplifier, P.A. System for your own live audio Cue).
The CUE outputs under Jack are setup to duplicate your STEREO MAIN out, controller by the CUE slider on panel.
PHONES: connect your stereo phones for listen the MAIN OUT audio OR the CUE audio Players ( DJ previste feature)
MIX OUT 2:Connect the two Jack plugs named " MIX OUT 2" to your external equipment (amplifier, P.A. System ) for two more separate outputs.
Under Jack connection kit is possible routing the all desidered sounds engines to the separate outputs.
FOOT PEDAL: The foor pedal will control only the Keyboard midi data inputs to the selected sounds engines. Sustain pedal will control the Su-
stain Midi CC control and the Volume will control the CC7 Midi volume control.
GROOVE X-6 EXPANDER MIDI CONNECTION:
The GROOVE Expander can be remote controlled by one external standard MIDI Masterkeyboard or any MIDI Keyboard.
The whole GROOVE system work by default on MIDI CH 1, same way as the Groove keyboards, the Fatar keyboard can trasmit MIDI data only on
MIDI CH 1.
When you will use one external MIDI master keyboard for drive the GROOVE Expander, you MUST to setup your external MIDI keyboard that
transmit the MIDI data on Channel 1.
Connect your midi master keyboard on the GROOVE MIDI IN 2 port, for manage in real time the all GROOVE features on the same way as the
GROOVE keyboards.
Connect one second MIDI master keyboard with MIDI CH 1, on the GROOVE MIDI IN 1 for play the SECOND Manual of the Native Instruments B4
II ASIO. Is also possible send any MIDI CC controller message and the selected Sounds Engines will reconize the all new MIDI CC controllers.
MIDI I/O CUE/Monitor OUT MAIN Xrl OUT
Keyb. Volume Pedal
Phones Jack OUTMIX OUT 2 OUTSustain pedal
Page: 5
GROOVE
LIONSTRACS
OS 5.1
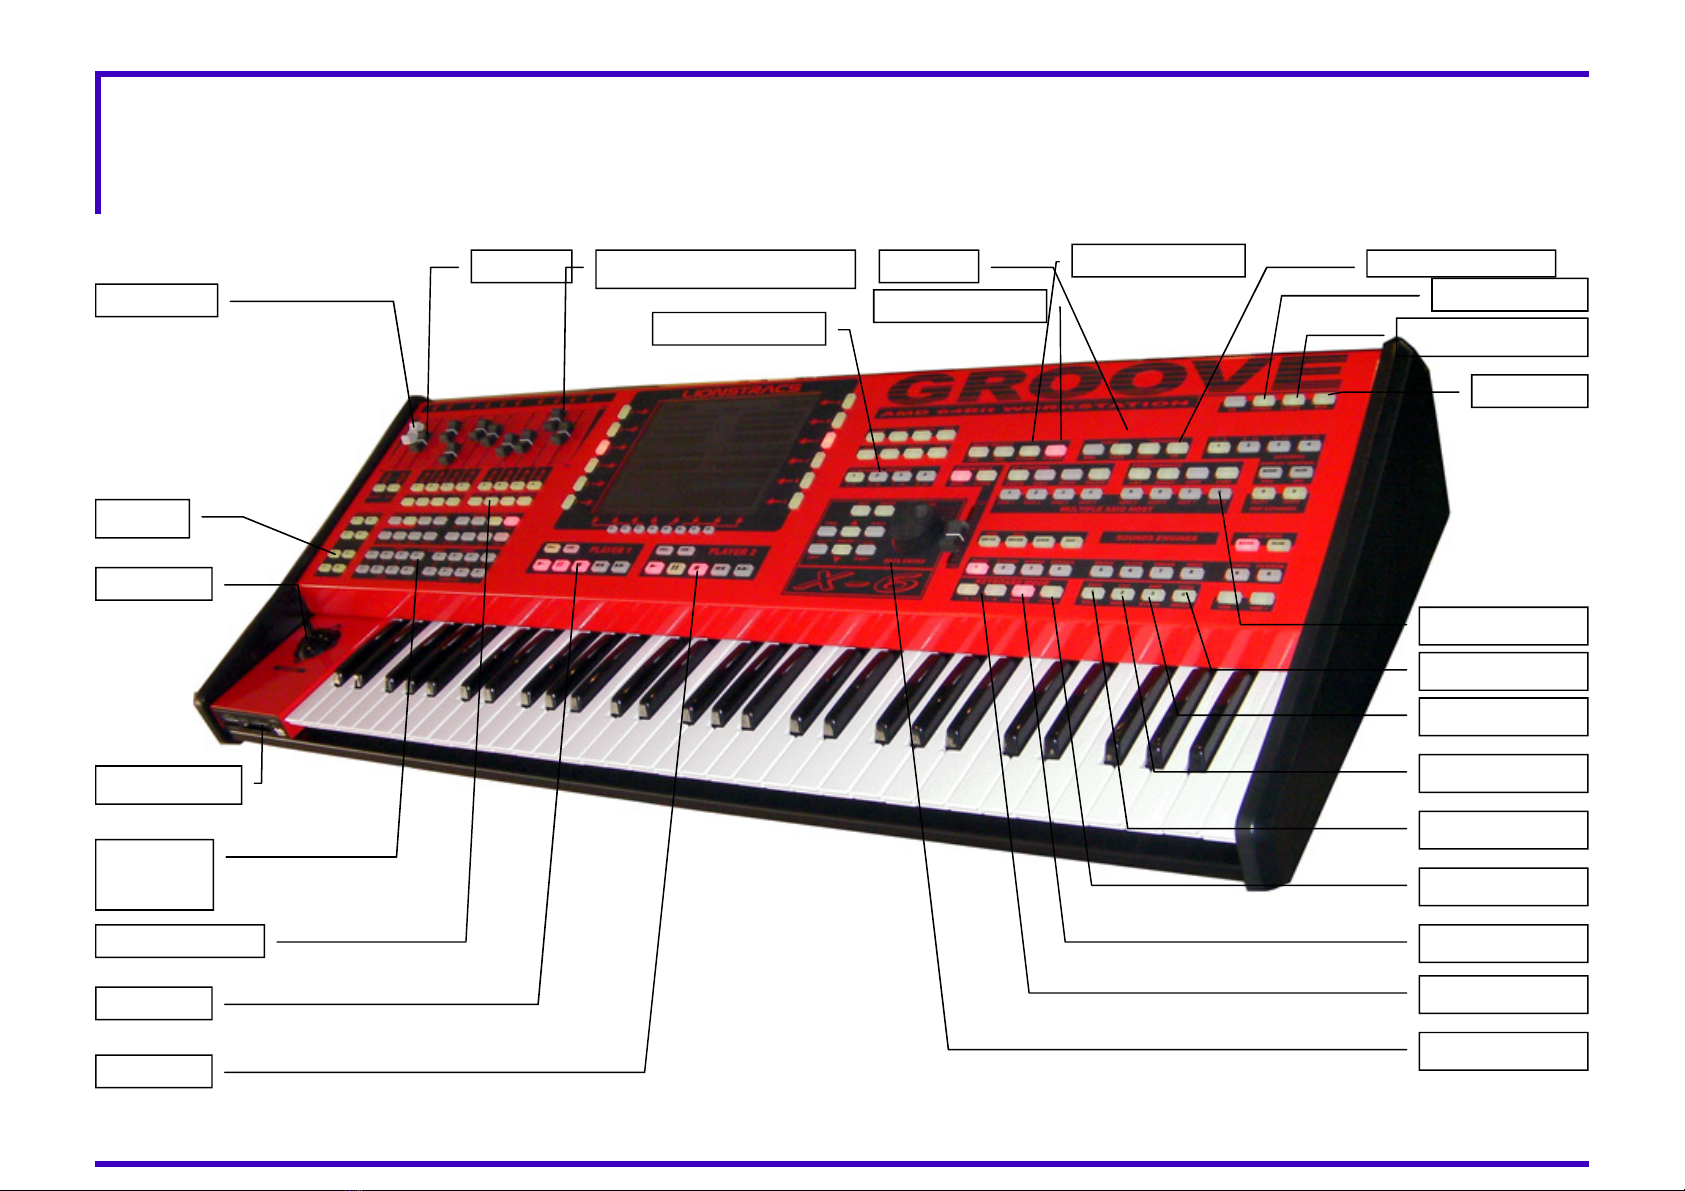
Front Panel
CUE Vol
MAIN Vol
Joystick
Sider Control C1-C8
Lamps Dimmer
RUN CPU
Power OFF
CARD Reader
Player 1
Qranger
section
Pads
Player Mode
Qstyle Mode Player Transpose
BPM
LCD Function
Mute Tracks
Player 2
The GROOVE is the first keyboard worldwide to use Silicon transparent buttons, It features 176 double-color buttons (RED & GREEN), 11
hardware sliders, 1 dial wheel, 2 keyboard control wheels (Pitch & Modulation), music stand support and XLR lamps with dimmer function. HD
Stata HD and 8.4" TFT touch display 800x600, with 64k colors and multimedia Card reader.
8 ASIO Host
GIGA GM
AMD Synth
VST Host
GIGA SOLO
WHOLE mode
COMBI Mode
Keyb Transp.
Data mode
Page: 6
GROOVE
LIONSTRACS
OS 5.1
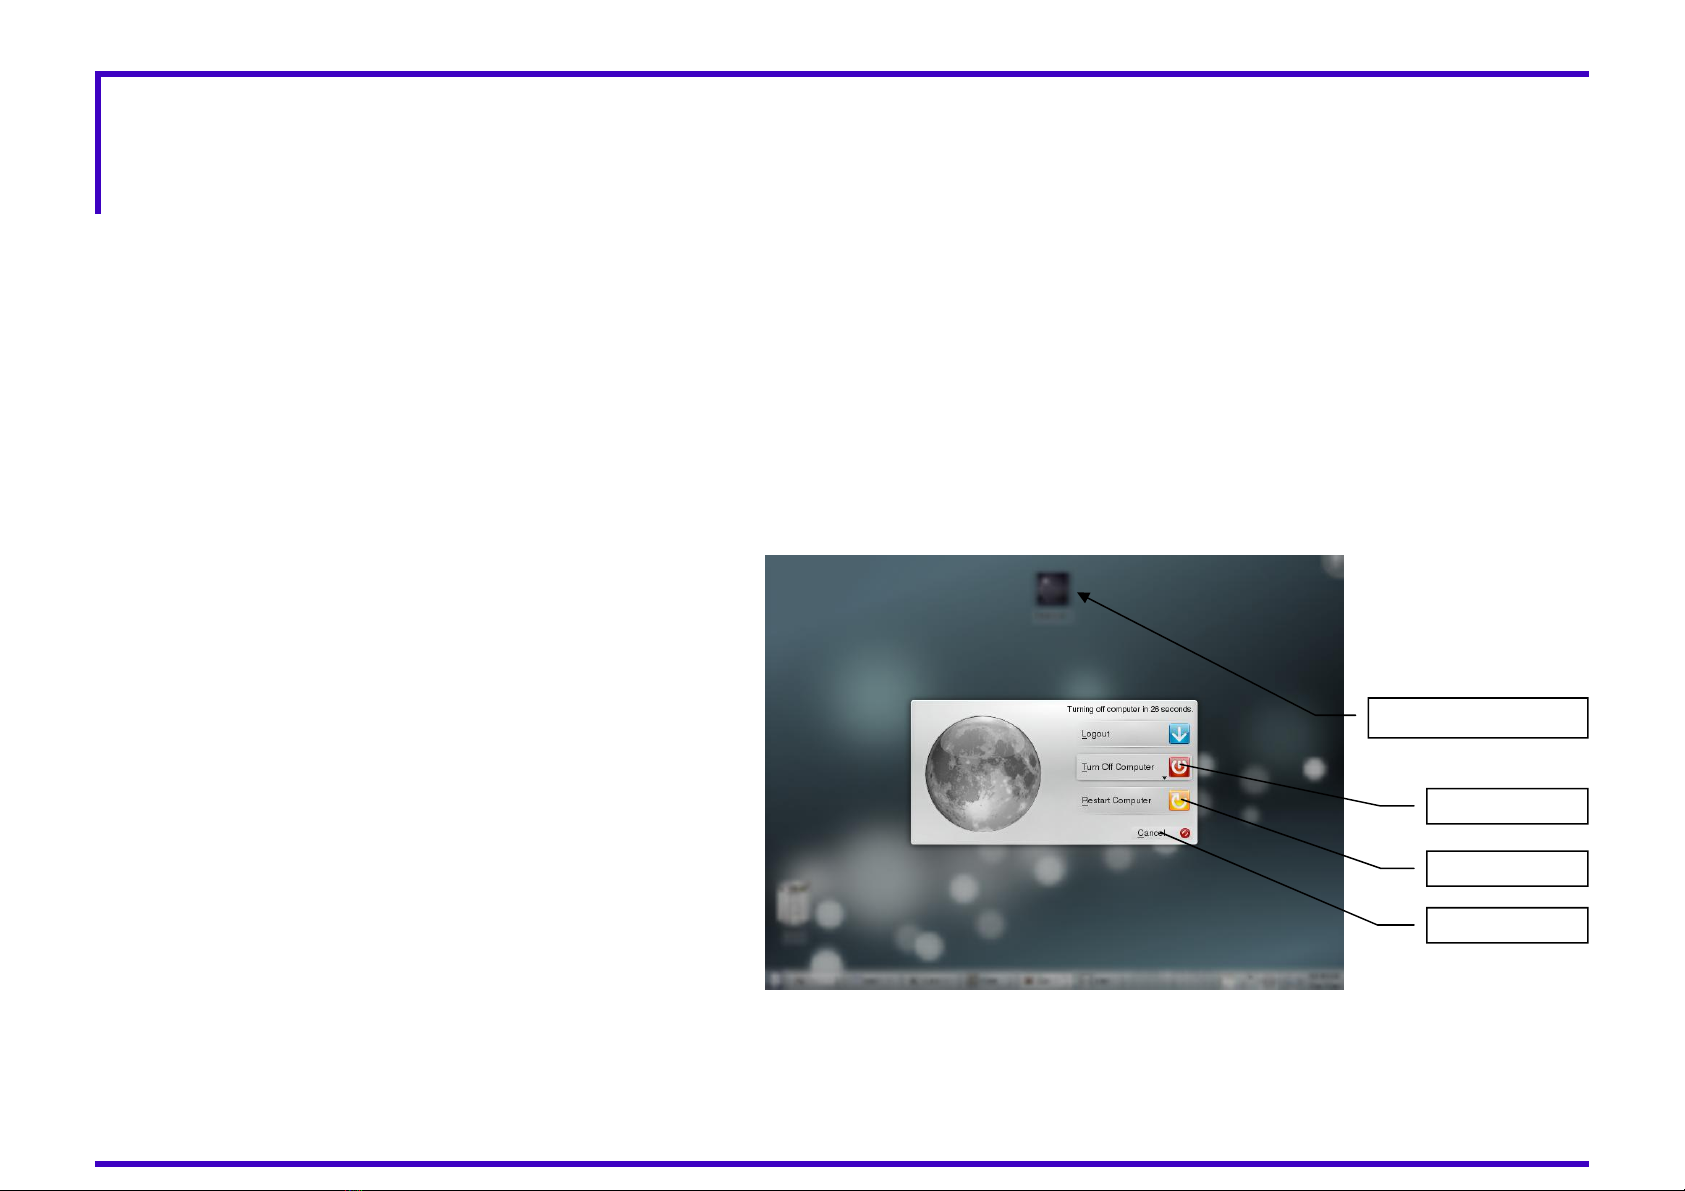
Once the cables are connected, you can switch ON your GROOVE by pressing the key marked "RUN", which is located on the top right-hand
side of the right-hand front panel. To switch OFF the GROOVE, you have two possibilities: you can log out of the system properly or you can
reset the device with a "kill system" command. This can be useful when you're in a hurry and you have to quickly shut down the workstation.
Logging Out
Press the key marked "RUN", which should be the second key in the top right-hand group. You'll see a pop up window on the screen from
which you can select these options:
Reboot the OS linux system
Completely turn off the GROOVE: select this option and wait until the GROVE shut down procedure is completed and the power supply is
disconnected. This is the preferred way of powering off the GROVE .
Cancel and exit the dialog window and return back in the working GROVE OS.
Kill System
Kill System The "kill system" command is activated by pressing and holding the "RUN" key for 4 seconds. This procedure will immediately
switch off the power from the GROVE CPU. This is not the recommended way to close your session, but the Linux operating system can safely
handle this kind of "hard" power off command without problems.
.
Switching ON and OFF the GROOVE
Turn OFF PC
Cancel
RESTART PLAYER-RESET
The RESTART PLAYER is used for reload the whole OS Pla-
yer application, Musltiple ASIO host and so on.
The Restart player is also linked on the GROOVE RESET
Key.
Mode 1: When the RESET key is pressed, will automatically
send the GS sysex ALL midi note OFF, rest CC controller.
Mode 2: When the RESET key is pressed and HOLD for mo-
re 4 seconds, will automatically RESTART the complete
GROOVE application on default setup.
If some mistake in realtime are made and the GROOVE ap-
plication NOT respond correct, just press and HOLD for 4
second the RESET key OR double click on the desktop the
Restart Player icon.
RESTART-PLAYER
Reboot PC
After the Linux operating system has loaded or rebooted, you will see the KDE desktop. Normally the GROOVE Player will start automatically,IF
not, touch the RESTART Player Icon on the desktop and the player will restart again in default mode.
Page: 7
GROOVE
LIONSTRACS
OS 5.1
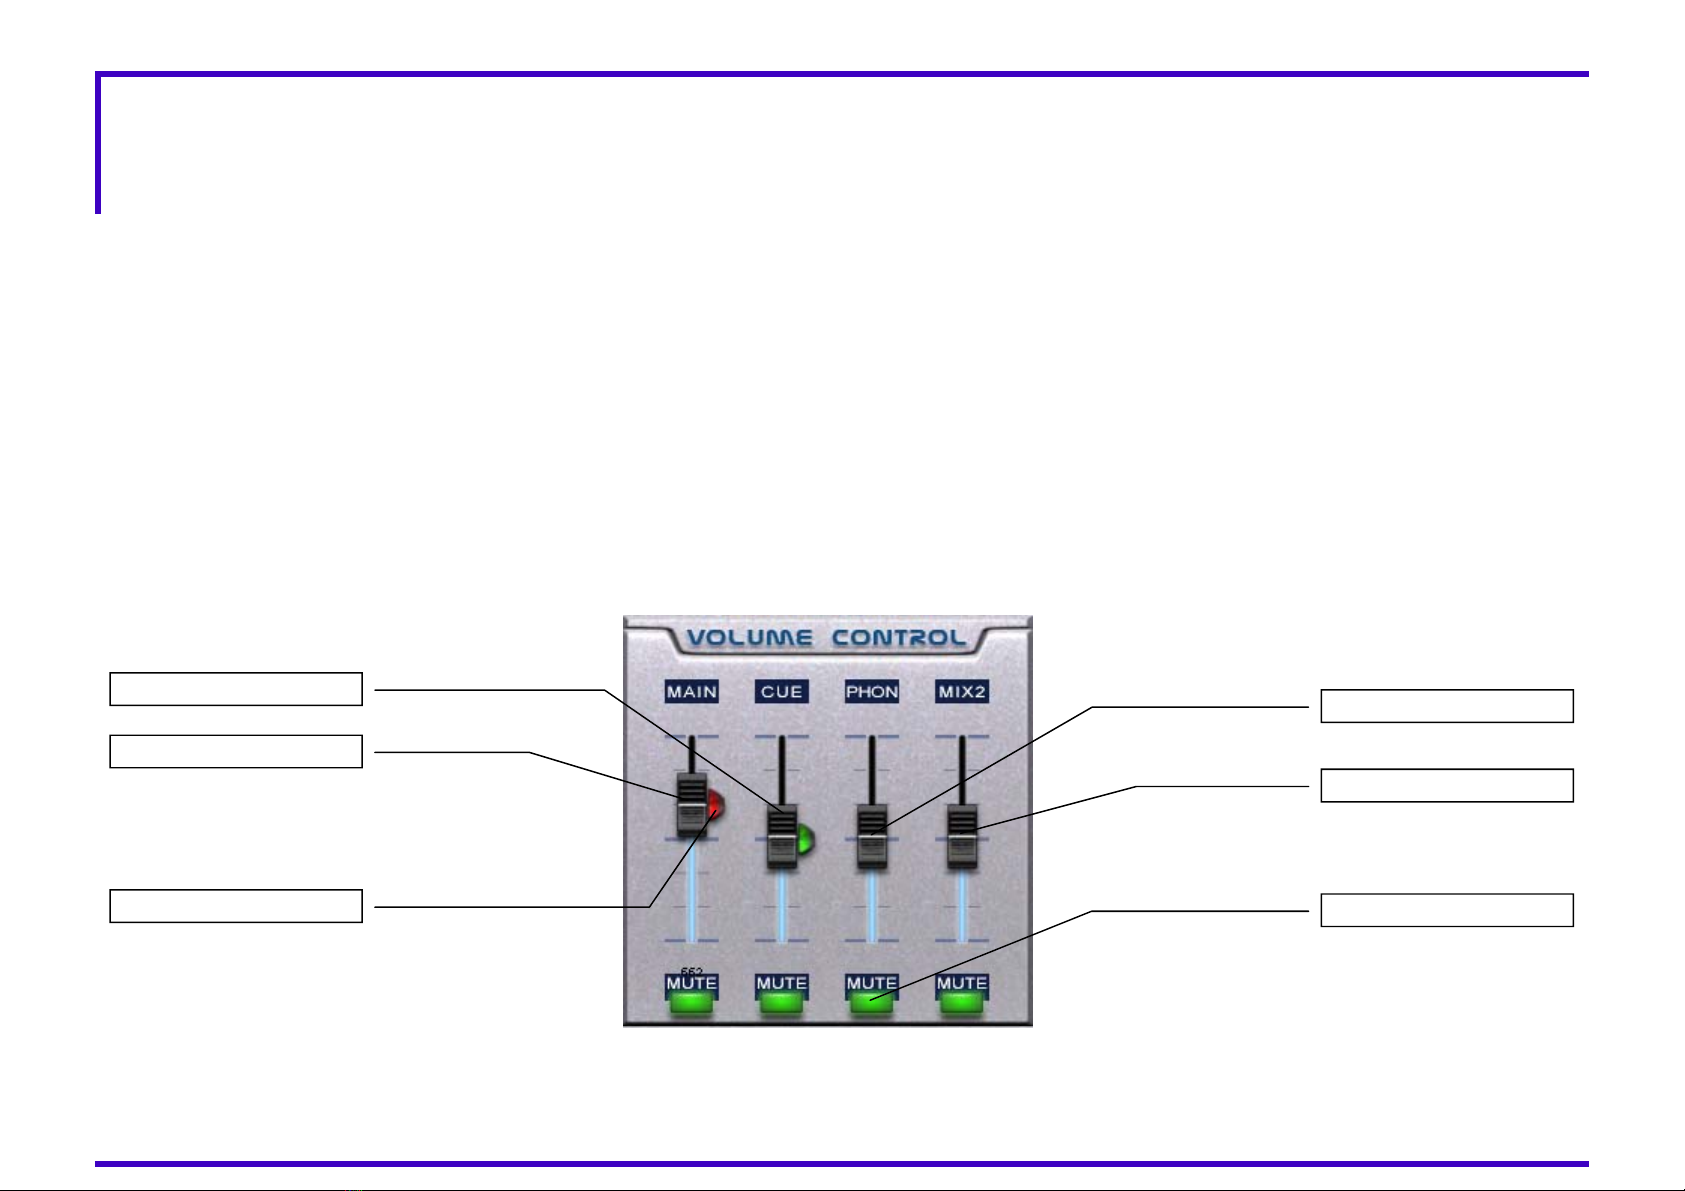
Main Volume Controls
The GROOVE uses digital audio volume controls, which means that the sliders only control the volume in a digital way, directly in software (as
opposed to analog, like other instruments). All audio are routed fully digitally, using 24bits, 116dB dynamic range and 10-20kHz bandwidth.
MAIN OUT: Stereo volume is controlled by the first GREY slider on the left-hand side, marked "MAIN MIX" and the relative outputs are the two
male XLR MAIN OUT L+R sockets on the back panel. All the default software is routed automatically by the Jack Connection OS to these two
XLR outs. Move the GREY slider and the Volume window will pop up. You can then see the virtual slider moving up and down following your
movements. The red light which appears under the virtual slider indicates that the hardware slider is locked on to the virtual controller.
CUE/MONITOR OUT: these two XLR connectors are used to prelisten/CUE or monitor your audio output using another power amplifier. The
CUE audio is controlled by the second slider from the left, which is BLACK and marked "CUE". It is possible to MUTE/UNMUTE the output with
the "CUE" key directly beneath it.
Phones OUT: the stereo PHONES OUT jack is controlled by the first GREY slider. Press and HOLD the "PHONES" key and move the GREY Main
slider to control the volume of the phones. You should see a green light move to the virtual channel you want to control, move the slider until it
locks on, as indicated by the light turning red, then it will be possible to alter the volume of the headphones. When you play WAV/MP3 files, the
Player "CUE" key will route the audio to the phones. Open Jack control to connect more audio devices to the phones or to the Monitor/CUE
channel.
MIX OUT 2 OUT: these two monophonic jack outputs (left & right) can be used to freely connect to another output device of your choice.
press and HOLD the key MIX 2 and then move the second black CUE slider, it will control the volume of the MIX OUT 2.
LAMPS: Towards the top rear, you will find the two female XLR connectors on the extreme right and left-hand sides of the GROOVE. These
connectors are used to control and turn ON/OFF the external LAMPS. Press the "LAMPS" key and move the "CUE" slider to dimm the lamps
Main Volume
CUE/Monitor Volume
Hardware ghost slider
Phones Volume
Mix OUT 2 Volume
4 MUTE OUT keys
Page: 8
GROOVE
LIONSTRACS
OS 5.1
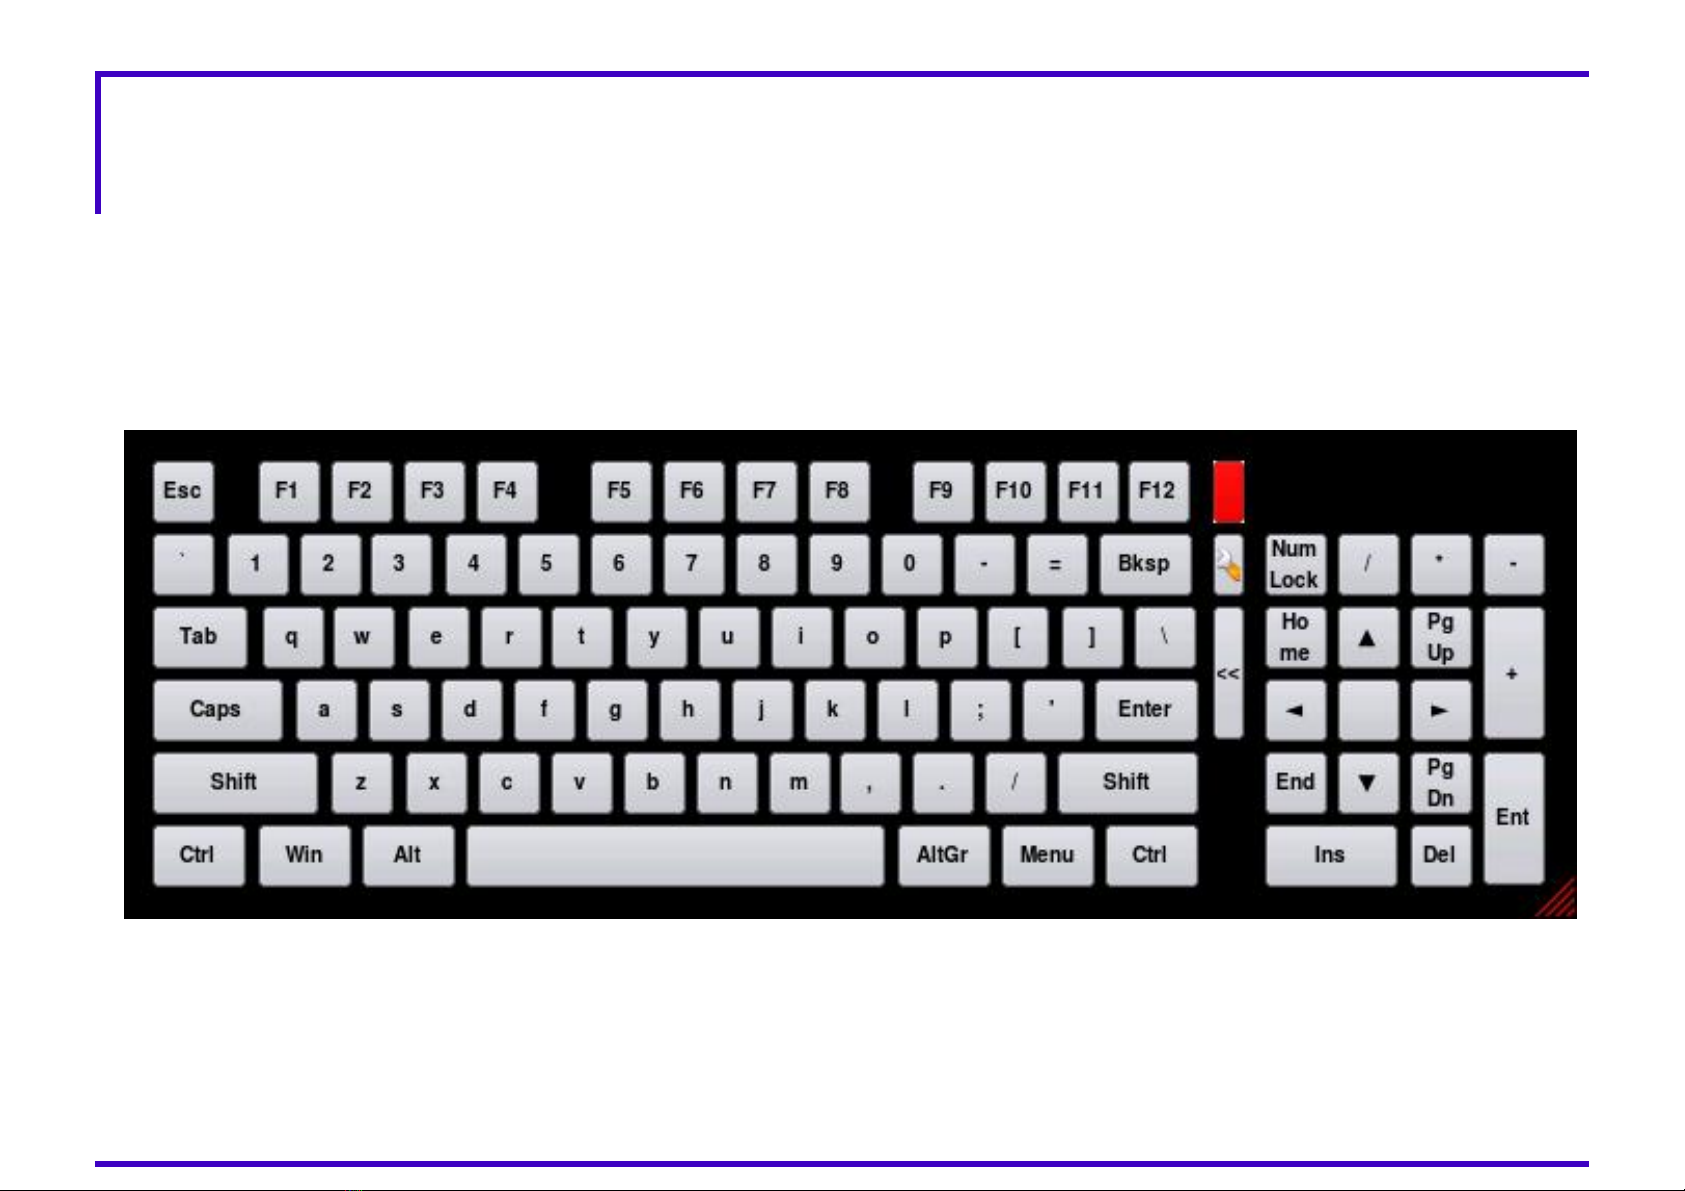
PC Virtual Qwerty Keyboard
PC Virtual Keyboard
Press the key “ V.KEYB” to pop up the virtual PC keyboard. When the virtual keyboard is displayed, you can type text in by touching the scre-
en, like you would do on a standard PC Qwerty keyboard. You can use V.keyb when you need to enter text and do not have a physical keybo-
ard connected. First time prssed the key CALL, will display the virtual keyboard on Bottom display, press again CALL to turn off, press again
CALL will display now on TOP display and so on..

Page: 9
GROOVE
LIONSTRACS
OS 5.1
12 Virtual Desktops on KDE 4
The GROOVE uses a TFT Touch screen display with 800x600 pixels resolution. It is driven by the KDE 4.3
desktop environment which allows you to switch between up to 12 virtual desktops in real-time. Each desktop can be called up by pressing the
4 "LCD WINDOWS PAGE" buttons, located on the right-hand side of the screen directly above the "DATA ENTRY" panel. Each button controls 3
virtual desktops, accessible by pressing the same key multiple times.
In the same way, 12 virtual desktops can be run on the 3 external VGA monitor and DVI 1 and DVI/HDMI outputs, making a total of 48 virtual
desktops. If you need to add a new folder or file onto the desktop, touch and HOLD an empty place on it for 2 seconds; a menu will pop up let-
ting you perform this operation. If you have a mouse connected to your GROOVE, you can also use the right click button.
NOTE: for the multiple display need to be install the special addon OS-X multi display server installer Disk.
For Enalbe the External display, need installed the OS X multiple display installer disk available on web store.
For display the 12 Panoramic displays, just press the TAB. key on data entry zone.
KDE 4 MENU 12 Virtual desktop
Restart GROOVE OS
Same function by pressing
for 3 second the RESET
KEY
USB device
Jack Connection Kit
Network LAN
TAB displays
Page: 10
GROOVE
LIONSTRACS
OS 5.1
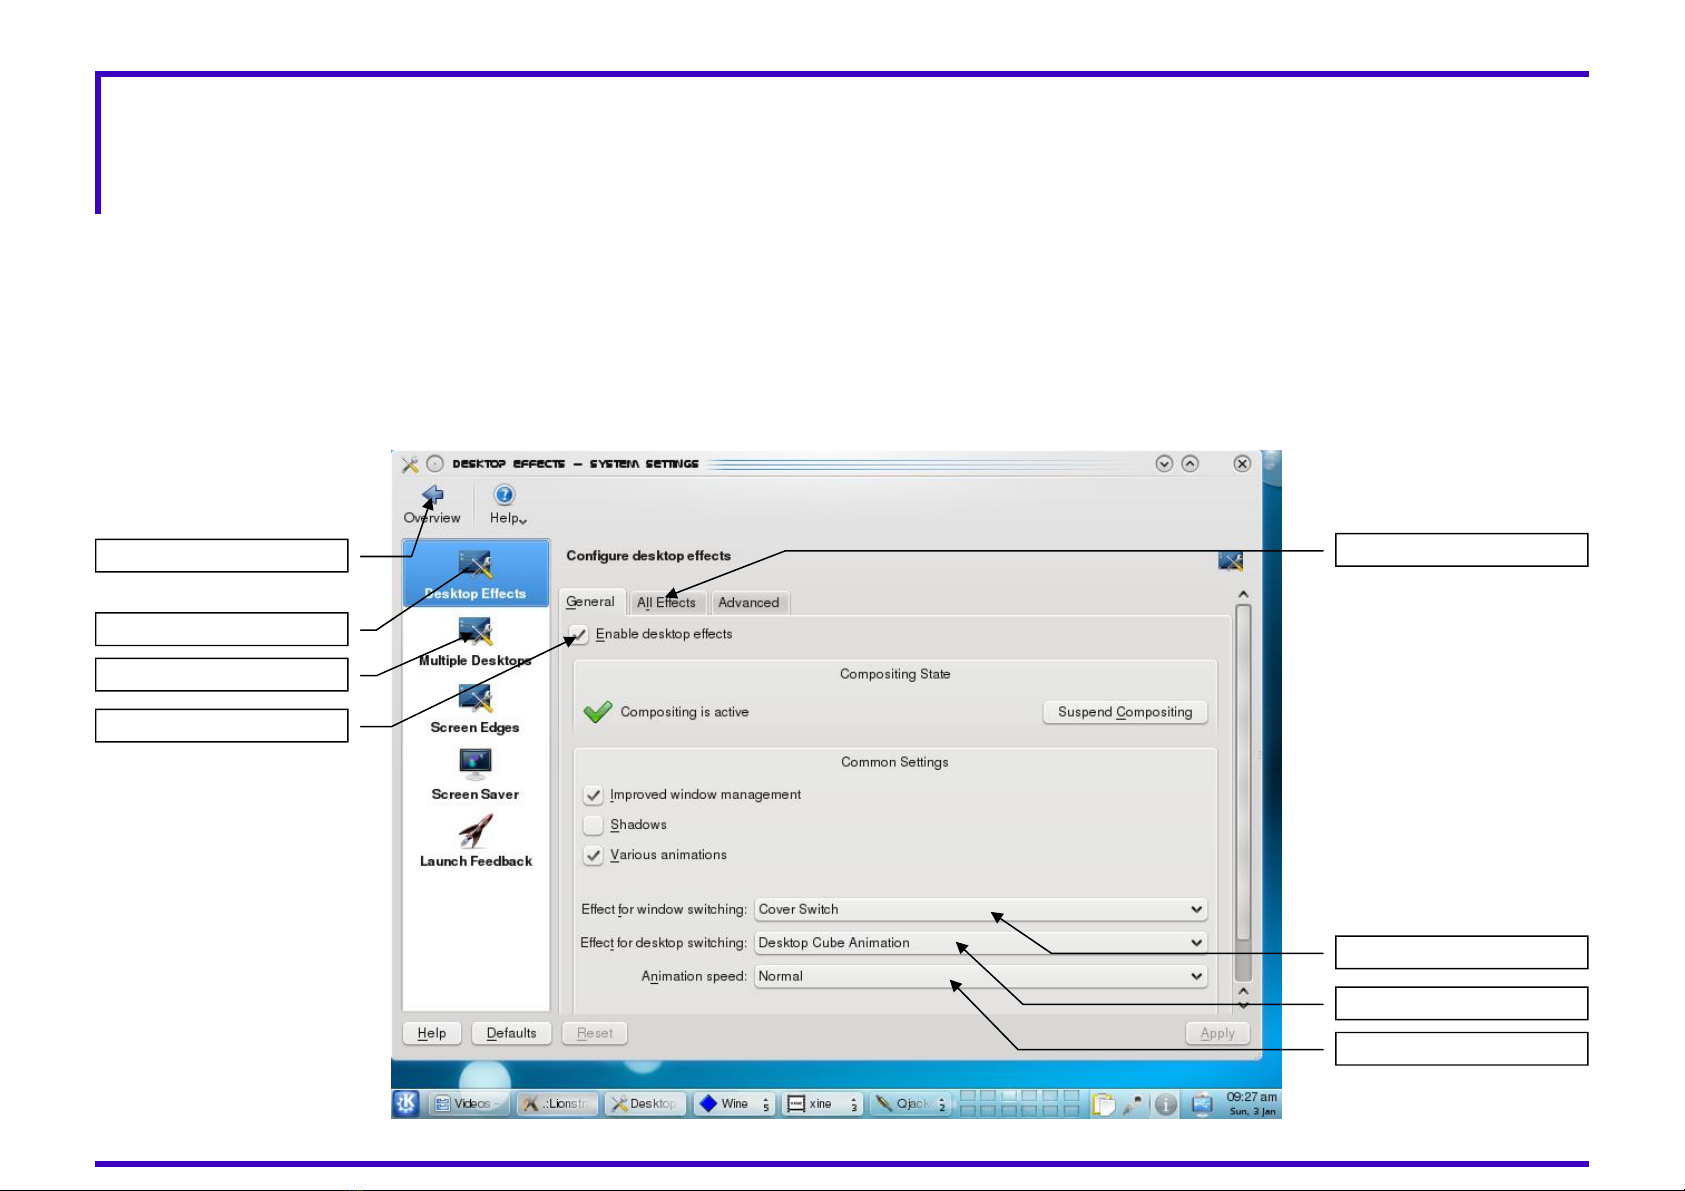
KDE 4, Configure desktops effects.
For configure the KDE desktops effects proceed on this way:
1) Touch the KDE menu luncher
2) Select the SYSTEM SETTING
3) Select now the DESKTOP icon
4) Wil display the Display setting like below image:
On Desktop Effect, general TAB: Under the Effect for the desktops switching you can select the follow available effects:
A) No Effects
B) Desktop Fade animation
C) Desktop Cube animation
D) Desktop Slide animation
When one new effect is selected, press the confirmation button: APPLY.
Now when you switch desktops you can see the new Effects animation.
Desktop Effects
Return to Main System More Effects
Multiple desktop setting
Enalbe Effects
Animation Speed
Switching Desk Effects
Switching windows effect

Page: 11
GROOVE
LIONSTRACS
OS 5.1
KDE 4, 12 Virtual Desktops Panorama
The GROOVE uses a TFT Touch screen display with 800x600 pixels resolution. It is driven by the KDE 4.3 desktop environment which allows
you to switch between up to 12 virtual desktops in real-time. Each desktop can be called up by pressing the 4 "LCD WINDOWS PAGE" buttons,
located on the right-hand side of the screen directly above the "DATA ENTRY" panel. Each button controls 3 virtual desktops, accessible by
pressing the same key multiple times.
In the same way, 12 virtual desktops can be run on the 3 external VGA monitor and DVI 1 and DVI/HDMI outputs, making a total of 48 virtual
desktops. If you need to add a new folder or file onto the desktop, touch and HOLD an empty place on it for 2 seconds; a menu will pop up let-
ting you perform this operation. If you have a mouse connected to your GROOVE, you can also use the right click button.
NOTE: for the multiple display need to be install the special addon OS-X multi display server installer Disk.
For display the Panoramic Desktop, press the TAB. button and the all 12 desktops will be displayed under Panorama mode.
Press again TAB for return back on the normal desktop size, OR just touch with the finger one desidered desktop for focusing.
Page: 12
GROOVE
LIONSTRACS
OS 5.1
SYSTEM SETTING

Page: 13
GROOVE
LIONSTRACS
OS 5.1
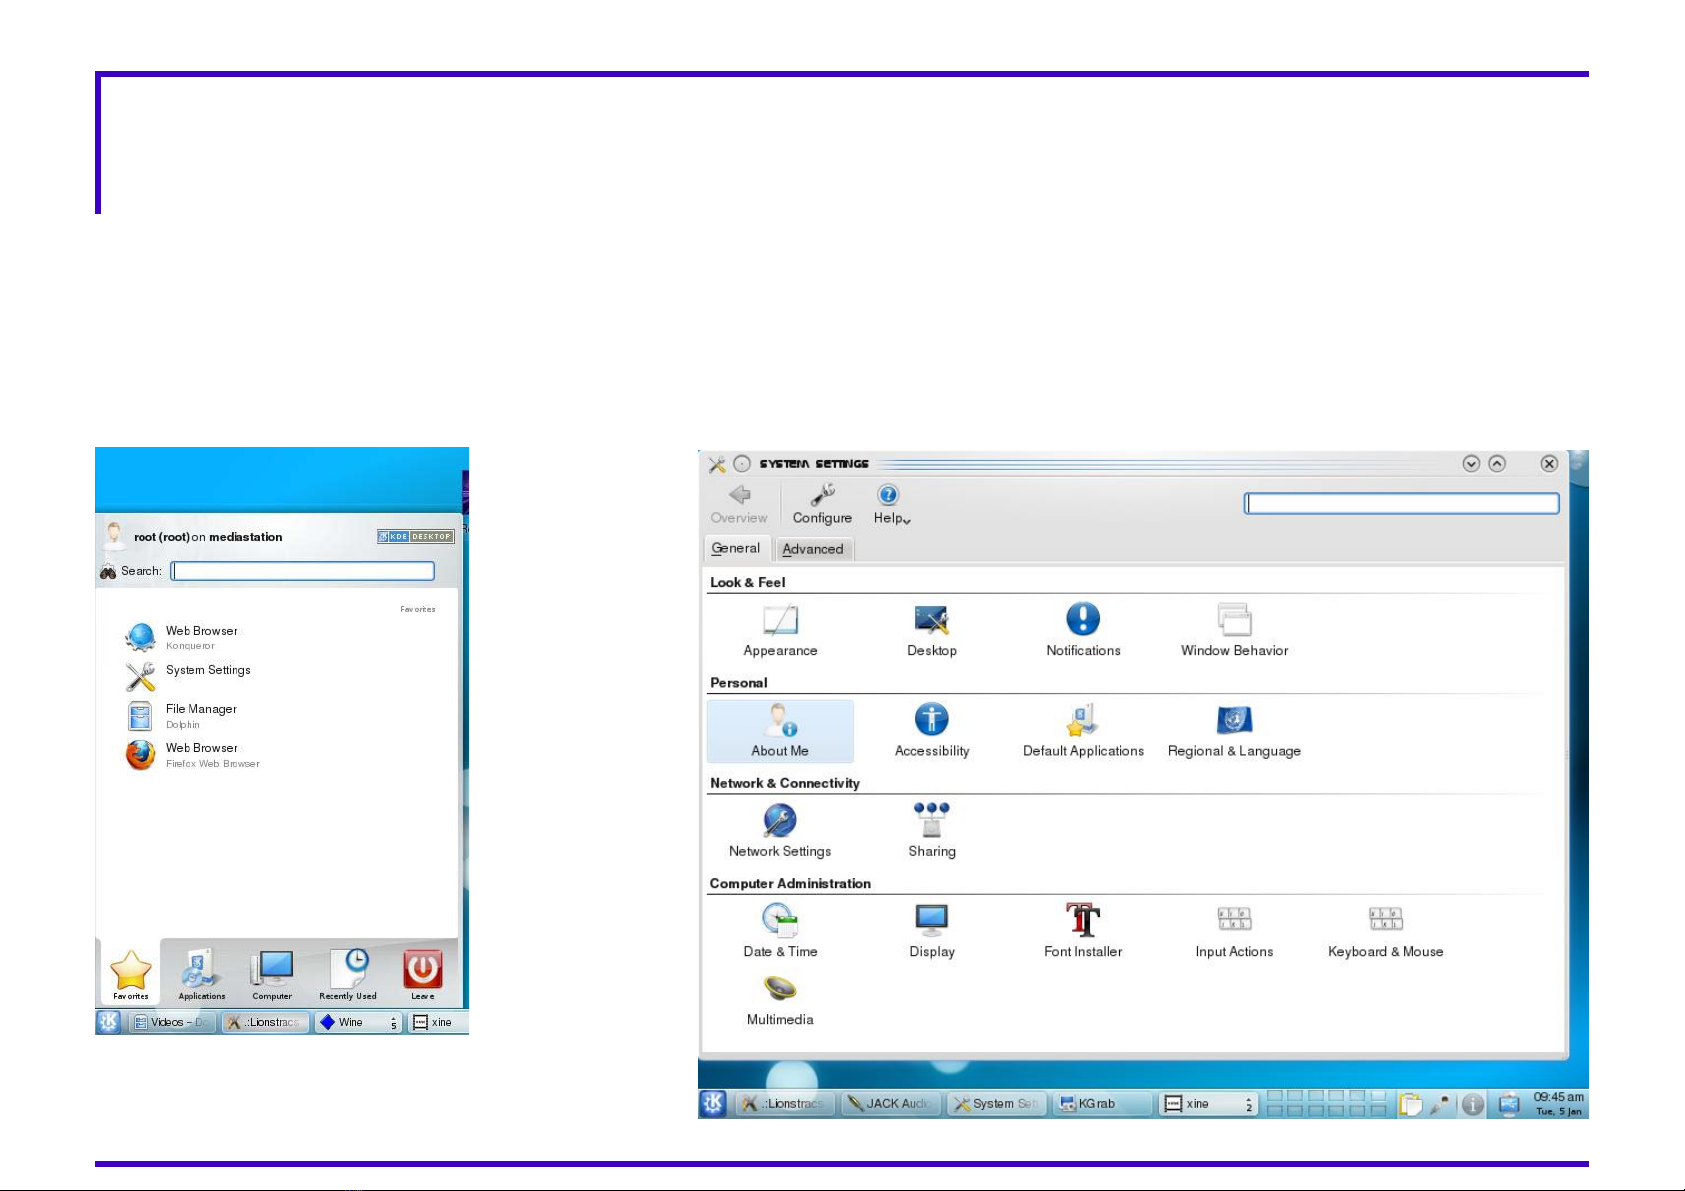
Setup your Country-Regional KDE Language
The new GROOVE OS also include the new worldwide regional Language package.
By pressing the GROOVE key HD ( you will find on TOP close the RUN key) will pop-up the KDE Control center interface.
With one finger select in the Touchscreen display the field: REGIONAL&ACCESSIBILITY function.
KDE Center will open the sub directory menu and you will find there the icon: Country/Regional & language function.
In the right field now you are able to select a new language setting:
Select first the desidered Country region and KDE will then open a new sub directory Regional country.
After one Regional Country is opened, you are able to select the desidered Country and Language.
Select the new Contry and language setting and press: APPLY.
The new System language now will update the whole KDE system and the all KDE menu, tools...will be displayed with your new language.
If you like return back to the default Language/country, just select again the DEFAULT regional mode.
The KDE Control center will update again the all system under the Default setting.
Regional Setting
Language Setting
Keyboard Layout Setting
Select your global country
Select your own country
DEFAULT Setting
Page: 14
GROOVE
LIONSTRACS
OS 5.1
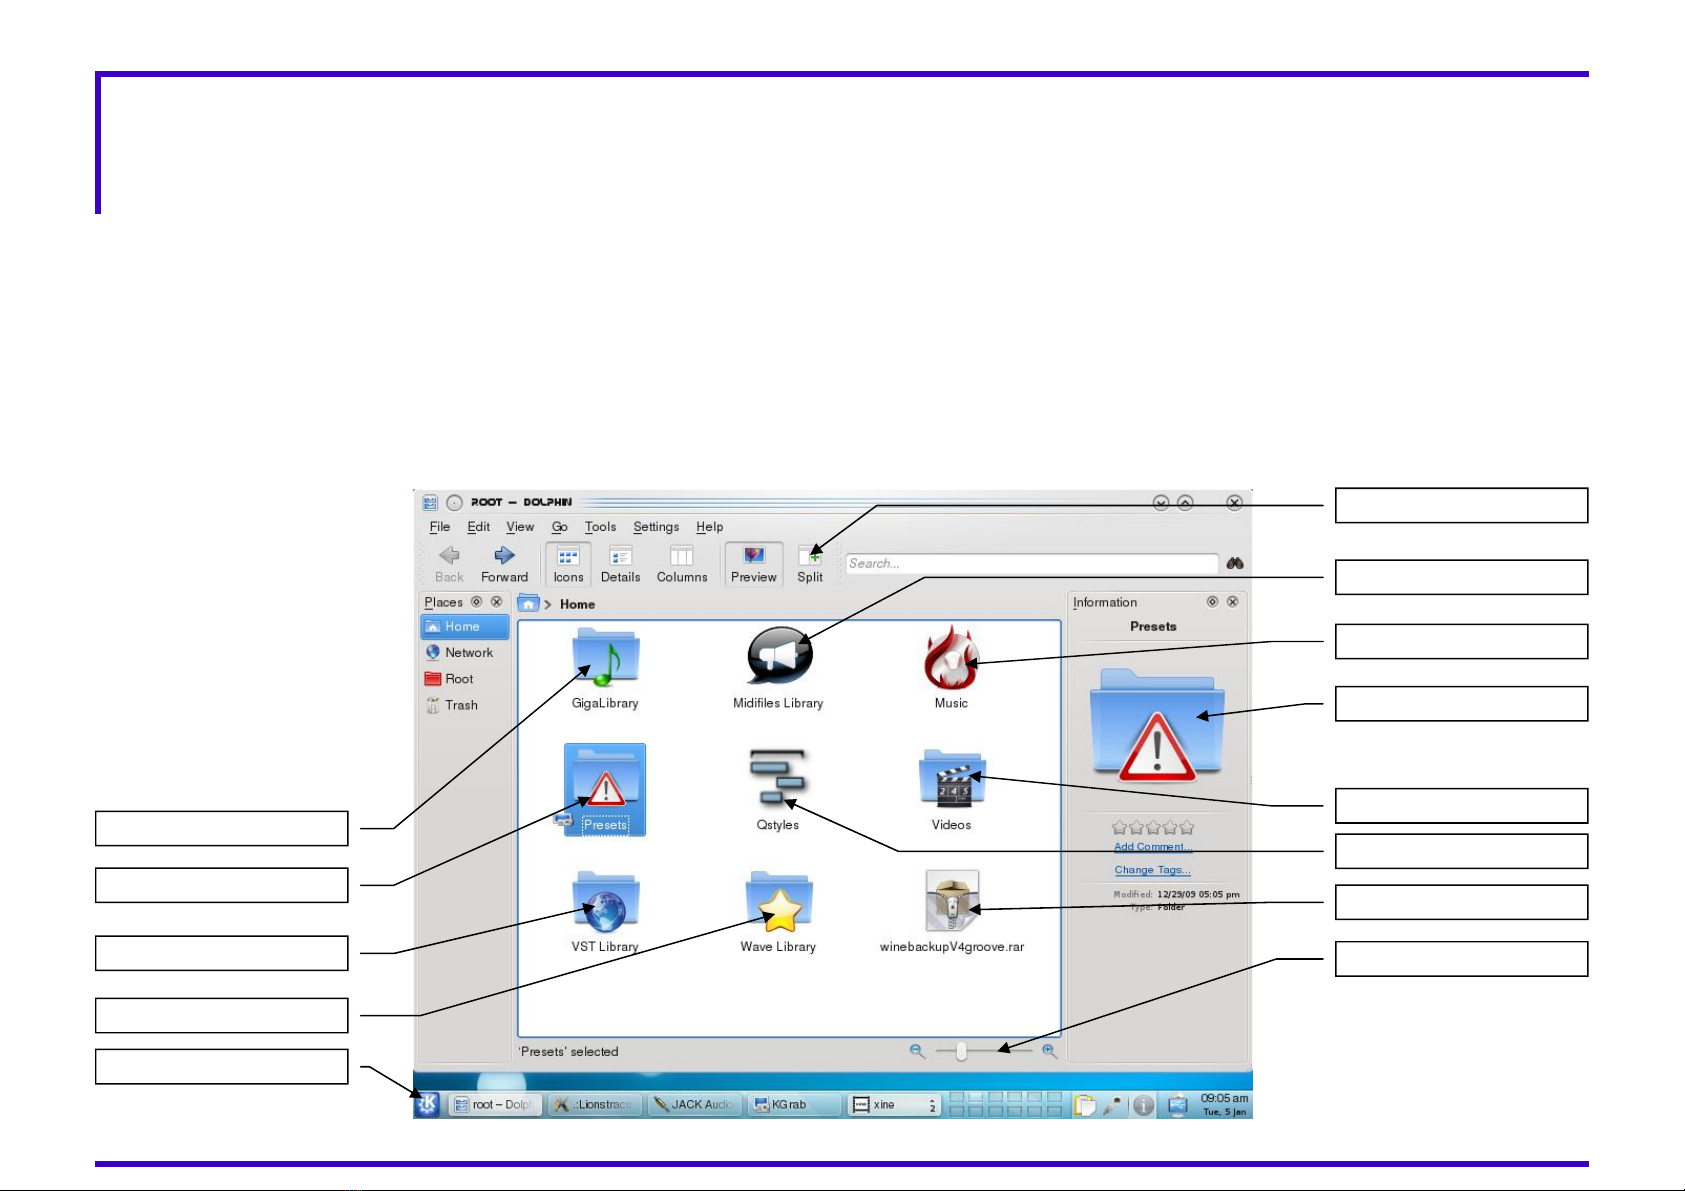
Linux Desktop— Managing MAIN Home ( root) Folder
The MAIN GROOVE Files/folder structure:
The GROOVE OS is working correct only if on the main ROOT folder ( /home/mediastation/) are available the follow MAIN folders:
1) PRESETS: on this folder are stored the all system OS 4.X setups files, where the OS will inizialize the all GROOVE software on startup/
Restart mode.
2) GIGALIBRARY: this folder will store the all Giga sounds library shared for GIGA sampler.Inside MUST be installed the SounbankGM2 or
the sampler is not able to preload the all backgroung GM sounds library.
3) QSTYLES: is the folder where the all new qranger styles must be installed/copied. The Qranger will read the styles ONLY from this folder!
4) VST LIBRARY: is the folder where all the owner VST plugins are stored.
5) WAVE LIBRARY: is the folder where the all owner WAV library are stored and shared for styles/songs SEQ/PAD Player.
6) MEDIA: the Media link folder will open automatically the all external USB media device without recall the System Icon on desktop
7) All the others folders are used for store your personal Media data, like Mp3, Midifiles, Video files and so on.
Midifiles Folder
Preview Folder
Video Folder
VST Own folder
Wave Library
KDE Menu
Windows splits setup
Music: Mp3, wave, folder
PRESETS system Folder
Giga Library Folder Qstyles Folder
Wine Backup RAR File
ZOOM View Folders
Page: 15
GROOVE
LIONSTRACS
OS 5.1
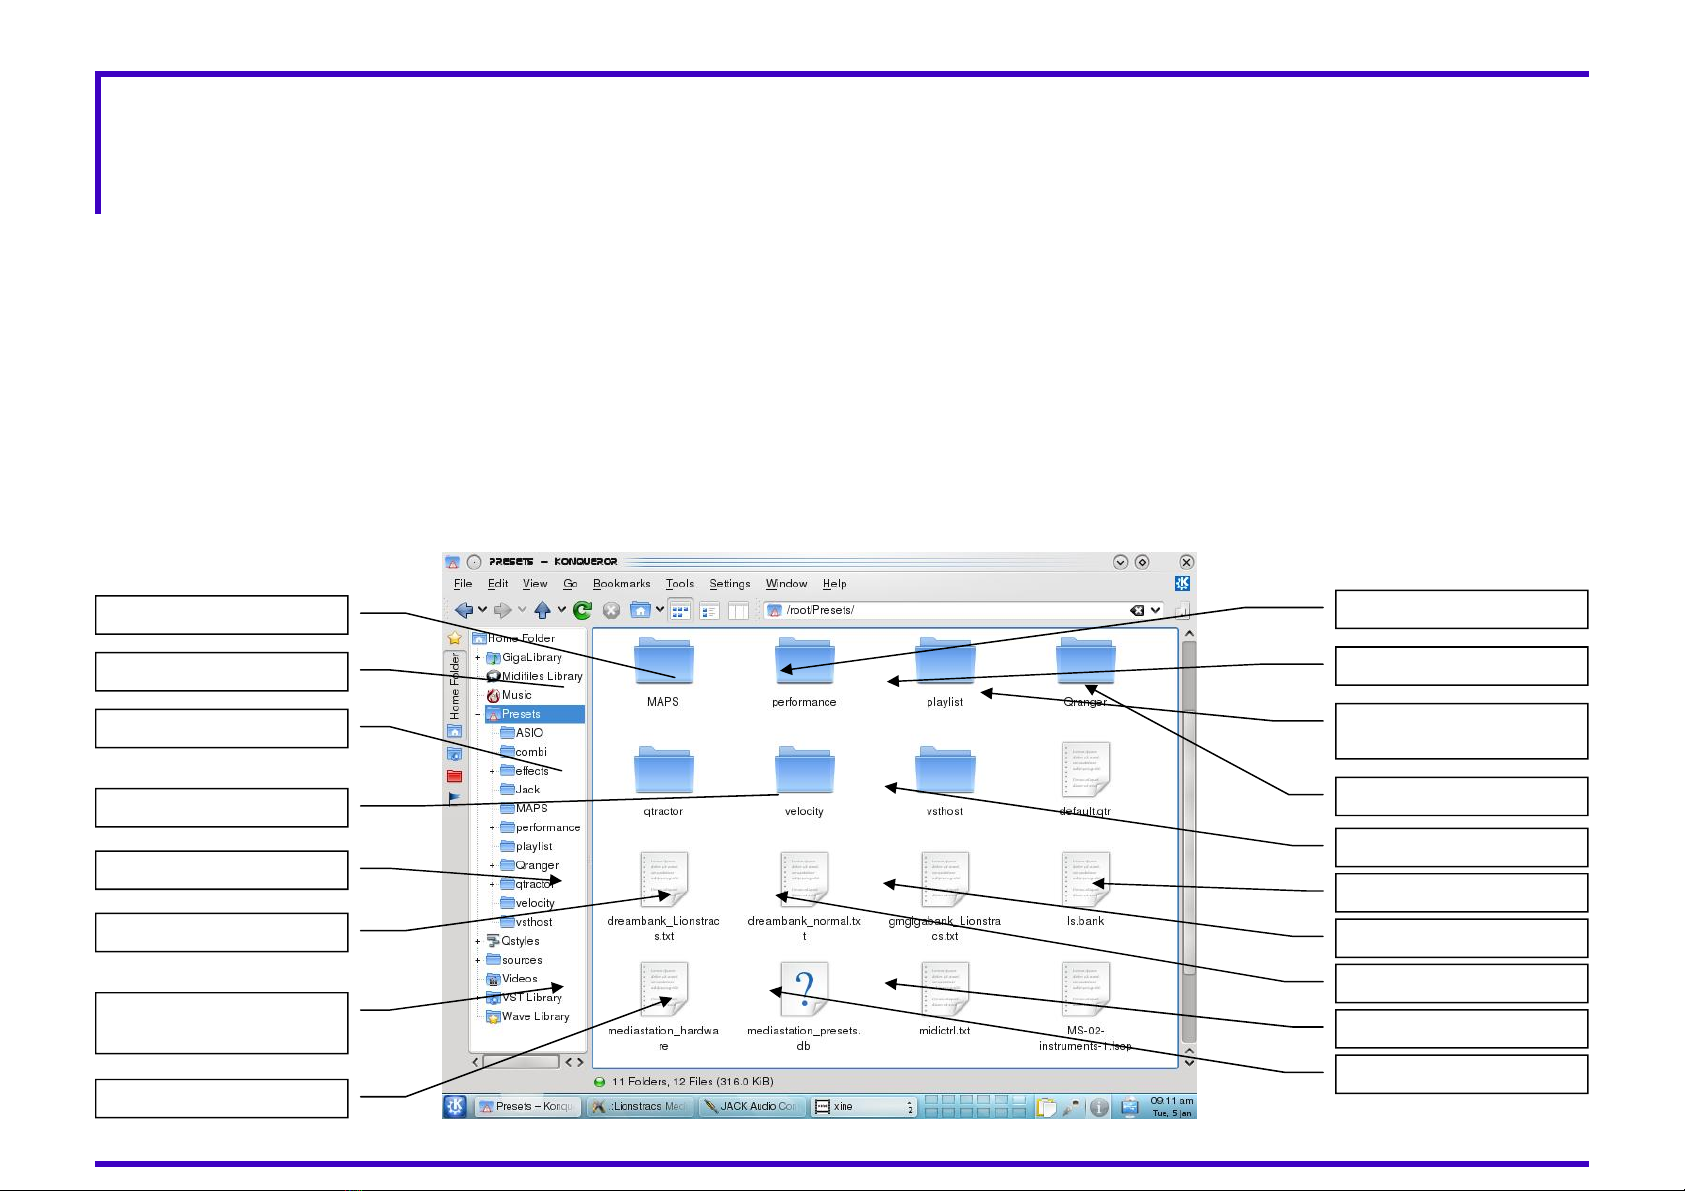
GROOVE “ Presets” OS system folder
The PRESET Folder is the MAIN OS GROOVE System startup configuration.
In the preset folder are stored the all GROOVE system files that are used when the GROOVE OS start and will inizialize the all engines and
hardware. Without this folder the GROOVE is NOT able to startup correctly and setup the all device/engine used for the system.
DO NOT AND NEVER: Delete, Move and Rename it!! You can also make your own copy backup and save it in another location.
The PRESET folder include:
1) COMBI: here are saved all the Combi Presets. When you will create new COMBI presets, the all files will be saved in this folder.
2) EFFECTS: here are saved the all Audio-midi Effects setting
3) JACK: here are saved the Jack connection kit PATCH BAY Presets. The main Jack patch bay preset file will routing the main OUT to the
CUE and STEREO OUT Jack left+Right.
4) PERFORMANCE: here are saved the all owner Performance files setup.
5) QRANGER: here are saved the default styles template presets and Instruments List Map files.
6) VSTHOST: here are saved the all VSTHOST files configurarion ( .ini) and the all Presets instruments used for the Mediastation Interface.
7) MS-2-instruments.lscp: this file is the script Sampler file loader, where the all basic GIGA GM2 sounds are pre loaded in background
system. Without this file configuration, the Sampler is NOT able to preload the all sounds in background!
8) ASIO: here are saved the all Multiple ASIO Patches for the ASIO Patch system.
9) All the other single files are the mediastation configuration OS system
COMBI Patches
ASIO Host Patches
Qranger templates
Keyboard Velocity setup
DSP sounds names
Effects patches
Jack Presets
Dream DSP Sound patch
list TXT
Performance presets
VST Host presets
GIGA-GM sounds names
USER Patch presets
GIGA GM sounds to load
in background Sampler
MIDI control TXT
Hardware setups
Sampler Banks
USER presets
WAV PADS presets

Page: 16
GROOVE
LIONSTRACS
OS 5.1
GIGA GM/GS Sounbank SAMPLER background Library
MS-2-instrument.lscp Linuxsampler configuration:
When you turn ON the GROOVE, during the booting OS, the linux Sampler will pre load automatically the all giga sounds used for the GIGA
GM/GS background system sampler. The Linuxsampler will automatically read the: MS-2-instruments.lscp scrip file and pre loading the all GIG
sounds saved on this map.
This lscp map is located on: /root/Presets/MS-2-instrument.lscp ( also called: /home/media station/Presets/)
The lscp file: MS-2-instruments.lscp scrip wil load the all sounds located on: /root/GigaLibrary/SoundbankGM2/…
The GROOVE Qsyste will work ONLY IF the: SoundbankGM2 is installed inside the GigaLibrary folder, if you dont have it, the GROOVE will NOT
play ANY GIGA GM sounds!
NOTE: If the MS-02-instruments.lscp file is present on Preset folder BUT is NOT present the SoundbankGM2 in the GigaLybrary folder, the
Sampler can crash the whole Sampler system and need to Restart Players!
Without the GIGA SounbankGM2 folder installed on Giga Library, the all Qstyles and Midiplayer 2 are NOT working!
Instruments folderson soundbank
GIGA SoundbankGM2

Page: 17
GROOVE
LIONSTRACS
OS 5.1
WIN SCP Setup– Use the stand Alone WINSCP version
How to setup WINSCP program for sharing files from Windows PC to MS Linux OS.
Win SCP allow you to share and browser the whole GROOVE hard disk files system
with the Windows PC OS, under Network LAN interface ONLY. Before use the Win
SCP, setup the Network of your GROOVE and then procede with the Win SCP tool.
1) Open WINSCP on
Press NEW to setup
Type here: 192.168.1.76
Set Port 22
User name, type: root
Password, type: mx76
Select SFTP fallback
Press LOGIN for start
After you have Run the Win SCP, locate first the IP address of your Router.
Open one Explorer windows and type: 192.168.1.1. IF you dont get back
the Router interface, try to type the different IP number: 192.168.0.1.
Untill is not locate your Router ( gateway ) number, the Win SCP with the
GROOVE will not work correctly.
Before connect with Win SCP, test your GROOVE that is able to browser in
the LAN and Internet or the Win SCP will never find the host IP address.
You can download the last stand Alone version of Win SCP under the webpa-
ge: www.winscp.org

Page: 18
GROOVE
LIONSTRACS
OS 5.1
Jack Audio Connection Kit Control Panel (QjackCtl)
All internal Audio and MIDI connections and routing are controlled under the JACK Audio Connection Kit Control Panel (QjackCtl). These are fle-
xible connections that can be made between all the internal Audio/MIDI software module programs (clients) and that run in the MS, establi-
shing an actual signal path from source to destination ports, as are the external input/ outputs in the MS rear panel.
Please locate the JACK GUI interface and press the [Connect] key.
In the JACK Connections window you will see all Audio/MIDI signal sources on the left pane (Readable Clients/Output Ports) and all possible
Audio/ MIDI signal destinations in the right pane (Writable Clients/Input Ports).
Actual connections are established between source (Output Ports) and destination (Input Ports) by selecting one item in either side and
pressing the [Connect] key at the bottom-left of the Connections window. Press the key “ JACK” or in the old graphics mediastation “VOCAL”
for recall in realtime the Jack connection Kit.
OUTPUTS connections
MS 8 OUTPUTS
CUE XRL OUT MS
JACK OUT 2 MS
Jack ALSA connections
ARTS Audio OUT
FX Server OUT
Mediastation OUTS
Qranger OUTS
Connect Key
DIsconnect Key
XRL MAIN OUTS MS
Click in the + to open
Digital Cable connection
Jack Audio Connection Kit
MS Player OUTS
Linuxsampler OUTS
CUE OUTS
Player MAIn OUT
Drums OUT NO Pitch
Master OUT Pitched
Phones OUT MS
MS Player INPUTS
Qranger INPUTS

Page: 19
GROOVE
LIONSTRACS
OS 5.1
What is a UI?
The GUI, or graphical user interface, is a customisable shell that allows the launching of applications from a single location. This GUI is
optimised for use with an 800x600 pixel touch screen and for musical performance. Traditionally, within the Linux environment, you would
have to make shortcuts for applications you use most often and arrange them on your desktop or system tray for easy access. Because these
items are often masked by open applications, you may have to reposition your windows every time you wish to initiate a new application.
Starting programs via the "KDE MENU" button is also not ideal, because the programs groups contain all installed programs, rather than those
just few applications you use the most. The LIONSTRACS 3D GUI is designed to allow access to the GROOVE OS programs and takes that you
will use most frequently with your GROOVE. After powering up your GROOVE, Linux will automatically launch the GROOVE 3D GUI and music
application.
Press in every moment the key “ HELP” to recall the MAIN GROOVE interface. Touch one icon in the display to recall the desidered function.
Some GROOVE 3D UI Interface:
Audio EQ Style Family Midi Matrix PADS Wav Spot
Double Players COMBI Sounds SETUPS PageMAIN MENU
Page: 20
GROOVE
LIONSTRACS
OS 5.1
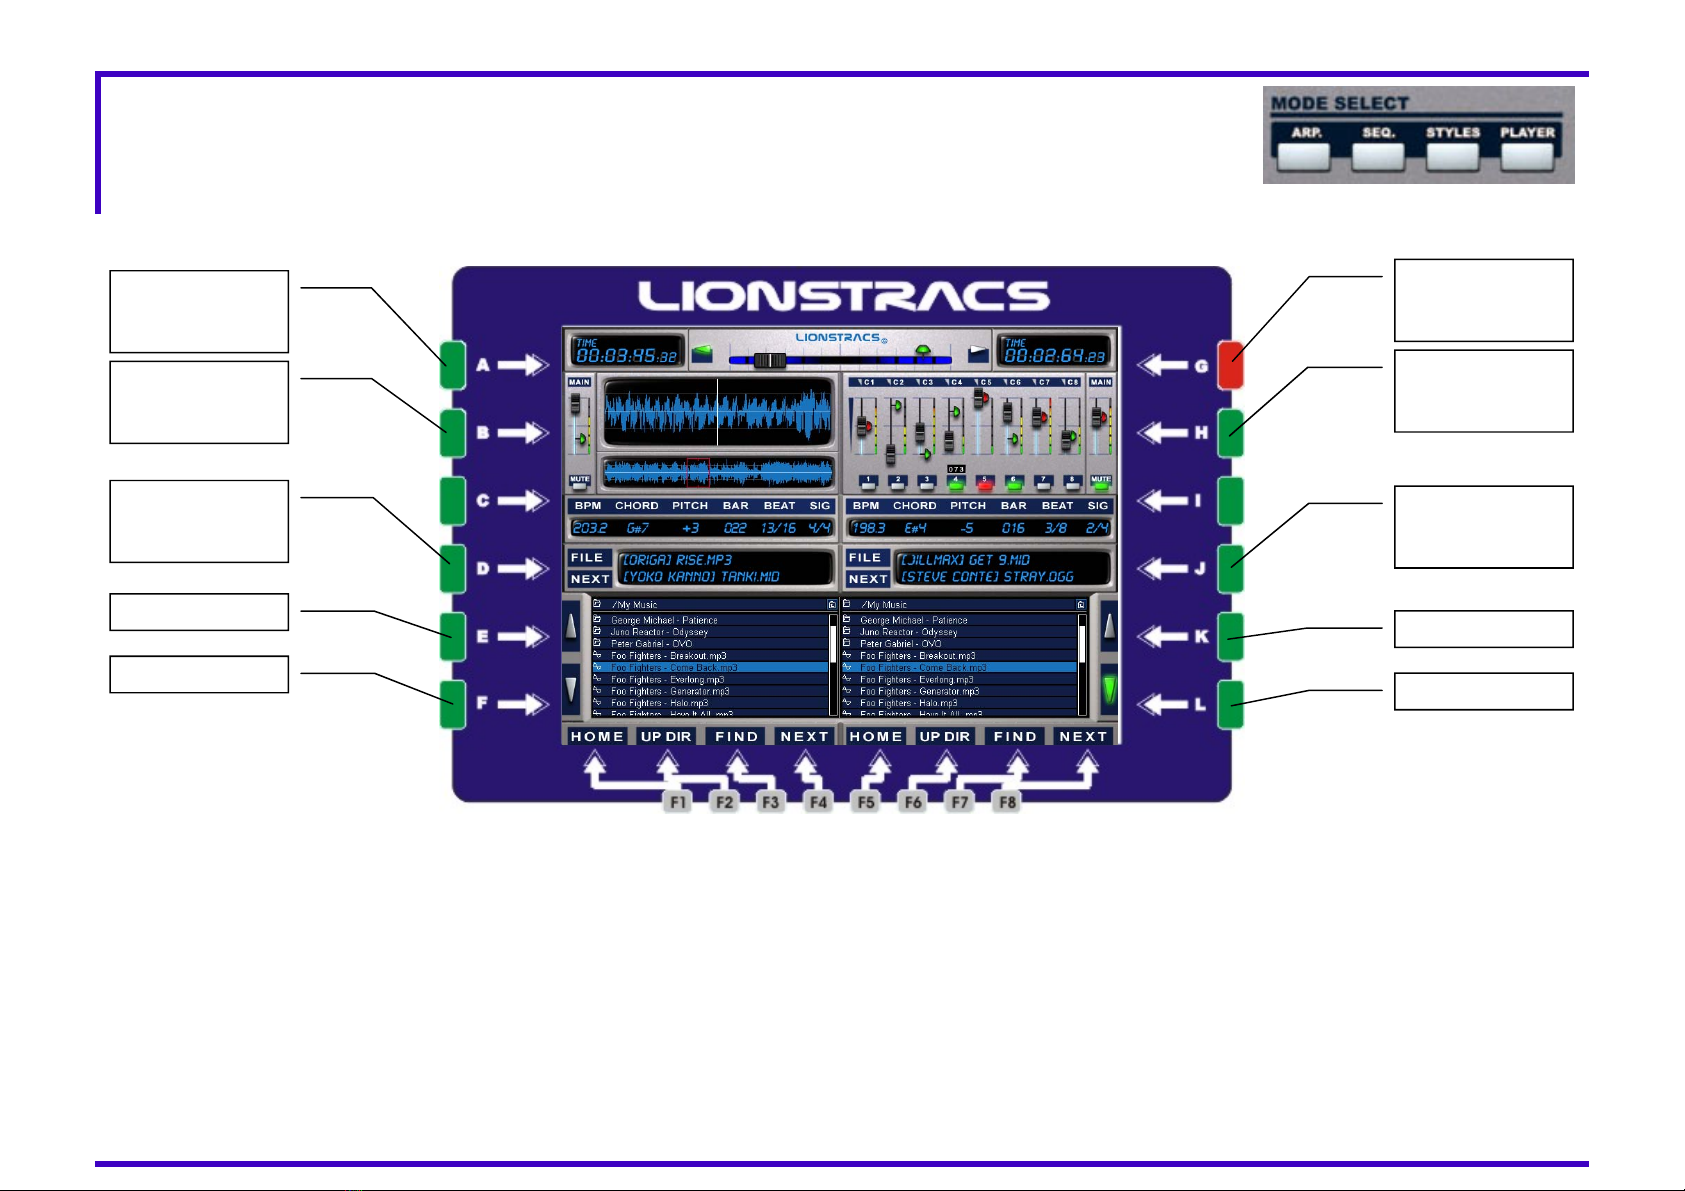
The Players Application
Right after booting, the operating system will display the player applications. It has two totally independent pla-
yers that can play audio files (wav, Mp3 or ogg.) and MIDI files. Press one of the "CALL" keys below each player
if another application is shown, or press the "RESTART MS" icon on the desktop if the players are not running. The "PLAYER" key will recall this
interface too. You'll see this interface:
Time wiev
Green=normal
RED= Time left
Audio Wiev
Green=waveform
RED= DJ EQ
Next file selector
Press to START
next files in list
Browser UP
Browser DOWN
Time wiev
Green=normal
RED= Time left
Audio Wiev
Green=waveform
RED= DJ EQ
Next file selector
Press to START
next files in list
Browser UP
Browser DOWN
With the "CALL" keys you can call up the left or right player (Player 1 / Player 2). Then all the control sliders and keys on the left panel (MUTE
"C1" to "C8") of the Mediastation will be linked to the player you called. The "CUE" key, when activated (the light turns GREEN) routes the re-
spective player's audio to the CUE/PHONES outputs. (open the Jack Audio Connection Kit, select the AUDIO interface, click on the Player icon
and select the CUE outs) to route the audio outs where you like). Keys from "F1" to "F4" and A, B, C, D, E, F, let you browse Player 1. Keys
from "F5" to "F8" and G, H, I, J, K,L, let you browse Player 2. F1, F5= HOME: when it is pressed you will return to the Home directory. F2,
F4=UP DIR: go up one directory level. F3, F7=FIND: open the "find file" dialog box and the Virtual keyboard to input text. F4, F8= KARA:
show the karaoke text/lyrics if available. Touch the text window to open the full karaoke screen; touch it again to return back to the player.
Key E/F, K/L: Browse up/down. Use these to scroll up and down the pages in the file browser (you can scroll single files with the "DIAL" wheel
or with the Up/Down arrows on the "DATA ENTRY" panel. Keys "D" and "J" allow you to select the next preloaded song in the respective pla-
yer: you can see the currently playing file in the "FILE" field and the preloaded next file into the "NEXT" field. Pressing "D" or "J" will switch to
the next song.
This manual suits for next models
2
Table of contents


