Lippert Components Flow Max 719323 Installation instructions

1
lci1.com 5 74 - 5 37- 8 9 0 0 Rev:0 4.10 .18
Flow MaxTM
Galley Faucets
Installation and Owner’s Manual
(For Aftermarket Applications)
CCD-0001241
Table of Contents
Introduction ............................................ 2
Quick Facts ............................................ 2
Safety Information ..................................... 2
Parts List ................................................ 2
Resources Required ................................... 3
Prior to Installation ..................................... 3
Installation .............................................. 3
Fixed Faucet ........................................... 3
Pull Down Faucet ...................................... 4
Operation ............................................... 5
Fixed Faucet ........................................... 5
Pull Down Faucet ...................................... 6
Troubleshooting Chart ................................. 7
Maintenance ............................................ 7
Notes .................................................... 8
Flow MaxTM
Galley Faucets
Installation and
Owner’s Manual
(For Aftermarket Applications)
2
lci1.com 5 74 - 5 37- 8 9 0 0 Rev:0 4.10 .18
Flow MaxTM
Galley Faucets
Installation and Owner’s Manual
(For Aftermarket Applications)
CCD-0001241
Introduction Parts List
Part # Description Size
719323 Spring Faucet 16.69” H x 8.26” D
719324 Curved Gooseneck Faucet 14.18” H x 8.15” D
719325 Square Gooseneck Faucet 13.67” H x 7.87” D
719326 Pull Down Sprayer Faucet 17.15” H x 9.12” D
719333 Bullet Pull Down Faucet 17.15” H x 9.12” D
719335 Alphorn Pull Down Faucet 17.15” H x 9.12” D
Add a splash of modern to your kitchen or bath with a
Stainless Steel Faucet by Lippert Components. Available
in a variety of spout constructions like coiled spring and
high-arched, we’re challenging how the world feels about
faucets. Constructed with quality stainless steel, these
sleek faucets are designed for maximum lifespan and
durability.
Quick Facts
• 304 Grade stainless steel construction
• Pull-down faucet with toggle
• Toggle for stream or spray options (Pull down only)
• Easy DIY installation
• Pairs well with stainless sink sets by Lippert Components.*
*Items sold separately
Safety Information
THE “WARNING” SYMBOL ABOVE IS A SIGN THAT
AN INSTALLATION PROCEDURE HAS A SAFETY
RISK INVOLVED AND MAY CAUSE DEATH OR
SERIOUS PERSONAL INJURY IF NOT PERFORMED
SAFELY AND WITHIN THE PARAMETERS SET
FORTH IN THIS MANUAL. ALWAYS WEAR
EYE PROTECTION WHEN PERFORMING THIS
INSTALLATION PROCEDURE. OTHER SAFETY
EQUIPMENT TO CONSIDER WOULD BE HEARING
PROTECTION, GLOVES, AND POSSIBLY A FULL
FACE SHIELD, DEPENDING ON THE NATURE OF THE
INSTALLATION PROCEDURE.
MOVING PARTS CAN PINCH, CRUSH OR CUT.
KEEP CLEAR AND USE CAUTION.
719323 - Spring Faucet
Pull Down Installation
719324 - Curved Gooseneck
Fixed Installation
719325 - Square Gooseneck
Fixed Installation
719326 - Pull Down Sprayer
Pull Down Installation
719333 - Bullet Pull Down
Pull Down Installation
719335 - Alphorn Pull Down
Pull Down Installation

3
lci1.com 5 74 - 5 37- 8 9 0 0 Rev:0 4.10 .18
Flow MaxTM
Galley Faucets
Installation and Owner’s Manual
(For Aftermarket Applications)
CCD-0001241
Resources Required
• Phillips screw driver
• Adjustable wrenches
• Bucket
• Flashlight
• Safety glasses
Prior to Installation
1. Shut off the hot and cold water outlet supply valves for
the existing faucet, typically located below the sink.
2. Relieve any pressure from the existing faucet by turning
the existing faucet on and off.
3. Place a bucket under the sink, under the supply lines’
supply valves to catch any excess water.
4. Using an adjustable wrench, disconnect the supply lines
from the outlet water supply valves. Place the supply lines
into the bucket to drain any excess water.
5. Under the sink, disconnect the mounting hardware for
the existing faucet and remove the faucet from the deck.
6. Make sure the deck around the mounting hole area is
clean, dry and free from any debris.
Installation
Fixed Faucet
1. Unscrew the metal collar with the two screws from the
faucet base and set aside (Fig.1A).
2. Remove the metal washer (Fig.1B) from the base and
set aside.
NOTE: Leave black rubber washer (Fig.1C) on faucet.
3. Place the faucet supply lines through the mounting
hole on the deck, making sure the black rubber washer
and faucet base are seated rmly on the deck of the sink
(Fig.2A).
4. Position the faucet base so the handle is to the right side
of the faucet base (Fig.2B).
NOTE: The handle can be positioned to the left of the
faucet base but is typically placed to the right. Placing the
handle in the middle may cause severe burns depending
on where the faucet neck is located when turning
on the water.
5. Under the sink, slide the metal washer (Fig. 1B) over
the supply lines onto the base of the faucet. Make sure
the metal washer is ush against the underside of the sink
deck and covering the mounting hole (Fig.3A).
A
B
Fig.1
C
A
B
Fig.2
Fig.3 A
sink deck
faucet base

4
lci1.com 5 74 - 5 37- 8 9 0 0 Rev:0 4.10 .18
Flow MaxTM
Galley Faucets
Installation and Owner’s Manual
(For Aftermarket Applications)
CCD-0001241
6. Make sure the two screws on the coupler are evenly
inserted and are ushed with the top of the coupler (Fig.4A).
7. Screw the coupler onto the faucet base all the way up to
the metal washer (Fig.5A).
NOTE: Make sure the handle of the faucet is placed in the
desired position.
8. Using a Phillips screwdriver, tighten the two screws
(Fig.5B) on the coupler to hold the coupler into place.
NOTE: The red marked supply line is for hot water and the
blue marked supply line is for the cold water.
9. Thread the nut on the hot water supply line onto the hot
water outlet supply valve and tighten with an adjustable
wrench. Do not over tighten.
10. Thread the nut on the cold water supply line onto
the cold water outlet supply valve and tighten with an
adjustable wrench. Do not over tighten.
11. Turn the hot and cold water outlet supply valves back on
and check for any leaks.
Pull Down Faucet
1. Unscrew the black plastic coupler from the faucet base
and slide off from the faucet assembly.
NOTE: Wiggle the plastic coupler off the supply lines one
line at a time.
2. Slide the clear plastic washer off the faucet assembly.
3. Place the faucet supply lines through the mounting
hole on the deck, making sure the black rubber washer
and faucet base are seated rmly on the deck of the sink
(Fig.6A).
4. Under the sink, slide the clear plastic washer over the
supply lines up to the underside of the sink deck and
covering the mounting hole (Fig.7A).
A
A
B
A
Fig.4
Fig.5
Fig.6
Fig.7 A

5
lci1.com 5 74 - 5 37- 8 9 0 0 Rev:0 4.10 .18
Flow MaxTM
Galley Faucets
Installation and Owner’s Manual
(For Aftermarket Applications)
CCD-0001241
Operation
Fixed Faucet
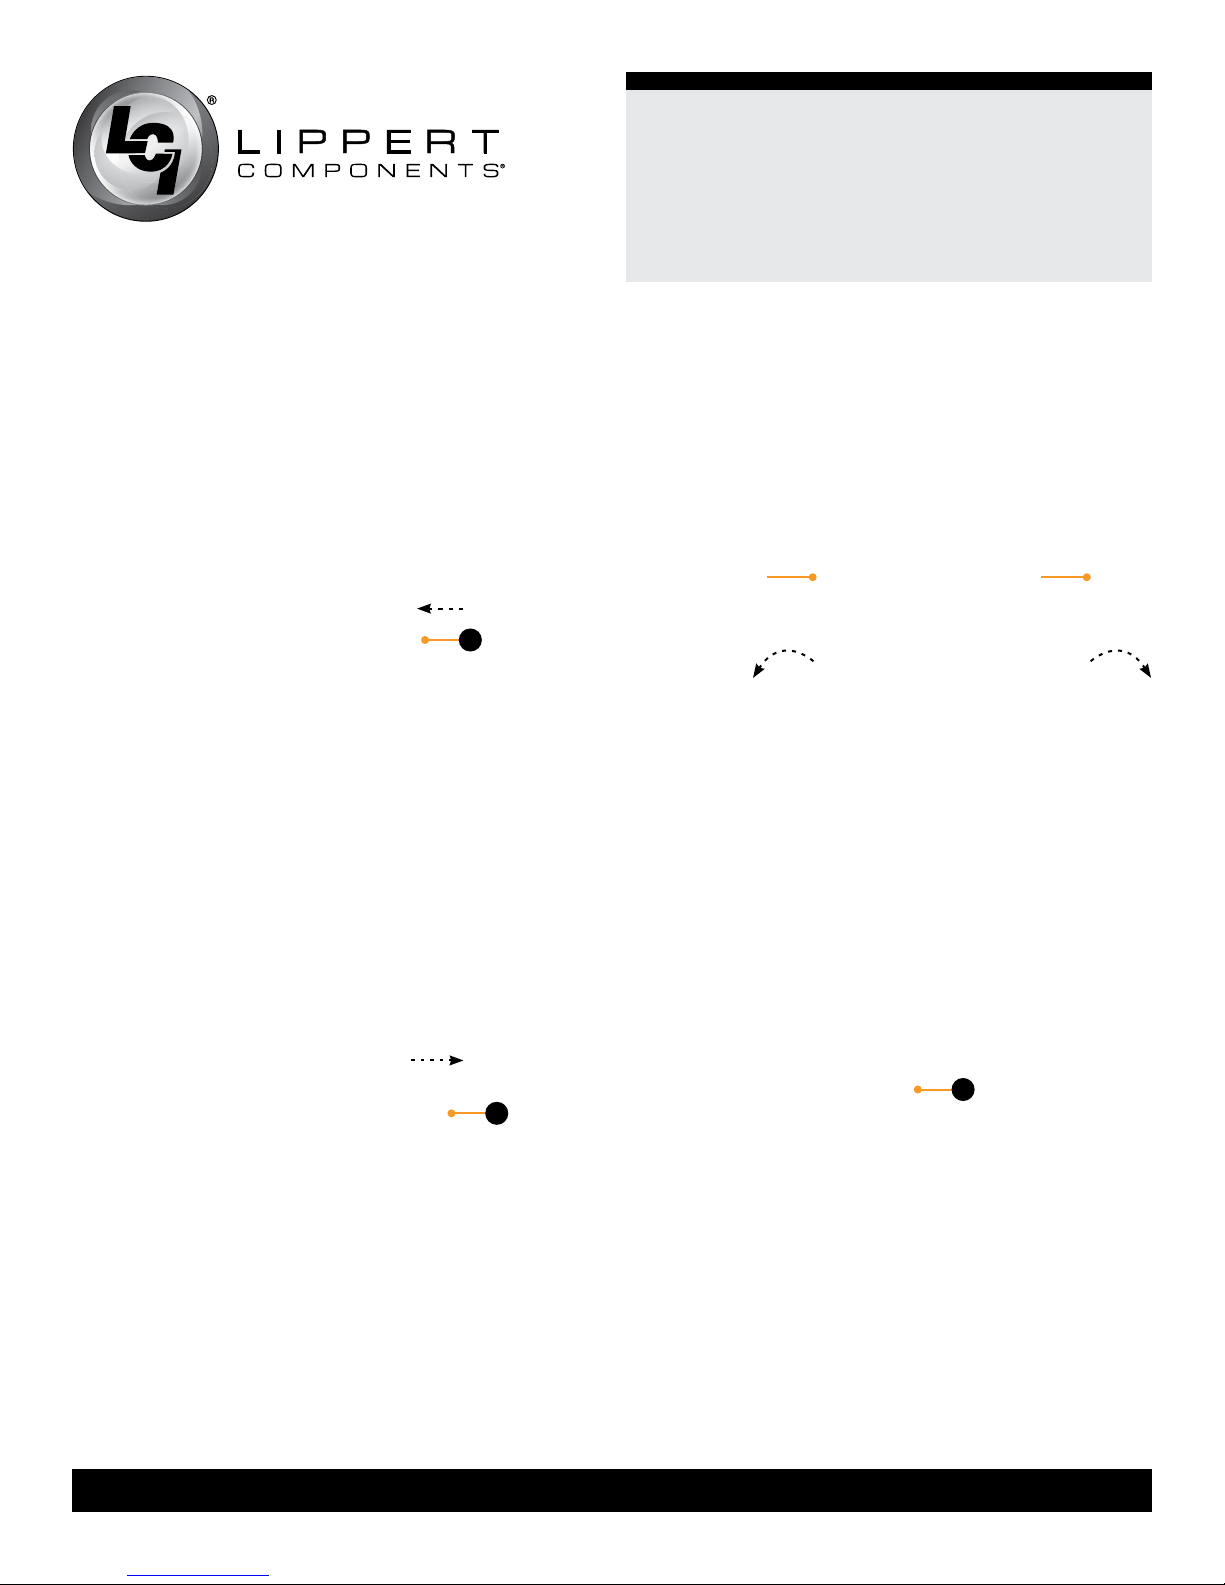
1. Pull the lever away from the faucet to turn it on (Fig.9A).
5. Slide the black plastic coupler back onto the supply
lines, inserting one supply line at a time.
NOTE: Make sure the inside threads of the black plastic
coupler are at the top.
6. Screw the black plastic coupler all the way up the faucet
base until it will no longer turn (Fig.8A).
NOTE: The red marked supply line is for hot water and the
blue marked supply line is for the cold water.
7. Thread the nut on the hot water supply line onto the hot
water outlet supply valve and tighten with an adjustable
wrench. Do not over tighten.
8. Thread the nut on the cold water supply line onto
the cold water outlet supply valve and tighten with an
adjustable wrench. Do not over tighten.
9. Turn the hot and cold water outlet supply valves back on
and check for any leaks.
2. Move the lever towards you for hot water (Fig. 10) and
away from you for cold water (Fig. 11).
NOTE: Located on the front of the lever is a “H” for hot
water and a “C” for cold water. Move the lever in the
direction of the desired temperature.
A
right profile
view
right profile
view
A
Fig.8 Fig.9
Fig.10 Fig.11
6
lci1.com 5 74 - 5 37- 8 9 0 0 Rev:0 4.10 .18
Flow MaxTM
Galley Faucets
Installation and Owner’s Manual
(For Aftermarket Applications)
CCD-0001241
3. Push the lever in towards the faucet to shut the water off
(Fig.12A).
Pull Down Faucet
1. Pull the lever away from the faucet to turn it on (Fig.13A).
A
2. Move the lever towards you for hot water (Fig.14) and
away from you for cold water (Fig.15).
NOTE: Located on the front of the lever is a “H” for hot
water and a “C” for cold water. Move the lever in the
direction of the desired temperature.
A
right profile
view
right profile
view
3. To use the spray wand pull down and out on the faucet
head.
4. Press and release the button in on the lower portion
of the faucet head (Fig.16A) for spray mode. Press and
release the button again for stream mode.
5. Replace the faucet head by gently guiding the hose back
into the faucet neck and insert into clip, if applicable.
A
Fig.12
Fig.13
Fig.14 Fig.15
Fig.16

7
lci1.com 5 74 - 5 37- 8 9 0 0 Rev:0 4.10 .18
Flow MaxTM
Galley Faucets
Installation and Owner’s Manual
(For Aftermarket Applications)
CCD-0001241
Troubleshooting Chart
Vibration caused by driving or transporting can loosen plumbing and hardware. Check for loose system components.
Many symptoms can be resolved by tightening hardware. Use care not to over-tighten. Refer to the chart for
troubleshooting tips.
Maintenance
Clean the faucet periodically with a soft cloth. Avoid
abrasive cleaners, steel wool and harsh chemicals as
these will dull the nish and void the warranty.
6. To shut the water off push the lever in towards the faucet
(Fig.17).
A
What is happening? Why? What should be done?
Irregular Flow Blockage at the screen
1. Unscrew the spray wand assembly.
2. Remove the O-ring and screen.
3. Clean screen by rinsing it for a few
seconds to remove any debris.
4. Reinsert O-ring and screen.
5. Screw the spray wand to the pull
down hose and tighten.
There is a leak from the aerator
when the faucet is on.
The aerator does not fit correctly
on the faucet.
1. Reinstall aerator.
The aerator has irregular
or reduced water flow. The aerator is dirty. Remove aerator and clear debris.
Fig.17

8
lci1.com 5 74 - 5 37- 8 9 0 0 Rev:0 4.10 .18
Flow MaxTM
Galley Faucets
Installation and Owner’s Manual
(For Aftermarket Applications)
CCD-0001241
Manual information may be distributed as a complete
document only, unless Lippert Components provides
explicit consent to distribute individual parts.
All manual information is subject to change without
notice. Revised editions will be available for free
download at lci1.com. Manual information is considered
factual until made obsolete by a revised version.
Please recycle all obsolete materials and contact
Lippert Components with concerns or questions.
Notes
Notes
This manual suits for next models
5
Table of contents
Popular Plumbing Product manuals by other brands


KEUCO
KEUCO Edition 11 51109 010100 Mounting instruction

Pfister
Pfister Park Avenue 016-FE0 Quick installation guide

BELLOSTA
BELLOSTA charlotte 0705/5/C Installation instruction

Hans Grohe
Hans Grohe Rainfinity Digital 500 1jet 25033000 Instructions for use/assembly instructions

Hans Grohe
Hans Grohe Ecostat E 15707 Series Instructions for use/assembly instructions

Armstrong
Armstrong 200 Series instructions