Lively LH 61-DRW User manual


2 3
Left Hearing Aid Right Hearing Aid
Serial number Serial number
Model number Model number
Receiver type Low Power
Medium Power
High Power
Ultra Power
Receiver type Low Power
Medium Power
High Power
Ultra Power
Receiver tube length 01234Receiver tube length 0 1 2 3 4
Battery size 312
Open/ standard
fitting:
Small
Medium
Large
Small
Medium
Large
Tulip Earmold
Open dome Power dome Tulip dome RIE mold
Program Beep Description
1
2
3
4
Specific features supported by your hearing system:
Smart Start on page 13
Phone Now on page 21
Tinnitus Sound Generator on page 25
Hearing aid type designations for models included in this user guide are:
VE312, FCC ID: X26VE312, IC: 6941C-VE312. Please see page 7 for list of models referring to all types.
This device operates in the frequency range of 2.4 GHz - 2.48 GHz. This device includes an RF transmitter
that operates in the range of 2.4 GHz - 2.48 GHz.

4 5
1 Introduction
Congratulations on the purchase of your new hearing aids. Lively’s innovative sound technology and
design, combined with the customized programming selected by your hearing care professional, will
make hearing a more enjoyable experience.
Please read this manual carefully in order to wholly benefit from the use of your hearing aids. With
proper care, maintenance, and usage, your hearing aids will serve you in better communication for many
years.
Ask your hearing care professional if you have any questions.
2 Intended use
Generic air-conduction hearing aids are wearable sound-amplifying devices intended to compensate for
impaired hearing. The fundamental operating principle of hearing aids is to receive, amplify, and transfer
sound to the eardrum of a hearing-impaired person.
3 Becoming accustomed to amplification
While purchasing a hearing aid is a major step, it is only one step in a process toward more comfortable
hearing. Successfully adapting to the amplification your hearing aid provides takes time and consistent
use.
You will enjoy more benefits from your Lively hearing aid by taking the following actions:
• Wear the hearing aid regularly in order to get comfortable with using it.
• It takes time to get used to a hearing aid. It may help to begin by wearing your hearing aid for
short periods – even as little as 15 minutes – and then gradually increasing your wearing time. In
a way, it is no dierent from adjusting to contact lenses. Speak to your hearing care professional,
who can design a schedule tailored just for you.
• As you get more comfortable with the hearing aid, increase the wearing time and wear your
• hearing aid in multiple types of listening environments.
It may take as long as several months for your brain to get used to all the “new” sounds around you.
Following these suggestions will give your brain time to learn how to interpret amplification and increase
the benefits you get from using a Lively hearing aid.

6 7
4 Statement
This device complies with part 15 of the FCC rules and ISED rules.
Operation is subject to the following two conditions:
1. This device may not cause harmful interference.
2. This device must accept any interference received, including interference that may cause
3. undesired operation.
iNOTE: This equipment has been tested and found to comply with the limits for a Class B digital
device, pursuant to part 15 of the FCC rules and ISED rules. These limits are designed to provide
reasonable protection against harmful interference in a residential installation. This equipment
generates, uses and can radiate radio frequency energy and, if not installed and used in accordance
with the instructions, may cause harmful interference to radio communications. However, there
is no guarantee that interference will not occur in a particular installation. If this equipment does
cause harmful interference to radio or television reception, which can be determined by turning
the equipment o and on, the user is encouraged to try to correct the interference by one or more
of the following measures:
• Reorient or relocate the receiving antenna.
• Increase the separation between the equipment and receiver.
• Connect the equipment into an outlet on a circuit dierent from the one in which the receiver
is connected.
• Consult the dealer or an experienced radio/TV technician for help.
Changes or modifications can void the user´s authority to operate the equipment.
The products comply with the following regulatory requirements:
• In EU: the device conforms to the Essential Requirements according to Annex I of Council Direc-
tive 93/42/EEC for medical devices (MDD) .
• Hereby, GN Hearing A/S declares that the radio equipment type VE312 is in compliance with Di-
rective 2014/53/EU. The full text of the EU declaration of conformity is available at the following
internet address: www.declarations.resound.com
• In US: FCC CFR 47 Part 15, subpart C.
• Other identified applicable international regulatory requirements in countries outside the EU and
US. Please refer to local country requirements for these areas.
• In Canada: these hearing aids are certified under the rules of ISED.
• Japanese Radio Law and Japanese Telecommunications Business Law Compliance. This device
is granted pursuant to the Japanese Radio Law (電波法) and the Japanese telecommunications
Business Law (電気通信事業法) This device should not be modified (otherwise the granted desig-
nation number will become invalid)
Mini Receiver In-the-Ear (RIE) hearing aids of type VE312 with FCC ID: X26VE312, IC number 6941C-
VE312 and size 312 battery are available in the following:
LH561-DRW

8 9
5 Contents
1 Introduction...........................................................4
2 Intended use ..........................................................4
3 Becoming accustomed to amplification ..........5
4 Statement ..............................................................6
5 Contents ................................................................8
6 Descriptions ....................................................... 10
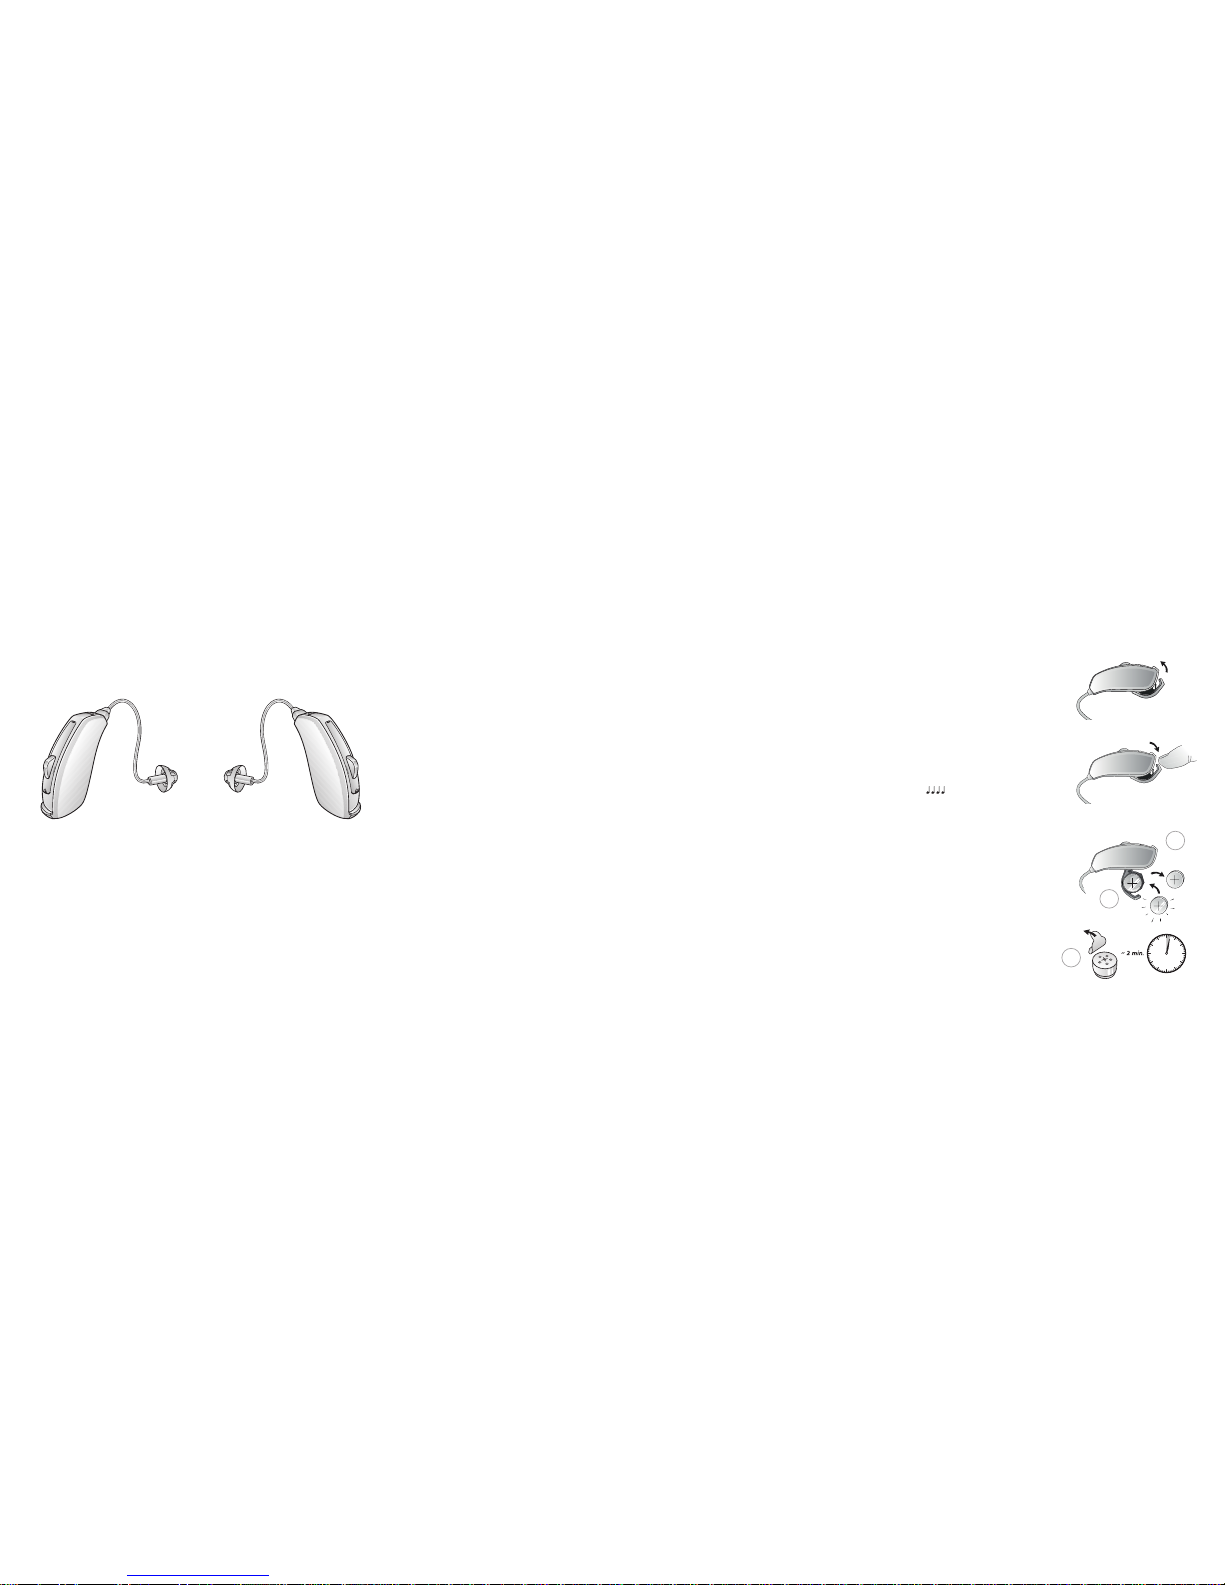
6.1 Your hearing aid LH61..........................................10
6.2 Recognizing left and right hearing aid ...........12
7 Getting started .................................................. 13
7.1 On/O function .....................................................13
7.1.1 Smart Start .............................................................13
7.2 Inserting/Replacing the battery ........................13
7.3 Low battery indicator ...........................................14
7.3.1 Low battery indicator when paired with
wireless accessories only.....................................15
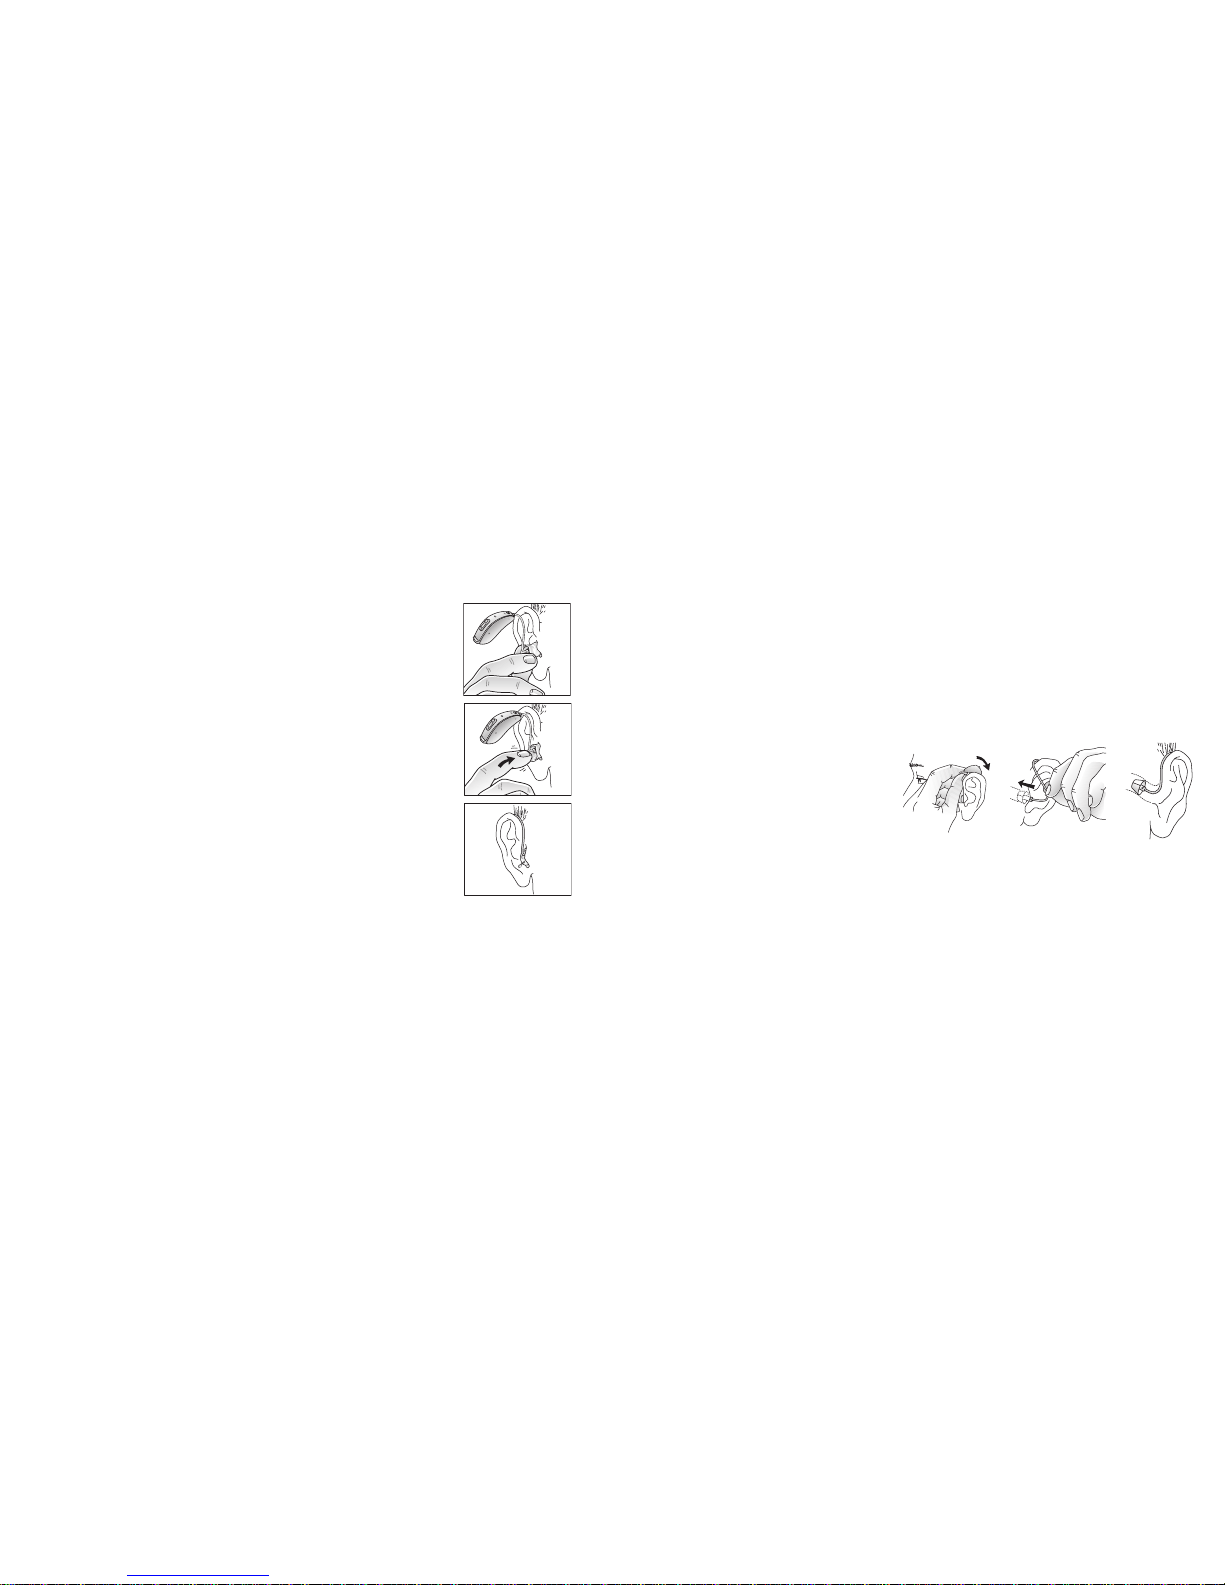
7.4 Insert/Remove hearing aid .................................16
7.4.1 Insert earmold........................................................16
7.4.2 Remove earmold ...................................................17
7.4.3 Insert thin tube with dome .................................17
7.4.4 Remove thin tube with dome.............................18
7.4.5 Sports lock ..............................................................18
7.5 Operation of the hearing aid ..............................18
7.5.1 Push button ............................................................18
8 Telephone use .................................................... 20
8.1 Using Lively Hearing Aids with
iPhone, iPad, and iPod touch (optional)...........20
8.2 Using Lively hearing aids with
My Lively phone app .............................................21
8.3 Cellular phones ......................................................21
8.4 Phone Now .............................................................21
8.4.1 Placement of Phone Now magnets..................22
8.4.2 Phone Now usage .................................................22
8.5 Flight mode (optional) .........................................24
9 Tinnitus Sound Generator (TSG) module ..... 25
9.1 Intended use for the TSG module .....................25
9.2 User instructions for the TSG module .............25
9.2.1 Description of the device.....................................25
9.2.2 Explanation of how the device functions ........25
9.2.3 TSG volume control..............................................26
9.3 Using TSG with smartphone apps ....................27
9.4 The scientific concepts that form the basis
for the device..........................................................27
9.5 Technical Specifications.......................................27
9.5.1 Audio signal technology ......................................27
9.5.2 Available sounds....................................................28
9.6 Prescription use of a Tinnitus Sound
Generator (TSG) hearing aid...............................28
9.7 Important notice for prospective sound
generator users......................................................29
10 The receiver tube............................................... 30
11 How to apply domes ......................................... 30
11.1 Lively domes ..........................................................30
11.2 Lively Tulip domes ................................................31
12 Wireless accessories.......................................... 32
13 Lively Assist (Optional) ..................................... 32
14 Care and maintenance...................................... 33
14.1 Daily maintenance.................................................34
14.2 Cleaning the receiver tubes and domes ..........34
14.3 Cleaning RIE or molds
(does not apply for UP molds) ...........................34
14.4 Changing wax guard for receiver tube.............35
15 General warnings............................................... 36
16 Using Lively hearing aids with
My LIvely app for smartphones ...................... 38
16.1 Intended use of My Lively app for
smartphones: .........................................................38
16.2 General precautions .............................................38
17 Phone Now warnings ........................................ 39
17.1 Phone Now precautions ......................................39
18 Important points for FM................................... 40
19 Tinnitus Sound Generator (TSG) warnings... 41
19.1 TSG precautions ....................................................41
19.2 TSG warning to hearing care professionals ....41
20 Battery warnings................................................ 43
21 Hearing aid expectations................................. 43
22 Warning to hearing aid professionals
(US Only) ............................................................. 44
23 Important notice for prospective hearing
aid users (US Only)............................................ 44
24 Children with hearing loss (US Only)............. 45
25 Technical Specs Section ................................... 46
25.1 RIE–LP receiver ......................................................46
RIE–MP receiver.....................................................47
RIE–HP receiver .....................................................48
RIE–UP receiver .....................................................49
26 Troubleshooting guide ..................................... 50
27 Warranties and repairs ..................................... 54
28 Temperature test, transport and storage
information ......................................................... 55

7
14
91
8
2
6
543
12 1310 11
10 11
LH 61-DRW
6 Descriptions
6.1 Your hearing aid – LH 61
1. Receiver tube
2. Receiver Open Dome
3. Receiver Tulip Dome
4. Receiver Power Dome
5. RIE mold
6. Sports lock
7. Battery door
8. Receiver
9. Push button
10. LP receiver tube
11. MP receiver tube
12. HP receiver tube
13. UP Receiver/Mold
14. Model, and serial number (in battery chamber)

2
1
3
12 13
6.2 Recognizing left and right hearing aid
If you have two hearing aids, they may be tuned dierently. One for your left ear, the other for your right.
Do not swap them. Please pay attention to this when cleaning, storing and inserting the hearing aids.
You might want to ask your hearing care practitioner to mark your hearing aids with a colored Left and
Right indication: Left is blue and Right is red.
Left Right
7 Getting started
Once you have placed the hearing aids on your ears, you can turn them on.
The hearing aid always starts in program 1 and with the pre-set volume.
7.1 On/O function
1. Close the battery door to turn on the hearing aid in program 1 (one).
2. Open the battery door to turn o the hearing aid. Use your fingernail to
pull it open.
7.1.1 Smart Start
Smart Start delays the time before the hearing aid turns on after you close the
battery door. With Smart Start, you will hear a beep ( etc.) for each second
of the delay period (5 or 10 seconds delay).
If you do not want to turn on the hearing aids prior to placing them on your ear,
ask your hearing care professional to de-activate Smart Start.
7.2 Inserting/Replacing the battery
1. Open the battery door completely by using your fingernail. Remove the
used battery if present.
2. Prepare the new battery (please refer to page 2 for information on ap-
propriate battery type/size for your hearing aid). Remove the protec-
tive foil to activate the battery.
3. Wait for 2 minutes before inserting the battery into the hearing aid.
On
O

14 15
4. Insert the new battery with the positive side in the correct position. Always insert the battery in
the door: never directly into the hearing aid.
5. Gently close the battery door.
i1. Always use new Zinc-Air batteries that have a minimum remaining shelf life of 1 year.
2. Whenever the hearing aids are not in use, remember to turn them o to avoid unnecessary
battery consumption.
3. At night, switch o the hearing aid and open the battery door completely to allow moisture to
evaporate and prolong the hearing aid’s lifespan.
4. If the hearing aid is experiencing frequent loss of connection to Lively wireless accessories,
contact your hearing care professional for a list of low impedance batteries.
iWARNING: Batteries contain dangerous substances and should be disposed of carefully in the
interest of your safety and for the environment. Also, keep batteries away from pets, children and
mentally disabled persons.
7.3 Low battery indicator
The hearing aid will reduce amplification and play a melody if battery power gets too low. This signal will
recur every 15 minutes until the hearing aid automatically switches o.
iNOTE: Keep spare batteries on hand.
7.3.1 Low battery indicator when paired with wireless accessories only
The batteries drain faster when you use wireless functionalities like direct streaming from your iPhone or
streaming sound from your TV with our TV Streamer. When the batteries deplete, the support of some
Lively wireless accessories shut down. Full functionality returns when you insert a new battery.
The table below shows how the functionality decreases with the depletion of the batteries.
Battery level Signal Hearing aid Remote Control Streaming
Fully charged P P P
Low P P O
Depleted
(change battery) P O O

16 17
7.4 Insert/Remove hearing aid
For comfort, always turn o your hearing aids before you insert or remove them.
7.4.1 Insert earmold
1. Hold the earmold between your thumb and index finger and position its
sound outlet in your ear canal.
2. Slide the earmold all the way into your ear with a gentle, twisting move-
ment.
3. Move the earmold up and down and gently press to place it correctly in
the ear. Opening and closing your mouth can ease insertion.
4. Make sure the hearing aid sits firmly behind the ear.
By experimenting, you may discover an easier method. With proper insertion,
hearing aids should fit snugly but comfortably.
iNOTE: It may be helpful to pull your ear up and outward with your opposite
hand during insertion.
iCAUTION: Never attempt to modify the shape of the hearing aid, earmolds, or tubing yourself.
7.4.2 Remove earmold
1. Lift the hearing aid from behind the ear. For a moment, let it hang beside your ear.
2. Gently pull the removal cord (not the hearing aid or the tubing) to pull the hearing aid from the
ear.
i
NOTE: For thin tube custom earmolds, grasp the removal cord and pull the earmold outward.
3. Remove the earmold completely by gently twisting it.
7.4.3 Insert thin tube with dome
1. Hang the hearing aid over the top of
the ear.
2. Hold the thin tube where it bends and
gently place/push the dome into the
ear canal. Push the dome far enough
into the ear canal so that the thin tube
lies flush with the head (check with a
mirror).
iNOTE: To avoid whistling, it is important that the tube and the dome fit correctly into your ear. For
other possible reasons, check with the Troubleshooting guide.
iCAUTION: Never attempt to bend or modify the shape of the thin tube.

18 19
7.4.4 Remove thin tube with dome
1. Hold the thin tube with your thumb and forefinger and remove the tube.
7.4.5 Sports lock
Your hearing care professional will apply and adjust the Sports lock.
7.5 Operation of the hearing aid
7.5.1 Push button
If your hearing aid is available with a push button, this will allow you to use up to four dierent listening
programs, each of them suitable for certain situations.
1. Tap the push button to switch between programs.
2. You will then hear one or more beeps. The number of
beeps indicates which program you have selected (one
beep = program one, two beeps = program two, etc.).
3. When you turn the hearing aids o and then back on,
they always return to the default setting (program one
and pre-set volume).
Program button (61 models only)
iNOTE: If you have two hearing aids with the Synchronized Push Button enabled, program changes
to one hearing aid automatically repeats in the second hearing aid. When you change a program
in one hearing aid, it responds with one or more beeps. The same number of confirmation beeps
in the second aid follow. This Synchronized Push Button can also be configured to allow one side
to control volume increase and the other side to control volume decrease. The volume changes to
one hearing aid are repeated on the other side to keep the levels the same.

20 21
8 Telephone use
Your hearing aid allows you to use the telephone as you ordinarily do. Finding
the optimal position for holding a telephone may require practice. One or more
of the following suggestions may be helpful:
1. Hold the telephone up to your ear.
2. Hold the telephone towards the top of the ear (closer to where the
microphones are).
3. If whistling occurs, it may take a few seconds of holding the telephone in
the same position before the hearing aid eliminates the feedback.
4. Whistling may stop by holding the telephone slightly away from the ear.
iNOTE: Depending on your individual needs, your hearing care professional may activate a
program specifically for telephone use.
8.1 Using Lively Hearing Aids with iPhone, iPad, and iPod touch (optional)
Lively hearing aids are Made for Apple, and allow for direct communication and control with an
iPhone®, iPad®or iPod touch®.
iNOTE: For assistance with pairing and using these products with your Lively device, please contact
your hearing care professional.
8.2 Using Lively hearing aids with smartphone apps
Use with smartphone apps:
• Notifications of app updates should not be disabled, and it is recommended that the user installs
all updates to ensure that the app will function correctly and will be kept up to date.
• The app must only be used with Lively devices for which it is intended, and Lively take no responsi-
bility if the app is used with other devices.
• If you would like a printed version of the user guide for a smartphone app, please consult cus-
tomer support or go to our website at www.listenlively.com/app/mylively.
8.3 Cellular phones
Your hearing aid complies with the most stringent Standards of International Electromagnetic Compat-
ibility. However, not all cell phones are hearing aid compatible (HAC).
Any degree of disturbance can be due to the nature of your particular cellular phone or of your wireless
telephone service provider.
iNOTE: If you find it dicult to obtain a good result while using your cellular phone, your hearing
care professional will be able to give you advice on available wireless accessories to enhance listen-
ing capabilities.
8.4 Phone Now
The Phone Now function automatically switches your present listening program to your telephone
program when a telephone receiver, equipped with a magnet, is close to your ear. When you remove the
telephone receiver from your ear, the hearing aid automatically returns to the previous listening program.

22 23
8.4.1 Placement of Phone Now magnets
Place Phone Now magnet on your telephone receiver to allow operation of the Phone Now function. In
order to place Phone Now magnet properly:
1. Clean the telephone receiver thoroughly.
2. Hold the telephone vertically, in a position similar to when mak-
ing a telephone call.
3. Place the magnets just below the telephone receiver. Make sure
not to cover the microphone openings. If necessary, move the
magnet to another position to improve ease of use and comfort
while speaking.
iNOTE: If you are not satisfied with the strength of Phone Now, you can reposition the Phone Now
magnet or add additional Phone Now magnets.
NOTE: Prior to placing the magnet on the telephone or cell phone, use a recommended cleaning
agent to clean the telephone.
8.4.2 Phone Now usage
1. Use your telephone in a normal manner.
2. A short melody indicates that the Phone Now feature has automatically switched on the tele-
phone program.
iNOTE: Initially, you may need to move the telephone receiver slightly to find the best position for
reliable Phone Now activation and good hearing on the telephone.
If you have two hearing aids with enabled Comfort Phone functionality, the hearing aid on the non
phone ear automatically reduces the volume.

24 25
8.5 Flight mode (optional)
iWARNING: When boarding a flight or entering an area where RF transmitters are prohibited, wire-
less functionality must be deactivated.
Your Lively hearing aid allows you to control it from your smartphone or Remote Control. However, in
some areas you are requested to turn o wireless communication.
Follow these steps to turn o wireless mode:
1. For each hearing aid, open and close (open-close, open-close, open-close) the battery door three
times within a 10-second period.
2. Double-dings for ten seconds ( etc.) indicate that your hearing aid is in Flight mode.
Follow these steps to activate wireless mode:
1. For each hearing aid, open and close the battery door once.
2. Your hearing aids are in wireless mode after 10 seconds.
iNOTE: Both hearing aids must be set in Flight mode - even with synchronization enabled.
NOTE: It is important to wait an additional 15 seconds after wireless function resumes before
opening and closing the battery door again for any reason. Flight mode will resume if you open
and close the battery door during this 15-second window.
9 Tinnitus Sound Generator (TSG) module
9.1 Intended use for the TSG module
Your Lively hearing aid includes the Tinnitus Sound Generator function, a tool for generating sounds to
be used in tinnitus management programs to relieve suering from tinnitus.
The Tinnitus Sound Generator can generate sounds adjusted to the specific therapeutic needs and your
personal preference as determined by your doctor, audiologist, or hearing care professional. Depending
on the selected hearing aid program and the environment you are in, you will sometimes hear the thera-
peutic sound resembling a continuous or fluctuating humming.
9.2 User instructions for the TSG module
9.2.1 Description of the device
The Tinnitus Sound Generator (TSG) Module is a software tool that generates sounds to be used in tin-
nitus management programs to relieve suering from tinnitus.
9.2.2 Explanation of how the device functions
The TSG module is a frequency and amplitude shaped white-noise generator. Noise signal level and
frequency characteristics can be adjusted to the specific therapeutic needs as determined by your doctor,
audiologist or hearing care professional.
Your doctor, audiologist or hearing care professional can modulate the generated noise with the purpose
of making it more pleasant. The noise can then resemble, for example, crashing waves on a shore.

26 27
Modulation level and speed can also be configured to your likes and needs. An additional feature can
be enabled by your hearing care professional that allows you to select predefined sounds that simulate
sounds from nature, such as breaking waves or running water.
If you have two wireless hearing aids that support ear-to-ear synchronization this functionality can be
enabled by your hearing care professional. This will cause the Tinnitus Sound Generator to synchronize
the sound in both hearing aids.
If your tinnitus troubles you only in quiet environments, your doctor, audiologist or hearing care profes-
sional can set the TSG Module so that it becomes audible exclusively in such surroundings. The overall
sound level can be adjusted via an optional volume control. Your doctor, audiologist or hearing care
professional will review with you the need for having such a control.
For hearing aids where ear to ear synchronization is enabled your hearing care professional can also
enable environmental monitoring synchronization so that the TSG noise level is automatically adjusted
simultaneously in both hearing aids dependent on the background sound level. Additionally if the hearing
aid has a volume control then the background noise level monitored by the hearing aid and the volume
control can be used simultaneously to adjust the generated noise level in both hearing aids.
9.2.3 TSG volume control
The sound generator is set to a specific loudness level by the hearing care professional. When switching
the sound generator on, the volume will have this optimal setting. Therefore, it might not be necessary to
control the volume (loudness) manually. However, the volume control provides the ability to adjust the
volume, or amount of stimulus, to the liking of the user.
9.3 Using TSG with smartphone apps
The Tinnitus Sound Generator control via hearing aid push buttons can be enhanced with wireless
control from a TSG control app on a smartphone or mobile device. This functionality is available in sup-
ported hearing aids when a hearing care professional has enabled the TSG functionality during fitting of
the hearing aid.
To use smartphone apps the hearing aid must be connected with the smartphone or mobile device.
9.4 The scientific concepts that form the basis for the device
The TSG module provides sound enrichment with the aim of surrounding the tinnitus sound with a neu-
tral sound, which is easily ignored. Sound enrichment is an important component of most approaches to
tinnitus management, such as Tinnitus Retraining Therapy (TRT). To assist habituation to tinnitus, this
needs to be audible. The ideal level of the TSG module, therefore, should be set so that it starts to blend
with the tinnitus, and so that you can hear both your tinnitus as well as the sound used.
In a majority of instances, the TSG module can also be set to mask the tinnitus sound, so to provide tem-
porary relief by introducing a more pleasant and controllable sound source.
9.5 Technical Specifications
9.5.1 Audio signal technology
Digital

28 29
9.5.2 Available sounds
White noise signal which can be shaped with the following configurations:
The white noise signal can be modulated in amplitude with an attenuation depth of up to 14dB.
High-pass filter Low-pass filter
500 Hz 2000 Hz
750 Hz 3000 Hz
1000 Hz 4000 Hz
1500 Hz 5000 Hz
2000 Hz 6000 Hz
9.6 Prescription use of a Tinnitus Sound Generator (TSG) hearing aid
The TSG module should be used as prescribed by your doctor, audiologist or hearing care professional.
In order to avoid permanent hearing damages, the maximum daily usage depends on the level of the
generated sound.
Should you develop any side eects from using the sound generator, such as dizziness, nausea, head-
aches, perceived decrease in auditory function or increase in tinnitus perception, you should discontinue
use of the sound generator and seek medical evaluation.
The target population is primarily the adult population over 18 years of age. This product may also be
used with children 5 years of age or older. However, children and physically or mentally disabled users will
require training by a doctor, audiologist, hearing care professional or the guardian for the insertion and
removal of the hearing aid containing the TSG module.
9.7 Important notice for prospective sound generator users
A tinnitus masker is an electronic device intended to generate noise of sucient intensity and bandwidth
to mask internal noises. It is also used as an aid in hearing external noises and speech.
Good health practice requires that a person with a tinnitus condition have a medical evaluation by a
licensed physician (preferably a physician who specializes in diseases of the ear) before using a sound
generator. Licensed physicians who specialize in diseases of the ear are often referred to as otolaryngolo-
gists, otologists or otorhinolaryngologists.
The purpose of medical evaluation is to assure that all medically treatable conditions that may aect tin-
nitus are identified and treated before the sound generator instrument is used.
The sound generator instrument is a tool to generate sounds to be used with appropriate counselling
and/or in a tinnitus management program to relieve patients suering from tinnitus.

21
30 31
10 The receiver tube
The receiver tube contains the wiring to the receiver, which delivers the sound to the ear canal. It is
important that the receiver tube and the receiver dome/RIE mold fits correctly in your ear. If the receiver
tube or the receiver dome/RIE mold irritates your ear in any way and prevents you from wearing your
hearing aid, please contact your hearing care professional.
You should never attempt to modify the shape of the receiver tube yourself. The receiver tube and the
receiver dome/RIE mold should be cleaned regularly.
Please see cleaning instructions in chapter 14.2 – 14.4.
11 How to apply domes
It is recommended that your hearing care professional shows you how to change the domes, because
incorrect dome replacement could result in the dome being left in the ear when you remove the hearing
aid.
11.1 Lively domes
Follow these steps to mount domes:
1. Push the new dome over the ribs flange on
the thin tube.
2. Make sure that the new dome is properly
and securely mounted.
11.2 Lively Tulip domes
The Tulip domes are mounted in a similar manner to the ordinary domes, but a few extra steps are
required. The Tulip domes consist of two “petals”.
Follow these steps to mount domes:
1. Push the largest petal away from the thin tube using a finger. This bends the petal forward.
2. Push the new tulip dome over the flange.
3. Then push the largest petal backwards, and it will be placed on top of the smaller petal.
iNOTE: It is important to note that the largest petal is the outermost petal.
4. Make sure that the new dome is properly and securely mounted.

32 33
12 Wireless accessories
With Lively wireless accessories, you can stream sound from your TV or music player directly to your Lively
hearing aids and you can also control them without wearing an intermediary device around your neck.
Ask your hearing care professional for more information on the range of Lively wireless accessories.
13 Lively Assist (Optional)
If you sign up to use the Lively Assist service available with your hearing aids, you can allow your hearing
aids to be adjusted remotely without even having to travel from where you are at the moment. This allows
you to experience unprecedented freedom and flexibility:
1. Request assistance remotely to adjust your hearing aids to be a better fit for you
Ask your hearing care professional for assistance or request adjustments to programs while installing
the changes at your convenience – wherever you are
2. Keep your hearing aid up to date with the latest software to ensure the best performance possible
Updates to the hearing aid software available for install at your convenience
iNOTE: Your hearing aids shut down during the install and update process. For optimum perfor-
mance, make sure the hearing aids are connected to the My LivelyTM app and placed close to the
iPhone or AndroidTM smartphone before applying the changes.
Your hearing care professional will gladly provide information regarding Lively Assist and how it works with
the My Lively app.
Ask your hearing care professional for more information.
14 iCare and maintenance
Please follow the instructions below to have the best user experience and to prolong the durability of
your hearing aids:
3. Keep your hearing aid clean and dry. Wipe the case with a soft cloth or tissue after use to remove
grease or moisture. Do not use water or solvents, as these can damage the hearing aid(s).
4. Never immerse hearing aids in water or other liquids, as liquids may cause permanent damage to
the hearing aids.
5. Avoid rough handling of hearing aids or dropping them on hard surfaces or floors.
6. Do not leave hearing aids in or near direct heat or sunlight, such as in a hot, parked car, as exces-
sive heat can cause damage or deform the casing.
7. Do not wear your hearing aid while showering, swimming, in heavy rain or in a moist atmosphere
such as a steam bath or sauna.
8. If your hearing aid does get wet, or if it has been exposed to high humidity or perspiration, it
should be left to dry out overnight with the battery out and the battery door open. It is also a
good idea to put the hearing aid and battery in a sealed container together with a drying agent
(desiccator) overnight. Do not use the aid until it is completely dry. Consult your hearing care
professional as to which drying agent to use.
9. Remove your hearing aid when applying cosmetics, perfume, aftershave, hair spray, and suntan
lotion. These might get into the aid and cause damage.

34 35
14.1 iDaily maintenance
It is important to keep your hearing aid clean and dry. On a daily basis, clean the hearing aids using a soft
cloth or tissue. In order to avoid damage due to humidity or excessive perspiration, the use of a drying kit
is recommended.
14.2 Cleaning the receiver tubes and domes
The receiver tube and the receiver dome should be cleaned regularly. Use a damp cloth to clean the re-
ceiver tube and receiver dome on the outside. Do not use water when you are cleaning the receiver tubes
or the receiver domes. This process is also used to clean the UP receiver mold. Please see chapter 15.4
for how to change the wax guard filter.
iNOTE: If the components get sti, brittle, or discolured, ask your hearing care professional for a
replacement.
14.3 iCleaning RIE or molds (does not apply for UP molds)
1. Separate the mold from the receiver tube.
2. Clean the RIE mold using a mild soap, and rinse with lukewarm water.
3. After cleaning, dry RIE molds thoroughly and remove any residual water and debris utilizing an air
bulb.
iNOTE: Earmold tubing may become sti, brittle, or discolored over time. Contact your hearing care
professional regarding tube changes.
14.4 Changing wax guard for receiver tube
For changing Cerustop (white) wax filters, the following steps are needed:
1. To remove the old wax guard, insert the removal side of the wax guard tool into the used wax
guard so that the shaft of the tool is touching the rim of the wax guard. Slowly pull the wax guard
straight out.
2. To insert the new wax guard, gently press the replacement side of the wax guard tool straight into
the hole of the sound outlet until the outer ring lies flush with the outside of the receiver. Pull the
tool straight out -the new wax guard will remain in place.

36 37
15 iGeneral warnings
1. Consult a hearing care professional if you think there may be a foreign object in your ear canal, if
you experience skin irritation, or if excessive earwax accumulates with the use of the hearing aid.
2. Dierent types of radiation, from e.g. NMR, MRI, or CT scanners, may damage hearing aids. It is
recommended not to wear hearing aids during these or other similar procedures. Other types of
radiation, such as burglar alarms, room surveillance systems, radio equipment, mobile telephones,
contain less energy and will not damage hearing aids. However, they have the potential to mo-
mentarily aect the sound quality or temporarily create undesired sounds from hearing aids.
3. Do not wear hearing aids in mines, oil fields, or other explosive areas unless those areas are certi-
fied for hearing aid use.
4. Do not allow others to use your hearing aids. This may cause damage to the hearing aids or to the
hearing of the other individual.
5. Hearing Aid usage by children or mentally disabled persons should be supervised at all times
to ensure their safety. The hearing aid contains small parts that could be swallowed by children.
Please be mindful not to leave children unsupervised with this hearing aid.
6. Hearing aids should be used only as prescribed by your hearing care professional. Incorrect use
may result in hearing loss.
7. Warning to hearing care professionals: Special care should be exercised in selecting and fit-
ting hearing aids with maximum sound pressure level that exceeds 132dB SPL with an IEC
60711:1981 occluded ear simulator. There may be a risk of impairment of the remaining hearing.
8. Be careful when boarding flights to deactivate the wireless functionality. Turn o your wireless
functionality by using the flight mode in areas where radio frequency emission is prohibited.
9. If device is broken, do not use.
10. External devices connected to the electrical input must be safe according to the requirements of
IEC 60601-1, IEC 60065, or IEC 60950-1 , as appropriate (wired connection, for example HI-PRO),
SpeedLink).
i1. Lively wireless devices include a RF transmitter that operates in the range of 2.4 GHz - 2.48
GHz.
2. Nominal RF output power transmitted is 0 dBm.
3. For use of wireless functionality only use Lively accessories. For further guidance regarding e.g.
pairing, please refer to the user guide of the relevant Lively wireless accessory.

38 39
16 iUsing Lively hearing aids with My Lively app for smartphones
16.1 Intended use of My Lively app for smartphones:
My Lively smartphone app is intended to be used with Lively wireless hearing aids. My Lively smartphone
app sends and receives signals from the Lively wireless hearing aids via smartphones for which the apps
have been developed.
16.2 iGeneral precautions
1. When wireless function is activated, the device uses low-powered digitally coded transmissions
in order to communicate with other wireless devices. Although unlikely, nearby electronic devices
may be aected. In that case, move the hearing aid away from the aected electronic device.
2. When using wireless functionality and the devices are aected by electromagnetic interference,
move away from the source.
3. Use only original Lively consumables e.g. tubes and domes.
4. Only connect Lively hearing aids to Lively wireless accessories intended and qualified to be used
with Lively hearing aids.
17 iPhone Now warnings
1. Keep magnets out of reach of pets, children and people with mental disabilities. If a magnet is
swallowed, please seek advice from a medical practitioner.
2. The magnet may aect some medical devices or electronic systems. The manufacturer of any
magnetically sensitive devices (e.g. pacemakers) should advise you regarding appropriate safety
precautions when using your hearing aid and magnet in close proximity to the medical device
or electronic system in question. If the manufacturer cannot issue a statement, we recommend
keeping the magnet or a telephone equipped with the magnet 30 cm (12”) away from magneti-
cally sensitive devices (e.g. pacemakers).
17.1 iPhone Now precautions
1. High distortion during dialling or phoning may mean that the magnet is not in the optimal posi-
tion relative to the telephone receiver. To avoid the issue, please move the magnet to another
place on the telephone receiver.
2. Only use magnets supplied by Lively.
This manual suits for next models
1
Table of contents