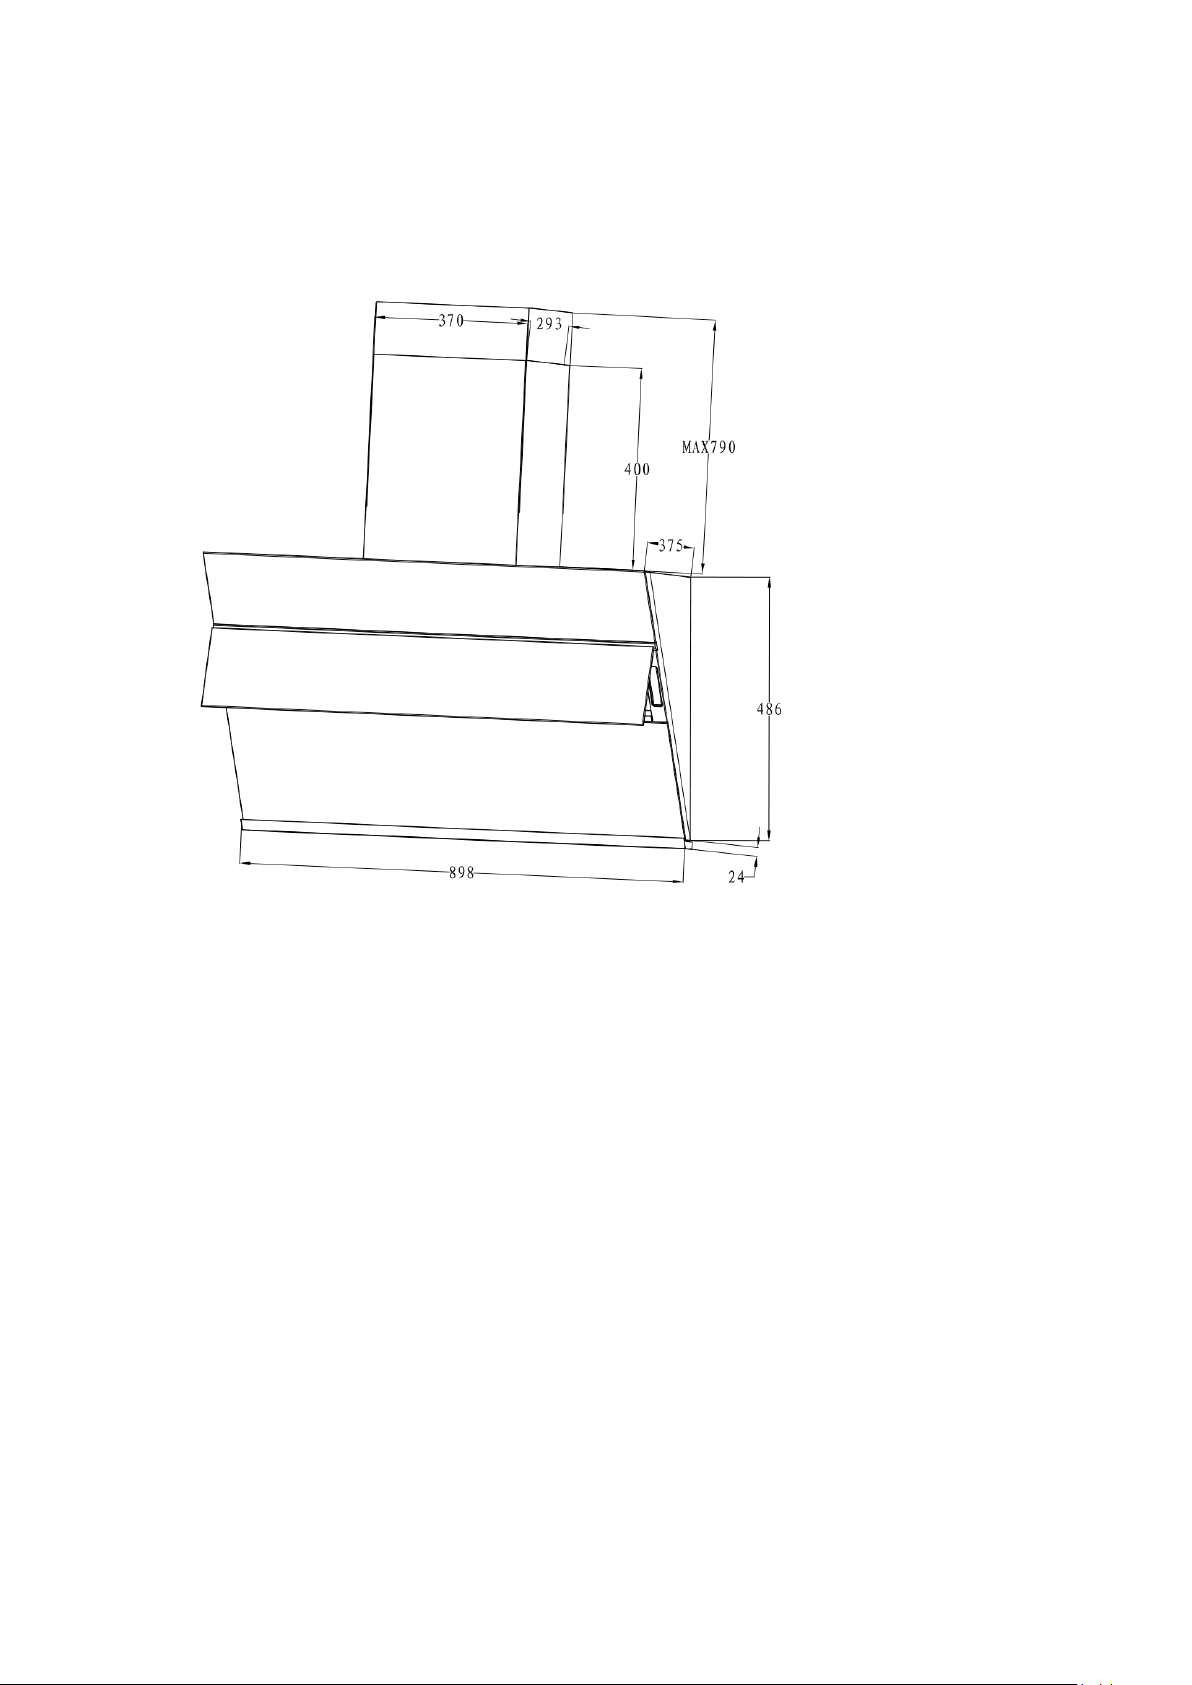
LIVINOX LCH-OCEAN-90BL User manual

1
LCH-OCEAN-90BL
User Manual

2
From the Manufacturer
Please read this user manual carefully before attempting to operate the appliance and keep it in a safe place for
future reference.
This appliance and its packaging are produced by processes that minimize waste and respect the environment.
Please help us to continue this effort to protect the environment by using the appliance efficiently and dispose of
the packaging in a responsible manner.
FOR THE USER
1. Safety Instruction
Warning
PLEASE READ THIS SECTION THOROUGHLY BEFORE ATTEMPTING TO OPERATE THE
APPLIANCE
1.To ensure adequate ventilation in the room when the range hood is in use at the same time as gas/fuel burning
cooking appliances (this is not applicable to appliances that only discharge the air back into the room).
2.There is a fire risk if cleaning is not carried out in accordance with the instructions.
3.To avoid using food products that produce flame under the range hood.
4.Do not “flambé“ food (is a cooking procedure in which alcohol is added to a hot pan to create a burst of flames)
under the range hood.
5.Sufficient air is needed for proper exhausting of gases through flue (chimney) of fuel burning appliances.
6.This appliance is not intended for use by persons (including children) with reduced physical, sensory, mental
capabilities, lack of experience and knowledge.
7.To reduce risk of fire and to properly exhaust air and to ensure to duct air outside. Do not vent exhaust air into
spaces within walls, ceilings, into attics and crawl spaces.
Installation
1. This appliance must be installed or repaired by a qualified technician only.
2. Do not modify any part of this appliance by yourself.
3. To ensure the location in which this appliance is installed has good and permanent ventilation.
4. In ducted mode, there must be one or more permanent air inlet. The air collected must not be discharged into
a duct used to blow off smoke from other appliances fed with electricity.
5. The distance between the bench to the lower part of the hood must not be less than 60cm.
6. Use an electrical connector with earth that is correct for your location.
7. To check the voltage in your area correspond to the appliance as indicated on the rating label.
8. Do not connect the hood to a duct that carries combustion fumes (e.g. fireplace).
Intended For Household Use
1.This product is designed for household use only and should never be used for commercial applications.
2.After use, always ensure that all controls are in the "OFF" position.
3.When frying with a gas flame, take particular care not to allow the oil or grease in the pan to catch fire.

3
Cleaning, Maintenance & Service
It is very important to clean and maintain the grease filters regularly (at least once monthly) to improve its efficiency
in eliminating heat and contaminated air in the kitchen. Heavy oil deposits is a fire hazard. Hood surface should be
cleaned with soft cloth and non-corrosive detergent.
Important: Never attempt to repair this appliance by yourself. Always refer to qualified Service Technicians.
For safety precaution, always purchase the original replacement parts.
Always switch off the power and unplug the connection before conducting maintenance or cleaning.
Electrical Cord
1.To ensure the electrical cord is not exposed to heat, chemical or sharp objects.
2.If the electrical cord is damaged, it must be replaced by the manufacturer or its service agent or qualified
electrician.
2. Hood Description
Ducted or Re-circulating mode
Depending on your requirement, this appliance can be configured to operate in the ducted or re-circulating modes.
DUCTED MODE: Fire proof ducting system of 160mm or 180mm diameter vent the fumes through a suitable outlet.
In the ducted mode, only the aluminum grease filters are installed.
RECIRCULATING MODE: Fumes are filtered for grease and odour through the aluminum grease filters and the
charcoal filters respectively and re-introduced into the kitchen environment. In re-circulating mode, both the
aluminum grease filters and the charcoal filters should be installed.
Speed Control
1. The hood is equipped with a 3 or 4 speed mechanical/electronic controls.
2. To use the low speed for simmering, medium speed for light cooking. To use the high speed for frying or heavy
cooking.

4
3. Dimension Diagrams
LCH-OCEAN-90BL

5
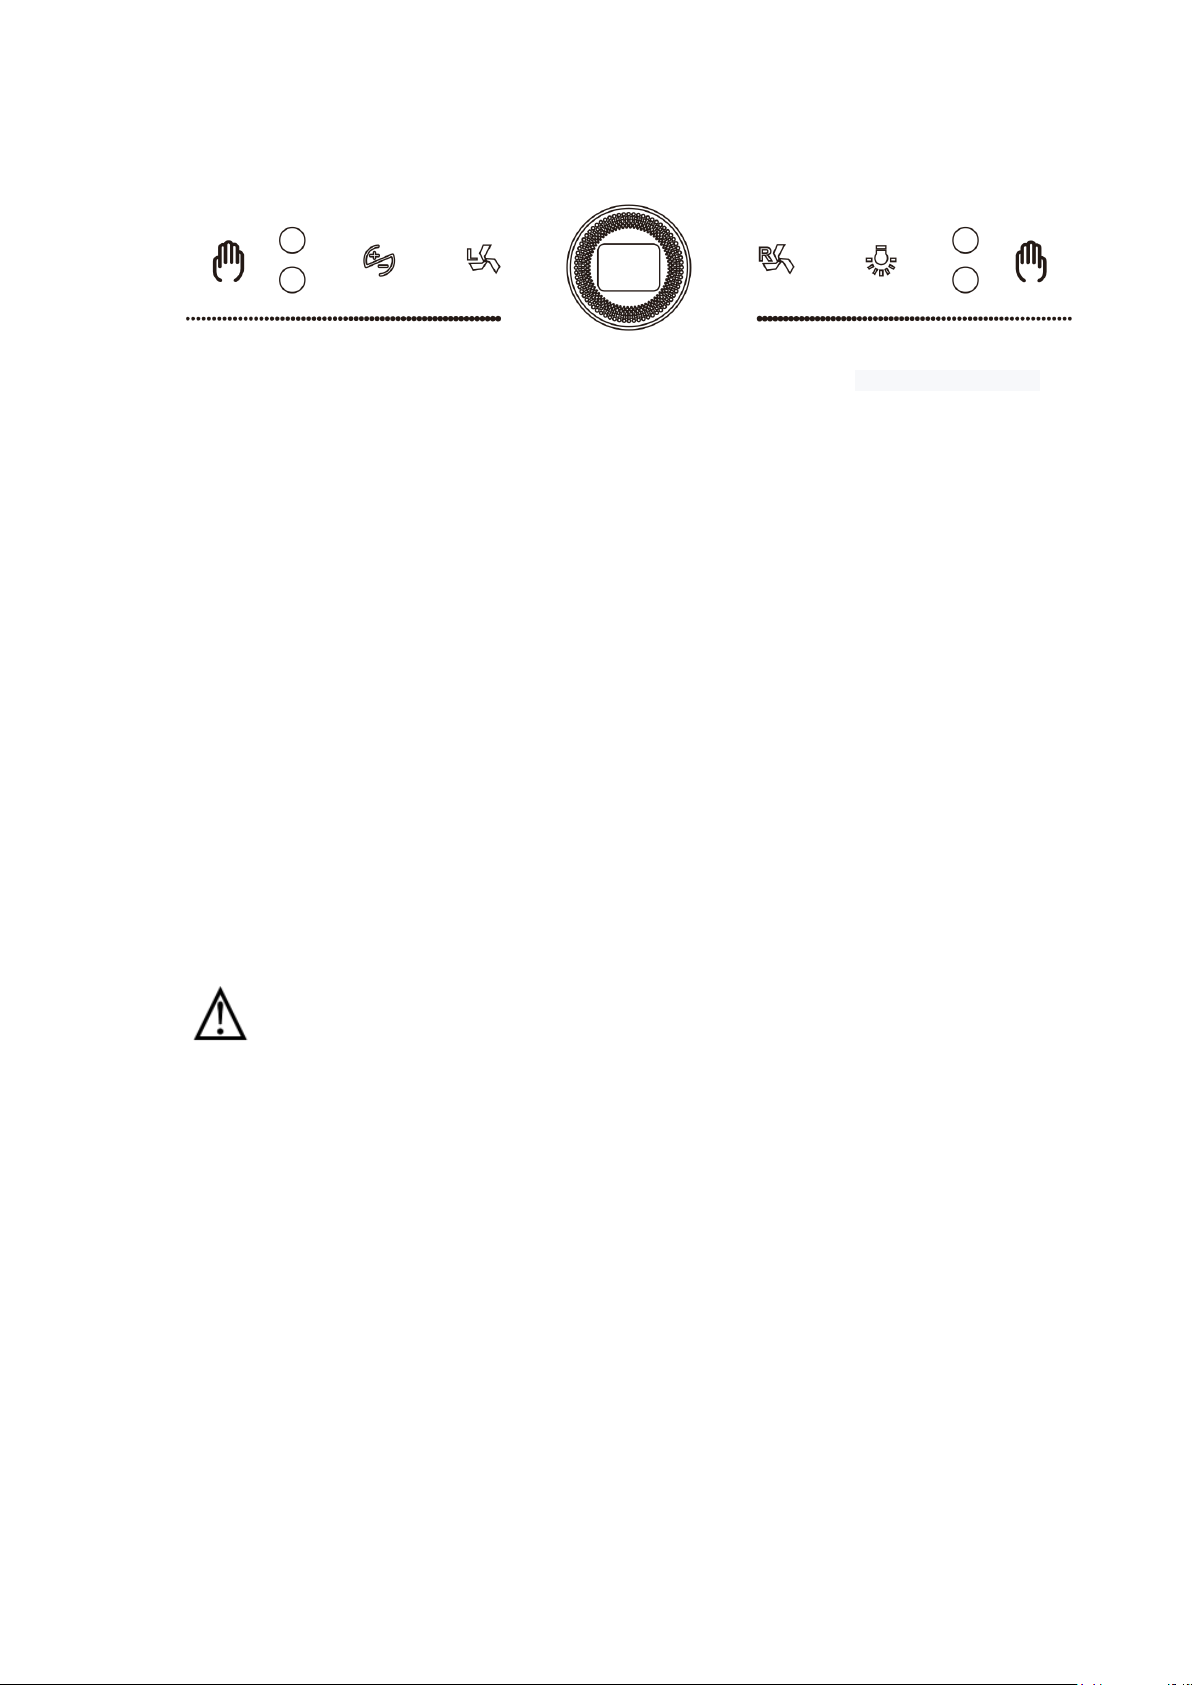
K. Touch control ( LCH-OCEAN-90BL)
A B C LED screen D E F
Wave A, Within 10-15cm distance from the switch, wave once from left to right, power and lighting will turn on (LED
screen shows “11”), Wave to the right once, the fan runs at mid speed (LED screen shows “22”). Wave
to the right again, the fan runs at high speed (LED Screen shows “33”) “Repeat this cycle".
Press B, the fan runs at low speed (LED screen shows “11”), Press B once, the fan runs atmid speed (LED screen
shows “22”). Press B again, the fan runs at high speed (LED Screen shows “33”). Press B again once for
1 minute delay power off).“Repeat this cycle".
Press C, the fan runs at low speed (LED screen left shows “1”), Press C once, the fan runs at mid speed (LED
screen left shows “2”). Press C again, the fan runs at high speed (LED Screen left shows “3”). Press C
again once for 1 minute delay power off). “Repeat this cycle".
Press D, the fan runs at low speed (LED screen right shows “1”), Press D once, the fan runs at mid speed (LED
screen right shows “2”). Press D again, the fan runs at high speed (LED Screen right shows “3”). Press
D again once for 1 minute delay power off). “Repeat this cycle".
Press E, turn on power. Press it again, turn off power.
In non-working state, press E for 3 seconds, oil removing function will operate for 10 minutes. Press
again, turn off oil removing function. The fan will automatically operate at high speed for 30 seconds after
the 10 minutes cleaning function.
Wave F, Within 10-15cm distance from the switch, wave once from right to left to turn off power.
Cleaning & Maintenance
ALWAYS SWITCH OFF AND UNPLUG FIRST!
SURFACES:
Wash with warm soapy water and a soft sponge. Never use abrasive detergent, scouring pads, steel wool or
solvents on any part of this appliance as this will cause irreparable damage.
ALUMNIUM GREASE FILTERS:
Wash in the dishwashers or soak the panels in a degreasing agent for an hour, then rinse off and dry before re-
installing.
CHARCOAL FILTERS:(optional and not included in package)
(only in re-circulating model): Charcoal cannot be reused. They must be replaced with the appropriate types
once a year or depending on the frequency of appliance usage.
For this appliance to function effectively, regular maintenance is a must.
Clogged filters restrict airflow and may cause the motor to overheat.

6
5. Installation
1. Use suitable bolts to mount the appliance on a secure surface.
2. The minimum distance between the supporting surface for the cooking vessels on the hob and the lowest
part of the range hood. When the range hood is located above a gas appliance, this distance shall be at
least 65 cm. If the instructions for installation for the gas hob specify a greater distance, this has to be
taken into consideration.
3. The location of the installation must have permanent openings for ventilation.
4. Regulations concerning the discharge of air have to be fulfilled.
5. It is strongly recommended that the hood to be installed right over the exhaust air from cooking.
6. Do not install the outlet of the pipe in the wind direction, which can prevent the exhaust air from flowing
backward.
7. To fasten the components for the exhaust outlet with screws. To ensure good ejection of exhaust air, the
pipe must not be bended for too many times.

7
FOR THE INSTALLER
6. Safety Information
1. Electrical connection must be in accordance with the local standards and laws.
2. To ensure that the electrical supply in compliance with the appliance setting, otherwise, do not
connect.
3. To ensure the power supply cord is free from any heat source or sharp objects.
4. The electrical connection of this appliance must be soundly earthed. In the event of electrical short
circuit, grounding reduces the risk of electrical shock. If unsure, contact a qualified electrician.
5. Replacement of lamp must not exceed 20W.
6. LED lamp must not exceed 1.5W/7W.
Wire Color Codes:
Green & Yellow = EARTH
Blue = NEUTRAL
Brown = LIVE
7. Trouble shooting

8
Problems
Possible Cause
Action
No go
No power supply
Check that the main switch is turned
on
Check that the plug is connected
Poor airflow
Aluminum grease filters clogged
Clean the filters and replace when dry
Charcoal grease filters clogged
Replace charcoal filters with new sets
Motor running but no
airflow
Butterfly valve jammed
Contact technician
Motor cuts after a few
minutes
High temperature safety device
activated
The kitchen is not sufficiently
ventilated
The hood is installed too near
the cooking stove
The hood must be at least 65cm from
stove
Strong cooking smell
Charcoal filters are not installed
Charcoal filters must be installed in re-
circulating mode
Oil dripping onto stove
Oil cup missing or not installed
Remove aluminum filter and replace oil
cup
aluminum grease filter saturated
Wash the aluminum grease filters
Whirring sound
Foreign object in contact with fan
blade
Contact technician
Table of contents
Other LIVINOX Ventilation Hood manuals

LIVINOX
LIVINOX LCH-601A-90SS User manual

LIVINOX
LIVINOX LCH-ROSEDC-90BL User manual

LIVINOX
LIVINOX LCH-ROSE-90BL User manual

LIVINOX
LIVINOX LCH-COPPERDC-GM-90 User manual

LIVINOX
LIVINOX LCH-LAPIS-90SS User manual

LIVINOX
LIVINOX LCH-NITE-90BL User manual

LIVINOX
LIVINOX LCH-COPPER-90SS User manual

LIVINOX
LIVINOX LCH-MICA-90BL User manual

LIVINOX
LIVINOX LCH-ROCK-BL User manual

LIVINOX
LIVINOX LCH-COPPERDC-90BL User manual