Livoo DOP229 User manual

User manual
WWW.LIVOO.FR
Reference : DOP229
Version : 1.4
Language : Englis
Soup maker

User manual
1
You ave purc ased a product LIVOO brand and we t ank you. We take great care in design, ergonomics
and ease of use of our products. We ope t at t is product will give you complete satisfaction.
GENERAL INSTRUCTIONS
PLEASE, TAKE TIME TO READ WELL THE INSTRUCTIONS FOR USE
PARTICULARLY BEFORE THE FIRST USE.
A misuse of t e appliance can damage it or urt t e user. Assure t at
you use t e appliance for t e use for w ic it is designed; we refuse
any responsibilities as for t e damages by an incorrect use or a bad
manipulation.
1. Before use c eck t at t e voltage of your wall outlet
correspond to t e rated voltage manner.
2. Do not operate t e appliance wit a damaged cord or after
malfunction or as been damaged in any manner.
3. If t e supply cord is damaged, it must be replaced by t e
manufacturer, its service agent or similarly qualified
persons in order to avoid a azard (*).
4. Do not let cord ang over edge of table or counter or touc
ot surface.
5. Appliance must not be immersed. Never place it into t e
dis was er.
6. Do not touc ot surface. Use andles or knobs only.
7. Close supervision is necessary w en your appliance is being
used near c ildren or infirm persons.
8. Do not place an appliance on or near a ot gas or on a eated
oven.
9. Do not use outdoors (House old use only).

User manual
2
10. Do not touc t e cutting blades and do not insert any kind of
object (knives, forks, spoons etc.) into t e bowl w ile t e
product is operation. A spatula may be used only w en t e
product is not in operation, avoiding t e risk of serious
injury.
11. To avoid t e risk of personal injury, t is product s ould not
be operated by c ildren or people w o are not familiar wit
t ese instructions.
12. Never operate t e product w en t e bowl is empty and do
not remove t e bowl lid before t e blades come to a
complete stop.
13. T is appliance is designed to c op small quantities of food
under no circumstances s ould t e bowl be overfilled.
14. T is appliance s all not be used by c ildren. Keep t e
appliance and its cord out of reac of c ildren.
15. T is appliance can be used persons wit reduced p ysical,
sensory or mental capabilities or lack of experience and
knowledge if t ey ave been given supervision or instruction
concerning use of t e appliance in a safe way and
understand t e azards involved.
16. C ildren s all not play wit t e appliance.
17. Never leave t e unit unattended w en switc ed on.
18. T e appliance is not intended to be operated by means of
external timer or separate remote control system.
19. Never use t is appliance :
-If t e socket or t e cord is damaged
-If case of disfunctionning

User manual
3
-If t e appliance is damaged in any manner
-If it fell in t e water
-If you dropped it
20. Always disconnect t e appliance from t e supply if it is left
unattended and before assembling, disassembling or
cleaning.
21. Regarding t e instructions for cleaning surfaces in contact
wit food, t anks to refer to t e below paragrap "cleaning"
in manual.
22. Regarding t e instructions for t e use of accessories,
operating times and speed settings, t anks to refer to
t e USE OF THE APPLIANCE.
23. It is absolutely necessary to keep t is appliance clean at all
times as it comes into direct contact wit food.
24. T ere is potential injury from misuse.
25. Care s all be taken w en andling s arp cutting blades,
emptying t e bowl and during cleaning.
26. Switc off t e appliance and disconnect from supply before
c anging accessories or approac ing parts t at move in use.
27. Accessories, ot er t an t ose supplied wit t e appliance,
s all include instructions for t eir safety use.
28. Be careful if ot liquid is poured into t e blender as it can be
ejected out of t e appliance due to a sudden steaming.
29. Heating element surface is subject to residual eat after use.
30. Do not use t e soup maker if t e rotating blades are
damaged.
31. Appliance must be used only wit stand provided.

User manual
4
32. Warning: Avoid spillage on connector.
33. Caution: Insure t at t e appliance is switc ed off before
removing it from its stand.
34. T is appliance is intended to be used in ouse old and
similar applications suc as:
•staff kitc en areas in s ops, offices and ot er
working environments
•farm ouses
•by clients in otels, motels and ot er
residential type environments
•bed and breakfast type environments
(*)
Competent qualified electrician: after sales department of t e producer or importer or any person w o
is qualified, approved and competent to perform t is kind of repairs in order to avoid all danger. In any
case you s ould return t e appliance to t is electrician
T is instruction manual is available too on our website www.livoo.fr
SPECIFICATION
Voltage:
220-240V
~
50-60Hz
Power: motor: 300W / eating: 900W
Capacity 1.7L
Working time eating function: 3 minutes, and stop 1 minute, total 10 cycles
Working time soy milk function: 3 minutes, and stop 1 minute, total 10 cycles
Working time blender function: respecting t e maximum rated capacity, t e ratio of carrots to water is 2 to
3, work 3 minutes, and stop 1 minute, total 10 cycles
VERY HOT SURFACE. Surfaces can
be very ot w en t e appliance is
in operation.

User manual
5
DESCRIPTION
Control Panel
Measuring cup
Lid
Blender jug wit cutting
blade
Handle
Unit motor base
Brus and
sponge
Stainless
Filter
Steam
baske
t
Eggs
basket

User manual
6
Before fir t u e:
Unplug t e appliance
Clean it wit damp clot
USE OF THE APPLIANCE
Thi appliance cannot be u ed to make cru hed ice or to heat milk.
Water doe not overflow the lower or upper level indicated in ide the metal bowl
Do not hold the appliance by the top handle when the jug i full, a it may tip over.
Do not use t e bowl as a storage container (freezing or ot ers).
Do not use frozen ingredients for your preparation ot erwise defrost t em before use.
Always make sure t at t e ingredients are c opped, peeled, sliced or cubed into small, 2-3 cm pieces.
1. Ensure t at t e Soup Maker is switc ed off and unplugged from t e mains power supply.
2. Position t e glass jug onto a flat, stable, eat-resistant surface.
3. Remove t e lid. Be careful not to touc t e blade.
4. Carefully apply a t in coat of cooking oil to t e bottom of t e jug. T is will elp to prevent t e
ingredients from sticking.
C op all of t e ingredients into approximately 2-3 cm cubes and place t em in t e jug wit some
brot .
5. Place t e lid on t e blender jug. T e lid must first be rotated so t at t e open lock symbol is aligned
wit t e arrow on t e andle. Press t e lid onto t e blender jug and rotate t e lid clockwise until t e
closed lock symbol is aligned wit t e arrow on t e andle. Place t e measuring cup in t e opening
of t e lid and lock t e measuring cup into position. To do t is, turn it clockwise.
6. Plug t e cable in t e power cord socket.
Place t e blender jug on t e motor unit and press t e blender
jug down until you ear a beep.
7. Press t e ON/OFF button on t e control panel. You will t en ear a beep, t e ON/OFF LED will lig t
up and t e ot er control panel buttons LED will flas .
Press t e button on t e control panel of your desired function for preparing t e ingredients.
T e LED for t e selected function will t en flas and all of t e ot er LEDs will turn off.
8. Once cooking is complete, ensure t at t e selected programme as finis ed and t en switc off t e
Soup Maker at t e mains power supply.
9. Carefully remove t e lid and transfer t e soup into a suitable container.
10. Allow t e Soup Maker to cool sufficiently before making a second batc of soup.

User manual
7
Warning:
•A slig t browning of t e internal base may appear w en cooking is complete. T is is completely
normal and can be removed during t e cleaning process.
•T e Soup Maker is not designed to re eat soup once it is made.
•T e jug and t e lid will get very ot during use; always take care w en touc ing t ese components
and use t e andle w en moving t e jug.
Smooth oup Program
:
1. W en making Smoot Soup, t e Soup Maker will automatically eat and blend t e ingredients to a
preset programme.
2. Turn on t e Soup Maker by pressing t e ‘ON/OFF’ button; t e indicator lig ts will illuminate.
3. Press t e ‘ ‘button to select t e ‘Smoot Soup’ programme.
4. It will run for approximately 20 minutes.
5. For t e final few minutes of t e ‘Smoot soup’ programme, t e appliance will blend t e ingredients
in order to ac ieve a smoot consistency.
Chunky oup Program:
1. W en making c unky soup, t e Soup Maker will automatically eat t e ingredients to a pre-set
programme.
2. Turn on t e Soup Maker by pressing t e ‘ON/OFF’ button; t e indicator lig ts will illuminate.
3. Press t e ‘ ’ button to select t e ‘C unky Soup’ programme.
4. It will run for approximately 30 minutes.
5. Once t e programme as finis ed, t e Soup Maker will make an audible beep to indicate t at t e
programme as completed.
6. It may be necessary to blend t e soup to reac t e required consistency.
Blend Program
T e Soup Maker can also be used to blend ingredients using t e ‘Blend ‘programme. W en using t is
programme, t e eater function will not operate, allowing t e ingredients to be blended to make smoot ies
and dressings. It can also be used to obtain t e desired consistency after ot er pre-set programmes ave
operated. T e process ends automatically after 3 minutes.
Note:
Do not blend dry ingredients and do not use t e ‘Blend’ programme for more t an 1 full cycles wit out
allowing t e Soup Maker to cool sufficiently.
Don’t take t e lid out w en t e Soup Maker is blending.
Heat up program

User manual
8
T is function is used to eat up pre-cooked food. T e contents are stirred and eated alternatively.
T e process ends automatically after approx. 10 minutes.
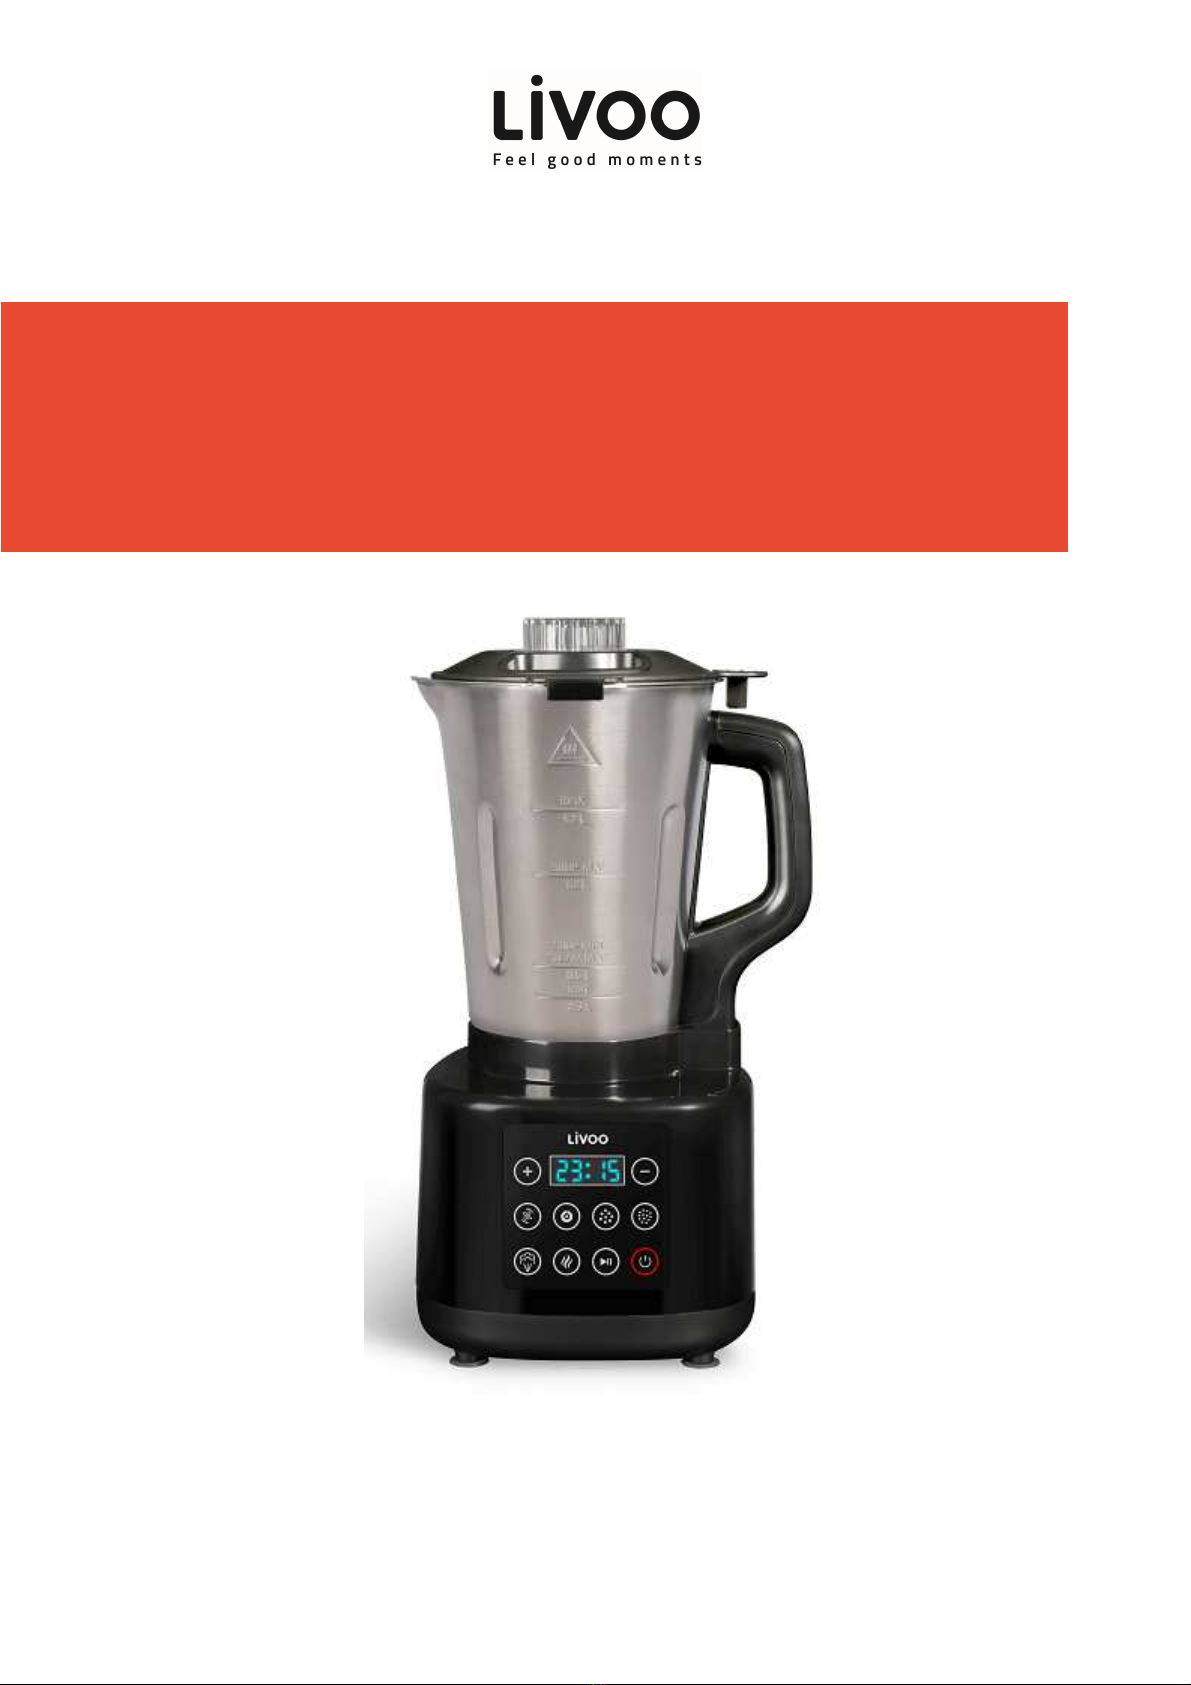
1. Add t e soup to t e blender jug. Do not fill t e blender jug past t e "MAX 1.2 L" mark.
2. Place t e lid wit t e measuring cup inserted on t e blender jug and lock into place.
3. Connect t e power cable of t e mains plug. You will t en ear a beep.
4. Press t e ON/OFF button on t e control panel. A beep will now sound and t e LEDs for t e control
panel buttons will flas .
5. Press t e button on t e control panel to start t e process. Next a beep can be eard and
t e LED of t e selected function will flas .
6. T e contents will be stirred and eated alternatively. Once t e process is finis ed, 10 beeps will
sound and t e LEDs on t e bottom row of t e control panel will flas .
7. If necessary, t e eating process can also be manually stopped earlier. To do so, press t e ON/OFF
button on t e control panel.
8. Switc t e appliance off and carefully remove t e lid.
9. Pour t e contents out of t e blender jug.
Pul e Program
1. Turn on t e Soup Maker by pressing t e ‘ON/OFF’ button; t e indicator LED will illuminate.
2. Hold pressing t e button to blend. Please don’t exceed 30 sec for eac cycle.
Tipp’
Do not use t e Soup Maker wit out t e lid securely fitted.
Do not add any frozen ingredients to Soup Maker. All ingredients must be t awed and at room temperature
before use.
All meat or fis must be precooked.
Do not add t e ingredients after blending if Smoot function and C unky Soup function is required as it will
cause damage on t e eating plate.
lf t e alarm sounds, unplug t e Soup Maker, clean t e sensor and reduce t e ingredients quantity before
trying again.
Stainle teel filter
T e strainer is used to prepare soups wit dual consistency: on t e one and, t e ingredients inside t e
stainless steel filter are smoot ed and on t e ot er, t e ingredients outside t e stainless steel filter are not
blended. T is means, for example, you can make soups t at are smoot but still contain some vegetable and
meat pieces.
1. Insert t e stainless-steel filter into t e blender jug. Place it onto t e centre of t e cutting blade.
2. T e strainer as a finer and a coarser side. T e way it is inserted will determine w et er larger or
smaller pieces make it into t e soup.

User manual
9
3. C op t e ingredients into approx. 1 cm sized pieces and add to t e blender jug. Put t e ingredients
so t at some are inside t e stainless-steel filter and some outside.
4. Complete above steps.
5. Disconnect t e power cable plug from t e wall outlet.
6. Remove t e stainless-steel filter from t e blender jug and stir t e contents wit a long spoon to
ensure t e pieces are evenly distributed.
7. Pour t e contents out of t e blender jug.
Boiling egg and team ba ket u e
Thi function i u ed to cook the ingredient , without blending them. It i al o uitable for boiling egg .
The cooking proce end automatically after approx. 15 minute (timer adju table for 0-30min )
.
1. Fill t e blender jug wit water to t e "MIN 0.3 L" mark.
2. Insert t e egg basket wit eggs or insert steam basket wit food in t e blender jug.
(Carefully pierce t e eggs on t e bottom to prevent t em cracking w ile cooking.)
3. Place t e lid wit t e measuring cup inserted on t e blender jug and lock into place.
4. Connect t e power cable of t e mains plug to a live wall outlet. You will t en ear a beep.
5. Press t e ON/OFF button on t e control panel. A beep will now sound and t e LEDs control panel
buttons will flas .
6. Press t e button on t e control panel to start t e process.
Note: We recommend manually stopping t e cooking process to ac ieve arder or softer boiled eggs as
desired. To do t is, press t e ON/OFF button on t e control panel after 10 minutes for soft-boiled eggs. Or,
wait until t e cooking function finis es automatically after 15 minutes for ard-boiled eggs.
7. Switc t e appliance off and carefully remove t e lid.
8. Remove t e egg basket (or steam basket) and rinse t e eggs wit cold water.
CLEANING AND MAINTENANCE
Note:
Never remove t e motor unit until t e unit as come to a complete stop. If you lift t e cover w ile t e unit
is operating, it will s ut off automatically.
1. Unplug appliance before assemble it, disassemble it or was it.
2. T e inside of t e bowl can be cleaned wit a little soapy water.
3. Was t e blade, egg basket, filter under running ot water wit caution.
4. Wipe outside of appliance wit soft clot .
5. Do not use wire brus or any abrasive items or liquids.
6. Never immerse appliance in water.
7. Forbidden dis was er.

User manual
10
T e Pulse programme can be used to remove any stubborn stains. To do so, add 750 ml of ot water wit a
small amount of mild detergent to t e jug.
For toug stains, it is recommended to leave t e ot water in t e Soup Maker for approximately 10-15
minutes before using t e pulse programme.
Problem
C
au e
S
olution
T e soup maker
does not work
1. Mains plug not connected
2. Blender jug incorrectly seated on
t e motor unit
3. Lid is incorrectly fitted on t e
blender jug
1. Connect t e mains plug to a live wall
outlet
2. Place t e blender jug onto t e motor unit
correctly.
3. Place t e lid onto t e blender jug correctly
All LEDs are
flas ing and a
beep is sounding
1. Over eating protection enabled
2. Contacts on t e blender jug or
motor unit are wet
1. Disconnect t e power cable from t e mains
and leave t e appliance to cool down
2. Disconnect t e power cable from t e mains
and allow t e appliance to dry out
Food as burned Blender jug not cleaned prior to
eating
T e blender jug must be cleaned t oroug ly
before every cooking and eating cycle
Contents are not
cooked
properly
1. Too many ingredients in t e
blender jug
2. Some ingredients require a longer
cooking time
1. Add fewer ingredients to t e blender jug
before cooking
2. Start t e cooking process again
Food was
insufficiently
blended
Not enoug liquid in t e blender
jug
Add some liquid and start t e BLEND
function

User manual
11
Correct Di po al of thi product
(Wa te Electrical & Electronic Equipment)
(Applicable in the European Union and other European countrie with eparate collection y tem )
T e European Directive 2012/19/EU
on Waste Facilities Electrical and Electronic (WEEE)
This marking shown on the product or its literature, indicates that it should not be disposed with other household wastes
at the end of its working life.
To prevent possible arm to t e environment or uman ealt from uncontrolled waste disposal, please separate t is from ot er types
of wastes and recycle it responsibly to promote t e sustainable reuse of material resources.
House old users s ould contact eit er t e retailer w ere t ey purc ased t is product or t eir local aut ority office, for details of w ere
and ow t ey can take t is item for environmentally safe recycling
.
•P oto no contractual
•Worried about t e quality of is products t e manufacturer reserves t e rig t to make modifications wit out advance
notice
LIVOO
BP 61071
67452 Mundolsheim - FRANCE
Table of contents
Other Livoo Blender manuals