LMX Bikes LMX 64 User manual

LMX 64 User Guide
The purpose of this document is to provide all the useful information
concerning the operation of an LMX 64T or LMX 64H.
Safety notice
The owner must act responsibly and follow the instructions of this manual. Particular
attention should be paid to the section on safety and legal regulations. By signing
this document, the owner acknowledges that he has read the safety instructions set
out in this document, that he will act responsibly and in accordance with applicable
laws.
Being an approved model, a registration and insurance are required for use on the
roads in the EU.
Owner's signature:

LMX 64 user manual
I. General description
Notes for the owner
Congratulations! You are now the owner of one of the best ultra light off-road
two-wheelers. At LMX, we are proud to manufacture these bikes and motorcycles,
and to launch the electric all-terrain revolution.
As an offroad bike, the LMX 64 is built in accordance with the construction and
safety requirements of standard 168/2014 for category L vehicles. It is strongly
recommended to follow the instructions in this manual relating to safety, checks
before driving and general maintenance.
Product information
LMX Each frame is identified by a serial number engraved on the mounting area of
the shock. If you encounter an LMX frame without this plate or this number, please
notify us at the following email address: [email protected]
Warranty information
LMX 64 frames are guaranteed against manufacturing defects for 2 years from
thedateinvoice. the systems electronics, the motor and the battery are also
guaranteed in the context of their normal use. Refer to the sales terms applicable on
the date of validation of the order for more information relating to the warranty.
Any operating condition not included in this manual is not covered under the
warranty.
1/ 26

LMX 64 user manual
Delivery and assembly information
The lmx 64H is delivered pre-assembled, however the front wheel, pedals and stem
remain to be installed.
1. Install the front wheel using the quick axle. See SR suntour manual.
2. Position the stem and the handlebar at 90 ° to the front wheel then tighten
the 2 stem screws located on either side of the steering tube to lock the stem
relative to the fork. Tighten to 8 NM
3. Install pedals with a 15mm open-end wrench. make sure to put the pedal
marked L on the left and the pedal marked R on the right. Firmly shake hands
with the 15mm wrench.
Loading capacity
Capacities The LMX 64 frame has been designed for all-terrain use. However, for the
durability of the frame and the technical elements, the load must remain within the
following limits:
●Maximum weight of the bike (ready for use): 30 kg
●Maximum weight of the equipped cyclist: 120 kg
●Maximum engine power (peak): 2.5 kW
●SpeedMaximum speed: 45 km / h
II. Operating conditions
I.Charge
The bicycle is supplied with a 4A charger without a fan. The normal charging time is
250 minutes at 100% and 210 minutes at 80%. When the battery is being charged,
the logo is red. When the battery is charged, the charger turns green.
2/ 26

LMX 64 user manual
The battery can be charged on or off the bike. Mechanical shock such as dropping
the battery during handling should be avoided. To install the battery on the frame,
slide it back into the U-channel of the frame and be sure to do so when the battery is
completely at the bottom. A click indicates that the battery is locked in place.
Be sure to close the rubber cap of the charging port before using the LMX.
To remove the battery, turn the key then slide the battery forward. Then remove the
key and then remove the battery completely by rotating it along its axis to the left of
the bike.
3/ 26
LMX 64 user manual
The voltage of the battery gives an indication of the battery charge level:
100%
80%
50%
20%
0%
58V
56v
52v
46V
42V
Lifetime
After 300 to 500 full charge cycles, the battery will provide 70% of its original
capacity. This number of cycles will be strongly influenced by the use case, the
driving style, the storage temperature.
Storage:
For quality storage, it is advisable to store the battery in a dry and temperate place
(between 10 and 30 ° C).
Below 10 ° C, the useful capacity of the battery can be reduced by 30%.
In the event of a long period of non-use, it is advisable to store it in the state of
charge at 2/3 of its capacity. This corresponds to a no-load voltage of 52V.
Maintenance
It is advisable to carry out a 24-hour maintenance charge every 5 cycles to ensure
cell balancing and optimal battery performance.
Note: The battery must not (or cannot) lose the charge level when not in use.
4/ 26

LMX 64 user manual
III.Checklist
Before using the LMX, check the following:
●The battery must be charged and locked to the frame.
●All the screws and nuts should be tightened and locked. Use medium thread
lock if necessary.
●The wheels, suspension and handlebars and the stem must have no play and
be tight.
●The saddle should be tight.
●Cables and electrical wires must be fixed to the chassis and must not move.
●The brakes should work properly. Storing or transporting the bicycle in an
abnormal position may cause the brakes to malfunction.
●The battery has adequate voltage.
●The wheels must be in good condition and the tires inflated with adequate
pressure. Please consult the tire manufacturer or this manual for nominal
pressures.
●The throttle should have a functional spring and no hard points on its
operation.
IV. Switching the LMX 64 on and off
To switch on the LMX 64, the battery must be installed in the frame and locked.
Press once on the button on the battery left cycling to power the battery (the LED
should all pass to green, then indicates the actual battery status) and press on the
middle power button on the handlebars, holding down until the LMX logo appears
on the screen.
Do not step on the pedals during startup because it could result in poor calibration
of the torque sensor. Do not use the throttle grip when starting.
To turn the bike off, press the power button holding until the logo appears,
then-release.
The battery goes into standby automatically after about 45 minutes, the LEDs on the
left side then go out.
5/ 26

LMX 64 user manual
V. Power modes
The mode can be changed using the handlebar switch. There are 5 feeding modes.
Modes 1,2 and 3 should be used for beginners or for using the LMX 64H similar to a
25 km / h VAE. Modes 4 and 5 are best suited for climbing extreme.
When the bike is on, the bike is inmode N (Neutral). As long as the stand is down, it is
impossible to change the mode. Lowering the stand automatically activates the N
mode.
By pressing the “+” button once , you can switch to mode 1.
Press “-” to return tomode N.
By pressing the “+” button, you can go up the modes. Press “-” to lower the modes
and reduce the power.
Modes 1, 2 and 3
25km / h Without accelerator, increasing power
Mode 4
45 km / h, with accelerator and pedaling sensor
Mode 5
45km / h, maximum power, without pedaling sensor (motorcycle mode)
6/ 26

LMX 64 user manual
VI. Informations on the main screen
Reset trip counter: Simultaneous long press on plus and minus buttons
Access to menu: double press on button M
VII. Use of the telescopic seatpost
Use the lever to unlock the seatpost. Use your weight while pressing the lever to
lower it.
7/ 26

LMX 64 user manual
VIII. Use of pedal side gears
The LMX 64 is delivered with an 11-speed transmission. Use the handlebar controls to
adapt the gear to the terrain. As a general rule to limit the power consumption, it is
better to turn faster in the climbs than to press very hard on the pedals. Using a
slower pedaling speed promotes a stronger engine response and therefore higher
assistance.
IX. Breaking in the brakes
It is important during the first few uses to run in the brakes in order to ensure
efficient braking without noise.
Running-in forms the wear layer of the brake disc. To avoid icing of the surface,
which can cause noise during braking, it is important to follow the running-in
recommendations.
When using for the first time, avoid any continuous braking at low power, for
example when going downhill. Favor short braking brusts, which will deposit a layer
of pad dust on the disc and prepare the braking surface for optimal performance
and without noise.
The braking performance will significantly increase once a correct break-in is carried
out. Particular attention is required during this step, especially at the front brake.
8/ 26

LMX 64 user manual
Safety instructions
Before driving, the owner (you) must read and follow safety instructions:
The LMX 64 is designed for off-road driving only and must not be used on public
roads unless expressly authorized to do so by the regulations in force in your country.
Offdriving -road can be dangerous, control your speed at all times and always be
prepared for the unexpected. Wearing protective equipment is mandatory: Helmet
with motorcycle approval and gloves a minimum.
Shin pads and body armor are highly recommended. Before driving, be informed of
your area of evolution and stay away from the restricted areas.
Although it is electric, the LMX 64 is still a motor vehicle and should not be used in
areas prohibited to motor vehicles.
Electrical systems such as batteries, motor, and controllers can get hot, so avoid
touching them after a ride. Batteries and systems can catch fire in the event of an
impact or improper use. In this case, stay away from fire. Do not breathe vapors and
use fire extinguishers. Powder fire extinguishers (CO2) are recommended for battery
and electric fires.
If your frame is damaged in an accident or other problem, do not use the bike. A
damaged part can cause a dangerous failure at an unexpected time. Please contact
us if your frame is damaged, so that your frame can be replaced and you can ride
safely.
Always test your bike on a smooth surface with suitables protective equipment. Do
not let inexperienced riders test your bike if it is in high power modes.
When working on your bicycle and performing cleaning maintenance tasks, always
disconnect the main power. Always keep in mind that an electrical fault can make
the engine run at any time if the vehicle is powered on.
Usage statistics
There are several usage information visible on the control screen.
Trip trip statistics are reset by a long simultaneous press on plus and minus.
9/ 26

LMX 64 user manual
A short press on the power button allows you to change the speed display between
max, average and instantaneous, while a short press on the M button allows you to
change the display between trip, odo, timer and range.
Refer to the screen manual for more information:
https://drive.google.com/file/d/1SDHpZIEoWHNkPJslkWmB6fsO9MrqKuiA/view?usp
=sharing
10/ 26
LMX 64 user manual
III. General maintenance
I. After the first hours of use
After completing your first rides , for your safety and the proper functioning of
the LMX 64, do not forget the following points:
Component
Tightening torque / point of attention
Tightening of the FRONT and
REAR brake discs
4 Nm
Tightening of the stem
8 Nm
Tightening of the spokes of the
front and rear wheels
Check that the spoke tension is
always correct
: Tip, hit the spokes with a
key, they should make a
similar sound
Checking the braking
Before each ride
11/ 26

LMX 64 user manual
As an electric bike, the maintenance required for the LMX 64 bike is very low.
Maintenance consists mainly of cleaning and greasing after each ride and keeping
the nuts tight and keeping the correct pressure in the tires. The suspension
components require regular maintenance in accordance with the manufacturer's
recommendations. Transmission components, such as chains and sprockets, must
be replaced every 2 years / 1500 km in off-road use, except in the event of abnormal
wear. Brake maintenance is also very important for optimal braking performance,
please refer to the brake manufacturer's recommendations. For battery
maintenance, please contact your battery supplier or this manual.
II. Washing the LMX 64
It is recommended to remove the battery when washing the bike.
Additional precautions have been taken to seal the controller, located under the
engine, but it is preferable to use as little water as possible on all the electronic
elements to reduce the risk of water infiltration into the electronics. Avoid watering
the screen, because even if it is waterproof, fogging may appear on it between the
outer shell and the inner part.
It is advisable not to use a high pressure washer, as this technology can damage
the stickers or internal components and affect the performance and durability
of the bicycle.
It is imperative to keep the water jet at a minimum distance of 40 cm, avoiding
delicate parts (controller, battery, bearings, axes ...).
Always lubricate the chain with a grease suitable for the conditions of use after
cleaning with water to preserve its service life.
A specific brush and a damp towel are the best tools to keep the bike clean.
12/ 26

LMX 64 user manual
III. Removing the rear wheel
To change an inner tube or a tire, you may have to remove the rear wheel. In this
case follow the following steps:
Put the derailleur in the maintenance position, using the locking button.
Install the pedal chain on the side of the axle then slacken the engine chain.
13/ 26
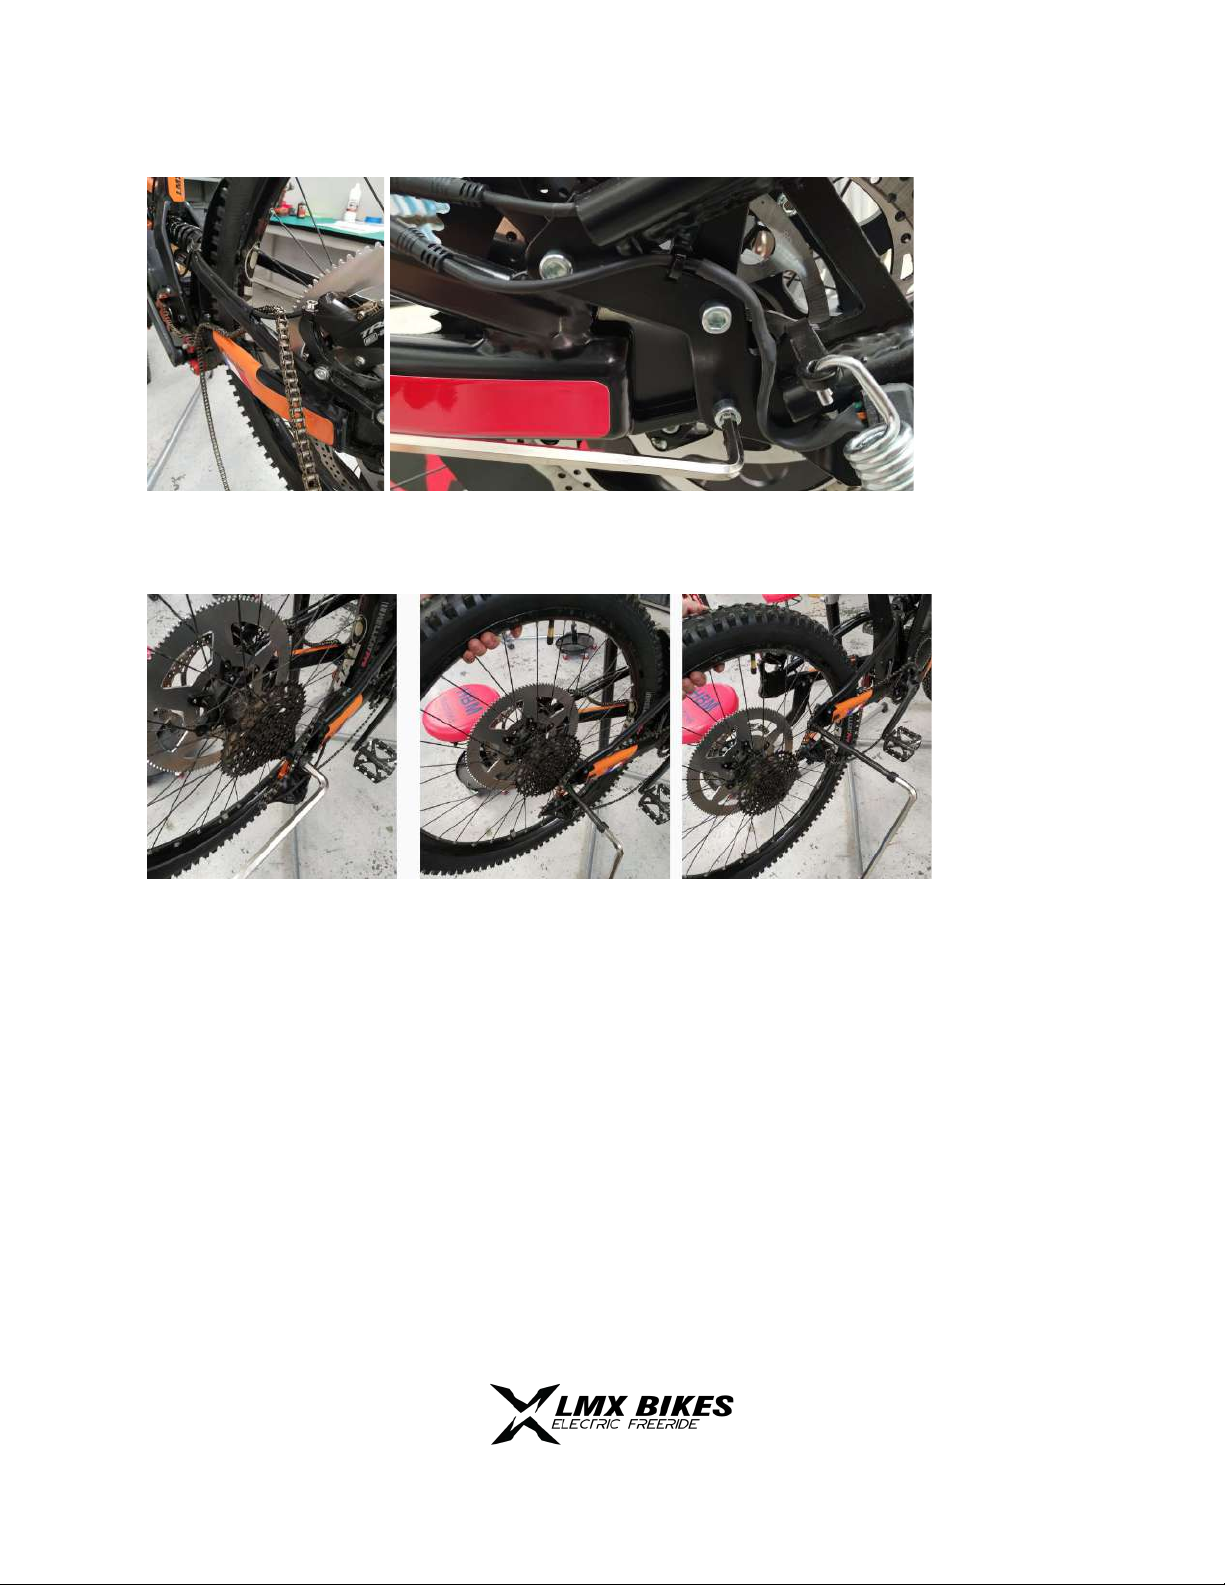
LMX 64 user manual
Install the engine chain over the swingarm.
On the LMX 64H, you must first unscrew the M6 screw from the licence plate
support before removing the axle from the rear wheel. Use a 5mm allen key for this.
For assembly: perform the operations in reverse order
14/ 26

LMX 64 user manual
V. Rear shock
See DNM shock manual
Hydraulic adjustment : Compression
Adjustments are made over the air
cartridge by simply turning the knob
marked with a blue "C".
There are 15 adjustment steps.
Hydraulic adjustment
HARD
MEDIUM
SOFT
Number
of clicks
0 - 5
5 - 10
10 - 15
When adjusting, it is best to start closing it by turning the
button until it stops and then return to the desired position.
The factory setting is 3 notches from the "soft" stop (fully
unscrewed thumbwheel).
Hydraulic adjustment: rebound
Settings are made in the spring
by simply turning the red wheel
marked "DNM". The adjustment
range is 20 clics.
Hydraulic adjustment
SLOW
MEDIUM
FAST
Number
of clicks
0 - 7
7-14
14-20
The factory setting is 6 clics from the “slow” position (fully
unscrewed wheel).
15/ 26

LMX 64 user manual
Spring preload adjustment
Clamping nut Factory settings: 20mm
The spring preload is done with a hook wrench or by hand. The spring preload must be
chosen according to its weight: the heavier the pilot, the greater the spring preload must be
to adjust the stiffness of the suspensions. Other springs are available on request to integrate
into a wider range.
Attention: it is imperative to check the tension of your spring regularly. If the spring is no
longer stressed, the risk of losing parts or even breaking the mechanism is high.
Tip: when using the bike, a low spring preload will be detected by clicking noises at the
shock absorber.
16/ 26

LMX 64 user manual
IV. Fork settings
Air pressure
It is necessary to adapt the pressure according to the riding style and the weight of
the rider. The recommendations are as follows:
17/ 26

LMX 64 user manual
Compression
The fork is made up of an Air sleeve and a hydraulic damping
sleeve with sealed cartridge.
The hydraulic adjustment of the compression is done on the top
of the fork, by turning the blue wheel marked "compression".
There are 13 adjustment steps for compression.
Compression adjustment
SOFT
MEDIUM
HARD
Total
click
0-5
6-10
10-13
The factory setting is 4 clics from the position "-" (knob completely
unscrewed)
Rebond
Setting the hydraulic rebound is by turning the red wheel
located under the right scabbard.
There are 25 clics for rebound adjustment.
Rebound adjustment
SLOW
MEDIUM
FAST
Number
of clicks
0-10
10-20
20-25
Close the hydraulic system by turning the screw until it stops
“+” then go to the desired position.
The factory setting is 12 clics from the "+" position (fully
screwed wheel)
18/ 26

LMX 64 user manual
V. Fork cleaning and maintenance
The recommended suspension cleaning and lubrication intervals are as follows:
After the first 50 hours
of use
All years
Cleaning and lubricating the sleeves
Complete disassembly, cleaning,
greasing, checking the seals and
guides
It is important to clean and lubricate the inside of the fork to maintain optimal
performance.
See manuals and tutorials SR suntour
https://www.srsuntour.com/service/download-area/consumer-downloads/bike/
VII. Braking
When to replace the pads?
To find out if you need to replace your pads, measure their total thickness. These
must measure at least 2.5 mm in total thickness with the support.
19/ 26
This manual suits for next models
2
Table of contents
Other LMX Bikes Bicycle manuals


