LMX Bikes LMX 56 User manual

English - 2023
USER MANUAL
LMX 56

The whole LMX team thanks you for adopting the LMX 56, the 45 km/h speed bike
is now in your hands and ready to take you over all the obstacles !
Your LMX was manufactured and assembled entirely in the Rhône (France) in our
workshop, thanks to our passion and our know-how.
In this manual, you will find all the useful information concerning how your LMX 56
works.
WARNING
Like any vehicle, your LMX 56 needs regular and appropriate maintenance to
ensure proper operation and a good lifespan.
Failure to perform maintenance or make personal modifications can
compromise the safety and performance of your vehicle.
This user manual therefore contains valuable information regarding the
maintenance and verification of your LMX.
Check your LMX before riding by carefully reading the instructions given.
Indeed, a fall in a motorized vehicle can inflict serious and irreparable injuries.
By following the instructions provided, you reduce the risk of injury to yourself or
the safety of your LMX.
2

SECURITY NOTICE
The owner of the LMX must act responsibly and follow the indications given in
this manual. Particular attention should be paid to the section on safety and
legal regulations.
By signing this document, the owner acknowledges that he has read the safety
instructions set out in this document and that he will act responsibly and in
accordance with applicable laws.
●LMX 56H : for a road legal model, a gray card and insurance are necessary
for use on public roads in France, and on paths authorized for 50cc
mopeds.
●LMX 56T : non-approved models are strictly prohibited for use on public
roads in France. Use authorized only on private roads/circuits.
The data and illustrations in this manual do not engage MS Systemes / LMX
Bikes, which reserves the right to make changes and improvements to its
models at any time and without notice.
Signature of owner :
3

SUMMARY
General description
1. Notes for the owner - p.5
2. The product - p.5
3. Warranty - p.5
4. Delivery and assembly - p.6
5. Load capacities - p.6
Working conditions
1. Charging - p.7
2. Checklist - p. 8
3. Turning the LMX 56 on and off -
p.9
4. Power modes - p.12
5. Using the dropper seatpost -
p.14
6. Use of speeds - p.14
7. Breaking in the brakes - p.15
Safety instructions - p.15
General maintenance
1. After the first hours of use - p.17
2. Tightening torques - p.18
3. Washing the LMX 56 - p.19
4. Lubrication - p.19
5. Removing the rear wheel - p.20
6. Fork settings - p.21
7. Cleaning and emptying the fork
- p.21
8. Rear shock settings - p.22
9. Braking - p.23
10. LMX 56H fuse replacement -
p.25
11. Engine block removal - p. 26
12. Engine block oil level - p. 27
13. Drive free wheel replacement -
p. 28
14. Belt change - p.29
Errors and defects of use
1. Battery protection - p.36
2. Low battery safety - p.36
3. Instantaneous overcurrent
protection - p.36
4. Continuous overcurrent - p.36
5. Excessive temperature - p.36
6. Low temperature - p.37
7. Battery status LEDs and error
codes - p.37
8. Motor and controller
overheating - p.37
Other defects
1. Clicking noise in the
transmission on the engine side
- p.38
2. Soft brake levers - p.38
3. N mode remains active - p.38
Exploded views - p. 39
Cockpit - p. 39
Mobile App Manual - p. 40
Technical support - p.44
Maintenance schedule - LMX 56 - p.45
4
GENERAL DESCRIPTION
1. NOTES FOR THE OWNER
Congratulations ! You are now the owner of one of the most powerful 45 km/h
off-road two-wheelers on the market. At LMX, we are proud to design and
manufacture our models in France, and to launch the electric revolution for
motorsports.
As an all-terrain vehicle, the LMX 56 is built in accordance with the construction and
safety requirements of the 168/2014 standard for L-category vehicles. It is strongly
recommended to follow the instructions in this manual relating to safety, pre-ride
checks and general maintenance.
2. THE PRODUCT
Each LMX frame is identified by a serial number engraved above the engine block,
right side. If you encounter an LMX frame without this number, please report it to
us directly (see Technical Support p. 43).
3. WARRANTY
LMX 56 frames are guaranteed against manufacturing defects for 2 years from the
date of invoice. Electronic systems, motor and battery are also guaranteed under
normal use. Refer to the T&Cs applicable on the date of validation of the order for
more information relating to the warranty.
In the event of modifications made to the equipment and use that does not
comply with the instructions in this manual, the warranty will no longer apply and
the manufacturer cannot be held liable in the event of malfunction or accident.
5

4. DELIVERY AND ASSEMBLY
The LMX 56 has been delivered to you pre-assembled. Upon receipt, you still have
to install the front wheel, pedals and stem.
1. Install the front wheel using the quick release axle. Refer to your fork
manual.
2. Position the stem and the handlebars at 90° in relation to the front wheel
then tighten the 2 stem screws located on either side of the steering tube
to lock the stem in relation to the fork.
Tighten to 8 Nm.
3. Install the pedals with a 15mm spanner.
Install the pedal marked L on the left and the pedal marked R on the right.
Tighten firmly by hand using the 15 mm spanner to a maximum tightening
torque of 35 Nm.
5. LOAD CAPACITIES
The LMX 56 frame was designed for off-road use. However, to maintain the
durability of the frame and technical elements, the load must remain within the
following limits :
●Maximum weight of the LMX ready for use (without bags) : 37 kg
●Maximum weight of the equipped pilot : 120 kg, including 30 kg
max on the luggage rack (bags included)
WARNING
Only 1 pilot is authorized to use the LMX 56 ⇒passenger transport prohibited
●Maximum motor power (peak) : 2.5 kW
●Maximum speed : 45 km/h for both versions (the LMX 56T is not
authorized on public roads).
6

WORKING CONDITIONS
1. CHARGING
IMPORTANT
1) USE THE ORIGINAL CHARGER ONLY
(do not use the LMX 64 one)
2) BATTERY MUST BE ON WHEN
CHARGING
3) THE BATTERY MUST BE CORRECTLY
PLACED AND LOWERED INTO THE
DOWN TUBE
The LMX 56 is supplied with a 4 A
fanless charger.
Normal charging time is 360
minutes to 100% and 240 minutes to
80%.
Be sure to properly close the rubber
cap on the charging port before
using the LMX.
Mechanical shocks during handling
must be avoided (battery drop).
The battery voltage gives an indication of its level of charge :
100%
80%
50%
20%
0%
58V
56V
52V
46V
39V
7

Lifetime
After 300 to 500 full charge cycles, the battery will only provide 70% of its original
capacity. This number of cycles will be strongly influenced by the number of
outputs, the driving style and the storage temperature.
Storage
For optimal storage, it is recommended to store the battery in a dry and temperate
place (between 10 and 30°C).
Below 10°C, the useful capacity of the battery can be reduced by 30%.
In the event of a long period of non-use, it is advisable to store it in a state of charge
at 2/3 of its capacity (no-load voltage of 52 V).
Maintenance
It is recommended to perform a 24-hour maintenance charge every 5 cycles to
ensure cell balance and optimal battery performance.
2. CHECKLIST
Before using the LMX, check the following points :
➔The battery is charged and locked to the frame,
➔All nuts and screws are properly tightened and locked (use medium thread
lock resin if necessary),
➔Wheels, suspension, handlebars, stem and saddle have no play and are
tight,
➔Cables and electrical wires are fixed to the chassis and do not move,
➔The brakes are working properly (storing or transporting the LMX in an
abnormal position may cause the brakes to malfunction temporarily),
➔The chain and belt have adequate tension. The belt must have a tension of
> 55 Hz (Tension measurement applications: Gates Carbon Drive or Easy Tension
Hutchinson),
➔The wheels are in good condition and the tires are inflated with the correct
pressure (consult the tire manufacturer for the nominal pressures),
➔The accelerator handle has a functional return spring and does not present
any hard point or slowdown on its stroke,
➔The pedal seals do not rub or make noise (apply oil to the
seals if necessary),
➔The engine oil level is above the red line (visible through the
window ⇒see image),
8

➔The charging port cap is closed. Risk of water infiltration and securing the
LMX during outings if it is not properly closed.
➔Sound signatures emit normal sounds (start-up music, changing modes).
➔If the LMX beeps regularly (every 2 seconds) : warning because attempt to
start the engine in neutral mode or with the stand lowered.
➔If the LMX beeps continuously : it is a throttle problem. Contact the support
service (see Technical Support p.43).
3. TURNING THE LMX 56 ON AND OFF
To turn on the LMX 56, the battery must be installed in the frame and locked
properly.
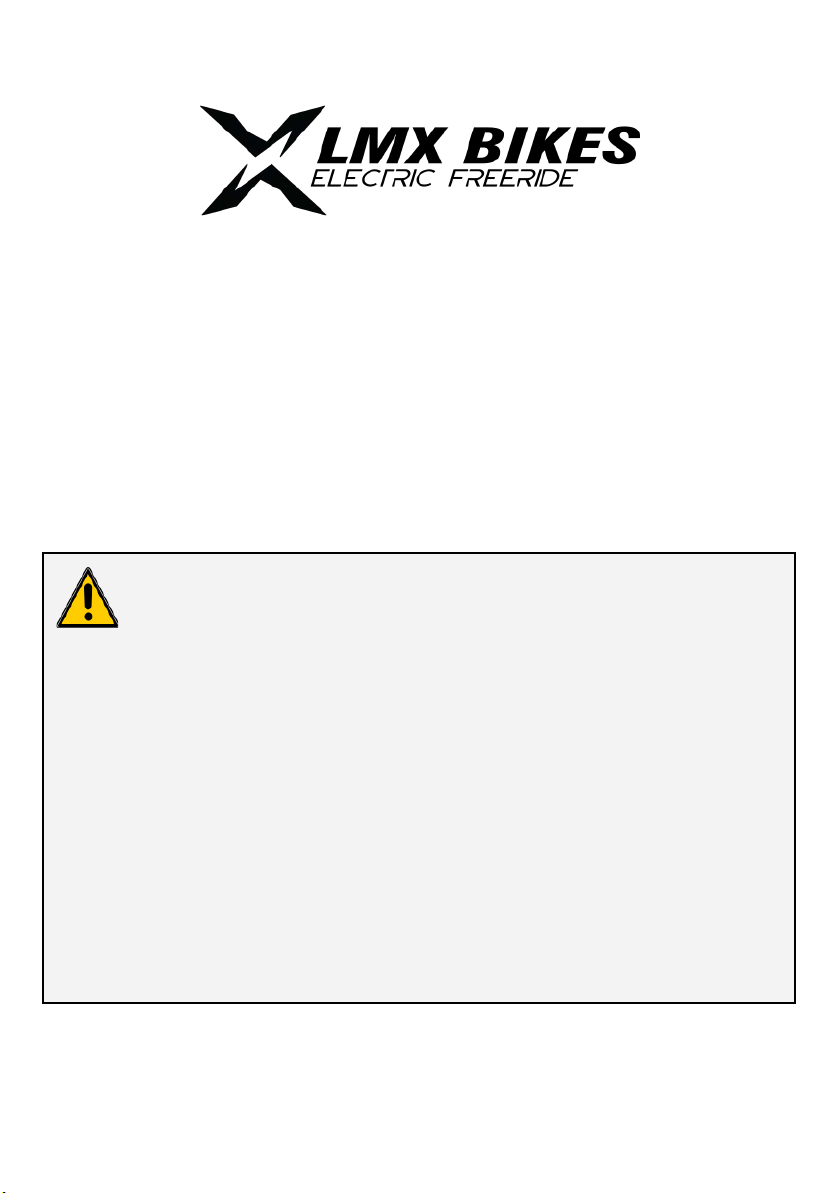
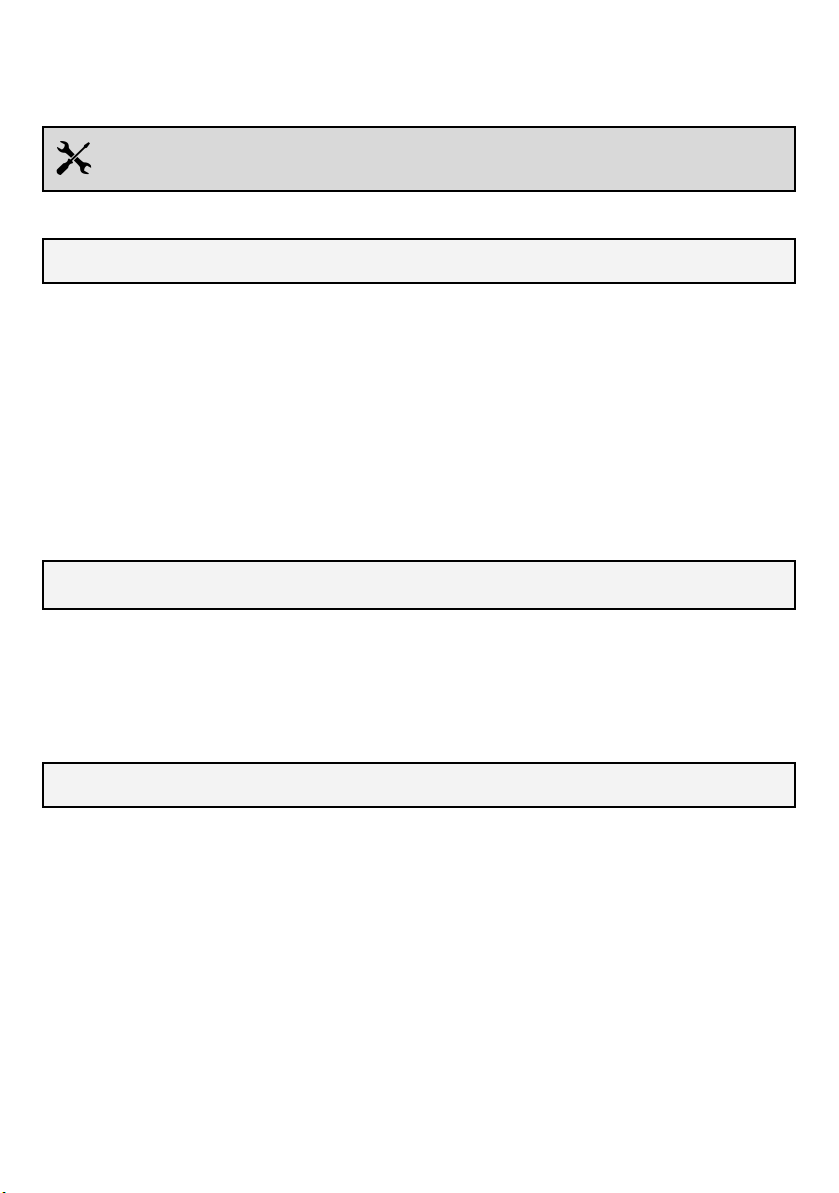
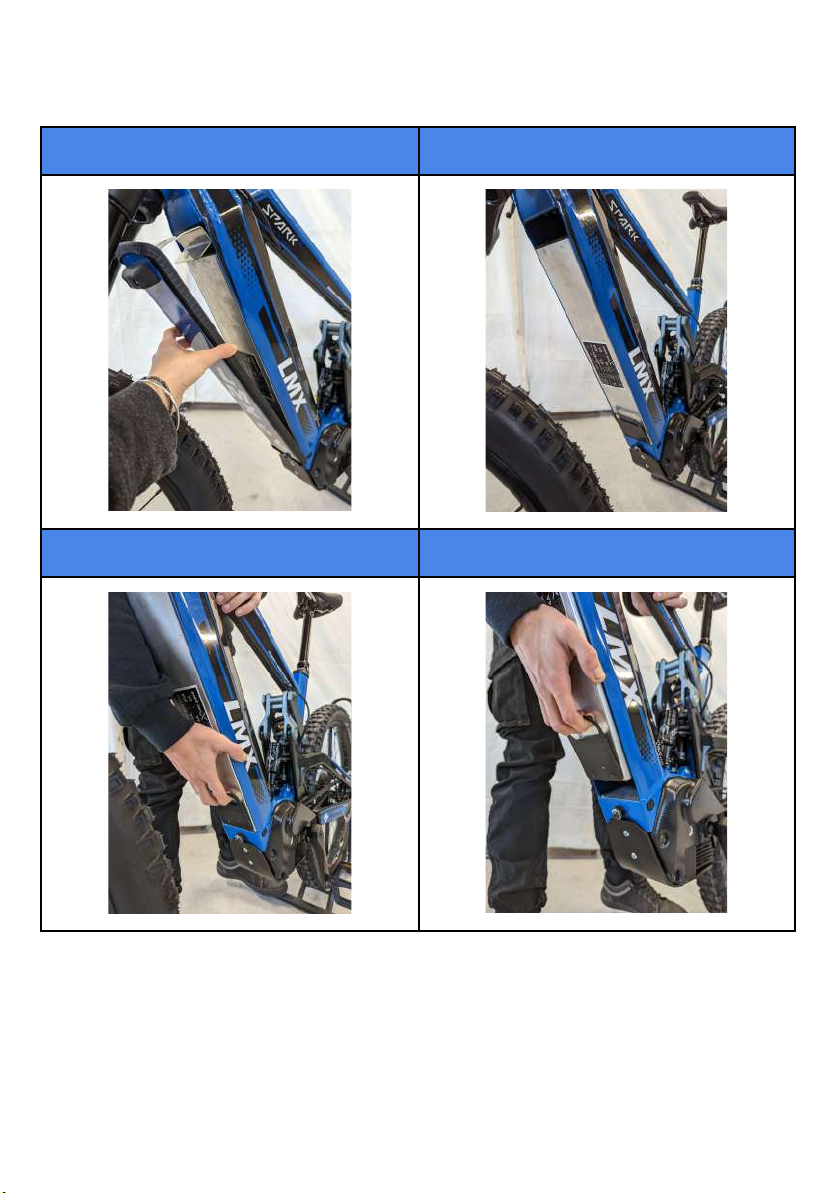
BATTERY INSTALLATION
●Install the battery : position the battery at the top and at the bottom of
the rail. Slide it up and down to lock it.
●Remove the battery : using the handle located at the bottom of the
battery, pull upwards to remove the battery from the block. Carefully
follow the natural alignment of the battery in the rail (positioned at the
bottom).
➔The battery hatch allows the battery to be locked in place.
Do not drive without the battery cover.
9
1
2
3
4
10

TURN ON/OFF THE LMX 56
1) Make a long press on the right side of the down tube to switch on the
battery (the LEDs then all turn GREEN then indicate the battery status).
Release your finger when switching on.
2) Magnetize the safety contactor (circuit breaker) to start the LMX. This emits
its starting melody.
WARNING
⇒Do not press the pedals when starting as this could cause the torque sensor to
be incorrectly calibrated. Also, do not use the throttle grip until the LMX is fully
ignited.
3) To turn off the LMX : remove the circuit breaker to turn it off. Then switch off
the battery by making a long press on the button, in the same place as at
start-up. The LEDs then turn BLUE.
11

OTHER POSSIBLE COLORS - BATTERY LED
3 possible codes apart from the colors seen above :
●Alternating BLUE/GREEN flashes ⇒Need to recharge
●YELLOW flash ⇒Temporary error (contact LMX support)
●Flashing RED ⇒Permanent error (contact LMX support)
4. POWER MODES
The change of power modes is done via the Smart LED on the handlebars, or
directly via the application (see page 39).
The LMX 56 has a Neutral (N) mode and 3 power modes: an
ECO mode, a MID mode and a HIGH mode. An N (neutral)
mode is also present.
These modes can be configured directly on the application
via the motor tuning tab (see page 42).
ON THE SMART LED
●Manage the 4 modes of your LMX by pressing the
“MODE” button on the LED. Each press advances
one mode in a cycle. The modes are identified by
these colors :
- WHITE for N/0 (Neutral) mode
- GREEN for mode 1 (Eco)
- BLUE for mode 2 (Mid)
- RED for mode 3 (High)
When the LMX 56 powers up, it is automatically in N (Neutral) mode.
The Smart LED also gives access to the battery level when you ride : without
clicking on the MODE button, the Smart LED displays the battery level by default.
- 60-100% = GREEN
- 40%-60% = YELLOW
12

- 20%-40% = ORANGE
- 10%-20% = RED
- 0%-10% = FLASHING RED
●When the LMX 56 has just connected to the app, the Smart LED turns
BLUE for 5 seconds.
ON THE APP
Possibility to switch between modes directly via the application by pressing the
arrows on the dashboard (see page 40).
COMMENT : On street legal models, as long as the kickstand is down, it is
impossible to change modes and start the LMX. Lowering the kickstand
automatically returns to N mode.
MOTOR TUNING - APP
The modes of your LMX can be configured directly on the application on the
Motor Tuning page.
Set for each mode :
●The max power (W)
●Max speed (km/h)
●The max torque (%) - Pedaling assistance
●The level of acceleration (%) - Twist grip on the handlebar
IMPORTANT
IN MODE 2 or 3, DO NOT TURN THE THROTTLE FULL WHEN THE LMX ENGINE
IS BLOCKED (0 rpm).
⇒RISK OF DAMAGE TO THE CONTROLLER
Example : rear wheel locked with the brake.
13

5. USING THE DROPPER SEAT POST
Unlock the seat post :
●Press the lever located on the
left side of the handlebar.
●The saddle then rises
automatically.
Lower the seat post :
●Push down on the saddle
while pressing the lever to
lower it to the desired level.
6. USE OF SPEEDS
The LMX 56 comes with a 12-speed
drivetrain.
Use the handlebar controls to adapt
the gear engaged to the terrain.
⇒As a general rule, to limit power
consumption, it is better to turn
faster when climbing than to press
very hard on the pedals. Motor
assistance is proportional to pedaling
power.
14

7. BREAKING IN THE BRAKES
Attention, it is important during the first use to carry out a running-in of the brakes,
in order to ensure efficient and noiseless braking.
Running in forms the wear layer of the brake disc. To avoid surface icing, which can
cause noise during braking, it is important to follow the break-in
recommendations:
- When using for the first time, avoid continuous braking at low power, for
example on a descent.
- Focus on short braking spurts, which will deposit a layer of pad dust on the
disc and prepare the braking surface for optimal, noise-free performance.
Be careful, the braking performance will increase significantly once the break-in
has been carried out correctly. Particular attention is required during this step,
especially at the front brake.
SAFETY INSTRUCTIONS
Before driving, the owner of the LMX should read the following safety instructions:
The LMX 56H is a 50cc moped approved vehicle. It must therefore be used on land
authorized by the regulations in force in your country (L1e-B).
The LMX 56T is not homologated and is designed for use on private land only. It
should not be used on public roads.
Off-road driving can be dangerous. Control your speed and always be prepared for
the unexpected. Wearing safety equipment is mandatory: helmet and
homologated motorcycle gloves are the mandatory minimum.
Wearing back armor is highly recommended. Before driving, find out where you are
riding and stay out of restricted areas.
Although electric and pedal-operated, the LMX 56 is still a motor vehicle and should
not be used in areas where motorized vehicles are prohibited.
15

Electrical systems such as batteries, motors and controllers can get hot, so avoid
touching them after a ride. Batteries and systems can catch fire if impacted or
misused. In this case, stay away from fire. Do not breathe vapors and use dedicated
extinguishers. Powder (CO2) extinguishers are recommended for battery and
electrical fires.
If the frame is damaged in an accident, do not use your LMX 56. A damaged frame
can cause a dangerous failure at an unexpected time. Please contact us as soon as
possible to replace your frame and ride safely as soon as possible.
Always test your LMX on a smooth surface with suitable protective equipment.
Do not let inexperienced pilots test your LMX if it is in a high power mode.
WARNING
When working on your LMX and performing maintenance or cleaning, always
unplug the main power or remove the battery.
Always keep in mind that an electrical fault can cause the engine to run at any
time if the vehicle is powered on.
16

GENERAL MAINTENANCE
1. AFTER THE FIRST HOURS OF USE
After your first outings, for your safety and the proper functioning of the LMX
56, check the following points :
Component
Tightening torque /points of attention
Tightening the FRONT and REAR
brake discs
4 Nm
Stem clamp
8 Nm
Front and rear wheel spoke
tightening
Check that the spoke tension is still
correct
ADVICE
Tapping the spokes with a wrench,
they should make a similar sound
Braking check before each ride
As an electric vehicle, the required maintenance of the LMX 56 is simple.
Maintenance consists mainly of :
●Clean and grease the chain after each ride,
●Keep the nuts tight,
●Maintain correct tire pressure.
Suspension components require regular maintenance in accordance with the
manufacturer's recommendations. Drivetrain components such as chain, belt and
sprockets should be replaced every 2 years or 1500 km in off-road use, unless there
is abnormal wear.
17

Brake maintenance is also very important to keep braking performance at peak
performance. Refer directly to the brake manufacturer's recommendations.
2. TIGHTENING TORQUE
Using a torque wrench, make sure that the various screws on your LMX are properly
tightened :
Checkpoint
Torque
4 stem/handlebar bolts
8 Nm
2 stem/fork bolts
8 Nm
R/L cranks
50 Nm
Shock absorber axles
17 Nm
Swingarm axle
25 Nm
Chainring screws
9 Nm
Shifter
4 Nm
Saddle trigger
3 Nm
Switch + -
3 Nm
Front/rear brakes + calipers
9 Nm
Saddle clamp and rail
8 Nm
Rear hub disc nut
40 Nm
2 BHC M8 motor screws
8 Nm
Motor pinion screw M5
5 Nm + thread lock
Pedals
35 Nm max
18

3. LMX 56 WASHING
●Remove the battery when washing your LMX,
●Use a specific liquid soap, a specific brush and a damp towel to
clean the LMX.
●It is essential to keep the water jet at a minimum distance
of 40 cm, avoiding delicate parts (battery, battery rail,
bearings, axles, etc.).
GOOD PRACTICE
Wash your LMX with the hatch in place to limit the presence of water near the
electronic / electrical components.
⇒Risk of damage to components
TO AVOID
●Use as little water as possible on all electronic elements to reduce the
risk of water infiltration (battery rail, battery, motor, seatswitch/input
charger),
●Avoid watering the screen, because even waterproof, fog may appear on
it between the outer shell and the inner part,
●Do not use a high-pressure washer, as this may damage the decals or
internal components and thus affect the performance and durability of
the vehicle.
4. LUBRICATION
The lubrication of your vehicle always comes after a good wash.
●A first cleaning phase can be carried out using a WD40 type
penetrating product (do not put it on the discs: risk of
contamination of the pads),
●Wipe the chain with a cloth,
●Grease the necessary parts.
19
Table of contents
Other LMX Bikes Bicycle manuals


