LocknLevel Single Axle Assembly instructions


1
Contents
Introduction ........................................................................................2
Warranty Terms and Conditions..............................................................2
SAFTEY INSTRUCTIONS..........................................................................3
CARE INSTRUCTIONS.............................................................................4
Instructions for Use..............................................................................4
SINGLE AXLE ...................................................................................5
Setting Up....................................................................................5
Levelling the Caravan....................................................................6
Lowering the Caravan ...................................................................7
TWIN AXLE.......................................................................................8
Setting Up....................................................................................8
Lowering the Caravan .................................................................10
Overwinter Caravan Storage ........................................................ 11
Use as a Jack .............................................................................12
Optional Combo Pack ......................................................................13
HI-5.............................................................................................. 16
Setting Up..................................................................................16
Lowering the Caravan .................................................................17

2
Introduction
Thank you for purchasing a LocknLevel, the effortless levelling device for touring
caravans. Use it once and you'll immediately see how LocknLevel gives you a no-
mess, no-fuss and absolutely stress-free start, every time you pitch.
Although these instructions are centred around the 'through-the-wheel’ locks, the
LocknLevel can be used with any type of wheel locks.
We use only the best quality materials in your LocknLevel and have carried out
extensive testing to prove durability. We are confident that, if you follow the
instructions in this booklet, it will give you many years' trouble-free service.
Warranty Terms and Conditions
Your LocknLevel device is warranted against manufacturing defects in material or
workmanship for a period of 12 months from the date of sale. The warranty is ‘return
to base’ and limited to the repair or replacement of the supplied product only.
If purchased from locknlevel.co.uk after 1st Feb 2022 and you live in the UK, your
standard warranty is automatically extended for an additional 12 months, for a total
of 24 months. If not purchased through locknlevel.co.uk, please register your product
at www.locknlevel.co.uk/register to receive your one year additional warranty.
These conditions are additional to and do not affect your statutory rights.
Should you be unfortunate to suffer a warrantable defect please contact us on
the purchase date.
We will pay return carriage to you, within the UK mainland only, upon confirmation of
a warrantable defect.
Damages resulting from external influences are excluded from any warranty
offered.
Examples of non-warrantable damage include, but are not limited to:-
Punctures, chemical or solvent damage, failure of the unit due to the deliberate
loosening of bolts and fittings, Damage resulting from running over the valve,
leaking ‘Schrader’ valve cores, loss of valve caps.

3
SAFTEY INSTRUCTIONS
Guidance on pitching given in this user guide is only general. As the topography of
pitches can vary greatly it is important that you fully assess the risks related to any
individual pitch and take appropriate precautions.
➢Always ensure the handbrake is on, the opposite wheels chocked and the wheel
lock fitted before inflating the LocknLevel.
➢Do not use the LocknLevel if it has been damaged in any way.
➢When inflating the device, NEVER exceed 30 psi (2.0 bar) pressure.
➢ALWAYS keep your face clear of the airflow when deflating your LocknLevel.
➢Always keep all body parts clear of the LocknLevel while deflating, until the
wheel has settled on the ground.
➢Do not operate or allow others to operate the LocknLevel until the user
understands all instructions.
➢Never reach under any caravan that is supported only by the LocknLevel.
➢Do not use a LocknLevel for anything other than its intended purpose. Doing so
may damage the LocknLevel or lead to property damage, injury or death.
➢The LocknLevel should not be operated by children.
➢This user guide is a supplement to and does not replace your trailer owner’s
manual. Always follow the instructions given in your trailer owner’s manual
relating to coupling and uncoupling procedures.

4
CARE INSTRUCTIONS
Your LocknLevel is suitable for use on all caravan and camping site surfaces,
including hard standings. It is also suitable for most other terrain; provided the
surface is firm.
➢Ensure there are no sharp objects under the LocknLevel, or trapped in your tyre
treads which could puncture it. We recommend that you always place a
protective non-absorbent mat underneath.
➢Avoid driving over the valve assembly and keep it clean.
➢The LocknLevel is designed for touring use and is not recommended for seasonal
pitching.
➢Do not expose the LocknLevel to oil, solvents, excessive heat or a naked flame.
➢The bolts on your LocknLevel have been precisely set to the correct tightness. Do
not attempt to disassemble.
➢Do not twist or turn the inflation valves against the body of the LocknLevel.
➢To avoid the risk of the ‘locks binding’ the deflation process should be the reverse
of the inflation.
➢Always remove moisture, mud and grit from your LocknLevel before storing it in
its bag.
➢Never fold too close to the valves when storing. See Lowering the Caravan
sections for the correct way to fold your LocknLevel.
Instructions for Use
Please visit our website for demonstrational videos www.locknlevel.co.uk
We recommend use of a standard 12-volt electric tyre pump with a pressure
indicator to inflate your LocknLevel (not included).

5
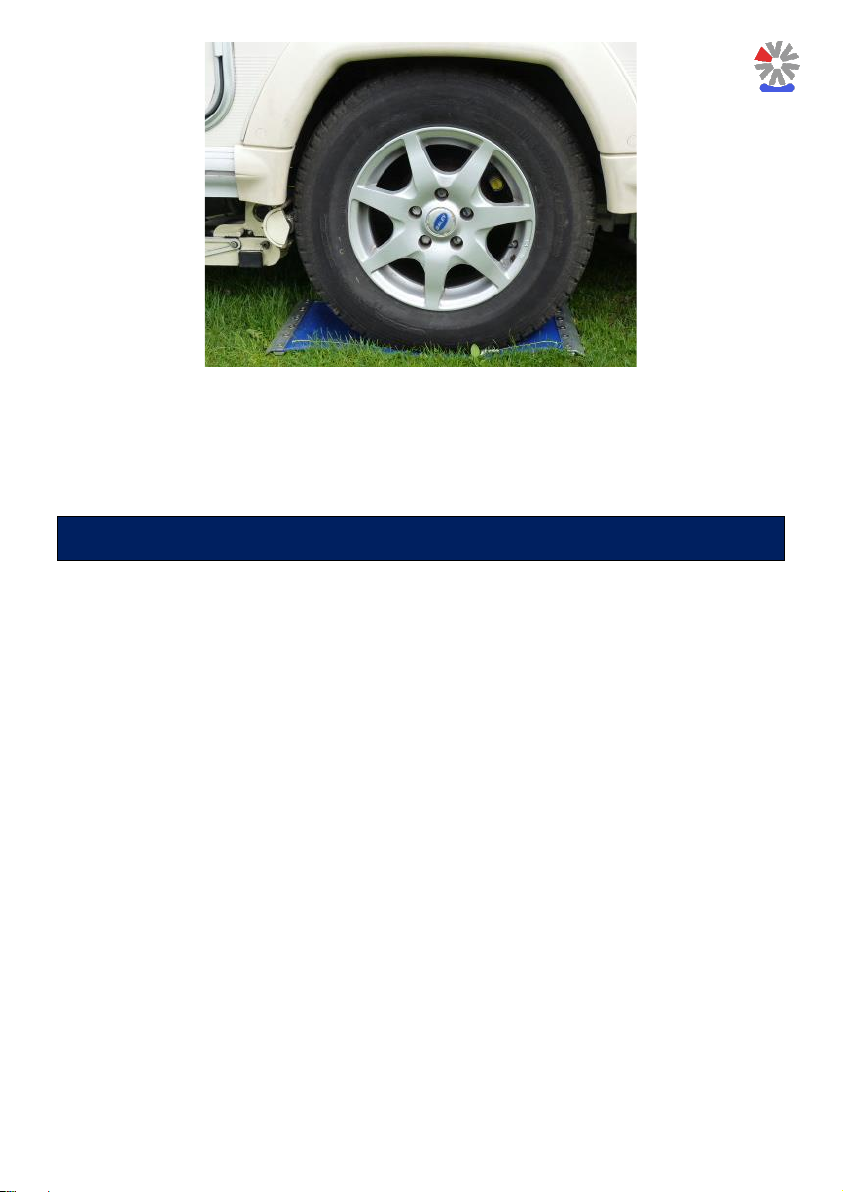
SINGLE AXLE
Setting Up
Move the caravan or trailer tent onto your chosen pitch and if using a through-the-
wheel lock, stop when the wheel is in the correct position to fit your lock.
You will not fit the lock yet, but this will ensure correct positioning to do so.
Lay the LocknLevel on the ground next to the wheel with the centre of the long edge
(indicated with a short line) aligned with the centre of the wheel. The valve should be
on the edge closest to you.
Roll the caravan or trailer forward until you can slide the LocknLevel inwards to a
position immediately behind the tyre.
Ensure that:-
➢The front edge is touching the tyre tread.
➢The tyre tread is lined up with the centre of the LocknLevel.
➢The LocknLevel is straight, fore-and-aft.
6
Reverse the caravan or trailer back onto the LocknLevel, stopping when the wheel is
in the centre of the device and again in the correct position for fitting the through-
the-wheel lock if applicable. (See photo below) Fit the through-the-wheel lock.
Levelling the Caravan
Chock both the opposite wheel and jockey wheel to prevent movement of the van.
Place your spirit level across the caravan or trailer floor (or worktop) in the usual
way.
Attach a standard tyre pump to the inlet valve (the short valve with the plastic cap)
on your LocknLevel and inflate until the caravan or trailer is level laterally. This will
normally happen between 8 - 30 psi (0.5 - 2 bar)
NEVER EXCEED 30 psi (2.0 bar).
You have now achieved both locking and lateral levelling - Detach the pump, replace
the plastic dust cap on the valve. Continue your set-up by levelling the vehicle front-
to-back using the jockey wheel and lower the steadies in the normal way.
Note. If raising the off side for level and using a through-the-wheel lock follow the
alignment process above, but place your LocknLevel against the off-side wheel.
Note the pressure that was needed to achieve level and re-check the pressure
weekly, topping up if needed.
7
VERY IMPORTANT!
Before proceeding ensure that there are no obstacles under the caravan or trailer
which might prevent the vehicle settling safely to the ground.
Ensure that the handbrake is on and the jockey and non-lifted wheel are chocked
and unable to move.
Raise the steadies or other supports before deflating.
Deflate the LocknLevel by loosening the silver cap on the longer deflation valve a
couple of turns (no need to remove the cap fully), keeping your face clear
.
The
caravan/trailer will settle gently back on the ground.
Remove your wheel lock and chocks and move the caravan or trailer off the
LocknLevel.
Expel the excess air from the LocknLevel before you tighten both of the valve caps
to a moderate 'finger tightness'. If necessary, clean and dry the LocknLevel before
placing it in its storage bag.
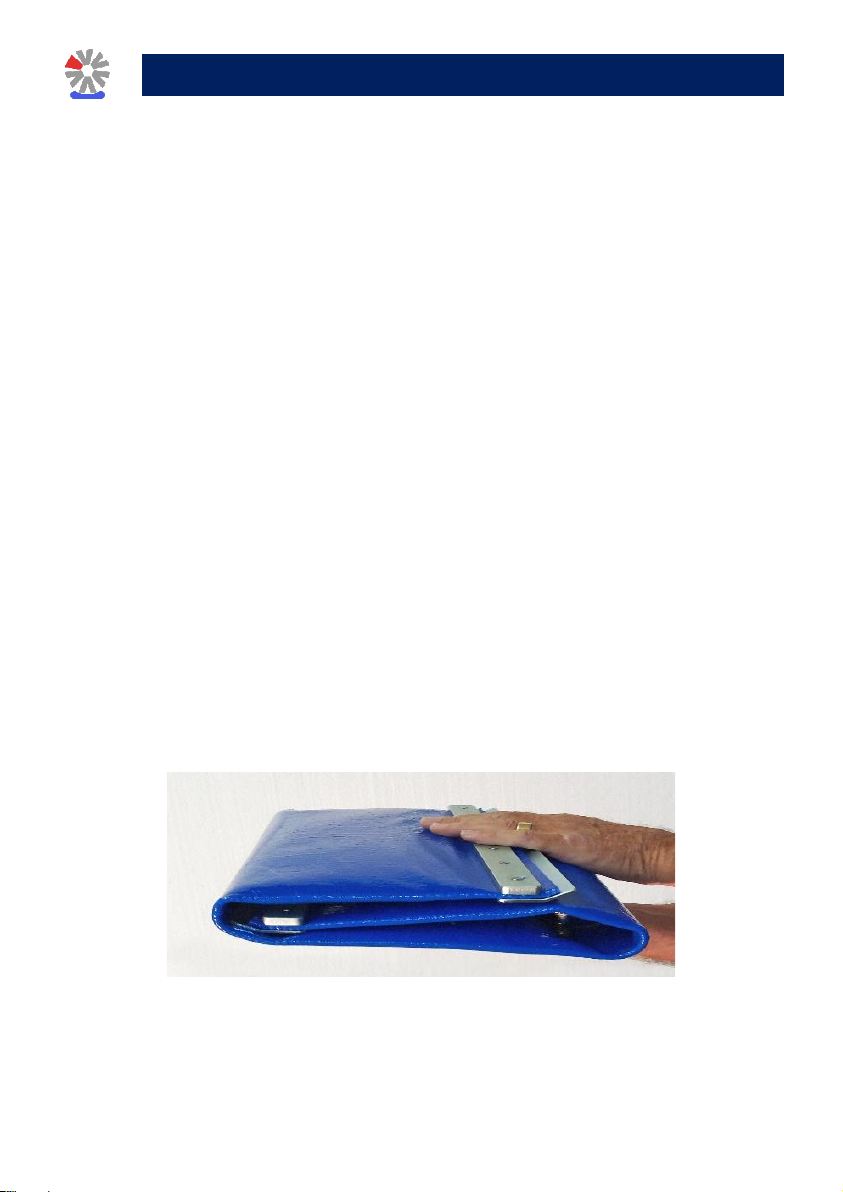
To fold the LocknLevel, hold it flat with the valve towards you. Make the first fold
from right to left so that the valve is inverted. Then fold the left side back over the
top.
Lowering the Caravan

8
TWIN AXLE
Setting Up
Move the caravan onto your chosen pitch and stop when the rear wheel is in the
correct position to fit the rear 'through-the-wheel' lock.
You will not fit the lock yet, but this will ensure correct positioning to do so.
Lay the LocknLevel on the ground alongside the wheels with the small yellow cross
line on the rear section in line with the centre of the wheel and with the valves
towards you.
Roll the caravan forward until you can slide the LocknLevel inwards to a position
immediately behind the rear tyre. Make sure that the front edge is touching the tyre
tread. The tyre tread is lined up with the centre of the LocknLevel.
The LocknLevel is straight, fore-and-aft
Reverse the caravan over the LocknLevel, stopping in its original position (with the
small yellow cross in line with the centre of the rear wheel, making sure that the
tyre tread is central along the length of the LocknLevel) and again in the correct
position for fitting the rear 'through-the-wheel' lock. Fit the rear wheel lock.
Chock both the jockey wheel and the off- side wheels to prevent movement of your
van. If your caravan is still coupled to the tow-car, it should be un-hitched. If using a
motor-mover disengage it before proceeding.
9
Ensure that the yellow automatic balance valve is in
the closed position and attach your tyre pump to the
inflation valve on the right (Plastic cap).
ALWAYS inflate your LocknLevel from the right-hand valve. (Black Plastic cap)
Start to inflate the LocknLevel, noting that only the segment under the locked wheel
will inflate at this stage. Continue inflation until the caravan has lifted high enough
to allow you to rotate the unlocked front wheel. This will normally happen between
18-30 psi (1.5 –2.0 bar).
NEVER EXCEED 30 psi (2.0 bar)
You can now fit the second 'through-the-wheel' lock.
With both wheels locked, turn the yellow automatic balance valve to the open
position. Air will then transfer from the rear section to the front, until the pressure is
equal in both sections.

10
Place your spirit level across the caravan or trailer floor (or worktop) in
the normal way.
You may need to pump more air in to raise the caravan to achieve a level (right hand
side) or to let air out to lower it (silver cap, left hand side).
If your pitch is perfectly level, the LocknLevel can be used to fit both through-the-
wheel locks, then deflated and left under the wheels for the duration of your stay.
Having achieved both locking and lateral levelling - Close the balance valve, detach
the pump and replace the plastic dust cap on the valve.
Continue your set-up in the normal way, by using the spirit level and jockey wheel to
level the vehicle fore-and-aft.
Finally lower the corner steadies firmly.
Before proceeding ensure that there are no obstacles under the caravan or trailer
which might prevent the vehicle settling safely to the ground. Check that the jockey
wheel and off-side wheels are chocked.
VERY IMPORTANT! Raise the steadies or other supports before deflating.
This process is essentially the reverse of the inflation procedure.
Leave the balance valve closed. Deflate the LocknLevel from the left-hand side, by
simply loosening the silver cap a couple of turns (no need to remove it),
keeping your
face clear.
The front wheel will settle gently on the ground.
Remove the wheel lock from this wheel (If the wheel lock is difficult to remove add
air to the rear section until the lock frees off).
Open the balance vale to allow the rear wheel to settle back on the ground. Remove
the rear lock, remove the wheel chocks and roll off of the LocknLevel.
Lowering the Caravan

11
If necessary, clean and dry the LocknLevel before placing it in its
storage bag.
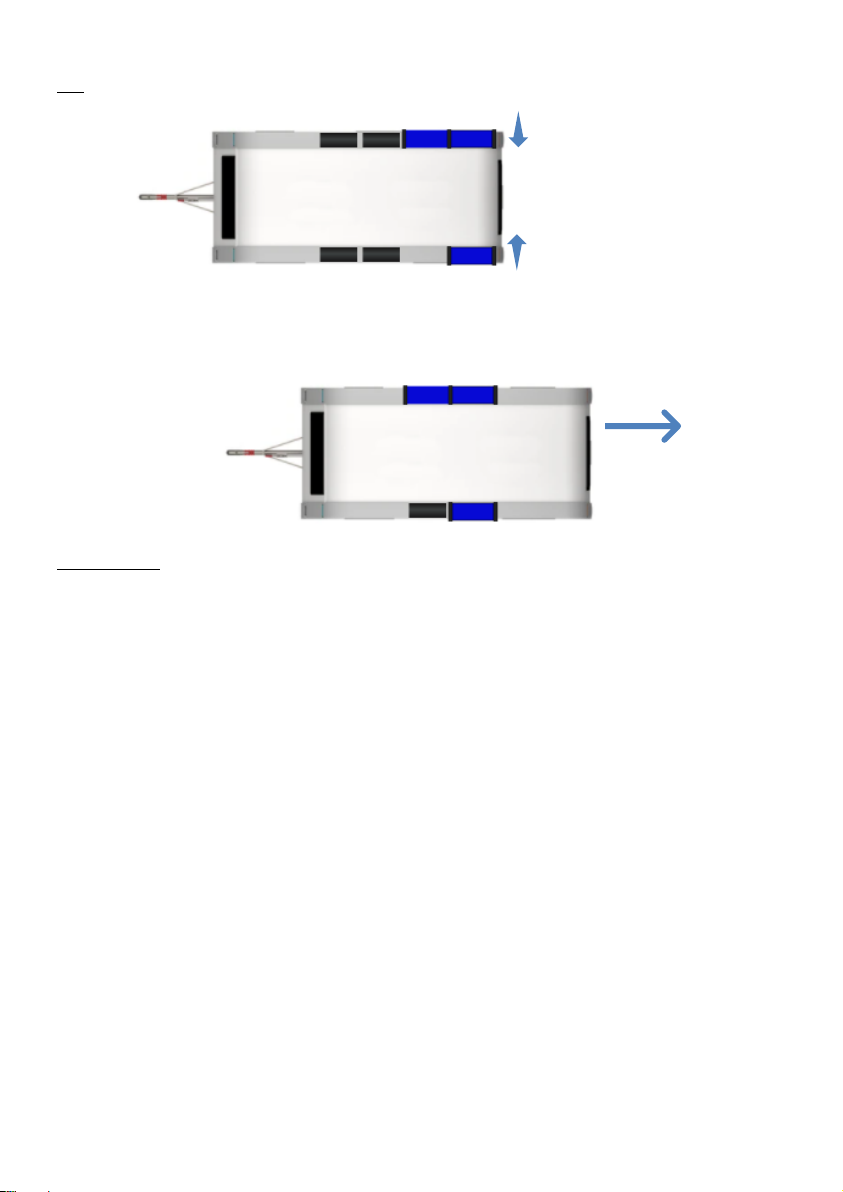
To fold your LocknLevel, lay flat and fold the right-hand side in an 'S' shape as per
photo. ‘Mirror’ the same shape on the left-hand side, then fold in half. Make sure that
the balance tube is not creased. (See the lower picture.) Finally, squeeze the
remaining air out, retighten the cap onto the valve to a moderate 'finger tightness'
and place in the bag.
Overwinter Caravan Storage
Your LocknLevel can, if required, be left deflated under your caravan wheels whilst
in long term storage.
Ensure there are no sharp objects under the LocknLevel, or trapped in your tyre
treads which could puncture it. We recommend that you always place a protective
non-absorbent mat underneath.
Fit your wheel locks then deflate your LocknLevel where it can remain in place.
Never store your caravan with the LocknLevel inflated.
Some discolouration will occur due to weathering, but the operation of your
LocknLevel will not be affected.

12
Use as a Jack
CAUTION - Use the handbrake, wheel lock and/or other means
to prevent vehicle movement while lifted.
To Change Nearside Front Wheel
Roll the caravan onto the LocknLevel in the normal way. Loosen the wheel nuts on the
front wheel. Ensure the balance valve is in the closed position. Inflate the LocknLevel,
which will lift the front wheel clear and enable you to remove it.
Once the wheel has been replaced and wheel nuts initially tightened, open the balance
valve and loosen the silver cap on the left-hand side. Tighten the wheel nuts.
To Change Nearside Rear Wheel
Roll the caravan onto the LocknLevel so that the front wheel sits on the back half of the
device. Loosen the rear wheel nuts. Close the balance valve.
Inflate the LocknLevel, which will lift the rear wheel clear of the ground, allowing you to
remove it.
Once the wheel has been replaced and wheel nuts initially tightened, open the balance
valve and loosen the silver cap on the left-hand air bag. Retighten the cap after deflation
is complete and finally tighten the wheel nuts.
To Change Offside Front Wheel
Roll the caravan onto the LocknLevel so that the rear wheel sits on the front half of the
device (nearest the front of the caravan). Loosen the wheel nuts on the front wheel.
Ensure the balance valve is in the closed position. Inflate the LocknLevel, which will lift
the front wheel clear of the ground, allowing you to remove it.
Once the wheel has been replaced and wheel nuts initially tightened, open the balance
valve and loosen the silver cap on the left-hand air bag. Now tighten the wheel nuts.
To Change Offside Rear Wheel
Roll the caravan onto the LocknLevel in the normal way. Loosen the rear wheel nuts.
Inflate the LocknLevel, which will lift the rear wheel clear and enable you to remove it.
Once the wheel has been replaced and wheel nuts initially tightened, open the balance
valve and loosen the silver cap on the left-hand air bag. Tighten the wheel nuts.

13
Optional Combo Pack
Levelling a twin axle caravan on the offside, while using a Single Axle LocknLevel
to fit both through-the-wheel locks
Manoeuvre your caravan onto the pitch into your chosen position.
Align the rear wheel with the lock receiver so that you would be able to fit the
through-the-wheel lock. Do not yet fit the lock.
Place the single axle LocknLevel on the pitch close to the rear nearside tyre. Align
the LocknLevel yellow centre marker with the centre of the rear wheel.
Place the twin axle LocknLevel in position on the offside, close to the tyres, with its
centre bar in line with the centre space between the wheels.
Move the caravan forward until the wheels just clear the front edge of the twin axle
LocknLevel on the offside (Approx. 1.5Mtrs/5ft).
Slide both the LocknLevels in under the Caravan so that the tyres will be within the
yellow lines when the caravan is reversed backwards into its original position.
14
It is important that when sliding the LocknLevels in behind the wheels that you do
not move them forward or backward.
Reverse the caravan back into its original position. Check that you now have all 3
wheels in the centre of both the single and twin axle LocknLevels. Fit the (nearside)
rear wheel lock, making any minor alignment adjustments as necessary.
Safety Note: Ensure you suitably chock the wheels on the offside to prevent any
sideways slewing. A smooth faced chock may be placed on top of the LocknLevel.
Disengage the motor mover (if used).
On the Single Axle LocknLevel, ensure that the silver deflation cap on the
LocknLevel is tightened closed. Remove the black cap, attach your air compressor
and turn on to raise the caravan.
The height required to lift the front wheel clear and fit the second lock is approx. 80-
100mm (3-4”). The pressure required to achieve this will vary according to the
weight of your caravan, but would typically be between 20-25 psi.
As soon as you are able to rotate the second wheel, turn off the compressor and
disconnect it. Now fit the second lock. Replace the black cap onto the short-
stemmed inflation nipple.

15
Deflate the LocknLevel by unscrewing the silver cap. No need to remove the cap, just
loosen it a couple of turns. Your caravan will now settle gently onto the ground.
Retighten the silver cap. Apply the handbrake.
The single axle LocknLevel now remains, deflated, under the wheel until your stay is
over.
Make sure that the balance valve on the twin axle LocknLevel is in the ‘open’ position
and that the silver cap is tightened.
Attach the compressor to the primary side (front chamber in this instance) and begin
to inflate. It will be noted that both wheels will lift together because the balance
valve is open.
Use a spirit level across the caravan to monitor the caravan’s current position. Once
the caravan is level, turn off the compressor and disconnect it. Now turn off the
balance valve and replace the black cap.
Reposition the spirit level (fore & aft), level the caravan using the jockey wheel and
lower the front and rear steadies firmly, in the normal manner to achieve level. Turn
off the balance valve and replace the black cap.
Advice
If the front wheel lock is difficult to undo, add air to the single axle LocknLevel until
you are able to undo the bolt.
The single axle LocknLevel can be used as a jack to change any wheel on a twin axle
caravan.
The Single Axle LocknLevel can be used to fit both through-the-wheel locks on a
twin axle caravan when storing in storage. When leaving in storage, always leave
the LocknLevel deflated under the wheel.

16
HI-5
The Hi-5 can be used on 5th Wheel Caravans, or Twin Axle Touring Caravans that do
not use through-the-wheel type locks.
Setting Up
Decide if you are going to reverse or drive forward onto the Hi-5.
Slide the Hi-5 inwards to a position so that the ramp is in contact with the tyre.
Ensure the tyre tread is lined up with the centre of the Hi-5 and the Hi-5 is straight,
fore-and-aft.
Move the trailer onto the Hi-5 and stop when the wheels are in the centre of the
Hi-5.
When levelling the trailer, remain coupled to your tow vehicle and apply the trailer
hand brake. If you do not have a handbrake on your trailer chock the wheels on the
high side (opposite to the Hi-5) to prevent movement. Place your spirit level across
the trailer floor or worktop in the usual way.
Attach a standard tyre pump to the inlet valve (short valve with black plastic cap)
and inflate until the trailer is level laterally. This will normally happen between 8 -
30 psi. (0.5 –2.0 bar) NEVER EXCEED 30 psi (2.0 bar).
Detach the pump replace the black plastic dust cap on the valve. Then having made
sure both front landing legs have equal contact with the ground, unhitch the trailer
as normal then remove the tow vehicle. Continue your front to rear levelling in the
normal manner once level deploy the rear corner steadies.

17
Should any further levelling be required due to settlement etc don’t forget to adjust
your rear corner steadies accordingly.
Once level deploy the rear steadying legs.
Lowering the Caravan
IMPORTANT Before proceeding ensure that there are no obstacles under the trailer
which might prevent the vehicle settling safely to the ground.
Ensure that the handbrake, if fitted, is on and/or the non-lifted wheels are chocked
and unable to move.
Raise the rear corner steadies hitch up the trailer as normal. Once that is done then
deflate the Hi-5 by simply loosening the silver cap on the longer valve a couple of
turns (there’s no need to remove it).
The trailer will settle gently back on the ground. Remove any wheel chocks and
release the handbrake, if fitted, slowly move the trailer off the Hi-5.
Expel the excess air from the Hi-5 before you tighten both of the valve caps to a
moderate 'finger tightness'. If necessary, clean and dry the Hi-5 before placing it in
its storage bag.
To fold the Hi-5, hold it flat with the valve towards you. Make the first fold approx. 16
cm from the righthand edge. Then fold the left side over the top.


19
Happy with your LocknLevel?
We’re just happy that you’re happy. If you don’t know how to
express your newfound joy, we’ve got a couple of suggestions…
Tell your friends, family and fellow caravaners
Share your experience by writing a review on our Facebook page
facebook.com/locknlevel
Not Happy?
Our friendly customer service team will work hard to put a smile
back on your face. Contact us:
Call: 01525 375271
Website: locknlevel.co.uk
Download a copy of this manual from our product website:
Locknlevel.co.uk
This manual suits for next models
2
Table of contents
Popular Automobile Accessories manuals by other brands

Parrot
Parrot CK 3000 Evolution user manual

Witter Towbar Systems
Witter Towbar Systems ZX504 Fitting instructions

Nuna
Nuna KLIK plus Instructions for installation

Overland Vehicle Systems
Overland Vehicle Systems 18199909 Set Up & Care Instructions

Whelen Engineering Company
Whelen Engineering Company AF6016A installation guide

Taffio
Taffio KM3D-360 manual

LSD-Doors
LSD-Doors 50025010 installation instructions

WeatherTech
WeatherTech No-Drill MudFlap installation instructions

Ultraflex
Ultraflex PADDLE TRIM installation manual

Bestop
Bestop Trek Top PRO 2 installation instructions

Wells Cargo
Wells Cargo Automobile Accessories owner's manual

Yakima
Yakima SmarT-Slot Kit 1 manual


