Loewe DVB-T User manual

1
233-32330.000
DVB-T/S Accessories.
Accessoires.
Accesorios.
Operating instructions.
Mode d’emploi.
Instrucciones de manejo.
■
DVB_T_S_GB_F_Esp 18.11.2004, 13:51 Uhr1

2
Content
Welcome 3
General information 3
Connecting antenna(e) 4
Initial start-up 5-9
Preparing for initial start-up 5
✳ Plug the Common-Interface module 5
Initial start-up 5-6
Station sorting 6
Determining the antenna position for
digital/terrestrial stations or aligning
the antenna 7
Automatic station search and store 8
Digital radio stations search and store 9
Programme manuell einstellen 9
Daily handling 10-11
Changing stations with the
station table 10
Status display 10
DVB subtitles 11
Picture in picture (PIP) 11
Electronic Programme Guide (EPG) 11
Recording programs 11
Playing radio stations 12
✳Removing the CI module 12
✳ Calling the CI module menu 12
Digital audio output 12
Installing new software 13
What to do when... malfunctions,
their causes and remedies 14-15
Index 16
✳ Only in the set version with CI slot
Sommaire Contenido
Page 18-32 Página 34-48
DVB_T_S_GB_F_Esp 18.11.2004, 13:51 Uhr2

3
Welcome
Thank you
and congratulations for choosing a Loewe product.
Depending on the capabilities, your set will have a DVB-T set for digital/
terrestrial stations or will also have DVB-S for digital stations via satellite.
This enables reception of a large number of free digital stations.
If your TV set is fitted with a slot for a Common Interface Module (CI) you
can also receive coded stations.
For this you only need a Common Interface Module and a Smartcard from
the programme provider. Both are available from dealers.
Your TV set also allows reception of digitally broadcast radio stations if
this feature is offered by the station providers.
Digital TV and radio stations usually offer not only a better sound and
picture quality than conventional analog stations but also provide
numerous additional functions which are explained in this manual.
Please read this manual carefully and thoroughly in order to make the
best possible use of all your receiver’s functions.You will find an
explanation of the terminology used herein at the end of the manual in
the Index chapter.
General information
Range of stations
How many and which stations you can receive essentially depends on your
location and your antenna system, e.g. roof antenna/indoor antenna or
satellite antenna.
Ask your dealer to find out which is the best antenna for your location.
The digital TV offers you the following advantages:
•All digital stations received terrestrially and via satellite are shown in a
station table.
•All stations can be called with one common remote control
•Support of EPG (the electronic program guide)
•The digital programmes can be recorded with a VCR or DVD recorder.
•It is also possible to receive coded stations (Pay-TV) as an option if the
corresponding Common Interface Module and the Smartcard from the
programme provider are available).
DVB_T_S_GB_F_Esp 18.11.2004, 13:51 Uhr3

4
Connect the antenna cable from the roof antenna to the antenna socket
”IN VHF/UHF/DVB-T” on the back of your TV set to receive digitally/
terrestrially broadcast stations.
An indoor antenna can also be used under good reception conditions.
Passive and active room antennas are offered commercially. In an active
antenna its power is supplied via the antenna connection
”VHF/UHF/DVB-T”.
The supply voltage (5 Volt) must be correspondingly set in the
„TV Menu – Connections–– DVB antenna–– DVB-T antenna“.
Connecting antenna(e)
It is advisable to use an antenna without directional characteristic. If the
location is outside the normal transmission range, a directional antenna
(Yagi) can also be used to improve the reception quality.
You can obtain more detailed information about receivable digital stations
in your area from your dealer.
You can also receive an analogue cable station or an analogue terrestrial
station and a satellite station at the same time and watch with the picture
in picture (PIP) function.
✳ Depending on the type of set
✳✳ Can be retrofitted
Antenna socket VHF/UHF/Cable/DVB-T
Socket for power cable
Digital sound output
✳✳ Satellite-antenna socket
✳ Slot for
Co
mm
o
n-In
te
rf
ace-
Module (CI)
Switch
on/off
Euro-AV-
socket 1
Euro-AV-
socket 2
DVB_T_S_GB_F_Esp 18.11.2004, 13:51 Uhr4

5
Preparing for initial start-up
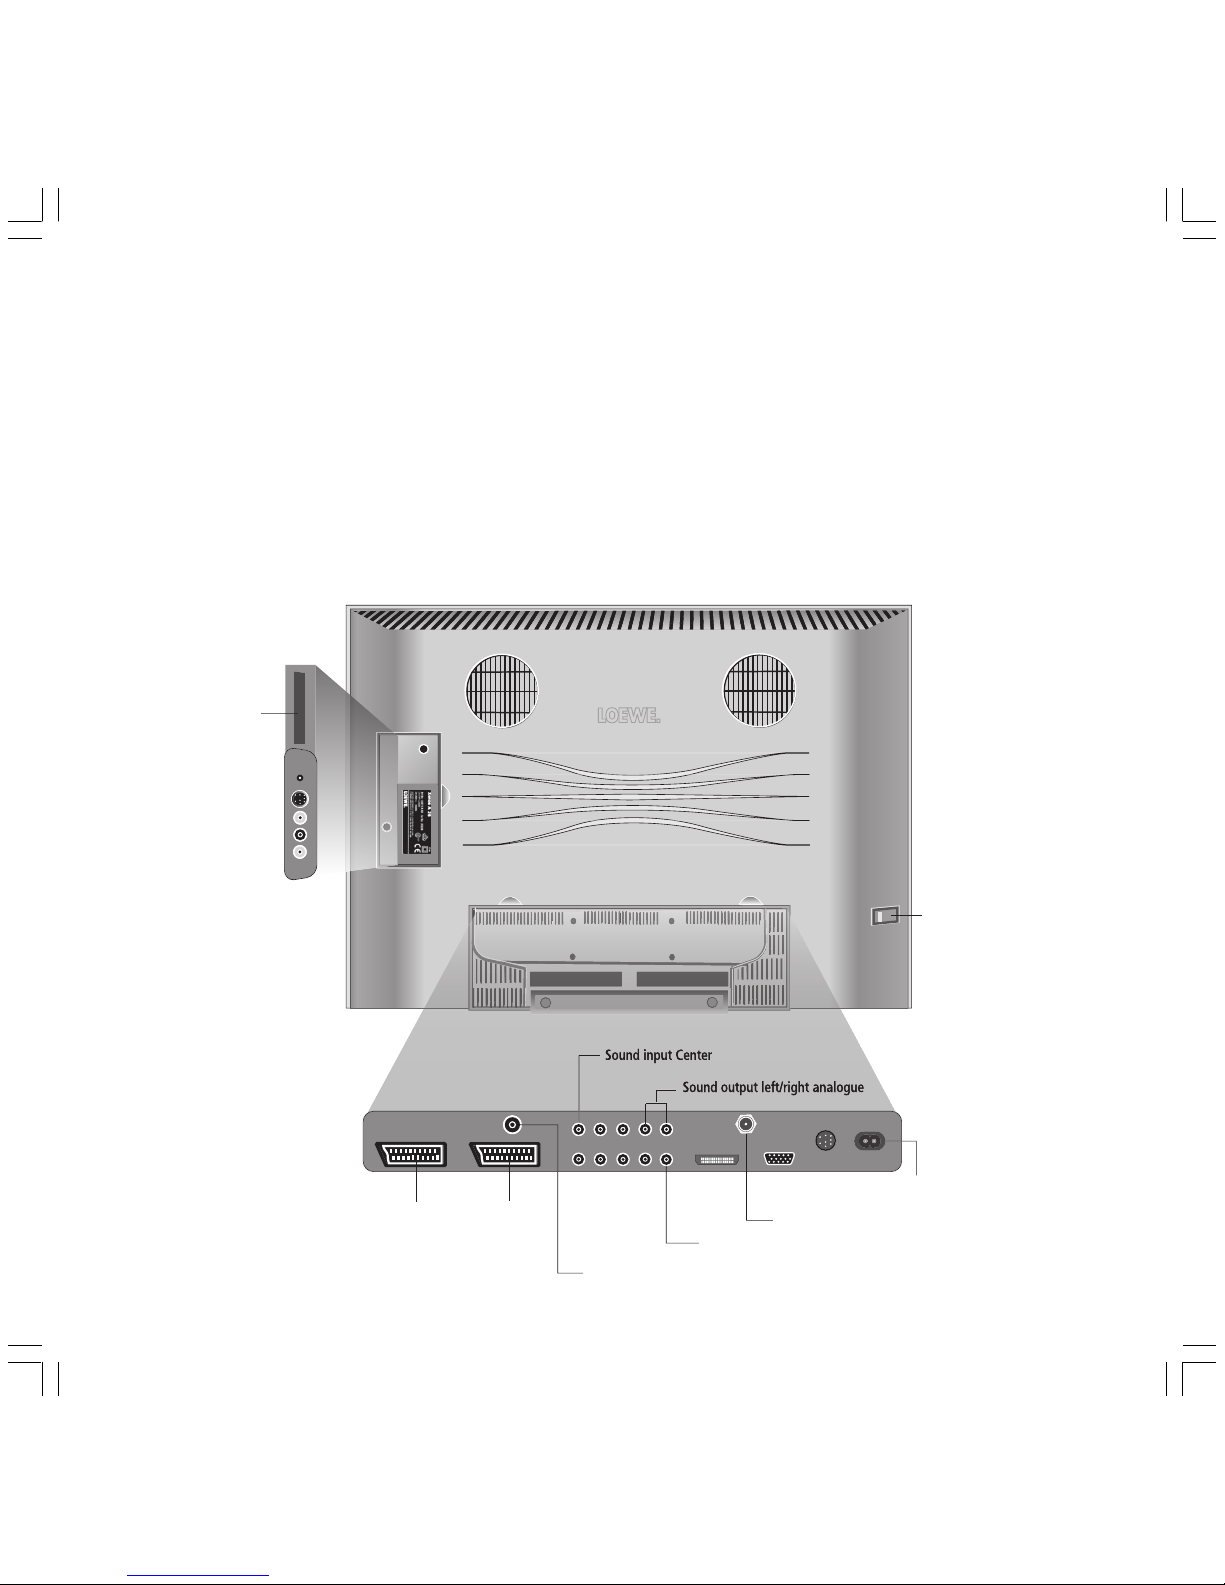
•Make sure an antenna for the VHF/UHF range is connected to the
” VHF/UHF/DVB-T” antenna socket.
With this antenna you can receive both analog and digital stations
(DVB-T) providing these are broadcast in your area.
•For the digital satellite reception (DVB-S) a suitable satellite antenna
must be connected to the antenna socket ”DVB-S” (see fig. page 4).
Inserting the Common-Interface module
(Only for sets with CI slot)
In order to be able to receive coded digital stations, the Common Interface
Module (CI module) and the Smartcard have to be inserted in the
appropriate slot of your TV. If this is not already the case, you have to
insert both. You can find the slot on the rear of your TV set, see fig. on
page 4.
1. Make sure that the TV set is switched off with the On-Off switch (not
on standby).
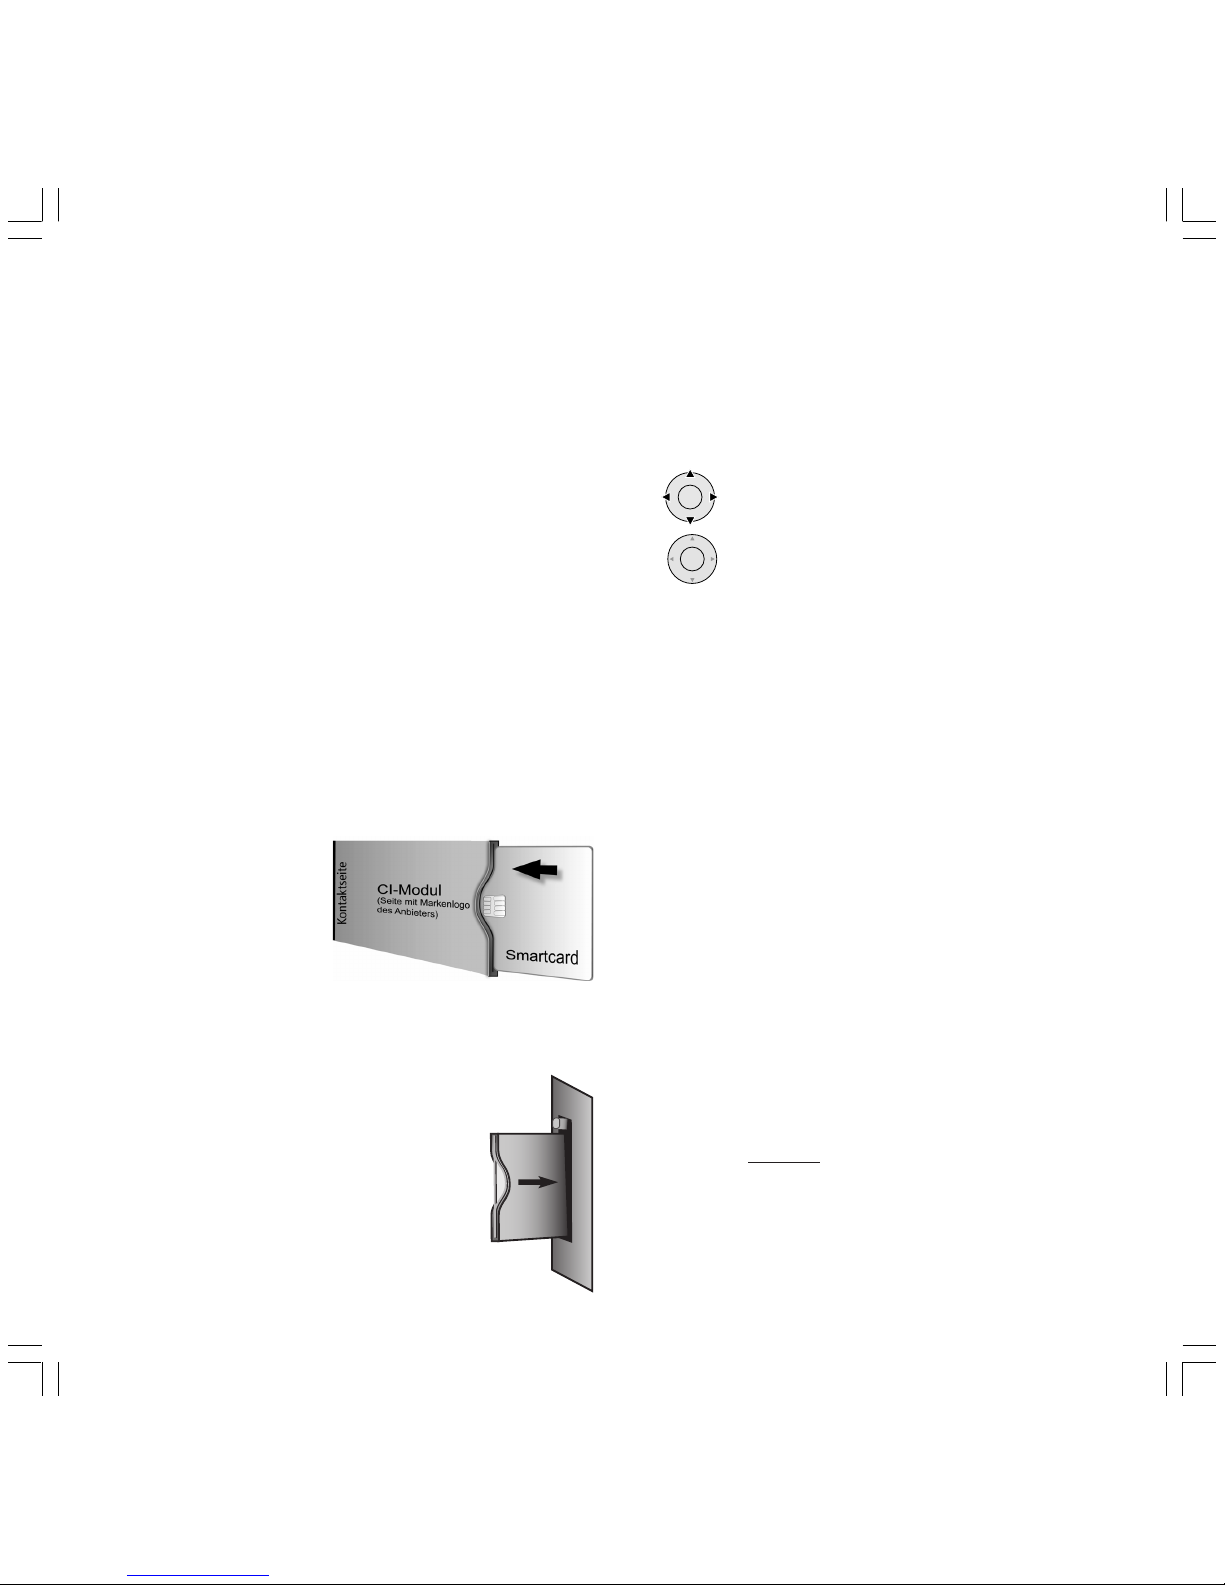
2. First push the Smartcard into the CI module as far as possible. The side
with the golden contact chip
neeeds to face the side of the
module printed with the
provider’s logo. Printed
arrows show you how to
insert the card.
Please also observe the installation
instructions enclosed with the Smartcard.
3. Push the CI module carefully, with the contact side
facing forwards, into the slot.The logo on the
Common Interface Module must be visible.
Make sure the module is not inserted skew.
Do not use force. The eject button is pressed out
when the module snaps in.
Initial start-up
Initial start-up
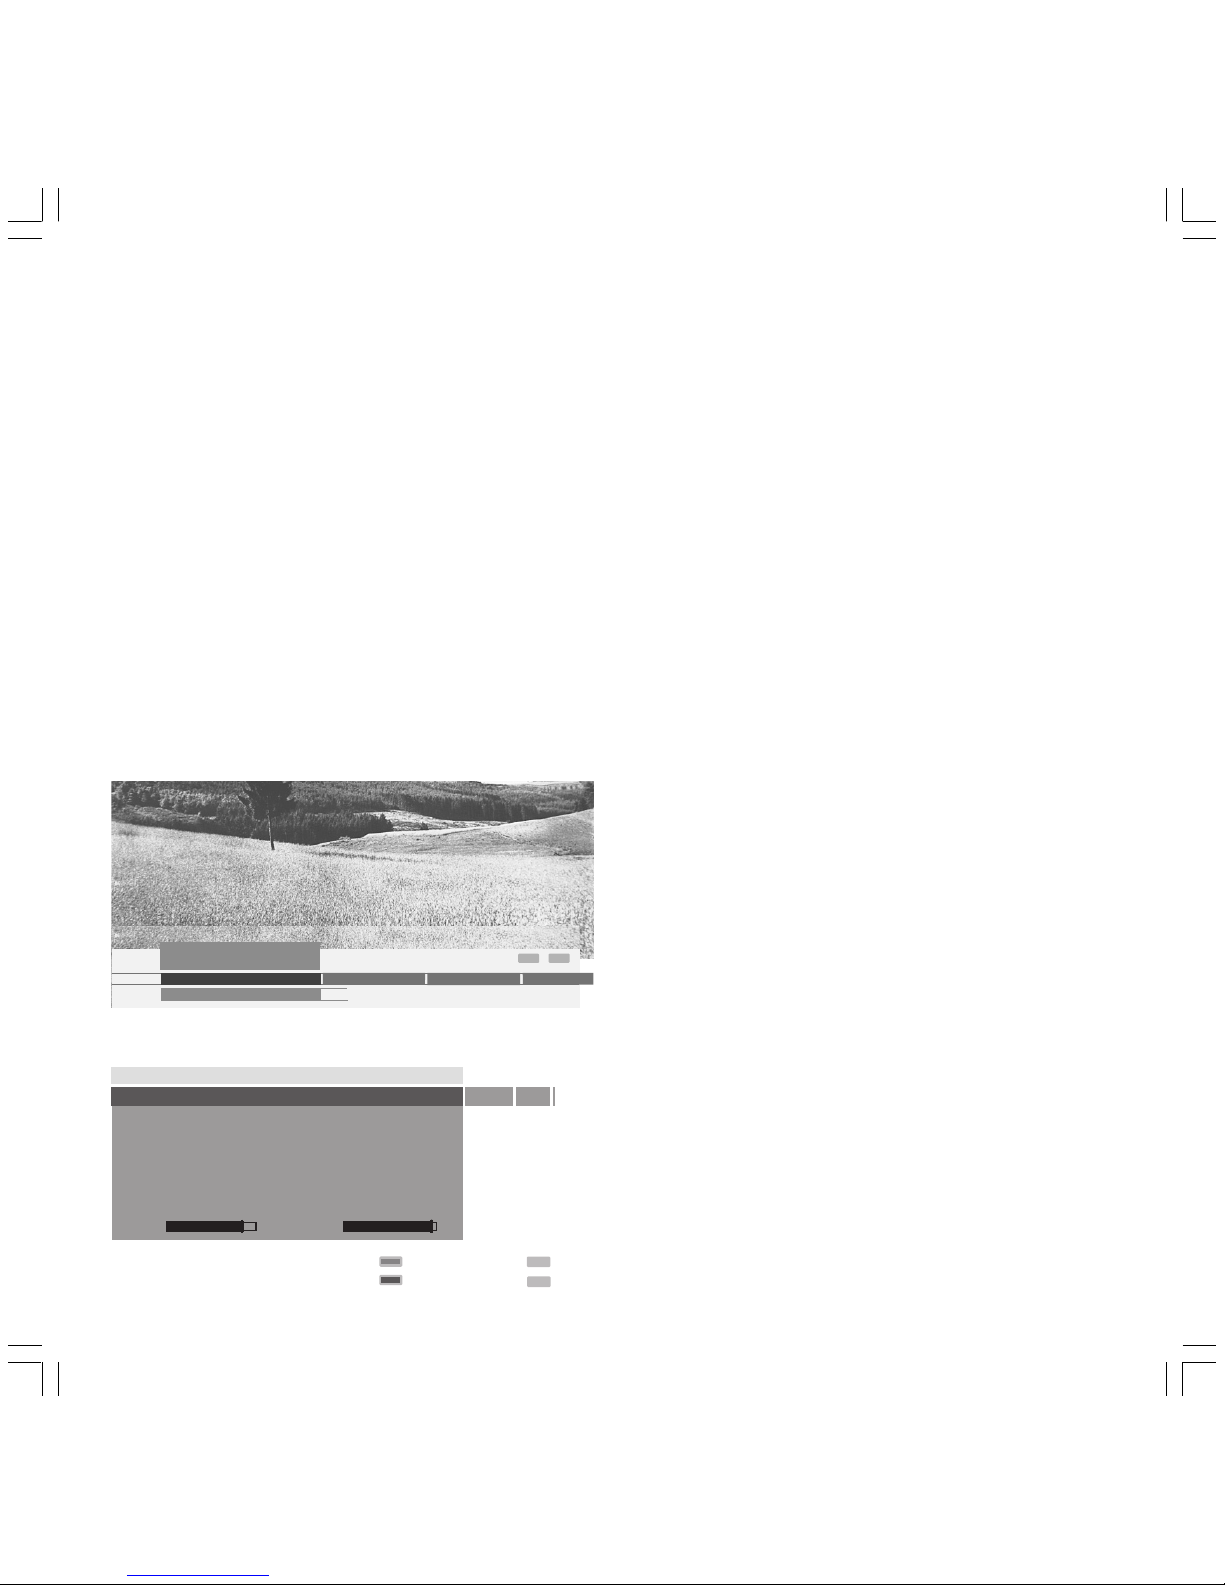
The TV’s automatic station programming is started after switching on for
the first time.
Follow the menus and make the necessary settings one after another.
Choose the settings …
using the arrows on the OK button.
... Confirm your settings with OK. You then go to the next
menu.
A) First you have to select the
menu language e.g. ”English” with the remote control.
B) Pressing the OK button takes you to the menu „Connect antenna(s)“.
If you wish to receive digital stations via satellite, select „Satellite
DVB-S“ and confirm with the yellow button.
If you wish to receive digital terrestrial stations (DVB-T), select
„Antenna DVB-T“.
Also select „Antenna/Cable (analogue) yes“, which allows you to
search for and store conventional analogue stations.
C) You go to the ”Location of set” menu by pressing the OK key.
State in what country you are operating your TV.
D) If you have selected DVB-T, pressing the OK button will take you to the
menu „Antenna DVB-T“.
E) You can make the selection corresponding to your satellite antenna
system in the menu „Select satellite system“.
Ask your antenna technician or dealer about the type of
satellite antenna system and the antenna settings if necessary.
In the ”Satellite system” menu state whether you can receive stations
from one or several satellites with your antenna system.
If you receive only one satellite...
F) Select the satellite at which the antenna is aimed, e.g. ASTRA 1.
G) In the following menu enter whether the station search is to take place
in the high and low band (Yes) or only in the low band (No).
COMMON INTERFACE
Auswurfknopf
CI-Modul
OK
OK
➝
DVB_T_S_GB_F_Esp 18.11.2004, 13:51 Uhr5

6
Note: A station search is necessary in both bands with most satellites.
H) The standard frequencies 9750 MHz and 10600 MHz are entered for
the low-band and high-band.
If your satellite antenna is fitted with an LNC (LNB) with a different
oscillator frequency, enter the corresponding frequency for high and
low band respectively.
Note: The correct display for the reception frequencies in the menu
„Set station manually“ depends on this setting!
I) You should see a picture and hear the sound with the settings
previously carried out (only for ASTRA 1 and HOTBIRD). Now press
OK.
J) You can select the default pre-programming in the menu „Pre-
programming“ for fast programming of the satellite stations.
Please select „No” to ensure that all stations currently receivable are
searched for and saved.
Symbol rates: The standard symbol rates 22000 and 27500 are
entered.
If you wish to receive stations with other symbol rates, please enter
the corresponding values here using the number buttons of the
remote control.
K) With OK you get an overview of which settings are to be used for
automatic programming.
L) Press the OK key again, the station search starts.
The TV searches for, sorts and stores all the receivable TV stations
according to their settings and the connected antennae.
M) When the TV stations are stored, you get an appropriate message.
Radio stations are then searched for with OK .
N) After storing the radio stations you get the ”Connections” menu by
pressing the OK key.
Select ”Yes” if you want to connect/log in a VCR, DVD player etc..
Follow the ”Connection wizard” and connect the equipment to the TV
set according to the connection diagram.
The menu is hidden if you select ”no”.
Note
You can repeat the initial start-up at any time, e.g. after moving.
The ”Repeat initial start-up” function deletes any stations already
stored!
Press the INFO key..
Then select the item ”Repeat initial installation”.
Then select ”Repeat initial start-up”.
Then start ”Initial start-up” with OK.
Station sorting
You can later change the station sorting performed automatically
whenever and however you wish, see „TV menu –Settings–Stations–
Automatic search–Change stations“ and conform with OK.
Initial start-up
DVB_T_S_GB_F_Esp 18.11.2004, 13:51 Uhr6

7
Initial start-up
Determining the antenna position for
digital/terrestrial stations or aligning the
antenna
If you receive one or more digital terrestrial stations (DVB-T) with picture
and sound interference using your room antenna, you should change the
location of the antenna.
For optimum alignment or determination of the suitable installation
location of the antenna your TV set has an indicator for the signal quality
C/N and signal strength Level.
Ask your dealer on which channels and frequency bands (VHF or UHF)
digital TV stations are broadcast in your area.
Several digital stations are transmitted on one channel.
Choosing a TV channel
1. Call the ”TV menu” with the MENU button.
2. Select the ”Settings” line and confirm with OK.
3. Select the ”Channels” line and confirm with OK.
4. Select the ”Set manually” line and confirm with OK.
INFO
END
Manual adjustment
Store
Search
Range
Channel
Frequency
Name
Bandwidth
C/N 96
DVB-T
E 05
177.50 MHz
Test
7 MHz
Level 99
DVB-S VHF
5. For digital programs select
”Range – DVB-T”.
6. Enter the appropriate channel number with the numeric buttons.
The corresponding bandwidth 7 or 8 MHz is set depending on the
channel and country.
Notes
•You should only adapt the bandwidth if the channel spacing of the
stations in your area deviate from the standard.
•If you receive a digital station, the signal quality C/N and the signal
strength Level is displayed by a black bar/numeric value.
The antenna alignment or position is at an optimum when as high a
value as possible (large bar) is displayed for the signal quality and
signal strength.
Align the antenna to a maximum numeric value/bar.
•If no signal is found in the set channel, you can start the frequency
search within the selected band (VHF or UHF) by pressing the blue
button.
7. Check other channels on which digital stations are broadcast
terrestrially in your area one after another.
Align the antenna using the weakest station to as maximum as
possible a bar/numeric value.
Note
After the antenna has been positioned and aligned, we recommend the
”Automatic station search and store” function to search for all stations
(see page 8).
INFO END
Manual adjustment ...
Timer functions
Parental lock
Channels Language
TV menu
Settings
DVB_T_S_GB_F_Esp 18.11.2004, 13:51 Uhr7

8
Initial start-up
Automatic station search and store
This function is of particular advantage if you are only searching for new
stations.
1. Switch on your TV and
if no menu is displayed, call the ”TV-menu” by pressing the MENU
button on the remote control
2. Select the ”Settings” item and confirm with OK.
Note:
If you use an active terrestrial antenna, this requires a supply voltage
(5 Volt). In this case, select the „Connections - Antenna DVB - Antenna
DVB-T“ line in the „TV menu“. Press the OK button and then select
„Yes (5 V)“. Confirm with OK.
3. Select ”Connections”, then ” Settings–Channels” and confirm with
OK.
4. Select ”Automatic search” and confirm with OK.
You will get a table for the automatic programme search.
5. Select ”Change search settings” and confirm with OK. Follow the
menus.
END
Select channel source
Change search settings
Antenne DVB
Proceed Back
Antenna/cable (analogue)
Antenna DVB-T
Satellite 1: ASTRA1 (DVB-S)
OK
OK
#
6. Indicate whether you are searching via antenna/cable (analogue),
antenna DVB-T or in the satellite range (DVB-S).
In DVB-T you can select a channel search (fast station search) or a
frequency search.
7. Indicate whether you wish to have all stations or only new ones
searched for.
Notes:
•The frequency search option is to be preferred only in exceptional
cases such as in the event of deviations from the standardized
channels.
•If you have purchased a CI module, please insert it before you start the
search because only then will the provider’s coded programs be
recognized and stored.
•If you change the CI module, you have to run a new station search so
that the stations of the new provider can be found and stored.
•Which of the programs of the provider you can watch in the end
depends on which program package you have bought.
•To extend an existing station list we recommend you to activate the
option search and store ”new stations only”.
8. Confirm your selection with OK.
9. Specify from which program place the stations are to be stored and
confirm with OK.
10. Select the ”Run search” line and confirm with OK.
The station search may take some time.
Do not make any entries or switch off the set during this time.
When the search has ended you will be shown the found and stored
stations sorted in numerical order.
If you also want to search for and store analog programs, press the MENU
button. Repeat the steps 5 to 10.
Select ”Analog” in step 6 and the transmission standard, e.g. ”Autom.–
BG”.
After the station search has been completed, hide the table by pressing
the END button.
DVB_T_S_GB_F_Esp 18.11.2004, 13:51 Uhr8

9
Initial start-up
Digital radio stations search and store
Your receiver can receive and play radio programs in high quality as well
as TV programs.
Note: Digital radio programs are not broadcasted in the DVB-T standard
in all regions at present.
Radio stations are stored in a separate station table.
You can search for and store digital radio stations in ”Radio-menu”.
1. Switch to radio mode with the RADIO button.
2. Use MENU to call up the „Radio menu“ and select the line marked
„Stations“.stations” line.
3. Confirm with OK.
4. You can have the radio stations searched for automatically or
manually.
In the „Change search settings“ menu you can decide whether to
search for and store all „digital radio stations“ or „Only new radio
stations“.
You can search for channels or frequencies.
Follow the wizard.
5. Finally enter from which program place the found stations are to be
stored.
6. Press the OK button.
Start search
Channels
Automatic search
Your TV set performs the search with the following settings:
Location of TV set
Signal source
Scope of search
Store stations beginning at ...
END
Radio menu
Automatic search
Great Britain
Antenna DVB-T
All channels
Channel pos. 1 (vacant: 1300)
Change search se
OK
You now get a summary of the settings you have made.
7. Select the line ”Start search”.
8. Start the search with OK.
If radio stations have been found and stored you get a station table at the
end.
Manual station setting
You can also search for and store stations manually. However, detailed
knowledge is necessary for manual programming.
1. Activate the appropriate menu – depending on whether you want to
set TV or radio stations – in the respective mode (TV or Radio) with the
MENU button.
2. Select ”Settings – Stations” in the TV-menu or ”Radio Stations” in the
Radio menu.
3. Select the entry ”Set manually” and confirm with OK.
4. Now enter the necessary setting parameters for each menu item. Press
the INFO button, if you need explanations of the individual menu
items.
Note
Several radio and TV stations can be broadcast on every channel.
END
Radio mode: 5 B5 AKTL
AUDIO IN
AVS
AV2
AV1
1 B5 AKTL
D
2 BAYERN 1
D
3 BR4 KLSK
D
4 SUNSHINE
D
5 ROCK ANT
D
6 ANTENNE
D
7 DLR
D
8 DLF
D
MENU
9 HR-INFO
D
10 MDR INFO
D
11 MDR FIGA
D
12 NDR KULT
D
13 SWR1
D
14 SWR2
D
15 WDR3
D
16 WDR5
D
17 OESTER 1
D
18 MDR JUMP
D
19 JAZZ RAD
D
20 BLUSAT20
D
OK
Switch over Scan sations
Select station Previous channel
Screen off Change sorting
0 9
...
OK
Automatic search ...
INFO END
Radio menu
Sound
Channels Timer functions
DVB_T_S_GB_F_Esp 18.11.2004, 13:51 Uhr9

10
Daily handling
Changing stations with the station table
The station table shows the currently stored stations in numerical order:
MENU
0 9
END
OK
Channel overview
6 3SAT
7 S–RTL
8 N–TV
9 DSF
10 TM3
11 PRO7
12 RTL 2
13 WDR 3
14 BR
15 HR
16 MDR 3
17 N 3
COMP.IN
HDMI/DVI
VGA
AVS
AV2
AV1
0 VIDEO
1
2 ZDF
3 SAT.1
4 RTL
5 VOX
ARD
OK
Switch over Change stations
... Select station Change sorting
D
D
D
D
D
D
D
D
D
D
D
D
D
D
D
D
D
You can change this sorting to:
•alphabetical
•in bouquets
•back to numerical
To change the sorting, please press the blue button on your remote
control.
The alphabetical sorting now appears:
MENU
a z
END
OK
Channel overview
CNN INT.
CAM
DSF
DVD
EUROSPRT
HOT
HR
KIKA
COMP.IN
HDMI/DVI
VGA
AVS
AV2
AV1
ARD
BR-ALPHA
BR3
OK
Switch over Change stations
... Select station Change sorting
D
D
D
D
D
D
D
D
D
D
D
The bouquet sorting appears when you press the button again.
Sorting according to bouquet lists the stations in groups of providers.
Every entry is explained by a symbol to the right:
Digital station
Child-protected station
Coded station
Status display
When you change to a digital station a status display appears for a few
seconds which informs you about the program which is currently showing
and about which options the program provider offers for this program:
14:42
Language / sound selection
1 ARD Eifellandschaft 14:30-15:15 Stereo
In the top line you can see the name of the programme. Further display
options which can be selected in the ”TV menu – Settings – On-screen
displays” are shown below it (time, language/sound selection, reminder
time, switch-off time etc.)
Additional selection options for the status display can be provided by the
station provider for the programme. In this case, the corresponding colour
button or the TEXT button will be displayed:
• Channel selection for multi-channel providers red button
• Language/Sound select green button
• Time select yellow button
• Child protection blue button
•DVB subtitles TEXT button
If you press the colour button or the TEXT button while the status display
is shown, the appropriate selection menu is displayed.
The subtitles of the status display refer exclusively to the ”DVD subtitles”
and are not offered by all station providers.
Which options you see depends on the respective programme provider
Many programme providers broadcast subtitles by teletext).
The status bar is displayed automatically when you change stations or
when a new program with different options to the previous program
begins.
D
DVB_T_S_GB_F_Esp 18.11.2004, 13:51 Uhr10

11
Daily handling
Notes:
•Selection menus are only available as long as the status bar is
displayed.
However, you can call it again at any time by pressing the END button
on your remote control.
Default for DVB subtitles
If the station provider offers DVB subtitles, you can have these displayed
permanently or suppress the display. You can also choose between
”Translation” or subtitles for the persons with hearing impediments.
1. Call the ”TV menu” with the MENU button.
2. Select the ”Settings” line and confirm with OK.
3. Select the line „Other“ and confirm with OK.
4. Select the ”DVB subtitles” line and confirm with OK.
END
INFO
Subtitles off
DVB Subtitles
for impaired hearing
for translation
OK
If you select ”Subtitles off” only a display appears in the status display if
subtitles are present.
You can show the subtitles again with the END and then with the
TEXT key.
DVB subtitles
•Call the status bar by pressing the END and then the TEXT button if
this is not already displayed.
•Press the TEXT (T) button if the status bar is visible.
Select the language and confirm with OK. The default changes for the
current program.
•The selectable subtitle languages depend on the program provider.
•The automatic pre-selection is determined by the menu language and
the selection in the ”DVB-Subtitle” setting menu.
•Hide the menu by pressing the END button.
Picture in picture (PIP)
You can follow one digital satellite and one analogue programme on your
screen at the same time.
Activate the function with the button # PIP on your remote control.
You will find further information about the picture in picture function in
your TV operating manual. It is only possible to select options (e.g.
subtitles) for the station in the main picture.
Electronic Program Guide (EPG)
The electronic program guide also contains a station table for your digital
programs. You can activate and use them as usual by pressing the button
EPG on your remote control.
MENU
END
Change to programme list
Electronic Programming Guide (EPG) Fr 10.09./14:14
Fr 10.09. soon 15:00
now
all
all
Date
Time
Channels
Topics
06:00-06:20 ZDF Die Blobs
06:00-06:30 RTL Wunderbare Jahre
06:00-06:25 Kabel 1 Dennis
06:00-06:25 N3 Extra en español (5)
06:00-06:30 BR Goal. Speak English, Play Football
06:00-06:30 WDR Lokalzeit Südwestfalen
06:00-07:10 SuperRTL Infomercials
06:00-07:10 Kinderkan Reif für die Dodo-Insel (25)
14:00-14:20 9LIVE Reisetraum
Comedyserie - Kandidaten mit gewissen Fehlern
When receiving digital-terrestrial and digital satellite stations, it may be
the case that two identical EPG data are displayed in the
„EPG (DVB)“ menu for one station.
If you call up the EPG menu in EPG mode using the MENU button,
then select „Station selection“, you can select the double-listed station
and deactivate it with OK
(marked black).
Recording programs
If you have connected a Loewe video/DVD recorder to your TV, you can
record digital and analogue TV programmes. It is preferable to use the
record function (red button) in the EPG. A detailed guide on how to use
video recorders can be found in the operating instructions for your Loewe
video/DVD recorder or Loewe TV set.
You can record a digitally transmitted programme and watch an analogue
programme at the same time or vice versa.
Note: Never select the sound format ”Dolby Digital” during recording,
even if this is provided.
DVB_T_S_GB_F_Esp 18.11.2004, 13:51 Uhr11

12
Daily handling
Playing radio stations
Change to radio mode with RADIO in order to play radio stations
(Exception: During active timer recording).
Call up the station table by pressing the OK button. You can then call, sort
and rename radio stations etc. exactly the same as for TV stations.
Press RADIO again to change back to TV mode.
END
Radio mode: 5 B5 AKTL
AUDIO IN
AVS
AV2
AV1
1 B5 AKTL
D
2 BAYERN 1
D
3 BR4 KLSK
D
4 SUNSHINE
D
5 ROCK ANT
D
6 ANTENNE
D
7 DLR
D
8 DLF
D
MENU
9 HR-INFO
D
10 MDR INFO
D
11 MDR FIGA
D
12 NDR KULT
D
13 SWR1
D
14 SWR2
D
15 WDR3
D
16 WDR5
D
17 OESTER 1
D
18 MDR JUMP
D
19 JAZZ RAD
D
20 BLUSAT20
D
OK
Switch over Scan sations
Select station Previous channel
Screen off Change sorting
0 9
...
OK
You can play the radio stations for a few seconds from the selected entry
upwards using the green button ”Play stations”. Pressing the green
button again stops the play.
You can switch off the screen in order to save energy using the red button.
Pressing the red button again or OK
switches the screen on again.
Removing the CI module
1. Switch off your TV at the power switch.
2. Press in the eject button on the slide-in module, the module jumps out.
3. Pull the module out of the set.
Calling the CI module menu
Here you can call information about the plugged Common-Interface
module and Smartcard. To do this, call the TV menu, select the ”Settings”
line and then the item ”CI-Module I/II – xxx”.
The content of this menu depends on the respective CI module provider.
Note:
This menu is only available with digital programs.
New CI module plugged
After plugging a new CI module and switching on the TV set, the
following dialog box appears:
END
Autom. channel search
Your TV set has detected a new CI module. This requires a
program search for all new receivable programs.
Continue with OK
After pressing the OK button, the wizard for the automatic station search
is started. Please check the suggested search parameters there.
Continue with the section ”Automatic station search” on page 8.
Digital audio output
You can also use the digital audio signals which your TV receives for
playing or recording the sound by an external audio system. The digital
sound output „DIGITAL (SPDIF) OUT“ (see fig. page 4) gives the sound
accompanying the television/radio programme.
Sound selection
If you are receiving a digital TV/radio programme with several sound
formats, you can call up the menu „Language/Sound selection“ by
pressing the END button. Press the green button after this.
If you have connected an external Dolby Digital decoder or the Loewe
AURO Preceiver and have entered this in the connection wizard, you
should now select „Dolby Digital“.
Note: The sound outputs of the TV set and speakers do not emit any sound
signals in this operating mode (Exception: the TV speakers are used as
active centre channel).
Only Stereo/PCM is reproduced with the setting ”Sound via TV”.This must
be considered when selecting the sound.
DVB_T_S_GB_F_Esp 18.11.2004, 13:51 Uhr12

13
Installing new software
Loewe is constantly working to develop its
products further, in order to offer you the last word in convenience and as
wide a scope of functionality as possible.
To ensure that your satellite receiver is always up-to-date and state-of-
the-art, new software versions will be provided from time to time which
can be beamed directly to your device via satelliteand can be installed
automatically (available only via ASTRA1).
Automatic software detection
Your device can find out when new software
versions are available. This happens at night, when your EPG is
automatically updated. To enable this update to take place, your TV set
simply needs to remain in standby mode (not with the On/Off button
switched off).
If a new software version has been found, an on-screen message will
inform you accordingly next time you switch the TV on:
You can decide whether you wish to download the new software or not.
Confirm with OK to start the download and install process for the new
software, which will be transmitted by satellite.
You can find out more in the section entitled „Downloading the
software“.
Searching for new software
If you always turn your TV set off using the On/Off switch, it will not check
automatically if there is new software available. If this is the case, you can
periodically carry out your own check (manual search). To do this, proceed
as follows:
1. Press the MENU key to call up the TV menu.
2. Confirm the line marked „Settings“ with OK.
3. Confirm the line marked ”Other” with OK.
4. Select the entry marked „Update digital TV software“ and press OK.
END
MENU
Update digital TV software
Current version: V 3.0. 0
You can search for a new software version with OK.
5. If you start the search with OK, a check is performed to see if a new
software version is available.
6. If a new version is available, an on-screen message will appear.
END
Current Version V 3.0.0
New Version: V 3.1. 0
Update digital TV software
Downloading the software
1. If you now press OK in the dialog box shown above, you can decide
whether you want to download the software straight away, when you
switch the TV off, or not at all.
We recommend that you always update your digital software. This is
the only way to ensure that your device is always up to date.
2. If you have chosen to download the software, the software on your
device will be configured and you will be informed of the download’s
progress by a grey bar and a counter.
Do not switch your device off during the download! The
download process can last up to an hour. Once finished, a
message will appear informing you that the download process
is complete.
3. Once you have updated the software, you will be prompted to turn off
your TV set with the On/Off switch and turn it back on again.
If you did not download the update, you will be asked again when you
switch the TV on whether you wish to continue with the update process.
DVB_T_S_GB_F_Esp 18.11.2004, 13:51 Uhr13

14
What to do if.. Faults, their causes and how to eliminate them
Problem
The channel overview doesn’t show any encoded
channels, although the CI module and smart card
are plugged in.
The Picture-in-Picture (PIP) function is not
available.
I’ve changed the CI module and smart card, but I
can’t find the channels from the new provider in
the channel overview.
Pre-programming: Only a few digital channels
are shown in the channel overview.
Message „Channel coded“
Message „No signal“
Possible cause and remedy
The CI module and / or smart card may not beplugged in correctly (see the section entitled
„Preparing for initial start-up“, see Page 5).
If no information appears for the CI module, smart card or CI software, the module or card has not
been installed correctly.
Plug in the module and card correctly and repeat the channel search process (see Page 8).
1. In order to be able to watch two satellite channels at the same time, or to watch one and record
another simultaneously:
2. You are trying to watch two digital stations at once. However, you can only watch one analog
and one digital station at the same time.
When you exchange a CI module, you will need to carry out the channel search process again before
you will be able to watch the channels provided by a new provider (see Page 8).
Start the automatic channel search (see Page 8).
The selected channel cannot be decoded. Possiblecauses:
•No suitable CI module is present, or it isn’tplugged in correctly.
•The smart card isn’t plugged in
•The channel hasn’t been released.
The antenna signal is not available.
Possible causes:
•The antenna cable isn’t connected, or isn’t connected to the correct socket (SAT A/D).
•The antenna system is not set correctly. Check your settings.
•The satellite antenna isn’t aligned correctly orreception is impaired (e.g. the antenna is iced
up or covered with snow).
DVB_T_S_GB_F_Esp 18.11.2004, 13:51 Uhr14

15
Problem
Message „Channels no longer available“
Message „Transmission break“
Message „Please wait“
No sound is emitted from the speakers of the
television set.
Two identical informations for one program are
displayed in the EPG(DVB) list.
Possible cause and remedy
The stored channel data is no longer available. Possible causes:
•The channel has ceased operating.
•The channel has changed its transmission parameters.
The channel is currently unavailable.
Key data is being stored. This can take a fewseconds.
Please do not turn your device off during this time.
”Dolby Digital” is selected in the menu „Language/Sound selection“. Connect the DIGITAL (SPDIF)
OUT output to an external AV receiver or change the settings in the language/sound selection menu
(see p.10 Status Display).
The EPG data are received for one station, e.g.ARD via DVB-T and DVB-S.
You can deactivate one of the two stations in the ”EPG menu – Station selection”.
Loewe Hotline
If you are still unable to resolve the problem,
please contact your dealer or the Loewe Hotline:
Germany
Telefon: (01801) 222 563 93
Fax: (09261) 99 500
Internet: www.loewe.de
E-Mail: www.loewe.de (Kontaktbereich)
DVB_T_S_GB_F_Esp 18.11.2004, 13:51 Uhr15

16
Index
CI module (Common Interface)
A CI module is a decoder module for digital TV and radio channels that
comply with the CI standard.
To display coded channels, you will also need a released smart card from
the channel provider in addition to a CI module. A CI module for digital TV
and radio channels is often also referred to as a CICAM (Common
Interface Conditional Access Module).
Common Interface (CI)
Standardised interface for accepting exchangeable CI modules.
Conditional Access System (CA system)
A CA system encodes and decodes digital channels.A channel provider
encodes its channels before transmission for legal or economic reasons.
The signal is then decoded in the end device using a suitable CI module.
There are various providers of CA systems. Virtually all support the CI
protocol, i.e. suitable CI modules are available.
DVB-T
Digital Video Broadcast Terrestrial:
Digitale Fernsehübertragung erdgebunden. Standard für digitales
Fernsehen, der in Europa und anderen Ländern verwendet wird.
DVB-S
Digital Video Broadcast Terrestrial: Digital TV Transmission Terrestrial.
Standard for digital TV used in Europe and other countries.
EPG
Electronic Programme Guide: Your TV set’s electronic channel magazine.
LNC (LNB)
Low Noise Block Converter:
Signal-Empfangsteil an der Satellitenantenne.
Smartcard
To decode coded DVB channels (digital TV and
digital radio), you will need a released smart card from the relevant
channel provider.The smart card authorises the TV user to decode a
specific package of channels.
Symbol rate
The symbol rate describes the volume of data that can be transmitted per
second. Most satellites use symbol rates 22 000 or 27 000 kBauds.
C/N: Carrier to Noise
Signal to noise ratio
The greater the pointer bar or number the better the reception signal
quality.
Printed in Germany
11.04/1,0
Subject to modifications.
DVB_T_S_GB_F_Esp 18.11.2004, 13:51 Uhr16

17
DVB_T_S_GB_F_Esp 18.11.2004, 13:51 Uhr17

18
Sommaire
Bienvenue 19
Instructions générales 19
Raccorder l’(les) antenne(s) 20
Mise en service 21-25
Préparation à la mise en service 21
✳ Installation du module Common-Interface 21
Première mise en service 21-22
Tri des programmes 22
Déterminer la position d’antenne, resp. orienter l’antenne
pour recevoir les émetteurs numériques/hertziens 23
Recherche automatique des programmes et mémorisation 24
Recherche et enregistrer les programmes radio numériques 25
Réglage manuel des programmes 25
Utilisation quotidienne 26-28
Changement de programmes à partir
l’aperçu des programmes 26
Affichage de l’état 26
Préréglage pour le sous-titrage DVB 27
Sous-titrage DVB 27
Image sur image (PIP) 27
Guide Electronique de Programmes (GEP) 27
Enregistrement de programmes 28
Lecture de programmes radio 28
✳ Retirer le module CI 28
✳ Appel du menu du module CI 28
Sortie de son numérique 28
Installer un nouveau logiciel 29
✳ Uniquement pour les versions d’appareil équipés d’un connecteur CI
Que faire quand... mauvais fonctionnement,
ses raisons et la réparation 30-31
Liste des mots clés 33
DVB_T_S_GB_F_Esp 18.11.2004, 13:51 Uhr18

19
Bienvenue
Nous vous remercions
et vous adressons toutes nos félicitations pour avoir choisi un produit
Loewe.
Selon son équipement, votre appareil dispose d’un module de réception
DVB-T pour les programmes numériques hertziens ou bien est équipé du
module DVB-S pour la réception des programmes numériques par satellite.
Ceci vous permet la réception d’une multitude de canaux libres
numériques.
Si votre téléviseur est en outre équipé d’une prise pour Common-
Interface-Modul (CI), vous pouvez également recevoir des programmes
cryptés.
Pour ceci, vous avez uniquement besoin d’un module Common-Interface
et d’une Smartcard du fournisseur de programmes. Les deux sont en vente
chez les spécialistes.
La réception de programmes radio numériques est également possible
avec votre téléviseur dans la mesure où ceux-ci sont proposés par les
fournisseurs de programmes.
En règle générale, les programmes télévisés et radios numériques n’offrent
pas seulement une qualité de son et d’image meilleure que celle des
programmes analogiques conventionnels, mais ils mettent également à
votre disposition de nombreuses fonctions qui sont expliquées dans ce
mode d’emploi.
Veuillez prendre le temps de lire ce mode d’emploi attentivement et dans
le calme, afin de pouvoir utiliser toutes les fonctions du récepteur de façon
optimale. Vous trouverez une explication des termes techniques utilisés à
la fin de ce mode d’emploi dans le chapitre « Liste des mots clés ».
Instructions générales
Varietà dei programmi
Le nombre et le genre de programmes que vous pouvez recevoir dépend
essentiellement de votre lieu de réception et de l’installation d’antenne,
par ex. une antenne installée sur le toit ou intérieure, ou bien une antenne
satellite.
Laissez-vous conseiller par votre spécialiste afin de trouver l’antenne la
mieux adaptée à votre lieu de réception.
L’extens numériques vous offre les avantages suivants :
•Tous les programmes numériques reçus par voie hertzienne et
satellitaire sont présentés dans un aperçu des programmes.
•Les programmes sont disponibles simplement à partir d’une
télécommande
•Equipé de GEP (EPG) (le magazine électronique de programmes)
•Les programmes numériques peuvent être enregistrés à partir d’un
magnétoscope, resp. d’un enregistreur DVD.
•La réception de programmes cryptés (Pay-TV) est possible en option
lorsque le module Common-Interface correspondant et la Smartcard du
fournisseur de programmes sont disponibles).
DVB_T_S_GB_F_Esp 18.11.2004, 13:51 Uhr19

20
Raccorder l’(les) antenne(s)
Pour la réception des programmes numériques émis par voie hertzienne,
branchez le câble de l’antenne installée sur le toit à la prise d’antenne
«VHF/UHF/DVB-T » située à l’arrière de votre téléviseur (sur la prise
«VHF/UHF/DVB-T »).
En cas de bonne réception, vous pouvez également utiliser une antenne
intérieure. Dans le commerce sont proposées des antennes intérieures
passives et actives. L’alimentation électrique d’une antenne active se fait
par le biais du branchement d’antenne « VHF/UHF/DVB-T »
L’alimentation électrique (5 volts) doit être configurée de
manière correspondante dans « Menu TV – Raccordements –
Antenne DVB–– Antenne DVB-T ».
Il est judicieux d’utiliser une antenne sans caractéristique directionnelle. Si
le lieu de réception se trouve en dehors d’un secteur d’émission normal,
une antenne directionnelle (Yagi) peut être utilisée afin d’améliorer la
qualité de réception.
Vous pouvez obtenir de plus amples informations concernant les
programmes numériques diffusés dans votre région auprès d’un
spécialiste.
Vous pouvez également recevoir simultanément un programme câblé
analogique ou un programme hertzien analogique et un programme
satellite et le visualiser avec la fonction d’image incrustée (PIP).
✳ Suivant le type d’appareil
✳✳ Peut être èquipé ultérieurement
Prise d'antenne VHF/UHF/Câble/DVB-T
Interrupteur de
Marche/Arrêt
Sortie son numérique
✳✳ Prise d'antenne satellite
✳ Prise
p
our modul
e
d
'in
te
rf
ace
co
mm
u
n
e
(CI)
Prise
Euro AV 1
e
Prise
Euro AV 2
Prise pour
câble réseau
DVB_T_S_GB_F_Esp 18.11.2004, 13:51 Uhr20
This manual suits for next models
1
Table of contents
Languages: