Logli Massimo LMDOCCIA Series User manual

rev. 1.1
INSTALLATION INSTRUCTIONS
LMDOCCIA SERIES
Model Wall/corner/wall
Glass 8 mm
Kit width 1000 mm
LMDOCCIA07
W
I
T
H
O
U
T
G
L
A
S
S
C
U
T
-
O
U
T
S

LMDOCCIA SERIES
Model Wall/corner/wall - Glass 8 mm - Kit width 1000 mm
LMDOCCIA07
Composition of the kit
2 / 15
LMSD27MAM
LMSD5020
1 Pc
LMSD10020
1 Pc
PBD3183.150
+ PBD3183.220
2 Pc + 2 Pc
PBD3184.100
2 Pc
GTUP4
5 mt
1 Set
1 Pc + 1 Pc
0 Pc
HAND6640VHB
4 Pc
LMC13.100
2 Pc
GM1520DX
+ GM1520SX

LMDOCCIA SERIES
Model Wall/corner/wall - Glass 8 mm - Kit width 1000 mm
LMDOCCIA07
Important information
3 / 15
GENERAL INDICATIONS
- The exclusive use of safety glass is required (monolithic tempered or laminated)
- Do not install the product in environments characterized by the presence of aggressive
chemical agents (pools, saunas, marine atmosphere, ...).
- Do not move the doors too fast.
- Do not move the doors with excessive force. Install and adjust the end stops correctly
supplied in the kit.
PROPER AND AUTHORIZED USE
- It is possible to install the product only indoors, protected from moisture and agents
atmospheric (sun, wind, pollution, ...)
- The authorized use concerns manual opening and closing and at a running speed of 1
or more sliding glass panels inside a door.
REQUIREMENTS OF GLASS PANELS AND ANCHORS
- The structure to which the product is anchored must be able to support permanent loads
and have an adequate geometric linearity (maximum height of 2 mm every 1000 mm).
- The anchors must be correctly selected according to the type of structure and the weight
of the suspended parts of the product (including glass panels).
- The exclusive use of safety glass (monolithic, tempered or laminated) is required.
- Never use panels that are not intact or otherwise damaged.
- During adjustment phases, make sure that the glass never comes into contact with potentially
dangerous parts because of its integrity (metal parts, masonry, ...).
- Never exceed the appropriate tightening torques; too tight a tightening does not correspond
to a better tightening and can cause permanent damage to the product, to the anchoring
structure and to the glass panels.
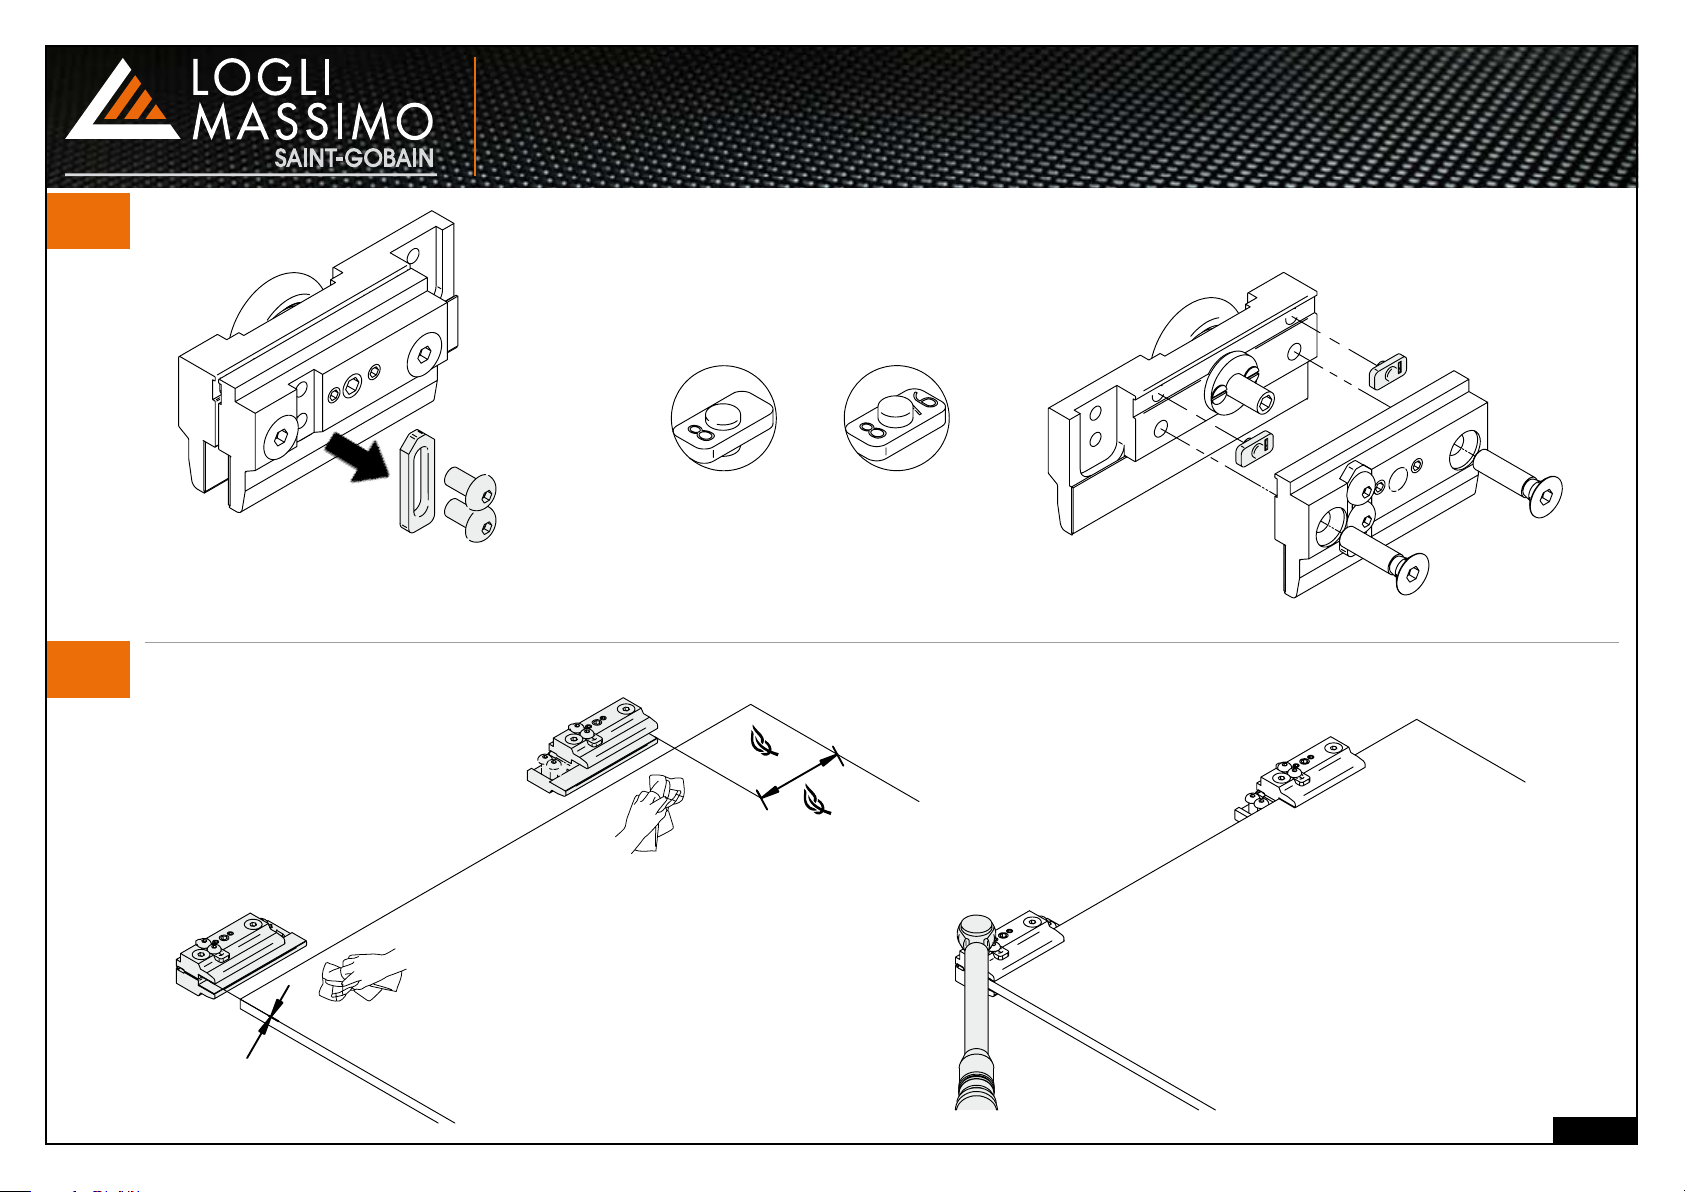
INSTRUCTIONS FOR MAINTENANCE AND CLEANING
- Replace damaged and / or worn parts immediately.
- Before installation, always degrease the areas of the glass panels on which the
clamping elements (clamps) will be installed
- Use non-aggressive, non-greasy detergents for cleaning.
- Regularly check the level of wear of the components and the correct operation of the product.
- Use only original spare parts.
SAFETY INSTRUCTIONS
- The installation requires the simultaneous presence of two operators.
- Wear appropriate personal protective equipment including gloves, shoes and goggles.
- Only qualified and trained operators can perform the installation and commissioning
of the product.
- Always avoid direct contact between glass and metal.
END OF LIFE
- The product disassembly procedure must be performed by two operators.
- Wear appropriate personal protective equipment including gloves, shoes and goggles.
- Only qualified and properly trained operators can disassemble the product.
Disposal of the product must be carried out in accordance with the national regulations in force
regarding waste and environmental protection. In particular, follow the instructions below:
- plastic, rubber and similar parts must be sent to an approved center;
- materials made of aluminum, iron and metal in general must be sent to an approved
recycling center;
- the glass parts must be sent to an authorized disposal center.
Warning: read the instructions carefully
To reduce the risk of accidents, operators who install and / or use
this product MUST read and understand these instructions.
DO NOT THROW
DELIVER TO USER

LMDOCCIA SERIES
Model Wall/corner/wall - Glass 8 mm - Kit width 1000 mm
LMDOCCIA07
General dimensions
4 / 15
min. 600
min. 790
LM
LF
30
8
LM
LF
30
8
45
45
LA
LV
LV
H
HF
HS
10
6
12
GLASS DIMENSIONING
1) detect the LV measurement
2) LM = LV/2
3) HS = H -40
4) LF = LM
5) HF = H -50
6) LA = 0,7 x (LV -140)
closed sliding
door configuration
Shower inside
opened sliding
door configuration
Shower inside
EXAMPLE FULL DIMENSIONS
dimensions expressed in mm
Lenght of the rail LB = LV - 36
L opening
(LV) L fixed (LF) L sliding (LM) Passage (LA)
1000 500 500 600
OPTIONAL
SOFTBREAK
Art. LMSTOP

LMDOCCIA SERIES
Model Wall/corner/wall - Glass 8 mm - Kit width 1000 mm
LMDOCCIA07
W
H
W-47
H -4
W
H
H
W
1
5 / 15
W = distance between wall
and external track
H = distance from ground to over track
Fix the support to the wall

LMDOCCIA SERIES
Model Wall/corner/wall - Glass 8 mm - Kit width 1000 mm
LMDOCCIA07
DCC90
PBDH
PBDW
LPBDH =H-66
GTUP
SPE2393
GTUP
SPE2393
2
6 / 15
FIXED GLASS ASSEMBLY
Use shims SPE2393 to distance
fixed glass from the bottom of the channel
and gaskets GTUP type for glass locking
Assembly of fixed glass gaskets
FLOOR
INTERIOR SIDE
INTERIOR SIDE
WALL

LMDOCCIA SERIES
Model Wall/corner/wall - Glass 8 mm - Kit width 1000 mm
LMDOCCIA07
±2
±2
GTUP
7 / 15
Insert the supports in the rail as shown
3
4a Rail mounting 4b Mounting of gaskets on the rail
INTERIOR SIDE

LMDOCCIA SERIES
Model Wall/corner/wall - Glass 8 mm - Kit width 1000 mm
LMDOCCIA07
±2
±2
GTUP
8 / 15
5
6b
Block
Adjust
Adjust
6a
7

LMDOCCIA SERIES
Model Wall/corner/wall - Glass 8 mm - Kit width 1000 mm
LMDOCCIA07
9 / 15
8
Fix the upper corner
9

LMDOCCIA SERIES
Model Wall/corner/wall - Glass 8 mm - Kit width 1000 mm
LMDOCCIA07
1°
2°
0
13 Nm
Min 70
X
Min 30
CLICK!
DCC218 / DCC220
20
PBD3184
DCC218 / DCC220
10 / 15
Remove anti-derailment accessory
10
11
Insert the grippers on the glass
GRIPPERS INSTALLATION
Select the spacer according to the thickness of the glass and insert it as shown
GLASS 8 mm GLASS 8,76 mm
Tighten the grippers
< DOOR CLOSING SIDE

LMDOCCIA SERIES
Model Wall/corner/wall - Glass 8 mm - Kit width 1000 mm
LMDOCCIA07
1°
2°
0
13 Nm
Min 70
X
Min 30
CLICK!
DCC218 / DCC220
20
PBD3184
DCC218 / DCC220
11 / 15
12
Insert the floor guide and the PBD3184 cover

LMDOCCIA SERIES
Model Wall/corner/wall - Glass 8 mm - Kit width 1000 mm
LMDOCCIA07
±3
STOP
12 / 15
13
14
BlockAdjust
15
Clean the profile first
to hook the wheels

LMDOCCIA SERIES
Model Wall/corner/wall - Glass 8 mm - Kit width 1000 mm
LMDOCCIA07
±3
STOP
13 / 15
16
17 18
Fix and adjust
the anti-derailment
snap the STOP&SLIDE
Mount the STOP & SLIDE
to the clamp

LMDOCCIA SERIES
Model Wall/corner/wall - Glass 8 mm - Kit width 1000 mm
LMDOCCIA07
14 / 15
19a
20
Hook the cover to the track
19b
21
Mechanical stop without STOP&SLIDE
Enter the STOP&SLIDE thrust
ACTIVATOR And screw it making sure that the sliding door
is correctly inserted in the floor guide

LMDOCCIA SERIES
Model Wall/corner/wall - Glass 8 mm - Kit width 1000 mm
LMDOCCIA07
15 / 15
Final adjustments
- Seal the joints inside the shower compartment
between the profiles and the fixed glass
- Seal the joints inside the shower compartment
between the profiles and the walls of the
shower compartment
- Apply GM gaskets
- Apply the adhesive handles
0 Pc
HAND6640VHB
4 Pc
1 Pc + 1 Pc
GM1520DX
+ GM1520SX
This manual suits for next models
1
Table of contents
Popular Bathroom Fixture manuals by other brands

Franke
Franke 7612210067297 Installation and operating instructions

agape
agape OTTOCENTO ACER0766-R Assembly instruction

MERLYN
MERLYN 6 Series quick start guide

KEUCO
KEUCO Axess 35006 010801 Mounting instruction

BELLOSTA
BELLOSTA Electa 5208/E Installation instruction

SANPLAST
SANPLAST KN-II/EKOPLUS /185 installation guide