Longshine LCS-8200 User manual

FCC Certifications
This Equipment has been tested and found to comply with the limits for a Class B digital
device, pursuant to part 15 of the FCC Rules. These limits are designed to provide
reasonable protection against harmful interference when the equipment is operated in a
commercial environment. This equipment generates, uses, and can radiate radio frequency
energy and, if not installed and used in accordance with the instruction manual, may cause
harmful interference to radio communications.
Operation of this equipment in a residential area is likely to cause harmful interference in
which case the user will be required to correct the interference at his own expense.
This device complies with Part 15 of the FCC Rules. Operation is subject to the following
two conditions: (1) this device may not cause harmful interference, and (2) this device must
accept any interference received; including interference that may cause undesired
operation.
CE Mark Warning
This equipment complies with the requirements relating to electromagnetic compatibility,
EN 55022 class B for ITE, the essential protection requirement of Council Directive
89/336/EEC on the approximation of the laws of the Member States relating to
electromagnetic compatibility.
Company has an on-going policy of upgrading its products and it may be possible that
information in this document is not up-to-date. Please check with your local distributors for
the latest information. No part of this document can be copied or reproduced in any form
without written consent from the company.
Trademarks:
All trade names and trademarks are the properties of their respective companies.
Copyright © 2004,All Rights Reserved.
Document Version: 2.0

Table of Content
Introduction ...............................................................................................................1
Key Features............................................................................................................................1
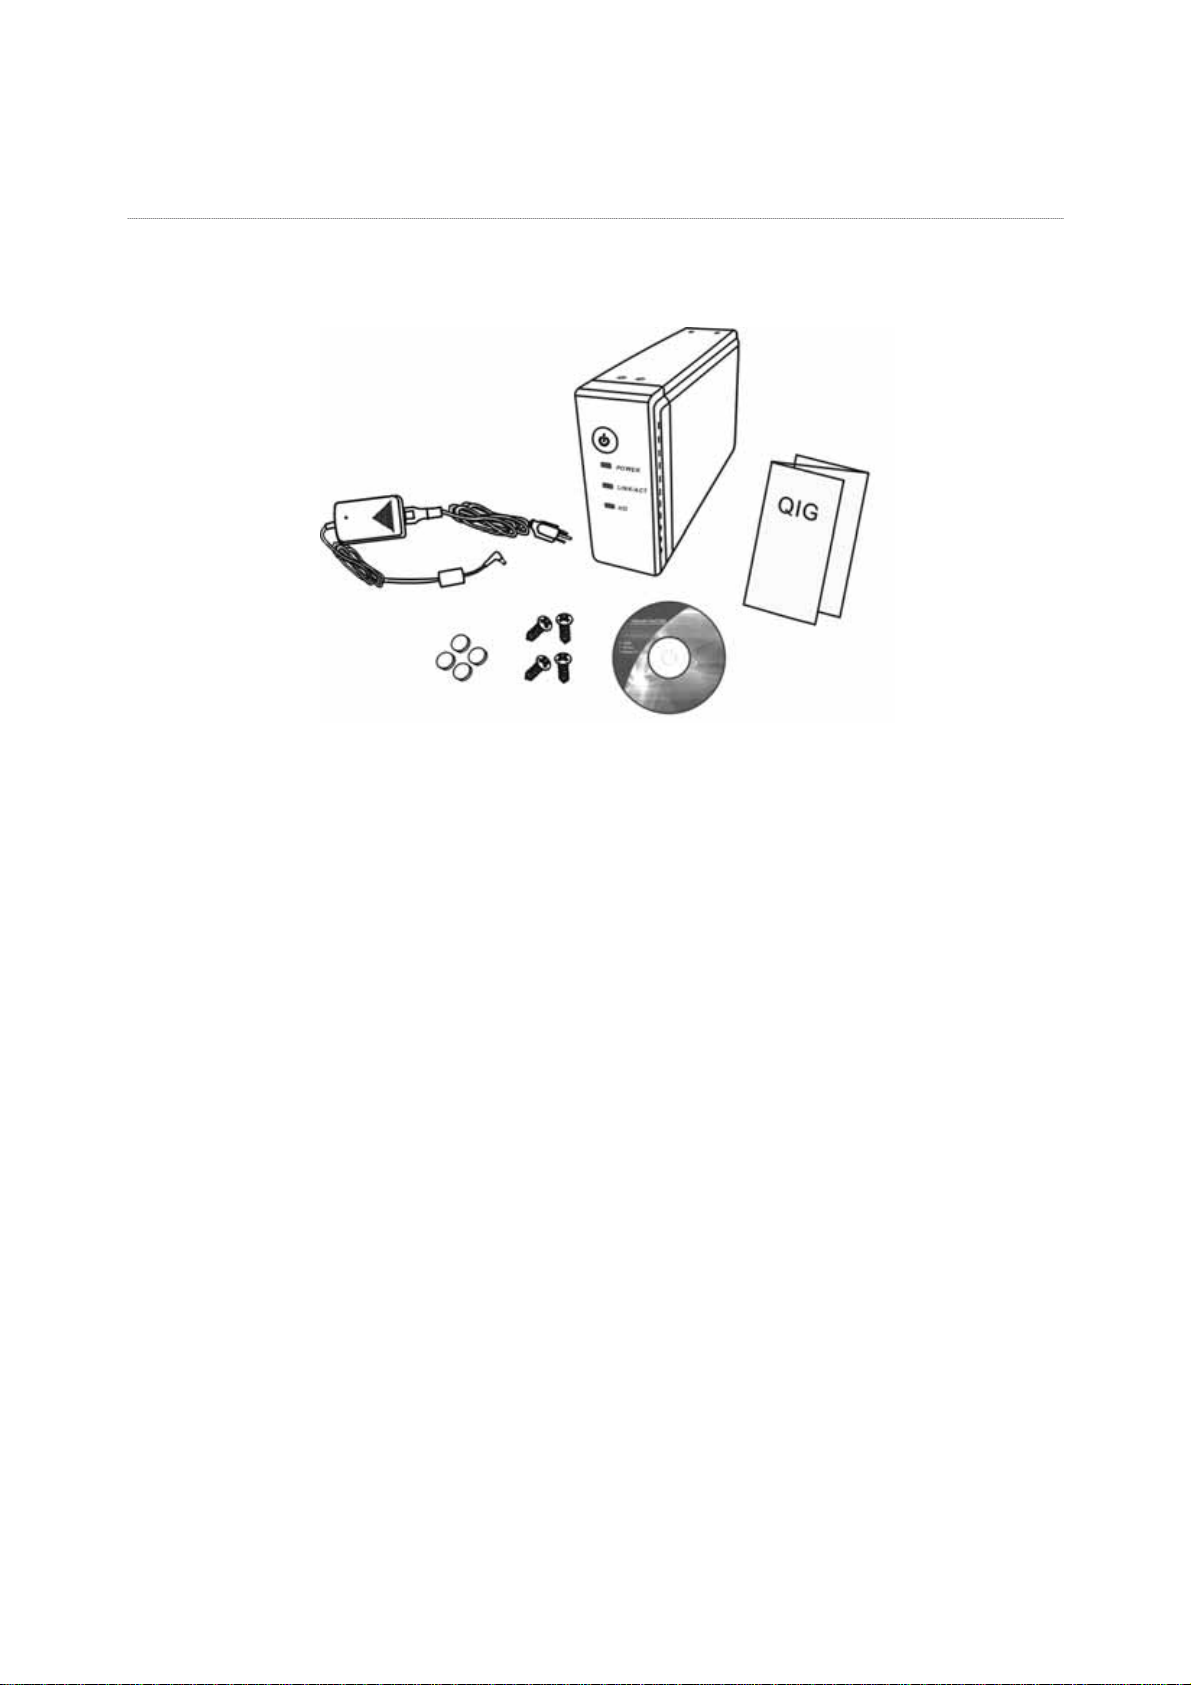
Unpacking Information...............................................................................................2
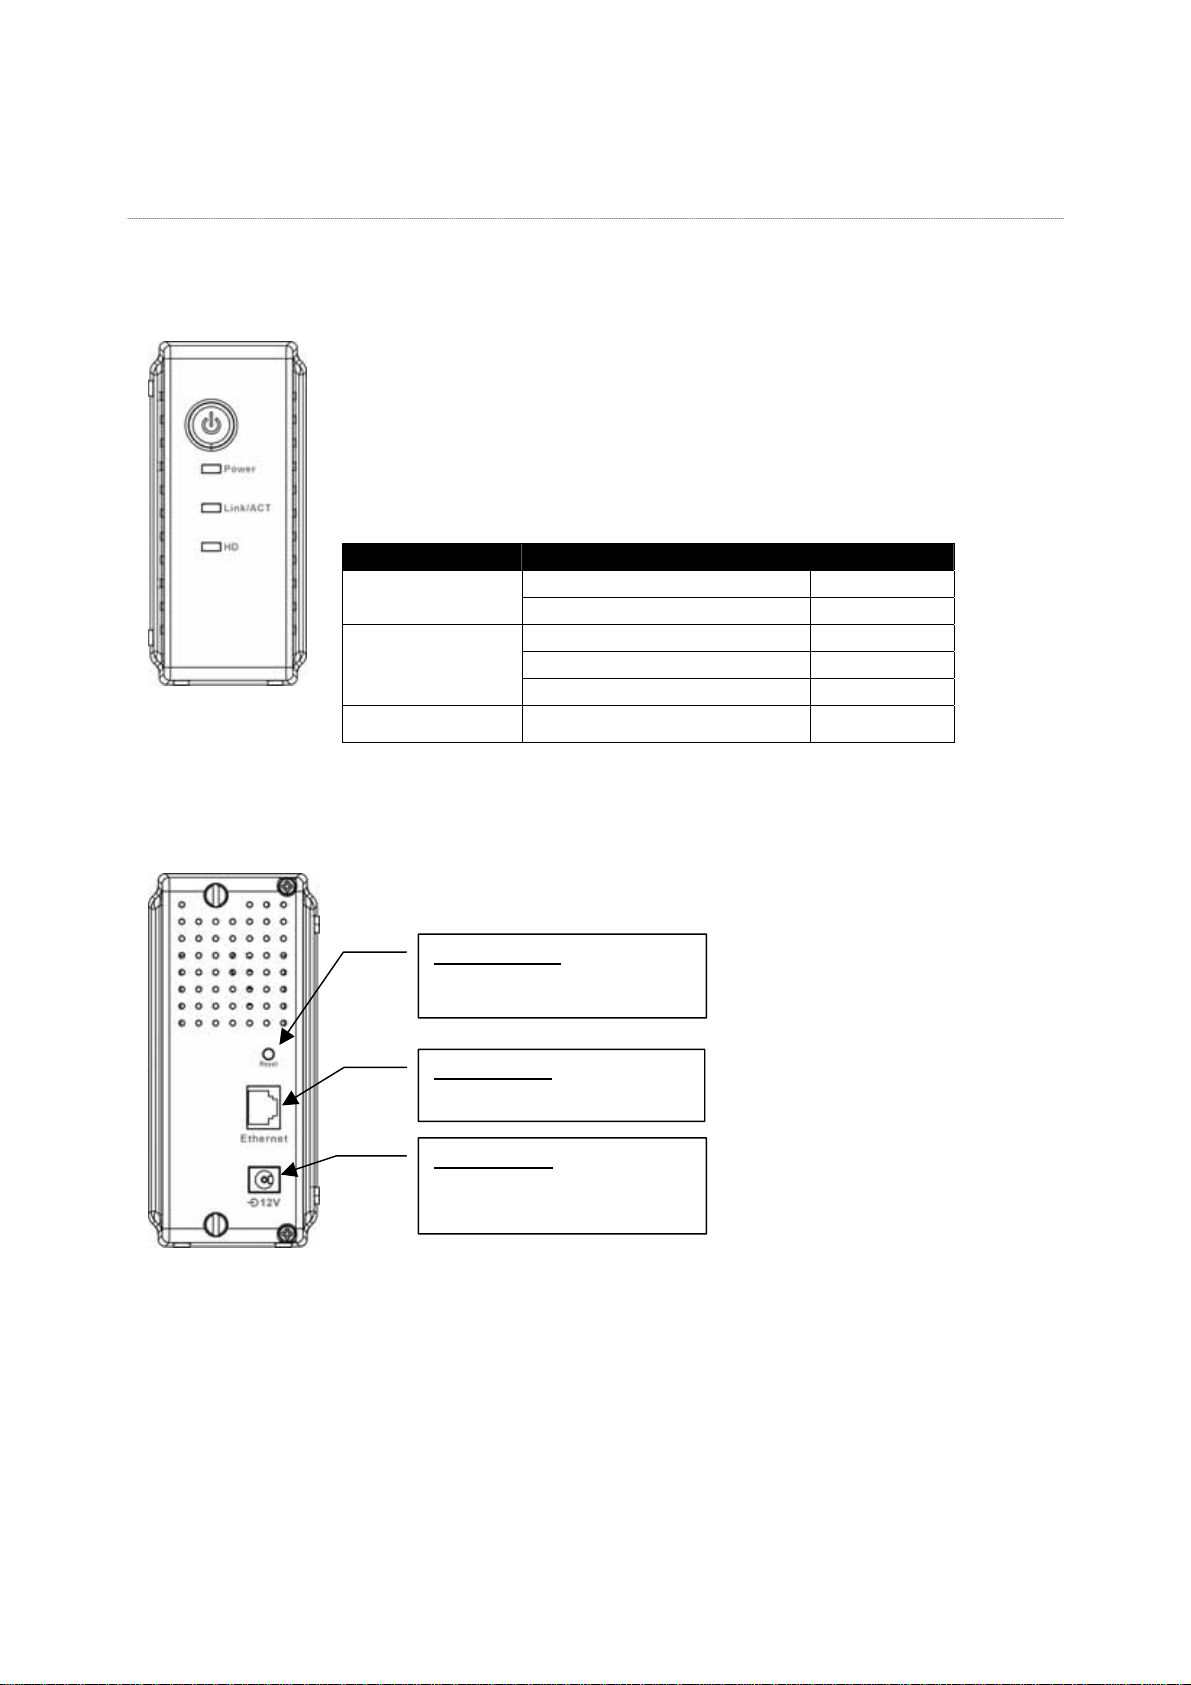
Hardware Guide .........................................................................................................3
Front Panel..............................................................................................................................3
Power Button ..........................................................................................................................3
LEDs Definition .......................................................................................................................3
Rear Panel...............................................................................................................................3
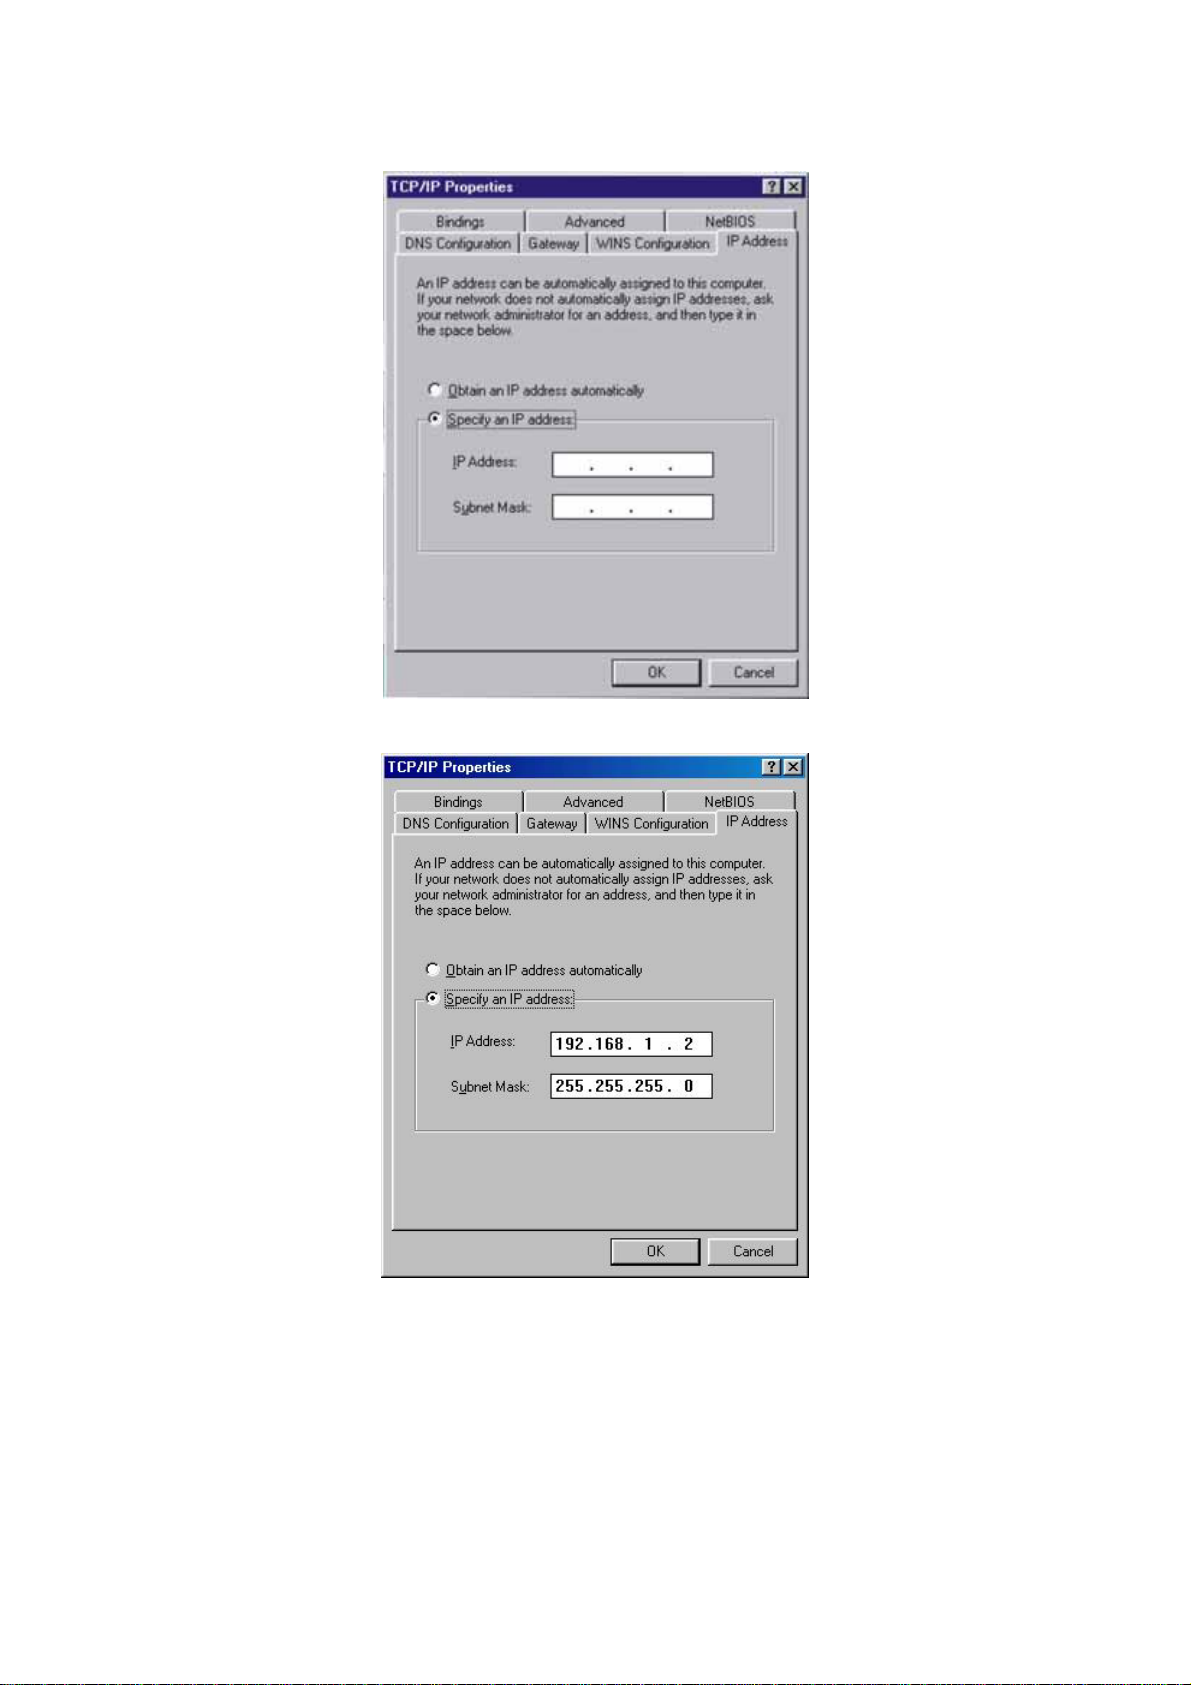
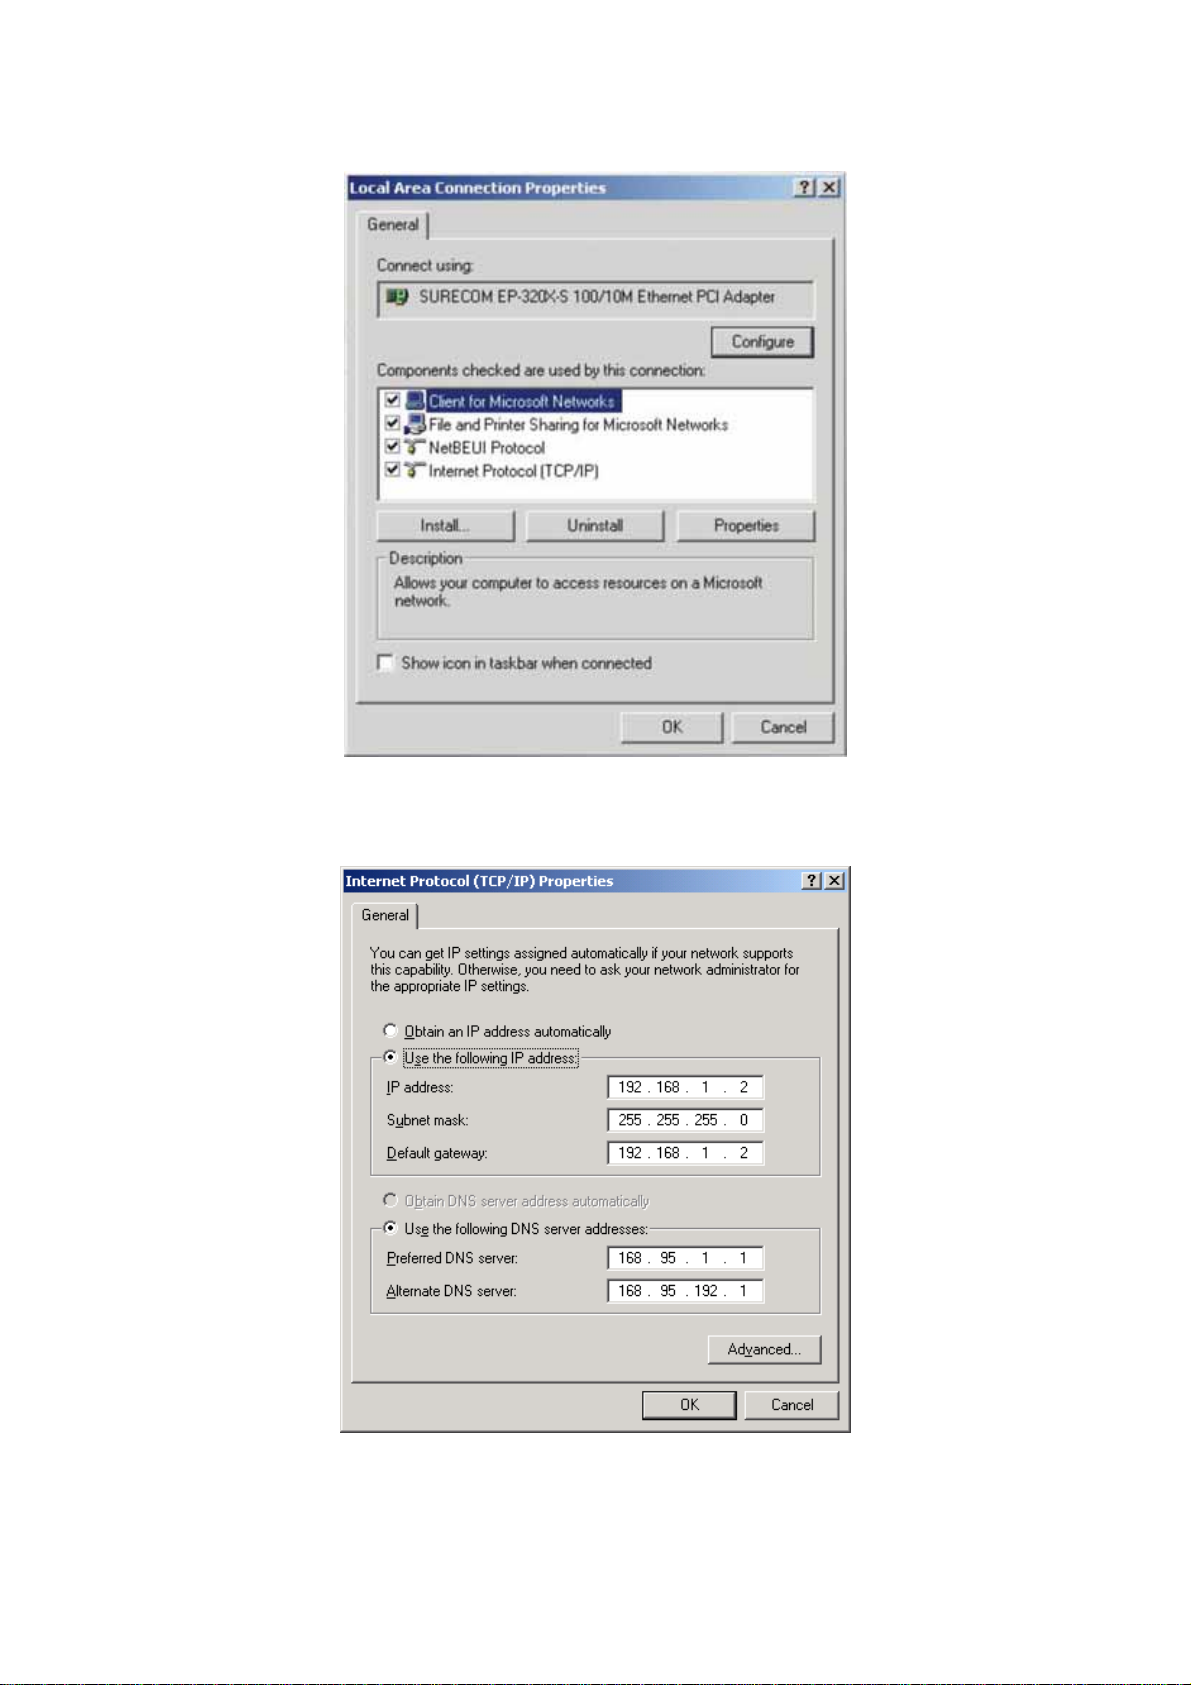
IP Protocol Setup .......................................................................................................4
Hard Disk Installation...............................................................................................11
Express Setup Wizard..............................................................................................13
Management Guide..................................................................................................19
Setup the Network HD ...........................................................................................................19
Home Page............................................................................................................................20
Home.....................................................................................................................................21
Status Detail...................................................................................................................22
Networking............................................................................................................................23
Host Name .....................................................................................................................23
IPaddress......................................................................................................................23
SuperUser/Password.......................................................................................................24
Administration.......................................................................................................................25
Restart System...............................................................................................................25
Format HD......................................................................................................................25
Factory Default................................................................................................................26
Firmware update.............................................................................................................26
Share.....................................................................................................................................27
User configuration...........................................................................................................27
Folder Configuration........................................................................................................29
FTP........................................................................................................................................31
Network HD Application...........................................................................................32
Trouble Shooting Guide ...........................................................................................34
Specification............................................................................................................35

1
Introduction
Powerful and Easy
This device is a compact, economical, powerful NAS (Network Attached Storage), especially
suitable for small business, SOHO (Small Office or Home Office) or personal requirement. It works like
a file server and FTP server. Users in a LAN can easily backup data or share files through
intranet/internet. It is compatible with Windows95/98/98SE/ME/XP/2000/NT4.0 network environment. Its
set-up procedure and operation are simple and user-friendly.
Smart Wizard
Don’t like Hi-tech stuff? Hate to deal with those troublesome setting? Try Network HD! Three
Powerful Auto Installation features, HD Auto detection, Pre-defined User Accounts, and Auto
Networking Setting, make the experience of installing and Using Network HD so Wonderful! All you
have to do is plugging your HD and turning it on, and you can start to enjoy the time with the Network
HD after activating the Wizard.
Key Features
Supports one 10/100Mbps Ethernet port (Auto MDI/MDIX) for network connection
WEB-based UI for easy configuration
Supports user selectable high speedATA/ATAPI-6 HD
Supports all standard 3.5” IDE HD up to 250GB
Hard Disk replaceable feature
Auto Networking Configuration Utility for Windows OS
Supports CIFS/SMB for Microsoft Network remote users easily retrieve files by using “My
Neighborhood”
Built-in FTP server for user conveniently transfer files by using FTPclient
Compatible Windows 95 /98 /98SE /ME /XP/2000 /NT4.0
Build in hardware button for Reset to Factory Default
Firmware upgrade by WEB page
Provide three Pre-defined User levels, all / power / guest for access accounts.
Provides five online users of Samba (Concurrently connected) and five online FTP users
(Concurrently connected)
Auto-detect HD for new installed HD (Only for the 1st FAT32 partition)
Supports static IPaddress
Provides Password security for WEB management & HDAccess
FCC, CE, VCCI Class B

2
Unpacking Information
Thank you for purchasing this product. Before you move on, please take look at the package to ensure
that the following items are in the package.
1. One Network HD (Hard Disk not Included)
2. One Power adapter (12V/3A)
3. One QIG
4. One Utility/Manual CD-ROM
5. Rubber foot x 4
6. Screws for HD Fastening x 4

3
Hardware Guide
Front Panel
The front panel is as following,
Power Button
To activate the Network HD, Press this Power button.To power off, press the button
for two seconds until Power LED start to blink.
LEDs Definition
LED Status
ON /OFF Green/DarkPower Boot/Shutdown: Blinking
Ethernet Connected Green
Ethernet Not Connected Dark
Link/ACT
Ethernet Data transferring Blinking
HD Data Transfer Amber/Blinking
Rear Panel
Default Button
To restore to default setting,
p
ress the button
Ethernet Port
Connected with the RJ-45 cable
Power Supply
External power adapter
DC 12V/3A.

4
IP Protocol Setup
Configuring the network protocols
If your PC obtains IP automatically, the Express Setup Wizard can’t get the PC’s IPto setup its network
configuration, IP etc….To solve the problem, you need to connect your PC with a router with a DHCP
Server or specify your IP in you IPaddress on Windows Network dialog box.
How to configure the TCP/IP network protocol
No matter what version of Windows, TCP/IPwill be the most obvious protocol to use because it is normally
installed automatically when first installing the drivers. If it is not installed automatically, it can easily be
added to your system.
You need to configure a unique IP address to each PC on the network in order to make it work successfully.
To do this, follow the instructions below:
An IP address is a group of four sets of numbers between 0 and 255. The first three sets of numbers can
be set to 192.168.1 which is to be the same for all clients. The last number is the number of the PC should
be from 2 to 255, ex 192.168.1.2, because it won’t conflict with the Network HD’s default IP “192.168.1.1”.

5
How to configure the TCP/IP network protocol
Windows 98/Me:
1. Click on Start-> Settings-> Control Panel-> Network.
2. Click TCP/IP-> EthernetAdaptor and click Properties.

6
3. Click IPAddress and click on Specify IPAddress.
4. Type in the IP address. State the subnet mask to be 255.255.255.0.
5. Click OK and OK at this point you may be asked for your Windows disc, follow the on screen displays
then restart your computer.

7
How to configure the TCP/IP network protocol
Windows 2000:
1. Click on Start-> Settings-> Network and dial-up connections.
2. Choose local area Connection and click Properties.

8
3. Click on Internet protocol (TCP/IP) then click properties.
5. Click on use the following IP address.
State the subnet mask to be 255.255.255.0.
Click OK and OK and restart your computer.

9
How to configure the TCP/IP network protocol
Windows XP:
1. If you are in Classic Start menu view click Start->Settings->Control Panel->Network Connections.
If you are in Start menu view click Start->Control Panel->Network Connections.
2. Double click “LocalArea Connection”
3. Choose Internet Protocol (TCP/IP), then click Properties. Click ‘Use the following IPAddress’.

10
4. Key in the IP Address that you chose earlier. The subnet mask is entered automatically on Windows XP.
Click OK.
Now your PC’s IPsetting is completed. Please Follow the guide to finish the Hard Disk installation and
Express setup wizard.

11
Hard Disk Installation
How to Connect Your Hard Disk with the Network HD:
1. Loosing the two screws on the rear panel by tools like screw driver or hand
2. Grabbing the front panel and separate the HD holder from case
3. Your HD jumper should be set to Master. Different Hard Disk has different jumper settings; please
refer to your Hard Disk manual for more information.
4. Insert the IDE connector into the IDE socket of the Hard Disk. Make sure the pin 1 on the cable is
connected to pin 1 on the HD socket. Pin 1 is the red or pink strip on the edge of an IDE cable. The
IDE cables are designed so that it will only go in one way, which will correspond to pin 1.
Screws
IDE Connector

12
5. Push the power connector into the power socket of HD as shown.The power cable is designed to go
in one way, so you shouldn't have any problems.
6. Secure the Hard Disk with the screws we provided
7. Push the Hard disk and HD holder back into the box and secure it with the two screws
Power Connector

13
Express Setup Wizard
For the user using the Network HD for first time, we provide a very simple utility to help you.
The Express Setup Wizard guides you to finish the basic cable installation, and the setup of Network.
Please follow the steps as below,
Step1: Activate The Utility software
Put the Utility CD into your CD-ROM drive and wait for autorun Menu. If the utility doesn’t activate
automatically, click the Start button, select Run, type D:\autorun.exe (where D is the letter of your CD-ROM
drive) into the Open window and press Enter. The autorun menu appears as shown in the figure below.
Please do as the program shows to finish the basic Cable installation and LED checking.
Please Click “Next” to continue.
Welcome page

14
Step2: Follow the Guide to install
Plug the circle end of the power adapter firmly into the rear panel of the Network HD, and the other
end into an electric service outlet
Press the power button to activate the Network HD and ensure that the Power LED is Green.
Power On
Connect the Network HD and PC/Switch with Ethernet RJ-45 cable.
Ensure that the Link/Act LED is Green
LAN Connection

15
Step3: Click “Next” to Start the Express Setup Wizard
Start to setup
Scan the HD Please Wait…

16
Select the Device you want to setup and Click “Next”
Reachable
Status Action
NO Network HD’s network setting is not compatible with
your LAN
Setting the network and creating two shortcuts to
access and setup the Network HD
YES Network HD’s network settin
g
is compatible with
y
our
LAN
Creating two shortcuts to access and setup the
Network HD
HD Found
User name/Password Reminder

17
Setting….
Please read it carefully
Click “OK” to setup your Network HD by Web-based UI or Click Cancel to Continue.

18
Setup my Network HD
Setup the Network HD by
Web-Browser Ex I.E.
Icons Created
When you see the two icons were created on the desktop of your PC.TheAuto-install is done, and you
can start to use the HD or setup the setting by Web-browser.As for the Setting, please refer to the
“Management Guide” as below.
Note. Express Setup Wizard will detect your HD content but only for the 1st Partition.
ToAccess this HD,
1. Click the “Access my Network HD” icon to access. There three pre-definedAccounts for you to use,
all/power/guest.
All=Read/Write (Able to Read/Write all the folders in Network HD)
Power=Read/Write (Able to Read/Write the “share’ Folder only)
Guest=Read Only (Able to Read the “share’Folder only)
2. You can enter the all/power/guest for the Username and password.
Ex. Username: all
Password: all.
Access my Network HD
Use the Network HD
Setup my Network HD
Setup the Network HD by Web-based
UI with Browser, ex I.E. 6.0.
Table of contents
Popular Storage manuals by other brands

CRU
CRU ToughTech Secure m3 quick start guide

AFL Hyperscale
AFL Hyperscale U Series installation guide

Exos
Exos ST6000NM0245 product manual

Seagate
Seagate ST9120817AS - Momentus 5400.4 120 GB Hard... product manual

Quantum
Quantum ValueLoader LTO-1 user guide

Western Digital
Western Digital WD3000F9YZ Applications