LooLinn Z6Pro User manual

User Manual
Camera with 500 m
Image
transmission range
(Please ensure your mobile
phone supports with 5G WiFi )
Accreditation standard: GB/T26701-2011
14+
Z
6Pro
GPS BRUSHLESS DRONE
Palm control
Flight plan Waypoint flightGPS tracking One key to retrun Circle flight
Human tracking
5G WIFI
Camera
Optical flow
positioning Long battery life Dual-frequency
technology
Take-off/landing
R

Important safety information
Thank you for purchasing this Loolinn product. To ensure that you operate the
drone correctly, please read these instructions carefully before first use and store
them in a safe place for future reference.
-1-
1. Adult or experienced RC pilot’s supervision is recommend for children.
2. Rechargeable batteries are only to be charged under adult supervision.
3. Turn off the drone/transmitter and remove the batteries when not in use.
4. The supply terminals are not be short-circuited.
5. Keep away from the rotating blades (rotating blades may cause bodily injuries,
or damage to property).
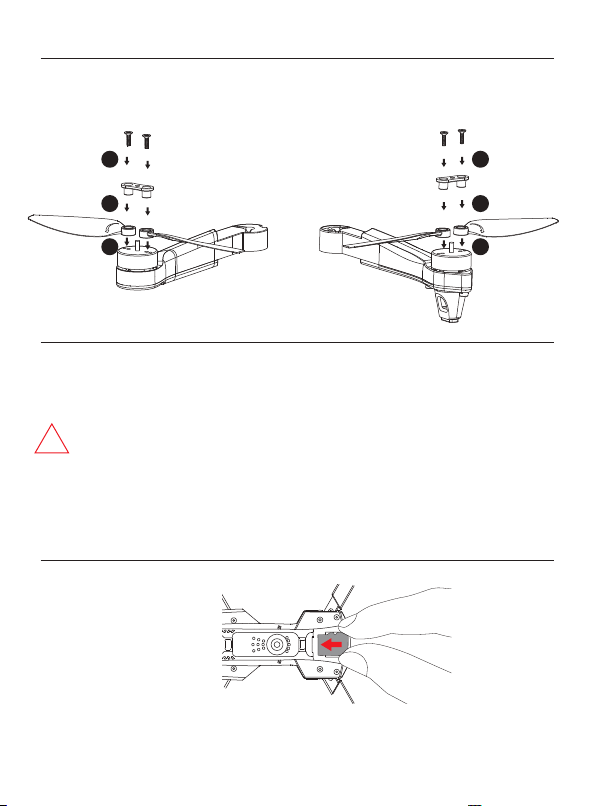
6. Attention:please assemble the drone with the guidance of adults.
7. Do not look directly into the LED lights of the drone as make your eyes
uncomfortable.
8. Exhausted batteries are to be removed from the drone.
9. Please store the smaller-sized drone accessories in places that are out of
reach of children.
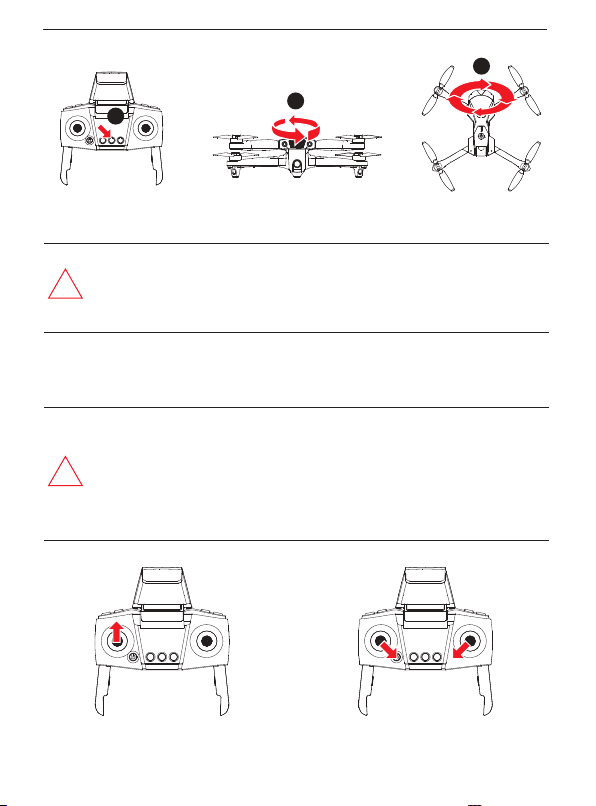
10. This drone is very powerful. For all first-time flights, the left joystick must be
slowly pushed up in order to prevent the drone from ascending too fast to
avoid unnecessary collision and possible damage and injury.
11. When the flight is ended, first turn off the power of the remote control. Then turn
off the power of the drone.
12. Avoid placing the batteries in places with high temperatures and exposure to
heat.
13. Please keep a safe distance from the spinning propellers to avoid injury.
14. To ensure the electromagnetic environment requirement of the aviation radio
(station), using remote controls in the zone, which is in a radius of about 5000m
zone from the circle center of the airport runway, is forbidden.All users also
should abide by the regulation of the radio set forth by government and
regulatory agencies including the duration and area.
15. Pay attention to keeping distance of 2-3 meters from the user or other people
when the drone is flying, avoid the drone landin to hit the head, face or face or
body of anoter person.
16. The packing has to be kept since it contains important information.
Safety Guide
Repair and maintenance
1. Use clean and soft cloth to clean the product.
2. Keep away the product from heat sources.
3. Avoid water exposure to this product. Moisture may cause damages of the
drone electronic parts.
4.Transformers used with the drone should be examined regularly,such as the
cord,plug,enclosure and other parts,If any damages are found, please
stop using it unless it is repaired or replaced.

Specifications
-2-
About this product
Download and install the Loolinn Air App
Drone weight
Drone Size
Range
Altitude
Image transmission range
Flight time
Operating conditions
Video transmission frequency
Motor
Battery
Charging time
216 g
305x280x65 mm
500 m
100 m
500 m
Hovers indoors for 24-25 minutes
0°C to 40°C
5 GHz
1503 Brushless motor
7.6 V 1700 mAh
About 3 hours
· Drone
Operating frequency
Range
Operating conditions
Charging time
2.4 GHz
500 m
0°C to 40°C
About 1 hours
· Remote control
Drone
Remote control
USB charging cable
Clockwise/anticlockwise propellers
Instructions
For Android phones, download and install the Loolinn Air
App by visiting Google Play or by scanning the QR
code.
For IOS Apple phones, download and install the Loolinn
Air App by visiting the App Store or by scanning the QR
code.
* Note: For best results, use a device with iOS 8.0/Android 5.0 or later.
1
1
2
4
1
· Package contents

-3-
①
①Photo button
②Record button
③Left joystick
④On / Off button
⑤One Key Take Off / Landing
⑥Calibrating the compass
⑦Home button
⑧Phone holder
⑨Lens up
⑩Lens down
Right joystick
②
③
④ ⑤
⑩
⑥
⑨
⑧
⑦
Remote control
①Motor
②Propeller blades
③Power switch
④Front camera
Drone components
⑤Battery
⑥Front LED indicator
⑦Rear LED indicator
⑧Bottom camera
⑥
⑤
⑦
⑧
①
②
③
④

-4-
!
Assembling the product
Installing the propellers
Clockwise propellers Anticlockwise propellers
Inserting a memory card (optional accessory)
* Attach the propellers as shown in the diagrams above. Ensure that they are
attached in the correct orientation.
* Ensure that the clockwise and anticlockwise propellers are attached to the
correct arms. The drone will not fly correctly if the propellers are attached
in the wrong position.
* The propellers are made from a delicate material. Pay attention when
attaching them to the drone.
* Only use propellers that are supplied by the manufacturer.
* The propellers are consumable parts. If necessary, purchase replacements
from the manufacturer.
1
2
3
1
2
3

5V2AA adapter
USB
!
* Charge the drone with the USB charging cable that came with the product.
* The battery will take longer to charge when you use an adapter with a smaller
rated current.
1 2 3
-5-
Remove the battery
Charge the battery
Charging the drone battery
USB charging cableBattery
Indicator in slow flashing green:
Charging in progress
Indicator in constant green:
Battery is fully charged
Indicator in rapid flashing green:
Battery is defective
Insert the battery
* Ensure that the battery holder
clicks into place.
* Do not short circuit or compress the battery, as this may cause an
explosion.
* Do not disassembling the battery or store it in a hot environment.
* If you do not plan to use the drone for at least 10 days, discharge the
battery to 40%-50%. This helps to prolong the lifespan of the battery.
* Rechargeable batteries should be removed from the drone before
being charged.
* Rechargeable batteries should only be charged under the supervision
of adults.and keep away from flammable materials.
* Exhausted batteries should be removed from the drone.
* Caution: Risk of explosion if battery is replaced with incorrect ones,
please install the batteries according to the instructions.
1
2

-6-
5V 1-2A
3
41
111 1
222 2
Open the remote control
Close the remote control
Flight preparation and turning the drone on/off
Pairing the remote control with the drone
Charging the remote
control batteries
Attaching the phone holder
Indicator stays constant when
pairing is complete.
* When you switch on the remote control, the indicator will flash
rapidly for approximately 20 secs to indicate that the remote
control is waiting for a signal. The indicator will then flash slowly to
indicate that pairing mode has been disabled.
!
Remote control
indicator flashes
rapidly
Switch on the remote control Indicator flashes
rapidly -> slowly
Switch off the remote controller
during charging
Charging : red light is on
Finish charging: light is off
2

-7-
1
Searching for satellites
The rear indicator will change from orange to green when the drone has locked
on to a satellite and recorded the take-off location. The drone is now ready to fly.
Calibrating the compass
* Do not calibrate the compass near strong electromagnetic fields or
large pieces of metal, e.g. magnetite, car parks or buildings with
underground steel reinforcements.
* When holding the drone horizontally, the angle of inclination must
not exceed 30 degrees.
!
!
* It should take approximately one minute for the drone to lock on to a
satellite. If the drone fails to find a satellite, recalibrate the compass.
* Before take-off, place the drone in an open space away from
obstacles and ensure that GPS mode is enabled.
* When the rear green indicator flashes rapidly, this indicates that the
GPS signal is weak. If this occurs, land the drone manually and
restart the satellite search.
Turning the drone on
Push the left and right joysticks
downwards in a V shape for 1
second.
Move the left joystick
upwards
or
Press to calibrating the
compass Hold the drone horizontally
and rotate 360 degrees for
few time. Indicator flashes
from slowly to rapidly.
Hold the drone vertically
and rotate 360 degrees for
few times. Indicator flashes
from rapidly to constant.
2
3

-8-
!
Turning the drone off
Method one Method two Method three
* The drone will switch off automatically if its angle of inclination
exceeds 90 degrees.
Using the remote control
Ascend
Descend
Forward
Backward
Left Rotation
Leftward Rightward
Right Rotation
Front
Rear
Front
Rear
Push the left joystick
downwards for 2-3
seconds.
Push the left and right
joysticks downwards in
a V shape for 2
seconds.
Press the take-off/land-
ing button to make the
drone land
automatically and
switch off.

-9-
!
!
Headless mode
The indicator on the drone will flash once every 4 seconds.
* When the battery level is normal, the drone can fly to a distance of
500 m at a maximum altitude of 100 m.
* When the battery level is low, the drone can fly to a distance of 20 m
at a maximum altitude of 20 m.
* If the rear indicator starts to flash rapidly, this indicates that the GPS
signal is weak and the drone cannot determine its position.
* GPS mode cannot be used indoors.
1. Configuring the forwards direction
When you switch on the drone for the first time, the direction in which the
front side of the drone is pointing will be set as the forwards direction.
2. Enabling headless mode
①After pairing the remote control with the drone, hold down
the right joystick for approximately 3 seconds. The remote
control will beep 8 times to indicate that headless mode is
enabled. To disable headless mode, hold down the right
joystick again for approximately 3 seconds.
②In headless mode, you do not need to determine the
drone’s orientation. You can move the joysticks on the
remote control to make the drone move in the corresponding
direction.
* If the rear indicator starts to flash rapidly, this indicates that the optical
signal is weak and the drone cannot determine its position.
* Performance may be impaired in dark surroundings, areas with
reflective surfaces (e.g. water), or at altitudes of more than 6 m.
* Optical flow positioning only supports altitudes of less than 6 m.
Flight modes
Optical flow positioning
Front indicator is constant white, rear indicator is constant
yellow.
GPS mode
Front indicator is constant white, rear indicator is constant
green.

Take a photo
Record video
Lens up
Lens down
-10-
Taking a photo or video
recording with hand gestures
Photo button Record button
Taking a photo or video recording
with the remote control
One - Key take-off/landing
Level calibration
High/low speed mode
* The drone cannot be calibrated if the angle of inclination is greater than 10
degrees.
1. Take a photo: Position your hand
approximately 1.5 m away from the
front lens and hold the hand
gesture for 3 seconds.
2. Record video: Position your hand
approximately 1.5m away from the
front lens and hold the hand
gesture for 3 seconds.
Place the drone on a level surface and
move the left and right joysticks to the
lower right corner for approximately 3
seconds. The indicator will flash rapidly
and then stay constant to indicate that
the calibration process is complete.
1. Take a photo: Press the photo button.
The indicator on the drone will flash
to indicate that a photo is taken.
2. Record video: Press the record button.
The indicator on the drone will flash
twice to indicate that recording is in
progress. Press the record button
again to end the recording. The
indicator on the drone will turn on to
indicate that recording is complete.
Briefly press the right joystick to switch
between high and low speed mode.
1. Low speed mode is enabled by
default when the drone is switched on.
2. The remote control beeps twice when
high speed mode is enabled and
once when low speed mode is
enabled.
1. When the drone is under standby
mode,Press the take-off/landing button
to make the drone take off automatically
and hover at a height of 1.5 m.
2. When the Drone is under active
mode, it will automatically land on
ground if you press the one key landing

In GPS mode (when the indicator is
constant), hold the return to home, so the
drone will return to its take-off position
automatically. During the return flight, you
can use the joystick to control the drone
ascend, descend and move left/right in
order to avoid obstacles. To terminate the
return flight, hold the return to home
button.
If the remote control signal is lost for
more than 6 seconds, the drone will
automatically return to the take-off
position. If the signal is restored during
the return flight, you can hold the return to
home button to terminate the return flight.
-11-
!
No signal
Automatic return
due to loss of signal
* Photo and video recording gestures cannot be used when the bottom
camera is on.(See LoolinnAirApp User Manual for further information)
* The camera may accidentally take a photo or start a video recording if
there are surrounding objects that resemble the or gestures.
* If there is no memory card in the drone, photos and video recordings will
be saved to your phone.
* If there is a memory card inserted in the drone, photos and video
recordings will be saved to the memory card and your phone.
* The drone supports memory cards with a capacity of up to 64 GB.
* If the drone is flying at an altitude less than 20 m, it will automatically ascend to
an altitude of 20 m before returning home.
* If the drone is flying at an altitude more than 20 m, it will return home at the
same altitude.
* The drone cannot automatically avoid obstacles during the return flight.
* The automatic return to home function is not available when the GPS signal is
weak (flashing indicator).
* If the drone does not receive a GPS signal and lost contact with the remote
control for more than 6 seconds, it will not be able to return to home but will land
automatically.
Return to home function

Smart Loolinn Air app features
When the drone battery is low, the drone
will automatically return to the take-off
position. During the return flight, you can
use the joystick to control the drone
ascend, descend and move left/right in
order to avoid obstacles.
* If the drone is further than 20 m from the landing position, the return flight
cannot be terminated.
* If the drone is less than 20 m from the landing position, the return flight can be
terminated.
Automatic return due
to low battery
Low battery
Landing position: The initial unlock/take-off position.
-12-

A
DH
VS
V
-13-
WiFi
Show the strength of the image
transmission signal;
Satellite signal
Show the current flight mode and
the number of satellites. Steady
light indicates it is the GPS
mode, so the GPS Auto return to
home, GPS tracking, round
flight, waypoint flight are
available. Flashing indicates that
it is the optical flow fixed-point
mode, so master tracking, palm
control, trajectory flight are
available.
Battery State
Battery State of drone
(1) 2-4 bars indicate normal
power. In GPS mode, the return,
tracking, round, and pointing
flight functions can be operated
normally;
(2) 1 bar (flashing state) means
that the drone is currently in a
low battery state, and the drone
will perform the automatic return
to home function; in the low
battery state, there is no
tracking, round, or pointing flight
function; the maximum flight
distance is 20 meters, and the
maximum flight altitude is 20
meters.
GPS Signal
Show the current altitude,
distance, and corresponding
latitude and longitude of the
drone from the home point.
Emergency landing
You can make an emergency
landing when the drone gets out of
control.
Lens switch
The front lens and the lower lens
can be switched.
VR Mode
Click for VR Mode.
Flight record
Records the relevant parameters of
each flight;
Album
Check photos and videos.
Parameter
The beginner mode and the
parameter adjustment mode can be
switched.
Joystick ON/OFF
Tap to switch between mobile
phone control or remote control.
Speed switch
Shows the current fast and slow
status. Click on the mobile phone
control mode to switch the fast and
slow status.
Photo/Video
Switch to Photo/Video
100
%

-14-
Photo/Video
Click to take photos and video
according to the current lens
(front lens or bottom lens).
When taking a picture, the
indicator lights on the body flash
once; when recording, the
indicator lights flash twice
continuously.
When recording, resolution of
videos on the mobile phone is
720P and resolution of videos in
the storage card is 1080P.
Motors Unlock
After unlocking, click to achieve
one-key take-off or one-key
descent.
Take-off/landing
After unlocking, click to achieve
one-key take-off or one-key
descent.
Front camera gimbal
controller
After the drone takes off, the front
camera gimbal controller will be
displayed on the left side of the
screen. At this time, if you move
the slider of the controller
upwards, the front lens of the
drone will move up a certain
angle; if you move the slider
down, the front lens of the drone
will move a certain angle
downward.
Flight posture
Show the flight posture change,
relative position and direction
change of the drone. The center of
the white circle indicates the
position of the operator, the white
triangle tip indicates the direction of
the drone's head; the offset of the
white triangle indicates the left and
right offset of the drone relative to
the operator.
Auto Return To Home
Click in GPS mode and automatic
return to home will be performed.
Palm -Control
In the optical flow mode, click the
palm control, a blue circle pops up
to indicate that the target is
detected. Select the blue circle and
click to confirm and it will turn into a
red circle. At this time, the rear
indicator light of the drone turns red.
When the target is lost, the indicator
turns yellow.
Master- Tracking
In the optical flow mode, click
"master tracking", a blue circle pops
up to indicate the target is detected,
select the blue circle and click to
confirm then it will turn red, when
the target is lost, the indicator light
will turn yellow. In master tracking
mode, the drone will automatically
fly back when you open your both
arms, and the drone will automati-
cally move forward when you retract
your arms.

* Before using the smart app features, see Loolinn Air App User Manual for further
information)
* Ensure that you pre-configure the flight altitude and distance in the Loolinn Air
App.
-15-
GPS- Tracking
In GPS mode, the drone will head
in the direction of the mobile
phone and follow the mobile
phone to move. The minimum
distance of GPS tracking is 5
meters. During GPS tracking,
operations such as ascent,
descent, forward, backward, and
left and right flying can be
performed.
Round Flight
In GPS mode, the drone will
circle clockwise or counterclock-
wise around the current position
of the drone. The minimum radius
of the orbiting flight is 5 meters,
and the ascent, descent, forward
and backward can be controlled
during the orbiting process.
Trajectory flight
In the optical flow mode, the drone
will fly according to the selected
position.
Waypoint Flight
In the GPS mode, the drone will fly
according to the selected position.
When the drone altitude is lower
than 15 meters, the drone will
automatically rise to 15 meters
before performing waypoint flight.
When the drone altitude is higher
than 15 meters, the drone will
perform directly waypoint flight.

-16-
Troubleshooting
Understanding the drone LED indicators
Problem Cause Cause Solution
No. Indicator status Meaning
1
2
3
4
5
6
7
8
9
Front indicator = constant white, rear
indicator = constant yellow
Front indicator = constant white, rear
indicator = constant green
Front and rear indicators flash once
every 4 seconds
Front and rear indicators flash twice
every 1.5 seconds
Front and rear indicators flash twice
every second
Front and rear indicators flash once
every second
Front indicator = constant, rear
indicator = flashing slowly
Front indicator = constant, rear
indicator = flashing rapidly
Front and rear indicators flash rapidly Pairing or level calibration in progress
Recording in progress
Signal lost
Low battery
Poor GPS reception
GPS fault
Headless mode
GPS mode
Optical flow positioning
1. Undervoltage protection was enabled.
2. The remote control battery level is low
and the power indicator is flashing.
1. Charge the drone battery.
2. Change the batteries in the
remote control.
The drone does
not respond.
1. The remote control batteries are
nearly empty.
2. There is interference from a remote
control on the same frequency.
1. Change the batteries.
2. Move to a different area
where there is no
interference.
The drone’s
response is
intermittent.
The drone is not calibrated level to the
ground. Calibrate the drone.
The drone drifts
to one side whilst
hovering.
The drone was involved in a collision. Reconfigure the forwards
direction.
The drone does not
travel in a forwards
direction in headless
mode. 1. The drone is not calibrated level to
the ground.
2. The air pressure is unstable due to
poor weather conditions.
3. A violent collision corrupted the
gyroscope’s data.
1. Calibrate the drone.
2. Avoid flying in poor weather.
3. Calibrate the drone.
The drone does not
hover properly/the
drone keeps
moving up and
down.

Accessories (available separately)
The following section contains a list of optional accessories that are available to
purchase. Accessories can be purchased from the seller.
-17-
Drone body
Main unit battery cover
Arm Arm parts
FeetLight cover Motor Protective cover
Lights GPS module Receiver board Camera circuit board
Battery Charging cable Remote control
Charging cable
Remote control
PCB

-18-
Warning: Changes or modifications to this unit not expressly approved by the party
responsible for compliance could void the user’s authority to operate the equipment.
NOTE: This equipment has been tested and found to comply with the limits for a Class
B digital device, pursuant to Part 15 of the FCC Rules. These limits are designed to
provide reasonable protection against harmful interference in a residential installation.
This equipment generates, uses and can radiate radio frequency energy and, if not
installed and used in accordance with the instructions, may cause harmful interference
to radio communications. However, there is no guarantee that interference will not occur
in a particular installation. If this equipment does cause harmful interference to radio or
television reception, which can be determined by turning the equipment off and on, the
user is encouraged to try to correct the interference by one or more of the following
measures:
●Reorient or relocate the receiving antenna.
●Increase the separation between the equipment and receiver.
●Connect the equipment into an outlet on a circuit different from that to which the
receiver is connected.
●Consult the dealer or an experienced radio/TV technician for help.
“This device complies with FCC radiation exposure limits set forth for general population
(uncontrolled exposure).This device must not be collocated or operating in conjunction
with any other antenna or transmitter.”
RF frequency band :2409-2475MHZ
Transmitter power : -3.73dBm (Max.)
product name: [GPS BRUSHLESS DRONE]
model number: [Z6 Pro]
Brand name :Loolinn
Table of contents