Juguetronica BRICK DRONE User manual

Age: +8
MANUAL DE INSTRUCCIONES
BRICK DRONE
Thank you for purchasing our Brick Drone.
Please read the instructions carefully to be fully familiar with the features and
functioning of the drone so as to fly it safely.
Save this instruction manual for future reference.

ÍNDICE DE CONTENIDOS
Warnings
Box content
Brick Drone general assembly steps
Departure
Calibration
Carga de la batería del drone
Battery charging
Precautions and safety warnings
List of parts
Parts of the controller
Drone synchronization
Precauciones durante la carga de la batería
Movement Control
Trimming
Pictures and videos with your Brick Drone
Functions of the Brick Drone
App download and features
Flight speeds
Acrobatic mode
3
3
5
8
9
9
10
10
12
14
3
4
7
8
8
9
10
11
13
Model 1. Assembly instructions
Model 3. Assembly instructions
Model 2. Assembly instructions
Accesories and spare parts 14
16
Model 4. Assembly instructions 20
15
18
Model 5. Assembly instructions 21
22Troubleshootings

3
3
3
5
8
9
9
10
10
12
14
3
4
7
8
8
9
10
11
13
14
16
20
15
18
21
22
WARNINGS
PRECAUTIONS AND SAFETY WARNINGS
BOX CONTENT
1. JUGUETRÓNICA is not responsible for any damage that may suffer the owner
due to misuse.
2. This aircraft requires certain knowledge of piloting and flying experience and the
age of 14 years.
3. After purchasing the product, JUGUETRÓNICA is not responsible of the security
of the owner or of the environment while the aircraft is being flown by its owner.
4. If you detect any malfunction, contact the establishment where you purchased
the drone.
This drone has hazardous parts, so it is important to consider the following
recommendations:
You should always maintain eye contact with your drone not exceeding, in any case,
the 1.20m high.
Although it is not necessary to be a professional pilot, you must always fly safely.
You can fly your drone only in areas suitable for this as flight camps or unpopulated
areas.
The damage to the drone is the responsibility of who handles.
You can never:
Flying in urban areas.
Fly over crowds of people: parks, beaches, concerts, events, etc.
Flying night.
Fly near airports, airfields, etc.
Flying in areas where conduct flights with other low-altitude aircraft (paragliding,
parachuting, heliports, etc).
Do not expose others to danger.
For more information visit: www.seguridadaerea.gob.es
x1 Brick Drone
x2 Batteries
x4 Propellers
x4 Replacement propellers
x1 Controller 2,4Ghz
x1 USB charger
x1 Screwdriver
x1 Propeller extractor
x1 Instruction Manual
x152 Pieces

LIST OF PARTS
BRICK DRONE
ACCESSORIES
x2x2
x10
x16
x4 x3
x2
x1
x2
x2
x1
x3x4
x4
x4
x2 x2
x1 x2x1
x2
x3
x1 x1x1x5 x1 x1
x8
x2 x2
x1
x1 x1
x4
x1 x2
x5
x4 x2
x1
x2
x3 x2
x2
x1 x2x2 x2 x2
x2x2
x1x1
x1
x1 x1
x4

5
BRICK DRONE GENERAL ASSEMBLY STEPS
LIST OF PARTS
1
3
2
4
x2x2
x10
x16 x1
x1 x1
x4
5
BRICK DRONE
ACCESSORIES

MODELO FINALIZADO
7
8
6WIRING PLACEMENT
ENGINE WITH
RED/BLUE WIRES
ENGINE WITH
WHITE/BLACK WIRES
ENGINE WITH
WHITE/BLACK WIRES
ENGINE WITH
RED/BLUE WIRES
BATTERY
CABLE
Trimming
turn right

7
PARTS OF THE CONTROLLER
Trimming Forwards
Trimming Right
Displacement
Trimming Backwards
Trimming Left
Displacement
Trimming
turn left
Trimming
turn right
Headless Mode
Light Control
Speeds
On / Off
Back Home
Acrobatics
Direction
stick
Indicator
Reset
Throttle stick/
rotation
BATTERIES INSTALLATION IN THE CONTROLLER
Remove the battery cover unscrew
the screws. Place 3 “AA” batteries
(not included) and place back the
cover of the batteries and screw it.
1 Place the batteries according to the polarity.
2 Do not mix new and old batteries.
3. Do not mix different types of batteries.
INSTALLATION AND ADJUSTMENT OF THE MOBILE CRADLE
Place the cradle on the
controller
Tighten or loosen up the
screw at the rear side to
lengthen the cradle.
Tighten or loosen up the
screw on the side to adjust
the angle of the cradle.
3 x AA | 1,5V
1 2 3

DEPARTURE
WARNING
Connect the battery to the drone, the front LEDs will continue to flash. Turn the transmitter on,
move the left joystick up, and then push it down to synchronise the drone.
When you hear a beep, it means the transmitter has been correctly synchronised with the
drone, and the LEDs will stop blinking.
1. If the transmitter's LED stays on but the drone LED is flashing slowly, synchronisation has
not been performed correctly. Turn off both the transmitter and the drone, and start the
procedure again from the beginning.
2. If once in the air the drone does not remain stable, land it and turn off both the transmitter
and the drone. Then, resynchronise it, making sure the drone is placed on a flat and
horizontal surface while you do so.
3. If the drone LED blinks slowly, the battery is running low. Land it and charge the drone battery
with the supplied USB charger.
When the drone is flying uncontrollably and it becomes impossible to make a trim that corrects
these errors (see p. 9 for more information on trimming), it is best to perform a factory reset so
that the drone returns to its default settings.
Posición
horizontal
TIP:
Make sure your Brick Drone is on a flat horizontal surface during
the synchronisation procedure, so the flight is stable.
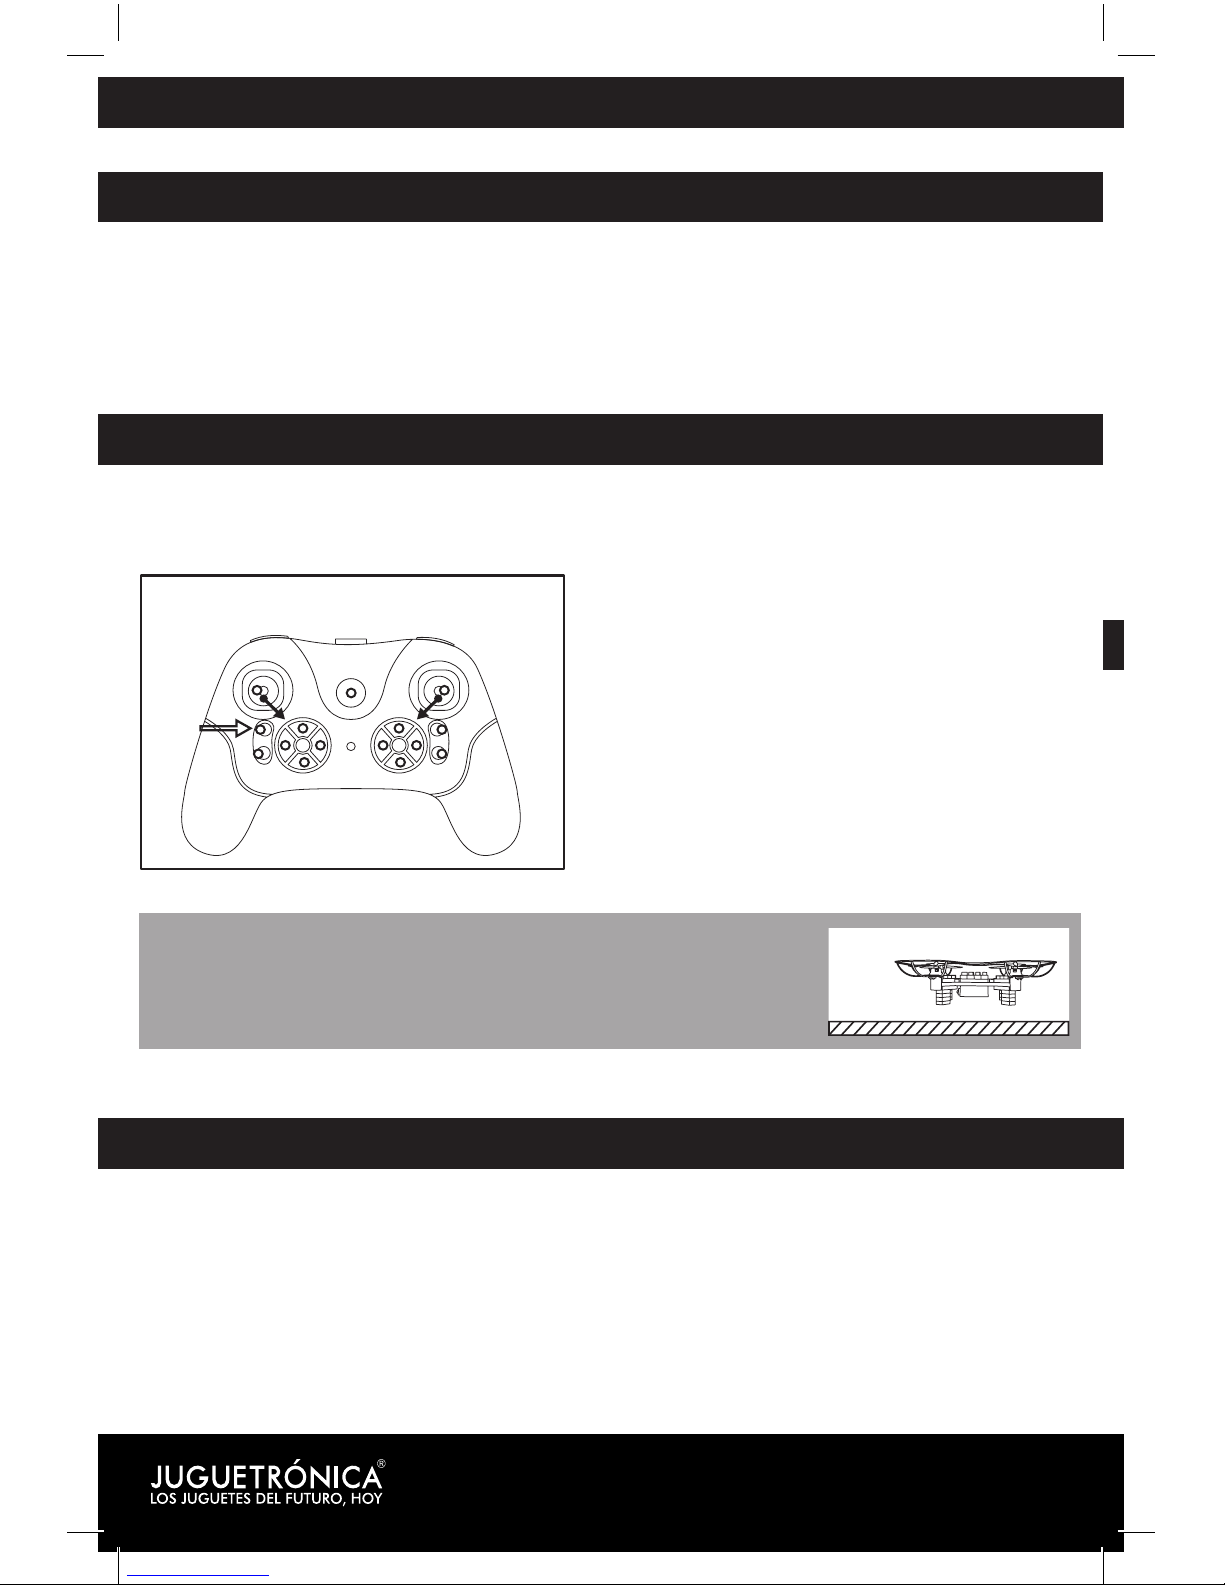
Land the drone on a flat surface. Then move
the left joystick to the lower right corner and
the right joystick to the lower left corner (move
them both at the same time). The two front
LEDs will stop blinking and remain fixed.
Another option is to press and hold the reset
button for 3 seconds. When the transmitter
emits a beep, the calibration has been
completed.
CALIBRATION
DRONE SYNCHRONIZATION

9
WARNING
CALIBRATION
DRONE SYNCHRONIZATION
Remove the battery from the drone. Connect the battery
to the USB cable and then plug it into the charging port.
The USB cable indicator will light up while charging
and it will turn off once the battery is fully charged.
CHARGING TIMES
The battery takes about 60 minutes to be fully charged. The flight autonomy time will depend
on the weight of the drone. The simplest configuration is for an 70-gram drone, which offers 7
minutes of flight autonomy, whereas for a 100-gram drone, autonomy is 3.5 minutes.
PRECAUTIONS FOR BATTERY CHARGING
1. During charging, place the battery and charger in a dry, ventilated area away from sources
of intense heat or flammable products.
2. During charging, disconnects the battery of the drone. It is important that the battery charge
be supervised by an adult to prevent accidents.
3. Do not charge the battery as soon as you finish flying. Wait for the battery to cool down,
otherwise the battery may swell, explode or burn.
4. Ensured you to use the original USB charger provided with the drone. When you’ve used
enough battery or see it’s a little swollen, exchange the battery for another.
5. A battery that is not used for a long period of time lose their charge.
6. Charge or discharge a battery often shortens its lifetime.
BATTERY MAINTENANCE
1. The battery must be placed in a dry, ventilated place at room temperature between 18 and 25º C.
2. To make the most of the life of your battery, avoid performing repeated loads or ecessivas
discharges.
3. When you are storing the battery for a long period of time, and first charges the battery with
the umbrella at least 50-60% of the total load allowed.
4. If you are not using it for more than a month, it is recommended to measure it the battery
voltage each month to assure you that is not below 3V. Otherwise back to point number 3.
BATTERY CHARGING

MOVEMENT CONTROL
FLIGHT SPEEDS
UP AND DOWN
GIROS A IZQUIERDA Y DERECHA LATERAL DISPLACEMENTS
FORWARD AND BACKWARD
Move up the power lever (left) to the drone go
up. Lowers the power lever (left) to the drone
down.
The Brick Drone has a 4-speed selector so you can increase
the level of difficulty as you get familiar with controlling the
drone.
You can select th speed you want by pressing the speed control
button as shown in the image on the left.
Move the power lever (left) to the right or left so
that the drone turn to the corresponding side.
Move the steering control lever right or left: The
drone will fly in the corresponding direction.
Move the steering control lever up or down:
The drone will move forwards or backwards.
ACROBATIC MODE
When you’ve controlled the flight and basic operation of the drone, you’re ready to perform
some tricks and impressive stunts.
The first of all is that you fly at a height of more than 3 meters, since all the stunts lead to a loss
of height, and so avoiding that the drone crashes into the ground.
To perform its acrobatics, you have to press the button “aerobatics” (button located on the front
right) and then push the direction lever (right) in the desired direction to make an acrobatic 360.
ACROBATIC FLIGHT MODE ADVICES:
The drone must be with battery charged to perform the stunts.
ACROBATIC MODE

11
MOVEMENT CONTROL
FLIGHT SPEEDS
Move the steering control lever right or left: The
drone will fly in the corresponding direction.
Move the steering control lever up or down:
The drone will move forwards or backwards.
ACROBATIC MODE
ACROBATIC MODE
Press the acrobatic mode button and move
the steering control forward: The drone will
execute a 360º turn in that direction.
Press the acrobatic mode button and move
the direction control to the left: The drone will
execute a 360º turn in that direction.
Press the acrobatic mode button and move the
direction control to the right: The drone will
execute a 360º turn in that direction.
Press the acrobatic mode button and move
the steering control backwards: The drone will
execute a 360º turn in that direction.
TRIMMING
TRIMMING OF FORWARD
AND BACKWARD
TRIMMING OF TURNS
LEFT RIGHT
TRIMMING OF LATERAL
DISPLACEMENT
When the Brick Drone tends to move forward under sta-
tionary flight conditions, press the trim button and move
it backwards as necessary until the position is corrected. If
it tends to move backwards, do the same with the forward
movement trim.
When the Brick Drone tends to turn to the left under sta-
tionary flight conditions, press the right turn trim button
as many times as necessary until is corrected. If it tends to
turn right, do the same with the left turn trim.
When the Brick Drone tends to move left under stationary
flight conditions, press the right movement trim button. If it
tends to move right, do the same with the left movement trim.

FUNCTIONS OF THE BRICK DRONE
HEADLESS MODE FUNCTION
During standard flight, if you press the right lever to move
forward, the drone identifies the direction in which it has to
move with the orientation of the front (figure 1). In contrast,
if you activate the headless mode by pressing the button
indicated in the image on the left, the drone flies forward
regardless of the orientation of the front (figure 2). When the
hedless mode is activated, the transmitter will beep and the
two front LEDs on the drone will blink.
Press the indicated button again to exit this mode of flight.
The transmitter will beep again and the indicator light will
remain on.
OVERCURRENT PROTECTION
When the drone of propellers collide against an object or lock, the power control system
momentarily paralyzes the engines, reactivating when the propeller is released.
LIGHTS CONTROL
The LEd lights drone can be activated or deactivated by
pressing the control of top courses as shown in the side
image. The first press turns on the LED lights, the following
pressure turns them off.
BACK HOME FUNCTION
Press the "home" button, the transmitter will beep and the
drone will return in a straight line to the starting position in
which it began to fly. . You can move the lever to the right to
correct the channel if the drone is off course. Press the "home"
button again or move the lever to the right, the transmitter
will beep again and the drone will end the return.
ATTENTION: Note that the drone
considers the direction as a refer-
ence during commissioning. If you
fly the drone until its located behind
you, when performing the "auto-
matic return", the drone will move
away as it considers the movement
in full and moves back the distance
recorded according to the initial ori-
entation.
Automatic return
Start
End
12
Headless mode disabled Headless mode enabled

13
FUNCTIONS OF THE BRICK DRONE
PICTURES AND VIDEOS WITH YOUR BRICK DRONE
On the smartphone app you will find an icon for taking pictures and another
icon for recording videos. Additionally, from the icon you will be able to
view the images and videos you have taken, which will be stored on the smartpho-
ne. You will need to enable the appropriate permissions to the APP when it requests
it. When recording from the APP, the drone will send the image and video signal live,
therefore, the video quality is 720x576 at variable FPS.
WIFI CONNECTION WITH MOBILE DEVICES:
It is recommended that beginners use this function within a 10 meters radius.
As you get familiar with the drone, you will be able to handle it at a greater distance.
1. Turn on your drone.
2. Access the settings on your mobile device and activate the WiFi connection.
3. Find the WiFi network of your drone and connect to it.
4. Click on the icon to access the control interface. At this point you will be able to start
watching the video the drone captures in real time.
INSTALLATION OF PROPELLERS
When a drone propeller is damaged or deformed, you can replace it with one of the propellers
included in the accessory pack. Please note the position requirements of the propellers when
installing them. The letters marked on each propeller must match to the following scheme,
otherwise the drone will not fly normally.
A
AB
B
A
A
B
B

Spare parts and/or accessories you can purchase to complete your Brick Drone.
ACCESSORIES AND SPARE PARTS
APP DOWNLOAD AND FEATURES
RETURN
3D VIEW
HEADLESS
MODE
REVERSE CA-
MERA
GYROSCOPE CALI-
BRATE
GRAVITY SENSOR
MODE
SHOW / HIDE
INTERFACE
PREVIEW AT 720P
TAKE PHOTO RECORD VIDEO
GALLERY
HELP
360º FLIP
SPEEDS
SCAN THE QR CODE TO
DOWNLOAD THE APP
URL: juguetronica.com/extras/brickdrone
CONTROL STICKS TRIMMING
Propellers Batteries Charger
SETTINGS

15
ACCESSORIES AND SPARE PARTS
APP DOWNLOAD AND FEATURES
MODEL 1. ASSEMBLY INSTRUCTIONS
FINISHED MODEL
x2
x2 x1
x4 x2x2
x2 x2
1 5
6
2
3
4
A1
A2
A3
A
STEP 1-6 GENERIC ASSEMBLY (PAGS. 5-6)
x2
x2
x2
x2
x4
x6 x2x2x2 x2x1x1
Red
Black

MODEL 2. ASSEMBLY INSTRUCTIONS
x1
x2
x1 x1
x2
x1 x1 x2
x2
x2
x3
x1
x2
x2
x1
x2
x2
x2 x1
x2
A1 A4
A5
A2
A3
A
45º

17
MODEL 2. ASSEMBLY INSTRUCTIONS
FINISHED MODEL
B4B1
B2
B3
B5
B6
B7
B
B
A
180º
1
2
3
STEPS 1-8 GENERAL ASSEMBLY (PAG. 6)
x2

MODEL 3. ASSEMBLY INSTRUCTIONS
x2
x5
x2
x2
x2 x2
x2
x2
x1
x1
x1 x1x6 x2
x1
x2
x2
x2 x1
A1
A2
A3
A4
A5
A
x2x2

19
MODEL 3. ASSEMBLY INSTRUCTIONS
FINISHED MODEL
1
5
6
2
3
STEPS 1-8 GENERAL ASSEMBLY (PAG. 5)
4A
B1
B2
B3
B
x2

FINISHED MODEL
MODEL 4. ASSEMBLY INSTRUCTIONS
A1
A2
A3
A4
A
x2
1
2
3
4
x1x1x1x1 x2
x1
x1
x1
x2 x2 x2x2 x2
STEPS 1-8 GENERAL ASSEMBLY (PAG. 6)
Table of contents
Other Juguetronica Drone manuals

Juguetronica
Juguetronica RACING DRONES GAME User manual

Juguetronica
Juguetronica SMARTVIEW Manual

Juguetronica
Juguetronica JUG0252 User manual

Juguetronica
Juguetronica SMARTDRONE BT User manual

Juguetronica
Juguetronica THE FOLLOWER User manual

Juguetronica
Juguetronica MICRODRONE AUTOFLIGHT User manual

Juguetronica
Juguetronica VR HD NANO DRONE User manual

Juguetronica
Juguetronica JUG0246 User manual

Juguetronica
Juguetronica NANODRONE EVOLUTION Manual

Juguetronica
Juguetronica NANODRONE VCAM HD 3 Manual