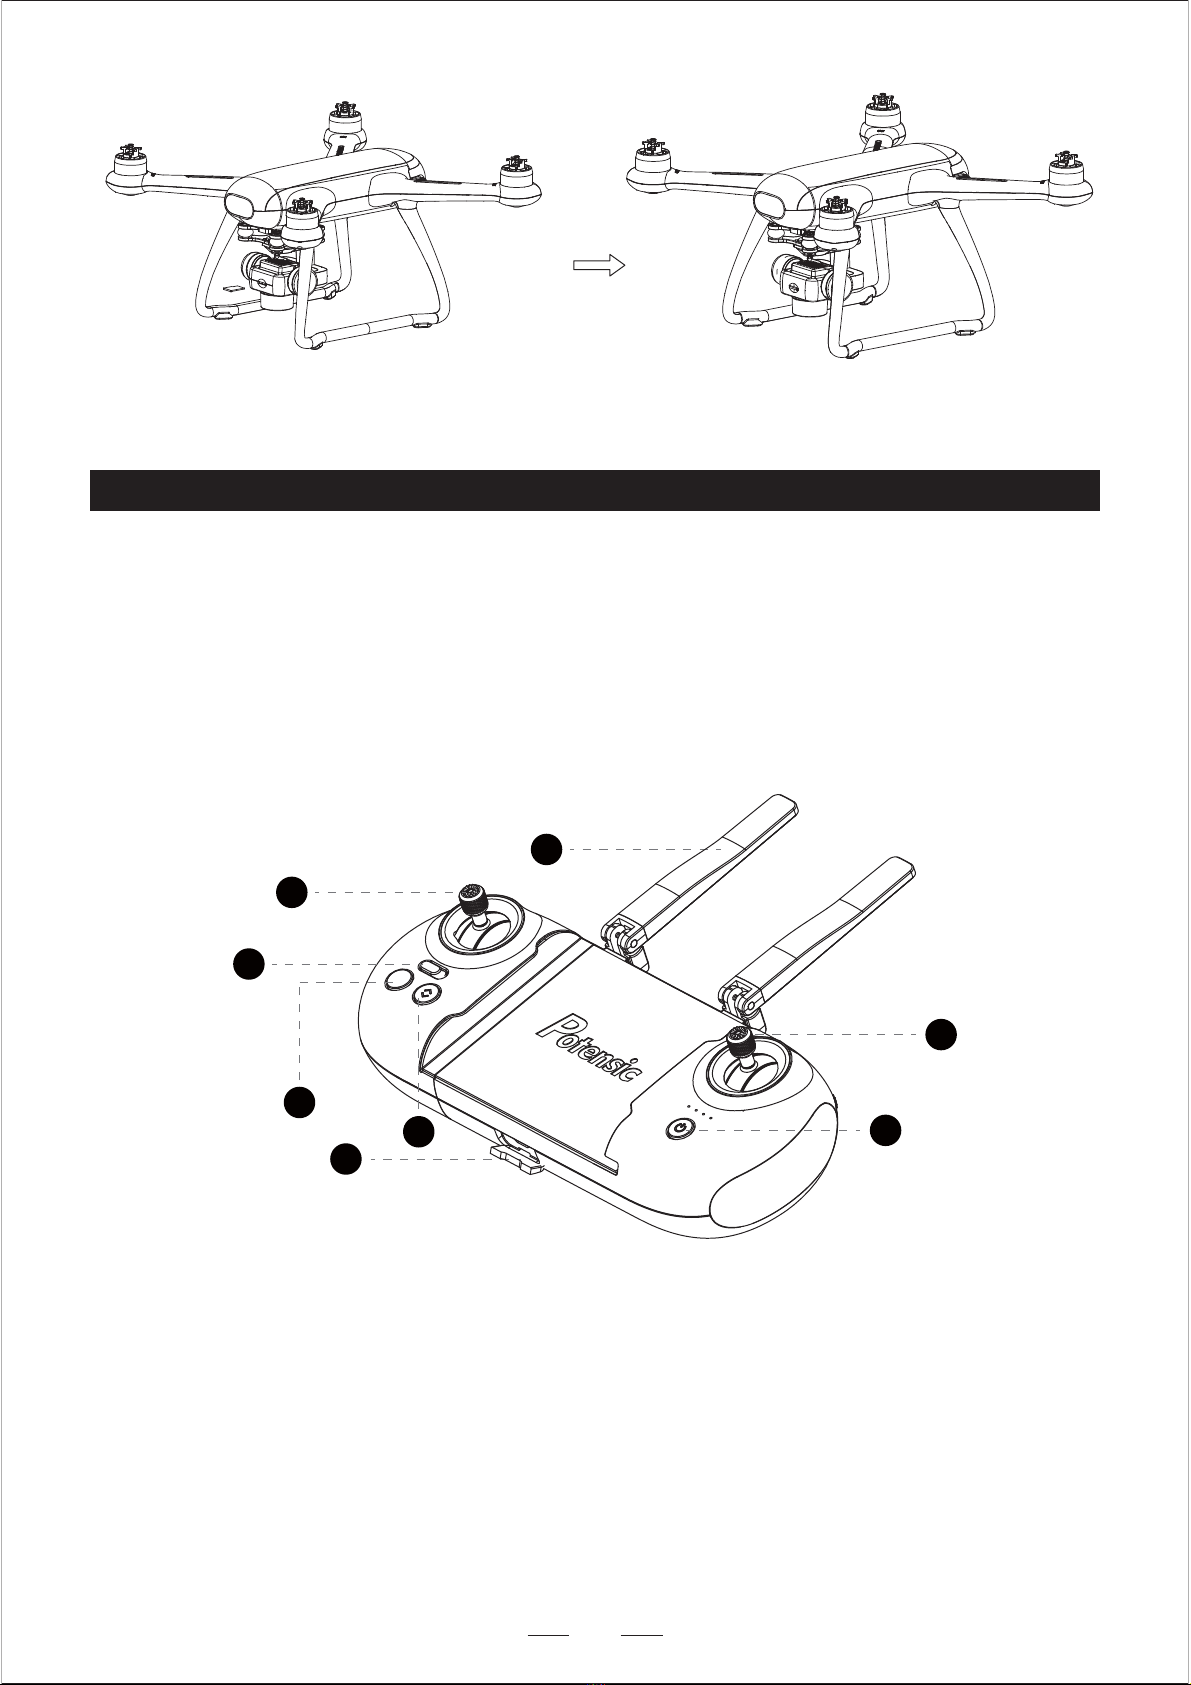
Potensic Dreamer 1 User manual

www.potensic.com
Dreamer 1
User Manual

CONTENTS
02
01
01
01
03
04
SPECIFICATION
BLADES
BATTERY
05
05
06
CAMERA
MICRO SD CARD
WARNING
NOTES AND DISCLAIMER
DRONE STATUS AND INDICATOR STATUS DESCRIPTION
INTRODUCTION
MAINTENANCE
PACKAGE INCLUDES
PRODUCT DIAGRAM
REMOTE CONTROLLER
08
REMOTE CONTROLLER CHARGING
09
CONTROLLING THE AIRCRAFT
10
DRONE APP “POTENSIC PRO”
08
PHONE CLIP
13
CONNECTION
21
23
23
25

Thank you for purchasing the Potensic Dreamer 1 Drone. Please check this user manual carefully
and save it for future reference. If you need any help, please contact our support team and provide
your product Amazon/Website order number.
Potensic Dreamer 1 is equipped with intelligent flight control system, which can realize the functions
of way-point flight, intelligent follow, and auto return home. With a 1/3 inch Sony CMOS image
sensor and a camera anti-shake system, the camera can stably shoot up to 30 frames per second
of 2.7K high-definition video and 4.0 million pixels of photos.
Drone with 2.7K camera x1
Remote Controller x1 Remote Controller x1
USB Charging Cable x1
(for remote controller)
Battery x1 Extra Blade x 2 (CCW & CW)
Drone Charger x1
01
INTRODUCTION
1. Use a clean soft cloth to clean this product frequently.
2. Avoid heating or prolonged exposure to the sun.
3. Don’t put the product in water. It will damage electronic parts.
4. Please check the plug and other accessories atregular intervals. If there is any damage, please
stop using it immediately until it is repaired completely.
MAINTENANCE
PACKAGE INCLUDES
User Manual x1Quick Start x1

02
5
6
4
2
3
1
7
8 9
PRODUCT DIAGRAM
10
11 12

03
BLADES
When installing, please pay attention to
the right rotating direction of the blades,
which are printed with "CW" and "CCW".
So, you need to install them according
to "CW" and "CCW" marks.
Press down and rotate according
to the marked direction of blade
locking until it can not be turned;
unload the blade, reverse the
above steps.
Dreamer LED Light
2
Motor
3
2.7K Camera
1Blade
4
Front LED
5
Tail LED
6
Shock Absorber Plate
7
Landing Gear
8
Foot Pad
9
Smart Battery
10
Power Indicator
11
Power Button (Short press once and then long press 2s to turn on / off the drone)
12

When the drone's power is too low, please fly the drone back and charge the battery in time.
Connect the adapter to charge the battery. When charging, the indicator flashes. When full charged,
the battery indicator lights will be off. The full charging time is about 2 hours.
1. Please charge the battery with a professional charger.
2. Do not charge on the carpet in case of fire.
3. Recharge every 3 months or so to keep the battery active.
4. Keep battery away from liquids, extreme heat (e.g fire or electric heating devices), and strong
magnetic fields.
5. Do not use batteries to hit or knock hard surfaces.
6. Never break down batteries.
7. Do not leave when charging.
04
BATTERY
BATTERY CHARGING
As shown in Pic 1, insert the battery in the right direction into the drone.
As shown in Pic 2, pinch the buttons on the left and right sides of the battery and pull out the battery.
Note: When you hear a click sound, indicating that the battery is fully inserted successfully.
BATTERY INSTALLATION AND TAKING OUT
WARNING
Pic 1 Pic 2

1. Install the shock absorber ball on the shock absorber board and install the anti-tripping device.
2. Insert the power cable and steering wire of the camera into the connector of the aircraft adapter
board, respectively.
3. Close the connecting wire cover.
05
CAMERA
CHARGING INDICATOR STATE
0%~25%
25%~50%
50%~75%
75%~100%
Full
LED 1 LED 2 LED 3 LED 4 Current battery capacity
Inset the Micro SD card into the camera SD card slot. It is recommended to use the brand product
such as SanDisk, Kingston or Samsung, and needs Micro SD cards with at least 4GB and max up
to 256GB. All the pictures and videos will be only saved in Micro SD card and not in App or your
phone. The Micro SD card is not included in the package.
MICRO SD CARD
Flashing status Lights out state

06
Insert the Micro SD card with its metal chip up.
REMOTE CONTROLLER
Dreamer1 uses a 2.4G remote controller with complete function keys. It can complete various
operations and settings of aircraft and the camera within a maximum communication distance of
500 meters and display high-definition pictures on mobile devices in real time through App “Potensic
Pro”. The remote controller is equipped with rechargeable lithium batteries, which can work
continuously for up to 4 hours.
KNOW YOUR REMOTE CONTROL
12
5
1
2
6
3
4
2

07
Folding Antenna
Receive transmission signals
1
Power Button
Long press to turn on / off the remote.
3
One-key Takeoff and Landing
Long press 1s to take off or land your drone.
4
One-key Return
Press the button to return your drone back.
5
Normal / Sport Mode
Push the button to adjust the different speed of the drone 5m/s or 8m/s.
6
Controlling Stick Storage Box
There is a inner box to storage your controlling sticks.
7
Camera Adjust Wheel
Roll the wheel to adjust the Lens shooting angle, 90° adjustable.
8
Take Photos
Press the button to take a picture.
9
Record Videos
Press the button to record a video.
10
Camera Brightness Adjust
Roll the wheel to adjust the camera shooting brightness.
11
Micro USB Charging Interface
Charge the battery through this Micro USB interface.
12
Controlling Stick (Mode1 )
Pull the left stick up or down to take off and land the drone, pull the stick left or right to let the
drone turn left or turn right. Short press the left stick to switch GPS mode or Attitude mode.
Pull the right stick up or down to control the drone fly forward or backward, pull the stick left or
right to let the drone left side or right side fly.
2
8
7
11
9
10

Pull the remote control plate, and put your phone or tablet into it. Phone clip telescopic range:
97-178mm.
PHONE CLIP
08
CHARGING INSTRUCTIONS
Connect the Micro USB interface of the remote controller to charge the most commonly used 5V/2A
charger. Full charging takes about 2 hours.
REMOTE CONTROLLER CHARGING
(The plug is Not Included)
5V 2A

09
There two remote control modes for controlling the aircraft, mode 1 and mode 2. And the remote
control is set to mode 1 by default.
CONTROLLING THE AIRCRAFT
MODE 1
MODE 2
Left Stick Right Stick
Forward
Backward
Turn Left Turn Right Left Right
Up
Down
Right Stick
Forward
Backward
Left Right
Up
Down
Left Stick
Turn Left Turn Right

REGISTRATION AND CONNECTION
After downloading the drone App, you need to register your personal account to use it.
REGISTRATION AND LOGIN METHOD
Fill in the mailbox - fill in the password - check the agreement and agree - just click on registration;
login after successful registration. (Note: Please open your phone data network when registering.)
DRONE WIFI CONNECTING STEPS
Turn on the drone - Search drone WiFi on the phone - select drone WiFi name "Dreamer 1_XXXXXX"
- enter the WiFi password “12345678” to connect it.
Note:
For the first time you log on to APP, please keep the phone data network on, and enter the
Map interface to start map data caching.
10
FOR ANDROID USERS
Please search and download the drone App “Potensic Pro” in Google Play or scan the below QR to
download the App. Compatible with phone with Android 5.0 or above version.
FOR IOS USERS
Please search and download the drone App “Potensic Pro” in App Store or scan the below QR to
download the App. Compatible with phone with iOS 9.0 or above version.
DRONE APP “POTENSIC PRO”
For Android
For iOS

11
OPERATION INTERFACE
GPS mode: Accurate hover, pointing flight and other intelligent flight modes are realized under the
GPS mode. Under the GPS mode, when the GPS signal is strong, it can be positioned
accurately. when the GPS signal is weak, the aircraft can not be positioned accurately,
and it only provides attitude stabilization, and does not support intelligent flight function.
Attitude mode: With the GPS is off, only attitude stabilization is provided. At this time, the maneuver
rocker is used to control the flight of the aircraft. This mode is used cautiously by
novices.
Dreamer 1 uses a new generation of Potensic flight control, which supports the following flight modes
DRONE FLIGHT MODE
1 2 3 4 5 6 7
8
9
10
11
12 20131415
19
18
17
16
Connection Status
2
Display the Current Mode of Drone
3
Return to Homepage
1
GPS Signal
4
Transmission signal strength
5
Drone Power
6
Setting Interface
7
Photo
8
Video
9
File Saved in Micro SD Card
10

FLIGHT MODE
Flight Height
12
13
14
15
Flight Distance
Camera Setting
11
Flight Speed
Drone vertical flight speed
16
17
18
19
20
Attitude Ball / Map
One-button Return
Flight Mode Setting
One-button Take-off / One-button Landing
Camera Pitch Adjustment
12
1 2 3 4
5 6 7 8
Headless Mode Switch
2
Unlock / Lock
3
Normal / Sport Mode Switch
1
App Remote Control
4
Circle Flight Mode
5
Way-point Flight Mode
6
Following Mode
7
GPS Mode / Attitude Mode
8

13
INTRODUCTION OF SETUP INTERFACE
Calibration Settings
2
Remote Controller Settings
3
Main Controller Settings
1About Smart Battery
4
More
5
1
2
3
4
5
Matters Needing Attention When Flying
FLIGHT
1. Make sure the remote controllers, smart flight batteries and mobile devices fully charged.
2. Check whether the fuselage is complete and the propeller is properly installed.
3. Whether the camera and the platform work properly after the power is turned on.
4. Make sure the App working properly.
5. Check whether the Micro SD card is inserted, and ensure that the camera is clean.
6. Low-power protection: When the battery power of the drone is less than 20%, the done will trigger
one key return function.
7. Lost-of-control protection: The done will trigger one key return after disconnection for 3 seconds;
If the drone is successfully re-connection during return the drone will hover in the air.
8. Out-of-control protection: After the horizontal tilt angle is greater than 80 degrees 0.5 seconds,
the drone will lock automatically and fall directly.
CONNECTION BETWEEN THE REMOTE CONTROLLER AND THE DRONE
The remote controller and the drone have been already paired when they leave the factory and can
be controlled just after being powered on. But after replacing a new remote controller, the remote
controller and the drone need to be re-paired to use. The pairing steps are as follows:
CONNECTION

14
CONNECTION BETWEEN THE DRONE AND THE APP
First: turn on the drone, enter the mobile phone "settings" interface and enter WiFi setting, find
"Dreamer 1_XXXXXX" network and connect it.
Second: open the App "Potensic Pro" in mobile phone and enter control interface.
GEOMAGNETIC CALIBRATION
The drone has been calibrated and can work normally in the factory. If the drone's geomagnetism is
disturbed, it may need re-calibration. The steps are as follows:
First: Enter the Potensic App settings interface, click on the second column, and select the
geomagnetic calibration in the list. The left front and left rear lights start to slowly flash,
indicating that the calibration program is started.
Second: Rotate the drone 360 degrees horizontally, the right front and right rear lights start to
slowly flash. (Pic 1)
Third: Rotate the drone 360 degrees vertically, the aircraft 4 LED lights will keep always on. Then
the calibration is finished. (Pic 2)
Fourth: If the 4 LED lights still keep slowly flashing, indicating that the calibration failed, it is
suggested that you need to change a new take-off place and do the calibration again.
First, insert the battery into the drone and short press the battery switch and then long press the
battery switch again for 7 seconds. At this time, the battery indicator is always on and the drone is
turned on.
Then, press down the middle key of the right stick and the Power Button together for a long time to
enter the binding state (Pic 1). The four footlights will flash, the remote control power lights will flash
slowly.
Last, the remote control will emit a short "di" sound, and power lights are always on, drone’s four
footlights are always on. The drone and the remote control is bounded successfully.
Pic 1

TAKE-OFF AND LANDING
Safety Flight Tips
Beginner mode is the default mode of operation for this product, in Beginner mode:
1. Flight Distance Limitation: 0-30m
2. Flight Altitude Limitation: 0-30m
15
Pic 1 Pic 2
GYROSCOPE CALIBRATION
During the flight, if the flying direction of the drone is deviated greatly, you need to place the drone
on the horizontal flat and start gyroscope calibration.
First: open the App, and click
Second: choose “Gyroscope Calibration”. At this time, the drone will enter calibration status, then, the
drone 4 LED lights will slowly flash 3 seconds. The Pop-ups will display calibration
successful tip , indicating the calibration is successful.

*One-button return:
Remote Control: Long press the "HOME" key on the remote control, you will hear a continue “di”
sound. Then, the drone will auto fly back. Long press "HOME" key again to exit
auto return and the “di” sound stops.
The Intelligent Return (RTH) function enables the aircraft to return to the final recorded take-off point.
This function must be realized under the GPS mode. There are three types of intelligent return flight
mode: One-button return, Low-Power return and Lost-of-signal return.
Pic 1
16
unlock the drone or just click the unlock key on the App.
Then long press 1 second "take off and land" key, you will hear a short "di" sound or click
icon on the APP. Then the drone will fly up slowly and hover at an altitude of about 1.2
meters.
Unlock the drone first: Push the left stick to down right and right stick down left together (Pic 1) to
RETURN TO HOME(RTH)

17
*Low power return:
Intelligent Return: When the power of the aircraft is less than 20%, the aircraft will automatically
start the return mode. At this point, the remote control will emit “di” sounds, the
battery power icon flashes on the App, and the Return icon lights up when the
drone is flying back.
Low-power Protection: The drone system will judge if the drone needs auto return according to
the distance and the battery power situation. When the drone is flying back,
its 4 LED lights continue to flash slowly until it lands on the ground.
HEADLESS MODE
Note:
Because the operator's operating position is very important for the realization of "headless mode"
when the frequency is aligned. Therefore, after entering the "headless mode", please do not change
the operator's operation direction.
*Lost-of-Signal Return:
When the drone lost connection with the remote control, it will auto fly back to 30m away from the
controller. And the drone can reconnect the remote control when flying, then you need to operate
the throttle stick to let it land. And you can push the left and right sticks inwards 45° to lock the
motors.
Note: The aircraft does not have an obstacle avoidance function. If the drone hits a
building or some obstacle on the way auto-return, it will fall down.
App Control: Click the "HOME" icon on the APP to start One-button return. And click the
icon to cancel auto-return.
Don't change the orientation
Keep the same orientation of operator facing
when in pairing as the pictures.

18
How to Start Headless Mode
Put the drone on the ground with its head forward and its back against you, then pair the drone with
the remote control. And click the headless mode button on the App to enter the headless mode and
click the headless mode icon again to exit.
ORBIT FLIGHT MODE
Click the icon to enter Orbit Mode. (Circle Flight)
Under normal flight conditions (flight altitude greater than 5 meters), the aircraft defaults to the
current position as the center of the surround, 10 meters as the radius, 3m/s flying, clockwise
surround flying.
Under the headless mode
The forward direction is the direction the pilot faces where the pilot pairs the drone with the
transmitter. If the pilot pushes the direction stick forward / backward, the drone will fly forward /
backward. If the pilot pushes the right stick left / right, the drone will fly left / right relative to you.
It is very important that the pilot does not change positions or the direction he is facing, because
this will cause confusion on the drone.
Table of contents
Other Potensic Drone manuals

Potensic
Potensic Wisp User manual

Potensic
Potensic A20 User manual

Potensic
Potensic Dreamer 4K User manual

Potensic
Potensic P7 User manual

Potensic
Potensic A30 User manual

Potensic
Potensic ATOM SE User manual

Potensic
Potensic Dreamer Mini User manual

Potensic
Potensic Dreamer Mini User manual

Potensic
Potensic ATOM SE User manual

Potensic
Potensic T25 User manual