LOOOX EASY User manual

NL
EN
FR
DE
GEBRUIKSINSTRUCTIES
USERMANUAL
INITIATION D’ UTILISATION
GEBRAUCHSANLEITUNG
EASY
CHILL
COOL [WALL]
looox.eu
LEES DEZE INSTRUCTIES
VOOR GEBRUIK!
READ THESE INSTRUCTIONS
BEFORE ASSEMBLING!
LISEZ CES INSTRUCTIONS AVANT
D’INSTALLER!
BITTE LESEN SIE VOR DER
MONTAGE DIE EINBAUANLEITUNG!

2
NL
LET OP! Lees deze instructies voor montage en gebruik. Controleer op schade voor montage. Na montage gemelde beschadigingen
of beschadigingen door het niet volgen van deze handleidingen geven geen recht op garantie.
Gefeliciteerd met aanschaf van jouw bad! Om het bad in optimale staat te behouden, zijn verschillende gebruiks- en onder-
houdsadviezen van toepassing. Lees deze aandachtig door. Eventueel overtollig aangebrachte kit kan worden verwijderd met
een spons en ruim water.
Gebruiksadvies en onderhoud
De reiniging van het bad is zeer eenvoudig, omdat vuil vrijwel geen kans krijgt zich te hechten aan het oppervlak. Deze werking
kun je het beste behouden door het bad na gebruik droog te maken met een zachte doek. Bij onderhoud maken we onderscheid
in de twee verschillende afwerkingen, namelijk mineraal marmer met gelcoat toplaag en acryl.
Mineraal marmer met een gelcoat toplaag (Easy)
Om het bad schoon te maken kun je het beste groene zeep gebruiken i.c.m. een zachte spons. Wrijf zacht in een ronde beweging
en gebruik genoeg water. Bij hardnekkige vlekken die niet op zojuist beschreven manier kunnen worden verwijderd óf wanneer er
sprake is van beschadigingen, neem dan contact op met onze serviceafdeling.
De plek waar het logo is geplaatst moet met extra zorg worden behandeld. Daarnaast raden wij het gebruik van bruisballen,
badparels en oliën af. Dit om kleuraanslag te voorkomen.
Acryl (Cool, Cool Wall en Chill)
Om het bad schoon te maken kun je het beste milde allesreiniger, water i.c.m. een zachte spons gebruiken. Wrijf zacht in een ronde
beweging en gebruik genoeg water. Altijd meteen en grondig naspoelen met water. Bij hardnekkige vlekken die niet op zojuist
beschreven manier kunnen worden verwijderd óf wanneer er sprake is van beschadigingen, neem dan contact op met onze
serviceafdeling.
De plek waar het logo is geplaatst moet met extra zorg worden behandeld. Daarnaast raden wij het gebruik van bruisballen,
badparels en oliën af. Dit om kleuraanslag te voorkomen.
Voor installatie:
Plaats het artikel dat u hebt gekocht tijdens installatie op een schoon, droog oppervlak om krassen te voorkomen.
Zorg dat restanten van bevestigingsmateriaal niet op het oppervlak van het artikel opdrogen. Verwijder restanten
van bevestigingsmateriaal met een vochtige doek voor deze opdrogen. Gebruik hiervoor een zachte doek en nooit
schuursponsjes die krassen op het oppervlak kunnen veroorzaken.
Gebruik / instructies
Let op!
Gebruik geen oplosmiddelen als:
- alcohol (of alcoholhoudend)
- aceton (of op basis van aceton)
- ammonia (of ammoniahoudend)
Let op!
Gebruik geen agressieve of schurende schoonmaakmiddelen als:
- chloor
- zoutzuur
- bijtende soda
- antikalk producten
- oplosmiddelen o.b. v. anionische oppervlakte actieve werking
Let op!
Gebruik geen oplosmiddelen als:
- alcohol (of alcoholhoudend)
- aceton (of op basis van aceton)
- ammonia (of ammoniahoudend)
Let op!
Gebruik geen agressieve of schurende schoonmaakmiddelen als:
- chloor
- zoutzuur
- bijtende soda
- antikalk producten
- oplosmiddelen o.b. v. anionische oppervlakte actieve werking

3
EN PLEASE NOTE! Read these instructions prior to assembly and use! Check for damage before assembly. Any damage reported
after assembly or damage caused by failure to observe these instructions is not covered by the guarantee.
Congratulations on the purchase of your bath! To keep the bathtub in optimal condition, various recommendations for use and
maintenance apply. Please read these carefully. Any excess sealant can be removed with a sponge and plenty of water.
Recommended use and maintenance
Cleaning the bath is very easy, because dirt has almost no chance to attach itself to the surface. The best way to maintain this eect
is to dry the bath with a soft cloth after use. When it comes to maintenance, we make a distinction between two dierent finishes:
mineral marble with a gelcoat top layer and acrylic.
Mineral marble with a gelcoat top layer (Easy)
To clean the bath, use mild soap and a soft sponge. Rub gently in a circular motion and use plenty of water. For stubborn
stains that cannot be removed in the manner described above or if there is damage, please contact our service department.
For stubborn stains that cannot be removed in the manner described above or if there is damage, please contact our service
department.
The area where the logo is located must be treated with extra care. In addition, we do not recommend the use of bathbombs, bath
pearls and oils. This is to prevent color stains.
Acrylic (Cool, Cool Wall and Chill)
To clean the bath, use a liquid cleaning agent, water and a soft sponge. Rub gently in a circular motion and use plenty of water.
Always rinse immediately and thoroughly with water. For stubborn stains that cannot be removed in the manner described above
or if there is damage, please contact our service department.
The area where the logo is located must be treated with extra care. In addition, we do not recommend the use of bathbombs, bath
pearls and oils. This is to prevent color stains.
Before installation:
During installation of the piece you have acquired, handle it on a clean, dry surface to prevent scratching. Residues of
setting materials should not be allowed to harden on the surface of the piece. To clean o residues of setting materials
before they harden, remove them with a damp cloth, always avoiding scouring pads that could scratch the surface.
Use / instructions
Please note!
Do not use solvents such as:
- alcohol (or alcohol-containing)
- acetone (or based on acetone)
- ammonia (or based on ammonia)
Please note!
Do not use abrasive or aggressive cleaning agents such as
- chlorine
- hydrochloric acid
- caustic soda
- limescale removers
- solvents based on anionic surfactants
Please note!
Do not use solvents such as:
- alcohol (or alcohol-containing)
- acetone (or based on acetone)
- ammonia (or based on ammonia)
Please note!
Do not use abrasive or aggressive cleaning agents such as
- chlorine
- hydrochloric acid
- caustic soda
- limescale removers
- solvents based on anionic surfactants

4
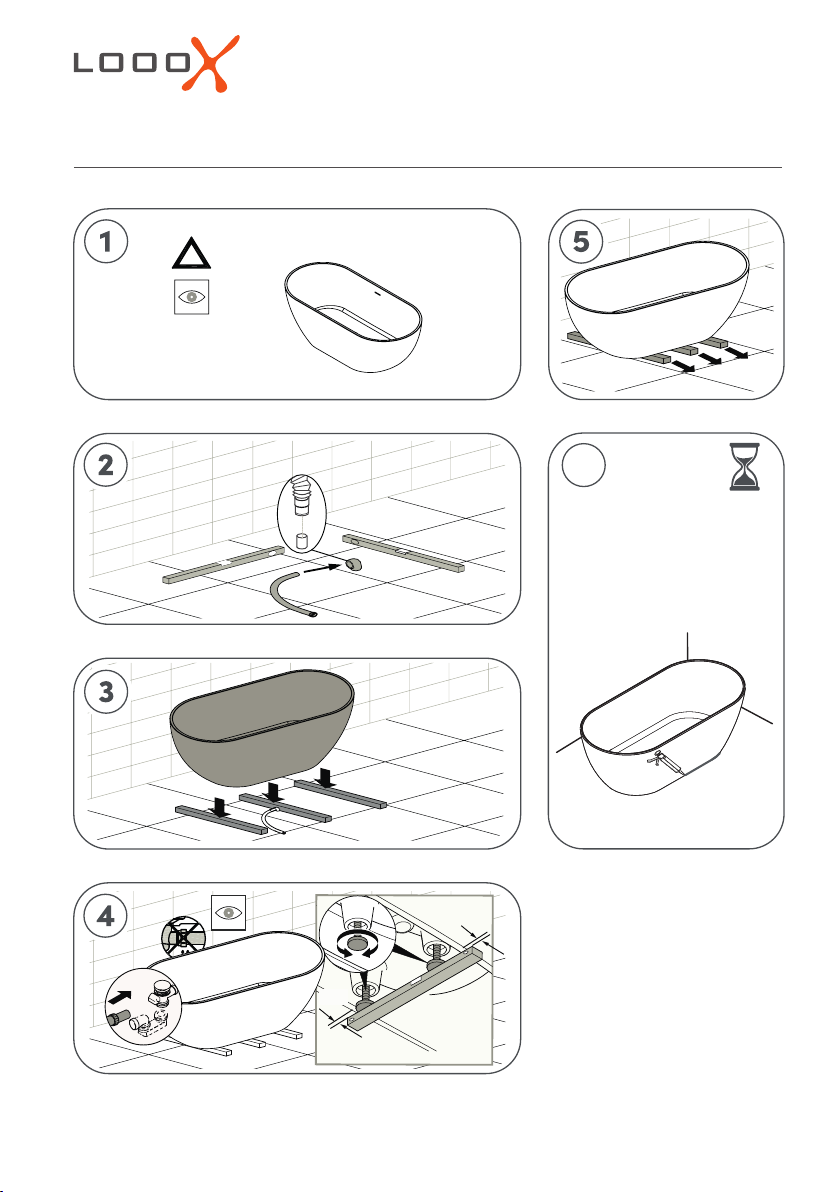
FR ATTENTION ! Lisez ces instructions avant le montage et l’utilisation. Avant le montage, vérifiez la présence éventuelle de dom-
mages. Les dommages signalés après le montage ou en raison du non-respect des instructions figurant dans ces manuels ne
donnent droit à aucune garantie.
Félicitations pour l’achat de votre baignoire ! Pour maintenir la baignoire dans un état optimal, il est important de respecter
les conseils d’utilisation et d’entretien. Veillez à les lire attentivement. Tout excès de mastic peut être enlevé avec une éponge
et de l’eau.
Conseils d’utilisation et d’entretien
La baignoire est très facile à nettoyer, car la saleté n’adhère pratiquement pas à la surface. Pour continuer à profiter de cet avantage,
séchez la baignoire avec un chion doux après chaque utilisation. En matière d’entretien, nous distinguons deux finitions diérentes,
à savoir le marbre minéral avec une couche supérieure en gelcoat et l’acrylique.
Marbre minéral avec une couche supérieure en gelcoat (Easy)
Pour nettoyer la baignoire, il est préférable d’utiliser un savon doux avec une éponge non rugueuse. Frottez doucement dans un
mouvement circulaire et utilisez susamment d’eau. En cas de taches tenaces ne pouvant pas être enlevées de la manière décrite
ci-dessus ou en cas de dommages, veuillez contacter notre service après-vente.
En cas de taches tenaces ne pouvant pas être
enlevées de la manière décrite ci-dessus ou en cas de dommages, veuillez contacter
notre service après-vente.
L’emplacement du logo doit être traité avec un soin particulier. De plus, nous déconseillons l’utilisation de bombe de bains, de
perles de bain et d’huiles. Ceci afin d’éviter les taches de couleur.
Acrylique (Cool, Cool Wall et Chill)
Pour nettoyer la baignoire, il est préférable d’utiliser des produits de nettoyage liquides et de l’eau, avec une éponge non rugueuse.
Frottez doucement dans un mouvement circulaire et utilisez susamment d’eau. Rincez toujours immédiatement et abondamment
à l’eau.
En cas de taches tenaces ne pouvant pas être enlevées de la manière décrite ci-dessus ou en cas de dommages, veuillez
contacter
notre service après-vente.
L’emplacement du logo doit être traité avec un soin particulier. De plus, nous déconseillons l’utilisation de bombe de bains, de
perles de bain et d’huiles. Ceci afin d’éviter les taches de couleur.
Avant installation :
Pour installer l’article que vous venez d’acquérir, nous vous conseillons de le manipuler sur une surface propre et sèche
pour ne pas le rayer. De plus, vous devez éviter que les résidus des produits nécessaires à sa mise en place ne durcissent
et restent collés à la surface de l’article. Pour retirer les résidus de ces produits d’installation avant qu’ils ne durcissent, il
est recommandé d’utiliser un torchon humide et d’éviter les éponges à récurer susceptibles de rayer la surface.
Utilisation / instructions
Attention !
N’utilisez pas des solvants tels que:
- l’alcool (ou à base d’alcool)
- l’acétone (ou à base d’acétone)
- l’ammoniac (ou à base l’ammoniac)
Attention !
N’utilisez pas des produits de abrasifs ou nettoyage
agressifs tels que le que:
- chlore
- l’acide chlorhydrique
- la soude caustique
- les produits anticalcaires
- les solvants à eet tensioactif anionique
Attention !
N’utilisez pas des solvants tels que:
- l’alcool (ou à base d’alcool)
- l’acétone (ou à base d’acétone)
- l’ammoniac (ou à base l’ammoniac)
Attention !
N’utilisez pas des produits de abrasifs ou nettoyage
agressifs tels que le que:
- chlore
- l’acide chlorhydrique
- la soude caustique
- les produits anticalcaires
- les solvants à eet tensioactif anionique

5
DE
ACHTUNG! Lesen Sie bitte vor der Montage und dem Gebrauch diese Anweisungen! Vor der Montage auf Schäden kontrollieren. Für
nach der Montage gemeldete Schäden sowie für Schäden, die auf Nichtbeachtung der Hinweise in dieser Anleitung zurückzuführen
sind, besteht kein Garantieanspruch.
Herzlichen Glückwunsch zum Kauf Ihrer neuen Badewanne! Damit Ihre Wanne in optimalem Zustand bleibt, sind die Ge-
brauchs- und Pflegehinweise zu beachten. Lesen Sie diese bitte aufmerksam durch. Eventueller überschüssiger Dichtsto kann
mit einem Schwamm und reichlich Wasser entfernt werden.
Gebrauchs- und Pflegehinweise
Die Badewanne ist sehr einfach zu reinigen, da Verschmutzungen kaum an der Oberfläche anhaften können. Diese Eigenschaft bleibt
am besten erhalten, wenn Sie die Wanne nach Gebrauch mit einem weichen Tuch abtrocknen. Für die verschiedenen Oberflächen –
Mineralmarmor mit Gelcoat-Deckschicht und Acryl – gelten unterschiedliche Pflegehinweise.
Mineralmarmor mit Gelcoat-Deckschicht (Easy)
Reinigen Sie die Badewanne vorzugsweise mit einer milden Seife und einem weichen Schwamm. Verwenden Sie reichlich Wasser
und reiben Sie die Oberfläche sanft in kreisenden Bewegungen ab. Bei hartnäckigen Flecken, die sich nicht auf die beschriebene
Weise entfernen lassen, und bei Beschädigungen wenden Sie sich bitte an unsere Serviceabteilung. Bei hartnäckigen Flecken, die
sich nicht auf die beschriebene Weise entfernen lassen, und bei Beschädigungen wenden Sie sich bitte an unsere Serviceabteilung.
Die Stelle, an der das Logo angebracht ist, muss besonders schonend behandelt werden. Außerdem raten wir von der Verwendung
von Badebomben, Badeperlen und Ölen ab. Dies soll Farbflecken verhindern.
Acryl (Cool, Cool Wall und Chill)
Reinigen Sie die Badewanne vorzugsweise mit einem Flüssigreiniger, Wasser und einem weichen Schwamm. Verwenden Sie
reichlich Wasser und reiben Sie die Oberfläche sanft in kreisenden Bewegungen ab. Immer sofort gründlich mit Wasser abspülen.
Bei hartnäckigen Flecken, die sich nicht auf die beschriebene Weise entfernen lassen, und bei Beschädigungen wenden Sie sich
bitte an unsere Serviceabteilung.
Die Stelle, an der das Logo angebracht ist, muss besonders schonend behandelt werden. Außerdem raten wir von der Verwendung
von Badebomben, Badeperlen und Ölen ab. Dies soll Farbflecken verhindern.
Vor der Installation:
Behandeln Sie das erworbene Teil während der Installation auf einer sauberen, trockenen Oberfläche, um Kratzer
zu vermeiden. Reste von Befestigungsmaterialn dürfen auf der oberfläche nicht aushärten. Um Rückstände von
Abbindemitteln vor dem Austrocknen zu entfernen, entfernen Sie diese mit einem feuchten Tuch und vermeiden Sie
immer Scheuerlappe, die die Oberfläche verkratzen könnten.
Gebrauch / Anweisungen
Achtung!
Verwenden Sie keine Lösungsmittel wie:
- Alkohol (oder alkoholhaltigen)
- Aceton (oder auf der Basis von Aceton)
- Ammoniakwasser (oder auf der Basis von Ammoniakwasser)
Achtung!
Verwenden Sie keine Scheuermittel oder aggressiven
Reinigungsmittel wie:
- Chlor
- Salzsäure
- Ätznatron
- Antikalkprodukte
- Lösungsmittel aauf der Basis anionischer
oberflächenaktiver Substanzen
Achtung!
Verwenden Sie keine Lösungsmittel wie:
- Alkohol (oder alkoholhaltigen)
- Aceton (oder auf der Basis von Aceton)
- Ammoniakwasser (oder auf der Basis von Ammoniakwasser)
Achtung!
Verwenden Sie keine Scheuermittel oder aggressiven
Reinigungsmittel wie:
- Chlor
- Salzsäure
- Ätznatron
- Antikalkprodukte
- Lösungsmittel aauf der Basis anionischer
oberflächenaktiver Substanzen

6
BATH COLLECTION
EASY
CHILL
COOL
COOL WALL
Optional Wooden Bath Shelf
Colour inlay Art.nr. 78 cm Art.nr. 88 cm
Brushed sst WBSHELF78RVS WBSHELF88RVS
Matt black WBSHELF78MZ WBSHELF88MZ
Matt white WBSHELF78MW WBSHELF88MW
Antracite WBSHELF78A WBSHELF88A
Optional Wooden
Bath Shelf Raw
Art.nr. ±78 cm
Art.nr. ±88 cm
WBSHRAW78 WBSHRAW88
Optional Bath Shelf
Advise 88 cm Bath Shelf
Optional Bath Shelf
Advise 88 cm Bath Shelf
Optional Bath Shelf
Advise 88 cm Bath Shelf
Optional Bath Shelf
Advise 88 cm Bath Shelf
*bath shelf not included
*
*bath shelf not included
*
8
10
12
14

1 ½“
585
450
75
1400
45
mm
+/- 5
800
275
1700
1090
470
Ø52
30
mm
+/- 5
1 ½“
570
420
75
1400
800
270
1700
1110
500
Ø52
40
85
65
Usual tap position, mounting 1
Ø52
800
400
1700
15
1200
520
1 ½“
75
65
600
450
1240
mm
+/- 5
BATH COLLECTION
mm
+/- 5
Ø52
1700
1174
80
24
400
800
444
450
570
1 ½“
1100
27
8
10
12
14

8
Instructies / Instructions / Instructions / Anweisungen
BATH COLLECTION - EASY
!
3mm
3mm
X1
X1
60'
12h
6
!
3mm
3mm
X1
X1
60'
12h
6
Pre-installatie / Preinstallation / Pré-installation / Vorinstallation
D
Afvoer / Waste / Bonde / Wasserablauf
Vrijstaand / Freestanding / En îlot / Freistehend
Ruimte voor vrijstaande kraan / Area for freestanding tap / Zone pour robinet exemptés / Platz für freistehende Armatur
D
Pre-installatie / Preinstallation / Pré-installation / Vorinstallation
Wall taps / Wall taps / Robinets muraux / Wandhähne
50 mm7≈
1/2”
280 mm
C
H
D
Afvoer / Waste / Bonde / Wasserablauf
Ruimte voor vrijstaande kraan / Area for freestanding tap / Zone pour robinet exemptés / Platz für freistehende Armatur
Koud water / Cold water / Eau froide / Kaltes Wasser
Warm water / Hot water / Eau chaude / Heißes wasser
C
DD
H
Ruimte voor vrijstaande kraan / Area for freestanding tap / Zone pour robinet exemptés / Platz für freistehende Armatur
50 mm7≈
1/2”
280 mm
C
H
D
Afvoer / Waste / Bonde / Wasserablauf
Ruimte voor vrijstaande kraan / Area for freestanding tap / Zone pour robinet exemptés / Platz für freistehende Armatur
Koud water / Cold water / Eau froide / Kaltes Wasser
Warm water / Hot water / Eau chaude / Heißes wasser
C
DD
H
Afvoer / Waste / Bonde / Wasserablauf
mm
+/- 5
Ø52
1700
1174
80
24
400
800
444
450
570
1 ½“
1100
27

9
Instructies / Instructions / Instructions / Anweisungen
BATH COLLECTION - EASY
!
3mm
3mm
X1
X1
60'
12h
6

10
Instructies / Instructions / Instructions / Anweisungen
BATH COLLECTION - CHILL
12h
W
3
5
4
X12
X1
X12
X1
X1
W/2
2
w
1
X2
W/2
30'
12h
W
3
5
4
X12
X1
X12
X1
X1
W/2
2
w
1
X2
W/2
30'
50 mm7≈
1/2”
280 mm
C
H
D
Afvoer / Waste / Bonde / Wasserablauf
Ruimte voor vrijstaande kraan / Area for freestanding tap / Zone pour robinet exemptés / Platz für freistehende Armatur
Koud water / Cold water / Eau froide / Kaltes Wasser
Warm water / Hot water / Eau chaude / Heißes wasser
C
D
D
H
50 mm7≈
1/2”
280 mm
C
H
D
Afvoer / Waste / Bonde / Wasserablauf
Ruimte voor vrijstaande kraan / Area for freestanding tap / Zone pour robinet exemptés / Platz für freistehende Armatur
Koud water / Cold water / Eau froide / Kaltes Wasser
Warm water / Hot water / Eau chaude / Heißes wasser
C
D
D
H
Pre-installatie / Preinstallation / Pré-installation / Vorinstallation
Vrijstaande kraan / Freestanding taps / Robinets exemptés /
freistehender Wasserhahn
Pre-installatie / Preinstallation / Pré-installation / Vorinstallation
Wandkranen / Wall taps / Robinets muraux / Wandhähne
50 mm7≈
1/2”
280 mm
C
H
D
Afvoer / Waste / Bonde / Wasserablauf
Ruimte voor vrijstaande kraan / Area for freestanding tap / Zone pour robinet exemptés / Platz für freistehende Armatur
Koud water / Cold water / Eau froide / Kaltes Wasser
Warm water / Hot water / Eau chaude / Heißes wasser
C
DD
H
Ruimte voor vrijstaande kraan / Area for freestanding tap / Zone pour robinet exemptés / Platz für freistehende Armatur
50 mm7≈
1/2”
280 mm
C
H
D
Afvoer / Waste / Bonde / Wasserablauf
Ruimte voor vrijstaande kraan / Area for freestanding tap / Zone pour robinet exemptés / Platz für freistehende Armatur
Koud water / Cold water / Eau froide / Kaltes Wasser
Warm water / Hot water / Eau chaude / Heißes wasser
C
DD
H
Afvoer / Waste / Bonde / Wasserablauf
50 mm7≈
1/2”
280 mm
C
H
D
Afvoer / Waste / Bonde / Wasserablauf
Ruimte voor vrijstaande kraan / Area for freestanding tap / Zone pour robinet exemptés / Platz für freistehende Armatur
Koud water / Cold water / Eau froide / Kaltes Wasser
Warm water / Hot water / Eau chaude / Heißes wasser
C
DD
H
Koud water / Cold water / Eau froide / Kaltes Wasser
50 mm7≈
1/2”
280 mm
C
H
D
Afvoer / Waste / Bonde / Wasserablauf
Ruimte voor vrijstaande kraan / Area for freestanding tap / Zone pour robinet exemptés / Platz für freistehende Armatur
Koud water / Cold water / Eau froide / Kaltes Wasser
Warm water / Hot water / Eau chaude / Heißes wasser
C
DD
H
Warm water / Hot water / Eau chaude / Heißes wasser
Ø52
800
400
1700
15
1200
520
1 ½“
75
65
600
450
1240
mm
+/- 5

11
Instructies / Instructions / Instructions / Anweisungen
BATH COLLECTION - CHILL
12h
W
3
5
4
X12
X1
X12
X1
X1
W/2
2
w
1
X2
W/2
30'

12
Instructies / Instructions / Instructions / Anweisungen
BATH COLLECTION - COOL
550 mm
350 mm
250 mm
D
Afvoer / Waste / Bonde / Wasserablauf
Ruimte voor vrijstaande kraan / Area for freestanding tap / Zone pour robinet exemptés / Platz für freistehende Armatur
D
Pre-installatie / Preinstallation / Pré-installation / Vorinstallation
Vrijstaande kraan / Freestanding taps / Robinets exemptés / freistehender Wasserhahn
50 mm7≈
1/2”
280 mm
C
H
D
Afvoer / Waste / Bonde / Wasserablauf
Ruimte voor vrijstaande kraan / Area for freestanding tap / Zone pour robinet exemptés / Platz für freistehende Armatur
Koud water / Cold water / Eau froide / Kaltes Wasser
Warm water / Hot water / Eau chaude / Heißes wasser
C
DD
H
Ruimte voor vrijstaande kraan / Area for freestanding tap / Zone pour robinet exemptés / Platz für freistehende Armatur
50 mm7≈
1/2”
280 mm
C
H
D
Afvoer / Waste / Bonde / Wasserablauf
Ruimte voor vrijstaande kraan / Area for freestanding tap / Zone pour robinet exemptés / Platz für freistehende Armatur
Koud water / Cold water / Eau froide / Kaltes Wasser
Warm water / Hot water / Eau chaude / Heißes wasser
C
DD
H
Afvoer /
Waste / Bon
de / Wasserablauf
1 ½“
585
450
75
1400
45
mm
+/- 5
800
275
1700
1090
470
Ø52
30
12h
W
3
5
4
X12
X1
X12
X1
X1
W/2
2
w
1
X2
W/2
30'
12h
W
3
5
4
X12
X1
X12
X1
X1
W/2
2
w
1
X2
W/2
30'

13
Instructies / Instructions / Instructions / Anweisungen
BATH COLLECTION - COOL
12h
W
3
5
4
X12
X1
X12
X1
X1
W/2
2
w
1
X2
W/2
30'

14
Instructies / Instructions / Instructions / Anweisungen
BATH COLLECTION - COOL WALL
1
3
4
5
150 mm
150 mm
2
30'
12h
X1
1
3
4
5
150 mm
150 mm
2
30'
12h
X1
Drainage outlet area
300
150
230
1/2”
300
1,2”
230
500 500
150
1/2”
100
500 500
100
Ruimte voor vrijstaande kraan / Area for freestanding tap / Zone pour robinet exemptés / Platz für freistehende Armatur
DD
C
H
D
Afvoer / Waste / Bonde / Wasserablauf
Koud water / Cold water / Eau froide / Kaltes Wasser
Warm water / Hot water / Eau chaude / Heißes wasser
C
C
H
H
50 mm7≈
1/2”
280 mm
C
H
D
Afvoer / Waste / Bonde / Wasserablauf
Ruimte voor vrijstaande kraan / Area for freestanding tap / Zone pour robinet exemptés / Platz für freistehende Armatur
Koud water / Cold water / Eau froide / Kaltes Wasser
Warm water / Hot water / Eau chaude / Heißes wasser
C
DD
H
Afvoer / Waste / Bonde / Wasserablauf
50 mm7≈
1/2”
280 mm
C
H
D
Afvoer / Waste / Bonde / Wasserablauf
Ruimte voor vrijstaande kraan / Area for freestanding tap / Zone pour robinet exemptés / Platz für freistehende Armatur
Koud water / Cold water / Eau froide / Kaltes Wasser
Warm water / Hot water / Eau chaude / Heißes wasser
C
DD
H
Koud water / Cold water / Eau froide / Kaltes Wasser
50 mm7≈
1/2”
280 mm
C
H
D
Afvoer / Waste / Bonde / Wasserablauf
Ruimte voor vrijstaande kraan / Area for freestanding tap / Zone pour robinet exemptés / Platz für freistehende Armatur
Koud water / Cold water / Eau froide / Kaltes Wasser
Warm water / Hot water / Eau chaude / Heißes wasser
C
DD
H
Warm water / Hot water / Eau chaude / Heißes wasser
Maten in milimeters / Measurements in millimeters / Mesures en millimètres / Maße in Millimeter
mm
+/- 5
1 ½“
570
420
75
1400
800
270
1700
1110
500
Ø52
40
85
65
Usual tap position, mounting 1
Pre-installatie / Preinstallation / Pré-installation / Vorinstallation
Vrijstaande kraan / Freestanding taps / Robinets exemptés / freistehender Wasserhahn
Tap holes: use a fine-toothed hole saw

15
Instructies / Instructions / Instructions / Anweisungen
BATH COLLECTION - COOL WALL
1
3
4
5
150 mm
150 mm
2
30'
12h
X1

HAN-BATH | 03-2022-003
NL Voor servicemeldingen kunt u terecht bij de partij
waar u ons product heeft aangeschaft.
Wijzigingen voorbehouden. Onder voorbehoud van
druk- en zetfouten. Afmetingen zijn indicatief. LoooX
B.V. is niet aansprakelijk voor schade die zou kunnen
voortvloeien uit het gebruik maken van uw LoooX
product(en).
EN For complaints please contact the party from whom
you purchased the product.
Subject to change without notice. Subject to printing
and typographical errors. Dimensions are indicative.
LoooX BV excludes any liability arising from using
and/or installing LoooX product(s).
FR
Pour les plaintes s’il vous plaît contacter la partie
où vous avez acheté le produit. Sous réserve de
fautes d’impression. Sous réserve de modifications.
Sous réserve d’erreur et de fautes d’impression. Les
dimensions sont données à titre indicatif. LoooX BV
n’est pas responsable de dommages résultant de
l’utilisation et du montage de produits LoooX.
DE Bei Reklamationen werden Sie sich bitte an Ihre
Bezugsquelle. Änderungen vorbehalten. Druck- und
Satzfehler vorbehalten. Die Abmessungen dienen
zur Orientierung. LoooX BV schließt jegliche Haftung
für Schäden aus, die sich aus der Verwendung und/
oder der Montage von LoooX-Produkten ergeben.
looox.eu
info@looox.eu
This manual suits for next models
3
Table of contents
Popular Bathtub manuals by other brands

American Standard
American Standard Scala Oval 2645.002 Specification sheet

Jacuzzi
Jacuzzi ARGA FREE-STANDING Installation

harma
harma MT-RT1804 Instructions of installation

American Standard
American Standard Williamsburg Elite 2425E SERIES installation instructions

Jacuzzi
Jacuzzi AnimaDesign installation manual

Kohler
Kohler K-1013 Roughing-In Guide

Fisher-Price
Fisher-Price DRD93 quick start guide

American Standard
American Standard Williamsburg Elite Whirlpool 2805E parts list

Signature Hardware
Signature Hardware Boyce 925340-61 manual

American Standard
American Standard Elevate RHO 2576102 owner's manual

AMERICH
AMERICH TURO 6036 RH Assembly instructions

Jacuzzi
Jacuzzi SHARP 170x70 Installation