Looperlative LP1 Gen B User manual

LP1
Gen B
Version 2.49
User Manual
July 26, 2020

Table of Contents
Front Panel.......................................................................................................................... 4
Back Panel........................................................................................................................... 5
Getting Started .................................................................................................................... 5
Quick Start...................................................................................................................... 5
Setting Audio Levels...................................................................................................... 6
Recording your first loop ............................................................................................... 6
Menu Operation .................................................................................................................. 6
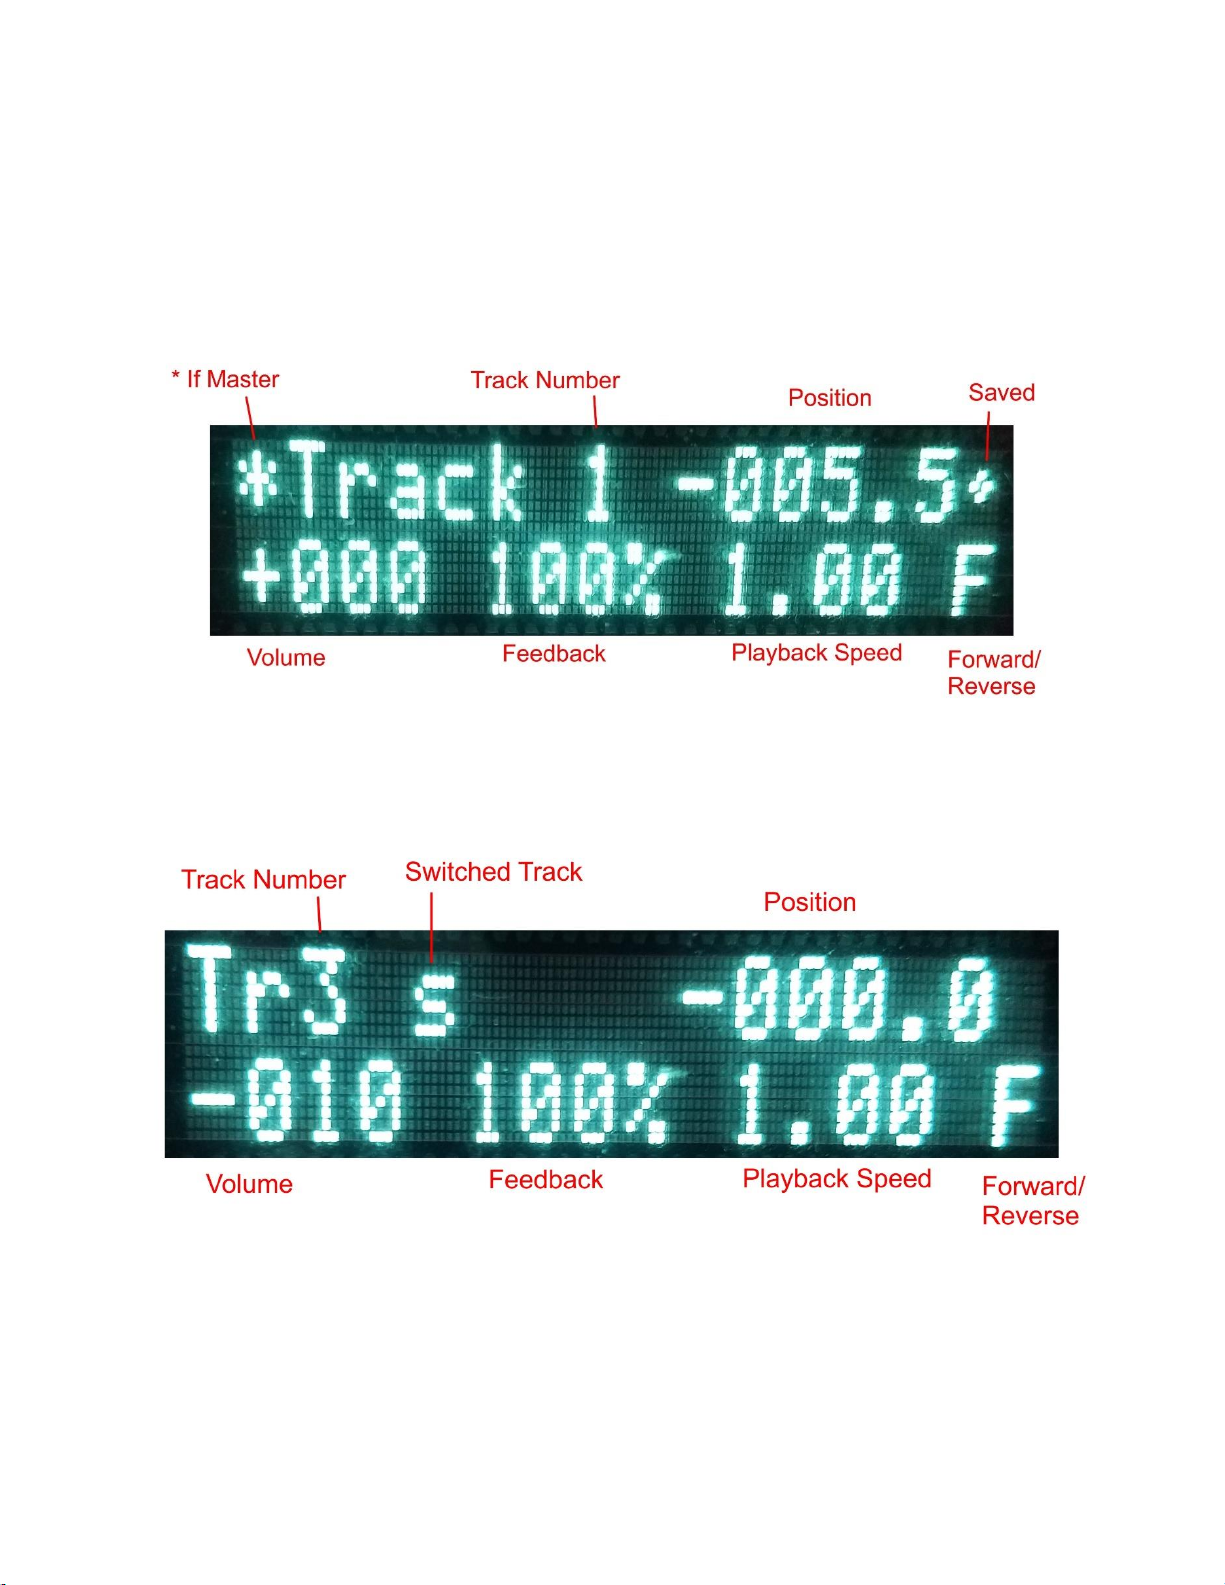
Track Display...................................................................................................................... 7
Undo.................................................................................................................................... 9
Recording and Playing Loops............................................................................................. 9
Recording a new unsynchronized loop .......................................................................... 9
Recording a new internally synchronized loop.............................................................. 9
Recording a new MIDI synchronized loop .................................................................. 10
Starting and stopping a recorded track......................................................................... 11
Creating Song Sections ................................................................................................ 11
Switch Record................................................................................................................................. 11
Switch Play ..................................................................................................................................... 11
Switch Play + CKSR....................................................................................................................... 11
Using Switched Commands............................................................................................................ 11
Changing Switch Behavior From End of Part to End of Clock Source.......................................... 12
Changing Switched Tracks ............................................................................................................. 12
Track Bouncing............................................................................................................ 12
Cue Track..................................................................................................................... 13
Replace......................................................................................................................... 13
Quantified Functions.................................................................................................... 13
Q Replace........................................................................................................................................ 14
Q MIDI Sync Rec ........................................................................................................................... 14
Random Restart............................................................................................................ 14
Audio Manipulations......................................................................................................... 15
Volume Control............................................................................................................ 15
Fade/Swell.................................................................................................................... 15
Pan Control................................................................................................................... 15
Feedback Control ......................................................................................................... 15
Audio Level Presets ..................................................................................................... 16
Track Volume Fade/Swell............................................................................................ 16
Reverse......................................................................................................................... 16
Speed Changing............................................................................................................ 16
Stretching/Shrinking..................................................................................................... 17
Mellotron Mode............................................................................................................ 17
Scramble....................................................................................................................... 17
Re-trigger ..................................................................................................................... 17
Configuring the LP1.......................................................................................................... 17
Edit Group.................................................................................................................... 18
MIDI Channel .............................................................................................................. 18

Noise Gate.................................................................................................................... 18
Wet/Dry Mix ................................................................................................................ 19
Time Display................................................................................................................ 19
Pedal Mode................................................................................................................... 19
MIDI Clock Out ........................................................................................................... 20
Programming the LP1 to use MIDI pedals or dials...................................................... 20
CC De-jitter.................................................................................................................. 21
MIDI or USER Button Configuration.......................................................................... 21
Advanced MIDI or User Button Configuration ........................................................... 21
Network configuration ................................................................................................. 22
Assignable Functions ................................................................................................... 22
Tips and Special Techniques: ........................................................................................... 27
Chorus/Verse/Bridge (deprecated)............................................................................... 27
Software Upgrades............................................................................................................ 28
LIMITED WARRANTY................................................................................................. 28

Front Panel
Front panel features:
1. Display shows current LP1 menu item. Initially the display shows “Looperlative LP1”,
hardware generation and software version number.
2. Knob is used to change menu item or menu item value. See “Menu Operation”.
3. Menu Button is used to move to previous menu. See “Menu Operation”.
4. Record/Overdub Button is a multifunction button that:
a. Records if track is stopped or empty,
b. Overdubs if track is playing or recording, or
c. Erases if button is held for 2 seconds.
5. User Buttons are programmable buttons. See “MIDI or USER Button Configuration”.
6. Track Indicator Lights are described in this table:
Light color and action
Track state
Light off
Track empty
Light blinking red
Audio recording to the track
Light blinking green
Audio overdubbing on the track
Light solid red
Audio recorded to the track, but the track is not playing
Light solid green
Audio recorded to the track and it is playing
7. Enter Button is used to select current menu item or select currently showing value on the
display. See “Menu Operation”.
8. Play/Stop Button is a multifunction button that:
a. Changes track to play mode if recording, overdubbing or stopped,
b. Changes track to stopped mode if playing,
c. Creates empty track same length as the clock source track if empty and the clock source
track is playing, or
d. Stops track immediately if button is held for 2 seconds.
9. All Tracks Button selects all tracks.
10. Individual Track Buttons select an individual track. If one of these buttons is held for 2
seconds, it opens a mode for selecting multiple tracks.

Back Panel
1. Power accepts the connector from the adapter supplied with the LP1. The LP1 requires a 9
VDC power supply capable of supplying at least 1A of power.
2. Network is used to connect a standard Ethernet cable. The LP1 GenB does not require cross-
over cables because it autodetects cable connection type. By default, the LP1 is configured to
automatically obtain its network configuration from a DHCP server or use an auto IP address if
there is no DHCP server on the network. Auto IP allows connecting an LP1 directly to a
computer Ethernet port without an additional router. The computer must support auto IP
configuration. For DHCP, the LP1 must be connected to a network with a DHCP server. This
is often your home router. You may instead manually configure the IP address, gateway
address, DNS server address, and netmask. All of these must have a value other than
000.000.000.000 otherwise the LP1 will attempt automatic configuration. Manual
configuration is described in “Network configuration”.
3. MIDI in is used to provide MIDI control and clock to the LP1.
4. MIDI through sends back out everything received on MIDI in.
5. MIDI out is used to send MIDI clock out to another device.
6. Audio In is two ¼ inch unbalanced audio connectors that accept line level inputs.
7. Audio Out is two ¼ inch unbalanced audio connectors that are the main outputs.
8. Aux 1 Out is two ¼ inch unbalanced audio connectors that are the aux 1 outputs.
Getting Started
Quick Start
⚫Unpack the LP1 from shipping carton. Please save shipping carton.
⚫Mount the LP1 in an empty space in your rack. The LP1 is not designed for desktop use. Please
properly mount your LP1 in a rack case or floor-standing rack.
⚫Connect the audio source to the audio inputs on the rear panel. The LP1 accepts unbalanced tip-ring
1/4” connectors. The audio inputs accept line levels or in some cases instrument levels. Never
connect an audio source that exceeds 5V peak-to-peak.
⚫Connect the audio outputs to line-level inputs on your amplifier, mixing console, or other effects
boxes.
⚫If you are using a remote MIDI controller, attach it with a MIDI cable to the MIDI input connector
on the back of the LP1.
⚫Plug the cable of the supplied power adapter into the power connector on the back of the LP1. The
LP1 requires 9VDC 1A power.
⚫Plug the power adapter into an appropriate power outlet.

⚫Turn on the power to your LP1.
⚫Your LP1 will display “LP1 booting ...”
⚫After about 8 seconds, the LP1 will display “Looperlative LP1” on the top line and the software
version on the bottom line.
Setting Audio Levels
To get the best possible audio from your sound system. It is important to correctly set audio levels.
When the display is left at the top menu where the software version is displayed for 10 seconds, then
the display will show input level on the top line and output level on the bottom line. These are the
levels of the digital audio within the unit. If possible, adjust signal levels with other equipment. If this
is impossible, then it is possible to adjust the trimmer pots within the LP1 GenB. There are 6 trimmers:
right and left input, right and left output, and right and left aux out. These trimmers require a small
screw driver to adjust the gain. You should always unplug the LP1 before removing the lid.
If the input audio level is too low or too high, adjust the volume on your audio source. Audio levels
should be set as high as possible without distortion.
When using multiple tracks or overdubbing it is possible to overdrive the output of the LP1 and cause
distortion. If this occurs, adjust the “All Main Level” from the “All Tracks” menu. A setting of -1 or -
2 is often enough.
Recording your first loop
⚫Press “REC/DUB” to begin recording.
⚫Play your musical phrase that you want looped.
⚫Press “REC/DUB” to end the loop and enter overdub mode.
⚫When you have completed overdubbing to the track, press “REC/DUB” one more time to change
from overdub mode to play mode.
⚫Press “PLAY/STOP” to stop playback of the loop.
Menu Operation
The selector knob allows you to scroll through menu items and to change the value of a menu item.
Menu items are displayed on the second line of the panel. To select a menu item:
⚫Turn the knob until the menu item is displayed.
⚫Press ENTER.
To change the value of a menu item:
⚫Select the menu item.
⚫Turn the knob until the value you want to select is displayed.
⚫Press ENTER
The MENU button returns the display to the previous menu.

The track selection buttons select a track for recording or changing. After selecting a track, turn the
knob to select a menu choice. Selecting a track also allows you to record, overdub, start or stop that
track.
Track Display
When a track is selected, the menu shows information about the track. The basic display which is the
default looks like this:
From the main menu item “Simple Display”, you can choose the option “Expert” instead of “Basic”.
The expert display is slightly different as can be seen in the following images.
Tracks that are designated in the configuration as switched tracks (see Creating Song Sections) will
have a small “s” to indicate the track will be switched.

MIDI synchronized tracks will indicate the MIDI clock on the display.
Tracks that were recorded using Sync Record will be indicated on the display.
Tracks recorded with the normal Rec/Dub show up as an asynchronous track. This also includes a
clock source track because clock source tracks are recorded as asynchronous. The subsequent child
tracks will show as synchronous as shown in previous picture.

Undo
Undo is available in the LP1. It is per-track and there are multiple undos per track. This feature is
limited by the available memory in the LP1. For a Gen B LP1, this is around 10 minutes of total audio
time. Many manipulations can be undone such us overdub, replace and scramble. Undo layers are
created when a track changes. If a track changes another time before the undo layer is completed, then
the incomplete layer is abandoned and a new layer is created. This means that changes made in close
succession may be saved together on a single undo layer.
If the audio memory runs out, the oldest undo layer from any track is thrown away. The LP1 always
maintains preference on retaining the newest undo layers.
Recording and Playing Loops
Recording a new unsynchronized loop
To record a loop to a track:
⚫Select an empty track (track light is off).
⚫Press the REC/DUB button or press the MIDI button assigned to this function.
⚫Play the audio that you want to record.
⚫Press the PLAY/STOP button or the MIDI button assigned to this function to begin looping the
audio.
Recording a new internally synchronized loop
Synchronized loops are loops that are locked in time with each other. In other words, if you have two
tracks, the music in those tracks will always stay together. You synchronize a loop to the clock source
track. By default, the clock source track is the first loop recorded. You can change the clock source
track at any time, which will not affect previous synchronizations.
Any track can be selected as the clock source track using the track menu. To select a clock source
track:
⚫Press the track number button.
⚫Turn the knob until the front panel displays, "Set As Clock Src."
⚫Press ENTER.
Or,
⚫Do nothing, and the first loop recorded will be the clock source track.
There are two methods available to create new synchronized tracks. The first method creates a
synchronized track that is the same length as the clock source track.

Method 1 for creating a new synchronized track:
⚫Select an empty track.
⚫Press the PLAY/STOP button or equivalent MIDI button. This will create an empty loop of the
same length as the clock source track.
⚫Press the REC/DUB to begin overdubbing on the new empty track.
⚫Play the audio that you want to record.
⚫Press the PLAY/STOP button to end overdubbing and continue looping.
Method 2 for creating a new synchronized track:
⚫Select an empty track.
⚫Choose the Sync Rec/Dub function or equivalent MIDI button. This begins the recording of a new
synchronized track.
⚫Press REC/DUB or the same button as in the last step to end the track and enter overdub mode on
the new track.
⚫Press REC/DUB or the same button as in the last step to stop overdubbing and simply replay the
loop.
Recording a new MIDI synchronized loop
It is possible to use an external MIDI clock source such as a drum machine to create loops that stay
synchronized. Recording new MIDI synchronized tracks is very similar to method 2 of recording
internally synchronized tracks. However, before you record a MIDI sync track, you need to tell the
LP1 how many beats per measure there are. This allows the LP1 to create loops which consist of only
complete measures. To set the number of beats measure:
⚫Press the ALL button on the front panel.
⚫Turn the knob until the bottom line reads “Beats / Measure”.
⚫Press the ENTER button.
⚫Turn the knob until the current number of beats per measure are displayed.
⚫Press the ENTER button.
After the measure length has been configured and the MIDI clock source is sending clock messages to
the MIDI input port of the LP1, you may now record a MIDI sync track. To do this:
⚫Select an empty track.
⚫Choose the MIDI Sync Rec function or equivalent MIDI button to start recording.
⚫To end recording and enter overdub mode, press the same button used in the last step.
⚫Finally, press the same button one last time to exit overdub mode.
⚫Your new loop will now be synchronized with the MIDI clock.
If your MIDI clock fluctuates a bit, the LP1 will adjust playback to remain synchronized. The LP1 will
try to remain synchronized even if you alter the MIDI clock speed. The results of changing speed are
unpredictable and if the speed is changed by a large enough amount the LP1 will lose synchronization.
However, this can be an interesting musical technique.

Starting and stopping a recorded track
The PLAY/STOP button starts and stops playback of a track when it is not currently overdubbing or
recording. This button is synchronized to the end of loop. Using this button to stop a playing track will
be delayed until the loop ends. A USER button or MIDI button can be programmed to perform a “Stop
Now” function which does not wait for the end of the loop. Also, “Stop Now” can be selected from the
track menu.
To stop all the playing tracks, press the ALL button and then the PLAY/STOP button. The “Stop
Now” functions are also available for stopping all tracks.
An important thing to know is that the stop function acts as a mute. To maintain synchronization of
synchronized tracks, the audio position of a stopped track continues to move in time. When all tracks
are stopped, then the first track to be played will cause all the tracks to shifted in time to allow the track
to start playing at its beginning. If more than one track is started after all tracks are stopped, the LP1
will shift all the tracks to allow the longest track to restart at its beginning.
Creating Song Sections
To help create songs with multiple sections, the LP1 can use different tracks for different sections.
These tracks are called switched tracks. By default, tracks 3, 4, 5 and 6 are switched tracks. Switched
tracks can be asynchronous tracks or synchronous tracks. Typically, track 1 will be recorded as a
rhythm track. As the first track recorded, this track will automatically become the clock source track.
The following functions which can be assigned to buttons are then used to create and select song
sections.
Switch Record
Switch Record stops all other switched tracks at their end, then starts recording of the current track
when that happens. If already recording, Switch Record ends recording. The newly created track will
be synchronized with the clock source track.
Switch Play
Switch Play stops all other switched track at their end, then starts playing the current track when that
happens. Switch Play will also stop recording of another switched track.
Switch Play + CKSR
Switch Play + CKSR is the same as Switch Play, but will also start the clock source track if it is
stopped.
Using Switched Commands
To create a song with part A and part B:
1. Select track 1.
2. Set clock source.
3. Record the rhythm part.
4. Select track 3.
5. Switch Record to record part A at the next start of the clock source track.
6. Switch Record to end recording (or any other overdub or play function).

7. Select track 4.
8. Switch Record to record part B at next end of part A.
9. Switch Record to end recording (or any other overdub or play function).
10. Select track 3.
11. Switch play to switch back to part A at the end of part B.
12. Select track 4.
13. Switch play to switch back to part B at the end of part A.
Changing Switch Behavior From End of Part to End of Clock Source
From the main menu, selecting the menu item “Switch Priority” will allow you to change whether the
switch function operates on the end of the other part or the end of the clock source track. By default,
switch is at the end of the previous part. There are some people that would prefer switching at the next
end of the clock source track instead. This could cut the previous part short if it is longer than the clock
source track.
Changing Switched Tracks
The main menu item “Edit Switched” will allow you to change which tracks are designated as switched
tracks.
Track Bouncing
Because the LP1 is designed to treat each track as an independent looping box, it will sometimes be
desirable record a new track from the output of an existing track. This would be the same as taking the
output of one looping box into the input of another. The original track can be altered using the various
audio manipulations allowed in the LP1, and that altered output will be recorded into the bounce track.
Track bouncing can also be used to capture a small portion of a larger loop and repeat it.
There are three bounce functions the same as there are three record functions: bounce, sync bounce,
and MIDI sync bounce. The bounce function is asynchronous. The first tap of the bounce button starts
the recording and the second tap immediately ends the recording.
The sync bounce function is nearly the same as the asynchronous bounce except that the end of the
recording is delayed after the second tap until the new loop is an integer multiple of the clock source
track length. The sync bounce function thus gives you a new loop that will remain synchronized with
the clock source track.
The MIDI sync bounce gives you a new track that is synchronized with the MIDI clock. The MIDI
sync bounce also makes use of the beats per measure setting in the all track menu. When this type of
bounce is used, the new track will be an integer number of measures long based on the MIDI clock and
the number of beats per measure programmed in the LP1.
Unlike the record functions, the bounce function is always ended by pressing the same button used to
start the bounce. After recording ends on the new track, all tracks that are being recorded into the
bounce track are stopped. They may be immediately restarted if you desire.
The bounce function automatically chooses the new track that you will record. It always picks the
highest numbered track that is currently empty (the front panel light is off). If no track is empty, then
the bounce function will not start.

Cue Track
The cue function is used to mark a track as ready to play or record. When used on an empty track, it
prepares a track to record the next time that any other track stops. When used on a stopped track, it
prepares the track to begin play the next time that any other track stops. This can be used to switch
between sections of a song.
Replace
Replace records new audio while erasing the old audio in a track. Press replace once to begin replacing
and press it a second time to end replacing. The replace function may also be assigned to a MIDI note.
In this case, the replacement starts when the note is pressed, and replacement ends when the note is
released.
There are two varieties of this function: replace and replace+original. The replace function replaces
while silencing the old audio that is being replaced. The replace+original function continues to play
the replaced audio one last time during the replace.
Quantified Functions
There are some situations where it is desired to operate on exact time divisions of a loop. For example,
substituting one quarter note in a loop that makes up one measure in 4/4 time. In this case, a
quantization value of 4 will be needed to divide the loop in 4 pieces. In MIDI sync recording, we may
want to record an exact number of measures. In these situations, we use quantified functions.
There are three ways to set the quantization value.
1. Each track menu has an option “Set Q Steps”.
2. MIDI CC message can set the value for all tracks.
3. Button programming can be used to assign a value at a button press.
“Set Q Steps” in the track menu sets the quantization value on a per track basis and saves the new value
to the configuration. This is the only method that is guaranteed to save to the configuration although
the other methods may save their value. Simply press ENTER when the track menu shows “Set Q
Steps”, then turn the dial to select the new value and press ENTER again.
By default, MIDI CC 126 can be used to transmit a new quantization value for all tracks. This changes
the configuration but doesn’t immediately save it. If you power off the LP1 before changing any other
configuration values, the new value will be lost until sent again. The main menu also allows changing
which Continuous Controller (CC) sends the value. The main menu item “Quant CC Num” is used to
set which controller can change the quantization value.
When programming buttons (see MIDI or USER Button Configuration), the options that look like
“Quant Value 4” will set the quantization for all tracks. This is similar to the MIDI CC behavior in
previous paragraph. Since each button can have multiple functions, you can set the quantization value
and then immediately run the quantized function from the same button.

Q Replace
Q Replace is very similar to the replace function described in an earlier section. It is used to replace all
or a portion of a loop. It differs from replace in that it is based on specific divisions of the original
loop. When you press Q Replace, it does not begin replacing until the next division is reached and
when ending the replace, it also waits until the next division is reached.
This is useful when creating rhythmic replacements of the original loop. For example, if a loop
contains one measure in 4/4 time. You can replace individual eighth notes by setting the number of q
steps to 8 and using two Q Replace functions in quick succession.
Q MIDI Sync Rec
This function allows you to record an exact number of measures of a MIDI synchronized track. Like
MIDI Sync Rec, you need to set the number of beats per loop in the ALL track menu. Once that is set,
the quantization value will be used to record an exact multiple of the beats per loops. For example, if
beats per loop is 4 and the quantization value is 2, then 8 beats will be recorded. If you set beats per
loop to 1, then the quantization value can be used to record an exact number of quarter notes.
The LED for this function is odd compared to other record functions. Because the exact length of the
loop is predetermined, the loop is set blank and immediately changes to overdub mode. It will
automatically switch from overdub to play mode at the end of the loop.
Random Restart
This function triggers a track to play once, then pause for a random amount of time before playing
again. After each playing of the loop, the pause length is randomly chosen resulting in a track that
plays at unpredictable times. To turn off random restart, you must use a stop function on the track.
To adjust the minimum and maximum pause lengths, there are two main menu items: “Rnd Restart
Min” and “Rnd Restart Max”. These set the minimum and maximum number of seconds to pause
between playing.
If you are using the expert display, a small “r” will appear on tracks that are in random restart mode.
Saving and Loading Track Audio
Track audio can be saved to the internal microSD storage card. Typically, this card is a 16GB card.
This storage is maintained even with the power turned off. Storage is done on a per track basis. To
save your audio, select a track and then use the front panel knob to select “Save Audio”. When you hit
ENTER, you will be prompted to choose a save slot to store the audio for this track.
To bring the audio back into this or another track, select the track that you want to receive the stored
audio. Then turn the knob to select “Load Audio”. Again after you press ENTER, you will be
prompted to select the save slot that you want to load from.

Audio Manipulations
Being able to record and play multiple loops is useful for musicians. However, the LP1 doesn't stop
there. The LP1 is capable of altering the audio in a recorded loop in several ways. These
manipulations can be used to assist in creating a unique musical composition that otherwise could not
exist without the assistance of the looper.
Volume Control
The volume level of each track can be individually controlled via the front panel or through a MIDI
controller. A desktop MIDI control panel can be used to adjust volumes providing a mixing console
feel.
In the Main Menu, “Volume Minimum” sets the lowest volume value that a controller will go down to.
By default, this number is -127, but a value near -60 is often better.
In the All Track menu, you can save and use volume presets. Volume presets remember the current
volume, pan and feedback settings for all tracks. Saving to preset 0 will determine the volume settings
that are used when the LP1 powers on.
Fade/Swell
The LP1 can automatically change volume to fade out or swell in. Fade and swell alter the volume
setting of the track to create the effect. After using fade, you will need to restore the volume to normal
levels to hear any new material placed on that track. This can be done in one of several ways:
⚫Swell will slowly restore the volume back to its normal level in a reverse effect of fade.
⚫An expression pedal assigned to track volume can be used to move the volume back to full.
⚫The volume menu item on the front panel can be used to restore the track volume.
⚫A volume preset can be used to restore all tracks back to a known setting.
Two settings in the LP1 control the operation of fade and swell. In the All Tracks menu, “Fade Time”
is used to determine how many seconds it takes for the fade to complete. In the Main Menu, “Volume
Minimum” sets the lowest volume value that fade will go down to. By default, this number is -127, but
a value near -60 is often better.
Pan Control
Each track can be panned left or right of center to create a more 3-dimensional feel. MIDI control and
front panel control are available for this feature.
Feedback Control
Audio delay lines normally have a feedback control. At 100%, all of the audio that exits the delay line
is reinserted at the beginning of the delay. At 0%, none of the audio is sent back to the beginning.

Thus, the feedback level determines how much of the delay output is sent back to the beginning after it
is heard delayed.
An audio loop is a long delay line. Audio heard playing from a loop is considered the same as audio
exiting a delay line. If the feedback setting on a track is reduced below 100%, then the audio sample is
reduced by the feedback setting after it is played. Thus, any feedback setting below 100% will cause a
loop to fade. The lower the feedback setting, the faster it will fade.
The feedback setting can be controlled in different ways. The first way is through the track menu.
There is a menu option to change the feedback level.
The second way to adjust feedback is to assign a MIDI controller. See the section on programming
MIDI controllers to learn how to assign your MIDI controller to the track feedback level.
The last way is to assign buttons to adjust the feedback level. This is useful if you have a MIDI remote
control that only has buttons.
Audio Level Presets
Track level, pan, and feedback levels for all tracks can be stored into presets that can be recalled from a
single button press or via the front panel menu. To save a preset, set track volume, pan and feedback
on all tracks to the desired levels. From the ALL track menu, select “Save Preset #” where “#” is the
preset number that you wish to save. Preset 0 is special because it is automatically loaded when the the
LP1 is turned on.
Track Volume Fade/Swell
The fade function will slowly lower the track volume until it reaches -127. The fade function
remembers the starting volume. The swell function can be used to slowly increase the volume to the
remembered starting volume.
Reverse
The reverse function causes the audio to play back in the reverse direction. This would be similar to
reversing the direction of an audio tape that is playing. Reversing a track that is playing in reverse will
cause it to play forward again.
Pressing reverse while recording a new loop will cause the loop to be ended and will immediately play
back the new loop in reverse.
Speed Changing
The LP1 can change the playback speed of a track. Changing the speed will alter both the timing of the
notes and the pitch of the notes. Changing the speed of a track to half-speed will shift the notes one
octave down. Overdubbing is allowed on a track that has been slowed below normal speed. When the

speed is increased again, the overdubbed audio will increase in pitch.
Speed can be toggled between half and normal using the track menu or by using a button assigned to
the half-speed function. The LP1 also allows you to assign a MIDI controller such as a pedal to speed
control. This allows you to adjust a track speed to values between half and normal.
Stretching/Shrinking
The LP1 can stretch or shrink a track without changing pitch. Note that this is an imperfect
transformation that can result in some artifacts in the audio. Use at your own discretion. From the
track menu, you can select on of the following menu items:
Shrink to 50%
Halves the time of the loop
Stretch to 200%
Doubles the time of the loop
Stretch
Allows selection of various stretches from 5% to 200%. Note that some of the
values may have significant artifacts depending on the audio.
Mellotron Mode
The original Mellotron used tape loops to generate notes from different sounds. The LP1 offers a set of
functions to alter the speed of a loop to generate different notes in a scale. These functions are Octave
Lower, Minor 2nd, Major 2nd, Minor 3rd, Major 3rd, 4th, Diminished 5th, 5th, Minor 6th, Major 6th, Minor
7th, Major 7th, and Original Note. These functions change the speed of the looping track. Original Note
is normal speed and Octave Lower is half speed. All the other steps are in between Octave Lower and
Original Note. Because of this, you will need to select Octave Lower before recording if you wish to
use notes higher than the original note.
Scramble
A unique feature of the LP1 is the ability to randomly scramble a track. The scrambling divides a loop
into smaller chunks. These chunks are then randomly reordered during playback. Three different
varieties of the scramble function are available: slow, medium, and fast
Pressing scramble on a scrambled track will restore it to normal. Each time a track is scrambled, it is
scrambled in a different order. If a track is left scrambled, the pattern will repeat each time through the
loop.
Re-trigger
The “play re-trigger”function does two things. If the track is stopped, it will begin playing it from the
beginning of the track. If the track is already playing, it will instantly rewind back to the beginning of
track and start playing from there again. Repeatedly using this function creates a stutter effect.
Configuring the LP1

The LP1 main menu offers ways to configure the device for your specific needs. This section of the
document is devoted to the options seen in the main menu.
Edit Group
Track groups are used to manipulate more than one track with a single command. Grouping can be
used to create song sections which can be stopped and started together. Grouping can also be used with
track bouncing to combine several tracks into a single track.
To create a new group:
⚫Press the MENU button until the main menu is selected. The main menu says “Looperlative LP” on
the top line of the display.
⚫Turn the knob until the second line of the display reads “Edit Group.”
⚫Press ENTER
⚫The top line will read “Select group:”
⚫Turn the knob to select the group that you wish to edit.
⚫Press ENTER.
⚫The top line will now indicate the group number that you selected.
⚫Press the track buttons for the track that you want in this group. The track buttons are toggle
controls. The first press adds the track, the next press removes the track. The display shows which
tracks are selected on the second line.
⚫Press ENTER when you have selected the tracks that you want in this group.
⚫Press MENU to return to normal operating mode.
MIDI Channel
To change the MIDI channel that the LP1 responds to:
⚫Press the MENU button until the main menu is selected. The main menu says “Looperlative LP” on
the top line of the display.
⚫Turn the knob until the second line of the display reads “MIDI channel.”
⚫Press ENTER
⚫The top line will read “MIDI channel”
⚫Turn the knob to select the channel that you wish.
⚫Press ENTER.
Noise Gate
The LP1 contains a built-in noise gate to assist in eliminating noise build up when using overdub. The
default settings are adequate for most circumstances. If you need to adjust it, there are two parameters:
noise gate level and noise gate delay.
Both parameters are adjusted in a similar manner:
⚫Press the MENU button until the main menu is selected. The main menu says “Looperlative LP” on

the top line of the display.
⚫Turn the knob until the second line of the display reads “Noise Gate Level” or “Noise Gate Delay”.
⚫Press ENTER
⚫The top line will read “Noise Gate Level” or “Noise Gate Delay.”
⚫Turn the knob to select the setting that you wish.
⚫Press ENTER.
Wet/Dry Mix
The main output normally outputs the audio in and the track audio. If you want to output only the track
audio and not the input audio, then the wet/dry mix needs to be set to wet only. To do this:
⚫Press the MENU button until the main menu is selected. The main menu says “Looperlative LP” on
the top line of the display.
⚫Turn the knob until the second line of the display reads “Wet/Dry Mix”.
⚫Press ENTER
⚫The top line will read “Wet/Dry Mix.”
⚫Turn the knob to select the setting that you wish.
⚫Press ENTER.
Time Display
The LP1 normally shows track times increasing from 0 at the beginning. If you prefer to see this
reversed where the display indicates time until the end of the loop, you can change the setting from the
main menu:
⚫Press the MENU button until the main menu is selected. The main menu says “Looperlative LP” on
the top line of the display.
⚫Turn the knob until the second line of the display reads “Time Display”.
⚫Press ENTER
⚫The top line will read “Time Display.”
⚫Turn the knob to select the setting that you wish.
⚫Press ENTER.
Pedal Mode
The LP1 normal respond immediately to pedal changes. However, when switching tracks this can lead
to sudden jumps in volume or feedback level. The LP1 offers a mode where pedal changes don't occur
until the pedal is brought to about the same location that it was the last time it was changed on the
current track. This mode is called “catch first”.
To change the setting:
⚫Press the MENU button until the main menu is selected. The main menu says “Looperlative LP” on
the top line of the display.
⚫Turn the knob until the second line of the display reads “Pedal mode”.
⚫Press ENTER

⚫The top line will read “Pedal mode.”
⚫Turn the knob to select the setting that you wish.
⚫Press ENTER.
MIDI Clock Out
The LP1 is capable of providing a MIDI clock output. This is used to synchronize another LP1, a drum
machine, or any other device that accepts a MIDI clock input. The clock output is based on the length
of the first track and the number of beats per measure configured in the ALL track menu.
To enable MIDI clock output from the main menu:
⚫Press the MENU button until the main menu is selected. The main menu says “Looperlative LP” on
the top line of the display.
⚫Turn the knob until the second line of the display reads “MIDI Clock Out”.
⚫Press ENTER
⚫The top line will read “MIDI Clock Out.”
⚫Turn the knob to select the setting that you wish.
⚫Press ENTER.
Selecting tracks by changing volume or feedback
When using multiple MIDI continuous controllers (CC) to change volume or feedback, the LP1 can be
programmed to automatically change track to the last track modified by a MIDI CC message. To
enable this feature:
⚫Press the MENU button until the main menu is selected. The main menu says “Looperlative LP” on
the top line of the display.
⚫Turn the knob until the second line of the display reads “Track Follows CC”.
⚫Press ENTER
⚫The top line will read “Track Follows CC.”
⚫Turn the knob to select the setting that you wish.
⚫Press ENTER.
Programming the LP1 to use MIDI pedals or dials
The LP1 can accept MIDI CC messages to control volume and feedback. To program a MIDI pedal,
follow the following procedure:
⚫Press the MENU button until the main menu is selected. The main menu says “Looperlative LP” on
the top line of the display.
⚫Turn the knob until the second line of the display reads “Calibrate Pedal.”
⚫Press ENTER.
⚫The display will read “MIDI controller?”
⚫Change the pedal position and then press ENTER.
⚫The display will read “Move nn To Min.” “nn” will be replaced by the CC number of the pedal.
⚫Move the pedal to its minimum position.
Table of contents