Lorelli HARMONY User manual

HARMONY
C a r s e a t / С т о л ч е з а к о л а
MANUAL INSTRUCTION
ИНСТРУКЦИЯ ЗА УПОТРЕБА
GROUP 1, 2, 3 ( 9- 36 kg )
ECE R44 / 04
R

СЪДЪРЖАНИЕ / CONTENT
Manual Instruction.............................................................................................................8
Инструкция за употреба................................................................................................11
Instrucţiuni de utilizare....................................................................................................15
Instrukcja użytkownika....................................................................................................19
Mode d’emploi ................................................................................................................23
Istruzione per l’uso..........................................................................................................27
ΟΔΗΓΙΕΣ ΧΡΗΣΗΣ ΚΑΡΕΚΛΑΣ.....................................................................................31
Упатствата за употреба................................................................................................35
Инструкция по експлуатации........................................................................................39
Uputstvo za upotrebu..43
Kullanim talimati......................47
Használati utasítás.................52
Insruksion për përdorim..........56
EN
BG
RO
PL
FR
IT
GR
MK
RU
TR
HU
AL
SRB HR
ME BIH
2
IT-Scansiona il codice QR per ottenere maggiori informazioni sul prodotto e istruzioni manuali in più lingue. Scarica l'app QR
Scanner sul tuo dispositivo.
AL-Skanoni kodin QR për të marrë më shumë informacion rreth produktit dhe për të hapur manualin në më shumë gjuhë.
Shkarkoni aplikacionin QR Scanner në celularin tuaj.
MK-Скенирај го QR кодот за да добиеш повеќе информации за производот и упатство за користење,на повеќе
јазици.Симнете ја апликацијата QR Scanner App на вашиот уред.
EN-Scan the QR code to get more product information and manual instruction in more languages. Download QR Scanner
App onto your device.
SRB/HR/ME/BIH
Skenirajte QR kod kako bi ste dobili više informacija o proizvodu i uputsva za upotrebu na više jezika. Preuzmite aplikaciju
QR Scanner na svoj uređaj.
D-Um weitere Produktinformationen sowie die Bedienungsanleitung in weiteren Sprachen zu erhalten, bitten wir Sie den
QR-Code zu scannen. Bitte downloaden Sie die QR Scanner-App auf Ihr Handy oder Tablet.
FR-Scannez le code QR pour obtenir plus d'informations sur le produit et le manuel d'utilisation (disponible en plusieurs
langues). Téléchargez l'application QR Scanner sur votre appareil
BG-Сканирайте QR кода, за да получите повече информация за продукта и инструкция за употреба на повече езици.
Изтеглете приложението QR скенер на устройството си.
NL -Scan de QR code voor meer productinformatie en de handleiding in meerdere talen. Download de QR scanner app op
je apparaat om te scannen.
PL-Zeskanuj kod QY, aby otrzymać więcej informacji, oraz instrukcję użytkowania w większej ilości języków. Pobierz
aplikację skanera kodów QR na twoje urządzenie.
HU-A QR-kód beszkennelésével bővebb információkhoz és összeszerelési útmutatóhoz juthat további nyelveken.
Amennyiben szükséges, töltsön le QR-kód olvasó alkalmazást a készülékére.
RU-Отсканируйте QR-код, чтобы получить больше информации о продукте и инструкции по эксплуатации на других
языках. Загрузите приложение QR Scanner на свое устройство.
RO-Scanati codul QR pentru a obtine mai multe informatii despre produs si manualul de instructiuni in mai multe limbi.
Descarcati aplicatia QR Scanner pe dispozitivul dvs.
GR-Σάρωση του κώδικα QR για περισσότερες πληροφορίες σχετικά με το προϊόν και οδηγίες χρήσης σε περισσότερες
γλώσσες. Κατεβάστε την εφαρμογή QR Scanner στη συσκευή σας.

a
a
22.1
2.2
3
9
11
10
1
22
9
3
4
5
6
78
12
13
14
15
15
16
14
17
18
122

3.1
4.1
3
3.2
4
4.2
6
a
b
a
a
5
4.2.1
4.2.2
4

1
2
3
8
7
9
10
5
10.1
1
2
1

a
11
12
1
2
3
4
5
6
a
b
b
56

b
d
c
13
a
ab
b
c
cd
7
13
14 15
16
c
b
b
c
aa

NOTICE
1. This is an "universally" securing device for children. It is approved in accordance with Rule № 44 for general
use in vehicles and is suitable for most but not all seats in cars.
2. Placing is correct if the vehicle manufacturer has declared in the Manual for the use of the vehicle that in
the vehicle may be placed "Universal" Safety devices for children of this age group.
3. This securing device for children is classified as "universal" under more stringent conditions than those
applied in previous structures, which don’t have this remark.
4. If you have doubt, consult the manufacturer of safety equipment for children or the seller.
Approved to UN/ECER Regulation No. 16 or other equivalent standarts.
Only suitable if the approved vehicles are fitted with 3-points static or 3-point retractor safety-belts.
8
IMPORTANT! KEEP FOR FUTURE
REFERENCE! READ CAREFULLY!
ЕN
EN
WARNING! Before you set any mobile or adjustable part of the child seat, you need to remove your
child from the child seat!
WARNING! Periodically check the belts for wear, paying special attention to the points of attachment,
protections and regulating devices.
An unsecured seat may injure other passengers in the car in an urgent stop!
Important safety instructions!
WARNING! The baby seat must be secured with car safety belt, even when it is not in use.
WARNING! It is appropriate only if approved vehicles are equipped with a 3-point holding device of
safety belt, approved in accordance with Rule № 16 of the ECE at the UN or other equivalent standards.
WARNING! Your child seat can only be fitted into the passengers seat of a car with a lap and diagonal
seat belt. Do not use any load bearing contact points other than those described in the instructions and
marked on the child restraint. Ensure the vehicle seat buckle is not positioned in or in front of the
specified (labelled) belt guide of the child restraint system.
WARNING! Do not leave the buckle in a partially closed position and it must only lock when all parts are
engaged. It must be possible to release the child from the restraint immediately in an emergency.
WARNING! Rearward child restraint systems should not be used in seats protected by an airbag.
WARNING! The interior of the car can become very hot when exposed to direct sunlight.
Therefore, it is recommended that the child seat is covered when not used. This prevents
heating of upholstery and components, and especially those attached to the child seat and
scorching the child!
WARNING! Do not use the car seat in the house. It is not designed for home use and should only be
used in the vehicle!
WARNING! The hard components or plastic parts of safety device for children should be deployed and
installed in way that during everyday use of the vehicle not be jammed by the movable seats or doors.
WARNING! All belts fastening car chair must be tight, belts restrain the child , must be adjusted to his
body and not twisted.
WARNING! The device must be replaced if it has undergone significant load of an accident.
WARNING! Waist belt has to be adjusted low so that child’s pelvis is restrained tight!
WARNING! It is dangerous to make changes or to supplement safety device without approval of the
competent authority!
WARNING! Follow closely the instructions for installation. Failure can result in injury to the child!
WARNING! Do not leave the child unattended in the safety device!
WARNING! Any luggage or other items that can cause injury if a collision should be properly secured!
WARNING! Safety device for children should not be used without case!
WARNING! Cases of seat should not be replaced with another, unless recommended by the
manufacturer, because it is an integral part of the system for securing children!
Your child must be taught never to play with the buckle.
When installed the seat with ISOFIX anchorages and top tether, this type of child safety seat is suitable for
fixing into the seat positions of the cars equipped with ISOFIX system that are fitted in accordance with
ECE R14

9
1. Place the seat and backrest horizontally on a flat surface. Picture 2 Place the hooks on the backrest in the
openings of the seat. Picture 2a Squeeze with hand the hooks on the backrest (2.1) and press firmly, lift the
seat in a vertical position (2.2).
Warning: Failure to comply with this instruction leads to breaking the hooks on the backrest, which is not
subject to warranty!
Notice: During assembling or dismantling in the vehicle, it is possible that the backrest of the seat moves from
the vertical position. This is not a defect in the seat, because the position of the backrest is determined by the
position of the backrest of the car seat!
Pull back up to make sure it is fastened to the seat.
Assembling the car seat
8. Seat
2. Guide for the belt
3. Belts
1. Backrest
7. Strap for belts adjustment
4. Belts softener
Parts
Picture 1
6. Button to adjust the belt (under the cover)
5. Belt buckles
9. Bracket for positioning the belt in the car
15. ISO FIX Connector
10. Metal clamp
13.. TT Release button
14. ISO FIX Release button
17. Head Pillow
18. Baby Insert
12. Top Tether Strap
11. Bracket for shoulder belts
16. ISO FIX Adjustment Handle
1.Take out the belts from hooks behind the seat. Picture 3.1
2. Pull out the belts of the holes on the backrest. Picture 3.2
3. Place back belts in the desired holes on the backrest. Picture4.1 Make sure the straps are placed on the
same level and are not twisted.
4. Place the belt in the central metal bracket behind the back. Picture 4.2.1 Connect the hook of the shoulder
belt softeners. Pull the softeners to make sure they are securely attached.
5. Select the height of the straps according to the child's height (Picture 5). The position of the straps should
be at or slightly above the shoulders of the child. (Picture 5B) Do not use seat belts if the openings for the belts
are under the child's shoulders or if the child is over 18 kg. In this case, use the belt of the car.
Adjusting the height of seat belts
Possibility to install ONLY on seats with 3-point seat belts!
TYPES OF APPROVED BELTS TO HAVE IN THE CAR
Your child seat can be installed ONLY in the direction of
movement of the car with the help of 3-point belts!!!
Your child seat can be installed with ISOFIX anchorages and top
tether, in the direction of movement for Groups 1;2;3 ( 9-36kg.)
CAN NOT BE USED FOR SEATS with 2-point belt!
1
WASHING INSTRUCTIONS
1. The car seat can be cleaned using lukewarm water and soap. Do not use aggressive cleaners like
abrasives or thinner.
3. The plastic parts can be cleaned by using a wet cloth. Please, do not use any solvate.
o
2. The cover should be washed by hand at a maximum temperature of 30 C. Do not put in the dryer, just
airing it.
WARNING! Store this child seat in a safe place when it is not being used. Avoid placing heavy
objects on top of it. Do not allow your child seat to come into contact with corrosive substances e.g.
battery acid. ECE R44/04
Adjust the length of the belt
1. Loosen the belt: Press the button for adjustment of the straps (Picture 6a) and at the same time pull out both
shoulder straps (Picture 6b).
2. Tightening the belt: Place your child in the seat, fasten both belts in the buckle in the center and pull the bar
in the middle of the seat. (Picture 12).
Removing the upholstery
1. Remove all belts as shown in Fig. 13
2. Remove the upholstery of the seat and backrest as shown in Fig.16

9
INSTALLATION OF SEAT With 3 - Point Belt
"Group II" "Group III" / from 15 to 36 kg. /
Please use 3-point safety belts of the car to ensure the safety of the child and to secure the car seat.
1. Remove the seat belts by releasing the shoulder belts from hooks on the back and pull them from the Step
holes on the back. (Fig 13 a; b)
2. Remove the metal plates of the belts from the bottom of the seat. (Fig. 13 c;d)Step 3. Press the button on the centre of the seat and pull the adjustment strap under the seat. Step 4. Place the red guide for the car belt in the corresponding hole on the back of the seat, slightly higher Step
than the shoulders of the child. (Figure 14)
5. Place the car seat tightly on the car seat facing front in "direction of travel". Make sure the seat is tight Step
to the vehicle seat.
6. Place the child in the seat.Step 7. Pass the shoulder belt of the car through the red guide in the back of the seat (Fig. 15 a;b) over the Step
shoulder of the child (but away from its neck) and under the armrest of the seat. Thread the abdominal belt
under the armrest of the seat and over the lap over the child, then fasten the belt in the buckle of the car until
you hear "click". (Fig.15 c)
8. Make sure the belt is properly positioned across all guides, not twisted and does not interfere with the Step
child.
10
INSTALLATION OF SEAT
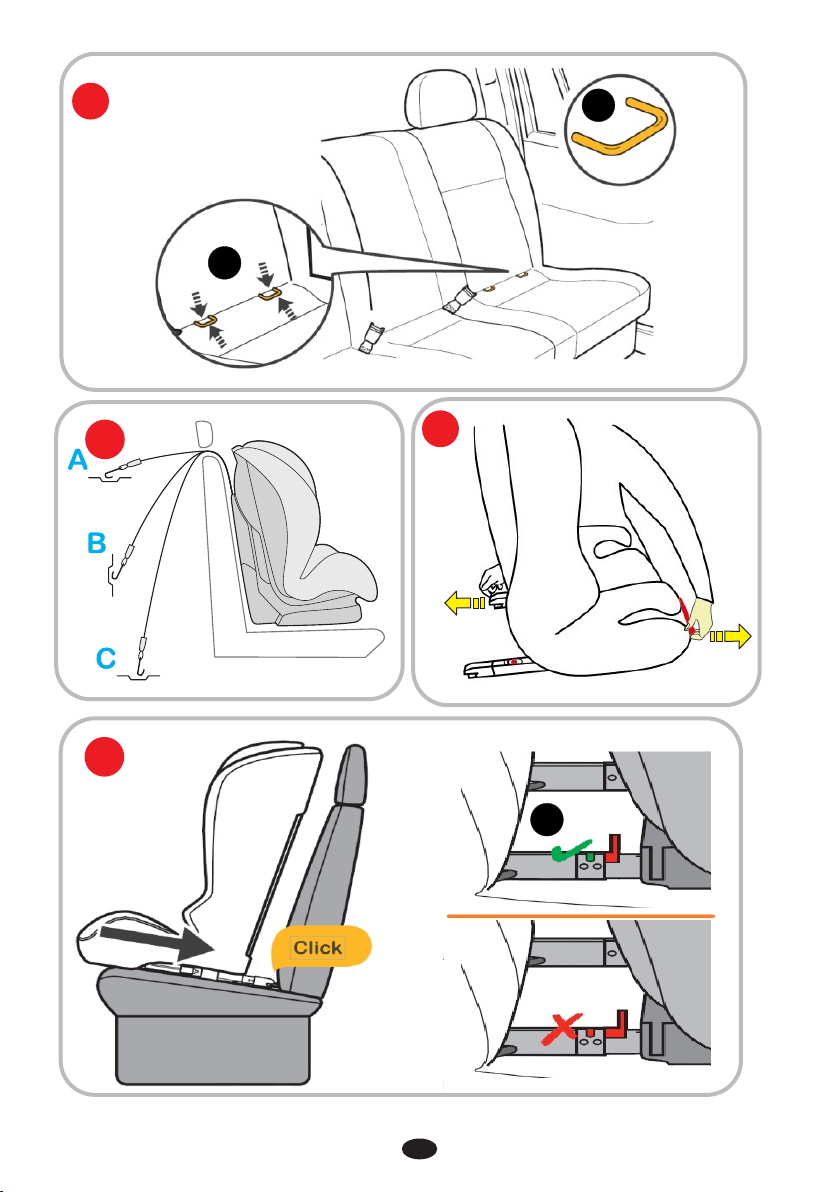
"Group I" / 9 to 18 kg. / With ISOFIX and Top tether
Tip: If the ISOFIX connectors are correctly installed, the Release button will pop out, and you can see a clear
green mark on it. Picture 10.1
Step 4. Grasp the seat body to check the seat if it is fastened tightly or shakes. If the seat shakes and the
ISOFIX connectors are pulled out, please repeat the above steps and install it again.
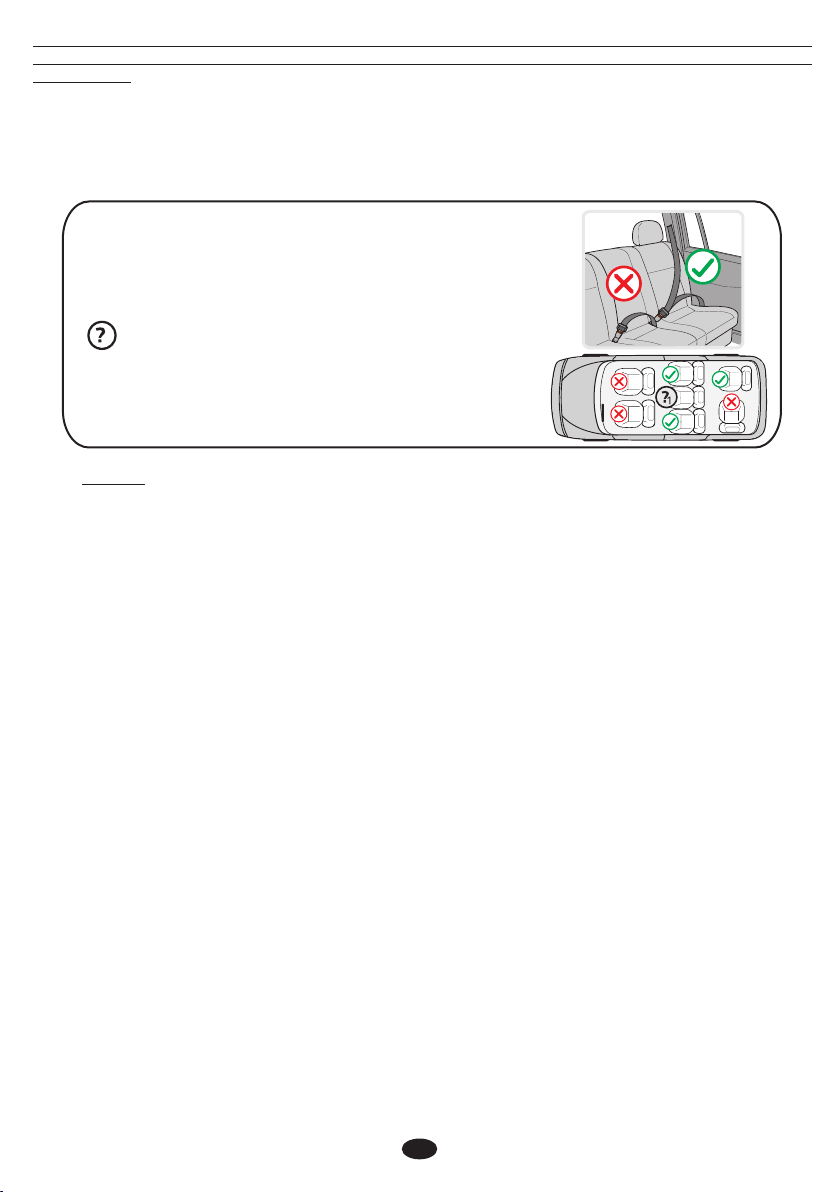
IMPORTANT: First please check if there are 2 ISO FIX anchorings in the perpendicular intersection of the
vehicle seat back and seat cushion, and the user-ready top tether anchoring behind the vehicle seat. Pic. 7.1
Tips: The user-ready tether anchorage usually permanently installed on the inner rear luggage shelf or on the
vehicle floor. For details you could read your vehicle guidelines or contact the vehicle manufacturer. Pic. 8
Step 1. Press the Release button to release the ISO FIX connectors. Than you can hear an audible sound
“click” Picture 9
Step 2. Push the ISO FIX connectors directly into the anchorages until you hear an audible sound "click".
Picture 10
Step 3. Press the Release button ( Picture 9) and push firmly the child seat towards the car seat backrest.
During this moving the ISOFIX system will tighten the child seat to the car seat backrest and you will hear a
"Click"sound . Ensure that the child seat is firmly pressed to the car seat backrest. Check the ISOFIX release
button again and ensure the latching indication shows GREEN. Picture 10.2
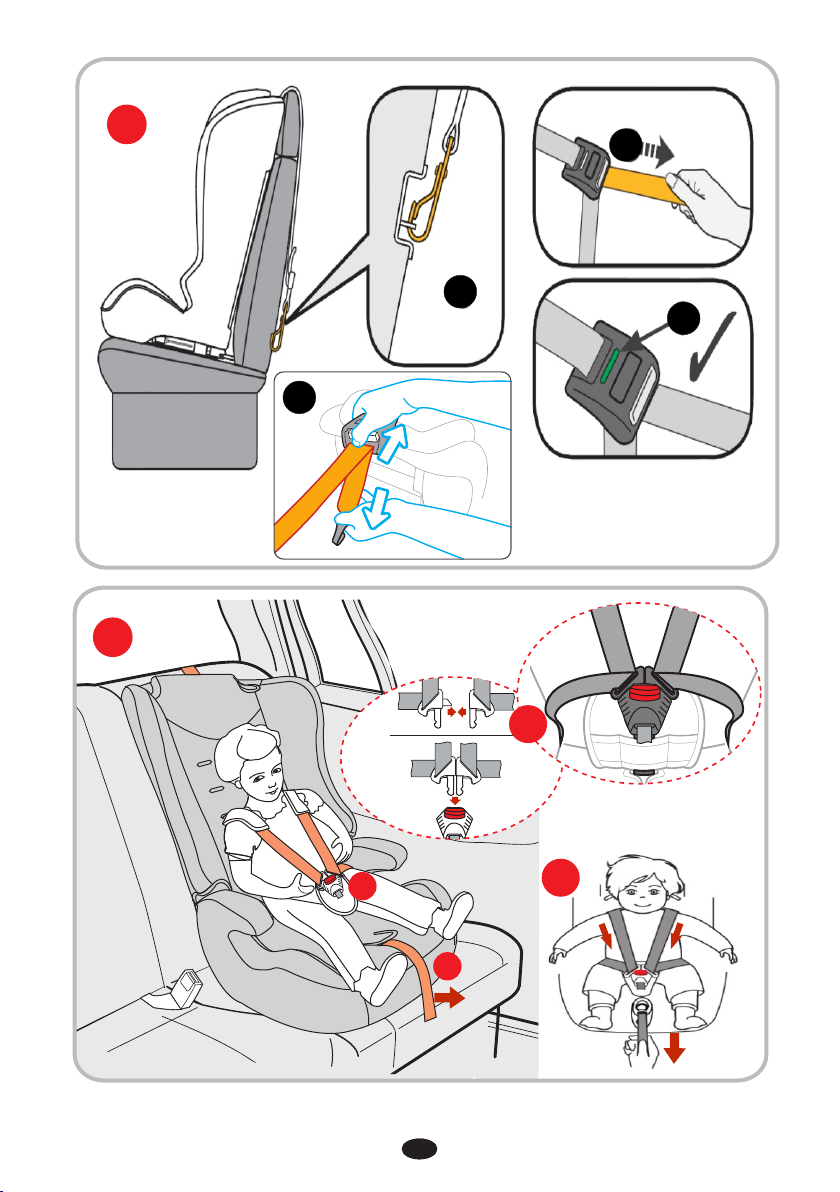
Step 5 Pull out the Top tether and press the Tether strap release button to extend the strap until it is long
enough to hook the User-ready tether anchorage behind. Picture 11.3 Guide the top tether through the
headrest of the car.
Step 6. Hook the Tether strap hook onto the User-ready anchorages. Check there maybe are 3 anchorages
for the hook, please find one in your favor. Picture 8 ; 11.4
Step 8. Place the child in the seat. Check the height of the shoulder belts. Make sure the straps are not
twisted or hanging somewhere. Fasten the seat belts on the child, making sure that they are well placed and
pull the strap in the centre of the seat to tighten. ( Picture 12)
Step 7. Pull the Tether strap on another end back to tighten the Top tether. Picture 11.5
CAUTION: If the Top tether is tightened favorably and correctly, a green mark will turn up on the other end of
the Strap release button, please do check it. Picture 11.6
INSTALLATION OF SEAT
“Group II;III” / 15 to 36 kg./ With additional attachment (FIT) and 3 - Point Belt
Step 1. Please repeat the steps from 1 to 4 for installation on the car seat described in Group II / 15 to 36 kg. /
with 3 - Point Belt
Step 2. Please repeat the steps from 1 to 4 for installation on the car seat described in Group I / 9 to 18 kg. /
with ISOFIX and Top Tether .
Step 3. Place the child into the safety seat. Position the shoulder belt through the hook over the shoulder of
the child and lap belt over the seat and lap of the child. Pass the belt through the lower opening into the seat
of the safety seat and fasten the clip to corresponding buckle until click is heard. Pictures 15 a;b;c Check that
the belt buckle is locked by pulling the belt.

3. Това обезопасително устройство за деца е класифицирано като „универсално” при по-строги условия в
сравнение с прилаганите в предишни конструкции, на които няма тази забележка.
2. Поставянето е правилно, ако производителят на превозното средство е декларирал в Наръчника за
използване на превозното средство, че в превозното средство може да се поставят „универсални”
обезопасителни устройства за деца от тази възрастова група.
ИНФОРМАЦИЯ
1. Това е „универсално” обезопасително устройство за деца.То е одобрено в съответствие с Правило
№44, за общо използване в превозни средства и е подходящо за повечето, но не за всички седалки в
леки автомобили.
4. Ако имате съмнения, консултирайте се с производителя на обезопасителното устройство за деца или с
продавача.
Седалката е подходяща само за превозни средства, оборудвани с 3-точкови статични или 3-точкови
прибиращи обезопасителни колани. Одобрени от UN/ECER № 16 или други еквивалентни стандарти.
11
ВАЖНО! ЗАПАЗЕТЕ ЗА
ПО-НАТАТЪШНИ СПРАВКИ.
ПРОЧЕТЕТЕ ВНИМАТЕЛНО !
BG
ВНИМАНИЕ! Не оставяйте детето без наблюдение в обезопасителното устройство!
ВНИМАНИЕ! Обезопасителното устройство за деца не трябва да се използва без калъф!
Важни инструкции за безопасност!
ВНИМАНИЕ! Подходящо само ако одобрените превозни средства са оборудвани с 3-точково
прибиращо устройство на обезопасителен колан, одобрен в съответствие с Правило №16 на ИКЕ при
ООН или други еквивалентни стандарти.
ВНИМАНИЕ! Твърдите елементи или пластмасовите части на обезопасителното устройство за деца
трябва да се разполагат и монтират така, че при ежедневното използване на превозното средство да не се
захващат от подвижните седалки или вратите на превозното средство.
ВНИМАНИЕ! Всички колани закрепващи столчето трябва да са стегнати, а коланите задържащи детето, да
са регулирани към тялото му и да не са усукани.
ВНИМАНИЕ! Устройството трябва да се замени, ако е било подложено на значително натоварване при
произшествие.
ВНИМАНИЕ! Да се осигури прилягането на надбедрения колан ниско, така че тазът да е захванат стегнато!
ВНИМАНИЕ! Опасно е да се правят изменения или да се допълва обезопасителното устройство без
одобрението на компетентния орган!
ВНИМАНИЕ! Спазвайте стриктно указанията за монтиране. Неспазването им може да доведе до
нараняване на детето!
ВНИМАНИЕ! Всякакъв багаж или други вещи, които могат да причинят нараняване в случай на сблъсък
трябва да са подходящо закрепени!
ВНИМАНИЕ! Седалката може да бъде монтирана само в пътнически седалки с 3-точкова система на
коланите. Не използвайте други точки за закрепяне на колана, освен тези, описани в инструкцията и
маркирани на обезопасителната система. Уверете се, че катарамата на автомобилния колан не е
разположена в или пред определен колан на обезопасителната система.
ВНИМАНИЕ! Вътрешността на колата може да стане много гореща , когато е изложена на пряка
слънчева светлина. Ето защо, е препоръчително детското столче да се покрива, котаго не се
използва. Това предотвратрява нагряване на тапицерията и компонентите, и особенно тези ,
прикрепени към детското столче, както и изгарянето на детето!
ВНИМАНИЕ! Не използвайте столчето за кола в дома. То не е проектирано за домашна употреба и
трябва да се използва само в превозното средство!
ВНИМАНИЕ! Периодично проверявайте коланите за износване , като обръщате специално внимание
на точките на закрепяне, на защитите и регулиращите приспособления.
ВНИМАНИЕ! Калъфът на седалката не трябва да се заменя с друг освен с препоръчвания от
производителя, защото представлява неразделна част от системата за обезопасяване на деца!
ВНИМАНИЕ! Преди да нагласите някоя подвижна или нагласяща се част на детската седалка, трябва
да извадите вашето дете от детското столче!
Когато се монтира седалката с ISOFIX закрепване и горната лента, този тип детска предпазна седалка е
подходяща за закрепване към седалките на автомобилите, оборудвани със система ISOFIX, които са
монтирани в съответствие с ECE R14

1. Поставете седалката и облегалката в хоризонтално положение на равна повърхност. Снимка 2
Поставете куките на облегалката в отворите на седалката. Снимка 2а Притиснете с длан куките на
облегалката ( 2.1) и притискайки здраво , вдигнете облегалката във вертикална позиция (2.2).
Внимание : По време на монтаж или демонтаж в автомобила , е възможно облегалката на столчето да
се измести от вертикалната си позиция. Това не е дефект на столчето , т.к. позицията на облегалката се
определя от позицията на облегалката на автомобилната седалка!
Внимание : Неспазването на това указание, води до счупване на куките на облегалката , което не е
обект на гаранция !
Сглобяване на столчето
Издърпайте облегалката нагоре за да се уверите , че е закрепена за седалката.
Снимка 1
2. Водач за колана
4. Омекотител на коланите
7. Каишка за регулиране на коланите
ЧАСТИ
1. Облегалка
3. Колани
5. Катарама за коланите
6. Бутон за регулиране на коланите
( под тапицерията)
8. Седалка
9. Скоба за позициониране колана на колата
11. Скоба за раменните колани
15. Механизми за захващане на система ISOFIX
12. Горна кука за заключване на ISOFIX
13. Бутон за освобождаване на горната кука
10. Метална скоба
14. Бутон за освобождаване на ISOFIX системата
(накрайници)
16. Дръжка за регулиране на ISOFIX (накрайници)
17. Възглавница за глава
18. Омекотители за бебето
НЕ МОЖЕ ДА СЕ ИЗПОЛЗВА НА СЕДАЛКИ С 2-ТОЧКОВИ
ВИД НА УТВЪРДЕНИТЕ КОЛАНИ, КОИТО ТРЯБВА ДА
ИМАТЕ В КОЛАТА
Вашата детска седалка може да бъде инсталиранa САМО по
посока на движението на автомобила с помощта на 3-
точкови колани !!!
Възможност за инсталиране САМО на седалки С
3-ТОЧКОВИ КОЛАНИ!
КОЛАНИ !
Вашата детската седалка може да се монтира с ISOFIX
закрепване и горно закрепване по посока на движението за
групи 1, 2, 3 (9-36 кг).
1
1. Столчето за кола може да бъде почиствано с хладка вода и сапун. Не използвайте агресивни
почистващи препарати, като абразиви или разредител.
3. Пластмасовите части могат да се почистват с помощта на влажна кърпа. Не използвайте абразиви.
ИНСТРУКЦИИ ЗА ПРАНЕ
2. Тапицерията трябва да се пере на ръка при максимална температура 30°С. Не я слагайте в сушилня.
Оставете тапицерията да изсъхне по естествен начин.
ВНИМАНИЕ! Не оставяйте катарамата частично затворена, тя трябва да бъде заключена, когато всички
части са ангажирани. Веднага трябва да можете да извадите детето от седалката в случай на спешна
ситуация. Детето Ви трябва да бъде научено никога да не си играе с катарамата.
ВНИМАНИЕ! Периодично проверявайте коланите за износване , като обръщате специално внимание на
точките на закрепяне, на защитите и регулиращите приспособления.
ВНИМАНИЕ! Детското столче трябва да бъде обезопасено с колана на колата, дори когато не се
използва по предназначение. Необезопасената седалка може да нарани другите пътници в
колата, в случай на внезапно спиране.
ВНИМАНИЕ! Съхранявайте детското столче на безопасно и недостъпно за деца място, когато не се
използва. Избягвайте да поставяте тежки предмети върху столчето. Не позволявайте досег на вашето
столче за кола с корозивни вещества като например киселината от батерия.
ECE R44/04
12

13
Настройка дължината на коланите
1. Отпускане на коланите: Натиснете бутона за настройка на коланите (Снимка 6а) и в същото време
издърпайте двата раменни колана (Снимка 6b).
2. Стягане на коланите: Поставете детето в столчето, закопчейте двата колана в централната катарама
и издърпайте лентата по средата на седалката. (Снимка 12).
2. Отстранете тапицерията на седалката и облегалката както е показано на Фиг.16
1. Отстранете всички колани както е показано на Фиг. 13
Премахване на тапицерията:
МОНТИРАНЕ НА СТОЛЧЕТО
"Група I" / 9 до 18 кг. / С ISOFIX и горно захващане
Стъпка 4. Хванете столчето и проверете дали е закрепено здраво или се клати. Ако столчето се клати и
ISOFIX захващащите устройства са изкарани, повторете горните стъпки и инсталирайте отново.
Съвет: Метална кука на автомобила за горно захващане обикновенно е монтирана зад облегалката на
кората под задното стъкло, зад облегалката на седалката или на пода на багажника. За подробности
прочетете инструкцията на автомобила или се свържете с производителя.(Снимка 8)
Стъпка 3. Натиснете бутона за освобождаване на ISOFIX системата(Фиг. 9) и натиснете здраво
детската седалка към облегалката на автомобилната седалката. По време на това преместване
системата ISOFIX ще затегне детската седалка до облегалката на седалката и ще чуете звук "Click".
Уверете се, че детската седалка е здраво притисната към облегалката на седалката на автомобила.
Проверете отново бутона за освобождаване на ISOFIX и се уверете, че индикацията за заключване
показва ЗЕЛЕНО. Снимка 10.2
ВАЖНО: Първо проверете дали автомобила има 2 ISO FIX метални куки за закрепване в пресечната
точка между седалката и облегалката на автомобила под тапицерията и метална кука за горно
захващане зад седалката на автомобила. (Снимка 7.1)
Стъпка 8. Поставете детето в столчето. Проверете височината на раменните колани. Уверете се ,че
коланите не са усукани или закачени някъде. Закопчайте коланите на детето, като се уверите , че са
добре поставени и издърпайте каишката в центъра на седалката за ги затегнете. Фиг. 12
ВНИМАНИЕ: Ако куката за горно захващане е стегната правилно, ще се покаже зелена маркировка в
другия край на бутона за освобождаване, Моля проверете ! Фиг. 11.6
Съвет: Ако са правилно монтирани захващащите ISOFIX устройства, освобождаващия бутон ще изкочи
навън и ще видите ясна зелена маркировка върху него Фиг. 6.4
Стъпка 6. Закачете куката на столчето към куката на автомобила. Проверете , може да има три места
за закрепване, изберете подходящото за вас. Фиг. 8; 11.4
Стъпка 5. Издърпайте куката за горно захващане, натиснете бутона за освобождаване, за да издърпате
колана достатъчно за захващане към металната кука на автомобила. Фиг. 11.3 Прекарайте горната
лента през облегалката за глава на автомобила.
Стъпка 1. Натиснете бутона за освобождаване на ISOFIX системата за да излязат механизмите за
захващане докато се чуе „ Клик“ Фиг. 9
Стъпка 7. Издърпайте колана на куката от другата страна за да го затегнете. Фиг. 11.5
Стъпка 2. Натиснете ISO FIX механизмите за захващане директно върху металните куки на
автомобила докато се чуе „ Клик“. Фиг. 10
3.Поставете отново коланите в желаните отвори на облегалката. Снимка 4.1 Уверете се , че коланите
са поставени на едно ниво и не са усукани.
4. Поставете коланите в централната метална скоба зад гърба. Снимка 4.2.1 Съединете куката на
колана на раменните омекотители. Издърпайте омекотителите за да се уверите, че са закрепени
здраво.
2.Издърпайте коланите от отворите на облегалката. Снимка 3.2
1.Извадете коланите от куките зад гърба на столчето. Снимка 3.1
5. Изберете височината на коланите спрямо височината на детето (Снимка 5). Позицията на коланите
трябва да бъде на нивото или малко над раменете на детето.(Снимка 5В) Не използвайте коланите на
столчето ако отворите за коланите са под раменете на детето или то е над 18 кг. В този случай
използвайте колана на автомобила.
Настройка височината на коланите

МОНТИРАНЕ НА СТОЛЧЕТО
“Група II; III ” / 15 до 36 кг./ С допълнително прикачване FIT и 3 точков колан
Стъпка 1. Моля, повторете стъпките от 1 до 4 за монтаж на седалката за автомобил,
Стъпка 2. Моля, повторете стъпките от 1 до 4 за монтаж на седалката за автомобил,
описана в група I / 9 до 18 кг. / с ISOFIX и горна лента.
Стъпка 3. Поставете детето в столчето. Позиционирайте раменния колан през куката над рамото на
детето а колана за скута над столчето и скута на детето.Прекарайте колана през долния отвор на
седалището на столчето и закопчайте колана в катарамата на автомобилната седалка докато чуете
„клик“. Фиг. 15 a;b;c Проверете дали катарамата на колана е заключена като издърпате колана.
описана в група I ; III / 15 до 36 кг. / с 3 тоюков колан.
МОНТИРАНЕ НА СТОЛЧЕТО с 3 точков колан
“Група II” “Група III” /от 15 до 36 кг./
Моля използвайте 3-точковите обезопасителни колани на колата, за да осигурите безопасността на
детето и да закрепите столчето за кола.
Стъпка 1. Отстранете коланите на столчето като освободите раменните колани от куките на гърба и ги
издърпате от отворите на облегалката.(Фиг 13 а;b)
Стъпка 2. Извадете металните пластини на коланите от дъното на столчето. ( Фиг. 13 с;d)
Стъпка 5. Поставете столчето плътно върху автомобилната седлака с лицето на пред „по посока на
движението“. Уверете се , че столчето е плътно прилепнало към седалката на автомобила.
Стъпка 4. Поставете червения водач за автомобилния колан в съответния отвор на облегалката на
столчето, малко по-високо от раменете на детето.( Фиг.14)
Стъпка 7. Прекарайте раменния колан на автомобила през червения водач в облегалката на столчето
(Фиг.15 a;b), през рамото на детето (но далече от врата му) и под подлакътника на седалката.
Прекарайте коремния колан под подлакътниците на седалката и над скута на детето, след което
закопчайте колана в катарамата на автомобила докато се чуе „клик“. (Фиг.15c)
Стъпка 3. Натиснете бутона по средата на седалката и издърпайте каишката за регулиране под
седалката на столчето.
Стъпка 8. Уверете се , че колана е правилно поставен през всички водачи, не е усукан и не пречи на
детето.
Стъпка 6. Поставете детето в столчето.
14

15
2. Amplasarea este corecta, daca producatorul mijlocului de transport a declarat in Manualul de utilizare al
autovehicului, ca in mijlocul de transport respectiv pot fi amplasate sisteme “universale” de siguranta pentru
copii din aceasta grupa de varsta.
4. In cazul in care aveti indoieli, consultati producatorul sistemului de siguranta pentru copii sau vanzatorul.
INFORMATIE
1. Acesta este un sistem “universal” de siguranta pentru copii. Aprobat in conformitate cu Regulamentul nr.44
pentru utilizare generala in autovehicule, care este potrivit pentru marea majoritate, dar nu pentru toate
scaunele auto.
3. Acest sistem de siguranta pentru copii este clasificat drept “universal” in conditii mai stricte, in comparatie
cu cele aplicate in constructiile anterioare, pe care nu exista aceasta mentiune/aviz.
Scaunul este potrivit numai pentru autovehicule dotate cu centuri de siguranta in 3 puncte cu dispozitiv static sau in
3 puncte cu dispozitiv retractor. Aprobate de catre UN/ECER nr.16 sau alte standarde echivalente.
RO
IMPORTANT! CITITI CU ATENTIE SI PASTRATI ACEST
DOCUMENT PENTRU CONSULTARE ULTERIOARA!
Scaunul auto / Instrucţiuni de utilizare
HARMONY
Aprobate de catre UN/ECER nr.16 sau alte standarde echivalente. Atunci cand se monteaza scaunul cu sistem de
fixare ISOFIX si banda superioara, acest tip de scaun pentru protectia copilului este potrivit pentru fixare de
scaunele auto, dotate cu sistem ISOFIX, care sunt montate in conformitate cu ECE R14
AVERTISMENT! Sistemul de siguranta pentru copii nu trebuie utilizat fara husa!
AVERTISMENT! Nu folositi scaunul auto in casa. Acesta nu este conceput pentru uz casnic si trebuie sa fie
utilizat numai in autovehicul!
AVERTISMENT! Inainte de a ajusta anumita componenta mobila sau reglabila la scaunul pentru copii, trebuie sa
scoateti copilul dumneavoastra din scaunul pentru copii!
AVERTISMENT! Respectati strict instructiunile de montare. Nerespectarea acestora poate duce la ranirea
copilului!
AVERTISMENT! Sistemul trebuie sa fie schimbat in cazul in care a fost supus unor solicitari semnificative in
urma accidentului rutier.
AVERTISMENT! Verificati in mod periodic centurile pentru uzura, acordand o atentie deosebita la punctele de
fixare, la dispozitivele de protectie si ajustare.
AVERTISMENT! Toate centurile care fixeaza scaunul trebuie sa fie tensionate, iar curelele care tin copilul
trebuie ajustate la corpul copilului iar curelele si centurile nu trebuie sa fie rasucite.
AVERTISMENT! Nu lasati copilul nesupravegheat in sistemul de siguranta!
AVERTISMENT! Este foarte periculos sa se faca modificari sau sa se faca completari pe sistemul de
siguranta fara aprobarea autoritatilor competente!
AVERTISMENT! Elementele rigide sau componentele din plastic aflate pe sistemul de siguranta pentru copii
trebuie sa fie pozitionate si montate in asa fel incat, in timpul utilizarii zilnice a autovehiculului, acestea sa nu
fie prinse in partile mobile sau usile autovehiculului.
Instructiuni importante de siguranta!
AVERTISMENT! Asigurati-va ca centurile transversale sunt bine pozitionate in partea inferioara, astfel incat
pelvisul sa fie bine sustinut!
AVERTISMENT! Husa scaunului nu trebuie inlocuita cu alta husa decat cea recomandata de catre
producator, deoarece husa reprezinta parte integranta a sistemului de siguranta pentru copii!
AVERTISMENT! Scaunul poate fi montat numai pe scaune pasagere cu centuri de siguranta in 3 puncte. Nu
folositi alte puncte de contact portante decat cele descrise in cadrul instructiunilor si marcate pe sistemul de
siguranta. Asigurati-va ca catarama centurii de siguranta nu este pozitionata in sau peste vreo anumita
centura, parte din sistemul de siguranta.
AVERTISMENT! In interiorul autovehiculului poate deveni foarte cald, atunci cand acesta este expus la
lumina directa solara. Prin urmare, este recomandat ca scaunul pentru copii sa fie acoperit, atunci cand
acesta nu se utilizeaza. Acest lucru previne incalzirea tapiteriei si a componentelor in special cele
atasate de scaunul copilului, precum si poate provoca arsuri ale copilului!
AVERTISMENT! Orice bagaje sau alte obiecte care ar putea provoca raniri in caz de coliziune trebuie fixate
in mod corespunzator!
AVERTISMENT! Potrivit numai daca mijloacele de transport aprobate sunt dotate cu centuri de siguranta in
3 puncte cu dispozitiv retractor, aprobate conform Regulamentului CEE al ONU nr.16 sau conform altor
standarde echivalente.

16
Asamblarea scaunului
Avertisment: Nerespectarea acestor instructiuni, duce la ruperea carligelor spatarului, fapt care nu este
obiect al garantiei !
Avertisment: In momentul asamblarii sau dezasamblarii in autovehicul, este posibil ca spatarul scaunului sa-
si modifice pozitia verticala. Aceasta nu este un defect al scaunului, deoarece pozitia spatarului este
determinata de pozitia spatarului scaunului auto!
1. Pozitionati sezutul si spatarul in pozitie orizontala pe o suprafata neteda. Figura 2 Pozitionati carligele
spatarului in orificiile sezutului. Figura 2a Apasand cu mana carligele aflate pe spatar (2.1) si strangand
puternic, ridicati spatarul in pozitie verticala (2.2).
Trageti spatarul in sus pentru a va asigura ca este bine fixat de scaunul auto.
COMPONENTE
1. Spatar
2. Ghidaj pentru curea
3. Curele / Centuri
5. Catarama pentru curele
4. Husa de protectie pentru curele
6. Buton pentru reglarea curelelor (sub husa
7. Banda pentru reglarea curelelor
Figura 1
8. Sezut
12. Carlig superior pentru blocare ISOFIX
16. Maner pentru reglarea de la ISOFIX
9. Clema pentru pozitionarea centurii auto
18. Perinita din material moale pentru nou nascut
13. Buton pentru eliberarea carligului superior
10. Brida de metal
15. Mecanisme pentru prinderea sistemului ISOFIX
(adaptoare)
14. Buton pentru eliberarea sistemului ISOFIX
11. Catarama pentru curelele pentru umeri
17. Perinita pentru cap
Scaunul dvs. pentru copii poate fi montat cu fixare ISOFIX si
fixare superioara in directia de deplasare pentru grupele 1, 2, 3
(9-36 kg).
TIPUL CURELELOR AUTORIZATE, CARE TREBUIE SA
DETINETI IN AUTOVEHICUL
Scaunul dvs. pentru copil poate fi instalat NUMAI in pozitia
directiei de deplasare a autovehiculului cu ajutorul centurilor de
siguranta in 3 puncte !!!
Posibilitate de instalare NUMAI pe scaune CU CENTURI
NU POATE FI UTILIZAT PE SCAUNE CU CENTURI DE
SIGURANTA IN 2 PUNCTE !
DE SIGURANTA IN 3 PUNCTE !
1
INSTRUCTIUNI DE SPALARE
3. Componentele din plastic pot fi curatate cu ajutorul unei carpe umede. Nu utilizati materiale abrazive.
1. Scaunul auto poate fi curatat cu apa calda si sapun. Nu utilizati agenti de curatare agresivi, precum
materiale abrazive sau diluant.
2. Husa trebuie spalata manual la o temperatura maxima de 30oC. Nu se recomanda uscarea in uscator de
rufe. Lasati husa sa se usuce in mod natural.
AVERTISMENT! Nu lasati catarama inchisa partial, aceasta trebuie sa fie blocata atunci cand toate
componentele sunt pozitionate bine. In cazul unei situatii de urgenta este foarte important sa puteti elibera in mod
rapid copilul din scaun. Copilul tău trebuie învățat să nu se joace niciodată cu catarama.
AVERTISMENT! Din motive de siguranta, scaunul pentru protectia copilului trebuie montat (fixat; atasat)
in autovehicul chiar si atunci cand copilul nu se afla pozitionat in scaun.
ECE R44/04

17
2. Indepartati husa de pe sezut si spatar asa cum este aratat la Fig.16
Inlaturarea husei:
1. Indepartati toate curelele asa cum este aratat la Figura 13
MONTAREA SCAUNULUI
“Grupa I” /de la 9 pana la 18 kg/ CU ISOFIX SI FIXARE SUPERIOARA
Sfat: Carligul de metal auto pentru fixare superioara in general este montat sub tetiera pe polita sub luneta din
spate, in spatele tetierei scaunului sau pe podeaua portbagajului. Pentru mai multe detalii, cititi instructiunea
auto sau contactati producatorul. Figura 8
Pasul 2. Apasati mecanismele de fixare ISO FIX direct peste carligele de metal auto pana se va auzi “Click”
Fig. 10
Pasul 1. Apasati butonul de eliberare la sistemul ISOFIX pentru a iesi mecanismele de fixare pana se va auzi
“Click” Fig. 9
Sfat: In cazul in care dispozitivele de fixare ISOFIX sunt montate corect, butonul de eliberare va iesi inspre
afara si se va vedea marcajul clar verde pe acesta. Fig. 10.1
Pasul 3.Apasati butonul de eliberare ( Figura 9) și apasati foarte bine scaunul pentru copii de spatarul
scaunului autovehiculului. In timpul acestei operatiuni sistemul ISOFIX va strange scaunul pentru copii de
spatarul scaunului autovehiculului si veti auzi un sunet “Click”. Asigurati-va ca scaunul pentru copii este foarte
bine strans de spatarul scaunului autovehiculului. Verificati din nou butonul pentru eliberare ISOFIX si
asigurati-va ca indicatia pentru blocare arata VERDE. Figura 10.2
Pasul 4. Prindeti scaunul si verificati daca este fixat bine sau daca nu se clatina. Daca scaunul se clatina si
dispozitivele de fixare ISOFIX sunt scoase, repetati pasurile de mai sus si montati din nou.
Pasul 5. Trageti carligul pentru fixare superioara, apasati butonul de eliberare, pentru a trage centura suficient
pentru fixare de carligul de metal auto. Fig. 11.3 Introduceti banda superioara prin tetiera autovehiculului.
IMPORTANT: In primul rand verificati daca autovehiculul are 2 carlige de metal ISO FIX pentru fixare in partea
de intersetare intre scaun si tetiera auto sub tapiterie si carligul de metal pentru fixare superioara din spatele
scaunului auto. Figura 7.1
Pasul 6. Fixati carligul scaunului de carligul auto. Verificati, poate sa existe trei puncte de prindere, alegeti pe
cel corespunzator pentru dvs. Fig. 8; 11.4
Pasul 7. Trageti cureaua carligului aflat de cealalata parte pentru al strange. Fig. 11.5
AVERTISMENT: Daca carligul pentru fixare superioara este strans corect, isi va face aparitia marcajul verde la
capatul opus al butonului de eliberare. Va rugam verificati ! Fig. 11.6
Pasul 8. Asezati copilul in scaunul auto. Verificati inaltimea curelelor pentru umeri. Asigurati-va ca curelele nu
sunt rasucite sau impletite undeva. Fixati curelele de siguranta ale copilului asigurandu-va ca sunt bine
pozitionate si trageti de cureaua aflata in centrul scaunului pentru a le strange. (Figura 12)
3. Amplasati din nou curelele in orificiile dorite ale spatarului. Figura 4.1 Asigurati-va ca curelele sunt orientate
intr-o pozitie si ca nu sunt rasucite.
1. Scoateti curelele din carligele aflate in spatele scaunului. Figura 3.1
2. Extrageti curelele din orificiile spatarului. Figura 3.2
5. Alegeti inaltimea curelelor in functie de inaltimea copilului (Figura 5). Pozitia curelelor trebuie sa fie la
nivelul sau putin deasupra umerilor copilului. (Figura 5B) Nu folositi curelele scaunului in cazul in care orificiile
pentru curele se afla sub nivelul umerilor copilului sau acesta are o greutate de peste 18 kg. In aceasta
situatie folositi centura autovehiculului.
Reglarea inaltimii curelelor
4. Amplasati curelele in clema centrala de metal aflata in partea din spate. Figura 4.2.1 Conectati carligul aflat
pe cureaua husei curelelor pentru umeri. Trageti de huse pentru a va asigura ca sunt fixate bine.
Ajustarea lungimii curelelor
1. Destinderea curelelor: Apasati butonul pentru ajustarea curelelor (Figura 6a) si in acelasi timp trageti cele
doua curele pentru umeri (Figura 6b).
2. Strangerea curelelor: Pozitionati copilul in scaunel, fixati cele doua curele de catarama centrala si trageti de
banda aflata in mijlocul sezutului. Figura 12

MONTAREA SCAUNULUI
“Grupa II; III” /de la 15 pana la 36 kg/
CU atașament suplimentar FIT SI centura de siguranta cu prindere in 3 puncte
Pasul 1. Va rugam, repetati pasii de la 1 la 4 pentru montarea scaunului auto, descrisa in
Pasul 2. Va rugam, repetati pasii de la 1 la 4 pentru montarea scaunului auto, descrisa in grupa I /9 pana la 18
kg/ cu ISOFIX si banda superioara.
Pasul 3. Asezati copilul in scaun. Poziționați centura de umăr peste cârligul peste umărul copilului ar centura
transversala deaspura scaunului si poalele copilului. Treceti centura prin orificiul inferior al sezutului scaunului
si fixati centura in catarama scaunului auto pana cand veti auzi “click”. Figura 15 a;b;c
Verificati daca catarama centurii este fixata bine prin tragerea centurii.
grupa II ; III /15 pana la 36 kg/ cu centura de siguranta cu prindere in 3 puncte.
DIDIS INTERNATIONAL STR. FOISORULUI NR.122-124 PARTER SECTOR 3 BUCURESTI
ROMANIA Telefon - 00 40 21 211 65 60 Fax - 00 40 21 210 65 62
E-mail: [email protected]
18
Pasul 2. Scoateti placutele metalice ale curelelor de pe fundul scaunului. (Figura 13 c;d)
Pasul 1. Inlaturati curele scaunului prin eliberarea curelelor pentru umeri din carligele aflate in spate si
extrageti din orificiile spatarului. (Figura 13 a; b)
Va rugam sa folositi centura de siguranta in 3 puncte auto pentru a asigura o sigurata pentru copil si pentru a
fixa scaunul auto.
Pasul 5. Amplasati scaunul pe scaunul autovehiculului cu fata indreptata inainte “in directia de mers”.
Asigurati-va ca scaunul este montat in mod corect.
Pasul 8. Asigurati-va ca cureaua este corect amplasata prin toate ghidajele, nu este rasucit si nu deranjeaza
copilul.
Pasul 3. Apasati butonul aflat in mijlocul scaunului si trageti banda de ajustare aflata sub sezutul scaunului.
Pasul 4. Amplasati ghidajul rosu pentru centura auto in orificiul respectiv la spatarul scaunului, putin mai sus
decat umerii copilului. (Figura 14)
Pasul 7. Inserati cureaua pentru umeri a autovehiculului prin ghidajul rosu la spatarul scaunului (Fig.15 a;b),
peste umarul copilului (departe de gatul acestuia) si sub cotiera sezutului. Inserati cureaua abdominala sub
cotierele sezutului si deasupra genunchilor copilului, dupa care conectati cureaua de catarama auto pana
cand se va auzi “click” (Fig.15 c)
Pasul 6. Pozitionati copilul in scaun.
MONTAREA SCAUNULUI
“Grupa II” Grupa “III” /de la 15 pana la 36 kg/
Cu centura de siguranta cu prindere in 3 puncte

INFORMACJA
1. To jest „uniwersalny” środek bezpieczeństwa dla dzieci. Urządzenie zostało zatwierdzone zgodnie z Regułą
Nr 44, do ogólnego korzystania w pojazdach i jest dopasowane do większości, lecz nie do wszystkich siedzeń
w samochodach osobowych.
2. Ustawienie jest prawidłowe, jeśli producent pojazdu zadeklarował w Instrukcji eksploatacji pojazdu, że do
pojazdu można stosować „uniwersalne” środki zabezpieczające dla dzieci w danej kategorii wiekowej.
3. Tan środek zabezpieczający dla dzieci został sklasyfikowany jako „uniwersalny” przy bardziej
restryktywnych warunkach w porównaniu z poprzednimi konstrukcjami, na których nie podano danego
oznakowania.
4. W wypadku jakichkolwiek wątpliwości należy skonsultować się z producentem środka zabezpieczającego
dla dzieci lub ze sprzedawcą.
Siedzenie jest odpowiednie tylko do pojazdów, wyposażonych w 3-punktowe statyczne lub 3-punktowe przesuwane
pasy bezpieczeństwa. Zatwierdzone przez UN/ECER № 16 lub inne odpowiednie standardy.
PL WAŻNE!ZACHOWAJ NA PRZYSZŁOŚĆ.
PRZECZYTAJ UWAŻNIE!
ЕN
PL
WAŻNE! PROSIMY PRZECZYTAĆ UWAŻNIE I
ZACHOWAĆ INSTRUKCJE , ABY MÓC Z NIEJ
KORZYSTAĆ W PRZYSZŁOŚCI!
Krzesełko samochodowe / Instrukcja użytkownika
19
HARMONY
OSTRZEŻENIE! Urządzenie powinno zostać zamienione, jeśli zostało poddane znacznemu uszkodzeniu
przy wypadku.
OSTRZEŻENIE! Każdy bagaż lub inne przedmioty, które mogą doprowadzić do urazów w przypadku
wypadku powinne być dobrze przymocowane do siedzenia lub podłogi!
OSTRZEŻENIE! еWszystkie paski przymocowujące krzesełko powinne być zaciągnięt , a paski,
przytrzymujące dziecko były uregulowane w stosunku do jego ciała i nie były przekręcone.
OSTRZEŻENIE! Nie używać krzesełka w domu. Ono nie jest zaprojektowane do użycia domowego i należy
korzystać z niego tylko w pojeździe!
OSTRZEŻENIE! Wnętrze samochodu może stać się bardzo gorące, kiedy jest narażone na bezpośrednie
światło słoneczne. Właśnie dlatego zalecane jest nakrywać krzesełko, kiedy nie korzysta się z niego. To
zapobiega nagrzaniu się tapicerki i komponentów, szczególnie tych , które są przymocowane do
krzesełka, jak również chroni przed poparzeniem się dziecka!
OSTRZEŻENIE! Wolno stosować tylko jeśli zatwierdzone pojazdy posiadają 3-punktowe urządzenie
chowające do paska zabezpieczającego, zgodnie z Regułą Nr 16 IKE-ONZ lub inne odpowiednie ООН
standardy.
OSTRZEŻENIE! Twarde element lub plastykowe części urządzenia zabezpieczającego dla dzieci muszą być
położone i montowane w ten sposób, że przy codziennym korzystaniu z pojazdu nie zostały zaczepiane
siedzenia ruchome lub drzwi pojazdu.
OSTRZEŻENIE! Urządzenie zabezpieczające dla dzieci nie powinno być używane bez pokrowca!
OSTRZEŻENIE! Siedzenie może być montowane tylko na siedzeniach pasażerskich z 3-punktowym
systemem pasów. Nie korzystać z innych punktów do przymocowania paska, oprócz tych, opisanych w
instrukcji i oznakowanych na systemie zabezpieczającym. Upewnić się, że klamra paska bezpieczeństwa
samochodu nie jest położona do lub przed danym paskiem systemu zabezpieczającego.
OSTRZEŻENIE! Nie pozostawiać dziecko bez kontroli w urządzeniu zabezpieczającym!
OSTRZEŻENIE! Pokrowiec na siedzenie nie wolno zastępować innym, oprócz takim, który jest zalecany
przez producenta, gdyż jest on niepodzielną częścią system do zabezpieczenia dziecka!
OSTRZEŻENIE! Przed ustawieniem jakiejkolwiek części ruchomej lub regulującej się krzesełka dziecięcego,
należy wyjąć dziecko z krzesełka!
OSTRZEŻENIE! Zapewnić przyleganie kolana nad biodrami nisko, w ten sposób, aby ta część ciała została
dobrze objęta pasem!
OSTRZEŻENIE! Niebezpiecznie jest wprowadzać zmiany lub uzupełniać urządzenie zabezpieczające bez
zgody kompetentnych instytucji!
Ważne instrukcję dotyczące bezpieczeństwa!
OSTRZEŻENIE! Należy przestrzegać ściśle wskazówki dotyczące montażu. Nieprzestrzeganie wskazówek
może doprowadzić do urazów dziecka!
Kiedy montuje się siedzenie z ISOFIX przymocowaniem i górną częścią, ten typ krzesełka bezpieczeństwa dla
dziecka jest przystosowany tylko do przymocowania do siedzenia samochodów, wyposażonych w system
ISOFIX, które są zamontowane zgodnie z ECE R14

Składanie stołka
1. Postawić siedzenie i oparcie w poziomym położeniu na równej powierzchni. Zdjęcie 2 Postawić haczyki
oparcia do otworów w siedzeniu. Zdjęcie 2а Przycisnąć dłońmi haczyki oparcia ( 2.1) i przyciskając mocno ,
podnieść oparcie do pozycji pionowej (2.2).
Ostrzeżenie : Nieprzestrzeganie tej wskazówki prowadzi do złamania haczyków oparcia, co nie jest objęte
gwarancją !
Ostrzeżenie : W trakcie składania lub rozkładania w samochodzie jest możliwie, aby oparcie krzeszełka
zostało przesunięte ze swojej pozycji pionowej. To nie jest wada krzesełka , ponieważ pozycja oparcia jest
określana przez pozycję oparcia siedzenia samochodowego!
Wyciągnąć oparcie do góry, żeby się upewnić, że jest przymocowane do siedzenia.
6. Przycisk do regulacji pasków
Zdjęcie 1
5. Klamry do pasów
CZĘŚCI
3. Paski
4. Zmiękczacz pasów
( pod tapicerką)
1. Oparcie
7. Pasmo do regulacji pasów
2. Przesuwać paska
9. Klamra do pozycjonowania paska w samochodzie
16. Uchwyt do regulacji ISOFIX
14. Przycisk do uwolnienia systemu ISOFIX
17. Poduszka na głowę
8. Siedzenie
11. Klamra do pasów na ramiona
15. Mechanizmy do przymocowania systemu ISOFIX (końcówki)
13. Przycisk do uwolnienia górnego haczyka
10. Klamra metalowa
18. Zmiękczacze dla dziecka
12. Górny haczyk do zapięcia ISOFIX
20
Z 3-PUNKTOWYMI PASAMI!
RODZAJ ZATWIERDZONYCH PASKÓW, JAKIE NALEŻY
MIEĆ W SAMOCHODZIE
Państwa siedzenie dziecięce może być zainstalowane TYLKO w
stronę kierunku samochodu za pomocą 3-punktowych pasów !!!
Krzesełko dziecięce może być zamontowane poprzez ISOFIX
przymocowanie i górne przymocowanie w kierunku jazdy dla
grup 1, 2, 3 (9-36 kg).
Możliwość zainstalowania TYLKO na siedzeniach
NIE MOŻNA KORZYSTAĆ NA SIEDZENIACH Z 2-
PUNKTOWYCH PASÓW !
1
INSTRUKCJE DOTYCZĄCE PRANIA
1. Krzesełko samochodowe może być czyszczone ciepłą wodą i mydłem. Nie korzystać ze zbyt mocnych
preparatów do czyszczenia, takich jak środki ścierne lub rozpuszczalniki.
2. Tapicerkę należy prać ręcznie przy maksymalnej temperaturze 30°С. Nie wkładać do suszarki. Pozostawić,
aby wyschła w sposób naturalny.
3. Części plastykowe mogą być czyszczone za pomocą wilgotnej ścierki. Nie korzystać z materiałów
ściernych.
OSTRZEŻENIE! Regularnie sprawdzać zużycie pasków, zwracając specjalną uwagę na punkty do zaczepiania,
na urządzenia zabezieczające i regulujące.
Twoje dziecko musi nauczyć się nigdy nie bawić się klamrą.
OSTRZEŻENIE! Ze względu na bezpieczeństwo krzesełko dla dziecka powinno być montowane
( przymocowane; przyczepione ) w samochodzie nawet jeżeli nie będziecie kłaść dziecka do krzesełka.
OSTRZEŻENIE! Nie pozostawiać klamrę częściowo zamkniętą, ona powinna być zamknięta, kiedy wszystkie
części są zajęte. Natychmiast należy wyjąć dziecko z krzesełka w wypadku wyjątkowej sytuacji.
ECE R44/04
Table of contents
Languages:
Other Lorelli Car Seat manuals