Lounge Audio COPLA User manual

1 | P a g e
Lounge Audio
www.loungeaudio.com
An Optical Moving Coil Step-Up Preamp
INSTRUCTION MANUAL
Thank you for purchasing the Lounge Audio Copla step-up preamp. This installation
guide is designed to help you connect and understand how to use our step-up
preamplifier. We reserve the right to make improvements or modifications as needed
due to availability of parts, and so design and specifications are subject to change
without notice.
Contents:
Introduction
Box contents and warranty
Front Panel Control
Installation and Rear Panel Connections
Rear Panel Control
Technical Specifications
Troubleshooting

2 | P a g e
Introduction
Lounge Audio is happy to introduce Copla, a moving coil step-up pre-amplifier designed
to drive a moving magnet phono preamp. It is the active electronic equivalent of a step-
up transformer (SUT), allowing control of active moving coil impedance. A single dial
provides variable added richness and dimension to the response of your moving coil
cartridge. This dial is comparable to a Tone knob.
Copla has an optically isolated power supply for low noise, allowing liquid, cohesive
midrange and deep soundstaging. Solid-state circuitry operates at low impedance for
superior hum and noise rejection.
Box contents and warranty
The box contains:
One Lounge Audio Copla step-up preamp and its power adaptor.
Your Copla has a one-year warranty on parts and labor, including the return shipping
back to you. You may return a non-defective unit within 15 days of delivery. If we get it
back in original condition, all accessories intact and with a copy of your original receipt,
we will refund your full purchase price minus a 10% restocking fee. On non-defective
returns, we do not refund shipping costs. Units damaged from use or mishandling will
be prorated.
3 | P a g e
Front Panel Control
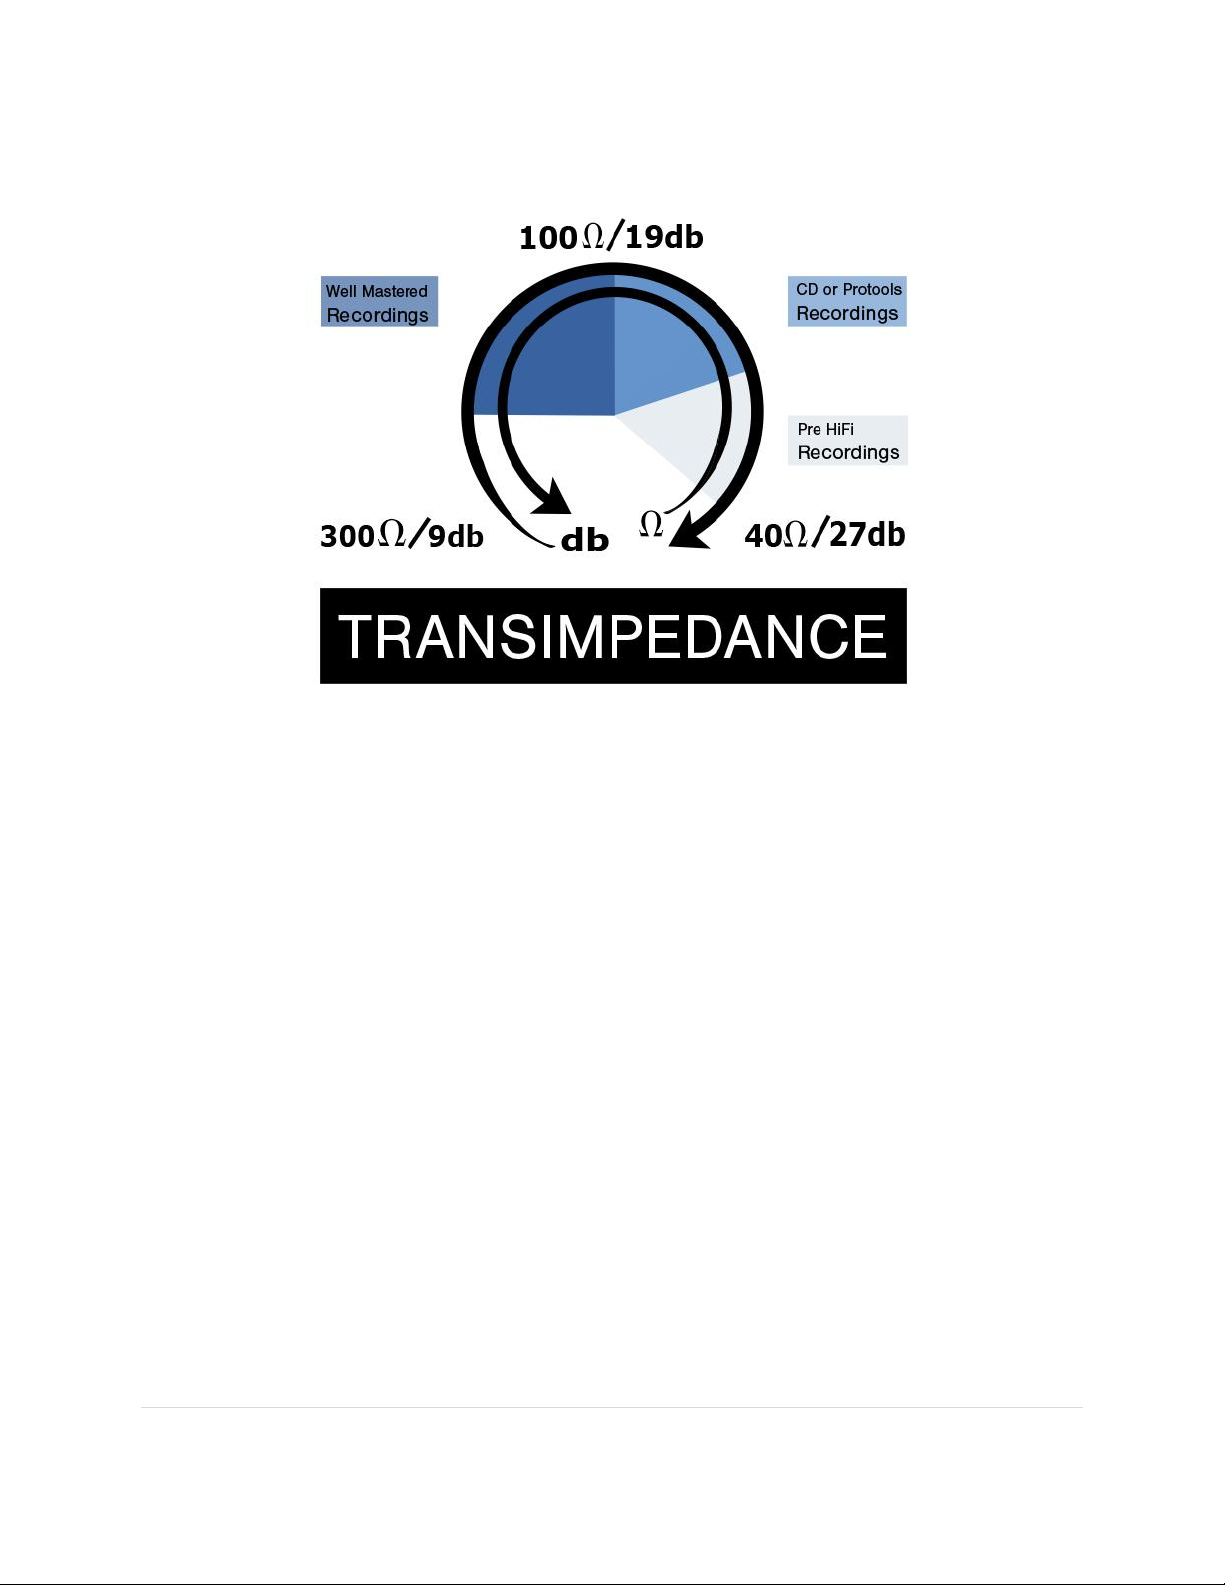
The Transimpedance knob provides sweepable loading from 300 Ohms down to 40
Ohms tied to a gain boost of 9db to 27db. The loading is not resistive; it is the native
input impedance of the transistors themselves. This knob has simultaneous control of
cartridge impedance loading and gain. As shown above, as you turn the knob
clockwise the loading value goes down and the gain goes up. The knob’s neutral
position is straight up, providing a 100 Ohms load for your cartridge. This is the most
common manufacturer-recommended load value for average moving coil cartridges,
and a good center point to start with. Use your ears to adjust the sound to your liking.
In case you wondered, the top blue edge of the Copla does get brighter and whiter as
the knob is turned clockwise. This is not just a visual effect. That white light is the power
being transferred to the amplifier circuitry through photo diodes.
This is a powerful tool that can adjust the response of your cartridge to different types of
music, recordings, masterings and pressings. We have found that well-mastered
recordings sound best with a gentle application of load/gain by setting the knob to about
200 ohms (9 o’clock dial position). With pressings sourced from normal digital sources,
(e.g. CD files or Pro Tools) a setting of 100-80 Ohms (12 - 2 o’clock on the dial) brings
out more richness and body, to offset the compressed dynamics often found in these
pressings. And finally, with pre-hifi era recordings or lo-fi garage recordings, an 80-40
Ohm load (2 –5 o’clock dial setting) will bring out even more body and midrange
resolution where the material is all about the musical performance and the technical
aspects of the recording leaves something to be desired. Of course, these are our
observations. Use the knob to find the sweet spots with your gear.

4 | P a g e
Installation and Rear Panel Connections
We assume your turntable system is already functioning and you are adding Copla to it.
There is no power switch. We suggest plugging Copla into a switchable socket on the
back of your amp (if there is one) or into a switchable power strip with the other devices
in your stereo system to turn the system on/off. You can, however, leave the unit on
24/7 with no adverse effect.
Insert the Copla between your turntable and phono preamp. Disconnect the turntable
phono cables and ground wire, and connect them to the Copla input jacks and ground
terminal. Then connect the Copla outputs to the phono preamp inputs. Make sure to set
your phono preamp mode to “moving magnet”(MM) if that option is available.

5 | P a g e
Rear Panel Control
Balance
Some MC cartridges have a channel imbalance. If you notice a stereo imaging
imbalance between the left and right channels which is not adequately addressed with
your preamp/receiver’s balance control, then, and only then, use Copla’s stereo balance
trim pot on the back panel. This adjustment is accessed through the hole labeled
“Balance.” The pot is factory set vertically for equal gain in each channel. Use a small,
flat head screwdriver, “greenie” or Miniature Potentiometer-Trimmer Adjustment Tool to
balance left and right channels. This is easiest with a test record or a mono record,
listening while turning the pot.

6 | P a g e
Technical Specifications
Continuous Adjustable Gain: 9 to 27dB
Continuous Adjustable Input impedance: 300 to 40 ohms
Output impedance: 1.5K ohms
Signal-to-noise ratio: 85db (ref to 0.775VRMS output)
Distortion: 0.03 % @-40db output 3rd Harmonic Dominating
AC Adaptor: 120VAC 60hz, 18VAC, 500ma Wall Cube type.
Amplification Type: complementary bipolar transistors
I/O’s: gold RCA jack
Dimensions: Height 3”, Width 6.5”, Length 5.8”
Weight: 2 lb 15 ounces
Troubleshooting
There is no power switch. We suggest connecting it to a switchable power strip with all
other devices, and switch the power strip on/off. You can leave the unit on 24/7 with no
adverse effect.
Hum can occur due to a variety of reasons, most commonly:
a) Quality of cables
b) Grounding: check to see that the turntable is grounded to the Copla as shown on
the “Installation and Rear connections” section.
c) Positioning of the unit: power amps or integrated amps should be far enough
away from the turntable tonearm, Copla or your preamp.
We are committed to providing excellent service. If you have any questions or issues,
Table of contents
Other Lounge Audio Amplifier manuals


