Lovi Prolactis User manual

Hospital personnel
recommendation*
Prolactis
2-Phase Electric Breast Pump
2-fazowy elektryczny laktator
2-фазный электронный молокоотсос
0% BPA
Instruction manual • Instrukcja obsługi • Руководство по эксплуатации
Masz pytanie dotyczące produktu?
lub wejdź na stronę
www.lovi.pl
gdzie znajdziesz więcej
cennych informacji i porad
poświęconych karmieniu piersią
Zadzwoń do nas!
46 858 00 28
w godzinach od 8 do 16
Prolactis
*) Breast Pump recommended by the members of the medical personnel from Ujastek hospital. Laktator rekomendowany przez osoby zpersonelu medycznego Szpitala
Ujastek. Молокоотсос рекомендованный медперсоналом больницы Уястэк.

6
AM
PM
AM
PM
AM
PM
1
7
5
8
23 4
4
5
5
6
6
7
7
8
1
2
3
4
1
2
3
1
2
3
4
5
6
7
8
Rys. 2 / Fig. 2
Rys. 1/ Fig. 1 Rys. 3 / Fig. 1
Rys. 4 / Fig. 4
c
a
b
a
b
c
d
d
b
a
c
9
Użyj instrukcji / Read the instruction manual
Wytwórca / Manufacturer:
Acute Ideas Co. Ltd., 3F No. 11 Lane 35, Jihu Road, Taipei 114, Neihu District, Taiwan
Autoryzowany przedstawiciel w UE / Authorized EU representative:
Well Kang Ltd, The Black Church, St. Mary’s Place, Dublin 7, Ireland
Ph. +353 (1) 4433560, fax +353 (1) 6864856
Importer:
Canpol sp. z o.o. SKA
ul. Puławska 430, 02-884 Warszawa
Biuro, sprzedaż: ul. Graniczna 4, Słubica B, 96-321 Żabia Wola, Polska
Ph. +48 46 858 00 00, fax +48 46 858 00 01
Data wydania / Date of issue
04.12.2017
Canpol sp. z o.o. SKA.
02-884 Warszawa,
ul. Puławska 430, Poland.
Biuro, sprzedaż:
Słubica B, ul. Graniczna 4,
96-321 Żabia Wola, Poland.
tel. (+48 46) 858 00 00,
fax:(+48 46) 858 00 01
www.lovi.pl
ISO 9001, ISO 22716
GB This product meets all applicable EU rules and directives and is made to LOVI® design and
specication. LOVI® is a registered trademark
PL Wyprodukowano zgodnie z obowiązującymi dyrektywami UE oraz ze specykacją LOVI®.
LOVI® jest zastrzeżonym znakiem towarowym

GB
1
INSTRUCTION MANUAL
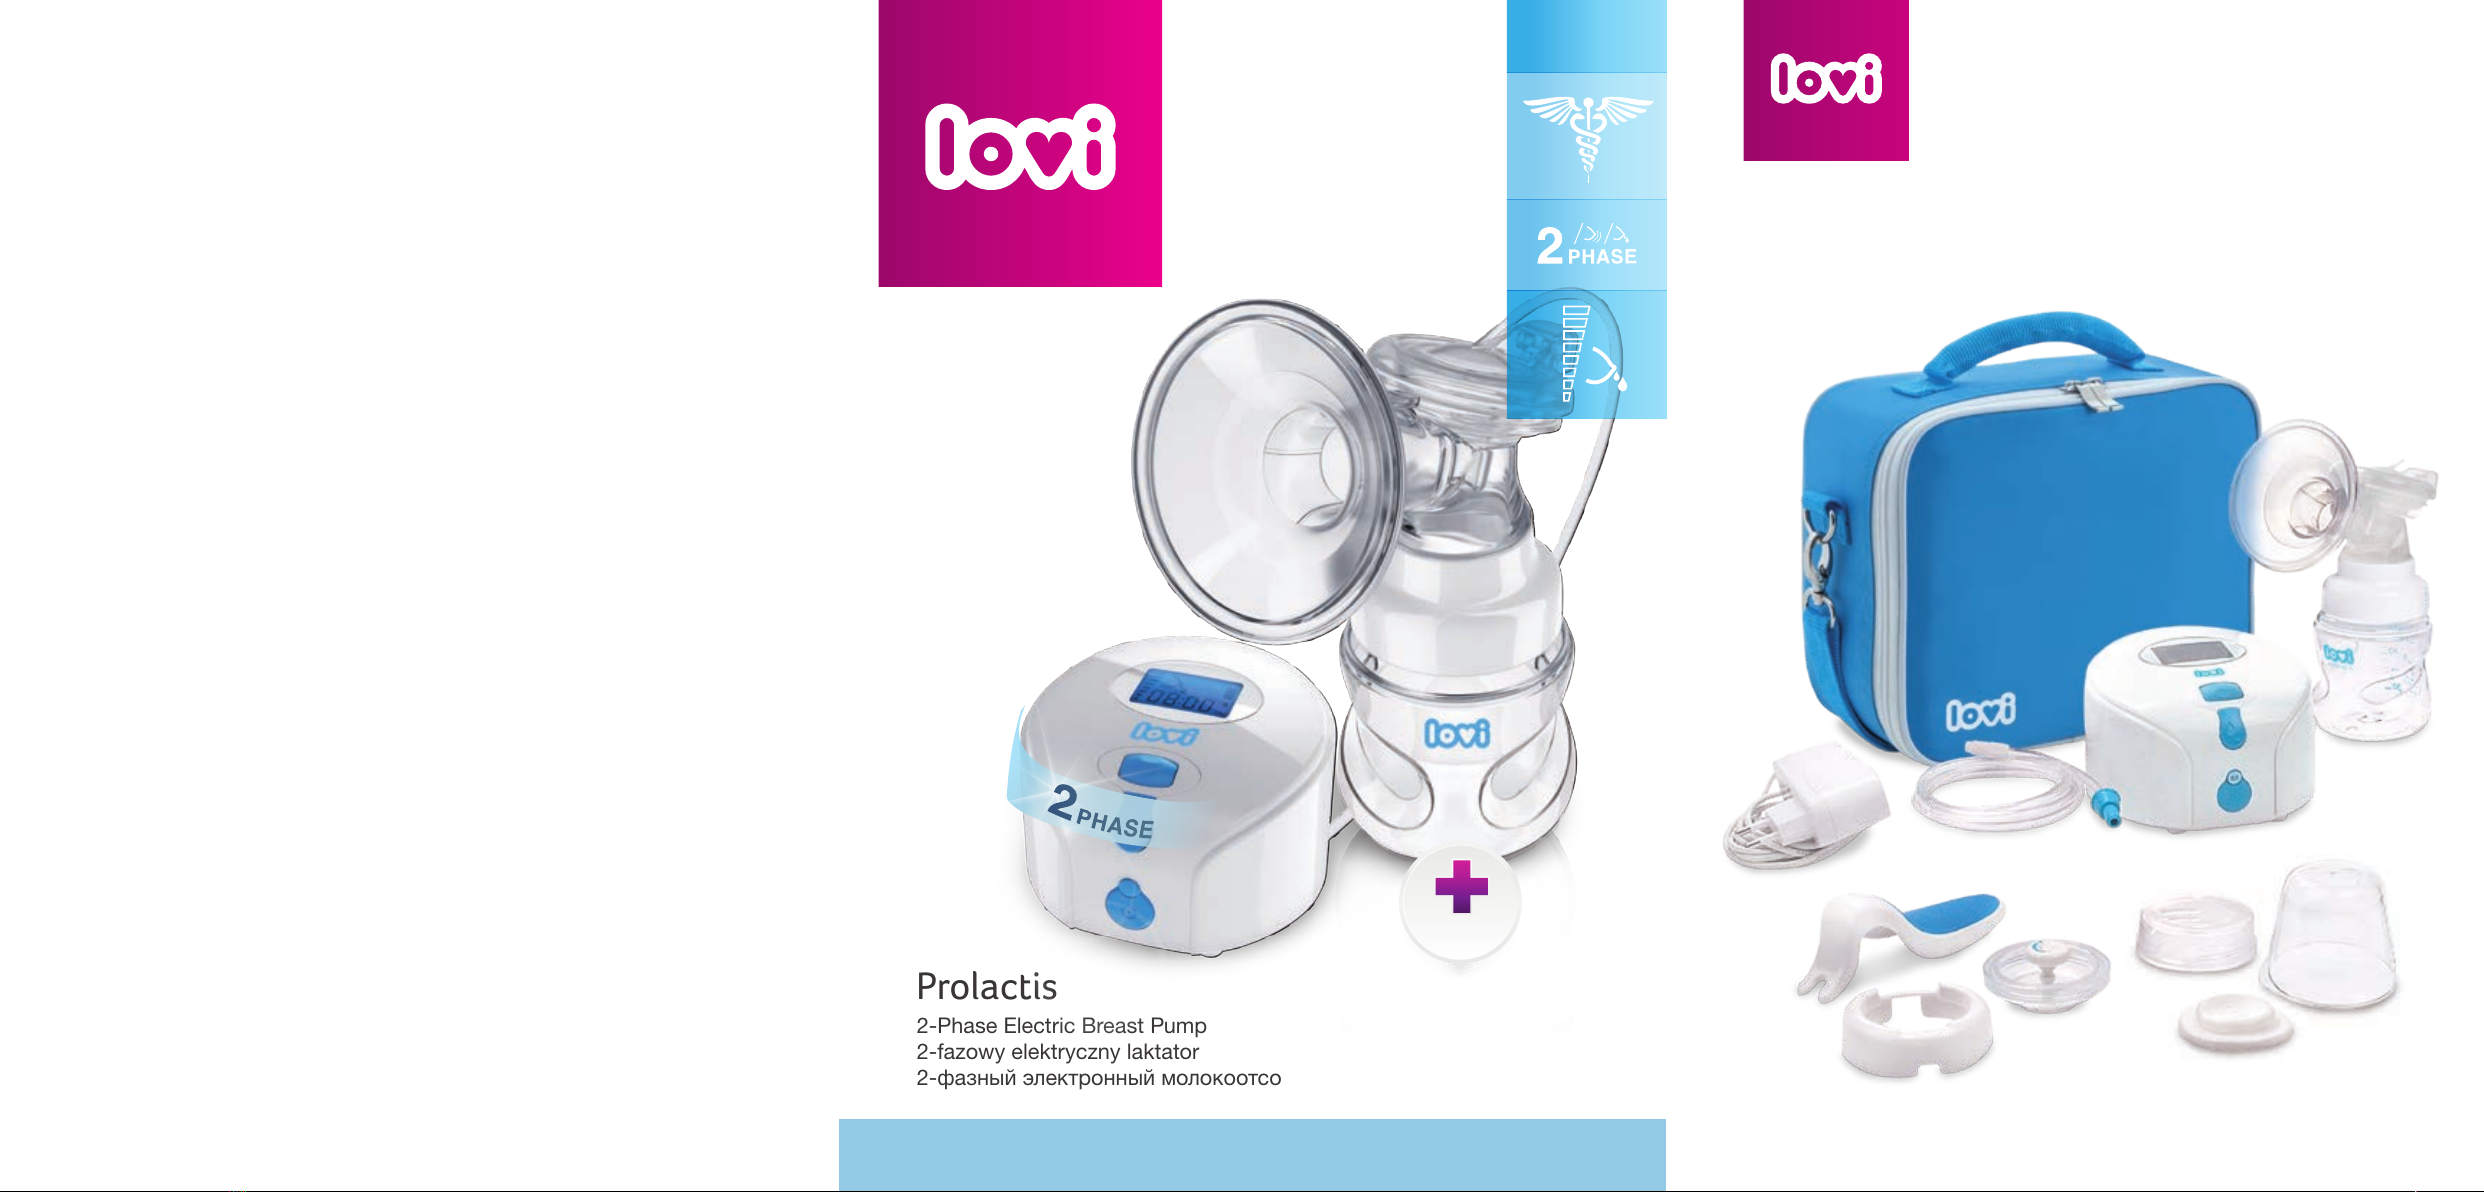
2-Phase Electric Breast Pump LOVI - Prolactis
Professional protection of breastfeeding
Please read this instruction manual carefully before using the device.
Important safety information:
Failure to observe this instruction manual and the safety information may result in danger and the device failure. Use the
device only as intended and described in this manual. The information contained in this manual is subject to appropriate
technical changes.
INTRODUCTION
Congratulations on your purchase of the 2-Phase Electric Breast Pump LOVI! Prolactis Breast Pump is a professional
aid to support breastfeeding and solve problems of lactation. Ideal for situations requiring frequent pumping.
It also provides support for active and working mums who require alternative ways to feed breast milk. Enables
painless, comfortable milk expression in a short time. Tested in cooperation with Polish hospitals*.
Prolactis Breast Pump is equipped with two expression cycles inspired by baby’s sucking rhythms:
stimulation cycle and expression cycle.
Stimulation cycle – imitates fast suckling moves that stimulate the production and milk let down.
Expression cycle – reects slower and deeper eective suckling. When milk start to ow, the baby must put more
eort into suckling. Milk slowly becomes more dense and lling, that is why the suckling rhythm and the pace slow
down.
Range of rhythm and power of Prolactis Breast Pump suction has been developed to reect the natural suckling
process and how the rhythm of sucking changes during breastfeeding.
Using both cycles, you will express more milk in less time.
Additional diaphragm and handle, included in the Prolactis set, enables manual milk expression. Converting only
few parts, Electric Breast Pump LOVI Prolactis can be transformed into Manual Breast Pump LOVI Protect.
Breast milk is the healthiest and most valuable food for newborns and infants. It is recommended as a sole food
given to your child in the rst 6 months of life. After six months, it should be combined with solid food.
NOTE! Do not use a breast pump in circumstances when a hungry baby fails to empty the breast itself, i.e. if there is any
possibility that your milk ducts are blocked.
USEFUL HINTS
When to use a breast pump?
If possible, wait until lactation stabilizes, which usually occurs within 2-4 weeks after birth.
Exceptions to this rule:
• If your breasts produce too much milk, they become swollen and hard (engorged). Expressing a small amount
of milk before or during a feed can give you relief and help your baby to grasp the nipple.
• If you have inverted nipples (which may occur because of long intervals between feeds.)
• If you have a concave, at or damaged nipples (using a breast pump can improve nipple shape).
• If you feel overow between breast feeds and do not want to wake the baby.
• The baby is sick and does not want to suckle.
• If your breasts produce too little milk, using the pump between feeds will help increase milk production.
• When you are working or away from home and want to continue breastfeeding, you should regularly express
milk using a breast pump to sustain the natural process of lactation.
GB
* Study LOVI Prolactis breast pumps and LOVI Protect the group of
40 women, supervised by midwives and lactation consultants.

2
How often should you express milk?
If you temporarily cannot breastfeed it is recommended that you express milk using Breast Pump at least 8 times
a day. This will keep milk production at the appropriate level. In the beginning you may experience diculty
expressing, but after a few days you will be pumping more. Collecting one portion of milk may require several
sessions.
BASIC PRODUCT INFORMATION
Breast Pump PA203S
2-Phase Electric Breast Pump LOVI – Prolactis, (later referred to in the manual as‚ a Breast Pump’), is a product
designed for breastfeeding mothers in order to express breast milk. It enables collection of milk for later usage i.e.
in the case of separation from the child. The Breast Pump helps maintain lactation and prepares for your planned
absence or random events such as power outages, treatment, cracked and sore nipples.
• The device is intended for personal use.
• The device warranty is 24 months.
• Before using, read the instruction manual and follow the rules of safe use.
• Keep the manual together with the device.
• The expected life of the product is 5 years. The life of silicone parts is 2 years.
Silicone parts may change color permanently. These elements must be replaced
after nding discoloration or after the estimated time of use.
Follow the recommendations on the correct use of the device and its accessories. Never
use a damaged or incomplete / broken device. Damaged or worn parts should be replaced
immediately. The manufacturer is not liable for damages resulting from the misuse of the
device, the resulting damage in this way cannot be the basis for the claim or warranty. Making
any repairs or modications to the product by unauthorized persons, results in loss of warranty
and may result in risks to health and life.
SAFETY RULES
• If you experience problems while breastfeeding, or feeding causes pain, it is necessary to seek medical advice,
before using the Breast Pump.
• The rst use of the Breast Pump is best done under the supervision of specialists.
• It is recommended to read specialist literature and get to know the principles of baby feeding.
NOTE! Insucient suction may result in a smaller amount of milk, but too high suction can cause soreness and reduce
production of milk. If you notice this type of failure, you should adjust the suction power (see SUCTION LEVEL).
• Keep the product clean. Prevent deposition of dust and other contaminants that could adversely aect the
performance of the product.
• Attention to hygiene is important for the safety of mother and child.
• Some elements of the device are not designed to be cleaned, protect them against water and moisture.
• Connect the unit to an ecient and secure mains.
• When using the product outdoors, only using battery power is permitted.

GB
3
Correct disposal of this product (waste electrical & electronic equipment). Applicable in the European
Union and other European countries with separate collection systems. This marking shown on the
product or its literature, indicates that it should not be disposed with other household wastes at the end
of its working life. To prevent possible harm to the environment or human health from uncontrolled
waste disposal, please separate this from other types of wastes and recycle it responsibly to promote
the sustainable reuse of material resources. Household users should contact either the retailer where
they purchased this product, or their local government oce, for details of where and how they can take
this item for environmentally safe recycling. Business users should contact their supplier and check the
terms and conditions of the purchase contact. This product should not be mixed with other commercial
wastes for disposal.
Manufacturer declares under our sole responsibility that the product typed In this manual fulls
the Essentials requirements of medical devices directive 93/42 EEC + 2007/47/EC for class II a.
The product is made in the second class protection.
The product is not a toy. Keep all parts away from children. Retain the instruction for later use. Batch code and expiry
date placed on the packaging.
PRODUCT MISUSE
• Never use a defective product, with visible damage characteristics.
• It is forbidden to use the device while bathing.
• Never use the product in locations exposed to contact with water, for example near a bathtub, wash bowl,
kitchen sink or shower enclosure.
• It is forbidden to use the device if it is possible to fall asleep.
• Do not connect the device outdoors to the to the AC adapter.
• Never use a product that has been dropped or has fallen on a hard surface. In this case, the product must be
returned to service in order to be checked.
• Never use the product discordant with the purpose and conditions of use.
TECHNICAL DESCRIPTION
Battery operation 4 x AA 1,5 V – alkaline
Power operation 230 V / 50 Hz / 0,4A max; output: =12V / 1A
Maximum power 12 W
Weight (with AC adaptor without batteries) 516 g
HOUSING
WARNING!
1. Make sure the polarity (+) and (-) is correct as indicated.
2. Remove batteries if pump is not in use for a long period of time.
3. Dispose of batteries according to regulations for environmental protection and recycling.
4. Replace batteries as a simultaneous set.
5. Remove battery from device when not in use for more than 24 hours.
6. Do not tamper with or attempt to repair the device.
GB
2460

4
SET COMPONENTS
Fig. 1 – PROLACTIS SET PARTS
1. Electric Pump main unit
2. AC adapter
3. Vacuum tube with adaptors
4. Expression collection combo kit
5. Food storage kit
a. Screw cap
b. Soft sealing disc
c. Hood/cup with scale
6. Breast Pump LOVI Protect Parts (for manual pumping)
a. Adjusting valve stem
b. Diaphragm
c. Handle
d. Diaphragm cover
7. Spare parts
a. One-way valve - 2 pcs
b. O-ring - 2 pcs
c. Let-down silicone cushion – 1 pc
d. Diaphragm (for electric pump) – 1 pc
8. Prolactis storing case
9. Disposable Breast Pads LOVI ‘Day&Night’ – 10 pcs
Fig. 2 – EXPRESSION COLLECTION COMBO KIT
1. Cap
2. Diaphragm
3. Cup with o-ring
4. Let-down silicone cushion
5. Breastshield body
6. One-way valve
7. Bottle adapter
8. Bottle
Fig. 3 – ELECTRIC PUMP MAIN UNIT
1. LCD screen
2. Vacuum adjusting wheel
3. Let-down button
4. M button
5. On/O button & power LED
6. Battery cover
7. Tubing adapter inlet
8. AC adapter inlet
Fig. 4 – LCD SCREEN GUIDE
1. Suction level indicator
2. Stimulation cycle indicator
3. Expression cycle indicator
4. Time indicator
5. Power indicator
6. M icon (memory)
7. Alarm

GB
5
tip
circular bottom
HOW TO ASSEMBLE THE BREAST PUMP
Hold the „horn” of the breastshield body in one hand.
Make sure the bottle-thread side opening is facing up.
With the thumb and fore-nger of the
other hand, hold the tip of the one-way
valve and place the at circular bottom
into the opening. Be sure not to stretch,
bend, or twist the tip of the one-way
valve. Seal all the edges rmly.
With your thumb and fore-nger, gently
seal any openings on the tip of the one-way
valve and shape into a straight line.
Note: The one-way valve tip does not have to align
with anything, as long as all the edges are securely
sealed. This is critical to the optimal performance
of the pump.
Carefully twist the bottle adapter to the breastshield body for a secure t.
Note: Be sure not to bump the one-way valve when twisting the breastshield
body & the bottle adapter pieces together. If you bump the one-way valve,
repeat above steps.
With the bottle adapter in one hand, twist the collection
bottle for a secure t.
With the cup in one hand, place the silicone
diaphragm in the cup (matching the shape
of the cup). Press around the edges of the
diaphragm for a secure t. Make sure the
diaphragm is evenly mounted on the cup
and there is no gap in between them.
GB

6
With the breastshield body in one hand, place the silicone cushion
in the breastshield body matching the shape of the ange).
Secure the lip of the cushion around the edges of the ange.
Note: Your Electric Breast Pump Prolactis will work with or without
the silicone cushion. Your comfort depends on your preference.
Using your AC adapter (included):
Attach the power cord to the electric pump base. Plug the AC adapter into
an electrical outlet.
Electrical safety can only be achieved when using the AC adaptor which was provided
with the pump. Use of any another adaptors causes concern for the safety of the product
and/or user and voids the warranty.
It is permitted to operate using AC adaptor without removing the battery from the container.
NOTE! If there are no working batteries in the pump and the devise is unplugged
from the electrical outlet, all previous settings are erased from the memory.
NOTE! AC adapter pins may vary depending on the country of destination.
Place the cap on the cup & diaphragm. (Be sure to
align the hinge and hinge cover). Press tightly to seal.
hinge cover
hinge
Twist the electric pump diaphragm
kit clockwise into the breastshield
body until it locks.
POWER OPTIONS
Electric Breast Pump Prolactis may be operated under 2 following power supply modes
90

GB
7
Open the battery cover.
Insert 4 new AA alkaline batteries.
Note: Make sure the polarity is correct as indicated.
Remove the old batteries
if you are replacing them.
Close the battery cover, making
sure it „snaps” into place.
Using 4 AA Alkaline batteries (1,5 V)
WARNING!
• Always replace all 4 batteries at the same time.
• Remove all batteries from the electric pump base if the Electric Breast Pump is not going
to be used for extended periods of time.
• Properly dispose of all batteries, according to regulations for environmental protection
and recycling.
• Alkaline batteries may present a risk of re or chemical burn if mistreated. Do NOT
disassemble any battery. Do NOT place batteries near heat source or re. Dispose of used
batteries properly. Do NOT dispose of batteries in re. Keep away from children.
PUMPING INSTRUCTIONS
Before each use:
• Wash your hands thoroughly before using the pump.
• Ensure that the pump is pre-washed and dried, if not, follow the instructions located below.
• Ensure that there is no liquid or moisture in the silicone tube. Never operate the pump if you notice
any water in the silicone tube.
Note! Do not mouth blow the silicone tube in order to remove water.
tubing
connector
Take the white end of vacuum tube and connect to the tubing
connector located on the cap. Push together rmly for a tight seal.
Note! Ensure that there is no liquid or moisture in the silicone tube.
GB

8
Make sure the tubing connector is properly inserted
into the electric pump base.
Do not remove the lm. Lift tab to insert the tubing
adaptor. Pull the tab down to cover the inlet after
use to keep the motor dust free.
Press the On/O button to begin pumping.
Adjust the suction in the stimulation cycle to your comfort level while
pumping by rolling the vacuum adjusting wheel up (+) or down (-).
Hold the expression collection combo kit to your breast so that your nipple(s) are
centered inside the breast shield.
IMPORTANT NOTE! Make sure that funnel or silicone cushion (if you use it) clings
tightly to the breast, otherwise the suction strength may be reduced.
If you want to increase the suction strength, use the funnel without the silicone cushion.
The LCD screen shows the time of your last pumping session for a few seconds,
the pump will automatically begin in the stimulation cycle.
On/O
vacuum adjusting wheel
let-down button
If you prefer to bypass the pre-set stimulation cycle or your milk lets down sooner
than 2 minutes, press the let-down button to switch to the expression cycle.
On/O

GB
9
When your pumping session is nished,
turn the pump o by pressing
the On/O button.
After the pump has been turned o, the display will remain on for
a few seconds. The display will show the total amount of pumping
time, then automatically switch to standby/clock mode, or alarm
clock mode if the alarm was turned on.
Note: Make sure there is no suction on the nipple(s) before removing the breast shield.
If necessary, break the suction by inserting a nger between the breast shield and the
breast, similar to the way you break away from your baby’s suction.
Note: If the Electric Breast Pump Prolactis is left on, but unattended for more
than 30 minutes, the pump will automatically shut-o.
Adjust the suction in the expression cycle to the most
comfortable and eective level while pumping by rolling
the vacuum adjusting wheel up (+) or down (-).
After two minutes, the stimulation cycle will end
and automatically switch to the expression cycle.
The expression icon will appear and indicate
that you are in the expression cycle.
expression cycle
stimulation cycle
vacuum adjusting wheel
On/O
GB

10
SUCTION LEVEL
Whenever you select a suction level (in both stimulation & expression cycle), your Electric Breast Pump Prolactis
remembers until you change it next time. This feature becomes useful after you are familiar with this pump. Your
Electric Breast Pump Prolactis keeps your previous pumping level without having to reset your preferred level each
time you pump.
To set your preferred suction level:
1. In stimulation cycle, adjust the stimulation suction to the level you nd most comfortable by rolling the
vacuum adjusting wheel up (+) or down (-).
2. In expression cycle, adjust the expression suction level to the highest eective, yet still comfortable level by
rolling the vacuum adjusting wheel up (+) or down (-).
If food gets under the silicone massaging cushion, reduce the suction level so that milk keep up owing
into the bottle.
NOTE: If you nd the suction power insucient (even at the highest setting) try pumping without massage cushion.
M BUTTON (MY FAVORITE MODE)
One of the great features of your Electric Breast Pump Prolactis is the M button (My Favorite Mode). You can easily
set your personal let-down time by press the M button.
To set your personal let-down time:
1. After few times of pumping, you will nd your let-down time about the same in every pumping session.
2. Start pumping as you normally do. Your pump starts in stimulation cycle with your last preferred stimulation level.
3. Press the let-down button when your milk starts to ow to begin the expression cycle with your last preferred
expression level.
4. Press and hold the M button for three seconds, until the M icon ashes . Your personal let-down time
has been set.
5. Continue expressing and nish your pumping cycle.
To pump with your personal let-down time:
1. Turn the pump on.
2. Press the M button. (Do NOT hold more than 3 seconds)
3. Your pump automatically switches from stimulation cycle to expression cycle at your personal let-down time.
NOTE: You CANNOT adjust the suction level or switch between stimulation cycle and expression cycle while in custom
mode. If you have to, stop My Favorite Mode by pressing the M button.

GB
11
SETTING THE TIME
How to adjust the clock:
1. While in the clock/standard by mode, press and hold the M button for 3 seconds to go into clock
setting mode. A beep will sound and the AM/PM icon will ash.
2. To change between AM/PM, use the vacuum adjustment wheel up (+) or down (-).
3. Press the let-down button once to change from AM/PM to the hour. The hour number will ash.
4. To change the hour, use the vacuum adjustment wheel to increase (+) or decrease (-) the hour.
5. Press the let-down button again to change the minutes. The minute number will ash.
6. To change the minutes, use the vacuum adjustment wheel to increase (+) or decrease (-) the minutes.
7. Press the let-down button one last time to save your settings.
NOTE: While in any clock setting mode, if no adjustments are made within 10 seconds, the setting will automatically save
and the pump will return to clock/standby mode.
press and hold
the M button
for 3 seconds
setting the time AM/PM setting hour
clock
** Roll Adjustment Wheel
to adjust
setting minutes
press the
let-down button
press the
let-down
button
press the
let-down
button
GB

12
ALARM CLOCK MODE
It is advised to pump regularly in order to maintain a good milk supply from your body. The alarm clock mode is
designed to maintain a regular expression cycle, by reminding you when it’s time for your next pumping cycle.
After setting the time interval between each pumping, the alarm countdown will automatically start after the
previous pumping cycle has stopped. An alarm will sound when the pre-set time has passed.
How to Adjust the Alarm:
1. In clock/standby mode, press the M button once to go into alarm adjusting mode.
2. Two sets of time will display alternately, the alarm interval time (the time between each expression cycle) and
the next alarm time.
3. Roll the vacuum adjustment wheel up (+) or down (-) to adjust the alarm interval time. The adjustment
increases (+) or decreases (-) in 15 minute increments. The next alarm time will be adjusted automatically
according to the last time the pump was used.
NOTE: The alarm interval time is the time from the beginning of one expression cycle to the next expression cycle. It is not
the time from the ending of one expression cycle to the next one.
4. Press the let-down button to switch to the alarm On/O setting.
5. Roll the vacuum adjustment wheel up (+) or down (-) to turn the alarm function On/O.
6. Press the let-down button again to save your setting.
NOTE: While in alarm adjusting mode, the setting will be automatically saved and the pump will return to clock/standby
mode if no adjustment was made within 10 seconds.

GB
13
MANUAL PUMPING
Converting into 2-Phase Manual Breast Pump LOVI - Protect
The set includes components for manual pumping. With these Electric Breast Pump Prolactis easily turns into the
2-Phase Manual Breast Pump LOVI Protect.
To assemble and correctly use the Manual Breast Pump LOVI Protect, please refer to the separate instruction
manual included in the packaging.
CLEANING INSTRUCTIONS
Sanitize prior to rst use:
Before you use your Prolactis Breast Pump for the rst time, disassemble and boil all parts (coming into contact
with the breast or food) in water for 5 minutes.
• Be sure to use enough water to keep all parts aoat while boiling.
• Do NOT boil tubing or tubing adaptor.
• Remove all parts from the water immediately after boiling.
• Completely air- or towel-dry before reassembly and next use. Dried parts should be stored in an airtight
container or a plastic bag.
Partially dry components may aect the operation of your Electric Breast Pump. Make sure that all parts are
completely dry before use.
PM
AM
press the M
button
Alarm time display
Time period adjustment
clock
**use the vacuum adjustment wheel
to increase (+) or decrease (-)
alarm o
alarm on
press the
let-down button
press the let-down button
GB

14
Cleaning instructions:
• Set aside the tubing and tubing connector. These items do not need to be washed or sanitized because the
diaphragm prevents them from coming in contact with the breast milk.
• All parts of the expression collection kit and electric-pump diaphragm kit may be hand washed in hot water
with mild detergent.
• Do NOT use solvents or abrasives.
• Rinse with hot, clean water.
• Suitable for disinfection in electric sterilizers. WARNING! The absence of uid in the sterilization unit, can cause
deformation of the breast pump parts.
• To clean the electric pump base, wipe the base with a damp cloth, using only water or water mixed
with a mild soap.
• DO NOT WASH THE TUBING, THE TUBING ADAPTOR OR ELECTRONIC PARTS.
• One way valve should be cleaned very carefully. Do not allow the food to dry out in the valve.
NOTE! Always disassemble the valve grasping the circular base with two ngers. Never grasp the end of the valve as it can
get damaged and weaken the strength of suction.
Caution: Take care when cleaning the one-way valve. If it gets damaged, your breast pump will not function properly.
To clean the one-way valve, rub it gently between your ngers in warm soapy water, then rinse thoroughly in clean warm
water. Do not insert any objects into the one-way valve as this may damage the valve.
Note: Before each use, visually inspect the individual components for cracks, chips, tears, discoloration or deterioration,
as they may aect the eciency of the breast pump.
TROUBLESHOOTING
While using the breast pump you may encounter small diculties. Before you decide to place the claim, try
to solve these minor problems by yourself. Here are some useful tips that will solve most problems faced.
Interruption of electrical service:
If you experience an interruption of electrical service, due to a power surge or other factors, during normal
operation of your Electric Breast Pump, try the following:
• Unplug the AC adapter cord from the electrical outlet and wait for ve seconds.
• Plug the AC adapter cord back into the electrical outlet.
• If problem persists, try a dierent electrical outlet.
circular bottom
tip

GB
15
Radio frequency energy:
This equipment generates, uses, and can radiate radio frequency energy. If not installed and used in accordance with the
instructions, may cause harmful interference with other devices in the vicinity. Try the following:
• Reorient or relocate the receiving device.
• Increase the separation between the equipment.
• Connect the equipment into an outlet on a dierent circuit from that which the other device(s) are connected.
• Consult the manufacturer or a eld service technician for help.
• There is no guarantee that interference will not occur.
Decreased suction:
If it feels like the suction has decreased, try the following:
• Detach the tubing and tubing adapter from the back of your Electric Breast Pump and place a nger over the
pump inlet.
- If you do feel suction, the electric pump base is operating properly.
- If you do NOT feel suction, try unplugging the AC adapter from the electrical outlet. If problem persists,
change electrical outlets.
• Make sure the expression collection combo kit is assembled correctly.
• Inspect the one-way valve for any tears or pinholes. This component is critical to
achieving proper suction. If damaged, replace the one-way valve with one of the
spare valves that is provided with your Electric Breast Pump.
• Make sure that the diaphragm is properly set up and there is no gap between the cup with o-ring and the
diaphragm.
• Make sure that the o-ring is properly placed on the cup and correctly assembled with the breastshield body.
• Make sure that the silicone cushion clings tightly to the breast, otherwise the suction may be reduced.
Breast milk buildup in the breast shield body:
• If breast milk doesn’t appear to be draining fast enough into the collection bottle, reduce the suction setting
on your Electric Breast Pump to allow the milk to drain before gradually increasing.
• Make sure that you keep breast pump properly. Bottle should be placed in an upright position.
HOW TO STORE AND USE YOUR EXPRESSED BREAST MILK?
• Milk can be stored in bottle or in breast milk storage bags.
• Freeze only fresh milk. Do not ll the bottle completely as frozen breast milk increases its volume.
• Breast milk can be heated in the same way as any other feed (but never in the microwave as this may destroy valuable
nutrients and antibodies).
• Frozen breast milk can be defrosted overnight in the refrigerator, the warmed gradually in bottle warmer or hot water.
• Shake the bottle to combine separated fat molecules with the remaining volume of milk.
• Once defrosted, milk should be served to your baby within 24 hours. It should be stored in the fridge at this time.
• NEVER refreeze defrosted milk.
• DO NOT add fresh breast milk to already frozen milk for storage.
• DO NOT add fresh breast milk to already frozen milk.
• NEVER heat breast milk by boiling or putting it in the microwave.
• ALWAYS check food temperature before feeding.
• Breast milk that was not used should be disposed.
GB

16
Fresh breast milk Defrosted breast milk
Room temperature Up to 12h Do not store
Refrigerator (+4°C) 2-5 days 24h
Freezer (-10°C) 2 weeks Never refreeze defrosted milk
Deep freezing (-18°C do -20°C) Up to 6 months Never refreeze defrosted milk
As the Breast Pump is for personal use, it cannot be refunded. In the case of mechanical failure, please contact your local
distributor or manufacturer. Please, keep your receipt as a proof of purchase. The warranty does not cover the parts
of the device undergoing natural wear and tear as a result of normal use. The warranty also does not cover the faults
resulting from the inuence of external atmospheric factors (e.g. moisture, high or low temperatures).
WARNING!
• Do not use this product for purposes other than those listed in the attached instruction.
• Do not place the product near sources of re.
• Before using the pump, make sure that all parts were assembled correctly.
• Immediately stop using the breast pump if you feel breast or nipple discomfort.
• Wash your hands before using the product.
• Keep the product out of reach of children.
• Do not drop the product to avoid any damage.
• To avoid burns do not touch the product with bare hands immediately after sterilization in boiling water.
MANUFACTURER DECLARATION
The manufacturer declares with full responsibility that the product complies with the essential requirements of the
New Approach Directives, leading to CE marking. For conrmation the declaration of conformity is issued.

17
INSTRUKCJA UŻYTKOWANIA
Dwufazowy laktator elektryczny LOVI - Prolactis
Profesjonalna ochrona laktacji
Przed rozpoczęciem korzystania z urządzenia należy bezwzględnie przeczytać niniejszą instrukcję.
Ważne informacje na temat bezpieczeństwa:
Nieprzestrzeganie niniejszej instrukcji oraz zawartych niżej informacji dotyczących bezpieczeństwa może prowadzić
do zagrożeń ze strony urządzenia. Urządzenie powinno być używane tylko zgodnie ze swoim przeznaczeniem opisanym
w niniejszej instrukcji. Informacje zawarte w niniejszej instrukcji mogą ulegać stosownym zmianom od strony technicznej.
WSTĘP
Gratulujemy wyboru dwufazowego laktatora elektrycznego LOVI! Laktator Prolactis to profesjonalne wsparcie
w rozwiązywaniu problemów laktacyjnych. Doskonale sprawdza się w sytuacjach wymagających częstego
odciągania pokarmu. Stanowi również pomoc dla aktywnych i pracujących mam, korzystających z alternatywnych
form karmienia własnym mlekiem. Umożliwia bezbolesne, komfortowe odciągnięcie pokarmu w szybkim czasie.
Przebadany we współpracy z polskimi szpitalami*.
Laktator posiada dwufazowy rytm odciągania pokarmu inspirowany rytmem ssania dziecka:
stymulacji i ssania głębokiego.
Faza stymulacji – naśladuje szybkie ruchy ssące niemowlęcia pobudzające produkcję i wypływ pokarmu.
Faza ssania głębokiego – naśladuje wolniejsze, głębsze, efektywne ssanie pokarmu przez dziecko.
Gdy pokarm już płynie dziecko musi się natrudzić by go wyssać. Mleko powoli staje się bardziej gęste, sycące,
a tempo rytmu ssania wolniejsze.
Zakres rytmu i siły ssania laktatora Prolactis został opracowany w oparciu o proces zmian rytmu
i sposobu ssania podczas karmienia piersią.
Korzystając z dwóch faz odciągania pokarmu odciągasz więcej mleka w krótszym czasie.
Dołączona w komplecie dodatkowa membrana i rączka umożliwiają również ręczne odciągnięcie pokarmu – dzięki
zamianie kilku części laktator LOVI Prolactis zmienia się w laktator ręczny LOVI Protect.
UWAGA: marka LOVI rekomenduje karmienie piersią jako najzdrowszą formę podawania pokarmu. Zaleca się
rozpoczęcie podawania pokarmu w formie alternatywnej wyłącznie po konsultacji z lekarzem, położną lub
farmaceutą, gdy karmienie piersią jest niemożliwe lub niewystarczające.
Mleko matki jest najzdrowszym i najbardziej wartościowym pokarmem dla noworodków i niemowląt.
Jest zalecane jako wyłączny pokarm podawany dziecku w pierwszych 6 miesiącach życia. Po 6 miesiącu
powinno być ono łączone z pokarmem stałym.
UWAGA! Laktator nie jest przeznaczony do odciągania pokarmu, gdy głodne dziecko nie może samodzielnie opróżnić
piersi tj. we wszystkich przypadkach, gdy występuje blokada przewodów mlecznych.
PRZYDATNE PORADY
Kiedy należy używać laktatora?
Jeżeli to możliwe zaczekaj do momentu, kiedy laktacja ureguluje się, co zwykle następuje w okresie 2-4 tygodni
po porodzie. Wyjątki od powyższej zasady:
• Twoje piersi produkują zbyt dużo mleka, stają się obrzmiałe i twarde (nawał pokarmu). Ściągnięcie niewielkiej
ilości mleka przed lub w trakcie karmienia sprawi Ci ulgę i ułatwi Twojemu dziecku uchwycenie piersi.
• Brodawka chowa się w pierś z powodu długiej przerwy między karmieniami.
• Masz wklęsłe, płaskie lub poranione brodawki (odciąganie pomaga formować wklęsłą lub płaską brodawkę).
• Jeżeli między karmieniami czujesz przepełnienie piersi i nie chcesz budzić dziecka.
• Dziecko jest chore i nie chce ssać.
• Jeżeli Twoje piersi wytwarzają zbyt mało pokarmu, używając laktatora symulujesz karmienie, co prowadzi do
zwiększenia laktacji.
• Kiedy pracujesz lub przebywasz poza domem i pragniesz kontynuować karmienie piersią, powinnaś regularnie
ściągać pokarm laktatorem, by podtrzymać naturalny proces laktacji.
PL
*Badanie laktatorów LOVI Prolactis i LOVI Protect na grupie 40 kobiet
nadzorowane przez położne i doradców laktacyjnych.

18
Jak często odciągać pokarm laktatorem?
Jeśli mama okresowo nie może karmić piersią zlecamy odciąganie pokarmu minimum 8 razy na dobę. To pozwoli
utrzymać laktację na właściwym poziomie. Na początku mogą wystąpić problemy odciągnięciem większej
ilości mleka, ale po kilku dniach odciągania pokarmu pojawi się więcej. Również przy ustabilizowanej laktacji,
możliwości jednorazowego odciągnięcia pokarmu są mniejsze (30-60 ml), dlatego zgromadzenie jednej porcji
mleka będzie wymagało kilku sesji odciągania.
PODSTAWOWE INFORMACJE DOTYCZĄCE WYROBU
Laktator PA203S
Urządzenie będące elektrycznym odciągaczem pokarmu, nazywane w dalszej części instrukcji obsługi laktatorem,
jest wyrobem przeznaczonym do odciągania pokarmu matek karmiących, w celu jego gromadzenia
i późniejszego wykorzystania, np. w przypadku separacji od dziecka. Laktator pomaga podtrzymywać laktację
i przygotować się na Twoją planowaną nieobecność lub zdarzenia losowe takie jak przerwy w dostawie prądu,
leczenie, popękane i obolałe sutki.
• Urządzenie jest przeznaczone do osobistego użytku.
• Gwarancja na urządzenie wynosi 24 miesięcy.
• Przed użyciem należy zapoznać się z instrukcją obsługi i przestrzegać
zasad bezpiecznego użycia.
• Należy przechowywać instrukcję obsługi wraz z urządzeniem.
• Przewidywany czas życia wyrobu wynosi 5 lat. Okres eksploatacji elementów
silikonowych wynosi nie więcej niż 2 lata. Elementy silikonowe ulegają trwałemu
odbarwieniu. Elementy te należy wymienić na nowe po stwierdzeniu odbarwienia
lub po upływie przewidywanego czasu eksploatacji.
Należy przestrzegać zasad prawidłowego użytkowania zarówno samego urządzenia jak
i poszczególnych akcesoriów do laktatora. Nie należy nigdy używać uszkodzonego lub
niekompletnego / niepełnowartościowego urządzenia. Uszkodzone lub zużyte części należy
bezzwłocznie wymienić. Za szkody powstałe w wyniku użycia niezgodnego z przeznaczeniem
i niniejszą instrukcją obsługi producent nie ponosi odpowiedzialności, a powstałe w ten
sposób szkody nie mogą być podstawą do reklamacji lub napraw gwarancyjnych. Dokonywanie
jakichkolwiek napraw lub modykacji wyrobu przez osoby nieupoważnione, skutkuje utratą
gwarancji oraz może być przyczyną powstawania zagrożeń dla zdrowia i życia.
OGÓLNE ZASADY BEZPIECZEŃSTWA
• W przypadku wystąpienia problemów z naturalnym karmieniem dziecka, lub karmienie powoduje ból, przed
zastosowaniem laktatora należy bezwzględnie zasięgnąć porady lekarza.
• Pierwsze użycie laktatora najlepiej przeprowadzić pod nadzorem specjalistki.
• Zaleca się zapoznanie ze specjalistyczną literaturą, dotyczącą zasad karmienia dziecka.
UWAGA! Zbyt małe podciśnienie może być przyczyną odciągania mniejszej ilości pokarmu, natomiast zbyt duże
podciśnienie może powodować bolesność procesu odsysania i zmniejszać ilość powstającego pokarmu. W przypadku
zaobserwowania tego typu nieprawidłowości, należy doregulować siłę ssania (patrz rozdział SIŁA SSANIA).
• Należy zapewnić zachowanie ogólnej czystości wyrobu. Należy zapobiegać zapyleniu i osadzaniu się innych
zanieczyszczeń, mogących pogorszyć pracę wyrobu.
• Dbałość o higienę jest ważna dla zapewnienia bezpieczeństwa matki i dziecka.
• Elementy urządzenia nieprzeznaczone do mycia, należy chronić przed wodą i wilgocią.
• Urządzenie podłączać do sprawnej i zabezpieczonej przeciw-przepięciowo sieci zasilającej.
• Podczas używania wyrobu na zewnątrz pomieszczeń, dopuszczalna jest tylko i wyłącznie praca przy użyciu
zasilania bateryjnego.
Table of contents
Languages:
Other Lovi Breast Pump manuals