LPL Saunders LPL 4500 Series User manual

Saunders LPL 4500 Series Operating Procedure
Ver 2.41 2017-09-19

Saunders/LPL 4500II and 4550 XL
Both enlargers are made by LPL in Japan. They ere sold in the USA by Saunders and are no sold by Omega.
Overview:
These enlargers are primarily for medium and large format because the Leitz Focomat V35 can only enlarge 35mm
negatives and is probably the better 35mm enlarger. If the Leitz Focomat is in use, you can use one of the LPL
enlargers.
The LPL 4500II has the standard length column and uses 200 att bulbs. DO NOT put in a 250 att bulb!
The LPL 4550XL enlarger has the XL (extra long) length column and uses up to 250 att bulbs. The XL should be
used for larger enlargements & dense (more opaque) negatives because it uses a 250 att bulb instead of the 200 att
bulb used by the LPL 4500II enlarger.
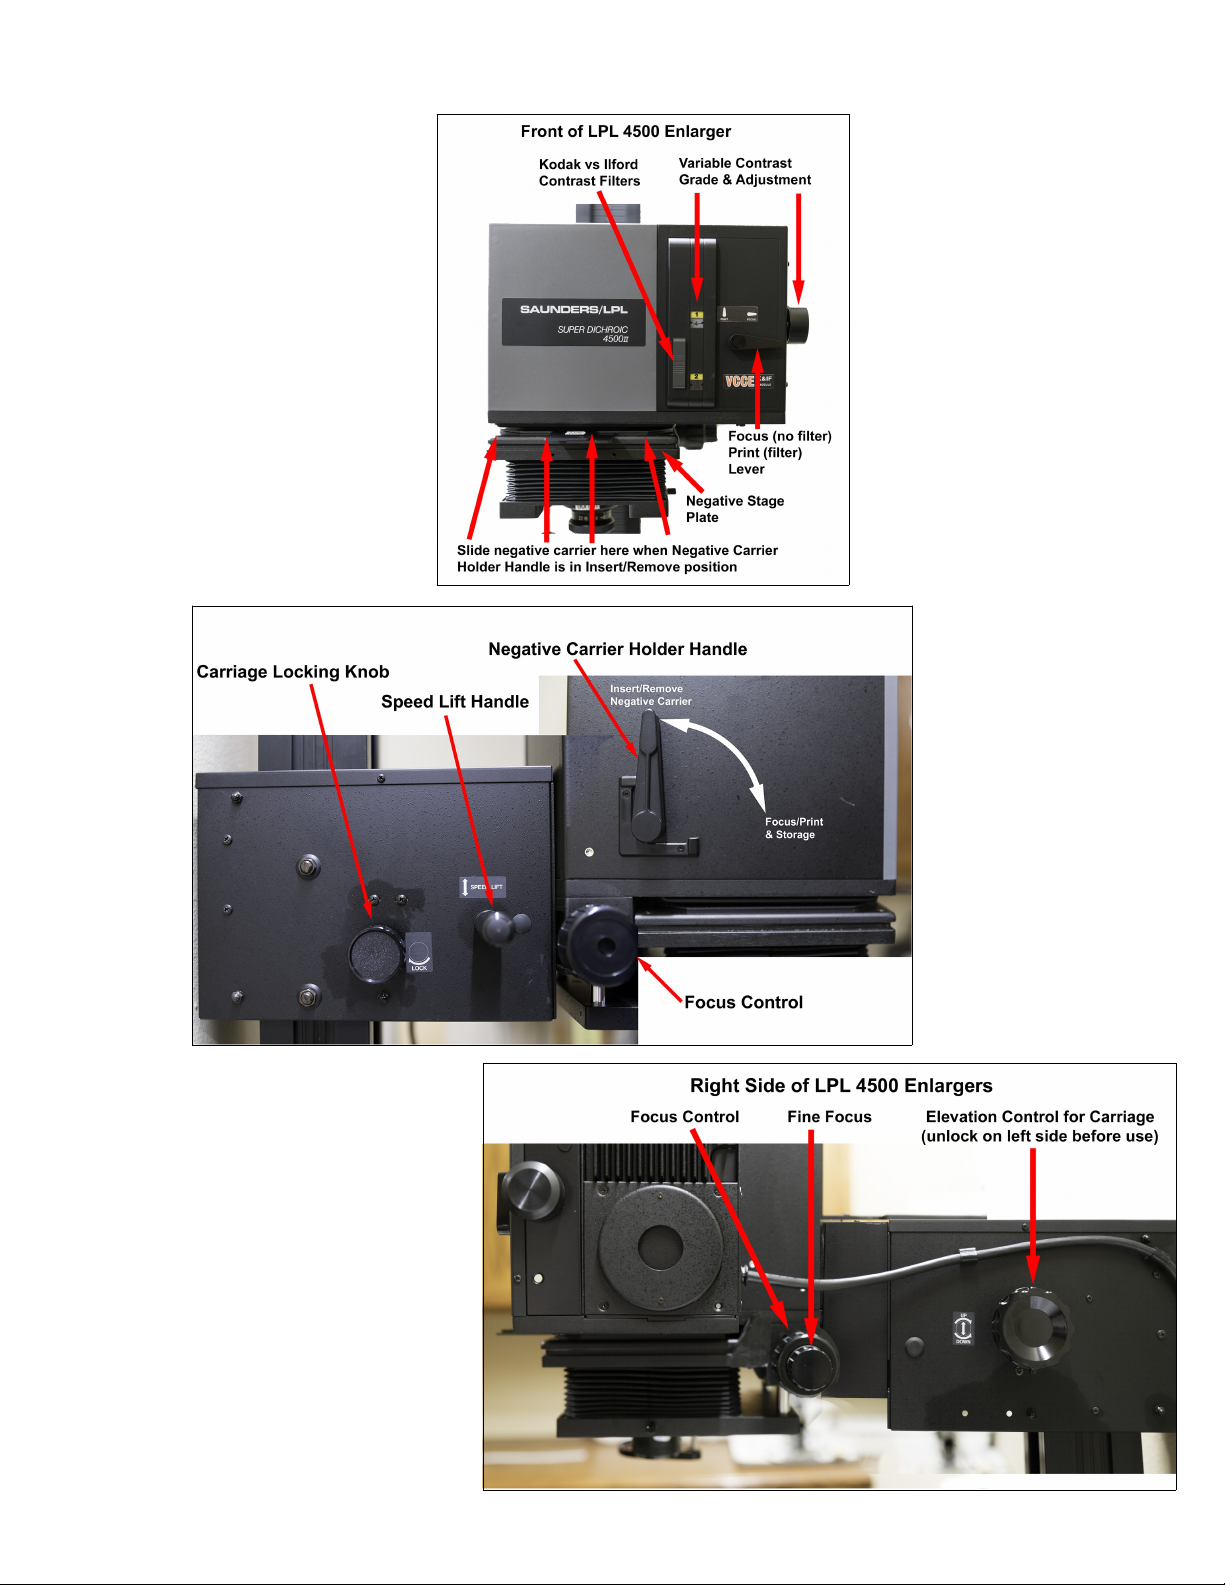
Both enlargers have Variable Contrast Constant Exposure (VCCE) heads. When using variable contrast paper, this
provides approximately the same exposure time regardless of hat contrast grade is set on the VCCE head. It is
easier to focus ithout the variable contrast filter in the optical path to give maximum brightness by setting the
VCCE's lever to Focus. Do not forget to set this lever to the Enlarge position hen you expose variable contrast
paper! If printing on single contrast grade paper ith a dense negative, you can get more light in the Focus setting
Standard operating procedure
Select which LPL enlarger to use
Raise the dust cover to see hich enlarger has the lens appropriate for your negative size. 35mm should use a 50mm
lens but moderate enlargements can be made ith the 75mm or 80mm lenses. Medium format should use the 75mm,
80mm, 90mm, or 100mm lenses. 4x5" negatives should use the 100mm or 135mm lens.
DO NO change the lens on the enlarger unless you are a Darkroom Docent and have the lights on. Changing the
lens must be done properly or it ill not clamp securely and ill fall out, damaging the lens. Call a darkroom docent
if you must have the lens changed.
Remove the dust cover completely. Unlock the head by loosening the Carriage Lock Knob on the left side. Then
grasp the adjacent Elevation Handle Bar to move the head up or do n so that you can easily see hat you are doing.
Finally tighten the Carriage Lock Knob so the head ill not move on the column.
Put an appropriate size enlarging easel on the enlarger baseboard.
Place negative in negative carrier, then gently slide negative carrier into enlarger
Select the appropriate size negative carrier. This may already be in one of the 4500 enlargers, the plastic rack
bet een the enlargers, or the labeled dra er. If the carrier you need is in one of the 4500 enlargers, rotate the
Negative Carrier Holder Handle on the left side of the enlarger head to point up to ards the Insert/Remove Negative
Carrier position. Then gently slide the negative carrier out. If you ill not be using this enlarger, put another negative
carrier in the enlarger and then rotate the Negative Carrier Holder Handle to the Focus/Print & Storage position and
put the dust cover over the enlarger.
The LPL carriers are labeled for the size negative they fit. We have one 35mm, one 6x6cm, one 6x7cm, t o 6x9cm,
and t o of the 4x5" glass carriers. Al ays return the carrier to the rack or dra er. Regardless of hich carrier you
use, al ays be a are there is glass in the 4x5 carriers. The Omega negative holders ill also ork in the LPL but
should only be used if you need a second 35mm negative carrier or a glassless 4x5" negative carrier. The Omega
negative carriers are stored in the dra er.
Ver 2.41 2017-09-19

Place carrier ith the Top label facing up, handle to ard you and hinge a ay from you. Open the carrier, put the
negative in and align it (a light table is available), and close the carrier.
Rotate the Negative Carrier Holder Handle on the left side of the enlarger head to point up to ards the
Insert/Remove Negative Carrier position. If there is a negative carrier in the enlarger, gently slide it out and return it
to an open shelf on the plastic rack bet een the enlargers. The 4x5 glass and the Omega carriers go into the dra er.
With the negative carrier Top label facing up and Bottom label do n, hold the negative carrier handle and gently
slide the negative carriers over the Negative Stage Plate until the metal key tabs on the bottom of the carrier fit into
the round hole in the Negative Stage Plate.
Rotate the Negative Carrier Holder Handle on the left side of the enlarger head to point horizontally to ards the
Focus/Print & Storage position.
Focus, then stop down the lens
Rotate the Print/Focus lever on the front of the VCCE to the horizontal Focus position if you ant the more light for
focusing. Do not forget to return it to the vertical Print position if you use variable contrast paper!
Set the enlarger lens to the largest aperture (smallest number) so that it is " ide open".
Check if anyone else in the darkroom has paper out that could be fogged by your enlarger's light.
Turn on the po er supply and the enlarger timer. Push the Focus button on the timer. The enlarger's light should
come on.
Unlock the Carriage Lock Knob on the left side. Then grasp the adjacent Elevation Handle Bar to move the head up
or do n until the image on the easel is near the size enlargement you ant.
Use the Elevation Control for Carriage knob on the right side of the enlarger if you need to move the head up or
do n a small amount. Be certain you first unlock the carriage on the left side. Then refocus. Repeat until the
enlargement size is correct. Lock the head. Rotate the center fine focus knob hile using an enlarger grain focuser for
final focusing. When finished focusing, stop the lens do n about t o stops or as needed for a reasonable print time.
Push the Time button on the timer. The enlarger light should turn off.
Print
If using variable contrast paper, slide the selector for Kodak vs Ilford. For Kodak paper, slide the selector to sho
both a "1" and a contrast grade scale in the upper indo . The lo er indo ill only sho "2". For Ilford paper
slide the selector so that the upper indo sho s only a "1" and the lo er indo sho s both a "2" and a contrast
grade scale. This selects the appropriate filtration for the brand of variable contrast paper.
Rotate the Print/Focus lever on the VCCE to the vertical Print position so that the variable contrast filter is used!
If using variable contrast paper, select the desired contrast grade on the VCCE.
Set timer to desired time, place paper in easel, press the timer's Start bar and expose the paper.
Finish using the enlarger, put dust cover on
Turn off the po er supply and timer.
Ver 2.41 2017-09-19

Rotate the Negative Carrier Holder Handle on the left side of the enlarger head to point up to ards the
Insert/Remove Negative Carrier position. Remove the negative carrier, remove your negative, and gently slide the
negative carrier back into the enlarger. Rotate the Negative Carrier Holder Handle to point horizontally to ards the
Focus/Print & Storage position to minimize dust getting into the enlarger.
Finally, place the dust cover over the enlarger.
Ver 2.41 2017-09-19
This manual suits for next models
2
Table of contents