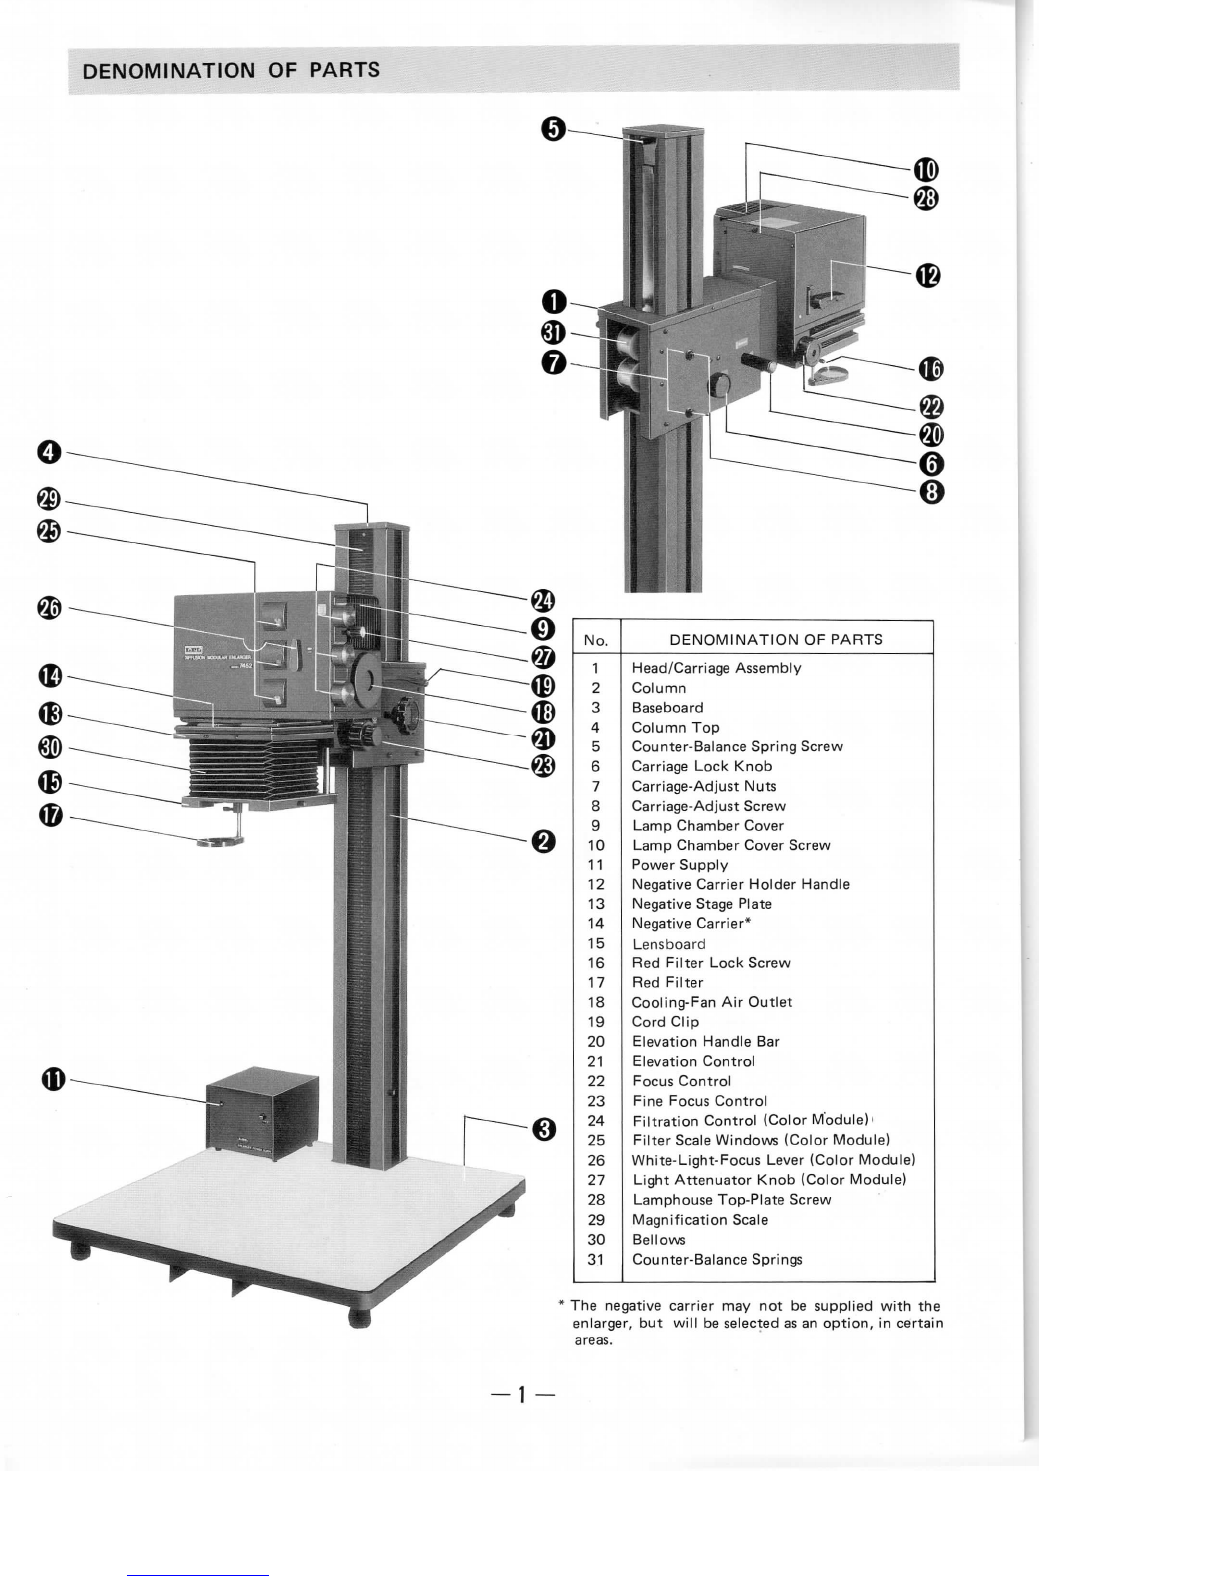
LPL 7452 User manual

DIFFUSION
MODULAR
ENLARGER
MODEL
fH-52
INSTRUCTIONMANUAL
3684-OO05

Thank
youfor
your
havingselected
anLPL
enlarger.
Please
readthismanualcarefullybefore
using
the
enlarger,
and
keep
itfor
future
reference.
INDEX
CONTENTSPAGE
DENOMINATION
OF
PARTS
1
PACKAGING
2
ASSEMBLY:
•
Column
3
•
Carriage
4
•
Lamp
5
•
Negative
Stage
Plate,Carrier,
Lens
Mount
6
•
Red
Filter,
PowerSupply
7
OPERATION:
•
Magnification,
Focus,
Floor
Projection
8
•
White-lightFocus,
Light
Attenuator
9
•
Diffusion
Box,
Filter
Modules
10
REMARKS
11/12
SPECIFICATIONS.
..13

OS
NOMINATION
O
No.
1
2
3
4
5
6
7
8
9
10
11
12
13
14
15
16
17
18
19
20
21
22
23
24
25
26
27
28
29
30
31
DENOMINATION
OF
PARTS
Head/Carriage
Assembly
Column
Baseboard
Column
Top
Counter-Balance
SpringScrew
Carriage
Lock
Knob
Carriage-Adjust
Nuts
Carriage-Adjust
Screw
LampChamberCover
Lamp
ChamberCoverScrew
Power
Supply
Negative
CarrierHolderHandle
Negative
StagePlate
Negative
Carrier*
Lensboard
Red
Filter
Lock
Screw
Red
Filter
Cooling-Fan
Air
Outlet
Cord
Clip
ElevationHandle
Bar
ElevationControl
Focus
Control
Fine
FocusControl
Filtration
Control
(Color
Module)1
Filter
Scale
Windows(ColorModule)
White-Light-FocusLever(ColorModule)
Light
Attenuator
Knob
(ColorModule)
Lamphouse
Top-Plate
Screw
Magnification
Scale
Bellows
Counter-Balance
Springs
The
negativecarrier
maynotbe
supplied
with
the
enlarger,
but
will
be
selected
asan
option,
in
certain
areas.

PACKAGING
1.
Head/Carriage
Group
1.
Lamphouse/Carriage/BellowsAssembly
(Diffusion
Box, FilterModule)
1C.
Enlarging
Lamp
8A.
ScrewDriver
13.
NegativeStagePlate
13C.
Position
Pins
14.
NegativeCarrier
4 x 5"
15.
Lensmount
17.Red
Filter
ATTENTION!
HEAD/CARRIAGE
AND
COLUMN
ARE
CUSTOM-ALIGNED.
MAKE
SURE
THEY
HAVE
SAME
SERIAL
NUMBER.
(I3:
®A
2.
Column
Group
2.
Column
2A.
Fixing
Bolts
2B.
Washers
2C.
Wrench
3.
Baseboard
3.
Baseboard
4.
Power
Supply
11.
Power
Supply
-2-

ASSEMBLY
Mounting
the
column:
Stand
the
column
(2)onthe
baseboard
as
shown.
Puta
fixing
bolt
(2A)
anda
washer
(2B)
as
shown
through
the
hole
inthe
baseboard
(3A).Tighten
the
bolt
thoroughly
with
the
wrench(2C).
Fix
the
otherthreeboltstoo.
-(2)0
2.
Mounting
the
head/carriage/bellows
assembly
(Thehead,carriage
and
bellows
are
already
put
togetherbefore
leaving
the
factory.)
Pull
offthe
column
top(4)and
remove
the
counter-balance
spring
screw
(5)as
shown.
-3

EMBLY
Loosen
the
carriage
lockknob
(6)by
turn-
ing
it
counter-clockwise.
Lift
the
entire
head
assembly
as
shown,matching
the
column
andthe
opening
ofthe
carriage,
and
putthe
assembly
over
the
column.
The
counter
balance
springs
endina
hook
(1A).
Putit
over
an
edge
ofthe
column
as
shown.
Lower
the
head
assembly
a
little
along
the
column,
and
tighten
the
carriage
lock
knob
(6)*.
Putthe
counter-balance
spring
screw
(5)
back
into
positionthrough
the
hole
inthe
hook
as
shown.
Replace
the
column
top
(4).
Note:
The
head
assembly
is
counter-balanced
so
that
it
will
stay
in
positionalong
the
column
without
beinglocked.However,
itis
always
recommendable
tousethe
car-
riage
lockknob
(6)to
prevent
an
uninten-
tional
move
ofthe
carriage.
-4-

ASSEMBLY
3.
Removing
the
support
packing
A
supportpacking
is
placedunderneath
the
lamphouse,between
front
ends
ofthe
lamphouse
and
bellows.
Ithastobe
removed
before
using.
Please
keep
itfor
future
trans-
portation.
The
support
packing
(1B)
will
be
removed
with
the
screw-driver(8A)provided
with
the
enlarger.
9,
4.
Installing
the
enlarging
lamp
Loosen
the
lamp-chambercoverscrew(10)
with
a
coin,
andletthe
lamp-chambercover
(9)
slide
offas
shown.
Note:
The
procedure
will
be
reversed
after
mount-
inga
lamp.
CAUTION:
The
cover
will
behot
after
the
enlarger
has
been
in
use.
Letit
cool
off
whenreplacing
a
lamp.
Pull
the
lamp
socket
(1D)
outofthe
cham-
ber.
Putthe
enlarging-lamp
(1C)
inthe
socket,
andputthe
lamp
inthe
lamp-holder
frame
(1E)
inside
the
chamber
as
shown.
-5-

Installing
the
negative
stage
plate
Push
upthe
negative
carrier
holderhandle*
(12)
and
insert
the
negative
stage
plate(13)
as
shown.
The
stage
will
fit
over
thetop
part
ofthe
bellows.
See
that
the
position
pin
(13A)
ofthe
plate
will
match
the
hole
inthetop
part
ofthe
bellows.
Note:
The
negativecarrierholder (12)
is
linked
tothe
negative
carrier
holderinside
the
lamphouse,which
goes
uptoleta
negative
carrier
in,and
come
down
to
hold
the
car-
rier
tightly
in
position.
6.
Inserting
the
negative
carrier
Insert
a
negativecarrier(14)
as
shown,
rt
maybe
inserted
from
the
side
as
well.Pull
down
the
negativecarrierholderhandle(12)
as
shown.
7.
Mounting
enlarging
lens
(lensmount)
Enlarging
Lenses
arenot
provided
with
the
enlarger.
A
39mm
lensmount
is
supplied
with
the
enlarger.
Lensmount
of
differentthreads
are
also
available
as
options.
Loosen
the
lensmountlock-screw(15A)
and
remove
the
lensmount(15).
Putan
enlarging
lens
inthe
lensmount
(15)*.
Putthe
lensmount
(with
the
lens)
back,
and
tighten
the
lock-screw(15A).
Lens-Board
Position
_L
(Try
the
other
position
ifthe
lens
fails
to
focus.)
-6-

ASSEMBLY
8.
Installing
red
filter
(safety
filter)
Thered
filter
provided
with
the
enlarger
is
effective
only
with
the
papers
for
mono-
chrome
printing.
Loosen
thered
filter
lock
screw
(16).
In-
sert
thered
filter
shaft(17A)frombelow,
matching
the
groove
onthe
shaft
andthe
lockscrew(16).Tighten
the
lock
screw(16).
9.
Connecting
the
power
supply
and
cooling
fan.*
Make
sure
that
the
powerswitch
(11
A)of
the
power supply(11)
isinOFF
position.
Connect
the
power-cord
ofthe
enlarger
(11B)
andthe
powersupply(11C).Then
connect
the
powercord
ofthe
powersupply
(11D)
anda
housemain.
Connect
the
powercord
ofthe
cooling
fan
(18A)directly
toa
house
main.
Note:
Type
ofthe
powersupply
andthe
con-
nectors
maybe
different
in
different
areas.
Shownhere
isa
standardexample.
CAUTION:
Always
keep
the
cooling
fanin
operation
while
the
enlarger
isin
use.
Use
only
the
powersupplyprovided
with
the
enlarger.
10.
Cord
Clip.
Put
the
powercordsthrough
the
cord
clip
(19)
to
keep
them
tidy.
THE
ENLARGER
ISNOW
ASSEMBLED
AND
READY
FOR
USE.
-7-

RATION
1.
Magnification/ElevationControl
When
the
carriage
lock
knob
(6)is
loose,
the
head
will
travellfreely
upand
down
along
the
column.
Use
the
elevationhandle
bar
(20)
for
swift
up/down.
Use,Elevation
Control
(21)
for
slow
lifts.
Lock
the
head
by
tightening
the
carriage
lock
screw
(6)
when
the
position
ofthe
head
is
deter-
mained.
2.
Focus
Controls
Use
oneofthe
focus
controls
(22)
on
either
sides
ofthe
bellows.
A
finefocus
control
(1
: 5)is
also
provided
onthe
right
side
focus
control.
3.
FloorProjection
For
making
extra-large
prints
offthe
base-
board,
"floor
projection"
will
be
possible.
Todoit,the
entire
head/carriage/bellows
assembly
will
be
drawn
offthe
column,
turned
round
180°
andput
back
onto
the
column
again
as
shown.
The
counter-balance
springs
will
be
hooked
and
fixed
onthe
other
side
ofthe
column,
an
extrascrew-
hole
is
provided
inthe
front
side
ofthe
column
for
thispurpose.
The
column
top
(4)
andthe
counter-balance
spring
screw
will
have
tobe
removed
and
replaced
in
the
shift
process.
Please
refer
to
"mounting
the
head/carriage/bellows
assembly
in
page
4.
Note:
Put
sufficientcounter-weight
onthe
base-
boardwhen
the
floor
projection
is
carried
out.
-8-

TION
4.
Color
(dichroic)
filtermodule
Filters
with
fade-free,hardmetalliccoating
are
used
inthe
color
filter
module.Filters
are
valuedaccording
to
density
ratio.
(Yellow
&
Cyan
0 - 200
cc.
Magenta
0 -
170
cc)
Three
filtration
controls(24)
are
provided
for
each
of
yellow,cyan
and
magenta
filter.
Scales
are
seen
inthe
filter
scale
windows
(25).
The
white-light-focus
lever
(26),when
turned
to
horizontal
position,
takes
the
filters
out
ofthe
light-path
without
chang-
ing the set
values,
for
easy
focusing.
'26:
The
lightattenuatorknob(27),when
turned
fully
clockwise,brings
the
attenuator
into
the
light-path, reducing
the
light
to
approxi-
mately
1/4
(twof-stops).
Useitto
extend
exposure
timewhendesired.
-9
—

E
RATION
CDF
—©G
5.
Changing
the
diffusion
box
A
diffusion
boxis
provided
with
theen-
larger.
Itis
alreadyplacedinside
the
head
as
the
enlarger
leaves
the
factory.How-
ever,
itmay
become
necessary
to
replace
it
aftermanyhours
of
use,
asthe
foam
liningturnsyellowish.
Remove
the
lamphousetop-plate
screw
(28),
and
slide
the
top-plate(1F)
tothe
direction
ofthe
arrow
as
shown,
offthe
lamphouse.
Place
the
negative-carrierholderhandle
(12)
in
horizontal
position,
and
take
out
the
diffusion
box
(1G).
Reverse
the
procedureafter
replacing
the
diffusionbox.
6.
Changingfilter
modules
Filter
modules
of
this
enlarger
is
inter-
changeable.
Besides
the
color
filter
module,
VCCE
(variable
contrastconstant
exposure)
module
is
also
available
foruse
with
variable
contrastpapers.
Foruse
with
ordinary
monochrome
papers,
B/W
module
ora
blind
lidmaybe
used.
Separate
manual
is
provided
for
VCCEfiltermodule.
Loosen
the
screw
onthe
bottom
as
shown.
Letthe
module
slide
forward
as
shown,
offthe
lamphouse.
Put
anothermodule
in,and
tighten
the
screw.
10

ADJUSTMENT
OFTHE
CARRIAGE
The
carriage/column
fitting
is
custom-ad-Loosen
the
carriage
adjustnuts
(7)
using
justed
to
ensure
smoothmovement.How-
the
column-top
(4)asa
wrench.
Letthe
ever,
means
of
slightadjustment
is
also
headtravell
upand
down,
whiletighten-
provided,
to
readjustplays
and
feel.
ingor
loosening
the
carriage
adjust
screws
(8)
with
the
screw-driver(8A)
searching
forthe
bestfeel.When
the
screws
(8)are
adjusted,
hold
the
screw
with
the
driver
so
that
it
will
not
turn,
and
tighten
the
relative
nut(7)
with
the
wrench(column
top).
DISMANTLING
THE
LAMPHOUSE
The
lamphouse,
if
desired,
canbe
dismantled
through
the
followingprocedures:
Screws
Place
the
head
assembly
upsidedown
and
loosen
the
four
screws
with
the
screwdriver.
-
11

REMARKS
FIXING
THE
NEGATIVESTAGEPLATE:
The
negativestage
plate
is
kept
loose
for
the
convenience
of
replacing
it
with
op-
tional
stage
plate
with
maskingblades.
How-
ever,
when
you
prefer
to
have
it
tightly
fixed,
itmaybe
screwed
down
after
hav-
ing
dismantled
the
lamphouse,
as
explained
inthe
foregoing
paragraph.
The
negativestage
further
provided
with
a
pair
of
extra
position
pins
and
holes,
for
use
with
negativecarriers
of
other
makes
inthe
market.
12
—

SPECIFICATIONS
ft"
Format Size:
Lens
Mount:
Illumination:
Light
Source:
Cooling
System:
Elevation
Control:
Focusing
Control:
FilterModules:
Negative
Carrier:
Maximum
Print
Size:
(on
Baseboard)
Baseboard:
Overall
Height:
ColumnHeight:
Weight:
36
x
24mm
~
4 x 5"
Disc
type
Diffusion
type
Quarts
Halogen
Lamp250W(24V
or
82V)
w/dichroic
mirror
Built-in
cooling
fan
Springcounter-balanced,
over-sized
friction
knob
Friction,
double-rail,dual-knob
w/fine
focus
control
(1:5)
Interchangeable,
Dichroiccolor(Y.M.C.),
Variable
ContrastConstantExposure
Black
&
White(Blind)
36
x
24mm
~ 4 x 5",
single-size,
sandwich
type
approx.
56x
60cm*
60 x
60cm,
steelreinforced
1,332
mm
1,260
mm
approx.
26.7
kg.
*
Note:Maximum
print
size
differsaccording
to
lenses
and
formats.
13
-

Manufactured
by
LPL
CO.,LTD.
TOKYO-JAPAN
Table of contents
Popular Magnifier manuals by other brands

Koba Vision
Koba Vision Vocatex standard user manual

ENHANCED VISION
ENHANCED VISION DaVinci Pro quick start

aidapt
aidapt Y006H Usage and maintenance instructions

Vispero
Vispero Enhanced Vision Transformer HD user manual

SKYTRONIC
SKYTRONIC 700.015 instruction manual

Healthmark
Healthmark LED Magnifier 4x instructions