Lucas TVS TVVD001HD User manual

TVS Auto Electrics Ltd
Ashroyd Business Park,
Ashroyds Way
Barnsley
S74 9SB
0333 555 0003
www.lucastvs.co.uk
DASHCAM
User Manual
TVVD001HD
TVS Auto Electrics Ltd
Ashroyd Business Park,
Ashroyds Way
Barnsley
S74 9SB
0333 555 0003
www.lucastvs.co.uk
DASHCAM
User Manual
TVVD001HD

_ 2_

_3 _
PREFACE ................................................................................................................4
SAFETY INSTRUCTIONS .........................................................................................4
PACKAGE CONTENTS.............................................................................................5
SD CARD ................................................................................................................5
TECHNICAL SPECIFICATIONS ..........................................................................6 – 8
OVERVIEW..............................................................................................................8
CAMERA FEATURES................................................................................................9
BUTTON & INDICATOR LIGHTS ........................................................................... 10
INSTALLATION GUIDE................................................................................... 10 – 11
RECORD TIMETABLE...................................................................................... 11 – 12
ON/OFF OPERATION ........................................................................................... 12
SMARTPHONE APP SETTINGS .......................................................................13 – 18
TV-OUT INTERFACE.............................................................................................. 19
VIDEO PLAYBACK................................................................................................. 19
INFORMATION & GUIDANCE........................................................................ 20 – 21
TROUBLESHOOTING.............................................................................................22
CONTENTS

_ 4_
PREFACE
Thank you for purchasing the Lucas TVS Dashcam TVVD001HD.
Please refer to this manual before use of the product. The contents of this manual at the time of
production are accurate though are subject to change at any given time. Lucas TVS have taken all
necessary precautions to ensure that information is correct.
Lucas TVS will not be responsible for any errors or inconsistencies and accept no liability for
any loss or damage that may arise. Improper use or operation of the product will result in the
warranty being void.
Please maintain this manual for future reference.
SAFETY INSTRUCTIONS
• It is unsafe to operate this device whilst the vehicle is in motion.
• Ensure time zone is adjusted prior to use of Lucas TVS Dashcam TVVD001HD
• For the safest use of this equipment, it is recommended that installation is carried out by
a professional only.
• The results of the GPS accuracy may different depending on geographical restrictions.
Solar reflective glass may also affect the GPS performance.
• When troubleshooting, in the first instance please exclude manageable problems before
contacting customer service.
• The device may become warm during operation, this is to be expected.
• Do not dismantle the battery, there are no user serviceable parts inside the battery.
• Follow local regulations when disposing of the battery.

_5 _
PACKAGE CONTENTS
Before using this product please check that all following items are present in your package.
If there are any omissions, please contact us immediately on: 0333 555 0003.
NOTE
SD Card not included. Please ensure you use Class 10 and above for writing speeds.
When using an SD Card for the first time, it is recommended that you back up and data and then
format the card before using the device. To maintain SD Card performance it is recommended
that the SD card is formatted on a monthly basis.
Please Note – you may wish to consider using a High Endurance SD Card which can be
overwritten many more times than a standard SD Card.
It is the responsibility of the user to regularly maintain and review footage to check that data and
videos are recording correctly to the SD Card.
SD Cards should be replaced every 12 months.
DESCRIPTION QUANTITY
Lucas TVS Dashcam TVVD001HD 1
Main Wiring Loom 1
2.5mm Jack to Female RCA (Video In Cable) 1
Emergency Record Button 1
Keys 2
RCA Male to Male converters 2
Manual 1

_ 6_
TECHNICAL SPECIFICATIONS &
PARAMETERS
TECHNICAL INDICATORS PARAMETER DESCRIPTIONS
Size / Weight / Colour L170mm*Ø65mm / 120g / Black
Camera Sensor 4M physical pixel CMOS image sensor
Seven groups all-glass lens
Lens Angle Front: 170°
Rear: Depending on the input camera
Second Camera Support CVBS (Composite Video Baseband Signal)
camera input
WIFI Built in WIFI module (IEEE 802.11b/g/n, 2.412 GHz)
APP
Video Record
Normal recording (card capacity of 79%, this space is
automatically deleted after the old file coexistence
of new files)
Event recording (20% of card capacity, G-Sensor, SOS
Button, Alarm in event triggered)
Parking Guard recording (if Parking Guard function
is turned on)
Sound Recording Built-in-Microphone
Audio and Video Format Video: H.264 Video Encoding / MOV format; audio:
AAC.
Storage Media
SD high-speed memory card (maximum support 128G,
make sure to use Class 10 or above – not included)
High Endurance SD cards can be overwritten many
more times than a standard SD card .
Speaker Built-in-Speaker

_7 _
TECHNICAL INDICATORS PARAMETER DESCRIPTIONS
Button (s)
Power button/ Camera button/ Emergency Recording
button/ Reset button/ Upgrade button (Press the key
to enter upgrade mode when the power is turned off
or the card is not present)
Note: The upgrade button is located above the SD
Card Slot.
LED 2 LED (Red and Blue)
G-Sensor Built-in triaxial three-dimensional collision
acceleration sensor
GPS Built-in high-quality GPS
RTC Connect the devices WIFI, open the App or GPS to
synchronise time.
Emergency Record Button Dash mounted SOS emergency record function
Parking Guard
The recorder uses vehicle power and is powered by
the battery of the vehicle after the ignition is turned
off. Triggered by the sensor determining vibrations
and begins to record
Video Output 2-Way TVOUT(NTSC/PAL)
Language Settings English, German, French, Dutch & Spanish
Take Pictures Support JPEG format
Resolution / Bit Rate / Frame Rate 1920*1080 16M @30fps / 1280*720 12M @ 30fps
Loop Recording Time 1,2,3 minutes optional
Communication Interface UART / IR Interface
HDMI Interface Reserved HDMI Interface
Alarm I/O Define input / output alarm line (active low)
Lock With lock to protect SD card / tamper resistant
Power 6V – 32V to be wired directly
Static Power Consumption 3.6W

_ 8_
YELLOW
RED
BLACK
ORANGE
GREEN
BLACK
BROWN
AVOUT2
SOS BUTTON
(active high)
(reserved)
(active low)
(active low)
2nd CAMERA (CVBS)
AVOUT1
OVERVIEW
TECHNICAL INDICATORS PARAMETER DESCRIPTIONS
Standby Current
Less than 1mA
Note: The vehicle is off and after full charge (within
10 minutes)
Optimal Performance Temperature -25° C to 65° C
Operating Temperature -40° C + 85° C
Storage Temperature -40° C + 90° C
ACC RED = ignition switched live
B+ YELLOW = constant live

_9 _
FRONT VIEW
REAR VIEW
LEFT VIEW RIGHT VIEW
POWER CORD
REAR CAMERA VIDEO IN
CAMERA POSITION
ADJUSTMENT
RESET
BUTTON
RED INDICATOR
LIGHT
BLUE INDICATOR
LIGHT
SPEAKER
DOUBLE SIDED TAPE
POWER BUTTON
POWER CORD
OUTLET
HDMI
LOCK
CAMERA
VENTILATION
FIXING PAD
LOCK COVER
CAMERA FEATURES

_ 10 _
BUTTONS & INDICATOR LIGHTS
POWER BUTTON: Press and hold the power button to start the device.
Quick press the power button to take a photograph.
Press and hold the power button to lock/unlock the most recent video file when the device boots up.
RESET BUTTON: Press Reset to restart the machine.
INDICATOR LIGHT:
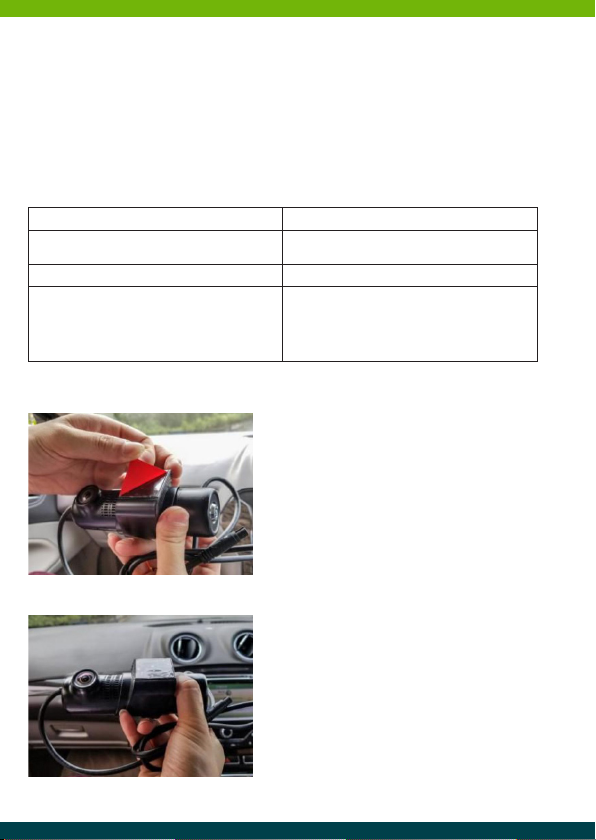
1. Determine the exact location the device will be
installed, ensuring not to obstruct the drivers
view (usually in the centre of the windscreen
behind the rear-view mirror, preferably on the
passenger side of the vehicle) The device must
have a clear view with the road ahead and not
be intrusive of the wiper blade area.
2. Thoroughly clean the area around the rear-view
mirror on the front windshield where the
dashcam will be mounted.
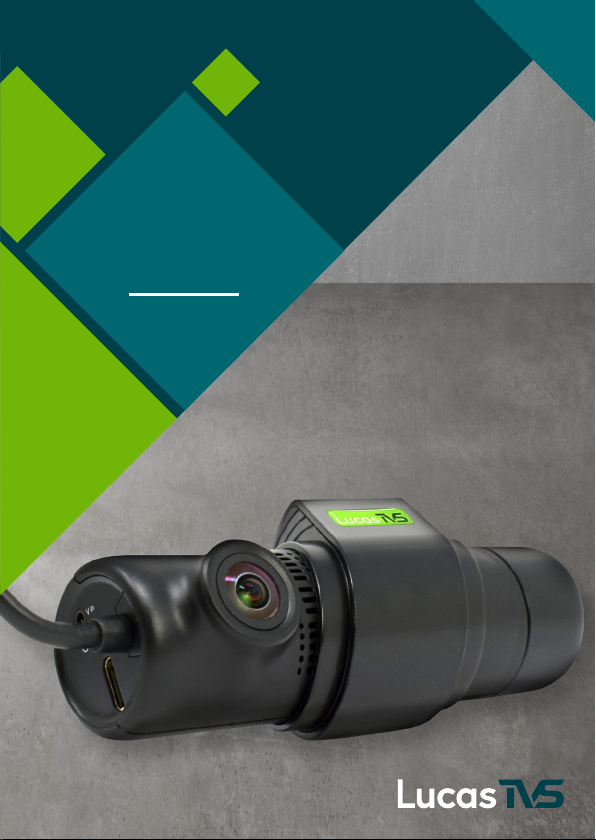
3. Remove the double-sided tape from the device
and position the unit horizontally with a clear
view of the road ahead before attaching it to
the windscreen.
4. Before installation refer to your owner’s manual
to determine the location off your fuse box.
The installation should be carried out by a
trained Auto Electrician.
INSTALLATION
Solid Red Light and Blue Flashing Light The device is on and recording
Red Flashing Light and Blue Solid Light The device is on with no SD card inserted or
requires attention
Blue and Red Lights off The device is off or in park mode
Red and Blue Light Flashing rapidly
The device has registered an event (G-Sensor)
alternatively the emergency record button has
been activated. The LEDS will continue to flash
in this sequence until the event recording has
ceased

_11 _
5. Route the power cable by disguising it neatly across the top of the windscreen and down the
‘A Pillar’ (located at the side of the windscreen) ensuring it is located at the same side as the
fuse box.
6. Upon locating the fuse box, initially determine if there are any unused fuse holders, in this
scenario it is beneficial to utilise those.
7. If no fuse holders are unused it is recommended that you refer to your user manual to locate
the safest and most efficient option before installing the device.
8. If a rear camera is to be used, attach this to the Video-in connector and run the wires
accordingly.
9. To ensure correct running of the device it would require both a constant and a switch live
feed. The RED (ACC) cable needs to be connected to an ignition switched fuse. The YELLOW
(B+) cable needs to be connected to a permanent live wire.
10. Continuously ensure that both the interior and exterior of the windshield are kept clean and
maintained efficiently so not to deplete the Dashcam footage.
NOTE
Many newer vehicles operate a ‘battery saving mode’ which include ‘timed fuses’ which stay live
for several minutes once the ignition has been terminated.
Lucas TVS AE recommend that installation is only carried out by a professional auto
electrician to ensure accuracy of the installation resulting in prime recording for the end user.
CAMERA AND VIDEO
PROPERTIES
MEMORY CARD CAPACITY AND RECORDING TIME
8G 16G 32G 64G 128G
Camera Res. fps bps N E N E N E N E N E
Front
Camera 1080p 30 16M 49
Min
12
Min
99
Min
24
Min
199
Min
48
Min
399
Min
96
Min
799
Min
192
Min
Front
Camera 720p 30 12M 67
Min
16
Min
134
Min
32
Min
268
Min
64
Min
536
Min
128
Min
1072
Min
256
Min
1. Recording schedule for front camera
N = Normal E = Event
RECORDING TIMETABLE

_ 12 _
NOTE
The above figures are only references, numbers are subject to change dependent on memory card
storage.
CAMERA AND VIDEO
PROPERTIES
MEMORY CARD CAPACITY AND RECORDING TIME
8G 16G 32G 64G 128G
Camera Res. fps bps N E N E N E N E N E
Front
Camera 1080p 30 16M 39
MIN
9
MIN
79
MIN
19
MIN
159
MIN
39
MIN
319
MIN
79
MIN
639
MIN
159
MIN
2nd
Camera 720p 25 or
30 4M
Front
Camera 720p 30
12M 50
MIN
12
MIN
100
MIN
24
MIN
200
MIN
48
MIN
400
MIN
96
MIN
800
MIN
192
MIN
2nd
Camera 720p 25 or
30
INSTRUCTIONS
ON/OFF
As the device is wired directly to the vehicle, the unit should switch on automatically when the
ignition is switched ON. If the unit is switched OFF when the vehicle ignition is switched OFF,
the unit will not automatically restart. You will need to switch the unit on by pressing the power
button (on the right-hand side of the device).
NOTE
When turning off the ignition, the device will begin to shut down. The ignition must not be
switched back on until the unit has completed shut down (No LED’s lit) Once the unit has
completed shut down, the ignition may be turned on. Failing to follow this procedure may corrupt
video files.
EMERGENCY RECORD BUTTON
Pressing the ‘Emergency Record’ button will lock and protect the current video file. The locked file
will not be overwritten unless the SD card is formatted, or the file is manually deleted. When the
‘Emergency Record’ is in action, both the red and blue LED will flash rapidly.
2. Recording schedule if a rear/secondary camera is installed
N = Normal E = Event

_13 _
CONNECT THE RECORDER
After downloading and installing the App. Turn on
the recorder and connect it within the Wi-Fi signal
coverage.
Please enter the phone system settings, and proceed
to open the WLAN, enter the WiFi list interface
and select the WiFi name ‘LucasTVS-******’ when
prompted for a password please use default password
12345678 you can now connect to the Dashcam.
SMARTPHONE APP.
Lucas TVS Dashcam TVVD001HD links seamlessly to the below App.
To download and install the app use the below links:
NOTE
Whilst connected to the devices Wi-Fi network you
may be unable to access the internet via Wi-Fi.
DEFAULT PASSWORD
12345678

_ 14 _
LIVE PREVIEW
Once a Wi-Fi connection has been established click the home page and select ‘Real-time preview’
this will allow you to view live footage.
ON SCREEN INFORMATION:
• Battery power level
• Current data and time
• Transmission rate
• Fragment length
• Record resolution
• Recording indicator
A. Switch between front and rear camera
Click this icon to switch between the front and rear camera (if applicable) If this icon is grey,
it is likely that no rear camera has been detected.
B. Mute / Unmute
The Mute / Unmute icon allows the radio function to be turned either on or off. The icon will
indicate the chosen setting.
C. Record / Stop Recording
A message will display if you have just requested recording to start or stop.
D. Capture: Click this icon to take a still image (JPEG Format)
E. Refresh
If the ‘Real Time’ preview is lagging, you can manually refresh the device to catch up with
‘Real Time’
A B C D E

_15 _
APP SETTINGS
1. Recording Resolution:
• 1080p @ 30 fps (Sharpest Image)
• 720 @ 30 fps
(Note: 3rd part cameras are set at this
resolution)
2. Clip Time:
• 1 minute
• 2 minutes
• 3 minutes

_ 16 _
3. G-Sensor Sensitivity:
Gravity accelerations are likely to vary when faced
with factors such as; sudden
acceleration, uneven road surfaces or emergency
breaking. The video file is protected when the
system senses a large acceleration/deceleration.
G-Sensor sensitivity is used to set the threshold for
sensing such fluctuations. The higher the sensitivity,
the more susceptible the unit is to fluctuations in
the acceleration of gravity, resulting in a protected
video.
NOTE: If the sensitivity is set too high the SD card
is likely to become full of ‘protected files’
Options are: Off, Low, Middle and High
4. TV-OUT:
The recorder supports TV-OUT video output to the
third-party AV display, the screen display format can
be set through this function.
• NTSC
• PAL

_17 _
5. Parking guard:
Parking Guard detects vibrations whilst the device Is
powered down, when a shock is detected the device
starts to record (default 25 seconds)
The video protection will be cancelled, if the vehicle
is started or the power button is activated manually
during the parking guard video recording.
NOTE: This feature is only accessible when
hardwired to the vehicles battery supply.
6. Speaker:
The built-in speaker can be switched to ON and
OFF. By selecting off the start up tone will be muted.
7. Formatting:
Formatting is used to format the memory card.
When using a new SD Card for the first time, use the
format function to format the SD Card.
8. Network configuration:

_ 18 _
In the configuration you can modify the devices
Wi-Fi name and password. After changing the Wi-Fi
name and/or password, the app and the device will
be disconnected. You will now need to re-enter the
new Wi-Fi and password to connect the device to
your smart phone.
NOTE: If you forget your password you will need
to re-upgrade the drive on the camera to return to
default settings.
DEVICE FILES
The device files are used to preview the recorded footage and images that are saves on the SD card.
1. Folder directory:
• Normal: View recorded video
• Event: View protected event videos
• Photo: View captured pictures
2. File operation:
After entering the corresponding folder, click on a video or direct photo to play the video
or view the photograph. To download a file, click the more button. When downloading files,
to maintain stability the device will not allow any other operations or functions other than
‘cancel’ the download.
NOTE: High definition playback online can result in slight delays in the playback. Footage
downloaded to a local device will not be interrupted.

_19 _
LOCAL FILES
Video footage downloaded to the local device can be viewed through the devices system file
directory. You can also delete or save footage to a designated album.
TVOUT INTERFACE
The device supports two TV OUT Outputs showing the below info on screen in addition to live
view footage, or playback functions.
On Screen Information:
• GPS Information
• Video Lock Icon
• Recording Icon
• Recording Resolution & FPS
• Video Mode
• Speaker ON/OFF
• Parking Guard ON/OFF
• SD Card Status
• Real-Time Preview
• Wi-Fi Strength
• Video Duration
• Front View
• Current Date & Time
• Rear View
VIDEO PLAYBACK
Footage can be played on any standard video streaming network.
• H.264 MOV format

_ 20 _
IMPORTANT INFORMATION
• When installing the device for the first time, or if the power is cut off completed, the device
will beep frequently to remind the user to synchronise the time. After the mobile terminal
is connected to the recorded Wi-Fi, open the TVVD001HD Dashcam App, and the cellular
time will synchronise to the device automatically. Otherwise when the device received a GPS
satellite signal, it will begin to synchronise the time.
• The SD Card slot should be FAT32 format before using. However if the SD Card capacity is
larger than 64GB, it is to be categorised as exFAT format. When using the SD Card for the
first time, the SD Card must be formatted via the device, it can then be used normally within
the device (the recorder device will format the SD card to FAT32 directly) Please be sure to
use a Class 10 or higher level reputable brand SD Card. Should a poor-quality SD card be
used you may experience running problems.
• Format the SD Card frequently. Replace the SD Card after 12 months use.
• Full HD Video has a large amount of data, and the online playback may buffer especially if
the playback buffer is more frequent in the state of video playback. Please download the full
video for playback.
• The ‘Real-Time’ preview of the mobile phone is based on Wi-Fi wireless transmission, and the
real-time preview of video will have some delay.
• Please do not take out the SD Card whist the Dashcam is recording. It may lose or corrupt
video footage as a result, or may damage the SD Card.
• When the vehicles ignition is switched off, the device will continue to be powered for approx.
10 minutes before entering standby mode.
• Be sure to clean the car recorder lens and the interior and exterior of the car windshield to
better the effects of the device.
• This recorder can connect to multiple mobile phones, but only one mobile phone is able to
benefit from the real time features at once.
• The files on the SD card are continually overwritten. The default normal recording accounts for
79% of the card capacity, the event video accounts for 20% of the card capacity, and the photo
accounts for 1% of the card’s capacity. When the normal recording space is full, the device will
delete the first video file. Similarly, when the event space is full, the device will remove the
earliest event, and when the photo space is full, the device will remove the first photo.
Table of contents