Luce Plan D30F User manual

D300IB001
PODLENS
ISTRUZIONI
ASSEMBLY INSTRUCTIONS
MONTAGEANLEITUNG
INSTRUCTIONS DE MONTAGE
mod. D30
design Ross Lovegrove
via E.T. Moneta, 46 - 20161 Milano - Italia
tel. (02) 66242-1 - fax (02) 66203400
www.luceplan.com

2 3
d
r
b
c
FBT E27 23W Max
fig.1
D30F
IATE1440WMax
D30I
n
L=400cm
MONTAGGIO LAMPADINA
ASSEMBLY OF THE BULB
MONTAGE DER GLÜHLAMPE
MONTAGE DE L’AMPOULE

4 5
ATTENZIONE:
Da questa operazione dipende la tenuta all’acqua
del prodotto.
Aprire la lampada svitando il diffusore (r) tenendo
fisso il bicchiere conico (b). Inserire la lampadina
avvitandola sul portalampada.
Per chiudere, fare coincidere i dentelli (d) del
diffusore con le tacche (c) del bicchiere (b) e
serrare allineando la scritta presente sul bicchiere
(b) con la parte prismata del diffusore (r).
Effettuare l'operazione con estrema cura
verificando il corretto posizionamento della
guarnizione (n)
Utilizzare il passacavo a gancio (g) (vedi fig.2)
per sospendere la lampada e regolare la
lunghezza del cavo.
WARNING:
The wet seal of the product depends on this
operation.
Open the lamp by unscrewing the reflector (r) and
holding the conical base (b). Screw the bulb in
the lamp-holder.
To close the lamp, let the teeth (d)on the reflector
correspond to the notches (c) of the conical base
(b)and tighten them, justifying the writing on the
base (b)with the prismatic surface of the reflector
(r).
Carry out this procedure very carefully and verify
the correct positioning of the washer (n).
Use the hook cable guide (g)(see fig. 2) to hang
the lamp and adjust the cable length.
ACHTUNG:
Die Dichte des Produktes hängt von dieser Aktion
ab.
Die Lampe öffnen durch Losschrauben des
Reflektors (r),dabei die Kegelbasis (b) festhalten.
Die Glühlampe an die Lampenfassung
anschrauben.
Zum Schließen die Zähne (d) des Reflektors auf
die gleiche Höhe der Kerben (c) der Kegelbasis
(b) bringen, festmachen und die Aufschrift auf die
Kegelbasis (b) dem prismatischen Reflektor (r)
anpassen.
Den Vorgang ganz sorgfältig ausführen und dabei
die richtige Ausrichtung der Dichtung (n)
überprüfen.
Den Kabeldurchgang mit Haken (g)(siehe Fig.
2) zum Aufhängen der Leuchte verwenden und
die Kabellänge einstellen.
ATTENTION:
L’étanchéité du produit dépend de cette opération.
Démonter la lampe en dévissant le réflecteur (r)
et en maintenant la base conique (b)fixe. Visser
l’ampoule sur la douille.
Pour fermer, faire co•ncider les dents (d) du
réflecteur aux crans (c)de la base conique (b)
et serrer en alignant l’écriture de la base (b) sur
la partie prismatique du réflecteur (r).
Effectuer l’opération avec le plus grand soin en
vérifiant le correct positionnement de la garniture
(n).
Utiliser le passe-câble à crochet (g)(voir fig. 2)
pour suspendre la lampe et régler la longueur du
câble.

6 7
MONTAGGIO SU PALI / ASSEMBLY
WITH POLES /MONTAGE AUF
STÄBEN/ MONTAGE SUR POTEAUX
fig.2 fig.3
SOSPENSIONE / SUSPENSION
SYSTEM / HÄNGESYSTEM /
SYSTEME DE SUSPENSION
D30/4.1 D30/4.2 D30/4.3
35
120
180
g

8 9
BASE FISSA / PERMANENT BASE /
FEST MONTIERTE BASIS / BASE FIXE BASE MOBILE / MOBILE BASE /
BEWEGLICHE BASIS / BASE MOBILE
D30/1D30/2
fig.4 fig.5

10 11
SUPPORTO APPLIQUE / SUPPORT FOR WALL LAMP / WANDHALTERUNG FÜR
BEWEGLICHE LEUCHTE / SUPPORT POUR APPLIQUE
D30/3
e
v
o
fig.6
Fissare la basetta (e) nel punto desiderato con i
2 tasselli in dotazione. Agganciare il supporto
della lampada e fissarlo con la vite (v). Inserire
la lampada nel supporto, lasciando uscire il cavo
di alimentazione attraverso la scanalatura (o).
Fix base (e) in the desired position with the two
expansion bolts provided. Hook the lamp
support and fasten it through screw (v).
Introduce the lamp onto the support, and let the
power cable pass through the slot (o).
Das Plättchen (e) an der gewünschten Stelle mit
den 2 mitgelieferten Dübeln befestigen. Den
Träger der Leuchte einhaken und mit der
Schraube (v) befestigen. Die Leuchte in den
Träger einsetzen, dabei das Versorgungskabel
durch die Nut (o) herausführen.
Fixer la petite base (e) dans la position désirée
avec les deux goujons fournis. Accrocher le
support de la lampe et le fixer avec la vis (v).
Introduire la lampe dans le support et laisser sortir
le câble d’alimentation par la fente (o).

12 13
fig.7
MONTAGGIO A CATENA / CHAIN ASSEMBLY / KETTENMONTAGE / MONTAGE A
LA CHAÎNE
D30/6
a
alm
hf
D30/5
t
p
p

14 15
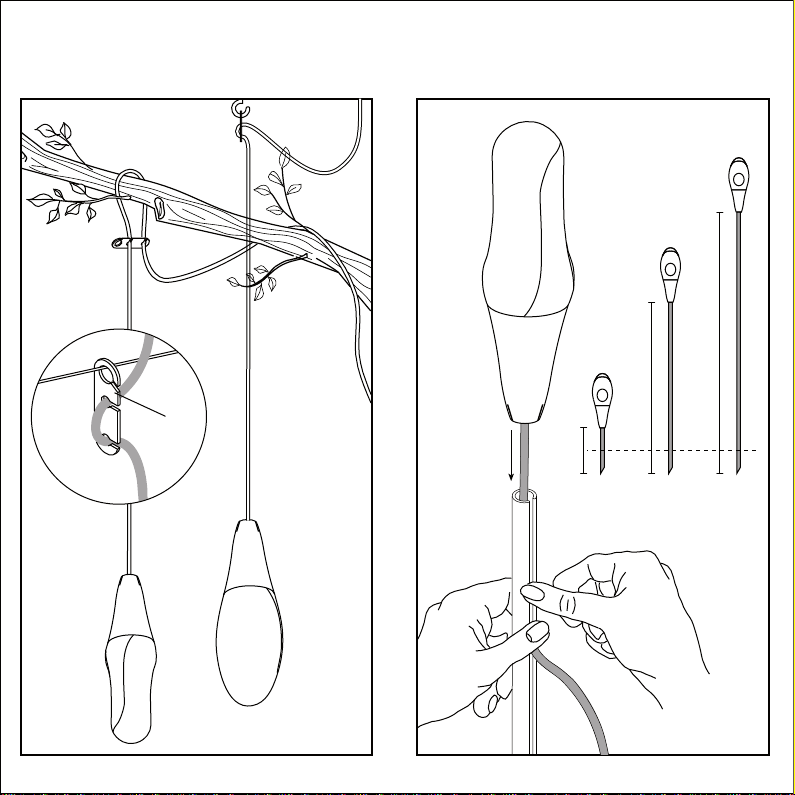
Per montare a catena più lampade (max 15),
utilizzare il giunto a 3 vie (cod D30/5) e il cavo (cod
D30/6).
Definire la lunghezza del cavo e tagliare. Inserire
i 2 cavi (a) nel giunto e, dopo averli fatti passare
per il foro inferiore, collegarli al cavo della lampada
(l) mediante il morsetto (m) in dotazione. Aver cura
di collegare tutti i fili dello stesso colore tra
loro.
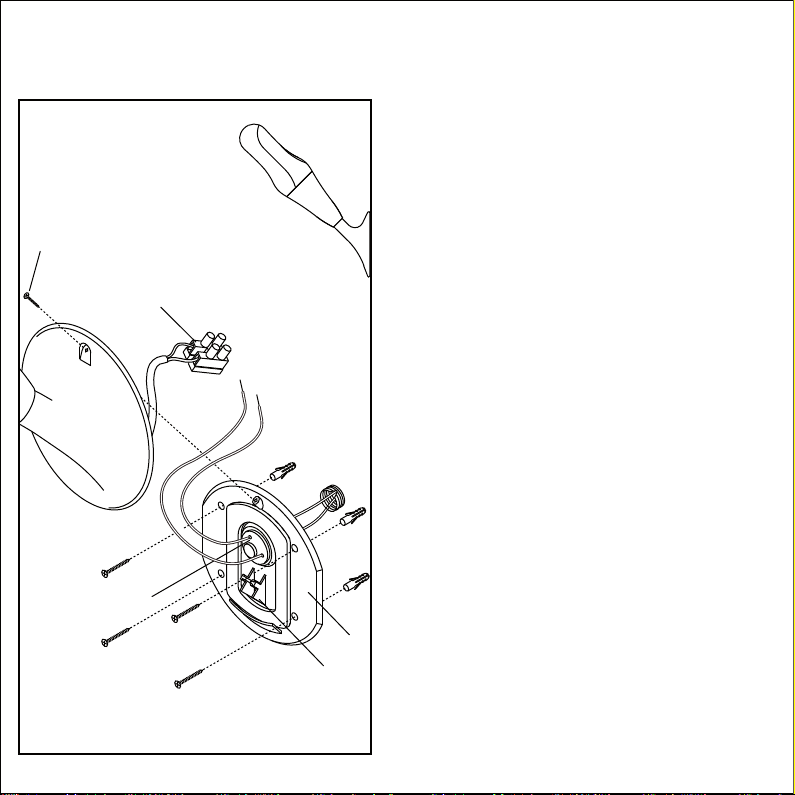
Dopo aver effettuato i collegamenti, infilare il
morsetto all'interno del giunto, tirando i due cavi
(a). Serrare i tappi (h) facendo attenzione che il
cavo non si arrotoli. Serrare i dadi (f) dopo aver
inserito la guarnizione (p) sotto i denti del tappo (h).
Al termine della catena utilizzare il tappo (t) per
rendere stagno il giunto.
For the chain assembly of several lamps (max. 15),
use a three-way coupling (code D30/5) and the
cable (code D30/6).
Define the cable length and cut it. Insert both cables
(a)in the coupling and, after letting them go through
the lower hole, connect them to the cable of the
lamp (l) with the clamp (m) provided. Take care
that all wires have to be connected to each
other with the same colours.
After the connections, insert the clamp inside the
coupling by pulling on the two cables (a). Tighten
the plugs (h)paying attention that the cable does
not roll up. Tighten the nuts (f)after inserting the
washer (p) under the teeth of the plug (h).
Use the stopper (t)at the end of the chain in order
to make the coupling watertight.
Um mehr Leuchten (max. 15) kettenartig zu
montieren, wird der T-Verbinder (Kod. D30/5) und
das Kabel (Kod. D30/6) verwendet.
Die Kabellänge bestimmen und zuschneiden. Die
2 Kabel (a) durch den Verbinder führen, dann durch
die untere Öffnung und anschließend an das
Lampenkabel (l) mittels der mitgelieferten Klemme
(m) anschließen. Darauf achten, daß alle Drähte
gleicher Farbe miteinander verbunden sind.
Nach Durchführung der Anschlüsse die Klemme
ins Innere des Verbinders einsetzen durch Ziehen
der zwei Kabel (a).Die Deckel (h) verschließen,
dabei aufpassen, daß sich das Kabel nicht einrollt.
Die Muttern (f) festziehen nach dem Einziehen der
Dichtung (p) unter den Zähnen des Deckels (h).
Am Ende der Kette den Stöpsel (t) benutzen, um
den Verbinder abzudichten.
Pour le montage à la chaîne de plusieurs lampes
(max. 15), utiliser un joint à trois voies (code D30/5)
et le câble (code D30/6).
Définir la longueur du câble et couper. Introduire
les deux câbles (a)dans le joint et après les avoir
fait passer par le trou inférieur, les connecter au
câble de la lampe (l)par la borne (m)fournie.
Assurez-vous que tous les fils de la même
couleur soient connectés l’un avec l’autre.
Après avoir effectué les connections, introduire la
borne dans le joint, en tirant les deux câbles (a).
Serrer les bouchons (h)et veiller à ce que le câble
ne s’enroule pas. Serrer les écrous (f) après avoir
placé la garniture (p)sous les dents du bouchon
(h).
A la fin de la chaîne utiliser le bouchon (h)pour
rendre le joint étanche.

16 17
m
v
se
z
fig.8
D30aF
D30aI
MONTAGGIO APPLIQUE FISSA / ASSEMBLY OF THE FIXED WALL LAMP /
MONTAGE DER FIXEN WANDLEUCHTE / MONTAGE DE L’APPLIQUE FIXE
Fissare la basetta (e) con i 4 tasselli in dotazione,
in corrispondenza del punto luce desiderato.
In caso di superfici irregolari fare attenzione a
mantenerne la planarietà della basetta, avendo cura
di non piegarla o deformarla.
Forare il pressacavo (z) per consentire il passaggio
del cavo di alimentazione. Collegare il cavo di
alimentazione al morsetto (m) e fissarlo al supporto
(s) della basetta. Agganciare la lampada alla basetta
e fissarla con la vite (v) .
Fix base (e) in desired location using the 4
expansion bolts provided. In case of irregular
surfaces, take care of keeping the flatness of the
base, making sure not to bend or deform it.
Perforate the strain-relief (z) to allow the passage
of the power cable. Connect the clamp (m) to the
power cable and fix it to the base support (s).
Hook the lamp to the base and tighten it with
screw (v).
Das Plättchen (e) mit den 4 mitgelieferten Dübeln
an der gewünschten Lichtposition befestigen.Bei
unregelmäßigen Oberflächen darauf achten, daß
die Ebenheit des Plättchens beibehalten wird, und
das Plättchen weder gebogen noch verformt wird.
Am Kabeldurchgang (z) eine Bohrung zum Durchlaß
des Versorgungskabels durchführen. Die Klemme
(m) an das Versorgungskabel anschließen und am
Träger (s) des Plättchens befestigen. Die Lampe
am Plättchen einhaken und mit der Schraube (v)
befestigen.
Fixer la petite base (e) dans la position désirée en
utilisant les 4 goujons fournis. En cas de surfaces
irrégulières, maintenir la planéité de la petite base
en faisant attention à ne pas la plier ou la déformer.
Percer le presse-câble (z) pour permettre le passage
du câble d’alimentation. Connecter la borne (m) au
câble d’alimentation et la fixer au support (s) de la
petite base. Accrocher la lampe à la petite base et
la serrer avec la vis (v).

18 19
LA SICUREZZA DELL'APPARECCHIO E'
GARANTITA SOLO RISPETTANDO QUESTE
ISTRUZIONI, SIA IN FASE DI INSTALLAZIONE
CHE DI IMPIEGO; E' NECESSARIO
CONSERVARLE. IL PRODUTTORE NON
RISPONDE DI DANNI DERIVANTI DA UN USO
SCORRETTO DELL'APPARECCHIO.
INSTALLAZIONE
Linstallazione deve essere fatta da personale
qualificato.
All'atto dell'installazione ed ogni qual volta si
maneggi l'apparecchio assicurarsi che sia
stata tolta la tensione di alimentazione!
Il cavo di alimentazione del prodotto non deve
essere sostituito dall'utente.
MANUTENZIONE
Per la pulizia del prodotto adoperare solo
detersivi neutri, non utilizzare solventi
corrosivi.
DOTAZIONE E SOSTITUZIONE LAMPADINE
Utilizzare esclusivamente il tipo di lampadina
indicato, non superare mai la potenza
massima indicata.
Nel caso di installazione in esterni, utilizzare
per il collegamento alla rete di alimentazione
una spina dei tipo IP 65 non in dotazione.
Utilizzare il prodotto solo nelle condizioni
sopra indicate (sospensione applique e testa
palo)
UTILIZZO
Non danneggiare il cavo di alimentazione.
Non utilizzare il prodotto se danneggiato.
ATTENZIONE
!
!
THE SAFETY OF THE APPLIANCE IS
GUARANTEED ONLY IF THESE
INSTRUCTIONS ARE FULLY RESPECTED,
BOTH DURING INSTALLATION AND USE;
THEREFORE KEEP THEM IN A SAFE
PLACE. THE MANUFACTURER CANNOT
BE HELD RESPONSIBLE FOR ANY
DAMAGE DERIVING FROM IMPROPER USE
OF THE APPLIANCE.
INSTALLATION
Installation has to be done by qualified
personnel.
For installation and whenever work is to be
done on the appliance, make sure that the
voltage has been switched off!
The power cable of the product should not be
replaced by the user.
MAINTEINANCE
Use only neutral cleansing agents for the
product's cleaning, do not use any corroding
solvent.
SUPPLY AND REPLACEMENT OF BULBS
Use only the type of bulb shown and never
exceed the maximum power specified.
In case of outdoor installation, use an IP65
socket, not included in the package, for the
connection to the supply mains.
Use the product only under the above
mentioned conditions (hanging, fixed on the
wall or planted on a pole).
USE
Do not damage the supply cable.
Do not use a damaged product.
!
!WARNING

20 21
DIE SICHERHEIT DES APPARATES IST NUR
DANN GARANTIERT, WENN VORLIEGENDE
ANLEITUNGEN SOWOHL BEI DER MONTAGE
ALS AUCH BEIM GEBRAUCH BEFOLGT
WERDEN; SIE MÜSSEN DAHER
AUFBEWAHRT WERDEN. DER HERSTELLER
KOMMT NICHT FÜR SCHÄDEN AUF, DIE
DURCH FALSCHEN GEBRAUCH DES
APPARATES VERURSACHT WERDEN.
INSTALLATION
Die Montage muß von Fachkräften ausgeführt
werden.
Sicherstellen, daß bei der Installation und
späteren Arbeiten am Gerät die
Versorgungsspannung abgeschaltet ist!
Das Versorgungskabel des Produktes darf
nicht vom Verbraucher ausgetauscht werden.
WARTUNG
Für die Reinigung des Produktes nur neutrale
Reinigungsmittel verwenden, keine ätzenden
Lösungsmittel benutzen.
LAMPENAUSSTATTUNG UND -AUSTAUSCH
Nur die angegebene Lampenart verwenden,
nie die festgesetzte Höchstleistung
überschreiten.
Bei Außeninstallationen verwenden Sie für
den Netzanschluß einen Stecker der Art IP
65, nicht im Lieferumgang enthalten.
Das Produkt nur wie oben beschrieben
(hängend, an die Wand oder auf einem Pfahl
montiert) verwenden.
GEBRAUCH
Das Versorgungskabel nicht beschädigen.
Wenn beschädigt, das Produkt nicht
verwenden
!
!
LA SECURITE DE L'APPAREIL N'EST
GARANTIE QUE SI CES INSTRUCTIONS
SONT RESPECTEES LORS DE
L'INSTALLATION ET DE L'UTILISATION;
IL EST PAR CONSEQUENT NECESSAIRE
DE LES CONSERVER SOIGNEUSEMENT.
LE FABRICANT DEGAGE TOUTE
RESPONSABILITE EN CAS DE DEGATS
DUS A UN USAGE INCORRECT DE
L'APPAREIL.
INSTALLATION
L’installation doit être effectuée par du
personnel professionellement qualifié.
Lors de l’installation et pour toute intervention
sur l’appareil, s’assurer que le courant
électrique a été coupé !
Le câble d'alimentation du produit ne doit pas
être replacé par l'utilisateur.
ENTRETIEN
Pour le nettoyage du produit n'utiliser que des
détergents neutres et surtout aucun solvent
corrosif.
FOURNITURE ET REMPLACEMENT DES
AMPOULES
N'utiliser que le type d'ampoules indiqué; ne
jamais dépasser la puissance maximale
prescrite.
En cas de montage à l’extérieur, utiliser pour
la connection au réseau d’alimentation,
une prise IP65, qui ne fait pas partie de notre
forniture.
Utiliser le produit seulement dans les
conditions susmentionnées (suspension,
applique et tête du poteau).
UTILISATION
Ne pas endommager le câble d’alimentation.
Ne pas utiliser le produit endommagé.
ATTENTION
ACHTUNG
!
!
This manual suits for next models
1
Table of contents
Other Luce Plan Outdoor Light manuals
Popular Outdoor Light manuals by other brands

HEPER
HEPER MINIMO 3x90 Installation & maintenance instructions

wofi
wofi 325601 9000 Series installation instructions

LIGMAN
LIGMAN MV-30002 instruction manual

Dale Tiffany
Dale Tiffany PG80519 Assembly instructions

Designplan
Designplan ACQUASTOP BRIGHT 2.6 installation instructions

DOTLUX
DOTLUX PLAZA user manual