Lumens Rhino CT-C30 User manual


Table of Contents
Chapter 1Safety Instructions ........................................................... 1
Chapter 2Package Contents............................................................. 3
Chapter 3Product Overview ............................................................. 4
3.1Dimension ..............................................................................................4
3.2Product Overview ..................................................................................5
Chapter 4Instruction for installation ............................................... 8
4.1Park the Charging Cart ............................................................................8
4.2Connect the Power Cord..........................................................................8
4.3Install the Machine...................................................................................8
4.4Position the Charging Cart.....................................................................10
4.5Use the U-type Lock ..............................................................................11
Chapter 5Start Using....................................................................... 12
Chapter 6Indicator Introduction..................................................... 12
Chapter 7How to Increase the Storage Space.............................. 13
7.1Remove the Partition .............................................................................13
Chapter 8Troubleshooting ............................................................. 14
1
Chapter 1 Safety Instructions
WARNING:
This cart must only be used for its intended purpose in accordance with these operating
instructions. Failure to observe the following notices can result in free, injury death by
electric shock or equipment damage.
ELECTRIC
SHOCK
Operate
Carefully
Inspect power cables carefully before each use.
Always turn OFF the power to the product before plugging IN or OUT.
Do not unplug by pulling on the cable.
Do not unplug the power cord from the outlet when your hands are wet.
Do not use cables that are damaged.
Do not walk or drive or place objects over the power cable.
Do not plug the cable into an extension cable.
Keep the door closed and locked when in use.
Keep the Cart away from water.
Do not place the Cart close to flammable liquids or gases.
This product is designed to be used indoors only.
This product is not designed to be operated by a child or student. Only Adult
operation and supervision is needed at all times.
Do not allow anyone to sit, stand, or climb on the product
Do not place TV or Monitor or any heavy objects on top of the product..
Do not use the product to store liquids or cleaning supplies.
Move / Push the Cart with caution.(Do not pull the Cart)
Keep the door closed and locked when in use ad when it is unattended.
Keep the castors locked when Cart is not in transit.
Keep the ventilation holes unblocked for air circulation.
Disconnect the power cable from the wall before relocate the mail unit.
Cautions when
moving the Cart
Disconnect the power cable from the wall.
Make sure the cable is wrapped and secure.
Close and lock the doors.
Unlock the casters.
Move / Push the Cart with caution.
Do not move the Cart across rough, uneven or irregular surfaces/floor.
Cautions when
parking the Cart
Do not park the Cart in areas of heavy traffics.
Do not leave Cart in unattended areas where children have access.
Keep Cart door closed and locked whenever it is unattended or parked for
charging or storage.
Keep Cart casters locked whenever it is unattended or parked for charging or
storage.

2
FCC Warning
This Document Camera has been tested and found to comply with the limits for a Class A
computer device, pursuant to Article 15-J of FCC Rules. These limits are designed to
provide reasonable protection against harmful interference in a commercial installation.
This digital apparatus does not exceed the Class A limits for radio noise emissions
from digital apparatus as set out in the interference-causing equipment standard
entitled "Digital Apparatus," ICES-003 of Industry Canada.
Cet appareil numerique respecte les limites de bruits radioelectriques applicables
aux appareils numeriques de Classe A prescrites dans la norme sur le material
brouilleur: "Appareils Numeriques," NMB-003 edictee par l'Industrie.

3
Chapter 2 Package Contents
Power Cord User Manual Cable Tie
User manual
4
Chapter 3 Product Overview
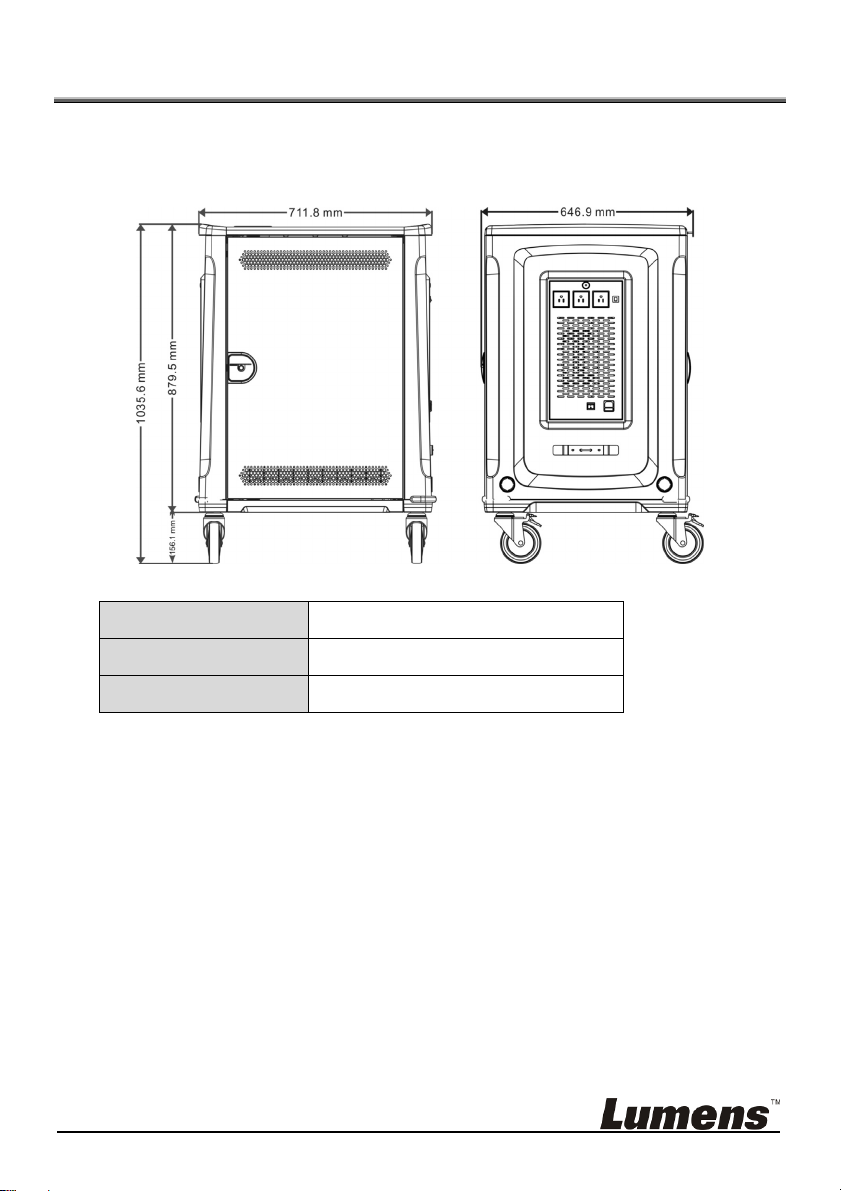
3.1 Dimension
Power Input AC 100V-120V,50/60Hz, 12A
Power Output AC 100V-120V,50/60Hz, 11A
Size (W x D x H) 711.8x646.9x1035.6mm
5
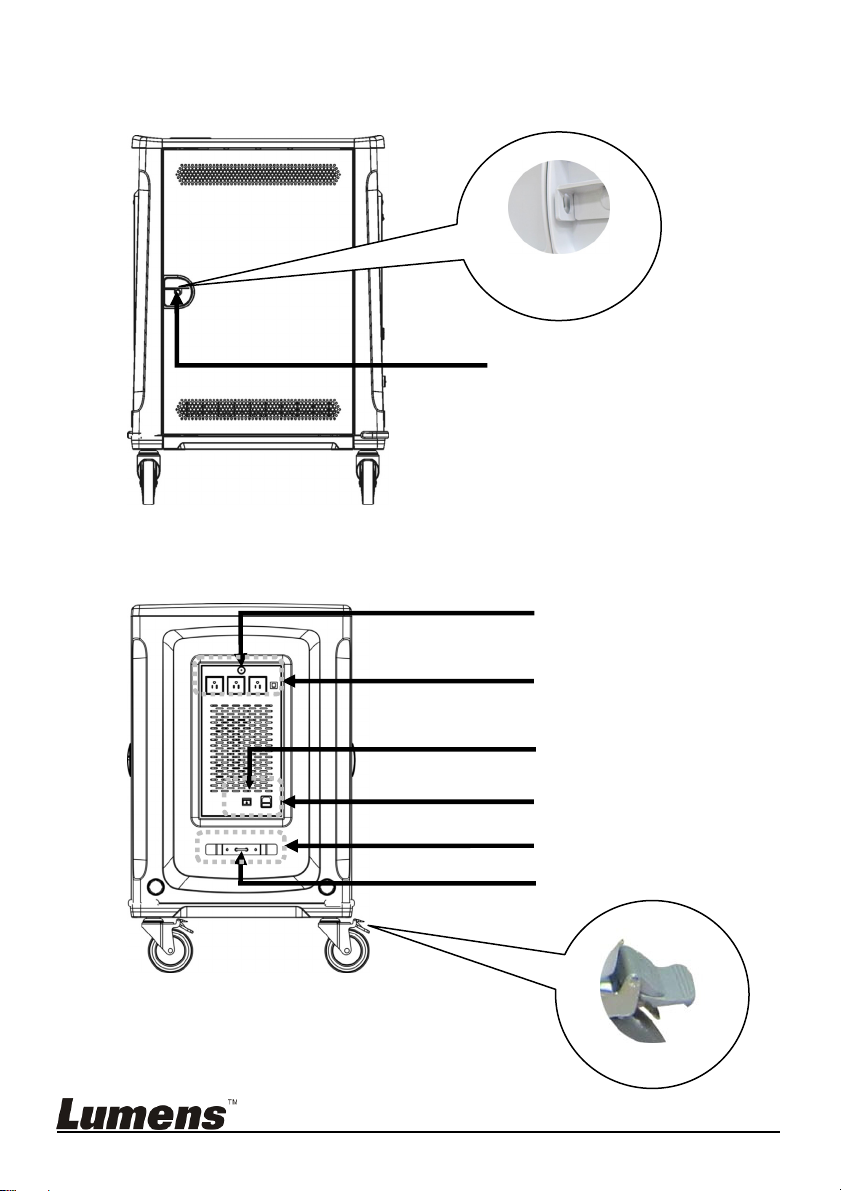
3.2 Product Overview
Front View
Side View
A safety lock can
be mounted
External AC breaker
Power input
Power cable winder
The 3 external power
outlets are for use by
other equipment, but not
for power strip.
Main power switch of
charging cart
U-type lock
Door handle switch
Anti-winding

6
Back View
Front View of Inside
Storage compartments
Slot dimension:15.2" x 10" x 1.3"
Quantity of storage compartments:
11 compartments each layer may
accommodate up to 33 laptops or
tablet PCs
One Touch Charge
Door handle
switch
U-type lock


8
Chapter 4 Instruction for installation
4.1 Park the Charging Cart
Prior to starting the equipment installation and connecting the power cord,
please lock the charging cart to avoid danger caused by sliding.
Press down the switch “ON” on the anti-winding cover to park the cart.
▼Lock the wheel
4.2 Connect the Power Cord
Connect the power cord to the power input on the right side.
4.3 Install the Machine
This product can be used for charging laptops and tablet PCs. The installation
method is as follows:
Fix the power cord in the cable slot and leave a short section of cord
available to connect to the laptop.
9
Place the laptop/tablet PC into the storage compartment and connect the
power cord to the laptop/tablet PC.
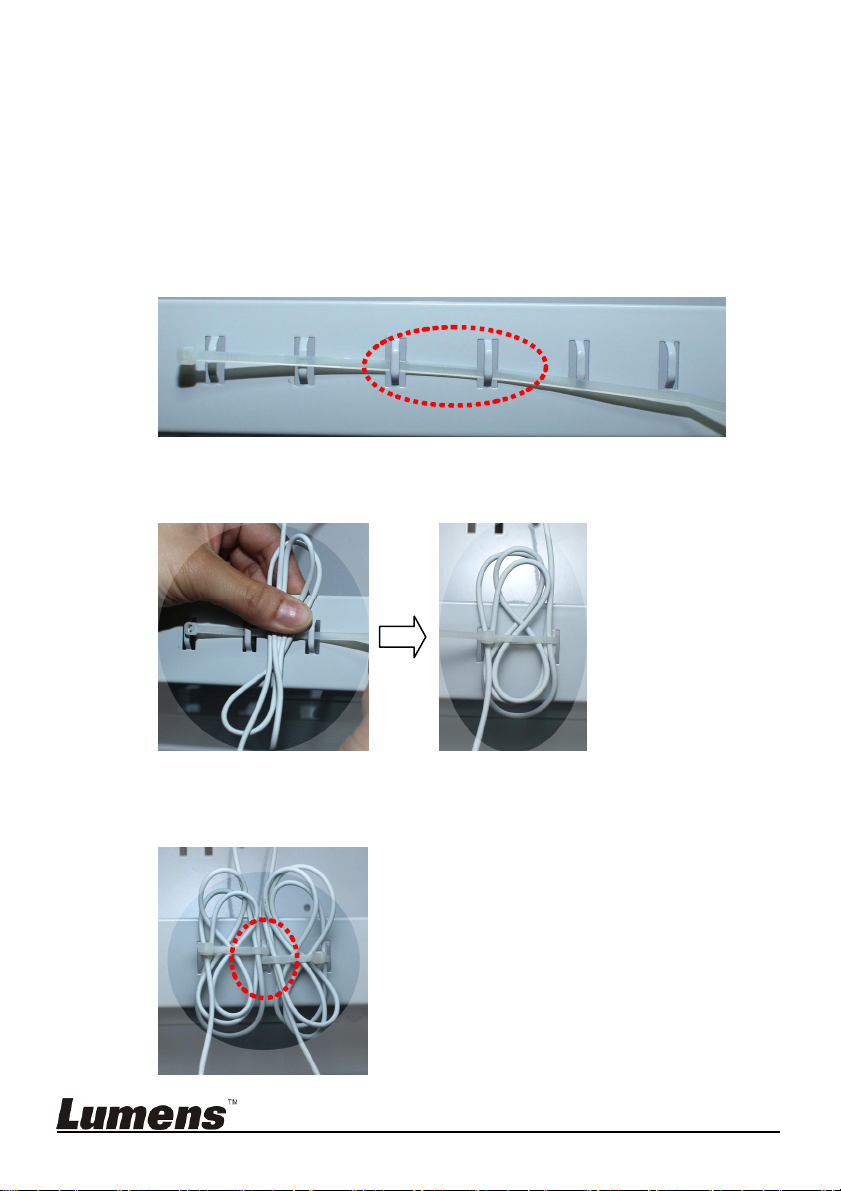
Organize the cables
Organize the cables to be stored in the back of the charging cart at the
location corresponding to the storage compartment used.
▼Put the cable tie through the adjacent 2 holes.
▼Organize the power cord neatly and bundle it into the cable tie. Close
the cable tie tightly and cut off the remaining portion of the plastic strip.
▼Always overlap one hole used by adjacent cable ties so that cable ties
form a zigzag row.

10
4.4 Position the Charging Cart
After the equipment installation is completed, release the locked wheels.
Move the charging cart to the selected location, and lock the wheels
again.
Press down the switch “OFF” on the anti-winding cover to release the lock.
▼Release the lock
▼Lock the wheel

11
4.5 Use the U-type Lock
The cart has U-type locks for retaining the cart fixedly and the equipment on
the panel separately. Chains and anti-theft security locks can be purchased if
needed.
Side View
Back View
U-type lock
U-type lock
12
Chapter 5 Start Using
Place the laptop into the storage compartment and connect with power
cord.
Turn on the main power.
Press the Quick Charge button to start the preset charging schedule.
Preset schedule is 4-hour charging time per layer and a total of 12 hours
to complete the charging.
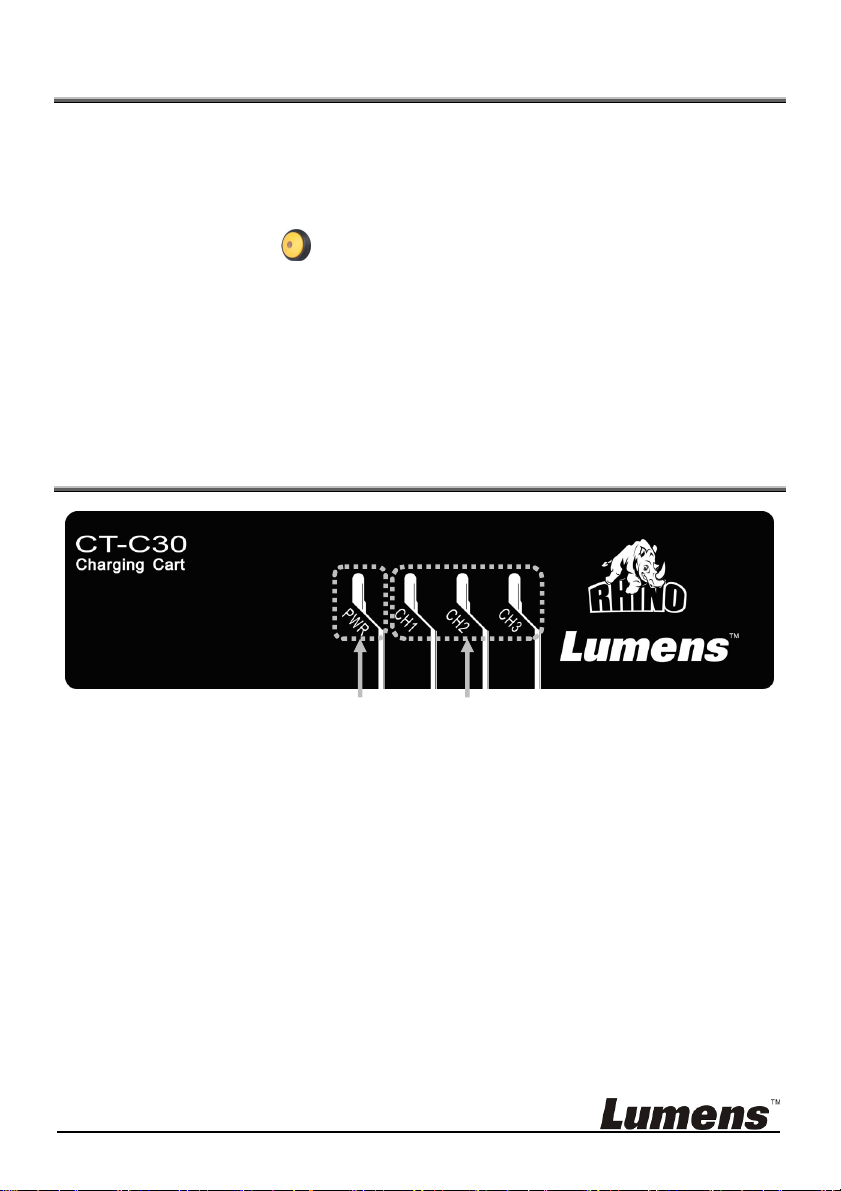
Chapter 6 Indicator Introduction
1. PWR: Power indicator. A green indicator means the main power is on and
no indicator means the power is off.
2. CH1/CH2/CH3: Charging indicator. A white indicator means the charging
is ongoing and no indicator means no charging is ongoing. A blue
indicator means the charging is full.
13
Chapter 7 How to Increase the Storage Space
If the storage compartment is not wide enough, remove some partitions to
increase the width.
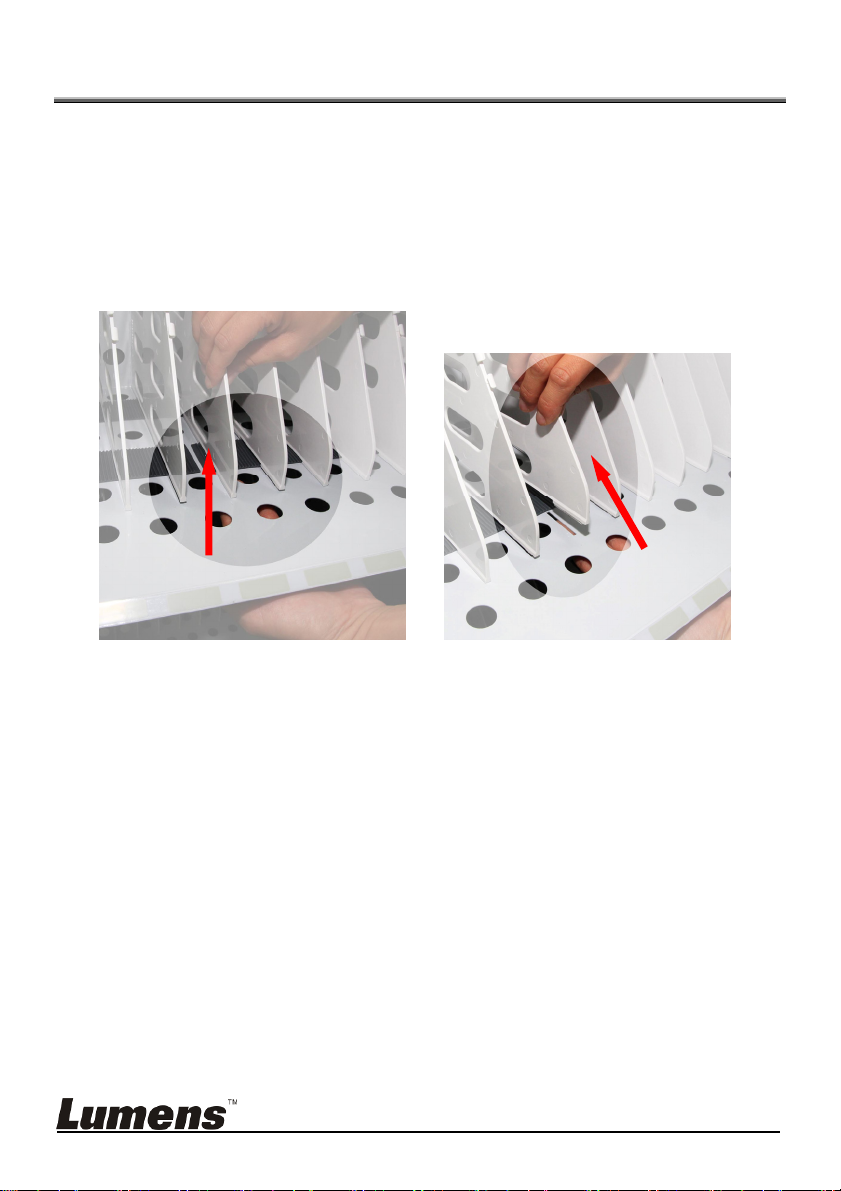
7.1 Remove the Partition
Reach below the layer board, and push the tenon of the partition upward.
Then gently pull the partition up to remove it from the cart

14
Chapter 8 Troubleshooting
No. Problems Solutions
1 Abnormal
voltage caused
outage of
charging cart
AC IN / AC OUT are installed with the overload
protection and the external AC breaker respectively to
automatically turn the power off to protect the machine
when the flow of electrical current is abnormal. Press
the switch again to restart the power.
Table of contents


