Hi-Tec RDX2 Mini User manual

INSTRUCTION MANUAL
WARNING: THE CHARGING OF RC HOBBY BATTERIES CAN BE DANGEROUS. FAILURE TO FOLLOW THE
INSTRUCTIONS AND WARNINGS IN THIS MANUAL MAY RESULT IN PROPERTY DAMAGE AND/OR LOSS OF LIFE.
AC DUAL
BALANCE CHARGER

2
Table of Contents:
Introduction..................................................................................................................................03
Warning and Safety Notes.....................................................................................................04
Product Layout............................................................................................................................09
Specications................................................................................................................................10
Features...........................................................................................................................................11
Battery Connections................................................................................................................14
Input Functions ..........................................................................................................................15
Program Flow Chart...................................................................................................................17
Charger Operation.....................................................................................................................18
Memory Set and Call - Out......................................................................................................21
Battery Resistance Meter.........................................................................................................23
Warning and Error Messages................................................................................................24
Advanced System Set Up........................................................................................................25
Commonly Used Terms............................................................................................................27
Conformity Declarations........................................................................................................29
Disposal and Prop 65 Warning............................................................................................30
Warranty and Service...............................................................................................................32
Table of Contents

3
Introduction
Congratulations on purchasing Hitec’s RDX2 Mini AC Dual Balance Charger.
The RDX2 Mini features independent circuits allowing you to charge two
batteries simultaneously, regardless of chemistry or capacity. The sleek,
compact design of this dual balance charger allows easy front-loading
convenience with balancing and XT60 ports readily accessible, while its
powerful 100W charging output and 5A current will make your battery
charging more ecient and eortless. The RDX2 Mini also includes new
AGM and Cold Charge modes, to safely and easily charge conventional
Lead-based (PB) and Absorbed Glass Mat (AGM) batteries in cold
conditions. Although simple to use, the RDX2 Mini does require some basic
knowledge for successful and safe operation. The operating instructions
included here are designed to ensure that you quickly become familiar
with its functions. It is important that you read through the Operating
Instructions, Warning and Safety Notes attentively and in full before
attempting to use your new charger for the rst time. By following the
guidelines and recommendations provided, you are sure to enjoy many
years of R/C fun with your RDX2 Mini charger!
Please BE SURE to read these INSTRUCTIONS, WARNING and SAFETY NOTES
before you use the charger for the rst time. Mishandling batteries and
battery chargers is dangerous, as there is always a risk of batteries catching
re and exploding.
THE CHARGING AND DISCHARGING OF RC HOBBY BATTERIES CAN
BE DANGEROUS. FAILURE TO FOLLOW THESE EXPLICIT WARNINGS
CAN RESULT IN PROPERTY DAMAGE AND/OR LOSS OF LIFE.
ANEVER LEAVE YOUR CHARGER UNATTENDED WHILE IN OPERATION.
ANEVER CHARGE ON OR AROUND COMBUSTIBLE MATERIALS.
ANEVER CHARGE A DAMAGED BATTERY PACK.
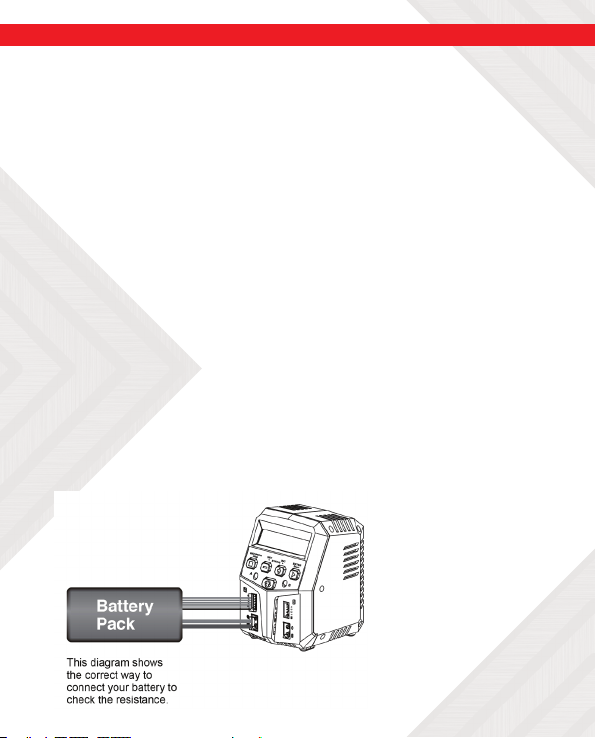
Warning

4
ALOW COST, NO-NAME BATTERY PACKS POSE THE MOST DANGER.
WE RECOMMEND YOU ONLY USE BATTERY PACKS THAT ARE SOLD
AND WARRANTIED BY A REPUTABLE COMPANY.
AIT IS HIGHLY RECOMMENDED THAT YOU UTILIZE A SAFETY DEVICE
SUCH AS A STEEL CASE OR LIPO SACK™ WHILE CHARGING LITHIUM
CHEMISTRY BATTERIES.
AIT IS HIGHLY RECOMMENDED THAT YOU KEEP AN OPERABLE “CLASS
A” FIRE EXTINGUISHER IN THE CHARGING AREA.
FAILURE TO FOLLOW THESE WARNINGS CAN BE
CONSIDERED NEGLIGENCE BY THE OPERATOR AND MAY
NEGATE ANY CLAIMS FOR DAMAGES INCURRED.
Hitec RCD USA will not be held responsible for any damages or injuries
that may occur by persons who fail to follow these warnings or who fail
to properly follow the instructions in this manual.
Warning: Be sure to read this section for your own
safety.
Caution: Be sure to read this section to prevent
accidents and damage to your charger.
Tip: This section will help you maximize the perfor-
mance of your charger.
Note: This section will provide more detailed expla-
nations.
These warnings and safety notes are of the utmost importance. You
must follow these instructions for maximum safety. Failure to do so can
damage the charger and the battery and in the worst cases, may cause
a r e .
Warning
Warning and Safety Notes
Caution
Tip
Warning
Note

5
NEVER LEAVE THE CHARGER UNATTENDED WHILE IT IS
CONNECTED TO ITS POWER SOURCE. IF ANY MALFUNCTION
IS FOUND, TERMINATE THE PROCESS AT ONCE AND REFER
TO THE OPERATION MANUAL.
AThe allowable AC input voltage is 100-240V AC.
AKeep the charger away from dust, damp, rain, heat, direct sunlight
and excessive vibration.
AIf the charger is dropped or suers any type of impact, it should be
inspected by an authorized service station before using it again.
AThis charger and the battery should be put on a heat-resistant, non-
ammable and non-conductive surface.
ANever place a charger on a car seat, carpet or similar surface. Keep all
ammable volatile materials away from the operating area.
AMake sure you know the specications of the battery to be charged
or discharged to ensure it meets the requirements of this charger.
If the program is set up incorrectly, the battery and charger can be
damaged.
AFire or explosion can occur due to overcharging.
ATo avoid a short circuit between the charge lead, always connect the
charge cable to the charger rst, then connect the battery. Reverse
the sequence when disconnecting.
ANever attempt to charge or discharge the following types of
batteries:
Warning
Warning and Safety Notes [cont.]

6
• A battery tted with an integral charge circuit or a
protection circuit
• A battery pack which consists of dierent types of cells
(including dierent manufacturer’s cells)
• A battery that is already fully charged or just slightly
discharged and non-rechargeable batteries (these pose
an explosion hazard)
• A faulty or damaged battery
• Batteries installed in a device or which are electrically
linked to other components
• Batteries that are not expressly stated by the
manufacturer to be suitable for the currents the charger
delivers during the charge process
PLEASE BEAR IN MIND THE FOLLOWING POINTS BEFORE YOU
COMMENCE CHARGING:
• Did you select the appropriate program suitable for the type of
battery you are charging?
• Did you set up the adequate current for charging or
discharging?
• Have you checked the battery voltage? Lithium battery packs
can be wired in parallel and in series, i.e. a 2-cell pack can be
3.7V (in parallel) or 7.4V (in series).
• Have you checked that all connections are rm and secure?
• Make sure there are no intermittent contacts at any point in
the circuit.
Warning and Safety Notes [cont.]

7
Warning and Safety Notes [cont.]
LiPo LiPo HV LiIon LiFe NiCd NiMH Pb
Nominal
Voltage
3.7V/cell 3.7V/cell 3.6V/cell 3.3V/cell 1.2V/cell 1.2V/cell 2.0V/cell
Max. Charge
Voltage
4.2V/cell 4.35V/cell 4.1V/cell 3.6V/cell 1.5V/cell 1.5V/cell 2.46V/cell
Storage
Voltage
3.8V/cell 3.85V/cell 3.7V/cell 3.3V/cell n/a n/a n/a
Allowable Fast
Charge
≤ 1C ≤ 1C ≤ 1C ≤ 4C 1C-2C 1C-2C ≤ .04C
Min. Discharge
Voltage
3.0-3.3V/cell 3.1-3.4V/cell 2.9-3.2V/cell 2.6-2.9V/cell 0.1-1.1V/cell 0.1-1.1V/cell 1.8V/cell
Standard Battery Parameters
WHEN ADJUSTING YOUR RDX2 MINI CHARGING
PARAMETERS, BE SURE YOU SELECT THE PROPER
BATTERY TYPE AND CELL VOLTAGE FOR THE TYPE OF
CELL YOU ARE CHARGING. CHARGING BATTERIES
WITH THE WRONG SETTINGS MAY CAUSETHE CELLS
TO BURST, CATCH FIRE OR EXPLODE.
Charging
Before charging your batteries, it is critical that you determine
the maximum allowable charge rate for your batteries. The RDX2
Mini is capable of charging at high rates that may not be suitable
or safe for your particular batteries. For example, Lithium cells are
typically safe to charge at 1C, or the total mAh÷1000. A 1200mAh
battery would have a 1C charge rate of 1.2 amps.
A 4200mAh battery would have a 1C charge rate of 4.2 amps.
Some manufacturers are oering Lithium cells that can be charged
at greater than 1C but this should ALWAYS be veried before
charging a Lithium battery at rates higher than 1C.
Warning

8
Warning and Safety Notes [cont.]
Voltage is just as critical as the charging amperage rate and this is
determined by the number of cells in series, or“S”. For example, a 3S
LiPo is rated at 11.1 volts (“S” multiplied by a single LiPo cell with a
nominal voltage of 3.7 volts DC. 3 cells x 3.7 volts each equals 11.1
volts DC).
Connect the battery’s main leads to the charger output: red is
positive and black is negative. Keep in mind that the gauge or
thickness of your charging leads from the RDX2 Mini to your battery
must be of an acceptable current rating to handle the applied
charge current. For maximum safety and charging eectiveness,
always match or exceed the main battery lead rating when
assembling or selecting your charging leads. If you charge a battery
at a high current rate (amperage) with a charging lead not rated for
the chosen amperage, the wire could get hot, catch re, short out
and/or potentially destroy your battery and the charger.

9
1
34
Scroll Through the Main Menu
Stop Any Charge Processes
Balance Lead
Socket
Output
Socket
LCD Display
LED
Indicator
Ventilation
Fan
Alter Values
See the Status of Individual
Cells in Balance of Charge Mode
Switch From
Channel A to B or
Vice Versa
AC Input (100-240V)
Resume or Start
Charge Processes
1. RDX 2 Mini Charger
2. AC Cord
3. T-Type Connector
4. T-Type Connector
Product Layout
2

10
AC Input Voltage 100 - 240V
Charge Power 50W x 2
Charge Current Range 0.1-5.0A
Balancing Port Current Drain 300mA/CELL
Trickling Charging Current 50mA-300mA & OFF
NiCd/NiMH Battery Cell Count 6-8 Cells
LiPo/LiHV/LiFe/LiIon Cell Count 2-4 Cells
Pb Battery Voltage 6/12V
Net Weight 500g
Dimensions 100 x 90 x 127mm
Specications

11
Features
Optimized Operating Software:
The RDX2 Mini features the user-friendly AUTO function that sets
the feeding current during the process of charging or discharging.
For lithium batteries especially, it can prevent overcharging and
any resulting consequences. With the AUTO function, users can
disconnect the circuit automatically and trigger a single alarm to
sound if any malfunction has been detected. All programs unique
to the RDX2 Mini are controllable through a two-way linkage and
communication system intended to maximize safety and minimize
the trouble. Every setting is customizable according to user
preference.
Battery Memory (Data Store/Load):
The RDX2 Mini is capable of storing up to 10 different charge/
discharge pro les for your convenience. Users can keep the data
pertaining to any program setting for any battery to facilitate
seamless charging or discharging. Saved pro les can be accessed
and recalled as necessary.
Terminal Voltage Control(TVC):
For experienced users, the charger’s end voltage can be reset.
Twin-Channel Charger:
Hitec’s RDX2 Mini allows you to plug two batteries into one charger
simultaneously; and it will intelligently and automatically initiate
the charging of two batteries at once to their maximum capacity.
Better yet, the batteries being charged do not need to have the
same con guration. You can connect different battery chemistries
(NiMH/NiCd/LiPo/LiFe/Lilon/LiHV/Pb) into any of the charging
ports.

12
Features Cont...
AGM and Cold Charge Modes:
With the new AGM and Cold Charge modes, the user is free to
charge their Lead-based (PB) and AGM batteries in cold days
and cold conditions.
Battery Icon & Percentage of Charge Display
It’s more intuitive to indicate the current real-time battery
power with the Battery Icon and Percentage of Charge Display.
Internal Independent Lithium Battery Balancer:
The RDX2 Mini employs an individual-cell-voltage balancer. It
is not necessary to connect an external balancer for balance
charging.
Adaptable to Various Types of Lithium Battery:
The RDX2 Mini is adaptable to various types of lithium
batteries, including LiPo, LiIon, LiFe and the new LiHV
batteries.
Re-Peak Mode of NiMH/NiCd Battery:
In re-peak charge mode, the charger can peak charge the
battery once, twice, or three times in a row automatically. This
function is useful for ensuring a full battery charge.
Delta-Peak Sensitivity for NiMH/NiCd:
This automatic charge termination program is based on the
principle of the Delta-peak voltage detection. When the
battery’s voltage exceeds the threshold, the process will be
terminated automatically.

13
Battery Meter:
The user can check the battery’s total voltage, the highest
voltage, the lowest voltage and the voltage of each cell. The
user can also check the battery’s total internal resistance and
the internal resistance of each cell.
Capacity Limit:
The charging capacity is always calculated as the charging
current multiplied by time. If the charging capacity exceeds
the limit, the process will automatically terminate according to
the maximum value previously set.
Processing Time Limit:
Protect your battery by setting a maximum time limit for
charging and discharging.
Features Cont...

14
Battery Supply & Connections
1.) Connecting to Power Source:
It is an AC charger only. Please insert the AC power cord to the wall
socket (100-240V) directly to power it on.
2.) Connecting the Battery:
Important!!! Before connecting a battery, it is absolutely essential
to check one last time that you have set the parameters correctly. If
the settings are incorrect, the battery may be damaged and could
even burst into ames or explode. To avoid short circuits between
the banana plugs, always connect the charge leads to the charger
rst and only then to the battery. Reverse the sequence when
disconnecting the pack.
3.) Balance Socket:
The balance wire attached to the battery must be connected to the
charger, with the black wire aligned with the negative marking. Take
care to maintain correct polarity. (See wiring diagram below)
This diagram shows the correct way to connect your battery to the
Hitec RDX2 Mini when charging in the balance charge program
mode.
WARNING:
Failure to connect as shown
in this diagram will damage
your charger. To avoid a short
circuit between the charge
lead, always connect the
charge cable to the charger
rst, then connect the battery.
Reverse the sequence when
disconnecting.

15
BATT PROG / STOP Button:
Stop a function in-progress or to go back to previous step/screen.
DEC Button:
Scroll through menus or decrease the parameter value.
INC Button:
Scroll through the menus or increase the parameter value.
ENTER / START Button:
It is used to enter parameter or store parameter on screen.
Input Functions
BATT. Type/Stop Button Start/Enter Button
Stop the progress
of the current
action or cycle back
to the previous
step / screen.
Scroll through
available menus
or increase
parameter values.
Scroll through
available menus
or decrease
parameter values.
Stop the progress of
the current action
or cycle back to the
previous step / screen.
INC. Button
DEC. Button
ENTER
DEC INC
Stop
BATT/PROG
Start

16
CHANNEL Button:
It is used to switch from Channel A to B or vice versa.
When changing a parameter value in the program, press the START/
ENTER button to make it blink, then change the value by pressing the DEC
and INC button. The value will be stored by repressing the START/ENTER
button. If there is a second parameter to edit on the same screen, it will
begin blinking after you conrm the rst parameter value.
When starting the progress, press and hold the START/ENTER button for 3
seconds. When stopping the progress or go back to previous step/screen,
press the BATT PROG/STOP button once.
When you rst power the charger on it displays the last processes used.
From here you can change the battery type or press enter to change the
charge/discharge process, charge/discharge current rate and/or battery
cell count. If you are charging a battery identical to the last one used and
want to perform the same process then simply press the start to begin that
process.
Input Functions Cont...

17
BATT/PROGRAM
BATT MEMORY ENTER
START [ BATT MEMORY 1 ]
ENTER SET->ENTER
STARTBATT TYPE
LiPo DEC
INC BATT VOLTAGE
14.8V ( 4S ) DEC
INC CHARGE CURRENT
2.0A TVC=YOUR RISK
4.20V
ENTER
START
ENTER
START
BATT/PROGRAM
SYSTEM SETTING->
Version
HW:1.00 SW: 1.00
ENTER
START
DEC
INC
Safety Timer
ON 120Min DEC
INC
Capacity Cut-Off
ON 5000mAH
DECINC
Key Beep ON
Buzzer ON
Load Factory Set
ENTER DEC
INC
Stop
Batt Type
DECINC
SAVE PROGRAM
ENTER
SAVE PROGRAM
SAVE….
[ BATT MEMORY 1 ]
LiPo 14.8V (4S )
[ BATT MEMORY 1 ]
C:2.0A
BATT TYPE
NiMH DEC
INC BATT VOLTAGE
ENTER
STARTCHARGE CURRENT
2.0A
DEC
INC
DEC
INC TRICKLE
100mA DEC
INC PEAK DELAY
1Min
DECINC
SAVE PROGRAM
ENTER
ENTER
STARTBATT TYPE
Pb
BATT VOLTAGE
6.0V
DEC
INC CHARGE CURRENT
2.0A
DEC
INC
DEC
INC SAVE PROGRAM
ENTER
BATT/PROGRAM
Pb BATT ENTER
START Pb NORMAL CHG
2.0A 12.0V DEC
INC Pb AGM CHG
2.0A 12.0V 2.0A 12.0V
BATT/PROGRAM
NiCd BATT
NiCd CHARGE
CURRENT 2.0A
ENTER
START
BATT/PROGRAM
NiMH BATT ENTER
START NiMH CHARGE
CURRENT 2.0A
BATT/PROGRAM
LiPo BATT
LiPo BALANCE
2.0A 14.8V(4S)
LiPo CHARGE
2.0A 14.8V(4S)
LiPo STORAGE
2.0A 14.8V(4S)
ENTER
START
DEC
INC
DEC
INC
DECINC
DECINC
BATT/PROGRAM
LiFe BATT
Lilo BALANCE
2.0A 14.4V (4S)
Lilo CHARGE
2.0A 14.4V (4S)
Lilo STORAGE
2.0A 14.4V (4S)
ENTER
START
DEC
INC
DEC
INC
BATT/PROGRAM
LiIo BATT
LiFe BALANCE
2.0A 13.2V (4S)
LiFe CHARGE
2.0A 13.2V (4S)
LiFe STORAGE
2.0A 13.2V (4S)
ENTER
START
DEC
INC
DEC
INC
DECINC
ENTER
START
BATT/PROGRAM
BATT METER
MAIN 7.35V
H3.724V L3.627V
DEC
INC
DECINC
DECINC
DECINC
NiCd RE-PEAK
1
NiMH RE-PEAK
1
DEC
INC
DEC
INC
DECINC
BATT/PROGRAM
BATT RESISTANCE
DECINC
ENTER
START 5.1 3.0 mΩ
5.3 3.5 mΩDEC
INC TOTAL:16.8mΩ
DEC
INC
DEC
INC
DECINC
DECINC
DECINC
ENTER
START
ENTER
START
STARG/ENTER>3 Seconds
0.000 V
0.000 V
0.000 V
0.000 V
3.722 V
0.000 V
3.627 V
0.000 V
(Connect the main battery socket)
(Connect battery via balance board)
NiMH Sensitivity
D.Peak 4mV
NiCd
Sensitivity
D.Peak
4mV
SAVE PROGRAM
SAVE…. ENTER
START
[ BATT MEMORY 2 ]
NiMH 9.6V (8S )
[ BATT MEMORY 2 ]
C:2.0A
STARG/ENTER>3 Seconds
NiMH CHARGE
CURRENT 2.0A DEC
INC NiMH RE-PEAK
1
[ BATT MEMORY 2 ]
ENTER SET->
[ BATT MEMORY 3 ]
ENTER SET->
SAVE PROGRAM
SAVE….
[ BATT MEMORY 3 ]
Pb 6.0V
[ BATT MEMORY 3 ]
C:2.0A
ENTER CHARGER
LOAD……
DEC
INC
LiHV BALANCE
2.0A 15.2V (4S)
LiHV CHARGE
2.0A 15.2V (4S)
LiHV STORAGE
2.0A 15.2V (4S)
BATT/PROGRAM
LiHV BATTENTER
START
DEC
INC
DEC
INC
DECINC
DEC
INC Pb COLD CHG
Pb NORMAL CHG
2.0A 6.0v
Pb AGM CHG
2.0A 6.0V 2.0A 6.0V
DEC
INC Pb COLD CHG
LiPo BALANCE
2.0A 14.8V(4S)
LiPo CHARGE
2.0A 14.8V(4S)
9.6V(8S)
LiPo STORAGE
2.0A 14.8V(4S)
DEC
INC
DEC
INC
For larger version visit www.hitecrcd.com
Program Flowchart

18
Charger Operations
It is highly recommended to have the owchart handy while learning
to operate this charger. There are two main ways to setup the charger:
(1) Memory prole are available for setting and storing charge or
discharge parameters for up to 10 dierent batteries. Once a battery’s
information is stored into memory, it will be retained until changed
again manually. Recalling a battery’s memory number makes the
charger instantly ready to go!
(2) The other method is by manually setting up the charge or
discharge process each time. The RDX2 Mini is capable of the
following processes:
NiMH
NiCd
RE-PEAK
Pb
Batt
Type
Operation
Program Description
This charging mode is for charging LiPo/LiHV/LiFe/LiIon battery in normal mode.
This program is for charging or discharginglithium battery which will not be
used for long time.
This mode is for balancing the voltage of lithium-polymer battery cells while
charging.
The charger will charge NiMH and NiCd batteries using the charge current
set by the user.
In re-peak charge mode, the charger can peak charge the battery once,
twice or three times in a row automatically. This is good for confirming the
battery is fully charged, and for checking how well the battery receives fast
charges.
LiPo
LiHV
Lilon
LiFe
CHARGE
STORAGE
BALANCE
CHARGE
COLD CHG
This mode is for charging Pb battery in cold days when the temperature is
5
℃
to -20
℃.
NORMAL CHG
This mode is for charging Pb battery.
AGM CHG
This mode is for charging AGM battery.

19
Charger Operation Cont...
The following steps describe how to manually setup the RDX2 Mini:
3. BATT/PROGRAM Select: Press INC and
DEC to scroll through all programs and press
START/ENTER to enter the LiPo BATT Program.
4. Mode Select: Press INC and DEC to scroll
through all modes and press START/ENTER to
enter LiPo Balance Charge Mode.
5. Battery Setting: Press START/ENTER. The
current value will start to blink, Press INC and
DEC to change the value and press START/
ENTER to conrm your setting.
At the same time, the battery cell’s number
will start to blink. Press INC and DEC to
change the value and press START/ENTER to
conrm your setting.
6. Program Start: Press and hold START/
ENTER for 3 seconds to start the program.
The charger is detecting the number of
cells. R shows the number of cells detected
by the charger and S is the number of cells
set by the user at the previous screen. If the
numbers are not identical, press STOP to go
back to the previous screen and recheck the
number of cells in the battery pack before
proceeding.

20
Charger Operations [cont.]
INC
INC
LiPo BALANCE
2.0A 11.1V (3S)
91% 12..14V
1.5A 0 0 :: :5 0 1 2
2 5 % B AL
B:
A:
6.3V CHGNiM H
4 0 7 0 4 0 6 0 V
4 1 1 0
0 V
91% 12..14V
1.5A 0 0 :: :5 0 1 2
r
DEC
DEC
DEC
R shows the number of cells detected by the charger and S is
the number of cells set by you at the previous screen. If both
numbers are identical, press START/ENTER to start charging
process
If the user charges two batterries simultaneously, this will be
started to display after the twin-channels have been working
for 10 seconds. And the user is only allowed to be back to the
working interface that started lastly with START/ENTER and
channel switch button
Real-time status: battery icon, percentage of charge or
discharge. Charge current, battery voltage, elapsed time &
capacity
Voltage of each cell in the battery pack when the battey is
connected with the balance lead.
Final voltage when program ends.
Saftey timer ON and duration of time in minutes.
Capacity cut-o ON and the setting value capacity.
7. Charging Status Monitor
During charge process, The real-time status will be shown on
screen
Table of contents
Other Hi-Tec Batteries Charger manuals

Hi-Tec
Hi-Tec X4 AC Pro User manual

Hi-Tec
Hi-Tec 44253 Operating and maintenance manual

Hi-Tec
Hi-Tec X4 MICRO SE User manual

Hi-Tec
Hi-Tec 44525 User manual

Hi-Tec
Hi-Tec X2 Ultima User manual

Hi-Tec
Hi-Tec X1-200 Touch User manual

Hi-Tec
Hi-Tec CG-330 User manual

Hi-Tec
Hi-Tec X1 Pro User manual

Hi-Tec
Hi-Tec X2 ACPro User manual

Hi-Tec
Hi-Tec RDX1 PRO User manual

Hi-Tec
Hi-Tec X2 700 User manual

Hi-Tec
Hi-Tec X4 User manual

Hi-Tec
Hi-Tec multi cahrger X4 AC Plus User manual

Hi-Tec
Hi-Tec X2 Ultima User manual

Hi-Tec
Hi-Tec RDX1 Mini User manual

Hi-Tec
Hi-Tec X4 MICRO User manual

Hi-Tec
Hi-Tec X1 Touch User manual

Hi-Tec
Hi-Tec RDX1 Mini User manual

Hi-Tec
Hi-Tec X4 AC Pro User manual

Hi-Tec
Hi-Tec X4-80 User manual