Lumi Ki User manual

Quick Start Guide

1. PIR Motion Sensor
2. Light Sensor
3. 166˚ HD Camera
4. Microphone
5. Push Button
6. LED Indicator
7. Speakers
1
2
4
65
7
3
1. PRODUCT DRAWING – FRONT

2. PRODUCT DRAWING – BACK
8. AC14V~24V Power
Interface
9. Reset Button
10. Micro USB Port
(Battery Charging)
11. SD Card Slot
12. Battery Compartment
Cover
9
12
11
8
10

3. PRODUCT DRAWING – MOUNTING BRACKET
13
15
14
13. Screw Holes x 4
14. Wire Terminals
15. Mounting Hooks x 6

4. PRODUCT DRAWING – BRACKET INSTALL
1 2
3
Push in and slide down Tighten to secure
Tighten screw
at base,
use provided
Allen Key

Hard wire power source
5. POWER SUPPLY
Download from App Store or Google Play, run the app on
your smart phone and set up the smart video doorbell,
following the in-app instructions.
Powered by battery
6. APP DOWNLOAD – SMART LIFE
AC 14V~24V
Bell Transformer
Rechargeable
18650 Battery
Micro USB port
for battery
charging (DC5V)

7. SMART WIFI VIDEO DOORBELL PARAMETERS
Smart WiFi Video Doorbell security solution provides the following
functions: wireless connection, ultra-low power consumption, remote
active wake-up and quick start.

Download Smart Life app on mobile phone. Open the app and you will
see the following guide page .
Register a new account. If you already have an account, simply log in.
8. APP GUIDE
9. USER REGISTRATION

Select the following options “Add Device > Security & Video Surveillance
> Smart Doorbell”
10. ADD DEVICE

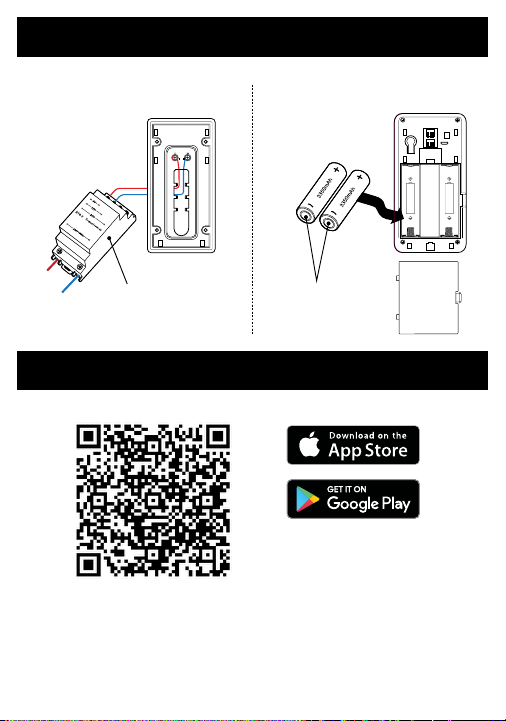
11. GENERAL CONNECTION
Remove “PULL” tags from back of the device (if not done so already).
You should now hear a voice and the LED indicator should now be
flashing red.
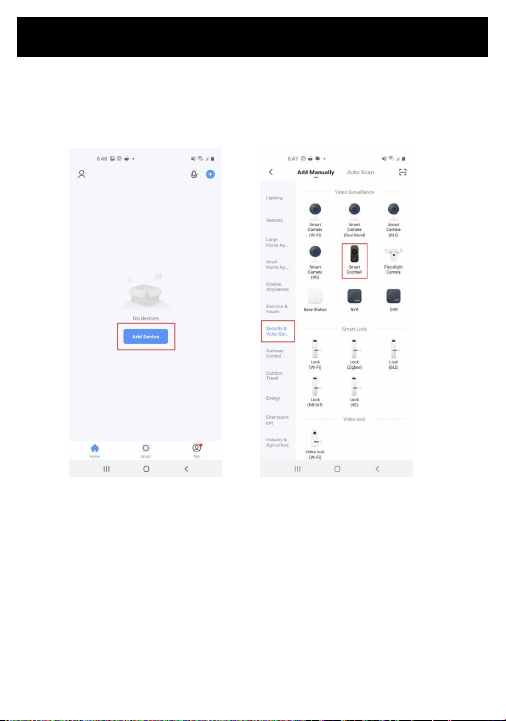
In the app, select “Make sure the indicator is flashing quickly or a prompt
tone is heard”. Then select “Next”.
Enter your WiFi password and confirm.

12. QR CODE CONNECTION
Hold the QR code up to the camera of the Ki device. You should hear a
chime. Select “I heard a prompt”. Wait for the device to be added.
If the connection fails, ensure you have entered the correct password
(the app won’t specifically tell you that the password is incorrect). If the
connection fails again, press the ‘reset’ button on the back of the device
and reconnect your Ki to the app.
If you have tried the above and are still having issues, it is likely to be
caused by one of the following:
Poor strength of your wifi signal from the doorbell location.
Already paired to another smartphone (ie, family member/builder/
electrician). A new smartphone not be added if old user still has their
phone connected to the Ki. To remove the Ki from a smartphone,
navigate to the home screen in the Smart life app and press the
“settings” icon in the top righthand corner, then scroll down to the bottom
and press “remove device”
Low power. Recharge/replace batteries and ensure there is power
coming out of the wall.
Smartphone connected to a weak wifi source.

13. QR CODE CONNECTION
DEVICE CONNECTION STATUS DESCRIPTION
1. The red light is always blinking.
Ready to connect to network mode, after a few seconds of waiting,
with tone reminder.
2. Flashing red, light blinks at one second intervals.
The device has entered the network connection mode. If the device
successfully receives the broadcast or detects QR Code, there will be
prompt tone reminder.
If the device failed to enter connection mode, possibly: 1) The WiFi
router does not support broadcast transmission. We suggest to change
QR code mode for connection. 2) It may detect QR code failed. We
recommend to highlight the light of smartphone screen. Put it directly in
front of doorbell lens.
3. The blue light is always blinking.
The device has entered the connection mode.
If the device failed to connect with network, possibly: 1) It may have
timed out due to configuring to the correct WiFi account but using
wrong WiFi password. Device will stay unconnection status. We suggest
reconfiguration of the network. 2) Device has been bound by other
user’s smartphone. We suggest deleting the device and reconfiguring
the network.
4. The red light and blue light alternatively blink once every one second;
device in normal standby mode. After wake up status, if it remains
unchanged, the device didn’t enter connection mode.
5. The blue Iight blinks once every one second; device in normal standby
mode. After wake up status, if it still remains unchanged, the device
entered connection mode properly.

14. DEVICE MANAGEMENT
Click “...” on live view page to enter device management.
15. MODIFY DEVICE NAME
Click “Modify Device Name” on setting page to rename device .

16. DEVICE SHARING
To share your Ki device with another user, navigate to the home screen
and follow the following prompts highlighted in the images below:

17. DEVICE INFO
18. POWER MANAGEMENT SETTING
CIick “Device Info” to check device information.
Click “Power Manage” to check power working status.

20. MOTION DETECTION SETTING
19. BASIC FUNCTION SETTING
Click “Basic Function Settings” to set below functions: lndicator status;
image reverse; time watermark; wide dynamic mode; IR night vision.
Select ”PIR” to set the sensitivity of the camera.

21. DOORBELL CALL PUSH MESSAGE
Press doorbell and it rings. Device makes call to smartphone, select
“Accept” to check the monitoring image or “Refuse” to end call.
Select push message to be notified if people stay in front of the device or
move. Device will and start recording.
22. PIR MOTION DETECTION PUSH MESSAGE

23. MESSAGE CENTER
Click “Message Center” to check the history of push messages.

1/2
Kī TROUBLESHOOTING
STEPS FOR PROBLEM DIAGNOSIS
MY KīIS NOT OPERATING
The unit will need to be fully charged for at least 24 hours prior to operating. When the unit is charged,
all device management functions (recordings, battery/power, device sharing, motion sensor etc.)
can be accessed from the app. If the unit is hardwired (product code 108018HW), the hardwiring
component will ‘trickle charge’1your unit.
A. Charge/restart your Kī
You will require a universal micro USB cable and a phone adapter.
1. Detach the Kī from the wall mount (if already installed). Remove the bottom screw and push the unit upwards to
detach the unit from wall mount.
Note: There is a screw at the bottom and six upward L-hooks2on the wall mount that may break if pushed too hard.
2. Insert the two batteries provided. This acts as a back-up power supply.
3. Connect the Kī, micro USB cable and phone adapter to wall socket. Hold down restart button until unit prompts are
heard. The restart button is located at the back of the unit.
MY KīIS NOT PAIRING
Completing part A is required. Refer to instruction manual - sections 8 to 11.2 with part B guides.
B. Step-by-step checklist
1. Ensure the correct app is downloaded. If QR code does not work, check in the App Store/Play Store for ‘Smart Life’.
Section 8 - select the correct logo.
2. Select ‘Smart Door Bell’ in the app. This can be found in the Video Surveillance category.
Section 10 - app interface may look different due to software updates.
3. Check that only one admin device does the initial pairing, then invite other devices via invitation3.
4. Ensure that the WIFI connection is good and action according to screen instructions and when prompts are heard.
MY KīSAYS ‘DEVICE HAS ALREADY BEEN CONNECTED TO ANOTHER USER’
The unit may have been paired by trade to check that it is in working order and the device was not
removed from the app prior to handover.
C. Contact Lumi Lighting to speak to a team member
1. Name, contact number, builder contract or job number and a screenshot of the ‘binding prompt’.
LUMI LIGHTING PTY LTD ABN 35 634 478 247
Telephone 1300 LIGHTS (1300 544 487) Email warr[email protected]om.au Head Office Unit 19, 52-60 Garden Drive Tullamarine VIC 3043
LUMI032
Other manuals for Ki
1
Table of contents
Other Lumi Accessories manuals