Lumikit PRO 4 User manual

Lumikit Sistemas para Iluminação | www.lumikit.com.br
1
Interface Lumikit PRO 4
User Guide
© 2011 Lumikit Sistemas para Iluminação
Is important to have both computer network and addressing backgrounds; available in following Websites:
http://en.wikipedia.org/wiki/IP_Address
http://en.wikipedia.org/wiki/Network_switch
The Network connecting cable provided along with the interface belongs to a direct connection type one; if
the interface is connected to an older version computer, it would be necessary a crossover network cable.
The power connection ground pin remains connected to the DMX connector hardware (XLR/canon).
Watch Lumikit PRO 4 interface’s initial setup video:
http://www.lumikit.com.br/videos
rev.2 –29/08/2012

Lumikit Sistemas para Iluminação | www.lumikit.com.br
2
CONTENTS
1. INTRODUCTION....................................................................................................................................................................................................3
2. INSTALLATION, CONNECTORS, LEDS AND BUTTONS...................................................................................................................................4
3. LUMIKIT PRO 4 INTERFACE SETUP..................................................................................................................................................................4
COMMUNICATION PROBLEMS.....................................................................................................................................................................................8
4. 1024-CHANNEL ARTDMX PACKAGES..............................................................................................................................................................9
5. CONNECTING THE INTERFACE..........................................................................................................................................................................9
6. INTERFACE RESET............................................................................................................................................................................................. 10
7. INTERFACE ISOLATION.......................................................................................................................................................................................11
8. PACKAGE CONTENTS .........................................................................................................................................................................................11
9. MAINTENANCE ...................................................................................................................................................................................................12
10. CLEANING ............................................................................................................................................................................................................12
11. WARRANTY.........................................................................................................................................................................................................12
12. CHANGING IP ADDRESS / WINDOWS 7.........................................................................................................................................................12
13. CHANGING IP ADDRESS/ MACOSX.................................................................................................................................................................14
14. PROBLEMS AND SOLUTIONS.......................................................................................................................................................................... 15

Lumikit Sistemas para Iluminação | www.lumikit.com.br
3
1. Introduction
Lumikit PRO 4 Interface stands out for its several setup ways, as well as its 4 galvanic-isolated DMX outputs.
It is compatible with Art-Net protocol used by most lighting software.
The interface setup can be done either through Lumikit SHOW or Lumikit LED;
Because of its network cable connecting, the interface may be placed at a long distance from the computer,
also being possible plugging the interface into a wireless router. A typical configuration would be directed to a
band (in a concert); for instance, the interface would be on the stage plugged into both lights and a wireless
router. On the other site, a notebook with lighting control software, connected to the wireless router, avoiding
wires.
It also supports connection between several interfaces network-wide. For instance, by lighting an avenue,
occurs a problem when passing DMX signal through long distance; one possible solution would rely on
distributing interfaces around and placing network cable topologies since a network signal is less likely to get
interfered. In this case, using buffers or splitters would be avoided.
As Art-Net universe of each interface’s DMX output can be configured, it is possible to assign every output into
the same Art-Net universe, this way the interface would work as a buffer or splitter.
The lighting designer can also configure DMX output 0 so it can be used by Lumikit SHOW software as well as
configure DMX outputs 1, 2 and 3 so it can be used by Lumikit LED software; only by adjusting each Art-Net
universe within the software or whatever more appropriate arrangement desired.
Technical features:
Easy setup through either Lumikit SHOW or Lumikit LED software;
It can be used together with wireless routers;
It allows itself to work together with more network-wide connected interfaces;
It can be used as a DMX buffer;
It is possible to connect some of outputs with Lumikit SHOW software and likewise with Lumikit LED
software, simultaneously; or else to manage different outputs together with different laptops;
Dimensions (AxLxC) 3,4x15,5x27,4 cm;
Weight 1.090 gr (1.490 gr with package+cables);
Metallic box containing connection plugs for power cables, DMX signal and Ethernet network;
Bi-volt power supply unit (115/220V) automatic;
1500Vrms isolation between the network connector and the logic gate;
2500Vrms isolation between the logic gate and the DMX gate;
1500Vrms galvanic isolation between DMX output;
4 DMX RS485-standard output;
14 to 18 FPS (frames per second) w/ 512 DMX channels in each DMX output;
Art-Net version 14;
Compatible to Art-Net packages: ArtDMX, ArtPool, ArtPollReply, ArtIpProg, ArtIpProgReply, ArtAddress;

Lumikit Sistemas para Iluminação | www.lumikit.com.br
4
2.Installation, connectors, LEDs and buttons
a: electrical power connector;
b0-b3: LED indicating DMX outputs’ behavior–in normal behavior those LEDs should quickly blink;
c: LED error indicators, no Art-Net signal on - this LED when turned on indicates that the interface is not
receiving any Art-Net package located throughout network;
d: 250V/300mA fuse;
e: reset button –when pressed over 10 seconds after turning the interface on, default configuration will
be restored: IP 192.168.0.30 / Subnet mask: 255.255.255.0 / DMX outputs 0, 1, 2, 3;
f0-f3: DMX outputs;
g: network connectors;
h: on/off key;
3.Lumikit PRO 4 Interface setup
Before start the setup, be sure the computer’s network controller and the interface are connected through a
network cable. Ethernet switches are allowed to be used so it guarantees more interfaces to be connected into
the same computer and/or access points/routers performing communication with the interface.
If the interface’s current defined IP address turns out to be unknown, do an interface RESET procedure (chapter
6); such procedure recovers previously adjusted IP values together with other initial definitions. Default
adjusted IP is 192.168.0.30.
Check also if your network card’s IP address belongs to the same network class as the one defined on the
interface, for instance: if the interface’s IP is 192.168.0.30, your network card used to perform communication
with the interface should have an IP 192.168.0.??? varying from 1 to 254 (minus 30). Otherwise it will not be
possible to perform communication with the interface. The interface and the network card must share the
same subnet mask number. Check on chapters 13 (Windows 7) and 14 (MACOS) for further explanations.
To make sure whether the communication with the interface is working or not, simply type on command line
ping 192.168.0.30
(or even the IP address defined within the interface, assuming it has been changed):

Lumikit Sistemas para Iluminação | www.lumikit.com.br
5
On either Lumikit SHOW or Lumikit LED software, inside interface settings (“INterfaces”button), click on the
“Setup Art-Net interfaces”button, and then the following window will be displayed:
In the list (1) will be displayed interfaces found over the network; in case of none to be displayed, check for
possible communication problems (next chapter) and then click on “Search Art-Net interfaces” (5).

Lumikit Sistemas para Iluminação | www.lumikit.com.br
6
In this list are displayed:
Interface’s MAC address, which cannot be changed;
Interface label, which cannot be changed;
IP address, which stands for the interface identification allowing itself to communicate with the
computer. It is defined by default as 192.168.0.30 for the first interface; in the case of multiple interfaces
working on the same network, it is defined as 192.168.0.31, 192.168.0.32 and so on. Important to notice
that not all lighting software allow using IP addresses that do not start with IP 2 (e.g.: 2.0.0.100) or 10
(e.g.: 10.0.0.100). In that case set IP addresses that match with the lighting software;
Number of universes, which stands for the number of DMX outputs found on the interface;
Art-Net universes, displays in a row which Art-Net universes will the DMX outputs use;
By selecting an interface on the list (1), subnet mask will then be displayed
(
http://en.wikipedia.org/wiki/Subnetwork
) in edit fields, use this mask according to the current IP address class,
e.g.: IP: 2.0.0.XXX, mask: 255.0.0.0; IP 192.168.0.XXX, mask: 255.255.255.0;
In these fields configuring a new IP and subnet masks is possible (2) besides defining which Art-Net universes
the DMX outputs will end up using (3);
Once required changes are finished being made, click then on “Program interface” (4) and follow the following
instructions displayed on screen:
To configure the interface within Lumikit SHOW or Lumikit LED software press button “Auto detect” (1):

Lumikit Sistemas para Iluminação | www.lumikit.com.br
7
Notice that the own software chose to send 2 packages each one containing 1024 DMX channels towards the
interface. Check for more details on 1024-channelArtDMX packages later on chapter 4. These 2 packages equal
to 4 512-channel packages.
In case that DMX outputs definitions have been changed to Art-Net universes 0, 0, 1 and 2:
Once “Auto detect” button is clicked on:

Lumikit Sistemas para Iluminação | www.lumikit.com.br
8
The software sends 3 512-channel packages. This way Interface DMX output 0 and 1 will share the same DMX
signal even if they’re isolated from each other working then as a splitter or buffer.
Communication Problems
In case you are unable to do initial communication with the interface, check on the following items:
Whether power supply cable is correctly connected;
Whether fuse is not burned out, if so replace it with an equivalent 250V/300mA;
If both previous items are correctly checked, 4 DMX LEDs should be quickly blinking as long as the
interface is on, otherwise contact technical support;
Whether cabled connection from the interface’s network cable to computer is correctly done;
Whether computer’s network card in which the interface is connected is activated;
Computer may belong to an older version, in this case use a crossover network cable instead;
If a router is being used check on its current settings; connect the interface directly to the computer to
make sure that it runs correctly;
In case of communication with the interface is still not possible to be done, perform an interface RESET
(chapter 6), set network settings IP to192.168.0.1 and try again;
If Windows is your operating system, turn its firewall off.

Lumikit Sistemas para Iluminação | www.lumikit.com.br
9
4.1024-Channel ArtDMX Packages
Lumikit PRO 4 Interface has 4 DMX outputs; which can be used to control whatever DMX device, including
electronic LED panels.
On controlling LED panels an undesirable outcome might happen: DMX outputs are updated different times,
therefore small shares from the panel updates themselves before the other.
This outcome happens for the following reason: by receiving a network package the interface sends
immediately a DMX signal through DMX output. As ArtDMX packages achieve their goals at different times, even
if time gap is measure by few ms, such differences may be seen on the LEDs; on other hand, by using either
movingheads or other DMX devices, such difference cannot be perceived.
To avoid such an outcome, a special 1024-DMX-channel Art-Net package was created, replacing the previously
used 512-channel standard paradigm. To use this package, interface must necessarily have all DMX outputs set
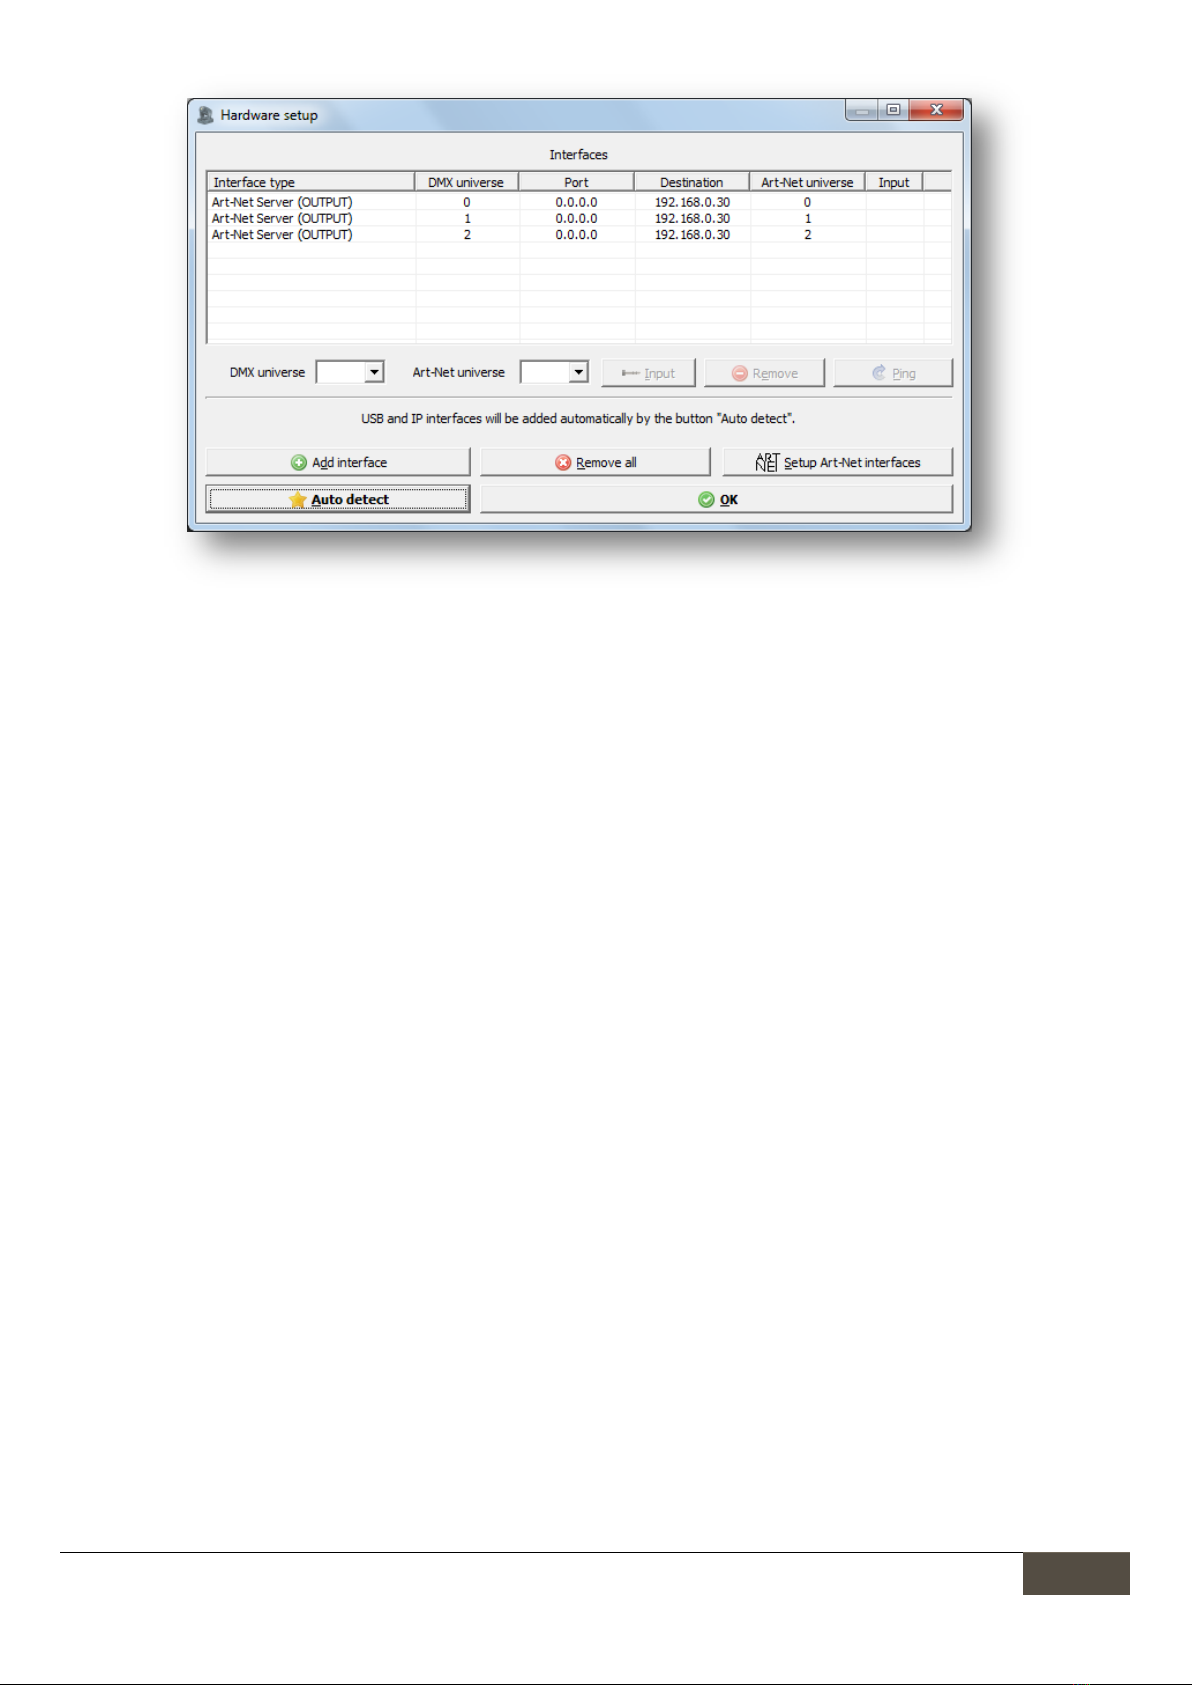
as ascending order, for instance: Art-Net universes at DMX outputs = 0, 1, 2 e 3, or 4, 5, 6 e 7 or 2, 3, 4 e 5, etc.
For instance, if interface is configured with Art-Net universes at DMX outputs: 0, 1, 2 and 3, software is able to
send a 1024-channel package to universe 0. Those 1024 channels will be stored in internal memory.
By receiving a second 1024-channel package to Art-Net universe 2, interface will send all 512 first channels from
this package to DMX output 2, and simultaneously send all stored 512 first channels to DMX output 0 (previously
stored in internal memory).
By receiving all other 512 channels out of 1024 ones from the package to Art-Net universe 2, interface will send
the 512 channels through DMX output 3 and the remaining stored-at-memory 512 DMX channels through DMX
output 1.
This way, all 4 DMX outputs will stand synchronized. By clicking on “Auto detect” button, at interface definition
window (Interfaces button) within either Lumikit SHOW or Lumikit LED softwares, it will automatically check on
the current configuration and then choose the better way to communicate with the interface.
5.Connecting the Interface
Connecting Lumikit PRO 4 Interface is simple:
DMX outputs can be connected directly into the proper lighting devices. It might also be used either a
splitter or a buffer on the DMX signal, in case over 32 lighting devices are connected into a single DMX
output;
Power supply is provided through a power plug. It works with 115V or 220V;
Ethernet connection:
oCan be connected directly into the computer network card by wire;
oCan be connected into an Ethernet switch in case of multiple interfaces; even if there are more
devices throughout network topology;
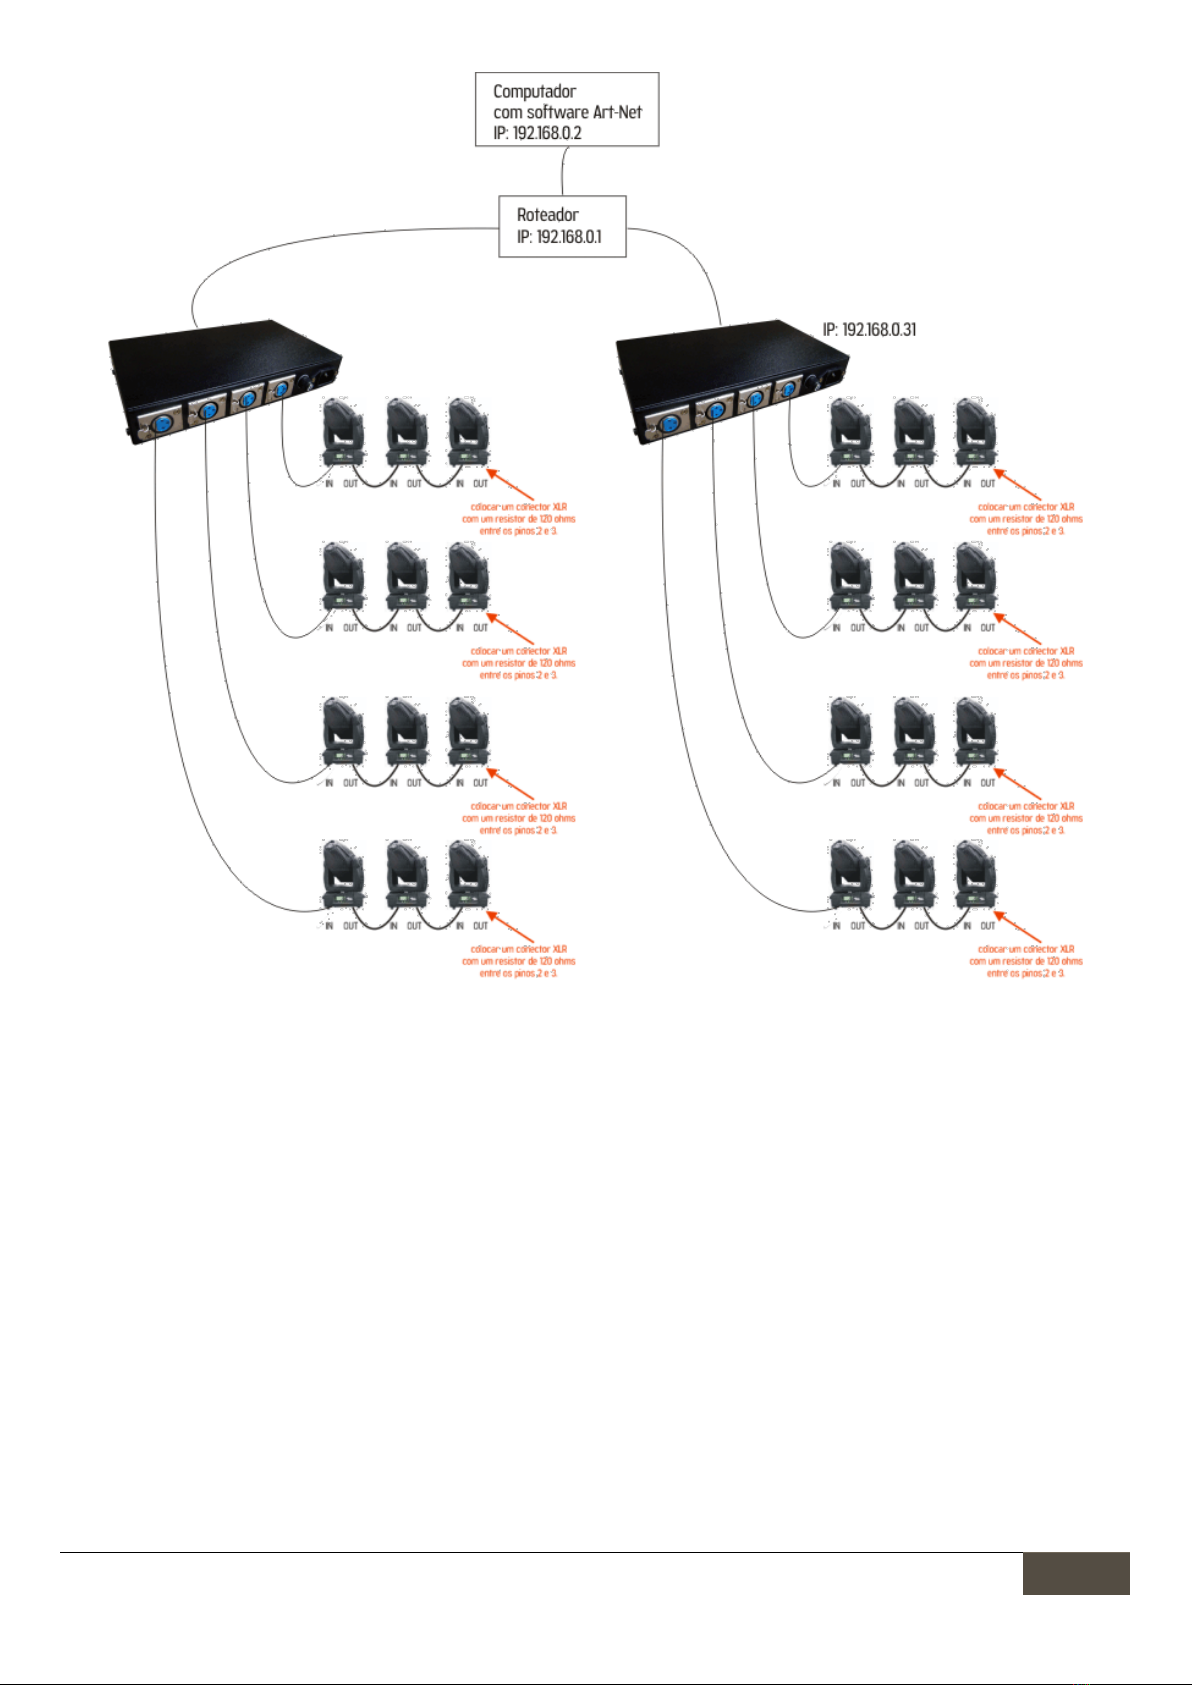
oCan be connected into a wireless access point allowing then wireless communication;
A following example on a connection between 2 interfaces into the same network topology:

Lumikit Sistemas para Iluminação | www.lumikit.com.br
10
Notice that the second interface’s IP address does not match to the IP address concerning the first one. Always
use not-matching addresses.
The computer belongs to the same network class as the interfaces (in this case class C - 192.168.XXX.XXX).
6.Interface Reset
To restore original default configuration an interface reset must be performed.
Restored values are the following:
IP Address: 192.168.0.30
Network mask: 255.255.255.0
DMX Output0 = Art-Net Universe 0;
DMX Output1 = Art-Net Universe 1;
DMXOutput 2 = Art-Net Universe 2;
DMX Output3 = Art-Net Universe 3;
IP: 192.168.0.30

Lumikit Sistemas para Iluminação | www.lumikit.com.br
11
Reset is made by the following method:
1. Turn the interface power supply off;
2. Put a paperclip into the small existing hole at the side part of the interface and hold itso (as the picture
above);
3. Turn the interface power supply on and hold the paperclip in for at least 10 seconds;
4. Take the paperclip out and the interface will then be on again adjusted with all original default
configurations.
7.Interface Isolation
All Lumikit interfaces have opto-isolators at the logic circuit output.
Interface has isolation of 1500 Vrms on network cable, according to the law; such isolation is performed by the
transformer standing inside the RJ45 connector.
DMX outputs have galvanic isolation (pin 1 from the isolated connector standing among outputs).
We recommend you to use grounded installations.
The power connection ground pin remains connected to the DMX connector hardware (XLR/canon).
Problems that may occur due to lack of grounded installations:
Interface randomly turns itself off;
Devices may receive random DMX signals;
LOW SECURITY ON USER: ELECTRIC SHOCK RISK!
Find more over grounding on the Internet:
http://en.wikipedia.org/wiki/Ground_(electricity)
8.Package Contents
Lumikit PRO 4 Interface;
Power supply cable;
Direct network cable;
Instruction booklet;
CD containing LumikitPack (SHOW + LED) and Lumikit SHOW MACOSX softwares, PDF manual and videos.

Lumikit Sistemas para Iluminação | www.lumikit.com.br
12
9.Maintenance
There are no internal parts that can be replaced by the client. Only DMX output integrated circuits can be
replaced by technicians. In case of problems to occur, we recommend you to contact Lumikit for proper
maintenance procedure.
All components are very sensitive to electrostatic energy. Use proper protection.
10. Cleaning
On cleaning the interface, remember to disconnect the DMX devices out from the computer and from electricity.
The interface can be cleaned with a slightly moistened cloth.
Wait until it is totally dry, so you can connect every cable into the interface again.
11.Warranty
Lumikit PRO 4 interface has a 12-month warranty. Network cable and all read-out integrated circuits are not
warranty covered, due to the fact it depends on the installation provided by the client.
12. Changing IP Address / Windows 7
To perform an initial communication with the interface, set your computer network controller with IP
192.168.0.30, for this IP belongs to the same class as the one configured initially by default 192.168.0.30; check
the steps below on how to perform IP configuration on Windows 7:
Click on “Begin” ; Search for “Control Panel”; click on “Network and Internet”:
Click on “Network and Sharing Center”:
At the left side, click on “Change Adapter Settings”:

Lumikit Sistemas para Iluminação | www.lumikit.com.br
13
Search for “Local Area Connection”, click with the right button on it and in the following menu select “Properties”:
On the list select “Internet Protocol Version 4 (TCP/IPv4)”, and click on “Properties”:
Select “Use the following IP address:”;Fill out “IP Address:” field with “192.168.0.1”; Fill out “Subnet Mask:” field with “255.255.255.0”:
Confirm all past windows pressing the “OK” button;
When you get to “Network Connections”, disconnect all other connections so it does not allow the software attempting to establish a connection through wireless port,
in which the interface is physically connected in the first place.
In case other network adapter makes itself needed to work together with the interface, you must within Lumikit SHOW or Lumikit LED softwares inform by which
network controller the connection is supposed to be made, only by informing the adapter IP address.

Lumikit Sistemas para Iluminação | www.lumikit.com.br
14
13. Changing IP Address/ MACOSX
To perform a first communication with the interface, set your computer network controller to IP 192.168.0.30,
for this IP belongs to the same class as the one configured initially by default 192.168.0.30;check the steps below
on how to perform IP configuration on MACOSX:
Access “System Preferences” ;
Click on “Network”:
On the following list, select “Ethernet”; Fill out the “IP Address:” field with “192.168.0.1” and “Subnet Mask:” with255.255.255.0”:
Type “ping 192.168.0.30” on Terminal to check if the communication is working.
Turn Air-Port off in case a communication with the interface could not be established.

Lumikit Sistemas para Iluminação | www.lumikit.com.br
15
14. Problems and solutions
We show below a list containing possible problems and their solutions:
P:Whenever I click on “Auto”, at Lumikit SHOW or LED interface setting screen, interface just doesn’t show up; it is on, its 4 LEDs are
blinking and the Error LED also on.
S: Check if Lumikit PRO 4 interface responds on performing a PING for its IP. Whether the interface isn’t able to respond to the PING, it should also not
be able to be found by software (you can learn how to perform a Ping action in the explanation videos). This problem may occur by the following
causes:
- Network cable currently being used is not compatible; in this case no interface network connector LEDs were supposed to be on or even blinking: a
direct network cable is provided, however if your computer is old compared to current machines a crossover cable will be necessary, easily found in
whatever computer-related store;
- Neither computer or interface must be using compatible IPs; in case you are not skilled in Computer Network, try setting IP 192.168.0.1 on your
computer and IP 192.168.0.30 on the interface, or a specialized support is required;
- Try using fixed IP addresses; even with a DHCP server router, computer might not receive any return package from the interface, so a fixed IP
address is required.
- Deactivate all other network adapters;
- If your operating system is Windows, check your firewall; at first turn it completely off, if it eventually works, create a new restriction and attach
all Lumikit software into it.
P: Interface doesn’t turn on.
S: In case the interface doesn’t turn on, check the fuse; it must be set in 250V / 300mA, unplug the interface out from the power supply to avoid
accidents while checking on the fuse. Confirm its current active power tension, whether it is correct of not.
P: Not all 4 LEDs are constantly blinking, or some DMX output LED is always on.
S: Interface must be sent to Lumikit Technical Support.
P: One or more DMX outputs aren’t working anymore.
S: Check on DMX cables, a burnout of its integrated circuits might have occurred, if so contact product support for more information concerning
technical support.
P: DMX devices are getting random signals.
S: Check on DMX cables and their length; avoid having the cables in a mess for it creates interferences directly on its performance. Check also on all
DMX devices in DMX line. Use a termination resistor in last DMX device; such resistor has 1/2W and 120 ohms, and must be set between pins 2 and 3
from XLR Connector –Canon.
P: Interface can be found by “Auto” button, but it doesn’t receive any Art-Net packages from software.
S: Interface probably belongs to a different network class as the one set on the network adapter. Always have the same network class set in both
interface and computer. Use fixed IP address on your computer too.
Table of contents
Other Lumikit Recording Equipment manuals