VR450
Caméra couleur
Jour/Nuit
Filtre IR mobile
1. CARACTÉRISTIQUES
1.1. Ne contient pas de plomb (Pb) conforme à la recommandation RoHS.
1.2. Processeur de traitement du signal: SONY HQ1
1.3. Longueduréedevieethauteabilitéontétérecherchéesenutilisantuncap-
teur CCD.
1.4. La sensibilité est de 0,15Lux @ F1,0 sans projecteur IR.
1.5 Facile à utiliser dans toutes les applications grâce à son faible encombrement.
Sa légèreté améliore aussi ses performances.
1.6 Immunisée contre les interférences provoquées par les champs magnétiques
et électrostatiques.
1.7 Compatible avec tous les objectifs du marché.
1.8 Peut-être utilisée avec un projecteur infra-rouge.
1.9 Équipéed’unmécanismemobiledultreinfra-rouge.Lorsquelacaméradé-
tecteunefaibleluminosité,leltreinfra-rougeestautomatiquementenlevé.
1.10Mécanismedecommutationdultreinfra-rouge.
Lorsque la luminosité se réduit (inférieur à 2 Lux), pour augmenter la sensibi-
litéetobteniruneimageplusclaire,leltreinfra-rougeestautomatiquement
enlevé et la caméra commute en mode monochrome. Lorsque la luminosité
augmente à nouveau (supérieur à 5 Lux), la caméra commute en mode cou-
leurenreplaçantleltreinfra-rougedevantlecapture.
2. PRÉCAUTIONS
2.1. Ne jamais pointer la caméra vers le soleil.
Ne pas exposer le capteur directement au soleil ou à une forte source lumi-
neuse cela peux détériorer le capteur.
2.2. Manipuler la caméra avec précaution.
Éviter tous choques ou chutes de la caméra. Une manipulation sans précau-
tion peu endommager la caméra.
2.3. Un environnement convenable est nécessaire.
Cette caméra à été conçue pour une utilisation intérieure. La plage de tem-
pérature de fonctionnement de la caméra se situe entre -10°C ~ 50°C et
l’humidité autorisée ne doit pas dépasser 85% au maximum. Lorsque vous
utilisez la caméra en extérieur, un caisson étanche équipé d’un chauffage
est nécessaire.
2.5 Vérierlatensiond’alimentation.
Latensiond’alimentationdoit-êtredanslaplagespécier.
2.6 Introductiond’objetoudeliquide.
Ne jamais introduire aucun objet dans la caméra, cela peu créer des courts
circuits qui peuvent engendrer des choques électriques ou un départ de feu.
Ne jamais introduire aucun liquide dans la caméra.
2.7 Réparation.
Ne tentez pas de réparer vous même cette caméra, l’ouverture de la ca-
méra peu vous exposer à des tensions dangereuses. Faites appelle à un tech-
nicienqualiépourtoutesréparations.
2.8 Dommage nécessitant une réparation.
Dans les cas suivants, démonter la caméra du support mural et adressez-vous
à un service technique compétent:
a. Lorsque le cordon ou la prise secteur est endommagé.
b. Si du liquide ou un objet c’est introduit dans la caméra.
c. Si la caméra à été laissée sous la pluie ou plongée dans l’eau.
d. Si la caméra est tombée ou que le boîtier a été endommagé.
e. Lorsque les performances de la caméra on nettement changées.
3 NOMENCLATURE ET FONCTIONS
3.1 Montagedel’objectif.
Vous pouvez installer un objectif ayant une monture CS, si vous souhaitez ins-
taller un objectif ayant une monture C, vous devez utiliser l’adaptateur.
3.2 Trousdexationdelacaméra.
Trousdexationdecamérastandard.
3.3 Connecteur AUDIO.
Sur cette sortie vous pouvez connecter un câble audio.
1
3
4.4 SW4. F.L. (Réduction de scintillement):
F.L: Fixe la vitesse du shutter à 1/120 Sec.
Lorsque vous utilisez cette fonction mettre le commutateur “AES” sur OFF.
NOM: Position normal.
4.5 SW5.AGC:
AGC: le niveau varie de 0 à 26 dB.
OFF:leniveaudel’AGCestxéà0dB.
5. SPÉCIFICATIONS
VR450
CAPTEUR 1/3” Sony Super HAD CCD
DSP SONY HQ1
RÉSOLUTION CAPTEUR PAL: 795 (h) x 596 (v)
SYNCHRONISATION SYSTEM Synchronisation interne et ligne
HORIZONTAL RÉSOLUTION 550 lignes
ILLUMINATION MINIMUM Commute du mode couleur au mode N&B
automatiquement en dessous 2 lux.
0,15 lux @ F1,0 sans projecteur IR
0 lux @ F1,0 avec projecteur IR
COMMUTATIONJOUR/NUIT Commutationautomatiquedultreinfra-rouge
SENSIBILITÉ INFRA-ROUGE 700 ~ 1100 nm
SHUTTER ÉLECTRONIQUE Auto. 1/50 to 1/100,000 - Commutation On/Off
BLC Compensation de contre jour, On/Off
CONTRÔLE DE GAIN AUTO. Commutation On/Off
BALANCE DES BLANCS AWB
RAPPORT SIGNAL/BRUIT Supérieur à 50 dB (AGC Off)
CONTRÔLE DE L’IRIS Commutation Vidéo/Commande direct AI
GAMMA CORRECTION > 0,45
MONTURE D’OBJECTIF Monture CS ou C avec adaptateur 5 mm
AUDIO Équipé d’un microphone
SORTIE VIDÉO 1,0 Vc-c, 75 ohm
ALIMENTATION 90 ~ 230 Vca
CONSOMMATION Approx. 5 W
(Incluant la consommation de l’objectif)
TEMPÉRATURES DE STOCKAGE -20° ~ + 60° C
GAMME DE TEMPÉRATURES -10° ~ + 60° C
DIMENSIONS 60 (l) x 51 (h) x 112 (p) mm
POIDS Approx. 550g
Objectif en option
Aspectetspécicationspeuventêtremodiéssansinformationpréalable.
2
4VR450-Manuel-V02
GARANTIE 2 ANS
(Voir les conditions générales de vente)
Mode jour Mode nuit
(<2 Lux)
(>5 Lux)
3.4. Connecteur Auto Iris (type 4-broche)
Le connecteur fournie les signaux nécessaires à l’objectif auto-iris (non four-
nie); alimentation et signal vidéo ou signal de contrôle DC.
3.5. Microcommutateurdeconguration.
SW1. MODE SYNC: Sélection du mode de synchronisation INT/L.L..
SW2. AES: Commutateur Shutter électronique Off/AES.
SW3. BLC: Commutateur de compensation de contre jour, Off/BLC.
SW4. F.L: Commutateur de réduction de scintillement Off/F.L.
SW5. AGC: Commutateur du contrôle de gain automatique Off/AGC.
3.6. Connecteur VIDEO.
C’est le connecteur de sortie vidéo pour moniteur, etc... (75 Ohm).
3.7. Commutateur de sélection du mode iris.
Utilisé pour choisir le mode DC ou VIDÉO en accord avec le type d’objectif
que vous utilisez.
3.8 Ajustement du niveau DC.
Utilisé pour ajuster le niveau de sortie vidéo de la commande DC de l’auto iris
de l’objectif.
3.9 Cordond’alimentation.
Cordon d’alimentation à connecter au secteur.
4 MICRO COMMUTATEUR DE CONFIGURATION
4.1 SW1. MODE DE SYNCHRONISATION:
MODE INT: La caméra peut fonctionner indépendamment avec sa propre
fréquence de synchronisation.
MODE L.L.: La caméra est synchronisée sur la fréquence secteur.
4.2 SW2. AES:
AES: Le contrôle du shutter électronique 1/50 ~ 1/100.000 sec. est nécessaire
lorsque l’on utiliser un objectif à iris manuel.
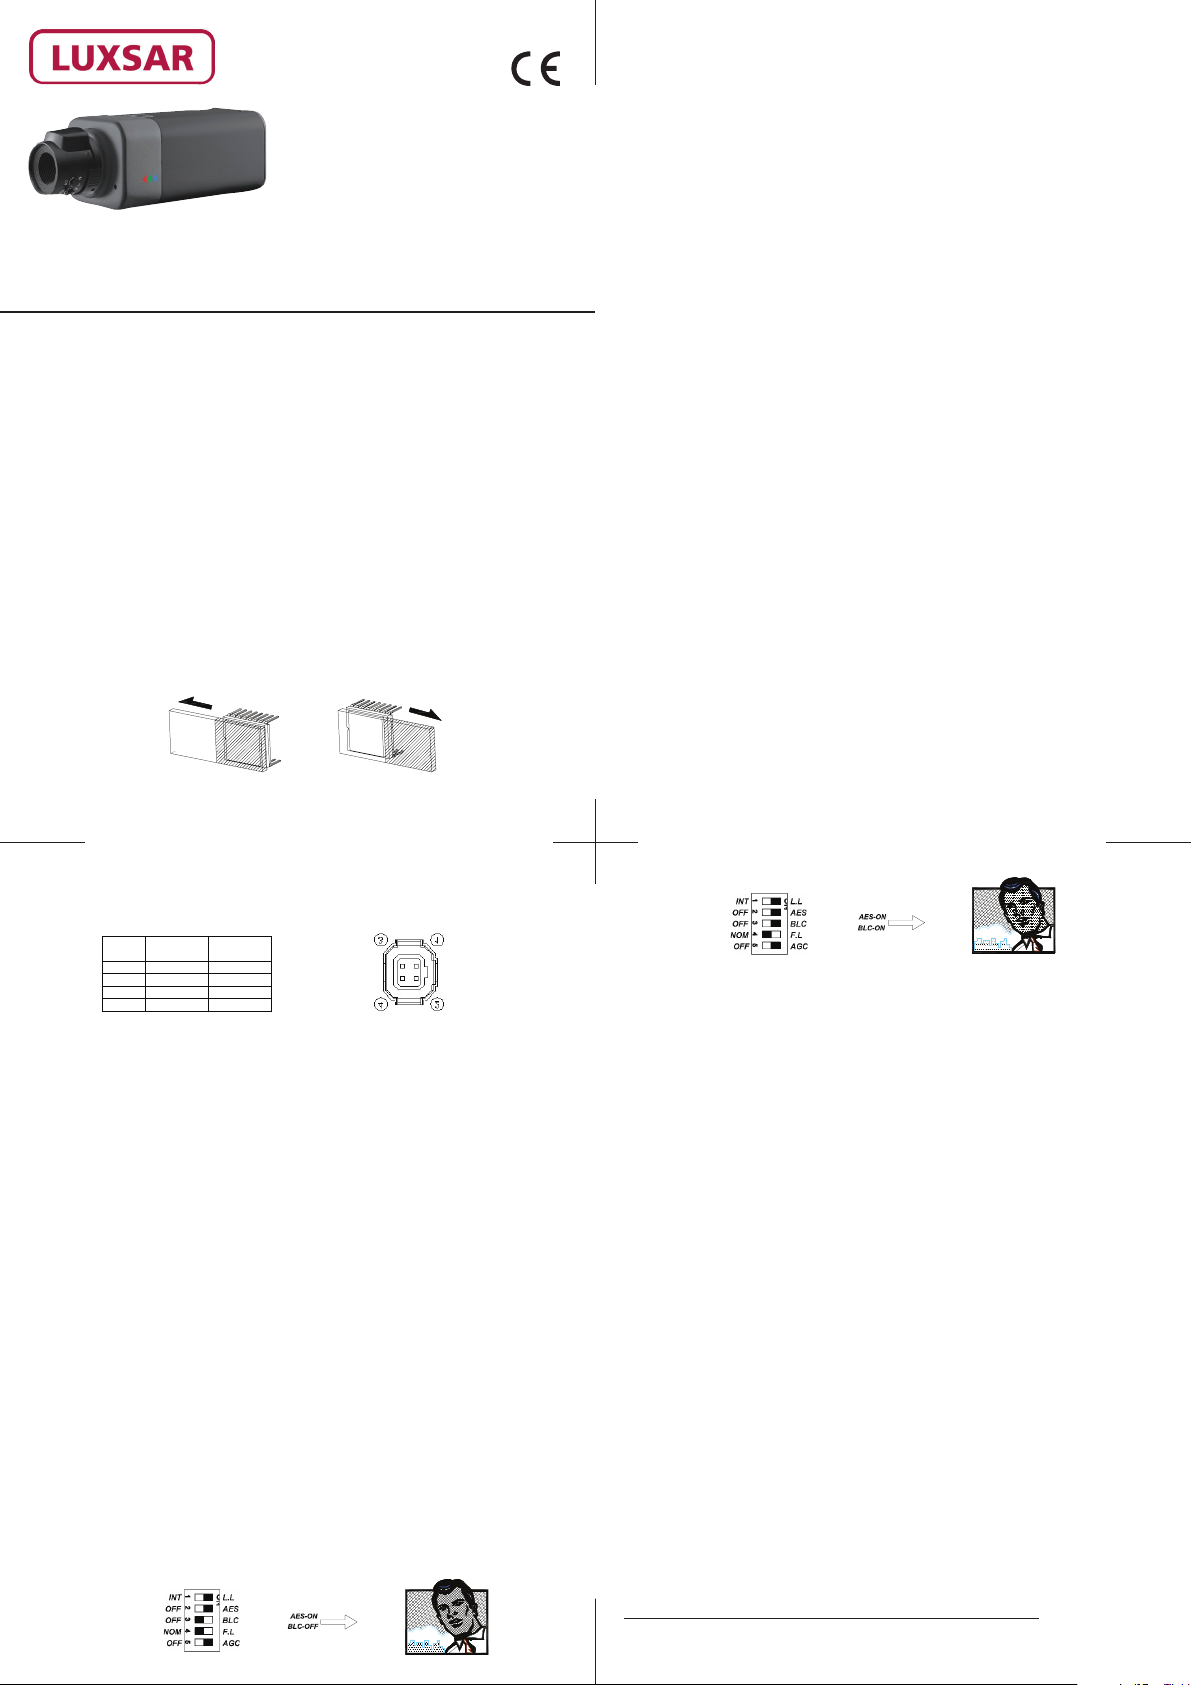
4.3 SW3. Exemple de correction de contre jour:
Lorsque le sujet est dans l’ombre avec une lumière forte associée (Soleil, pro-
jecteur, etc...) comme sur l’image 1, veuillez mettre le commutateur BLC sur
On. Le sujet devient alors comme sur l’image 2.
No.
Broche Avec EEAmp. Avec
EEAmp.
1 12 Vcc Contrôle -
2NC Contrôle +
3Signal Vidéo Commande +
4GND Commande -


