VIDéO: Une valeur faible, peut modier le réglage du potentiomètre de
l’objectif.
SEUIL: Seuil de commutation de l’objectif auto iris. Plus grand que la plage
defonctionnementdushutterélectronique.Lavaleurpartdéfautest-18.
- SYNCHRONISATION
Utilise la synchronisation ligne
pour éliminer les désynchronisa-
tions verticales lorsque l’on uti-
lise plusieurs caméras. Line lock:
Sélectionner LINE LOCK pour régler
manuellement la phase de cette
caméra.
Laplagevade0à624.Lavaleurpardéfautest519.
2.3. EXPOSITION
- BALANCE DES BLANCS:
Cettefonctionestutilelorsquevouslmezdesscènesavecdeschange-
mentsdetempératuredecouleur.
ATW: Sélectionner cette option pour des scènes ayant un éclairage
contant,telqu’enintérieur.
ADV ATW: La balance des blancs est
continuellementajustée enfonction
des changements d’éclairage. La
plage va de 2000° K à 11000° K.
AWB:Restituelescouleursleplusdè-
lementpossible.Certainmélangede
couleur peuvent fausser la balance
des blancs.
Par exemple, un petit objet blanc
sur un fond bleu peu avoir un rendu
rouge.
AWButiliselacalibrationdel’imagepouridentierleniveaudecorrection.
Alorslacamérautilisecettecorrectionpourtoutel’image.
VR480
Dôme couleur
Jour/Nuit
Wide dynamics
1. CARTE DE CONFIGURATION
1.1. Commutation du signal
“X1”(Congurationpardéfaut)estlacongurationpourunesortievi-
déounique,lavidéopeuxêtreprésentesoitsurlacartedecongura-
tionoudelacaméradôme.“X2”estlacongurationpouravoirlavidéo
présentesurlesdeuxsorties;cartedecongurationetcaméradôme.
Lorsquevousutilisezuniquementunesortievidéo,mettezlecavaliersur
“X1”pouravoirl’imagevidéoappropriée.Lorsquevousutilisezlesdeux
sortiesvidéo,veuillezplacerlecavaliersur“X2”pouravoirl’imagevidéo
appropriée.Veuillezsuivre cesinstructions pouréviter toutedétériora-
tion ou mauvais fonctionnement.
1.2. Bornier d’alimentation
Connecteur de l’alimentation 12 Vcc. Connecter l’alimentation 12Vcc
surceconnecteurousurceluidelacaméra.Veuillezconnecterqu’une
alimentation,cecipourévitertoutedétérioration.
Unefoislacongurationeffectuée,veuillezretirerlacartedeconguration
delacaméradôme.
1.3. Clavier
Utiliser la touche du centre pour entrer dans le menu.
Appuyer sur la touche du milieu durant 2 secondes, le
menu apparaîtra, appuyez dessus une nouvelle fois
pour sortir du menu.
Déplacelecurseurverticalementdanslesoptions.
Déplace le curseur horizontalement dans les op-
tions.
2. FONCTIONS
2.1. MODE DE FONCTIONNEMENT
Sélectionner le mode de fonctionnement par défaut NORMAL - INTéRIEUR
- EXTéRIEUR - FLUOR1- FLUOR2 - PERSONNALISE avec les touches gauche et
droite.
NORMAL:Principalementutilisépourdesenvironnementsayantunéclairage
stable.
INTéRIEUR:Principalementutilisépourunevisiondel’intérieurversl’extérieur.
EXTéRIEUR:Principalementutilisépourl’extérieur.
FLUOR1:Optimisépourlesintérieursayantunéclairageuorescent.Lechoix
delafréquencedesynchronisationestde60,01Hzor59,97Hz.
FLUOR2:Optimisépourlesintérieursayantunéclairageuorescent,pourévi-
ter les effets de scintillement sans utiliser la synchronisation ligne, synchronisa-
tionxéà2xESSavecuneplagedynamiquenormale.
PERSONNALISE:Effetdel’imagepersonnalisé.
2.2. CONFIGURATION DE BASE
- LANGAGE:Sélectionnerletypedelangagedumenuaveclestouchedroi-
te et gauche.
- VIDEO I/O
STANDARDVIDEO:LacamérasupportelesdeuxstandardsvidéoNTSCet
PAL.
NIVEAU VIDEO: Congure la tension
desortiedusignalvidéode1,0Vc-c
à 1,2 Vc-c. Vous pouvez utiliser cette
option pour augmenter le niveau de
sortie vidéo an de compenser une
perte due à la longueur des câbles.
100 ~ 120 corresponds à 1,0 ~ 1,2
Vc-c. La valeur part défaut est 110.
BARREDECOULEUR:Règlelacouleur,larésolutionoulaluminosité.
MIROIR:SélectionnerOUIpourinverserl’imagehorizontalement.Lavaleur
partdéfautestNON.
1
3
2
4VR480F-Manuel-V02
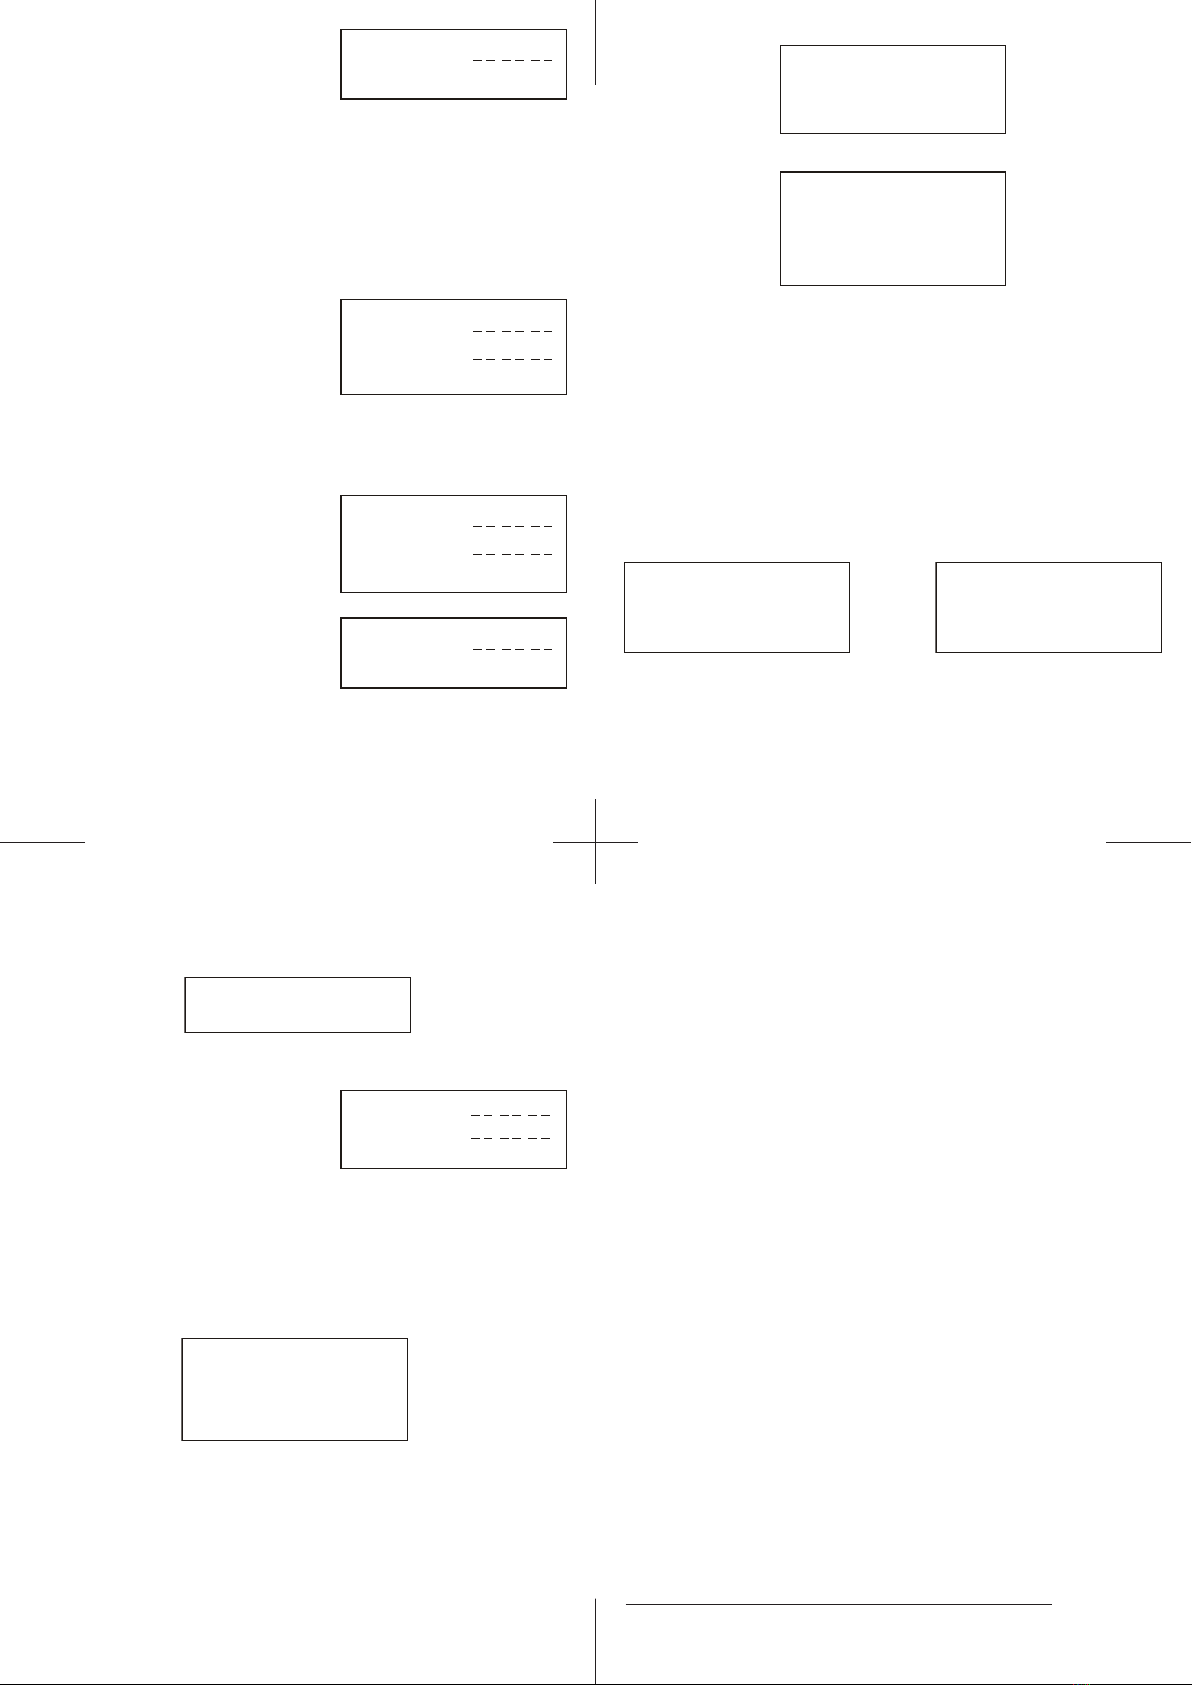
MENU PRINCIPAL
MODE
CONFIG. DE BASE...
EXPOSITION...
CONFIG. AVANCEE...
ENREG./RESTORATION...
QUITTER
NORMAL
E/S VIDEO
STANDARD VIDEO
NIVEAU VIDEO
BARRE DE COULEUR
PAGE PRECEDANTE
PAL
||||
80 110 150
NON
- RÉGLAGE DE L’IMAGE
MODE GAMMA: Ajuste le signal de sortie vidéo pour compenser une ré-
ponsenonlinéairedumoniteur.SélectionnerAUTOpouravoir0,45enNTSC
ou 0,36 en PAL.
GAMMA MANUEL: Sélectionner MA-
NUEL pour utiliser la conguration
manuel de la correction gamma. 25
~ 100 correspond à une valeur de
gamma entre 0,25 ~ 1.
RéSOLUTION: Standard/Haute en option.
CONTOUR: Plus la valeur est haute, plus la correction de contour est forte.
SATURATION: Plus la valeur est haute, plus la saturation est forte.
- CONFIGURATION CAMERA ID
AFFICHAGEID:SélectionnerOUIpour
afcherlenomdelacaméra.
IDCAMERA:Le nompart défautest
CAMERA.
Leslettrespouvantêtreutiliséessont:
abcdefghijklmnopqrstuvwxyz{|}~!”#$%&’()*+,-./0123456789:;<=>?@
ABCDEFGHIJKLMNOPQRSTUVWXYZ[\]^_’
ID POSITION: HAUT-GAUCHE/HAUT-CENTRE/HAUT-DROIT/BAS-GAUCHE/BAS-
DROIT.
- IRIS
OBJECTIF: Supporte les deux types d’objectif auto iris DC-drive et Video-
drive.Assurez-vousquelacongurationdelacaméraestenaccordavec
le type d’objectif que vous utilisez.
DCGAIN:Ajustelasensibilitédel’ob-
jectif auto iris aux changements de
luminosité. Avec une valeur haute,
l’irisrépondralentementàunevaria-
tionrapidedelumière.Silavaleurest
tropbasse,l’irispeutentrerencont
avecleshutter.Lavaleurpartdéfaut
est 50.
REGLAGE IMAGE
MODE GAMMA
RESOLUTION
CONTOUR
SATURATION
PAGE PRECEDANTE
AUTO
HAUTE
||||
-8 0 8
||||
-8 0 8
GAMMA MANUEL
GAMMA
PAGE PRECEDANTE
||||
25 45 100
CONFIG. ID CAMERA
AFFICHAGE ID
ID CAMERA
POSITION ID
PAGE PRECEDANTE
OUI
CAMERA
HAUT-GAUCHE
DC
GAIN DC
GAIN AI
PAGE PRECEDANTE
||||
0 50 255
||||
-42 -18 60
VIDEO
GAIN AI
PAGE PRECEDANTE
||||
-42 -18 60
MANUEL
GAIN AI
PAGE PRECEDANTE
||||
-42 -42 60
LINELOCK
V PHASE
PAGE PRECEDANTE
||||
0 519 624
EXPOSITION
BALANCE DES BLANCS
CONFIG. AE
CAG
PLAGE WD
LIMITE SHUTTER
PRECEDANTE PAGE
ATW
HAUTE LUMIERE
MOYEN
AUTO..
X2
ENREGISTREMENT AWB
Ecriture propriétés utilisateur dans la ROM
ANNULER
Enrg. AWB & tous cahngements
*** ATTENTION***
LIMITES BALANCE DES BLANCS
LIMITE BASSE
LIMITE HAUTE
PAGE PRECEDANTE
||||
2K 2000 5,5K
||||
5,5K 10000 11K
GARANTIE 2 ANS
(Voir les conditions générales de ventes)