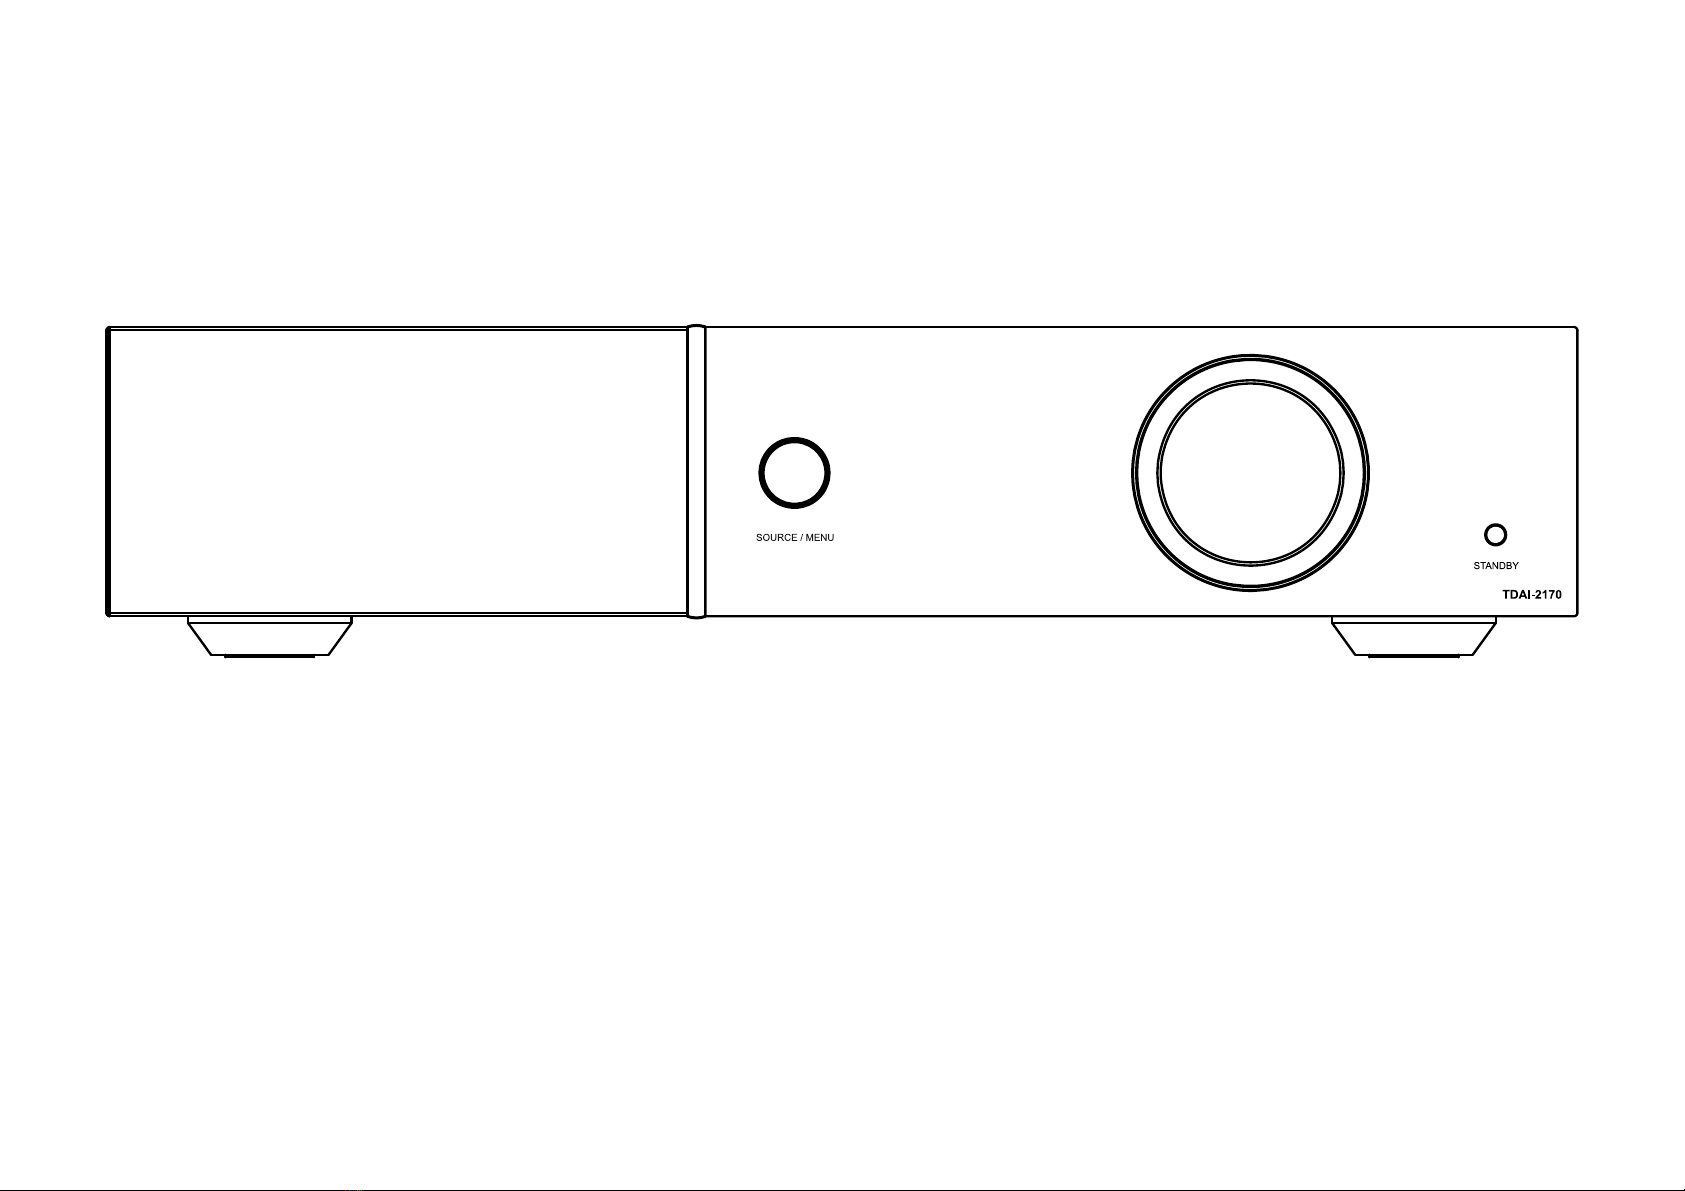
Lyngdorf TDAI-2170 User manual

1
Owner´s manual TDAI-2170

2
Welcome
Congratulations on your purchase of the Lyngdorf Audio TDAI-2170 fully digital amplifier with RoomPerfect™.
With this purchase, you have joined the ranks of an elite group of people who believe that perfect sound
is more than a luxury. It’s a requirement. The TDAI-2170 will deliver an audio experience that will far
exceed your expectations. We thank you for placing your confidence in Lyngdorf Audio.
This manual will give you an overview of how to set up your system. Please read the manual carefully to
better understand the capabilities of your TDAI-2170. For more in-depth information about
the technologies used in Lyngdorf Audio products, please visit www.lyngdorf.com.

3
What’s in the box .......................................................4
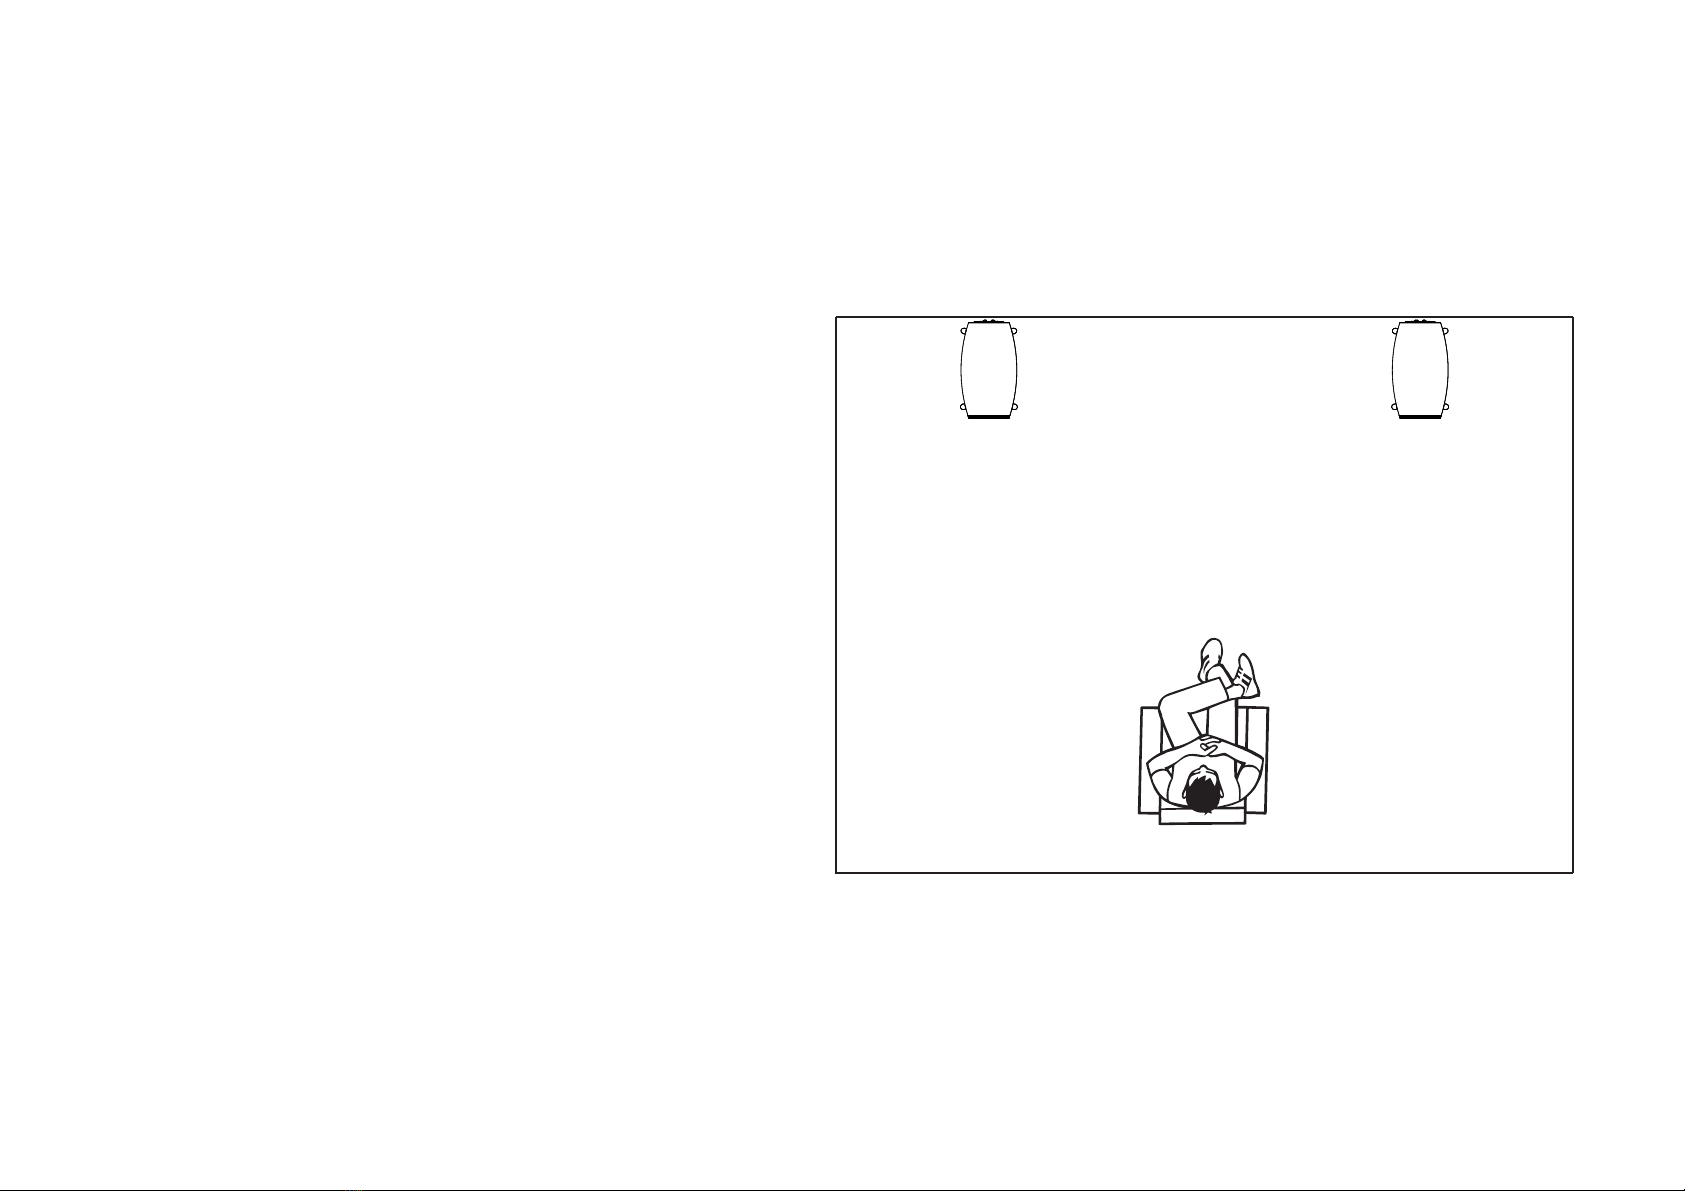
Speaker setup guide ..................................................8
RoomPerfect™........................................................15
Installing the USB streaming audio driver ..................24
Menu walkthrough ...................................................25
1 RoomPerfect™.....................................................25
2 Voicing .................................................................25
3 Speaker Setup ......................................................25
4 Setup ...................................................................25
4.1 Inputs ...............................................................25
4.2 RoomPerfect™ setup ........................................28
4.3 Volume..............................................................30
4.4 Voicings.............................................................30
4.5 Display..............................................................30
4.6 HDMI.................................................................31
5 Advanced settings.................................................35
5.1 Auto off .............................................................35
5.2 Remote control ..................................................35
5.3 ICC ...................................................................35
5.4 Guided setup .....................................................36
5.6 Second Speaker Setup .......................................37
5.6 Outputs .............................................................37
5.7 Trigger mode .....................................................44
5.8 Lock setup.........................................................45
5.9 Software info .....................................................46
5.10 Factory reset ...................................................46
FAQ and recommendations.......................................47
RoomPerfect™ troubleshooting................................50
Cleaning and maintenance .......................................53
Serial Control Manual...............................................53
Technical assistance ................................................54
Specifications ..........................................................55

4
What’s in the box
Microphone stand

5
12 3
456
7
digital info
analog
A/B random repeat
AMP
channel
ENTER
volume
RCS CD TUNER
menu
8
0
9
Mains cord 8 m (26.25 feet) XLR – XLR cable Microphone
Quick start guide USB stickRemote control

6
Remote control
- the most used buttons
1. Standby Turns the TDAI-2170 on and into standby.
2. Digital and Analog Selects, or if already active, cycles to the next input.
3. Channel -/+ Toggles between active inputs.
4. Up/Down Toggles between the available RoomPerfect™ filters. Increases
and decreases settings in the menu.
5. Left/Right Toggles between neutral and the available voicings.
Used to browse in the menu.
6. Info Shows information of level and type of input signal.
7. Menu Press to enter the menu. When in the menu press to go back or cancel.
Note: If the TDAI-2170 isn’t responding to the remote, press the AMP key and
try again. If that doesn´t work, check the batteries.
12 3
456
7
digital info
analog
A/B random repeat
AMP
channel
ENTER
volume
RCS CD TUNER
menu
8
0
9
26
7
4
5
3
1

7
Front panel controls
123
1. Source/menu Press to mute and unmute.
Press and hold to access the menu, press to select a menu item, press and hold to exit a menu.
Rotate left and right to toggle between audio sources and browse while in the menu.
2. Volume wheel Adjust the volume with left or right rotation.
3. Standby button Turns the TDAI-2170 on and into standby.

8
Speaker setup guide
When starting up the TDAI-2170, you will be
prompted to start the setup guide. This tip sheet
will provide setup guide help.
When connecting the speakers, always connect “+” and
“-” from the amplifier to the corresponding “+” and “-”
terminals on the speaker.
Warning: Never connect the TDAI-2170´s speaker output
to other amplifiers’ output terminals, a setting also known
as bridge mode.
ANALOG
INPUT OUTPUT INPUT OUTPUT
A2 MICROPHONE
L
R
RIGHT
0,1ȍ
CLASS 2 WIRING
LEFT
DIGITAL
D2
D1
D3 D4 D5 D6 RS232
TRIGGER
IN
TRIGGER
OUT
SW
UPDATE TDAI 2170
A1
USB AUDIO IN
USB MODULE
L
R
ANALOG AUDIO MODULE
A6 RIGHT A6 LEFT
A4 A5A3
HDMI MODULE
HDMI 1 HDMI 3
HDMI 2 HDMI 4 OUT
INPUT OUTPUT

9
Tips for setting up speakers
Tip: With hard floors, you can reduce reflections from the floor by positioning a carpet between you and
the speakers. With hard surface walls, you can use a painting, a book shelf, or other furnishings.
Find the position of the diffusers by having someone hold a mirror against the wall opposite the speaker.
When you can see the speaker in the mirror from the listening position, you have found the optimal
position for the diffuser.
Stereo triangle
You can use the stereo triangle as a good rule
of thumb when determining where to place your
speakers. The distance between the speakers should
be the same as the distance from your listening
position to both speakers.

10
Speaker placement
For an optimal listening experience, we
recommend you place your speakers against
the back wall. This will ensure the back wall
audio reflection and the direct sound will reach
your ears at the same time, giving you perfect
timing.
If your speakers have a bass-reflex port on the
back, you should allow for a 5cm/2in clearance
to the back wall. This will ensure there is no
disruption to the functionality of the port.

11
Connecting the subwoofer
In a traditional single subwoofer setup, connect the subwoofer to the left analog out on the TDAI-2170.
For a stereo subwoofer setup, or if you have a subwoofer which has stereo input, use both left and right
analog out.
Warning: Do not connect the TDAI-2170 to a subwoofer with speaker terminal inputs if they are
grounded. The TDAI-2170 +/+ speaker output
terminals must never touch each other, likewise the
-/- speaker output terminals.
ANALOG
INPUT OUTPUT INPUT OUTPUT
A2 MICROPHONE
L
R
RIGHT
0,1ȍ
CLASS 2 WIRING
LEFT
DIGITAL
D2
D1
D3 D4 D5 D6 RS232
TRIGGER
IN
TRIGGER
OUT
SW
UPDATE
100-240V ~ 50/60Hz 80W
Designedand manufactured in
Denmarkby SL Audio A/S
www.lyngdorf.com
TDAI 2170
Avertissement:Pourréduire le
risqued'incendie et de décharge
électriquel'appareil ne doit pas
êtreexposé à l'eau ou à l'humidité
Warning.Toreduce the risk of fire
orelectric shock, do not expose
thisapparatus to rain or moisture
AudioEquipment
3YZ9
A1
USBAUDIO IN
USBMODULE
L
R
ANALOGAUDIO MODULE
A6RIGHT A6LEFT
A4 A5A3
HDMIMODULE
HDMI1 HDMI 3
HDMI2 HDMI 4 OUT
INPUT OUTPUT
ANALOG
INPUT OUTPUT
A2
L
R
A1

12
Subwoofer controls
1. Phase adjustment should be 0°.
2. The subwoofer cut-off frequency should be set to the highest possible frequency range.
3. Level should be set to 50% of maximum volume.
Phase Cut off
1800 20040
Level
1000

13
Subwoofer placement
With a single subwoofer, we recommend placing the
subwoofer against the wall between the main speakers.
With two subwoofers, you should position one in each front
corner, in line with the main speakers.

14
Measuring distances
When measuring the distance to your main speakers, measure
from the focus position to the front of the speakers.
When measuring the distance to a subwoofer, measure from
the focus position to the back corner of the subwoofer.

15
RoomPerfect™
RoomPerfect™ is designed to analyze and correct for the negative effects that the listening room has
on the speaker sound.
Global listening The global filter improves sound quality across the whole room. When you are moving
around a room, the global filter gives the best result.
Focus listening The focus filter improves the sound quality at a specific listening position. This makes
the focus filter the best solution for optimal sound quality at a single listening position.
Voicings A voicing is an equalizer filter that can be activated to amplify or attenuate certain frequencies
according to your personal preferences. This equalization is an addition to the RoomPerfect™
corrections. The equalizer settings of a given voicing can be seen on the display of the amplifier.

16
Placing the microphone in the focus position
When you are prompted to place the microphone in the focus position, connect the microphone to the
microphone input on the back panel and place the microphone, using the microphone stand, in your
primary listening position. The height and the orientation of the microphone should correspond to your
head’s height and direction.
Press enter and a test signal will start from the left speaker. The TDAI-2170 will give an estimated
optimal volume for calibrating the system or will accept the current volume. Adjust the volume if
required and retry the measurement.
The calibration volume should not be so loud that it is inconvenient to you, or that it causes damage
to your loudspeakers. If this is the case, set it to a lower and more appropriate level. A low volume can
result in a longer calibration time or a measurement time out. A low volume and long measurement will
not affect the quality of the end result.

17

18
Measuring the focus position
When the calibration volume has been set, RoomPerfect™ will send a range of tones to measure the
focus position.
If there is noise in the room, the measurement may take longer.
This will not affect the quality of the end result.
See RoomPerfect™ troubleshooting if the measurement will stop prematurely, and then retry the
measurement.

19
Measuring random room positions
When the focus position has been measured, the next step is to measure the acoustical properties of
the room. It is important to perform well spaced measurements to get a comprehensive image of the
acoustical properties of the room. See RoomPerfect™ troubleshooting if the measurement will stop
prematurely.
Keep taking measurements until RoomKnowledge reaches 90%.

20
These are the rules of thumb when measuring the room:
• the microphone should be in random and varying positions, heights, and orientations.
Point it up/down/sideways, the more random positions the better.
• the measurements should cover the entire room, not only your listening area.
• do not take measurements behind plants, furniture, ext.
0.5 m / 1.5ft
0.5 m / 1.5ft
Min.
0.5m /
1.5ft 1m /
3ft
Other manuals for TDAI-2170
3
Table of contents
Other Lyngdorf Amplifier manuals
Popular Amplifier manuals by other brands

GRASS VALLEY
GRASS VALLEY HDA-3962 Guide to installation and operation

MODEL SOUNDS
MODEL SOUNDS MSMAK50 quick guide

Perreaux
Perreaux SP100II Schematic diagram

AUSTRALIAN MONITOR
AUSTRALIAN MONITOR AMIS AMC60 Specifications

Harman Kardon
Harman Kardon The Allegro A-10 Instruction book

Hafler
Hafler T3 user manual